Adobe Creative Suite 6 Design and Web Premium All-in-One For Dummies (2012)
Book I
Adobe Creative Suite 6 Basics
Chapter 8: Printing Documents
In This Chapter
![]() Understanding color and black-and-white printing
Understanding color and black-and-white printing
![]() Choosing a printer
Choosing a printer
![]() Outputting your work
Outputting your work
You can print documents in many ways in Adobe Creative Suite 6. Similarly, you can print many different kinds of documents. You can create anything from a CD-ROM sticker to a 300-page book to a T-shirt iron-on transfer using the programs you find in the Creative Suite. Whatever you’re working on, knowing the options that are available for printing your work is a good idea. Knowing the kinds of printers you can work with, what to buy (and from where) in order to use them, and how to save your work help improve the quality of the print job when you’ve finished your work.
Choosing Printers
When it comes to printers, you encounter hundreds of options at a great variety of prices. Printers can differ greatly in the areas of quality, cost of maintenance, and the speed at which the printer can print. Some inkjet printers excel at printing full-color photos but don’t print text well; a low-end or medium-end laser printer may print black-and-white documents at good speed and quality but can’t print in color.
Using consumer printers
The most common type of consumer (home) printer is now an inkjet printer, which works by spraying ink stored in cartridges onto a sheet of paper while it passes through the printer. This type of printer is common in households because it’s the least expensive type of color printer. It’s also versatile. You can walk into virtually any computer store and buy a color inkjet printer (which can print résumés, photos, and brochures) for a low price.
 The lone drawback of inkjet printers is that they can be expensive to maintain in the long run. Depending on how much you print, you may need to replace the black or color cartridges often, which can get costly and quickly exceed the cost of the printer itself.
Looking at professional printers
Professional printers typically have a more rounded feature set compared to consumer printers. Professional printers can either be inkjet or laser printers and can even perform multiple functions within the office. Not surprisingly, printers that have several roles within the office are often referred to as multifunction or all-in-one printers and typically also include scanning, photocopying, or faxing capabilities in addition to printing. These all-in-one units are useful in small offices and home offices because they save the consumer some money while providing access to a variety of useful tools.
Laser printers have several benefits: They typically produce a higher quality printout and print pages faster than inkjet printers, as well as produce a clean, professional-looking document. You can also print more pages per ink cartridge, saving you money in consumable items.
Buying a Printer
Some common features to look for when purchasing a printer (either consumer or professional) are
![]() Speed: Printers are rated in pages per minute (PPM). Low-end inkjet printers typically print about 12 or fewer PPM when printing black-and-white pages. When you’re printing color documents, the number of pages printed per minute is less.
Speed: Printers are rated in pages per minute (PPM). Low-end inkjet printers typically print about 12 or fewer PPM when printing black-and-white pages. When you’re printing color documents, the number of pages printed per minute is less.
![]() Color: Almost all inkjet printers can print in color, but many print only in black and white. Color printers can be expensive to maintain because most inkjet printers have one cartridge for black ink and a second cartridge for colored inks. When one color runs out, you’re forced to replace the entire cartridge or else none of the colors will look right when you print the document. Color laser printers are available, although they’re usually very expensive.
Color: Almost all inkjet printers can print in color, but many print only in black and white. Color printers can be expensive to maintain because most inkjet printers have one cartridge for black ink and a second cartridge for colored inks. When one color runs out, you’re forced to replace the entire cartridge or else none of the colors will look right when you print the document. Color laser printers are available, although they’re usually very expensive.
![]() Resolution: Similar to monitors, a printer’s quality can be rated in resolution. Higher resolution means images and text appear crisper. Low-end or older inkjet printers may print only a maximum of 600 dpi (dots per inch), which is more than fine for text but may be low if you want to print high-quality photographs.
Resolution: Similar to monitors, a printer’s quality can be rated in resolution. Higher resolution means images and text appear crisper. Low-end or older inkjet printers may print only a maximum of 600 dpi (dots per inch), which is more than fine for text but may be low if you want to print high-quality photographs.
![]() Connectivity: You can connect a printer to your computer in three ways. Older printers typically connect to your system using a parallel (36-pin) port, whereas newer printers often offer both parallel and USB (Universal Serial Bus) connections. The third way of connecting to a printer is by connecting a printer to your network, although this option is usually seen only on professional printers.
Connectivity: You can connect a printer to your computer in three ways. Older printers typically connect to your system using a parallel (36-pin) port, whereas newer printers often offer both parallel and USB (Universal Serial Bus) connections. The third way of connecting to a printer is by connecting a printer to your network, although this option is usually seen only on professional printers.
![]() Duplexing: Another feature to consider is duplexing, the ability to print on both sides of a sheet of paper without having to manually flip the piece of paper and place it back in the paper tray.
Duplexing: Another feature to consider is duplexing, the ability to print on both sides of a sheet of paper without having to manually flip the piece of paper and place it back in the paper tray.
Printing Your Work
When it comes to printing, countless options and settings can affect the final result of your document. Whether you’re printing banners, business cards, T-shirt iron-on transfers, or lost-cat posters, you must be aware of several factors, such as paper quality, printer quality, and ink usage. You also have to decide whether to print to documents yourself at home or take them to a professional printing business to get the work done.
Although RGB (Red, Green, Blue) is the color standard for the web, CMYK (Cyan, Magenta, Yellow, and Key [or Black]) is the standard in print. For information about using the RGB and CMYK color modes in the Creative Suite, see Chapter 7 of this minibook.
Choosing where and how to print
You can choose from several options when it comes to printing your files. You can take your digital files to a printing service provider, which is an establishment that prints electronic documents (such as FedEx Office), or even print the files yourself at home on your inkjet or laser printer. Each option has several advantages and disadvantages. Depending on how many copies and the number of colors, having files printed professionally can be cost prohibitive. Having files printed by a professional print house, however, almost always means that the print quality will be much better than if the document were printed on a low-end inkjet printer.
Naturally, if you’re only printing flyers to distribute around the neighborhood, you may not need high-quality output, and a home inkjet or laser printer would be more than adequate. However, printing documents professionally may be cheaper than printing them at home if you’re going to use up large amounts of black ink or perhaps one or two cartridges of toner.
If you’re using an inkjet printer, often you can get an average of 400 to 600 pages of black text before you need to replace a cartridge; a laser printer prints around 2,500 to 4,000 pages before you need to purchase new toner. Simply using a laser printer can save hundreds of dollars a year, depending on the number of pages you need to print and whether you need to print in color. If you need to print in color, many color laser printers are available (although they can be expensive). Entry-level color laser printers can cost around $500; some high-end color laser printers can cost more than $10,000. In comparison, black-and-white laser printers can cost as little as $100. So unless you plan to print lots of documents, outsourcing your printing to a service provider may be the best solution.
 The kind of printer you use (such as a commercial or PostScript printer or a low-cost household inkjet) makes a great difference in the quality of output. Some illustrations or layouts will look a lot better when printed commercially depending on what’s in your document.
Looking at paper
Before printing your documents, consider the type of paper that’s best for the job. If you’re printing on glossy paper, make sure that the paper works with your printer type. Although most glossy paper works fine in inkjet or laser printers, some brands or types of paper may not.
 Always double-check paper when purchasing it to make sure that it won’t damage your printer. The kinds of printers supported by the type of paper are listed on the paper’s packaging.
One benefit to using glossy paper is that it has a finish similar to photo paper finish, which can make your printouts appear to have a higher quality.
Using good paper can result in photos that have richer colors and show more detail. When purchasing printer paper, here are some important characteristics to look for:
![]() Brightness: Refers to how bright the paper is. Higher numbers mean the paper looks brighter and cleaner.
Brightness: Refers to how bright the paper is. Higher numbers mean the paper looks brighter and cleaner.
![]() Weight: Refers to how heavy the paper is. Higher weights mean a thicker, more durable piece of paper.
Weight: Refers to how heavy the paper is. Higher weights mean a thicker, more durable piece of paper.
![]() Opacity: Refers to how translucent, or transparent, the paper is. If the paper is too thin, too much light can pass through it; also, you may be able to see the ink through the other side of the page (which can be a problem if you want to print on both sides of the sheet). Opacity relates to weight, in that a heavier sheet of paper would be thicker and allow less light to pass through it.
Opacity: Refers to how translucent, or transparent, the paper is. If the paper is too thin, too much light can pass through it; also, you may be able to see the ink through the other side of the page (which can be a problem if you want to print on both sides of the sheet). Opacity relates to weight, in that a heavier sheet of paper would be thicker and allow less light to pass through it.
![]() Texture: Refers to the smoothness or roughness of the surface of the paper. Texture can provide dramatic differences between inkjet and laser printers. Inkjet printers spray ink onto a page, so having a slightly textured surface to print on can be beneficial because the texture allows ink to dry somewhat faster and bleed a little less, making the finished product look a little sharper. When you’re using a laser printer, the opposite is true. Having a smooth, flat surface for the toner to transfer onto produces better results.
Texture: Refers to the smoothness or roughness of the surface of the paper. Texture can provide dramatic differences between inkjet and laser printers. Inkjet printers spray ink onto a page, so having a slightly textured surface to print on can be beneficial because the texture allows ink to dry somewhat faster and bleed a little less, making the finished product look a little sharper. When you’re using a laser printer, the opposite is true. Having a smooth, flat surface for the toner to transfer onto produces better results.
Remember that you may not always print on 81⁄2-x-11-inch paper (also referred to as Letter or A4). Many printers also allow you to print on envelopes, labels, stickers, business cards, and even iron-on transfers. You can use iron-on transfers to create your own T-shirts with your company logo or shirts with your face on the front. Some newer printers even allow you to print directly onto the surface of a CD-ROM. You can even purchase small printers designed solely to print standard-size photographs.
Another important note is the difference in paper sizes globally. Whereas the United States and Canada use inches to measure paper, the rest of the globe uses a metric system based on an ISO (International Organization for Standardization) standard.
The North American Letter format may be replaced by the ISO A4 format. The other differences between the U.S. and Canadian systems from the ISO is that the ISO paper sizes always follow a set ratio, whereas the U.S. and Canadian systems uses two different aspect ratios.
Saving files for a professional printer or service provider
When working with a professional print service provider, make sure to find out which file formats it accepts. Almost all print service providers accept files created using an Adobe program (Illustrator, Photoshop, InDesign, or Acrobat, for example) as well as files created using QuarkXPress, CorelDRAW, or other professional-level programs. Also confirm which version and operating system the service provider accepts because you may be required to save your files so that they’re compatible with whichever version of software the service provider uses.
You may want to export your work to a universal file format, such as PDF (Portable Document Format), if your service provider doesn’t accept native InDesign or QuarkXPress files. In fact, exporting as a PDF is an intelligent choice. When you create a PDF (with the correct settings), you essentially package up all you need to print your file correctly.
For most of your applications, you can choose File⇒Export or File⇒Save and select PDF, but if you are sending your output to a professional printer we recommend you print to a PDF following these steps:
1. Choose File⇒Print and select Postscript File from the Printer drop-down list, as shown in Figure 8-1.
2. Choose PDF for the PPD.
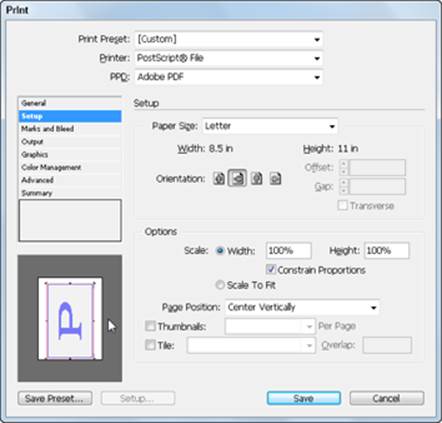
3. In the options on the left side of the Print dialog box, click Setup to view a preview of your page art in the lower-left corner. (See Figure 8-2.)
4. Confirm that your page art is positioned correctly in the document window.
If your art is incorrectly positioned, change it accordingly.
Figure 8-1:Print to a PostScript file and then open in Adobe Distiller.
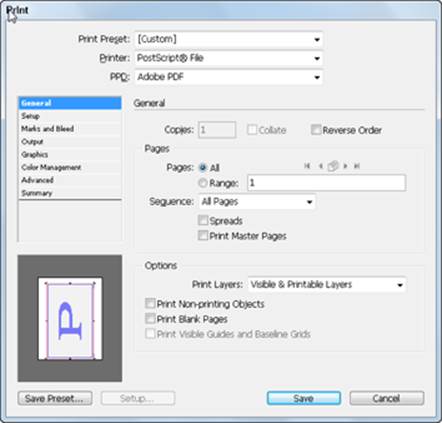
Figure 8-2:Make sure that the document fits in the print area.
5. In the options on the left side, choose Marks and Bleeds. Turn on crop marks and registration marks if needed. Click Save to save your changes as a Postscript file.
6. Launch Adobe Distiller (which is in the Adobe Acrobat application folder installed with the Creative Suite) and choose File⇒Open to open your PostScript file.
7. For a high resolution output, select Press Quality from the Default Settings drop-down list, as you see in Figure 8-3.
Figure 8-3: For a high-resolution PD choose Press Quality in Adobe Distiller.
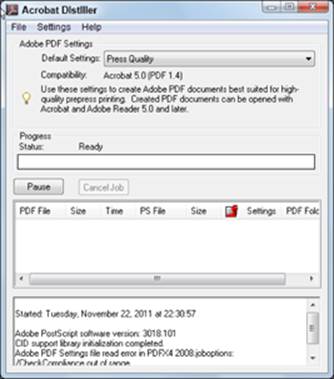
Distiller automatically converts the file to a PDF based on your present settings. Read more about PDF options in Book V, Chapter 2.
Printing at home
When you’re ready to print your documents, you can open the Print dialog box and then specify a number of settings depending on which kind of printer you’ve installed. For this example, Adobe Distiller is used.
Though you can simply save a Photoshop PDF from the regular Save menu, we walk you through the steps of creating a PDF file from the Photoshop Print dialog box. Using the Print dialog box, you can take advantage of additional options that aren’t available on the Save menu, such as the ability to preview printed documents, scale images, and apply color settings.
To print a file as a PDF from Photoshop CS6, follow these steps:
1. Choose File⇒Print.
The Print dialog box opens, as shown in Figure 8-4.
The Print dialog box differs, depending on which program you’re using. In this dialog box, Photoshop allows you to change the scale of the image by entering a value in the Scale text box or selecting and dragging a handle on the preview image on the left side.
2. From the Printer drop-down list, select Adobe PDF.
If you want to choose the settings for an installed printer, you can also select it here.
3. If necessary, scale the image to fit by selecting the Scale to Fit Media check box and then click the Print Settings button.
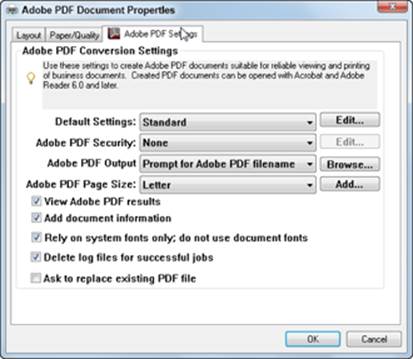
A second Print dialog box appears, as shown in Figure 8-5.
4. Select the quality of PDF that you want to create from the Default Settings drop-down list.
5. (Optional) If you want to see your PDF file right after it’s created, choose View Adobe PDF Results.
6. Click OK.
You return to the Print dialog box.
7. Click Print.
The Save PDF File As dialog box appears.
Figure 8-4: The Print dialog box in Photoshop CS6 for Windows.
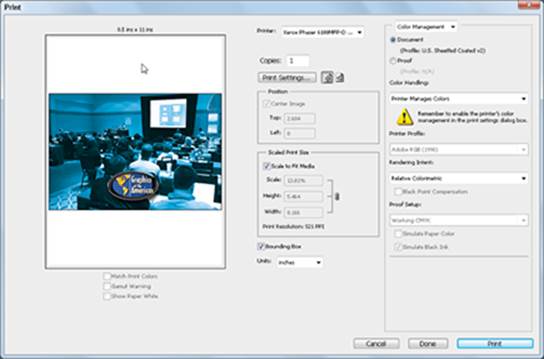
Figure 8-5: The secondary Print dialog box in Photoshop CS6.
8. Enter a name for the PDF, navigate to the location where you want to save the file, and click Save.
The document is saved as a PDF file.
Because most printers have custom interfaces for defining settings, you may need to consult your printer’s documentation for detailed information on using the printer’s features.
All materials on the site are licensed Creative Commons Attribution-Sharealike 3.0 Unported CC BY-SA 3.0 & GNU Free Documentation License (GFDL)
If you are the copyright holder of any material contained on our site and intend to remove it, please contact our site administrator for approval.
© 2016-2026 All site design rights belong to S.Y.A.