Swift Development with Cocoa (2015)
Chapter 20. Working with Text
Both OS X and iOS have tremendously powerful tools for working with text. Whether it’s working with multiple languages, converting data into human-readable forms, or detecting information in text, Cocoa and Cocoa Touch contain a wide variety of useful tools for working with strings, text, and language.
In this chapter, you’ll learn how to use the system’s built-in internationalization and localization features to easily make your app display strings in your code in whatever language the user prefers. You’ll also learn how to use NSFormatter and its subclasses to format data into strings, and how to use data detectors to detect URLs and dates in arbitrary text.
Internationalization and Localization
Your primary language may not be the one spoken by your end user. When you write strings embedded in your code for the user to see, those strings are hardcoded into the compiled executable—so if something is written in English, the user will see it in English, even if she doesn’t necessarily read English.
To address this problem, Cocoa has support for localized text, which is text that is replaced at runtime with versions appropriate for your user. In your code, you use placeholder strings, and store the translated versions for every language that you support in a separate file. When the code that displays the text runs, it checks to see which language the user is using, and replaces the placeholder text with the appropriate version.
Strings Files
A strings file maps internal representations of text to localized representations. Strings files look like this:
"welcome message" = "Welcome to OS X!";
"quit message" = "Goodbye! Come back soon!";
Strings files let you keep the text used in your application separate from your code. This becomes especially useful when the text used in your application changes—for example, when running in another language.
Strings files can be localized, which means that Xcode will create multiple versions of the file based on language; at runtime, the application will use only the version of the file appropriate to the user’s choice of language. If an appropriate version doesn’t exist, the application will load the best one it can find.
Creating a Sample Localized Application
To demonstrate how localization works in Cocoa, we’ll build an application that makes use of strings files to translate its interface.
1. Create a new Cocoa application named Localized.
The first thing to do is to enable localization on the interface file. This will make the application automatically load the locale-appropriate version of the file, and also lets you preview the application in different languages.
2. Go to the File Inspector. This is the leftmost inspector in the Utilities pane.
Once there, scroll down to the Localization section. You’ll see two localizations available: Base and English.
Turn on the checkbox next to English. This will enable localization on the file, because at least one localized language is now available.
3. Create the interface. Open MainMenu.xib and drag a label into the window. Position it at the upper left of the window and make its text read “This is a localized application for Mac OS X.”
Drag a second label into the window. Position it at the left edge of the window, underneath the first label. Make its text read “Today is 30 July 2014.”[9]
Finally, drag in a button. Place it on the right side of the window, aligned with the second label. Make its text read “Tell the World.”
Next, add the following constraints to the items in the window:
o First label (“This is a localized application for Mac OS X”):
§ Leading space to superview: 20
§ Top space to superview: 20
§ Vertical space to second label: ≥ 8
o Second label (“Today’s date is 30 July 2014”):
§ Leading space to superview: 20
§ Bottom space to superview: 20
§ Trailing space to button: ≥ 20
o Button (“Tell the World”):
§ Trailing space to superview: 20
§ Align baseline to second label
When you’re done, the window should look like Figure 20-1.
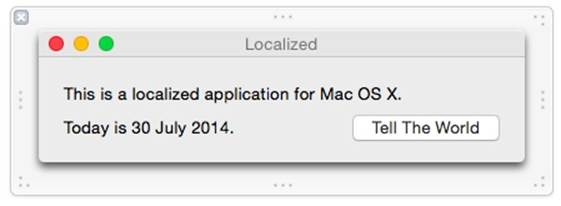
Figure 20-1. The user interface for the application, including its constraints
NOTE
When designing interfaces that are going to be localized (which should be all of them!), avoid creating constraints that set a fixed width on controls. A piece of text will be one width in one language and a different width in another, and if you enforce a fixed width, you’ll more than likely end up with truncated text.
Instead, it’s better to set up leading and trailing space constraints. The constraint system will then able to work out the width appropriately.
We can now see if the interface appropriately handles different text lengths, even before translating any of the text in the application. This is possible thanks to Xcode’s built-in pseudolocalizations, which do things with your app’s base text to test out your interface.
One of these pseudolocalizations is the Double-Length Pseudolanguage. This localization simply takes the text of your development language, and doubles it. So, for example, “Tell the World” becomes “Tell the World Tell the World.” While many pieces of text won’t actually double in length when translated to another langauge, it serves as a great way to test to see whether your interface can handle the wide variation in length.
We’ll now test this interface using this pseudolocalization:
1. Select Preview from the menu at the far left of the Jump Bar at the top of the assistant.
A copy of the main window of the app should appear in the right side of the Xcode window. If it doesn’t, make sure you’ve selected the window on the lefthand side.
2. Change the language, at the lower-right of the window, to Double-Length Pseudolanguage, as shown in Figure 20-2.
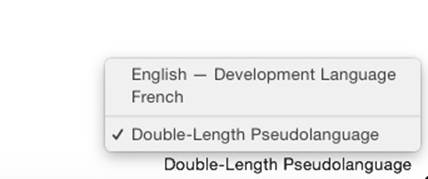
Figure 20-2. Selecting the Double-Length Pseudolanguage in the Preview assistant
The preview pane will update to show the app as it appears in the new language. You’ll notice that it mostly works! The labels have updated to their new sizes, and the button has been pushed aside further to accomodate the width of the label next to it. However, one obvious error immediately appears: the first label (the one that reads This is a localized application for Mac OS X) is too long, and goes off the side of the window. You can see this in Figure 20-3.
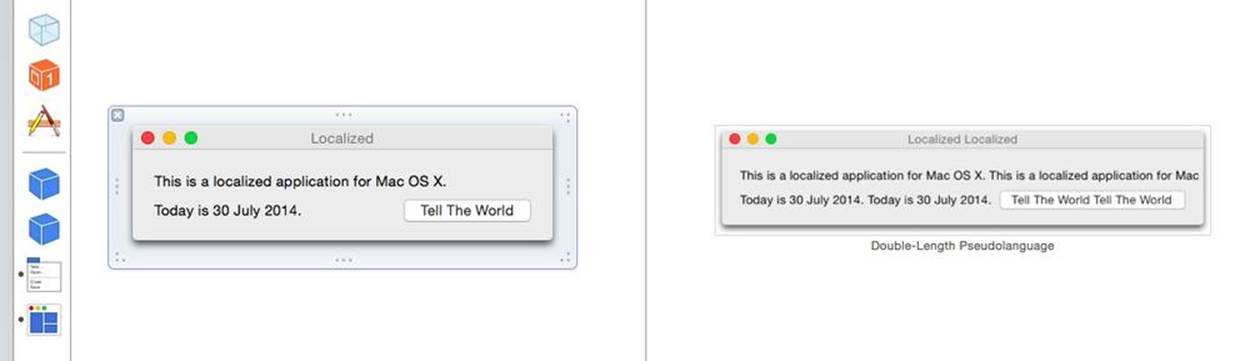
Figure 20-3. The application, translated into the Double-Length Pseudolanguage (note that the first label is too long, and extends off the side of the window)
The cause of the error is that the first label’s trailing space isn’t constrained: what we want is for the trailing edge of the first label to always be 20 pixels away from the edge of the window. Fortunately, this is very easy to add:
3. Constrain the trailing edge of the first label. Hold down the Control key, and drag from the trailing edge of the label to the window. Select Trailing Space to Container.
A new constraint will appear. Select it, and open the Attributes Inspector. Change its Relation from Equal to Greater Than or Equal, and set the Constant to Standard by selecting Use Standard Value from the drop-down menu. You can see the final settings of this constraint inFigure 20-4.
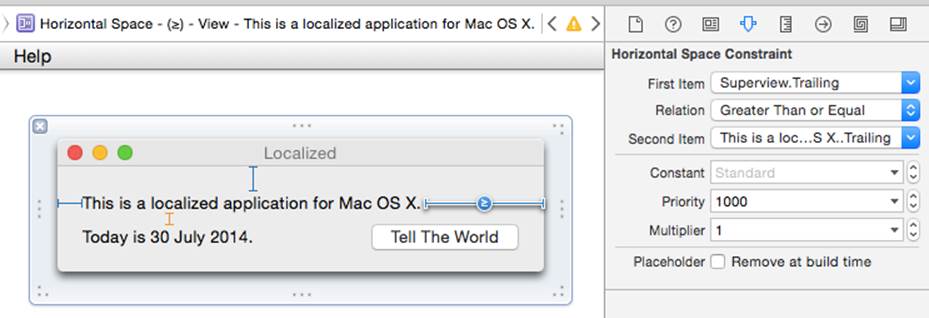
Figure 20-4. The settings for the trailing space
Once the constraint is set up, the preview will update, showing that the layout flows correctly, as seen in Figure 20-5.

Figure 20-5. The double-length interface, now flowing correctly
The Double-Length Pseudolangage is a great test of your interface’s ability to handle varying text length, but it’s not a real language, and is only applicable to developers. Let’s now translate this interface to a real language.
NOTE
In this chapter, we’re using French as our demonstration language, but you can pick anything you like. Just choose a different language when adding a new localization to your app.
The first step to adding a new language is to add a new localization to the project. This makes Xcode aware that you want to start translating files into that language, which means you can do things like select that language in the Preview assistant.
1. Select the project in the project navigator. It’s at the top of the list. Select the project from the menu at the top of the editor, as seen in Figure 20-6.
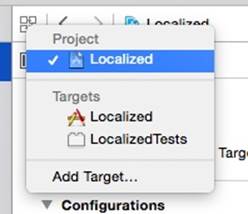
Figure 20-6. Selecting the project in the editor view
2. Add the new localization. Scroll down to the Localizations section. Click the + button, and select French from the menu that appears, as seen in Figure 20-7.
NOTE
Most languages come in a variety of different dialects. You may see a giant list that includes many different types of French.
3. Select the files you want to localize. Xcode will ask you which files you want to translate into the new language. At this stage, there will only be a single file: the app’s interface, stored in MainMenu.xib. It’s selected by default, so click Finish.
A new file will be created: a strings file for the MainMenu.xib file. It’ll appear as an item inside the MainMenu.xib file, in the project navigator, as seen in Figure 20-8.
4. You can now go through the new French version of the strings file, and begin translating the interface to French. For each item in the strings file, you replace the original language with the French version.

Figure 20-7. Adding a localization to the project
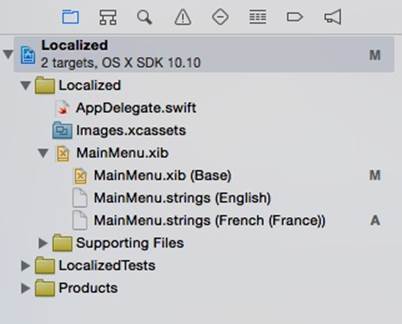
Figure 20-8. The strings files, shown in the project navigator
This application now has a mostly localized interface. However, it’s not obvious how the second label will be localized, as it’s going to be displaying dynamic text (i.e., the text isn’t defined at compile time, but rather depends on the current date).
To localize this text, we need to be able to localize chunks of text from within code. We need to be able to take a string, and look up the appropriate localization at runtime. We can do this using the NSLocalizedString function.
5. Connect the interface to the code. Open AppDelegate.swift in the assistant. Control-drag from the lower label (the one containing the date) into the AppDelegate class.
6. Replace the applicationDidFinishLaunching method with the following code:
7. let languageFormat = NSLocalizedString("today's date: %@",
8. comment:"shows today's date")
9.
self.dateLabel.stringValue = String(format: languageFormat, NSDate())
The NSLocalizedString function and its sibling functions load text from the Localized.strings file—specifically, from the localized version of that file that fits the user’s current language.
To localize this application, we’ll create the strings file, and then add both English and French localizations.
7. Create a new file in the project: a strings file. You’ll find this in the Resource section of the file templates.
Name the file Localizable.strings.
NOTE
It’s important to use this filename, as this file is the one the app will look for if you don’t specify another name.
8. Next, add the English and French versions of the strings file. Select Localizable.strings. Open the File Inspector and scroll down to Localizations.
Click the Localize button. A menu will appear; choose Base and click Localize.
Now the localization option has changed, with three small checkboxes, one for Base, one for English, and the last for French. Select all of the checkboxes.
9. Add the English text. Open Localizable.strings (English) and add the following text:
"today's date: %@" = "Today's date is %@";
10.Then add the French text. Open Localizable.strings (French) and add the following text:
"today's date: %@"="La date d'aujourd'hui est %@";
It is also good practice to fill in the Base language, but in this case it is also English so we will leave it blank.
11.Run the application. Now that the localized strings files have been written, test the application in English mode.
The text of the label will change to the more accurately written English text.
Next, we’ll test the French version. To avoid having to change the language of the entire system, we’ll make Xcode launch the application using the French langauge.
To do this, we’ll edit the current scheme and add a parameter that is passed to the application at start time:
12.Make the application launch using the French language. Click on the Scheme at the upper left of the window (it’s the drop-down list just to the right of the Stop button).
Choose Edit Scheme… from the menu that appears.
Make sure that the Run Localized.app option is selected. Open the Options panel.
Change the Application Language from System Language to French.
13.Run the application like a Frenchman.
Run the app again. Note that the text appears in French. Quelle surprise! (See Figure 20-9.)
You can continue adding more localized strings and more localizations to your application. The more languages supported by your app, the more potential users you have.
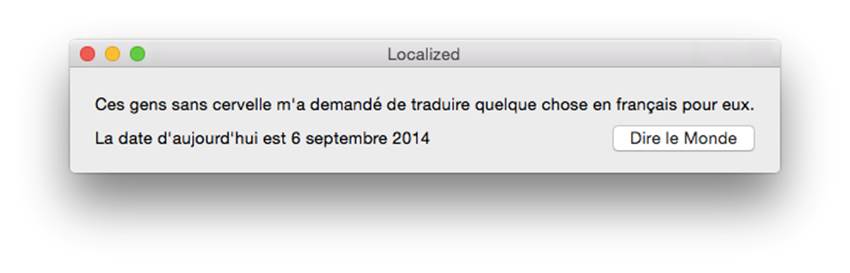
Figure 20-9. The application fully localized into French
NOTE
Xcode can also export and import the localized parts of your app using XLIFF, a standard XML-based format for localized information. Using XLIFF, you can export all of the strings in your app that need translation, and hand them off to a translator who can work on it using their own tools; they can then deliver the translated XML back to you, and you can import it back into your project.
To learn more about Xcode’s support for XLIFF, see the Internationalization and Localization Guide in the Xcode documentation.
Formatting Data with NSFormatter
Many useful pieces of information need conversion to text before a human can read them. Additionally, different people expect information to be presented in different ways depending on where they live. For example, dates and times are displayed differently depending on the country. The difference could be as simple as the order of numbers and punctuation—dates are written “MM-DD-YY” in the United States, and “DD-MM-YY”[10] in Australia. However, sometimes the differences are radical—your user could be using the Muslim calendar, in which case the same point in time has a completely different date representation.
To solve this and other problems, Cocoa separates dates from their presentation. When you want to work with date and time information, you use the NSDate class. When you want to create text to display a representation of that date to the user, you use the NSDateFormatter class.
Dates aren’t the only things that can be formatted. Numbers have different representations in different cultures, as well as different representations in different contexts.
For example, in the United States, the decimal marker is a period (.), while in many European countries the marker is a comma (,). Different locales also group numerals together differently—some Indian numbering systems group numerals in two and three, so that the number one million is represented as 10,00,000. If you’re writing an application that displays monetary figures, it’s common to display negative figures in parentheses (()). Additionally, the locale that your user is in will very likely have a different currency symbol than $.
NSNumberFormatter takes localization into account, and creates strings that suit what your user expects to see to what your application needs to display.
To demonstrate how formatters work, we’ll extend the application that we created earlier in this chapter to format the date using an NSDateFormatter:
let languageFormat = NSLocalizedString("today's date: %@",
comment:"shows today's date")
let dateFormatter = NSDateFormatter()
dateFormatter.timeStyle = NSDateFormatterStyle.NoStyle
dateFormatter.dateStyle = NSDateFormatterStyle.LongStyle
let dateString = dateFormatter.stringFromDate(NSDate())
self.dateLabel.stringValue = String(format: languageFormat, dateString)
NOTE
Creating an NSDateFormatter is a rather expensive operation. If you need to format a large number of dates, create one and keep it around rather than creating a new one for every time you need to format a date.
Run the application. The date will appear in the application, correctly formatted for your user’s locale (Figure 20-10).
You can set the style of both the time and date in the formatter. Both timeStyle and dateStyle accept any of the following options (note that the precise format will change depending on the user’s locale—read on if you want total control!):
NoStyle
Dates and times don’t appear at all.
ShortStyle
A brief style. Usually, only numbers appear. Dates appear like “10/24/86” and times appear like “5:05pm.”
MediumStyle
Slightly more detail appears in the medium style. Dates appear like “Oct 24, 1986.” Times appear like the short style.
LongStyle
With the long style, almost every detail appears. Month names, for example, are fully spelled out. Dates appear like “October 24, 1986” and times appear like “5:05:23pm.”
FullStyle
Every detail is presented in the full style, including era and time zone information. Dates appear like “Friday, October 24, 1986 AD” and times appear like “5:05:23pm AEDT.” NSDateFormatter also allows you to format dates with your own format string. A format string defines which components of the date and time should appear. For example, to render an NSDate to look like “17:05 October 24, 1986” (in that order, regardless of the locale’s preference), you do this:
let dateFormatter = NSDateFormatter()
dateFormatter.dateFormat = "HH:mm, MMMM d"
NOTE
Note that the various names for months and days will be correctly presented in the user’s current language. “July” in English becomes “juillet” in French, for example.
All the different letters in the format string define what parts of the date and time appear, and the number of times the symbol is repeated changes the format of the component.
For full details on the format patterns that can be used, see the Unicode specification TR35, which is used by both OS X and iOS.
Testing Different Locales
The language of an application is separate from the way that dates, times, and measurements are displayed. If you want to test out different locales in your application, you need to add a parameter to your application’s run scheme.
To do this, choose Edit Scheme… from the menu that appears, select the Run option, and open the Options panel.
Change the Application Region to Europe → France.
You can then run your application, and the date formatter will produce a date string that’s delivered in the system language, but uses French styles of dates. The differences are often subtle—things like the names of months being shorter—but add up to feeling like an app that matches what the user is comfortable with.
Figure 20-10. The app, with a French-formatted date
Formatting Numbers, Lengths, Mass, Energy, and Data
In addition to dates, it’s often very useful to format values for the user to see. These sometimes need localization, such as in the case of formatting numbers as currency, but often you just want to display a quantity with the right unit.
This is where the NSNumberFormatter and its related classes comes in. These classes take a value along with any information on how you’d like it to be formatted, and return a string for you to display to the user.
NSNumberFormatter
The basic NSNumberFormatter is very straightforward, but also very versatile. You can use it to format numbers into decimal formats, scientific notation, currency, and as percentages.
Creating one is very easy—all you need to do is to create an instance of the class:
let numberFormatter = NSNumberFormatter()
Let’s say you wanted to format a number value as some currency. In this case, you’d just need to set the formatting style as CurrencyStyle; the formatter automatically selects the locale-appropriate currency symbol:
// Showing currency
numberFormatter.numberStyle = NSNumberFormatterStyle.CurrencyStyle
numberFormatter.stringFromNumber(23.42) // = "$23.42"
NOTE
The number formatter doesn’t perform currency conversions—you’ll need to do that yourself. All it does is take a number and turn it into a string that can be presented to the user.
The number formatter is also capable of rounding to arbitrary intervals. For example, if you want to round to the nearest 0.5:
// Round to the nearest 0.5
numberFormatter.roundingIncrement = 0.5
numberFormatter.stringFromNumber(23.42) // = "$23.50"
NSNumberFormatter is good for more than just currency, however. When you need to render an arbitrary number, it’s got you covered:
// Showing numbers
numberFormatter.numberStyle = NSNumberFormatterStyle.DecimalStyle
numberFormatter.stringFromNumber(2003.42) // = "2,003.42"
You can also feed it decimal numbers and have it render them as percentages (such as 0.43 being rendered as “43%”; this would be displayed as “45%” with rounding enabled):
// Showing percentages
numberFormatter.numberStyle = NSNumberFormatterStyle.PercentStyle
numberFormatter.stringFromNumber(0.95) // = "95%"
NSEnergyFormatter, NSMassFormatter, and NSLengthFormatter
The NSEnergyFormatter class is designed to support rendering values, measured in joules, into locale-appropriate strings. This is usually for apps that care about energy in food, such as in diet-management apps, but the concepts apply to non-food energy just the same.
NSEnergyFormatter, along with its NSMassFormatter and NSLengthFormatter cousins, allow you to keep all of your app’s data in a single consistent unit (joules, kilograms, and meters), and display them to the user in units that they’re familiar with, no matter where they’re from.
Creating an energy formatter is just a matter of creating an instance of the NSEnergyFormatter class:
let energyFormatter = NSEnergyFormatter()
If you have a specific unit you want to display the energy value in, you can provide that unit to the formatter along with the value you want to format:
// Formats the value, given in joules; uses a specific unit
energyFormatter.stringFromValue(5000,
unit: NSEnergyFormatterUnit.Kilojoule) // = "5,000 kJ"
If you want to use the user’s default units, you can simply provide just the value, and the formatter will automatically select an appropriate unit for its size and the user’s locale:
// Formats the value, given in joules; automatically uses a locale-specific
// unit
energyFormatter.stringFromJoules(50000) // = "11.95 kcal"
Mass formatters and length formatters work identically to energy formatters. First, you create the instance:
let massFormatter = NSMassFormatter()
let lengthFormatter = NSLengthFormatter()
Once you have the object, you can begin formatting values. You can format mass and lengths as specific units (you provide the values in either kilograms or meters, respectively):
// Formats the value, given in kilograms; uses a specific unit
massFormatter.stringFromValue(0.5,
unit: NSMassFormatterUnit.Kilogram) // = "0.5 kg"
// Formats the value, given in meters; uses a specific unit
lengthFormatter.stringFromValue(42.3,
unit: NSLengthFormatterUnit.Meter) // = "42.3 m"
Additionally, you can provide just the values, and have the formatter select the unit for you, depending on the quantity and the user’s locale.
// Formats the value, given in meters; automatically uses a locale-specific
// unit
massFormatter.stringFromKilograms(0.5) // = "1.1 lb"
// Formats the value, given in meters; automatically uses a locale-specific
// unit
lengthFormatter.stringFromMeters(42.3) // = "46.259 yd"
NSByteCountFormatter
The NSByteCountFormatter class is a bit different to the previously discussed formatters. The byte count formatter is designed to take a value, measured in bytes, and convert that to a representative string that displays the number of kilobytes, megabytes, gigabytes (or more). This is very useful for indicating the size of a download, a file, and more.
Again, creating the formatter is simple:
let dataFormatter = NSByteCountFormatter()
Simple use of the byte count formatter is just as straightforward—you simply provide a number of bytes, and receive a string:
// Formats the value, given in bytes
dataFormatter.stringFromByteCount(200000) // = "200 KB"
The main way in which the byte count formatter differs from other formatters is that there are two ways that bytes can be counted: decimally, in which 1,000 bytes are counted as a kilobyte, and binarily, in which 1,024 bytes are counted as a kilobyte. The reasoning for this is boring, and filled with words like “mebibyte”; let’s just leave it at the simple fact that most people think of a thousand bytes as a kilobyte, and are totally incorrect in doing so.
However, good app design is all about not surprising the user, so the default counting style is decimal: 1,000 bytes is a kilobyte. If, however, you want to change this counting style, you can very easily do so:
// Count style can be changed; defaults to decimal (2,000 bytes = 2KB)
// Setting this to Binary makes it treat 2,048 = 2KB
dataFormatter.countStyle = NSByteCountFormatterCountStyle.Binary
dataFormatter.stringFromByteCount(200000) // = "195 KB"
The byte count formatter also intelligently knows how to handle zero bytes. Zero bytes is a special case, and simply displaying the digit 0 isn’t very readable. NSByteCountFormatter, therefore, formats zero bytes using words:
// Also formats zero bytes intelligently, as a word
dataFormatter.stringFromByteCount(0) // = "Zero KB"
Detecting Data with NSDataDetector
As far as the system is concerned, text that it receives can be literally anything. However, text frequently contains information that’s useful to both the user and to the app you’re writing. For example, posts to Twitter often contain links to websites, and it’s a useful feature for a Twitter app to be able to quickly open a link in the tweet’s text. Another example is date and time information: an email could contain the date for a meeting, and an app may want to extract that.
To extract information from text, you use the NSDataDetector class. This class reads through a string and looks for whatever data you tell it to keep an eye out for.
You can use data detectors to detect the following kinds of data in strings:
§ Dates
§ Addresses
§ Links
§ Phone numbers
§ Transit information (like flight information)
When you create an NSDataDetector, you provide it with the kinds of information that you’re looking for. You then provide a string to the data detector, and get back an NSArray that contains NSTextCheckingResult objects. Each NSTextCheckingResult contains additional information about what type each result is—a date, URL, or other kind of detectable data.
To demonstrate data detectors, we’ll build a simple application that allows users to type in anything they want and see what the data detector finds.
The application will present a text field and a button. When the button is clicked, the text will be checked and the results will be presented in a label:
1. Create a new Cocoa application and call it DataDetectors.
2. Create the interface. Open MainMenu.xib.
Drag in a text field, and resize it until it’s a few lines high. Place it in the top half of the window.
Drag in a button and place it under the text field. Change its label to Check.
Drag in a multiline label. Place it under the button in the bottom half of the window.
When you’re done, the app’s interface should look like Figure 20-11.
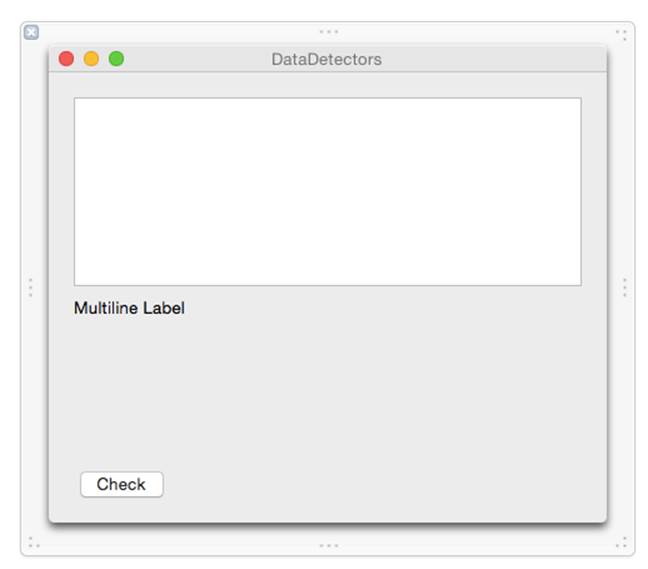
Figure 20-11. The data detector app’s interface
3. Connect the interface to the code. Open AppDelegate.swift in the assistant.
Control-drag from the top text field into the AppDelegate class. Create an outlet called inputTextField.
Control-drag from the bottom text field into AppDelegate, and create an outlet called outputTextField.
Finally, Control-drag from the button into AppDelegate, and create an action called check.
4. Replace the check() method with the following code:
5. @IBAction func check(sender: AnyObject) {
6.
7. let detector = NSDataDetector(
8. types: NSTextCheckingTypes(NSTextCheckingAllTypes), error: nil)
9.
10. let inputString = self.inputTextField.stringValue
11. var resultsText = ""
12.
13. if let matches = detector?.matchesInString(inputString, options: nil,
14. range: NSMakeRange(0, countElements(inputString))) {
15.
16. for match in matches {
17.
18. if let result = match as? NSTextCheckingResult {
19.
20. switch result.resultType {
21.
22. case NSTextCheckingType.Link:
23. resultsText += "Link: \(result.URL)\n"
24.
25. case NSTextCheckingType.Date:
26. resultsText += "Date: \(result.date)\n"
27.
28. case NSTextCheckingType.PhoneNumber:
29. resultsText += "Phone Number: \(result.phoneNumber)"
30.
31. case NSTextCheckingType.Address:
32. resultsText += "Address: \(result.addressComponents)"
33.
34. default:
35. resultsText += "Other: \(result.description)\n"
36.
37. }
38. }
39. }
40. }
41.
42.
43.
44. self.outputTextField.stringValue = resultsText
45.
}
46.Run the application. Type in text like this:
Apple's doing an event at 4pm tomorrow!
and click the Check button. The app will display the date and time it detected.
TextKit
TextKit is a new text rendering engine, originally included in iOS 7, built on top of CoreText, replacing WebKit as the text engine for iOS. Technically, everything that TextKit allows you to do was possible in the past through clever use of CoreText, but it was hard and very time consuming. TextKit allows you to do text-related manipulation, including kerning, ligatures, and letterpress effects, among other features.
One of the most important features of TextKit is dynamic type, allowing your users to increase or decrease the size of fonts on the fly to better suit their own needs. Users of your app will start expecting dynamic font to be implemented and obeyed inside your app from the beginning, so be wary of ignoring it! At its most basic, dynamic fonts simply add a new method to UIFont called preferedFontForTextStyle to allow for the user’s system-wide preferred font to be determined. The different text styles available are:
§ Headings
§ Subheadings
§ Body
§ Footnotes
§ Captions
As a quick demonstration of TextKit and dynamic fonts, we’ll create a simple iPhone app that responds to the updates in dynamic fonts.
1. Create a new single view iPhone application, and call it TextKitDemo.
2. Create the interface. Open Main.storyboard.
Drag in a text view, and place it to fill the entire view.
Select the text view, and inside the Attributes Inspector, untick Editable.
3. Connect the interface. Open ViewController.swift in the assistant.
Control-drag from the text view into the ViewController class, and create an outlet called textView.
4. Add the code. Replace ViewController.swift with the following:
5. import UIKit
6.
7. class ViewController: UIViewController {
8.
9. @IBOutlet weak var textView: UITextView!
10.
11. var observer : AnyObject?
12.
13. override func viewDidLoad() {
14. super.viewDidLoad()
15.
16. self.textView.font =
17. UIFont.preferredFontForTextStyle(UIFontTextStyleBody)
18.
19.
20. observer = NSNotificationCenter.defaultCenter()
21. .addObserverForName(UIContentSizeCategoryDidChangeNotification,
22. object: nil, queue: NSOperationQueue.mainQueue(),
23. usingBlock: { (notification) in
24.
25. self.textView.font =
26. UIFont.preferredFontForTextStyle(UIFontTextStyleBody)
27.
28. })
29. }
30.
31.
}
Now if you run the app, it will dynamically change and update to the user’s preferred dynamic font!
[9] You may provide any date you like for this field. The possibilities available to you in this universe are truly limitless.
[10] The authors, who are Australian, contend that this is superior.