Take Control of the Mac Command Line with Terminal (2015)
Work with Programs
Every command that you use on the command line, including merely listing files, involves running a program. (So, in fact, you’ve been using programs throughout this book!) However, some aspects of using programs on the command line aren’t entirely obvious or straightforward. In this chapter, I explain some of the different types of programs you may encounter and how to run them (and stop them).
I also show you how to edit files on the command line, and I talk about shell scripts, a special kind of program you can create to automate a sequence of tasks.
Learn Command-Line Program Basics
If you’ve been reading this book in order, you already know many basics of running programs on the command line. Each time you enter a command such as ls or cp or pwd, you’re running a program—and we saw how to change program options and supply additional parameters with arguments and flags earlier (in What Are Commands, Arguments, and Flags?). However, I think you should know a few other important facts about running programs.
Command-line programs come in a few varieties, which for the sake of convenience I’ll lump together in three broad categories. (These are my own terms, by the way; other people may categorize them differently.) You’ll have an easier time using the command line if you’re aware of the differences.
Basic Programs
Most command-line programs you use simply do their thing and then quit automatically. Enter ls, for instance, and you instantly get a list of files, after which point ls is no longer running. Some of these single-shot programs produce visible output (date, ls, pwd, etc.); some normally provide no feedback at all unless they encounter an error (cp, mv, rm, etc.). But the point is: they run only as long as is needed to complete their task, without requiring any interaction with you other than the original command (with any flags and arguments).
Interactive Programs
A second type of program asks you for an ongoing series of new commands, and in some cases doesn’t quit until you tell it to. For example, the command-line program used to change your password is passwd. If you enter passwd, you see something like the following:
Changing password for jk.
Old password:█
You type your old password and press Return, and then the program gives you another prompt:
New password:█
Type in a new password and you get yet another prompt:
Retype new password:█
Reenter your new password, as long as it matches the first one, the program changes your password and exits without any further output.
Note: This procedure really does change the password for your user account, which applies everywhere on your Mac (not just on the command line).
Programs of this sort include ssh, which lets you Log In to Another Computer, and ftp, which lets you transfer files between computers, among many others. If you’re running an interactive program, want to quit it, and can’t find an obvious way to do so, try pressing Control-C (see Stop a Program for more possibilities).
Full-Window Programs
The third broad category of programs is full-window programs—those that are interactive but, instead of handling input and output on a line-by-line basis, take over the entire Terminal window (or tab). You’ve already tried a few of these—less and man are examples. Some full-window programs helpfully display hints at the top or bottom of the window showing what commands you can use; others require that you’ve memorized them (or can look them up in a man page, perhaps in another window). As with other interactive programs, pressing Control-C usually lets you exit a full-window program if you can’t find another way to do so.
Change Your Terminal Type
A curious feature of full-window programs such as less, top, and man is that once you quit them, everything they previously displayed on screen disappears; for example, you can’t scroll back to see something from a man page once you quit man.
This behavior (among others) is determined not by your shell but by the specific kind of terminal that Terminal happens to be emulating at any given time. By default, that terminal type is something called xterm-color. Without getting into any tedious details, let’s just say that xterm-color has many virtues, but some people dislike the way it handles full-window programs. If you’re one of those people, you can easily switch to a different terminal type.
Follow these steps:
1. Choose Terminal > Preferences > Settings > Advanced.
2. Choose vt102 from the Declare Terminal As pop-up menu.
3. Close the Preferences window.
The change takes effect beginning with the next shell session you open in Terminal.
Run a Program or Script
Often, running a program requires nothing more than typing its name and pressing Return. However, the process can be a bit trickier in certain cases. Read on to discover how to run programs located in unusual places, as well as scripts (programs packaged in a somewhat different form).
How Your PATH Works
As you know already (see Understand How Paths Work), each file on your Mac has a path—a location within the hierarchy of directories. So a path of /Users/jk/Documents/file1 means file1 is in the Documents directory, which is in turn in the jk directory, which is in Users, which is at the top, or root, level of the disk (signified by the initial /).
But there’s another, specialized use of the term PATH: when capitalized like this, it refers to a special variable your shell uses that contains a list of all the default locations in which a shell can look for programs.
To run a program, your shell must be able to find it. But so far, all the commands you’ve entered have been “bare” program names without specific paths given. For example, to run less, you simply enter less, but in reality the program you’re running is stored in /usr/bin. Looking everywhere on your disk for a program would be time-consuming, so how can your shell find it in order to run it? The answer is that when you enter a command without an explicit path, the shell automatically looks in several predetermined locations. That list of locations, which happens to include /usr/bin, is your PATH.
By default, your PATH includes all of the following directories:
/bin
/sbin
/usr/bin
/usr/local/bin
/usr/sbin
A program in any of these locations is said to be “in your PATH.” You can run a program in your PATH, regardless of your location in the file system, simply by entering its name. I encourage you to look through these directories (try ls -l /bin, ls -l /sbin, and so on) to get an idea of the hundreds of built-in programs and where they’re located.
Tip: To see the current contents of your PATH, enter echo $PATH. Each valid directory is separated from the next by a colon—for example: /usr/local/bin:/usr/bin:/bin:/usr/sbin:/sbin.
Most programs you’ll need to run are already in your PATH, and if you download or create new programs, you can put them in one of these locations to make sure you can run them just by entering their names. But what about programs that aren’t in your PATH? You can either enter the program’s full or relative path (for example, /usr/local/bin/stuff or ../software/myprogram), or you can expand your PATH to include other directories (I explain how in Modify Your PATH).
Run a Program
To summarize, you can run a program in any of three ways, depending on where the program is located, your current position in the file system, and what’s in your PATH:
· By relative or absolute path: You can always run a program by entering its complete path, such as /usr/bin/less, or its relative path from the current location, for example apples/oranges/program.
· In the current directory: If you’re in the same directory as the program you want to run, you might think you could just enter the program’s name, but that doesn’t work. Instead, you must precede the name with ./ (and no space). For example, to run a program named counter in the current directory, enter ./counter.
· In your PATH: To run a program anywhere in your PATH, simply enter the program’s name—for example, less, mkdir, or man.
Running Multiple Programs on One Line
Ordinarily, if you want to run two commands in a sequence, you enter the first command, let it run, and then enter the second one on a new line. However, sometimes it’s more convenient to tell the command line: “Hey, just run these commands one after the other instead of making me wait to enter the next one.” To do this, type the first command, then a semicolon (;), a space, and the second command. (You can chain more than two commands together in this way.) Not every command can work as part of a chain, but most do.
To learn about another way of running multiple programs on one line, in which one command’s output supplies the input for the next command, see Pipe and Redirect Data.
Run a Script
In Mac OS X, as in other varieties of Unix, the programs you run are usually compiled binary files. If you were to open them in a text editor, they’d look like nothing but garbage characters, because they’ve been put into an optimized, self-contained, machine-friendly format for maximum performance. However, another broad category of programs consists of human-readable text that’s interpreted by the computer as it runs instead of being compiled in advance. Programs in this category are often referred to as scripts, and they’re often used to automate or simplify repetitive activities. Just as AppleScript provides a way of writing human-readable programs that run in Mac OS X’s graphical environment, scripts of various kinds can run from the command line.
A shell script is a series of instructions interpreted, or run, by the shell itself. So, a shell script could consist of little more than a list of commands, just as you would type them manually in a Terminal window. Run the script, and the shell executes all those commands one after the other. (In fact, shell scripts can use variables, conditional tests, loops, math, and much more—I introduce you to these items later, in Add Logic to Shell Scripts.) I explain the basics of creating a simple script ahead in Create Your Own Shell Script. By convention, shell scripts usually have an extension of .sh.
Other kinds of scripts are written in scripting languages such as Perl, Python, and Ruby, and run by the corresponding interpreter. Perl scripts, by convention, end in the .pl extension, Python scripts in .py, and Ruby scripts in .rb.
Regardless of a script’s extension, it’s considered good programming practice to include the name and location of the interpreter that should process it on the first line of the script. For example, if a shell script is intended to be interpreted by the sh shell, the first line should be:
#!/bin/sh
The #! at the beginning of this line, called a “shebang,” is a marker indicating that what follows it is the path to the interpreter. (You can examine a script using, say, less or cat to see if it has such a line.)
Because the interpreter is spelled out right in the script, you can run the script just as you would any other program, by entering its name (if it’s in your PATH) or its path.
However, if a script doesn’t include that line, you must tell it explicitly which shell or other interpreter to run it with. You do that by entering the interpreter’s name with the path to the script as an argument. For example:
sh ~/Documents/my-shell-script.sh
perl ~/Documents/my-perl-script.pl
python ~/Documents/my-python-script.py
ruby ~/Documents/my-ruby-script.rb
Running Shell Scripts outside the Shell
You don’t have to be in the Terminal application to run a shell script! You can also run shell scripts from within numerous other apps and environments, including:
· AppleScripts
· Automator workflows
· Keyboard Maestro macros
· TextExpander snippets
I cover these and numerous other examples in my book Take Control of Automating Your Mac.
Run a Program in the Background
Most of the time when you run a program, it does its thing, and then you quit it (or it quits by itself). While it is running—whether that takes a second or an hour—it takes over your shell and thus the Terminal window or tab in which the shell is running. If you expect a program to take some time to complete its task, or if you want it to keep running even after you exit the shell, you can run it in the background. Background programs let you do other tasks in the same Terminal window or tab, and, if necessary, they keep going even after you quit Terminal.
To run a program in the background, you simply put a space and an ampersand (&) after the program name (and any flags or arguments). For example, suppose you want to compress a folder containing hundreds of large files. Ordinarily, you might use a command like zip -r archive.zip apples. To run that command in the background instead, enter this:
zip -r archive.zip apples &
While a program is running in the background, you’ll see no feedback or output. If it’s a program that simply accomplishes a task (such as copying or compressing files) and then quits automatically, then you’ll see a message stating that it’s finished—not immediately afterward, but the next time you execute a command or even just press Return to create a new command line. The message saying a process is finished looks something like this:
[1]+ Done zip -r archive.zip apples
Note: Programs designed to run in the background every time are called daemons (pronounced “demons”). Examples include database and Web servers, firewalls, and some backup programs. You wouldn’t use the term “daemon,” however, for an ordinary program you opt to run in the background temporarily.
See What Programs Are Running
Here’s a thought question: How many programs are running on your Mac right now? If you glance at the active icons in your Dock and conclude that the number is, say, a dozen, you haven’t even scratched the surface. For example, as I type these words, my Dock tells me I have 16 programs running, but in reality the total is 135! Besides the visible programs like Mail and Safari, that figure includes background programs that are part of Mac OS X—the Spotlight indexer, Time Machine, iTunes Helper, and many others that perform important but little-noticed functions behind the scenes. It also includes my bash shell running in Terminal, and every program running in that shell.
Note: Roughly speaking, the term “process” is used to describe programs (of any sort) that are actively running, as opposed to those that are merely occupying space on your disk. The commands and procedures I describe in this section are concerned only with active programs, and therefore I use the term “process” to describe them.
You may be aware of Activity Monitor (in /Applications/Utilities), which lists all this information and more. In the command-line environment, too, you can list all your Mac’s processes (visible and invisible) and get a variety of useful facts about them. The two most commonly used command-line programs for discovering what’s running on your Mac are top and ps.
Top
The top command is the nearest command-line equivalent to Activity Monitor. Enter top and you get a full-window list of all your running processes, updated dynamically. Figure 4 shows an example.
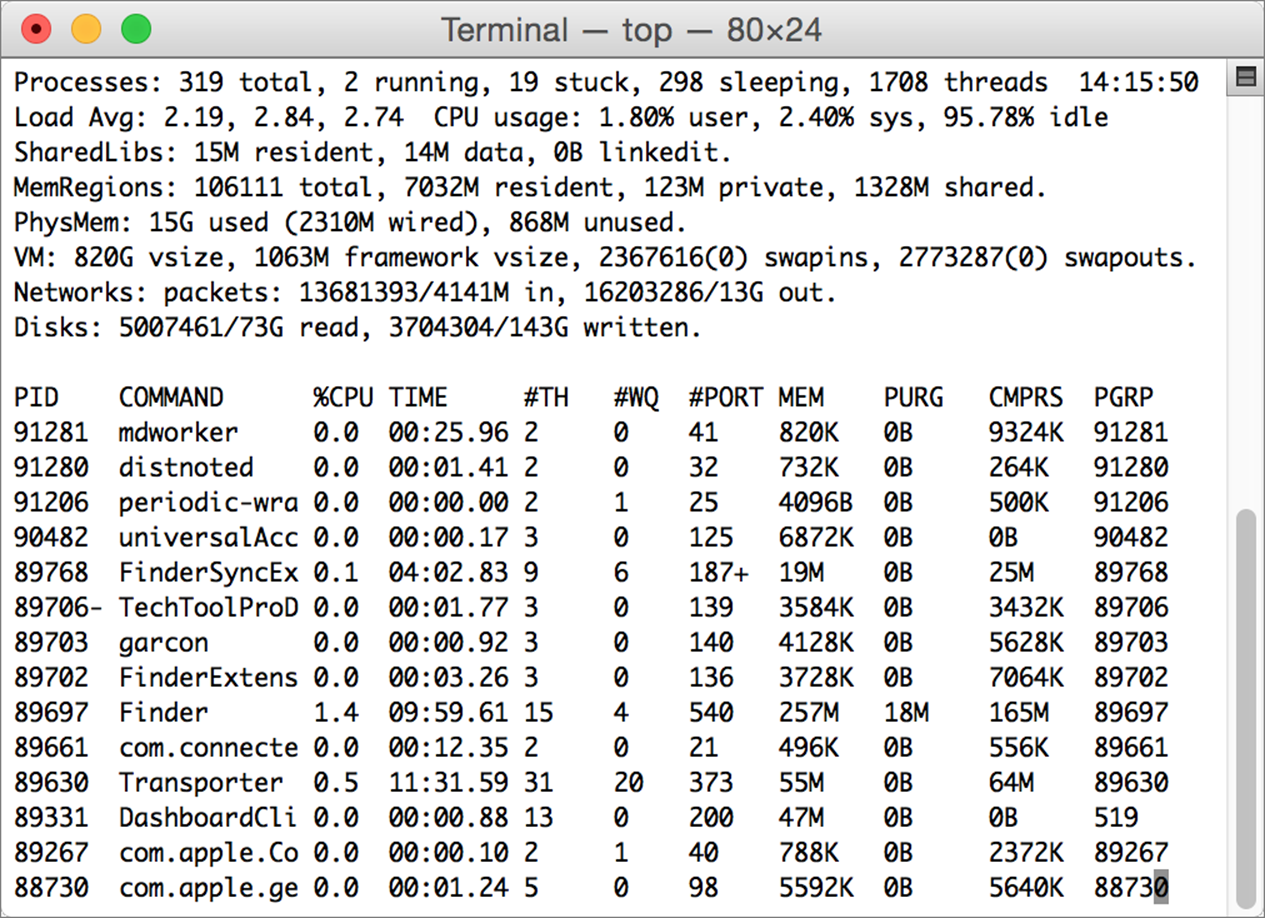
Figure 4: In the top window, you get a list of all the processes currently running on your Mac.
By default, the top command lists several pieces of information for each process, including the following particularly interesting ones: PID (process ID), COMMAND (the process name), %CPU (how much CPU power the process is using), TIME (how long the process has been running), and MEM (how much RAM the process is using).
I won’t go into great detail about everything you see here (try man top to learn more), but I do want to call your attention to a few salient points and offer some top tips:
· Pruning the list: You almost certainly have many more processes than can fit in your window at one time, even if you make your window very large. So you can restrict the number of items top shows at a time using the -n (number) flag, followed by the number of items to show (top -n).
· Sorting the list: By default, top lists processes in reverse order of PID, which basically means the processes at the top of the list are the ones launched most recently. You can adjust the sort order with the -o (order) flag—for example, enter top -o cpu to list processes in order of how much CPU power they’re using, or enter top -o rsize to list processes in order of how much RAM they’re using.
· Top at the top: Depending on what else is running on your Mac at the moment, top itself may be at or near the top of the list, even when sorted by CPU usage. Don’t be alarmed: the effect is caused by the way top gathers its data.
· Customizing the list: You can combine flags to customize your display. For example, enter top -n 20 -o cpu to list only the top 20 processes by CPU usage.
· Quitting: To quit top, just type the Q key (by itself).
Ps
Whereas top is dynamic, you may want simply to get a static snapshot of the processes running at any moment. For that, the best command is ps (process status). If you enter ps by itself, you get a list of your processes running in terminals—which usually means the Terminal application. In all likelihood, this is just bash itself.
The list includes the PID, the TTY (or terminal name), time since launch, and command name for each process:
PID TTY TIME CMD
22635 ttys001 0:00.06 -bash
You can expand the amount of information that ps provides using flags. For example, to include not only processes in the current shell session but also those from other sessions (yours or those belonging to other users), enter ps -a. To show processes that aren’t running in a shell at all (including regular Mac OS X applications and background processes), enter ps -x. Combine the two (ps -ax) to show all the processes running on your Mac.
Of course, although ps -ax provides lots of information, it might be too much to be useful. You can filter the output from the ps command by using a couple of spiffy Unix tricks. First, you add the pipe (|) character (which you get by typing Shift-) to channel the output from ps into another program. (For more on the pipe, see Pipe and Redirect Data, later.) The other program, in this example, is grep, a powerful pattern-matching tool we’ll see again in Get a Grip on grep. So, enter ps -ax | grep followed by a space and some text, and what you get is a list of all and only the running processes whose listing includes that text. For example, to list all the processes that are running from inside your /Applications directory, enter this:
ps -ax | grep /Applications
Note: A curiosity of this command is that the grep process itself will appear in the list, because grep includes /Applications as an argument! If that bothers you and you want to exclude grep itself, add the following after /Applications and a space: | grep -v grep. The same applies for the next example.
Or, to show only the processes whose names include the characters sys (in any combination of upper- and lowercase), try this:
ps -ax | grep -i sys
Stop a Program
As we’ve seen, most command-line programs quit automatically when they finish performing their functions, and full-window programs usually have a fairly obvious way of quitting them (for example, pressing Q in the case of less or man. However, if a program doesn’t quit on its own, or if you need to unstick one that’s stuck (even if it’s a graphical Mac OS X application!), you can use one of several techniques.
Ask Politely
If a command-line program won’t quit on its own, the first thing to try is pressing Control-C. In this context, it’s approximately like pressing Command-Q in a regular Mac OS X application—it tells the process to quit, but to do so in a controlled way (saving open files and performing any other necessary cleanup operations).
Kill (Humanely)
What if you want to stop a program that’s not running in the current shell? If it’s a graphical Mac OS X application, or an invisible background process, or a program running in another shell, you can send it a “Quit” signal remotely. The command you use to do this is kill. That sounds extreme, but, in fact, when kill is used on its own, it sends a program the same sort of polite request to terminate that Control-C does.
Note: You can only kill processes you own (that is, ones started under your user account). To kill another user’s processes, you must use sudo (see Perform Actions as the Root User).
The catch is that you have to know how to refer to the program you want to kill. Here there are two options:
· By PID: If you can find the process’s PID (process ID)—using top, ps, or even Activity Monitor—you can simply enter kill followed by that number. For example: kill 1342
· By name: If you don’t know the process’s PID, or can’t be bothered to find out—but do know its name—you can quit it by name using a variant of kill called killall. Simply follow killall with the program’s name. For example: killall iTunes
You must enter the name exactly as it appears in top, ps, or Activity Monitor. For example, if you want to quit Excel, you must enter killall "Microsoft Excel" (quotation marks added because there’s a space in the name).
Kill (with Extreme Prejudice)
If a program fails to respond to Control-C or to the standard kill or killall command, it’s time to pull out the big guns. By adding the -9 flag to the kill command, you turn a polite request into a brutal clobbering that can terminate almost any process.
When you use the kill -9 command, you must give it the process’s PID; the -9 flag doesn’t work with killall to force-quit a process by name. For example:
kill -9 1342
If even kill -9 doesn’t stop a process, and I’ve seen that happen more than once, it is likely stuck beyond the power of any software command, and your only choice is to restart the computer.
Edit a Text File
Earlier I showed you how to view the contents of text files, but you may also need to modify them. For that, you can work with any of several command-line text editors. Using a command-line text editor is often quicker and easier than opening a text file in a program like TextEdit—especially for files that don’t appear in the Finder—and is less likely to cause problems with file formats or permissions.
If you ask a hardcore Unix geek what text editor he uses, he (there are far too few female Unix geeks) will probably answer vi. (That’s “vee-eye,” not “vie,” by the way.) It’s a very powerful text editor that’s been around forever, and because a lot of programmers cut their teeth on vi and then proselytized future generations, it’s become a sort of badge of honor to be skilled in using vi.
Mac OS X includes vi, but I’m not going to tell you how to use it. As command-line programs go, vi has the most opaque user interface I’ve seen. Until you get used to vi’s oddities and memorize its commands, you can’t even change a letter in a text document without referring to a manual. Powerful or not, from a usability standpoint, vi is hideous. I just want you to know about vi so that when someone asks you why you don’t use it, you can give the correct response: “Life is too short.”
Happily, you can use several other fine text editors. There’s the venerable emacs, which is less obnoxious than vi while still being fabulously flexible. But I’m going to recommend what you might think of as the TextEdit of command-line text editors: a simple, straightforward, and adequately powerful program called nano.
Note: The nano editor is an “enhanced clone” of an earlier editor called pico; they have almost identical interfaces and feature sets. In much the same way as more and less, Mac OS X includes a program called pico and a program called nano, but they’re the same, and if you try to run pico, nano is what actually runs.
To edit a text file in nano, use a command like the following:
nano file1
If file1 is already present, nano opens it; otherwise, it opens a blank file that will be called file1. Figure 5 shows a text file open in nano.
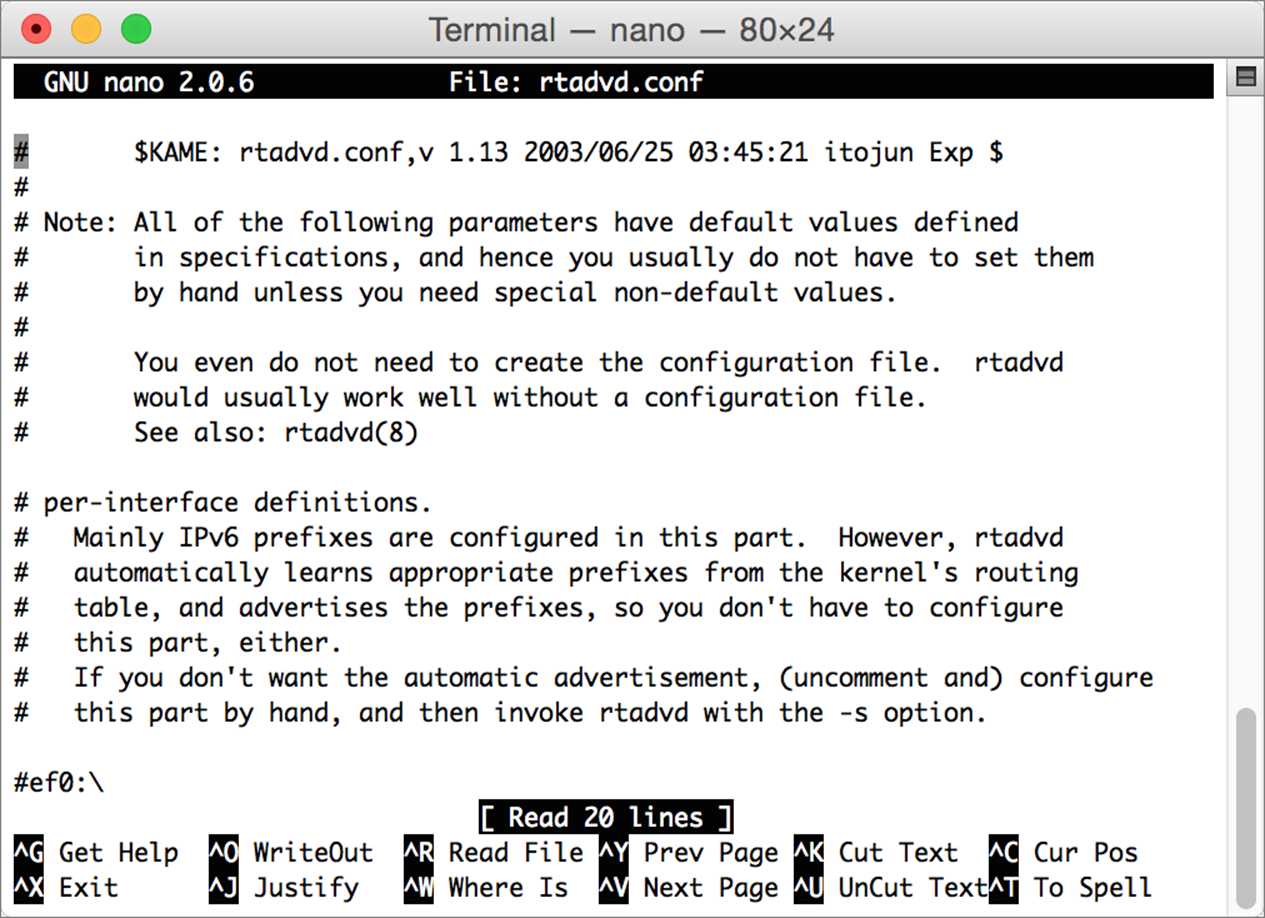
Figure 5: A text file open in the nano text editor. The menu of keyboard controls is at the bottom of the window.
Note: You can select text in a nano screen using your mouse, and you can even copy it using Edit > Copy or Command-C. See the sidebar Using a Mouse in Terminal for more tips. But in general, you can ignore your mouse in nano.
One of the reasons nano is easy to use is that editing is straightforward. To insert text at the cursor location, simply type—or paste the contents of your Clipboard by choosing Edit > Paste or pressing Command-V. To delete the character to the left of the cursor, press the Delete key; to delete the character at the cursor, press the Forward Delete key (if your keyboard has one). To delete the entire current line, press Control-K.
Tip: The nano editor doesn’t have an Undo command as such, but if you cut a line of text with Control-K and want to restore it, you can press Control-U to “uncut” it.
Other than those basics, here are the most important things you should know how to do in nano:
· Save: To save the current file, press Control-O (WriteOut).
· Quit: To quit nano, press Control-X (Exit). If you’ve made any changes to the document that you haven’t yet saved, nano prompts you to save the file before exiting. Press N to discard changes and quit immediately, C to cancel and stay in nano, or Y to save changes and exit. If you do save changes, nano verifies that you want to keep the existing filename (if you don’t, you can type a new one). Press Return after verifying the filename.
· Find: To find text within the file, press Control-W (Where Is). Type the text you’re searching for (case doesn’t matter) and press Return. The cursor jumps to the next spot in the document where that string appears. Repeat this procedure to do additional searches.
Those commands alone should enable you to do almost everything you need to do in nano. To learn about additional nano features and shortcuts, press Control-G to view its online help.
Create Your Own Shell Script
Before I wrap up this discussion of running programs, I want to give you a tiny taste of creating your own shell scripts. Scripting is a bit like learning chess: you can pick up the basics in a few minutes, but it may take years to master all the subtleties. So I’m not going to teach you anything about programming as such, just the mechanics of creating and using a simple script. I want you to have enough familiarity with the process that you can successfully reproduce and run shell scripts you may run across in magazines, on Web sites, or even in this book (see Command-Line Recipes, which includes a couple of shell scripts). Later on, for those who are interested in learning a bit more, I’ve included instructions on how to Add Logic to Shell Scripts.
You can create and run a shell script in six easy steps; in fact, you can arguably combine the first four into a single process. But one way or another, you must make sure you’ve done everything in the list ahead.
Step 1: Start with an Empty Text File
Scripts are plain text files, so you should begin by creating one in a text editor. You can make a shell script in TextEdit, BBEdit, or even Word, but that requires extra steps. So I suggest using nano, as described in Edit a Text File. For the purpose of demonstration, name your script test.sh. (Remember from Run a Script that the .sh extension isn’t mandatory, but it can help you keep track of which files are scripts.)
Before you create this file, I suggest using cd (all by itself!) to ensure that you’re in your home directory. (You can put scripts anywhere you want, but for now, this is a convenient location.) That done, enter nano test.sh. The nano text editor opens with a blank file.
Step 2: Insert the Shebang
The first line of your script should include the “shebang” (#!) special pointer (see Run a Script) to the shell it will use. Since this book is all about the bash shell, we’ll use that one. Type the following line:
#!/bin/bash
Step 3: Add One or More Commands
Below the shebang line, you enter the commands your script will run, in the order you want them executed. Your script can be anything from a single one-word command to thousands of lines of complex logic.
For now, let’s keep things simple. Starting on the next line, type this:
echo "Hello! The current date and time is:"
date
echo "And the current directory is:"
pwd
The echo command simply puts text on the screen—and you’ve seen the date and pwd commands. So, this script displays four lines of text, two of which are static (the echo lines) and two of which are variable.
Step 4: Close and Save the File
To save the file, press Control-O and press Return to confirm the filename. Then press Control-X to exit nano.
Step 5: Enable Execute Permission
The only slightly tricky thing about running scripts—and the step people forget most often—is adding execute (run) permission to the file. (I say more about this later, in Understand Permission Basics.)
To do this, enter chmod u+x test.sh.
Step 6: Run the Script
That’s it! To run the script, enter ./test.sh. It should display something like this:
Hello! The current date and time is:
Wed Aug 1 19:58:21 CET 2012
And the current directory is:
/Users/jk
For fun, try switching to a different directory (say, /Library/Preferences) and then run the script again by entering ~/test.sh. You’ll see that it shows your new location.
Any time you need to put a new script on your system, follow these same steps. You may want to store the scripts you create somewhere in your PATH (see How Your PATH Works), or add to your PATH (see Modify Your PATH), to make them easier to run.
Shell scripts can be much more than simple lists of commands. If you want to explore more advanced capabilities, skip ahead to Add Logic to Shell Scripts.
Customize Your Profile
Now that you know the basics of the command line and Terminal, you may find some activities are a bit more complicated than they should be, or feel that you’d like to personalize the way your shell works to suit your needs. One way to exercise more control over the command-line environment is to customize your profile, a special file the bash shell reads every time it runs. In this chapter, I explain how the profile works and how you can use it to save typing, customize your prompt, and more.
How Profiles Work
A profile is a file your shell reads every time you start a new session that can contain a variety of preferences for how you want the shell to look and behave. Among other things, your profile can customize your PATH variable (see How Your PATH Works), add shortcuts to commands you want to run in a special way, and include instructions for personalizing your prompt. I cover just a few basics here.
What you should understand, though, is that for complicated historical reasons, you may have more than one profile (perhaps as many as four or five!), and certain rules govern which one is used when.
When you start a new shell session, bash first reads in the system-wide default profile settings, located at /etc/profile. Next, it checks if you have a personal profile. It first looks for a file called ~/.bash_profile, and if it finds one, it uses that. Otherwise, it moves on to look for ~/.bash_login and, finally, ~/.profile. Of these last three files, it loads only the first one it finds, so if you have a .bash_profile file, the others, if present, are ignored.
Note: You may also read about a file called .bashrc, which bash reads in only under certain unusual conditions that you’re unlikely to encounter when using Terminal on Mac OS X.
Because .bash_profile is the first user-specific profile to be checked, that’s the one I suggest you use.
Note: Customizations you make in .bash_profile (or any other profile file mentioned here) apply only in a shell session; they aren’t used by shell scripts (see Create Your Own Shell Script). As a result, when writing a script, you should always spell out complete paths and assume default values for all variables.
Edit .bash_profile
To edit .bash_profile in nano, simply enter the following:
nano ~/.bash_profile
If the file already exists, nano opens it for editing; if not, it prompts you to create the file when you save or quit the program.
This file is a simple text file, and unlike shell scripts, it doesn’t use a shebang. Just add one or more lines to specify the changes that you want (as described on the following pages). When you’re finished editing .bash_profile, save it (Control-O) and close it (Control-X). Ordinarily, the changes take effect with the next shell session (window or tab) you open. To load the modified profile immediately, enter source .bash_profile.
Create Aliases
In the Finder, an alias is a small file that serves as a pointer to another file (for something comparable to Finder aliases on the command line, refer to Use Symbolic Links). In the command-line environment, however, the word alias means a shortcut in which one command substitutes for another.
For example, suppose you’re used to command-line conventions from DOS and Windows, in which you enter dir (directory) to list your files. If you want to use that same command in Mac OS X, you can make an alias, so that entering dir runs the ls command. Or, maybe there’s a lengthy command you use frequently, and you want to run it with fewer keystrokes. No problem: you can use (for instance) pp to mean cp *.jpg ~/Pictures/MyPhotos.
To create an alias, put a new line in your .bash_profile consisting of the word alias, a space, the shortcut you want to use, and ="" with the command you want to run inside the quotation marks. For example, to use the command dt as a shortcut for the date command, enter this:
alias dt="date"
Aliases can include flags and arguments, and if you enter a shortcut that’s identical to an existing command, your alias takes precedence. For example, if you always want to show file listings in the long format, instead of typing ls -l every time, you can create an alias so typing ls gives you the same result:
alias ls="ls -l"
Or, suppose you’ve taken my advice to heart to always use the -i flag with cp (copy) and mv (move), to display a warning if the command is about to overwrite an existing file. You could add aliases to new, easy-to-remember commands like copy and move, respectively, with those options pre-configured:
alias copy="cp -i"
alias move="mv -i"
Warning! You could set up aliases such that entering cp or mv would include the -i flag, but I recommend against it because you might get into a habit of using cp and mv carelessly, assuming you’ll be warned of any impending overwrite. That could lead to data loss if you find yourself using the command line on a computer that doesn’t have the same aliases configured.
Modify Your PATH
As I explained in How Your PATH Works, when you run a program by entering just its name, your shell looks for it in several predetermined directories. You may want to specify additional places where programs or scripts are located, to make it easier to run them. For example, if you’re experimenting with your own scripts and you store them all in ~/Documents/scripting, you should add that directory to your PATH.
To add a directory to your PATH, put this in your .bash_profile:
export PATH=$PATH:/your/path/here
For example, to add the directory ~/Documents/scripting, enter this:
export PATH=$PATH:~/Documents/scripting
You can add as many of these export statements as you need. You can also add multiple directories to your PATH in a single export statement by separating them with a colon, like so:
export PATH=$PATH:~/Documents/scripting:/Library/Scripts
Change Your Prompt
Your command prompt—the string of characters at the beginning of every command line—normally looks something like this:
Joes-MacBook-Pro:~ jk$ █
You can modify this by adding a line to your .bash_profile that begins with PS1= and ends with whatever you want your prompt to be. For example, if you enter this:
PS1="I love cheese! "
then the next time you open a shell, your prompt looks like:
I love cheese! █
Tip: Always enclose your prompt in quotation marks, and include a space before the closing quotation mark, to make sure you can easily see where the prompt ends and commands begin.
Prompts can include variables. Some common ones are these:
· \u: Your short username
· \h: Your computer’s name
· \s: The name of the current shell
· \w: The current directory
· \d: The current date, in the format “Mon Feb 16”
· \@: The current time, in 12-hour format with AM/PM
So, to make the following prompt:
jk 09:08 PM ~ * █
Enter this:
PS1="\u \@ \w * "
You can even use emoji in your prompt. If you’d like it to be (or include) a pizza 🍕, baseball ⚾️, sun ☀️, or some other symbol, you can paste it right into the PS1 line of your .bash_profile in nano. You can find emoji listed on many Web pages or in Mac OS X’s Character Viewer utility (available in most apps by choosing Edit > Emoji & Symbols or Edit > Special Characters).
Tip: For another example of a profile customization, see the recipe Read man Pages in BBEdit or TextWrangler.
All materials on the site are licensed Creative Commons Attribution-Sharealike 3.0 Unported CC BY-SA 3.0 & GNU Free Documentation License (GFDL)
If you are the copyright holder of any material contained on our site and intend to remove it, please contact our site administrator for approval.
© 2016-2026 All site design rights belong to S.Y.A.