iOS Components and Frameworks: Understanding the Advanced Features of the iOS SDK (2014)
Chapter 8. Getting Started with iCloud
iCloud is a set of cloud-based services provided by Apple. It was introduced with iOS 5 as a replacement for MobileMe, and generally provides cloud storage and automatic syncing between iOS devices, OS X devices, and the Web. iCloud includes email, address book, and calendar syncing; automated iOS device backup and restore; a “Find My iPhone” feature to locate and/or disable a lost device; a “Find My Friends” feature to share locations with family or friends; “Photo Stream,” which automatically syncs photos to other devices; “Back to My Mac,” which allows configurationless access to a user’s Mac over the Internet; and “iTunes Match,” which provides access to a user’s music library without uploading and syncing. In addition, iCloud provides the ability for apps to store app-specific data in the cloud and automatically sync between devices. At the time of this writing, iCloud provides 5GB of storage free, and offers paid plans for additional storage.
For app-specific storage and syncing, iCloud supports three approaches: document-based storage and syncing (based on NSDocument or UIDocument), key-value storage and syncing (similar to NSUserDefaults), and Core Data syncing. This chapter explains how to set up an app to sync via iCloud using UIDocument and key-value store syncing. Using Core Data with iCloud is not covered; although the setup and initial implementation are relatively straightforward, there are some challenging implementation issues that make using iCloud with Core Data risky. Specifically, there are complexities associated with initial data syncing when migrating from an existing dataset, problems with users shutting off iCloud or deleting iCloud data, and several other detailed issues. Refer to Marcus Zarra’s second edition of Core Data from The Pragmatic Programmers for a thorough explanation of these issues and some recommended approaches to handle them.
The Sample App
The sample app for this chapter is called MyNotes, which is a simple note editor. Notes are constructed using a custom subclass of UIDocument, and are synced between devices using iCloud. The sample app also uses the iCloud-based key-value store to keep track of which note has most recently been edited, and syncs that information between devices.
In a shipping app, support for iCloud would typically be optional, because not all users have or use iCloud accounts. The sample app assumes that iCloud is available for simplicity, and does not support “local only” usage without an iCloud account. The major difference is the URL where files are stored; for local-only storage, user-generated files should be in the Documents directory inside the app sandbox. For iCloud, documents are stored in a special directory with a URL provided by the system (as seen in the next section, “Setting Up the App for iCloud Support,” and in the later section “Initializing iCloud”).
Setting Up the App for iCloud Support
To set up an app to use iCloud, it used to be that several steps were required. Entitlements for the app needed to be set up, and the app needed to be configured in the iOS Provisioning Portal for iCloud support. iCloud usage can be tested only on the device, so the provisioning profile work needed to be completed in order for an iCloud app to work. With the introduction of Xcode 5, this process has been significantly streamlined and can be done entirely within Xcode 5.
Account Setup
Xcode 5 needs iOS developer account information in order to connect to the Member Center and perform all the setup necessary for iCloud on the developer’s behalf. Select Xcode, Preferences from the Xcode 5 menu, and then select the Accounts tab, as shown in Figure 8.1.
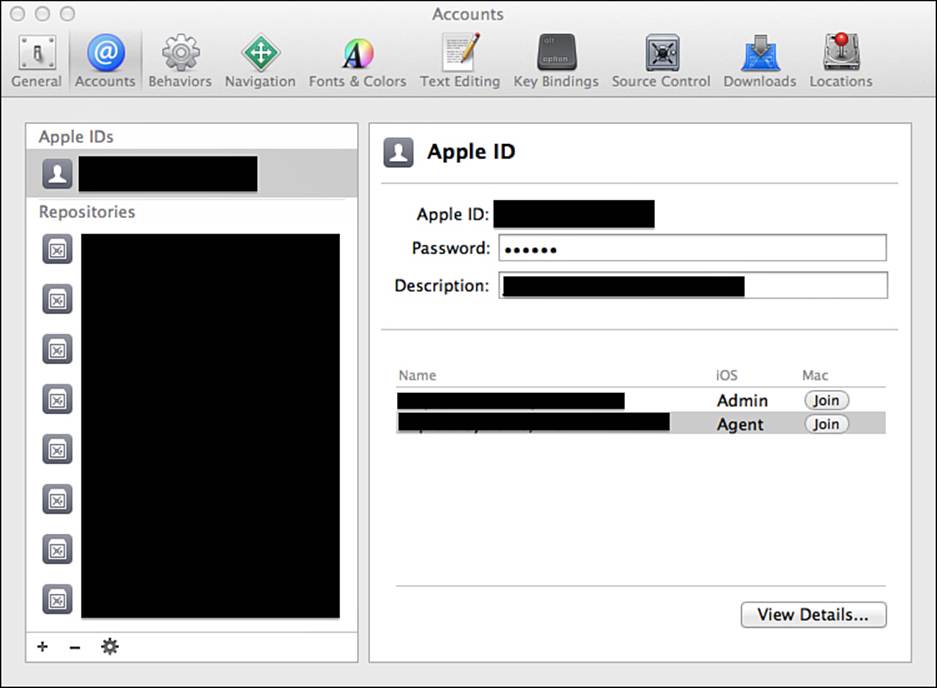
Figure 8.1 Xcode 5 Accounts tab.
To add a new account, click the plus sign in the lower left of the Accounts tab, and select Apple ID. Enter the account credentials and click the Add button. Xcode will validate the credentials and gather account information if valid. Click the View Details button to see what certificates and provisioning profiles are currently configured for an account, as shown in Figure 8.2.

Figure 8.2 Xcode 5 Accounts detail view.
Enabling iCloud Capabilities
After Xcode 5 has account credentials, it can configure apps with capabilities on behalf of the account. It can set up App IDs, entitlements, and provisioning profiles as needed. To set up the iCloud capability, view the MyNotes Target in Xcode, click the Capabilities tab, and find the iCloud section. Change the iCloud switch to On and Xcode will automatically create an entitlements file for the project. Check the Use Key-Value Store checkbox to enable the key-value store for the app. Xcode will automatically populate an entry with the project’s bundle ID in the Ubiquity Containers table. For the sample app, this is all that is needed; for a more complex app that shares with a Mac OS X application and that would need to support more than one ubiquity container name, additional ubiquity container names can be added here. Xcode will check with the developer portal to see whether the App ID is configured correctly for iCloud. If not, Xcode will display the issue as shown in Figure 8.3. Tap the Fix Issue button and Xcode will communicate with the developer portal and fix any issues with the app setup.
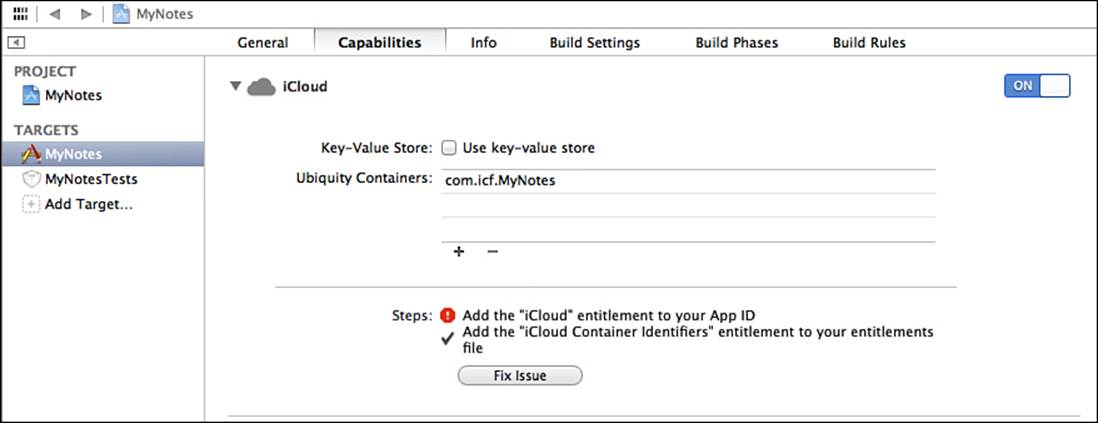
Figure 8.3 Xcode 5 Accounts detail view.
Initializing iCloud
Each time the app is run, a call must be made to the URLForUbiquityContainerIdentifier method of NSFileManager to get the URL for the iCloud container where files can be stored and synced. The setupiCloud method is called from the app delegate’sapplication:didFinishLaunchingWithOptions: method.
- (void)setupiCloud
{
dispatch_queue_t background_queue =
dispatch_get_global_queue(DISPATCH_QUEUE_PRIORITY_DEFAULT,
0);
dispatch_async(background_queue, ^{
NSFileManager *fileManager =
[NSFileManagerdefaultManager];
NSURL *iCloudURL =
[fileManager URLForUbiquityContainerIdentifier:nil];
if (iCloudURL != nil)
{
NSLog(@"iCloud URL is available");
}
else
{
NSLog(@"iCloud URL is NOT available");
}
});
}
The first time this call is made, it will set up the directory for the app. Subsequent calls will confirm that the URL still exists. If iCloud support is enabled for the app, a valid URL will be returned. If iCloud is not available, nil is returned. It is entirely possible that the user might disable iCloud for an app (or altogether on a device) and iCloud might no longer be available. A shipping app would need a sensible strategy to notify the user when iCloud support has been lost, and to redirect any file activity to the local Documents directory in that case.
An important detail to note is that the call to URLForUbiquityContainer: is made on a background queue. This is done because the call might take an indeterminate amount of time to return. If this is the first instance of the app and there is no data, it will complete and return quickly. However, if this is a second instance of the app on another device and there are several documents to download, it might take some time for the system to set up the directory and begin populating the files from the cloud. The user interface will need to take this timing issue into consideration.
Introducing UIDocument
When an app’s functionality works around user-centric, document-style data, subclassing UIDocument is appropriate. UIDocument is designed to automate many of the typical functions needed when interacting with documents. For example, UIDocument supports automatic saving, and background loading and saving of documents to avoid affecting the main queue and slowing down the user interface. In addition, UIDocument abstracts away the loading and saving logic into simple calls, so the developer just needs to write simple logic to translate the document data to and from NSData. Most important for this chapter, UIDocument automates interactions with iCloud as well.
Subclassing UIDocument
In the sample app, each note that a user creates is an instance of a custom UIDocument subclass called ICFMyNoteDocument. Subclasses of UIDocument should implement the contentsForType:error: method and the loadFromContents:ofType:error: method, and then implement change tracking to enable UIDocument’s autosaving feature. Because the notes in the sample app are only storing the note text in a string, these methods are simple to implement.
- (id)contentsForType:(NSString *)typeName
error:(NSError *__autoreleasing *)outError
{
if (!self.myNoteText)
{
[selfsetMyNoteText:@""];
}
NSData *myNoteData =
[self.myNoteText dataUsingEncoding:NSUTF8StringEncoding];
return myNoteData;
}
In the contentsForType:error:, the method first checks whether there is a value in myNoteText; if not, it provides a default to prevent a crash. Next, myNoteText is translated to NSData and returned. The NSData is what the UIDocument will save. TheloadFromContents:ofType:error: method reverses the process.
- (BOOL)loadFromContents:(id)contents
ofType:(NSString *)typeName
error:(NSError *__autoreleasing *)outError
{
if ([contents length] >0)
{
NSString *textFromData =
[[NSStringalloc] initWithData:contents
encoding:NSUTF8StringEncoding];
[self setMyNoteText:textFromData];
}
else
{
[self setMyNoteText:@""];
}
if (self.delegate && [self.delegaterespondsToSelector:
@selector(documentContentsDidChange:)])
{
[self.delegate documentContentsDidChange:self];
}
return YES;
}
The UIDocument returns the saved contents in NSData format, and it is up to the method to translate it into the properties in the subclass. The method checks the length of the content. If there does not appear to be any content, the method defaults myNoteText to an empty string; otherwise, it converts the NSData to NSString and populates myNoteText with the results. Lastly, the method informs the delegate of the change to the document so that it can take the appropriate action, such as update the user interface with the newly loaded data.
To enable the automatic save feature that UIDocument provides, the subclass needs to implement change tracking. Change tracking is enabled with the undoManager provided by UIDocument.
- (void)setMyNoteText:(NSString *)newMyNoteText
{
NSString *oldNoteText = _myNoteText;
_myNoteText = [newMyNoteText copy];
SEL setNoteText = @selector(setMyNoteText:);
[self.undoManager setActionName:@"Text Change"];
[self.undoManager registerUndoWithTarget:self
selector:setNoteText
object:oldNoteText];
}
Note that no additional action is required to get autosaving; the app does not need to actually implement undo functionality. After the undoManager has an action, registered autosaving is enabled.
Interacting with UIDocument
To create a new instance of a UIDocument subclass, first determine the URL where the file needs to be saved. When the user taps the plus button in the sample app, the master view controller has a method to determine a filename for a new note called newMyNoteName. That method starts with “MyNote” as a base, and adds a number at the end. It checks for the existence of a note with that filename, and then increments the number if one already exists, until an unused filename is created. That filename is added to the end of the iCloud directory URL path to get the full path for the file. That URL is then passed to the detail view controller, where the configureView method determines whether the file already exists using NSFileManager, and then creates or loads it as necessary.
[self.myNoteTextView setText:@""];
myNoteDocument =
[[ICFMyNoteDocument alloc] initWithFileURL:[self myNoteURL]];
[myNoteDocument setDelegate:self];
NSFileManager *fileManager = [NSFileManager defaultManager];
if ([fileManager fileExistsAtPath:[self.myNoteURL path]])
{
[myNoteDocument openWithCompletionHandler:^(BOOL success)
{
[self.myNoteTextView
setText:[myNoteDocument myNoteText]];
UIDocumentState state = myNoteDocument.documentState;
if (state == UIDocumentStateNormal)
{
[self.myNoteTextView becomeFirstResponder];
}
}];
}
else
{
[myNoteDocument saveToURL:[self myNoteURL]
forSaveOperation:UIDocumentSaveForCreating
completionHandler:nil];
[self.myNoteTextView becomeFirstResponder];
}
To create a document, the saveToURL:forSaveOperation:completionHandler: method on UIDocument is used, specifying the UIDocumentSaveForCreating save operation. To open an existing document, the openWithCompletionHandler method is used, specifying a completion block. In this case the completion block will update the user interface and make the text view the first responder to begin editing the note. Note that the logic checks the documentState for the document. This indicates whether the document can be edited, or whether it is in a conflict state that needs to be resolved (covered later in the chapter). See the later section “Detecting Conflicts in iCloud” for more detail.
Interacting with iCloud
The introduction of iCloud to an app adds some additional complexity that the app needs to handle. Listing available documents in a non-iCloud-enabled app is simple; however, with iCloud the list of available documents can change at any time, even when the list is being generated and displayed. In addition, since documents can potentially be edited on multiple devices at the same time, conflicts can occur that otherwise wouldn’t in a non-iCloud app. This section describes how to handle these situations correctly.
Listing Documents in iCloud
To show the list of notes created and available, the app needs to query the iCloud directory to find out what files are there. This is done with an NSMetadataQuery.
- (NSMetadataQuery*)noteListQuery
{
NSMetadataQuery *setupQuery = [[NSMetadataQuery alloc] init];
[setupQuery setSearchScopes:
@[NSMetadataQueryUbiquitousDocumentsScope]];
NSString *filePattern = [NSStringstringWithFormat:
@"*.%@",kICFMyNoteDocumentExtension];
[setupQuery setPredicate:[NSPredicate predicateWithFormat:
@"%K LIKE %@",NSMetadataItemFSNameKey,filePattern]];
return setupQuery;
}
The NSMetadataQuery is set up with the NSMetadataQueryUbiquitousDocumentsScope search scope, which is the iCloud directory for the app. Then a predicate is set up using a file pattern string that will match all documents with the file extension .icfnote. The metadata query is set up in the ICFMasterViewController’s viewDidLoad method, and the view controller is set up to receive notifications from the NSMetadataQuery.
if (!noteQuery)
{
noteQuery = [self noteListQuery];
}
NSNotificationCenter *notifCenter =
[NSNotificationCenter defaultCenter];
NSString *metadataFinished =
NSMetadataQueryDidFinishGatheringNotification;
[notifCenter addObserver:self
selector:@selector(processFiles:)
name:metadataFinished
object:nil];
NSString *metadataUpdated =
NSMetadataQueryDidUpdateNotification;
[notifCenter addObserver:self
selector:@selector(processFiles:)
name:metadataUpdated
object:nil];
The two notifications will call the processFiles: method when the NSMetadataQuery has finished gathering information that matches the predicate, and when external changes from iCloud have occurred. The directory will be updated when iCloud syncs a new file from another device.
- (void)processFiles:(NSNotification*)notification
{
NSMutableArray *foundFiles = [[NSMutableArrayalloc] init];
[noteQuery disableUpdates];
NSArray *queryResults = [noteQuery results];
for (NSMetadataItem *result in queryResults)
{
NSURL *fileURL =
[result valueForAttribute:NSMetadataItemURLKey];
NSNumber *isHidden = nil;
[fileURL getResourceValue:&isHidden
forKey:NSURLIsHiddenKey
error:nil];
if (isHidden && ![isHidden boolValue])
{
[foundFiles addObject:fileURL];
}
}
[noteList removeAllObjects];
[noteList addObjectsFromArray:foundFiles];
[self.tableViewreloadData];
[noteQuery enableUpdates];
}
When processFiles: is called, it is important to have the NSMetadataQuery stop getting updates while the results are being processed. This will prevent it from getting called again in the middle of an update and potentially crashing or getting spurious results. Then the results from the query can be iterated, and an updated list of notes can be created. After the list is created, the table view will be updated, as shown in Figure 8.4. Then the NSMetadataQuery is instructed to resume getting file-system updates.
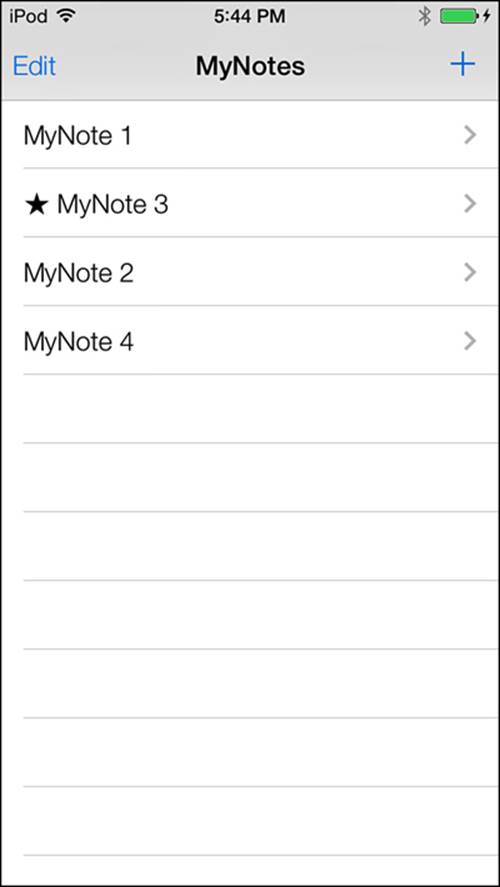
Figure 8.4 MyNotes sample app—note list.
The list of files produced by NSMetadataQuery is an array of NSURLs. In the tableView:cellForRowAtIndexPath:, the NSURL is trimmed to be just the filename without the extension for display in the table cell.
NSURL *myNoteURL =
[noteList objectAtIndex:[indexPath row]];
NSString *noteName =
[[myNoteURL lastPathComponent] stringByDeletingPathExtension];
if ([self.lastUpdatedNote isEqualToString:noteName])
{
NSString *lastUpdatedCellTitle =
[NSString stringWithFormat:@"![]() %@",noteName];
%@",noteName];
[cell.textLabel setText:lastUpdatedCellTitle];
}
else
{
[cell.textLabelsetText:noteName];
}
The if logic checks to see whether the note for a row is the last updated note, which is maintained using iCloud’s key value store, described later (see the section “Key-Value Store Syncing” for more detail). If so, it adds a star to the filename.
Opening a document or creating a new document has already been covered, in the “Interacting with UIDocument” section. When a row in the table is selected or the Add button is tapped, the URL for the new or existing document will be passed to the detail view controller, which will open or create the document, set up the text view with the text from the document, and make the text view the first responder so that editing can begin immediately.
Closing the document is simple. In the detail view controller’s viewWillDisappear: method, the document is updated with the current text from the text view, and is then closed. Saving is automatic since autosave is turned on.
NSString *newText = [self.myNoteTextView text];
[myNoteDocument setMyNoteText:newText];
[myNoteDocument closeWithCompletionHandler:nil];
Detecting Conflicts in iCloud
With all syncing technologies it is possible, even probable, to have conflicts. A conflict occurs when a document has been edited simultaneously on more than one device, and iCloud is unable to decide based on sync rules which version of the document should be current.
To get a conflict, test with two devices simultaneously. Turn on airplane mode on the first device, edit a note, and save. Edit and save the same note on the second device. Turn off airplane mode on the first device, and then attempt to edit the note again on the second device. A conflict will occur on the second device.
The UIDocument class has a document state that will indicate whether the document is in conflict or is able to be edited normally. An instance of UIDocument will also post a notification when the document state changes, which is useful since a conflict might occur while the document is being edited, and it is a much better user experience to be notified of the conflict and resolve it immediately. To detect conflicts, the detail view controller needs to register to receive document state change notifications from the document; this can be done in the viewWillAppear:method.
[[NSNotificationCenter defaultCenter] addObserver:self
selector:@selector(documentStateChanged)
name:UIDocumentStateChangedNotification object:myNoteDocument];
A method called documentStateChanged is set up to handle the document state changes. That method will check the new document state, and adjust the user interface as necessary depending on the state of the document.
- (void)documentStateChanged
{
UIDocumentState state = myNoteDocument.documentState;
if (state & UIDocumentStateEditingDisabled)
{
[self.myNoteTextView resignFirstResponder];
return;
}
if (state &UIDocumentStateInConflict)
{
[self showConflictButton];
return;
}
else
{
[self hideConflictButton];
[self.myNoteTextView becomeFirstResponder];
}
}
If the document state is UIDocumentStateEditingDisabled, the method will resign first-responder status for the text view, which will end editing right away. If the document status is UIDocumentStateInConflict, the user interface will be updated to display a button that the user can tap to resolve the conflict (see Figure 8.5); otherwise, the user interface will return to normal editing status.
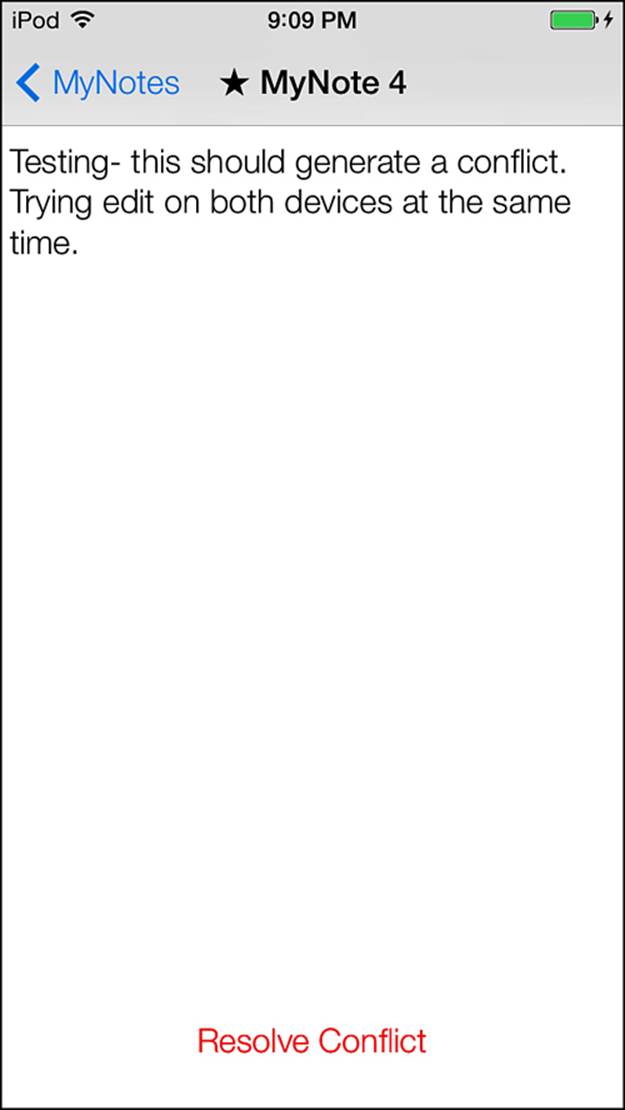
Figure 8.5 MyNotes sample app—document in conflict.
Conflict Resolution
Information about different versions of a document in conflict is available through the NSFileVersion class. When the user taps the Resolve Conflict button, the resolveConflictTapped: method is called. This method gathers information about versions of the document in conflict, and instantiates a custom page view controller to allow the user to browse through the versions in conflict and select a winner.
- (IBAction)resolveConflictTapped:(id)sender
{
NSArray *versions = [NSFileVersion
unresolvedConflictVersionsOfItemAtURL:self.myNoteURL];
NSFileVersion *currentVersion =
[NSFileVersion currentVersionOfItemAtURL:self.myNoteURL];
NSMutableArray *conflictVersions =
[NSMutableArray arrayWithObject:currentVersion];
[conflictVersions addObjectsFromArray:versions];
ICFConflictResolutionViewController *conflictResolver =
[self.storyboard instantiateViewControllerWithIdentifier:
@"ICFConflictResolutionViewController"];
[conflictResolver setVersionList:conflictVersions];
[conflictResolver setCurrentVersion:currentVersion];
[conflictResolver setConflictNoteURL:self.myNoteURL];
[conflictResolver setDelegate:self];
[selfpresentViewController:conflictResolver
animated:YES
completion:nil];
}
First the method grabs the conflict versions, or the remote versions that cannot be merged with the local version, of the document in an array because there might be more than one. Then the method grabs the current version of the document, where the current version is the locally edited version, and adds it to a mutable array with the conflict versions. This mutable array represents all the version choices the user needs to evaluate to select the correct version. The method then creates an instance of ICFConflictResolutionViewController, a custom page view controller for navigating and selecting from the available conflict versions. It then sets properties so that the controller knows about the conflict versions, what the current version is (which is important in resolving the conflict later), the URL of the note in conflict, and the delegate to be called when the user has selected a version.
Note
The page view controller is a convenient way to browse through conflict versions, but it is by no means the only way. Any method that can display information about the conflict versions and allow the user to select one will work just fine.
The conflict resolution view controller is then presented to the user, as shown in Figure 8.6.
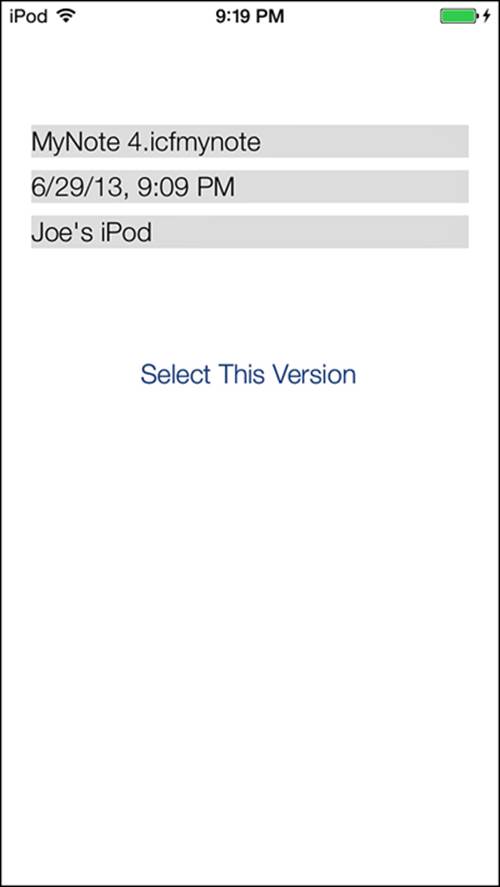
Figure 8.6 MyNotes sample app—conflict resolution page view controller.
For each conflict version of the note, the conflict resolution page view controller creates an instance of ICFConflictVersionViewController, which presents the information specific to a single conflict version of the note. The page view controller instantiates each version controller as needed in the viewControllerAtIndex:storyboard: method, and tells the controller which NSFileVersion it represents.
NSString *viewIdentifier = @"ICFConflictVersionViewController";
ICFConflictVersionViewController *versionViewController =
[storyboard instantiateViewControllerWithIdentifier:viewIdentifier];
[versionViewController setFileVersion:self.versionList[index]];
[versionViewController setDelegate:self];
return versionViewController;
The user can page between the conflict versions, as shown in Figure 8.7.
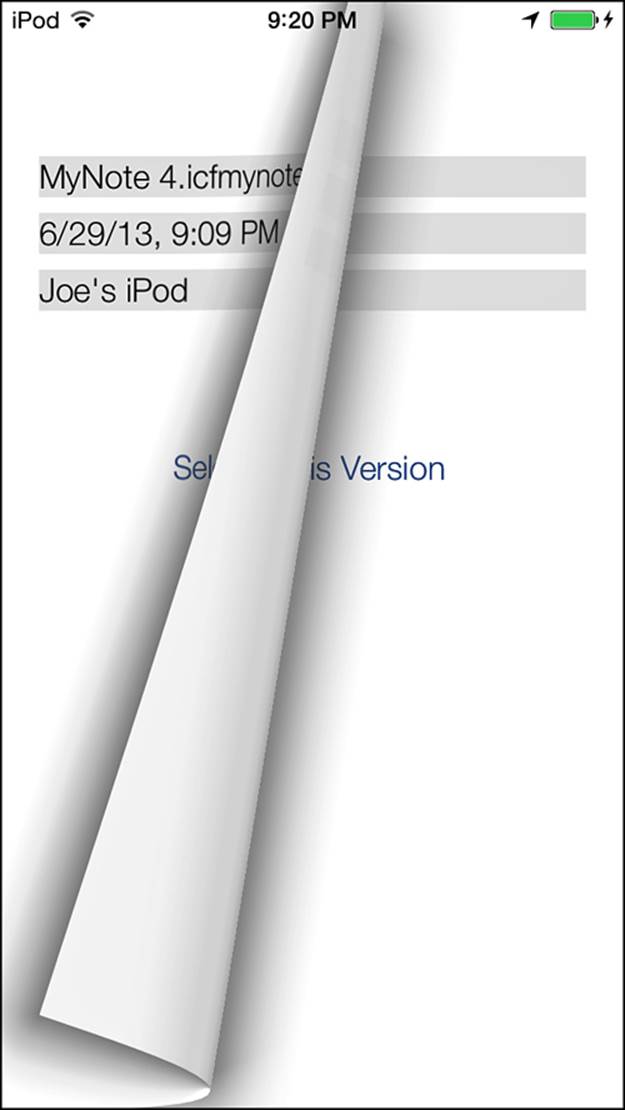
Figure 8.7 MyNotes sample app—conflict resolution view controller, paging between versions.
To display information about each version, the version view controller gets information from its NSFileVersion and updates the user interface in the viewDidLoad method.
NSDateFormatter *dateFormatter = [[NSDateFormatter alloc] init];
[dateFormatter setDateStyle:NSDateFormatterShortStyle];
[dateFormatter setTimeStyle:NSDateFormatterShortStyle];
NSString *dateString =
[dateFormatter stringFromDate:
[self.fileVersion modificationDate]];
[self.versionLabel setText:[self.fileVersion localizedName]];
[self.versionDate setText:dateString];
[self.versionComputer setText:
[self.fileVersion localizedNameOfSavingComputer]];
When the user selects a version, the version view controller tells its delegate, the page view controller, which version was selected.
- (IBAction)selectVersionTouched:(id)sender
{
[self.delegate conflictVersionSelected:self.fileVersion];
}
The page view controller in turn tells the detail view controller which version was selected, and whether the selected version is the current, local version.
- (void)conflictVersionSelected:(NSFileVersion *)selectedVersion
{
BOOL isCurrentVersion =
(selectedVersion == self.currentVersion);
[self.delegate noteConflictResolved:selectedVersion
forCurrentVersion:isCurrentVersion];
}
The detail view controller will then take the appropriate actions to resolve the conflict, depending on whether the selected version is the current version, in the noteConflictResolve:forCurrentVersion: method. The method checks the isCurrentVersion parameter passed in; if the value is YES, the method removes the other versions of the file for the note URL, and then tells the remaining version that the conflict is resolved.
if (isCurrentVersion)
{
[NSFileVersion
removeOtherVersionsOfItemAtURL:myNoteDocument.fileURL
error:nil];
NSArray* conflictVersions =
[NSFileVersionunresolved ConflictVersionsOfItemAtURL:
myNoteDocument.fileURL];
for (NSFileVersion* fileVersion in conflictVersions)
{
fileVersion.resolved = YES;
}
}
If the selected version is not the current version, the method handles resolution slightly differently. It replaces the current version with the selected version, removes the other versions, and then indicates that the conflict has been resolved for the remaining version.
else
{
[selectedVersion replaceItemAtURL:myNoteDocument.fileURL
options:0
error:nil];
[NSFileVersion
removeOtherVersionsOfItemAtURL:myNoteDocument.fileURL
error:nil];
NSArray* conflictVersions =
[NSFileVersion unresolvedConflictVersionsOfItemAtURL:
myNoteDocument.fileURL];
for (NSFileVersion* fileVersion in conflictVersions)
{
fileVersion.resolved = YES;
}
}
After that is completed, the document will issue a notification that it has returned to a normal state, and editing will recommence when the documentStateChanged method receives and handles the notification (described earlier in the chapter, in “Detecting Conflicts in iCloud”).
Key-Value Store Syncing
iCloud also supports key-value store syncing. This is similar to storing information in an NSMutableDictionary or NSUserDefaults, where a key is associated with an object value for storage and retrieval. The difference with the iCloud key-value store is that the keys and values are synced automatically between devices. At the time of this writing, iCloud supports a total of 1MB of usage for the key-value store for an app, and up to 1,024 key-value pairs, so the key-value storage mechanism is appropriate only for small amounts of information.
The sample app utilizes the iCloud key-value store to keep track of the last edited note. The detail view controller will store the name of the last updated note when the configureView method is called.
NSUbiquitousKeyValueStore *iCloudKeyValueStore =
[NSUbiquitousKeyValueStore defaultStore];
NSString *noteName = [[[selfmyNoteURL] lastPathComponent]
stringByDeletingPathExtension];
[iCloudKeyValueStore setString:noteName
forKey:kICFLastUpdatedNoteKey];
[iCloudKeyValueStore synchronize];
The method gets a reference to the iCloud key-value store, which is an instance of NSUbiquitousKeyValueStore. It sets the note name for key kICFLastUpdatedNoteKey, and then calls synchronize to ensure that the data is synced immediately.
The master view controller registers for the NSUbiquitousKeyValueStoreDidChangeExternallyNotification notification in the viewDidLoad method.
NSNotificationCenter *notifCenter =
[NSNotificationCenter defaultCenter];
...
NSString *keyValueStoreUpdated =
NSUbiquitousKeyValueStoreDidChangeExternallyNotification;
[notifCenter addObserver:self
selector:@selector(updateLastUpdatedNote:)
name: keyValueStoreUpdated
object:nil];
When a notification is received that the key-value store was updated, the updateLastUpdatedNote: method is called.
- (void)updateLastUpdatedNote:(NSNotification *)notification
{
NSUbiquitousKeyValueStore *iCloudKeyValueStore =
[NSUbiquitousKeyValueStore defaultStore];
self.lastUpdatedNote =
[iCloudKeyValueStore stringForKey:kICFLastUpdatedNoteKey];
[self.tableView reloadData];
}
The method gets a reference to the iCloud key-value store, updates a property with the last updated note from the store, and reloads the table view. When the table cells are displayed in the tableView:cellForRowAtIndexPath: method, logic there adds a star next to the last updated note.
if ([self.lastUpdatedNote isEqualToString:noteName])
{
NSString *lastUpdatedCellTitle =
[NSString stringWithFormat:@"[ss] %@",noteName];
[cell.textLabel setText:lastUpdatedCellTitle];
}
else
{
[cell.textLabel setText:noteName];
}
Try updating a note on one device, with the list of notes displayed on a second device. Notice that the star appears next to the edited note in a few seconds on the second device.
Summary
This chapter explained how to sync application data between devices running the same app using iCloud. It demonstrated how to set up an app to be able to use iCloud, including establishing entitlements, setup required in the Provisioning Portal, and setup required in the app. The chapter described how to create a subclass of UIDocument, and how to set up autosaving for a document. Next, this chapter explained how to list and display documents stored in iCloud and how to detect conflicts. Examining conflict information and resolving document conflicts was demonstrated as well. Lastly, the chapter showed how to use the iCloud key-value store to sync application data.
Exercises
1. The note document stores only a single string of information. Enhance the note to include and display a created date and time, a last updated date and time, and an image.
2. Currently, the conflict resolution approach only uses file metadata to help the user decide which version should be kept. Extend the solution to download and display the actual text for each version.
All materials on the site are licensed Creative Commons Attribution-Sharealike 3.0 Unported CC BY-SA 3.0 & GNU Free Documentation License (GFDL)
If you are the copyright holder of any material contained on our site and intend to remove it, please contact our site administrator for approval.
© 2016-2026 All site design rights belong to S.Y.A.