Learning Core Data for iOS (2014)
1. Your First Core Data Application
If you can’t explain it simply, you don’t understand it well enough.
Albert Einstein
Kinesthetic learning, or learning by doing, is one of the best ways to absorb and retain information. The topic of Core Data has been a great hurdle for many seasoned programmers, so it’s about time a book with a hands-on approach to Core Data was written. In order to avoid side tracking into deep topics too early, this chapter has many pointers to later chapters. First things first: It will give you a Core Data essentials primer, then dive right in and show how to add Core Data to the sample application. The sample application will be expanded over the course of this book as increasingly advanced topics are introduced.
What Is Core Data?
Core Data is a framework that enables you to work with your data as objects, regardless of how they’re persisted to disk. This is useful to you as an Objective-C programmer, because you should be comfortable using objects in code already. To provide data objects, known as managed objects, Core Data sits between your application and a persistent store, which is the generic term given to a data file such as an SQLite database, XML file (which can’t be used as a persistent store on iOS), or Binary (atomic) store. These files are called “persistent” because they can survive the underlying hardware being reset. Another (oddly named) persistent store option is the In-Memory store. Although it isn’t really “persistent,” an In-Memory store allows you to leverage all the functional benefits of Core Data to manage your data, such as change management and validation, not to mention performance.
To map data to a persistent store from managed objects, Core Data uses a managed object model, where you configure your application’s data structure using an object graph. You can think of an object graph as a collection of cookie cutters used to make managed objects from. The “object” in object graph refers to something called an entity, which is used as a cookie cutter to make a customized managed object. Once you have managed objects, you’re then free to manipulate them natively in Objective-C, without having to write any SQL code (assuming you’re using SQLite as the persistent store, which is the most common scenario). Core Data will transparently map those objects back to a persistent store when you save to disk.
A managed object holds a copy of data from a persistent store. If you use a database as a persistent store, then a managed object might represent data from a table row in that database. If you use an XML file as a persistent store (Mac only), then a managed object would represent data found within certain data elements. A managed object can be an instance of NSManagedObject; however, it’s usually an instance of a subclass of NSManagedObject. This is discussed in detail in Chapter 2, “Managed Object Model Basics.”
All managed objects exist in a managed object context. A managed object context exists in high-speed volatile memory, also known as RAM. One reason a managed object context is required is the overhead involved with transferring data to and from disk. Disk is much slower than RAM, so you don’t want to use it more than necessary. Having a managed object context allows access to data that has been previously retrieved from disk to be very fast. The downside, however, is that you need to call save: on the managed object context periodically to write changes back to disk. The managed object context exists also to track changes to its objects in order to provide full undo and redo support.
Note
“If you can’t explain it simply, you don’t understand it well enough” is a famous quote from the late great Albert Einstein. Each chapter of this book is headed by a famous Albert Einstein quote. Core Data can be a difficult topic to learn; however, that doesn’t mean it cannot be broken down and explained in understandable chunks. Whenever I write technical tutorials or documentation, I remember this quote and strive for easy-to-read, highly informative material.
To help visualize how the main pieces of Core Data fit together, examine Figure 1.1.
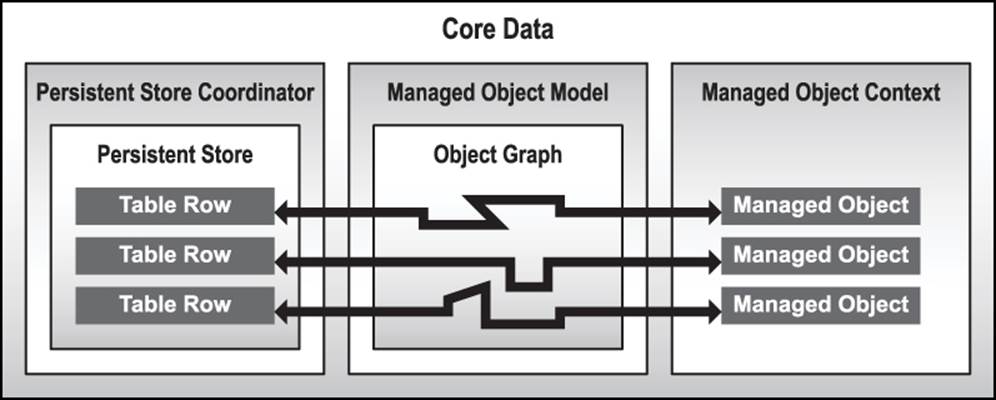
Figure 1.1 Core Data overview
Persistent Store Coordinator
On the left of Figure 1.1, a persistent store coordinator is shown containing a persistent store with table rows. When you set up a persistent store coordinator, you’ll commonly choose an SQLite database as the persistent store. Other options for the persistent store are Binary, XML, and In-Memory stores. The thing to note about Binary and XML stores is that they are atomic. This means that even if you only want to change a small amount of data, you still have to write out the whole file to disk when you save. Of course, the same issue applies when reading an atomic store into memory in the first place. This can become problematic if you have a lot of data because it consumes valuable memory.
An SQLite database, on the other hand, is updated incrementally as change logs, also known as transaction logs, are committed. As a result, the SQLite database memory footprint is comparably very small. For these reasons, you’ll typically choose an SQLite database, especially when integrating Core Data with iCloud.
Note
Persistent stores should only ever be created by Core Data. You should not configure Core Data to use a database it did not originally create. If you need to use existing data, you should import it. This topic is covered in Chapter 8, “Preloading Data.”
A persistent store coordinator can have multiple persistent stores. One situation where this may be appropriate is when Core Data is integrated with iCloud. By putting data that doesn’t belong in iCloud into one store, and data that does in another, you will save network bandwidth and iCloud storage space. Even though you would then have two persistent stores, it does not mean that you need two separate object graphs. Using Core Data model configurations allows you to use separate stores, yet still have the one object graph. When you set up a Core Data model configuration, you can select what parts of the object graph belong in what persistent store. If you do use separate persistent stores, you’ll need to ensure there’s no requirement for a relationship between data in each store. Core Data configurations are discussed in Chapter 15, “Taming iCloud.”
A persistent store is created from an instance of NSPersistentStore and a persistent store coordinator is created from an instance of NSPersistentStoreCoordinator.
Managed Object Model
In the middle of Figure 1.1, a managed object model is shown sitting between a persistent store coordinator and a managed object context. As its name suggests, a managed object model is the model or graphical representation of a data structure. It forms the basis on which managed objects are produced. This is similar to a database schema and is also referred to as an object graph. To create one, you’ll use Xcode to configure entities and the relationships between them. An entity is similar to a table schema in a database. Entities don’t contain data; they only dictate the properties that managed objects that are based on them will have. They’re cookie cutters! Just as a database table has fields, similarly an entity has attributes. An attribute can have one of several data types, such as integer, string, or date. Chapter 2 and Chapter 4, “Managed Object Model Expansion,” cover these topics in more detail.
A managed object model is created from an instance of NSManagedObjectModel.
Managed Object Context
On the right of Figure 1.1, a managed object context is shown with managed objects inside. A managed object context manages the lifecycle of objects within and provides powerful features such as faulting, change tracking, and validation. Faulting simply means that when you fetch data from a persistent store, only the parts you need are retrieved. Faulting is covered further in Chapter 10, “Performance.” Change tracking is used for undo and redo support. Validation is the enforcement of rules set in the managed object model. For example, a minimum or maximum value rule can be enforced at an attribute level on an entity. Validation is discussed in Chapter 2.
Much like you can have multiple persistent stores, you may also have more than one managed object context. Typically you would use multiple contexts for background processing, such as saving to disk or importing data. When you call save: on a foreground context, you may notice user interface lag, especially when there are a lot of changes. An easy way to get around this issue is to simply call save: only when the home button is pressed and the application enters the background. Another more complicated yet flexible way is to use two managed object contexts. Remember that a managed object context is an area in high-speed memory. Well, you can actually configure a managed object context to save to another managed object context. Once you save a foreground context to a background context, you may then save the background context to disk asynchronously. This staged approach ensures the writes to disk never interfere with the user interface responsiveness.
The ability to configure a parent and child context hierarchy has been available since iOS 5. A child context treats its parent as a persistent store, when really the parent is another context that exists to process heavy workloads, such as saving in the background. This is discussed in further detail in Chapter 11, “Background Processing.”
A managed object context is created from an instance of NSManagedObjectContext.
When to Use Core Data
Once your application outgrows trivial “settings” storage, such as NSUserDefaults and property lists, you’re going to run into memory usage issues. The solution is to use a database either directly or instead indirectly with Core Data. If you choose Core Data, you’ll save time otherwise spent coding a database interface. You’ll also enjoy big performance gains, as well as some functional benefits such as undo and validation. The time you would have spent developing, testing, and generally speaking “reinventing the wheel,” you’ll free up to focus on more important areas of your application.
Now you might be thinking, “I just want to save lots of stuff to disk, so why does it have to be so complicated?” Well, it’s not that difficult once a few key points are understood. Sure, you could write your own database interfaces and they would probably work great for a while. What happens, though, when your requirements change or you want to add, say, data synchronization between devices? How are your skills at building multithreaded data-import routines that don’t impact the user interface? Would your code also support undo and validation yet still be fast and memory efficient on an old iPhone?
The good news for you is that all the hard work has already been done and is wrapped up in the tried and tested Core Data Framework. Even if your application’s data requirements are minimal, it’s still worth using Core Data to ensure your application is as scalable as possible without compromising performance.
Once you start using Core Data, you’ll appreciate how robust and optimized it really is. The millions of people worldwide using Core Data applications every day has led to a mature feature set with performance to match. In short, you’ll save more time learning Core Data than throwing it in the too-hard basket and writing your own database interfaces. You’ll also benefit from loads of additional functionality for free.
Note
Before you continue, you should have at least Xcode 5 installed on your Mac. The code used in this book is targeted at iOS 7, so it won’t work in lower versions of Xcode. It is also recommended that you become a member of the iOS Developer Program, so you can run the sample application on your device as required. Go to http://developer.apple.com for further information on becoming a member.
Introducing Grocery Dude
Grocery Dude is the sample iPhone application you’ll create over the course of this book. As the features and best practices of Core Data are introduced, you can apply what you’ve learned to Grocery Dude. By the end of the book, you’ll have created a fast and fully functional Core Data application that integrates seamlessly with iCloud. If you would like to see the end result upfront, head over to the App Store and download Grocery Dude now. Note that Grocery Dude is written only for iPhone. This is because Core Data doesn’t care what size screen you display data on; the concepts are the same. Without further ado, it’s time to begin!
Have you ever stood in front of the fridge, pantry, cupboard, or some other location at home wondering what you’re forgetting to put on your shopping list? Then, when you get to the store, you can’t find something because you have no idea what aisle it’s in? To top it off, after zigzagging all the way from aisle 8 (and finally finding what you’re looking for in aisle 2), you discover the next item you need is back in aisle 8!
Here’s what Grocery Dude will do for you:
![]() Remind you what you might need by sorting potential items by their storage location in your house.
Remind you what you might need by sorting potential items by their storage location in your house.
![]() Help you locate items at the grocery store by showing what aisle they’re in.
Help you locate items at the grocery store by showing what aisle they’re in.
![]() Group your list by aisle so you only need to visit each aisle once, and in order.
Group your list by aisle so you only need to visit each aisle once, and in order.
![]() Sync between your devices with iCloud.
Sync between your devices with iCloud.
![]() Help you learn Core Data!
Help you learn Core Data!
Note
Appendix A, “Preparing Grocery Dude for Chapter 1,” shows the steps required to create the master project “Grocery Dude” from scratch. You may run through those steps manually or alternatively download the starting point project fromhttp://www.timroadley.com/LearningCoreData/GroceryDude-AfterAppendixA.zip. Once you have downloaded the project, you should open it in Xcode 5 or above.
Adding Core Data to an Existing Application
When you create an iOS Application project in Xcode, you can choose from various starting-point templates. Using Core Data in your project is as easy as ticking the Use Core Data check box during creation of a Master-Detail, Utility Application, or Empty Application template-based project. Adding Core Data manually is more educational, so the “Grocery Dude” project is created based on the Single View Application template, which doesn’t include Core Data. To use the Core Data Framework, you’ll need to link it to the project.
Update Grocery Dude as follows to link to the Core Data Framework:
1. Select the Grocery Dude Target, as shown in Figure 1.2.
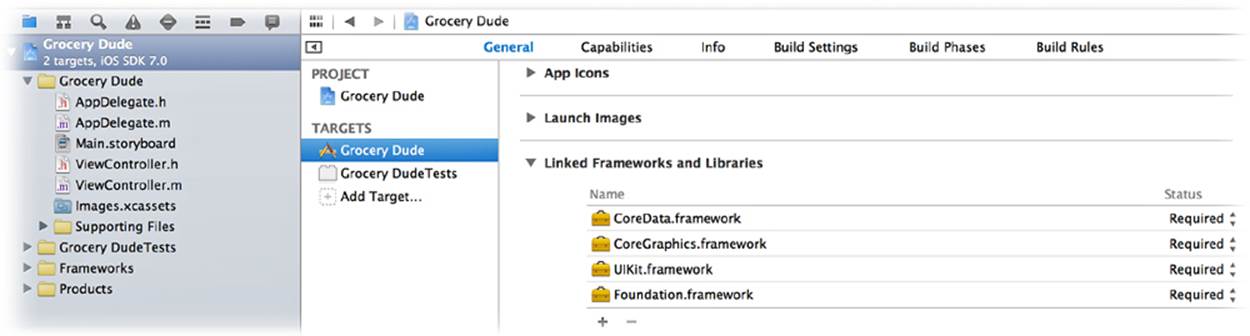
Figure 1.2 Linking the Core Data Framework
2. Click the + found in the Linked Frameworks and Libraries section of the General tab and then link to the CoreData.framework, as shown in Figure 1.2.
Introducing Core Data Helper
If you’ve ever examined the built-in Core Data–enabled templates, you may have noticed a lot of Core Data setup is done in the application delegate. So that you may apply the approach used in this book to your own projects, Core Data will be set up using a helper class. This keeps the Core Data components modular and portable. The application delegate will be used to lazily create an instance of the CoreDataHelper class. An instance of this class will be used to do the following:
![]() Initialize a managed object model
Initialize a managed object model
![]() Initialize a persistent store coordinator with a persistent store based on the managed object model
Initialize a persistent store coordinator with a persistent store based on the managed object model
![]() Initialize a managed object context based on the persistent store coordinator
Initialize a managed object context based on the persistent store coordinator
Update Grocery Dude as follows to create the CoreDataHelper class in a new Xcode group:
1. Right-click the Grocery Dude group in Xcode and then create a new group called Generic Core Data Classes, as shown in Figure 1.3.
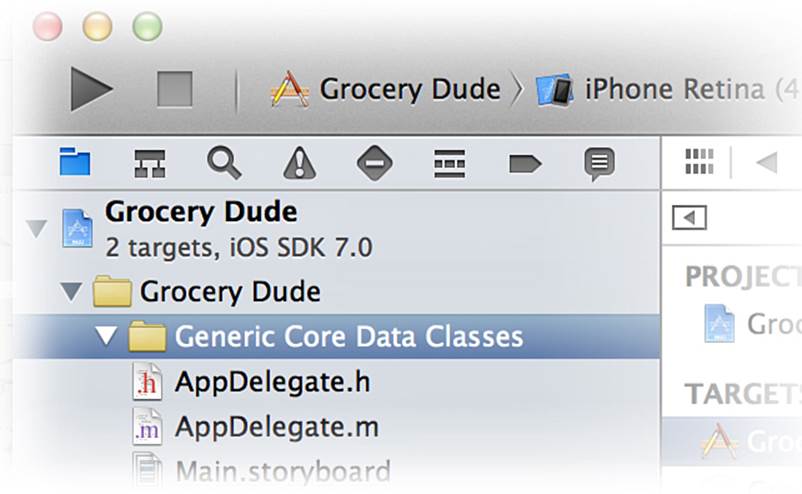
Figure 1.3 Xcode group for generic Core Data classes
2. Select the Generic Core Data Classes group.
3. Click File > New > File....
4. Create a new iOS > Cocoa Touch > Objective-C class and then click Next.
5. Set Subclass of to NSObject and Class name to CoreDataHelper and then click Next.
6. Ensure the Grocery Dude target is ticked and then create the class in the Grocery Dude project directory.
Listing 1.1 shows new code intended for the CoreDataHelper header file.
Listing 1.1 CoreDataHelper.h
#import <Foundation/Foundation.h>
#import <CoreData/CoreData.h>
@interface CoreDataHelper :NSObject
@property (nonatomic, readonly) NSManagedObjectContext *context;
@property (nonatomic, readonly) NSManagedObjectModel *model;
@property (nonatomic, readonly) NSPersistentStoreCoordinator *coordinator;
@property (nonatomic, readonly) NSPersistentStore *store;
- (void)setupCoreData;
- (void)saveContext;
@end
As an Objective-C programmer, you should be familiar with the purpose of header (.h) files. CoreDataHelper.h is used to declare properties for the context, model, coordinator and the store within it. The setupCoreData method will be called once an instance of CoreDataHelper has been created in the application delegate. The saveContext method may be called whenever you would like to save changes from the managed object context to the persistent store. This method can cause interface lag if there are a lot of changes to be written to disk. It is recommended that it only be called from the applicationDidEnterBackground and applicationWillTerminate methods of AppDelegate.m—at least until background save is added in Chapter 11.
Update Grocery Dude as follows to configure the CoreDataHelper header:
1. Replace all code in CoreDataHelper.h with the code from Listing 1.1. If you select CoreDataHelper.m, Xcode will warn that you haven’t implemented the setupCoreData and saveContext methods, which is okay for now.
Core Data Helper Implementation
The helper class will start out with four main sections. These sections are FILES, PATHS, SETUP, and SAVING. For easy navigation and readability, these areas are separated by pragma marks. As shown in Figure 1.4, the pragma mark feature of Xcode allows you to logically organize your code and automatically provides a nice menu for you to navigate with.
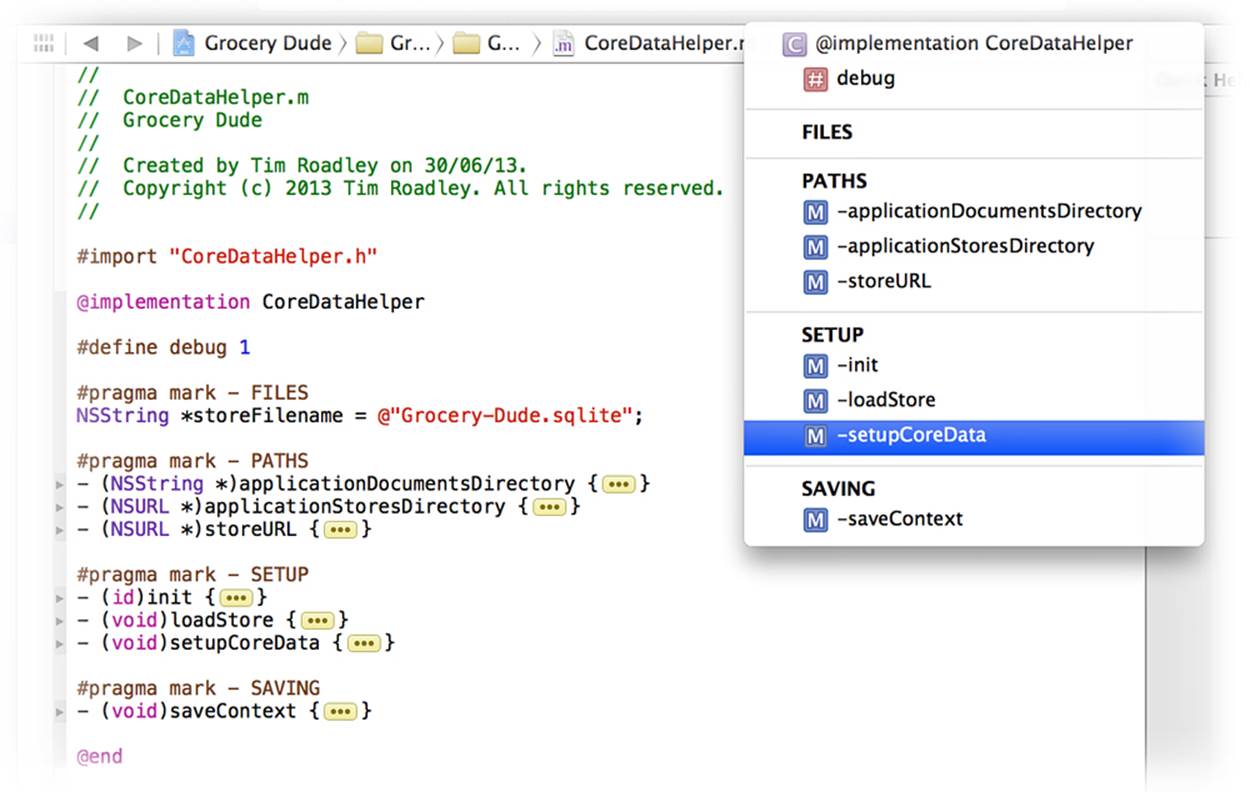
Figure 1.4 Pragma mark generated menu
Files
The FILES section of CoreDataHelper.m starts out with a persistent store filename stored in an NSString. When additional persistent stores are added later, this is where you’ll set their filenames. Listing 1.2 shows the code involved along with a new #define statement, which will be used in most of the classes in Grocery Dude to assist with debugging. When debug is set to 1, debug logging will be enabled for that class. Most NSLog commands will be wrapped in an if (debug == 1) statement, which will only work when debugging is enabled.
Listing 1.2 CoreDataHelper.m: FILES
#define debug 1
#pragma mark - FILES
NSString *storeFilename = @"Grocery-Dude.sqlite";
Update Grocery Dude as follows to add the FILES section:
1. Add the code from Listing 1.2 to the bottom of CoreDataHelper.m before @end.
Paths
To persist anything to disk, Core Data needs to know where in the file system persistent store files should be located. Three separate methods help provide this information. Listing 1.3 shows the first method, which is called applicationDocumentsDirectory and returns an NSString representing the path to the application’s documents directory. You’ll also notice the first use of an if (debug==1) statement wrapping a line of code that shows what method is running. This NSLog statement is useful for seeing the order of execution of methods in the application, which is great for debugging.
Listing 1.3 CoreDataHelper.m: PATHS
#pragma mark - PATHS
- (NSString *)applicationDocumentsDirectory {
if (debug==1) {
NSLog(@"Running %@ '%@'", self.class,NSStringFromSelector(_cmd));
}
return [NSSearchPathForDirectoriesInDomains(NSDocumentDirectory, NSUserDomainMask,YES) lastObject];
}
Update Grocery Dude as follows to add the PATHS section:
1. Add the code from Listing 1.3 to the bottom of CoreDataHelper.m before @end.
The next method, applicationStoresDirectory, appends a directory called Stores to the application’s documents directory and then returns it in an NSURL. If the Stores directory doesn’t exist, it is created as shown in Listing 1.4.
Listing 1.4 CoreDataHelper.m: applicationStoresDirectory
- (NSURL *)applicationStoresDirectory {
if (debug==1) {
NSLog(@"Running %@ '%@'", self.class, NSStringFromSelector(_cmd));
}
NSURL *storesDirectory =
[[NSURL fileURLWithPath:[self applicationDocumentsDirectory]]
URLByAppendingPathComponent:@"Stores"];
NSFileManager *fileManager = [NSFileManager defaultManager];
if (![fileManager fileExistsAtPath:[storesDirectory path]]) {
NSError *error = nil;
if ([fileManager createDirectoryAtURL:storesDirectory
withIntermediateDirectories:YES
attributes:nil
error:&error]) {
if (debug==1) {
NSLog(@"Successfully created Stores directory");}
}
else {NSLog(@"FAILED to create Stores directory: %@", error);}
}
return storesDirectory;
}
Update Grocery Dude as follows to add to the PATHS section:
1. Add the code from Listing 1.4 to the bottom of CoreDataHelper.m before @end.
The last method, which is shown in Listing 1.5, simply appends the persistent store filename to the store’s directory path. The end result is a full path to the persistent store file.
Listing 1.5 CoreDataHelper.m: storeURL
- (NSURL *)storeURL {
if (debug==1) {
NSLog(@"Running %@ '%@'", self.class, NSStringFromSelector(_cmd));
}
return [[self applicationStoresDirectory]
URLByAppendingPathComponent:storeFilename];
}
Update Grocery Dude as follows to add to the PATHS section:
1. Add the code from Listing 1.5 to the bottom of CoreDataHelper.m before @end.
Setup
With the files and paths ready to go, it’s time to implement the three methods responsible for the initial setup of Core Data. Listing 1.6 shows the first method, called init, which runs automatically when an instance of CoreDataHelper is created.
Listing 1.6 CoreDataHelper.m: SETUP
#pragma mark - SETUP
- (id)init {
if (debug==1) {
NSLog(@"Running %@ '%@'", self.class, NSStringFromSelector(_cmd));
}
self = [super init];
if (!self) {return nil;}
_model = [NSManagedObjectModel mergedModelFromBundles:nil];
_coordinator = [[NSPersistentStoreCoordinator alloc]
initWithManagedObjectModel:_model];
_context = [[NSManagedObjectContext alloc]
initWithConcurrencyType:NSMainQueueConcurrencyType];
[_context setPersistentStoreCoordinator:_coordinator];
return self;
}
The _model instance variable points to a managed object model. The managed object model is initiated from all available data model files (object graphs) found in the main bundle by calling mergedModelFromBundles and passing nil. At the moment, there are no model files in the project; however, one will be added in Chapter 2. It is possible to pass an NSArray of NSBundles here in case you wanted to merge multiple models. Usually you won’t need to worry about this.
Note
Another way to initialize a managed object model is to specify the exact model file to use. This takes over twice the amount of code, as opposed to just merging bundles. Here’s how you would manually specify the model to use: _model = [[NSManagedObjectModel alloc] initWithContentsOfURL: [[NSBundle mainBundle] URLForResource:@"Model" withExtension:@"momd"]];.
The _coordinator instance variable points to a persistent store coordinator. It is initialized based on the _model pointer to the managed object model that has just been created. So far, the persistent store coordinator has no persistent store files because they will be added later by thesetupCoreData method.
The _context instance variable points to a managed object context. It is initialized with a concurrency type that tells it to run on a “main thread” queue. You’ll need a context on the main thread whenever you have a data-driven user interface. Once the context has been initialized, it is configured to use the existing _coordinator pointer to the persistent store coordinator. Chapter 8 will demonstrate how to use multiple managed object contexts, including a background (private queue) concurrency type. For now, the main thread context will do.
Update Grocery Dude as follows to add the SETUP section:
1. Add the code from Listing 1.6 to the bottom of CoreDataHelper.m before @end.
The next method required in the SETUP section is loadStore and is shown in Listing 1.7.
Listing 1.7 CoreDataHelper.m: loadStore
- (void)loadStore {
if (debug==1) {
NSLog(@"Running %@ '%@'", self.class, NSStringFromSelector(_cmd));
}
if (_store) {return;} // Don't load store if it's already loaded
NSError *error = nil;
_store = [_coordinator addPersistentStoreWithType:NSSQLiteStoreType
configuration:nil
URL:[self storeURL]
options:nil error:&error];
if (!_store) {NSLog(@"Failed to add store. Error: %@", error);abort();}
else {if (debug==1) {NSLog(@"Successfully added store: %@", _store);}}
}
The loadStore method is straightforward. Once a check for an existing _store has been performed, a pointer to a nil NSError instance is created as error. This is then used when setting the _store instance variable to capture any errors that occur during setup. If _store is nil after an attempt to set it up fails, an error is logged to the console along with the content of the error.
When the SQLite persistent store is added via addPersistentStoreWithType, a pointer to the persistent store is held in _store. The storeURL of the persistent store is the one returned by the methods created previously.
Update Grocery Dude as follows to add to the SETUP section:
1. Add the code from Listing 1.7 to the bottom of CoreDataHelper.m before @end.
Finally, it’s time to create the setupCoreData method. With the other supporting methods in place, this is a simple task. Listing 1.8 shows the contents of this new method, which at this stage only calls loadStore. This method will be expanded later in the book as more functionality is added.
Listing 1.8 CoreDataHelper.m: setupCoreData
- (void)setupCoreData {
if (debug==1) {
NSLog(@"Running %@ '%@'", self.class, NSStringFromSelector(_cmd));
}
[self loadStore];
}
Update Grocery Dude as follows to add to the SETUP section:
1. Add the code from Listing 1.8 to the bottom of CoreDataHelper.m before @end.
Saving
The next puzzle piece is a method called whenever you would like to save changes from the _context to the _store. This is as easy as sending the context a save: message, as shown in Listing 1.9. This method will be placed in a new SAVING section.
Listing 1.9 CoreDataHelper.m: SAVING
#pragma mark - SAVING
- (void)saveContext {
if (debug==1) {
NSLog(@"Running %@ '%@'", self.class, NSStringFromSelector(_cmd));
}
if ([_context hasChanges]) {
NSError *error = nil;
if ([_context save:&error]) {
NSLog(@"_context SAVED changes to persistent store");
} else {
NSLog(@"Failed to save _context: %@", error);
}
} else {
NSLog(@"SKIPPED _context save, there are no changes!");
}
}
Update Grocery Dude as follows to add the SAVING section:
1. Add the code from Listing 1.9 to the bottom of CoreDataHelper.m before @end.
The Core Data Helper is now ready to go! To use it, a new property is needed in the application delegate header. The CoreDataHelper class also needs to be imported into the application delegate header, so it knows about this new class. The bold code shown in Listing 1.10 highlights the changes required to the application delegate header.
Listing 1.10 AppDelegate.h
#import <UIKit/UIKit.h>
#import "CoreDataHelper.h"
@interface AppDelegate : UIResponder <UIApplicationDelegate>
@property (strong, nonatomic) UIWindow *window;
@property (nonatomic, strong, readonly) CoreDataHelper *coreDataHelper;
@end
Update Grocery Dude as follows to add CoreDataHelper to the application delegate:
1. Replace all code in AppDelegate.h with the code from Listing 1.10.
The next step is to update the application delegate implementation with a small method called cdh, which returns a non-nil CoreDataHelper instance. In addition, a #define debug 1 statement needs to be added for debug purposes, as shown in Listing 1.11.
Listing 1.11 AppDelegate.m: cdh
#define debug 1
- (CoreDataHelper*)cdh {
if (debug==1) {
NSLog(@"Running %@ '%@'", self.class, NSStringFromSelector(_cmd));
}
if (!_coreDataHelper) {
_coreDataHelper = [CoreDataHelper new];
[_coreDataHelper setupCoreData];
}
return _coreDataHelper;
}
Update Grocery Dude as follows to add the cdh method to the application delegate:
1. Add the code from Listing 1.11 to AppDelegate.m on the line after @implementation AppDelegate.
The final step required is to ensure the context is saved each time the application enters the background or is terminated. This is an ideal time to save changes to disk because the user interface won’t lag during save as it is hidden. Listing 1.12 shows the code involved in saving the context.
Listing 1.12 AppDelegate.m: applicationDidEnterBackground
- (void)applicationDidEnterBackground:(UIApplication *)application {
[[self cdh] saveContext];
}
- (void)applicationWillTerminate:(UIApplication *)application {
[[self cdh] saveContext];
}
Update Grocery Dude as follows to ensure the context is saved when the application enters the background or is terminated:
1. Add [[self cdh] saveContext]; to the bottom of the applicationDidEnterBackground method in AppDelegate.m.
2. Add [[self cdh] saveContext]; to the bottom of the applicationWillTerminate method in AppDelegate.m.
Run Grocery Dude on the iOS Simulator and examine the debug log window as you press the home button (Shift+![]() +H or Hardware > Home). The log is initially blank because Core Data is set up on demand using the cdh method of the application delegate. The first time Core Data is used is during the save: that’s triggered when the application enters the background. As the application grows, the cdh method will be used earlier. Figure 1.5 shows the order of method execution once you press the home button.
+H or Hardware > Home). The log is initially blank because Core Data is set up on demand using the cdh method of the application delegate. The first time Core Data is used is during the save: that’s triggered when the application enters the background. As the application grows, the cdh method will be used earlier. Figure 1.5 shows the order of method execution once you press the home button.
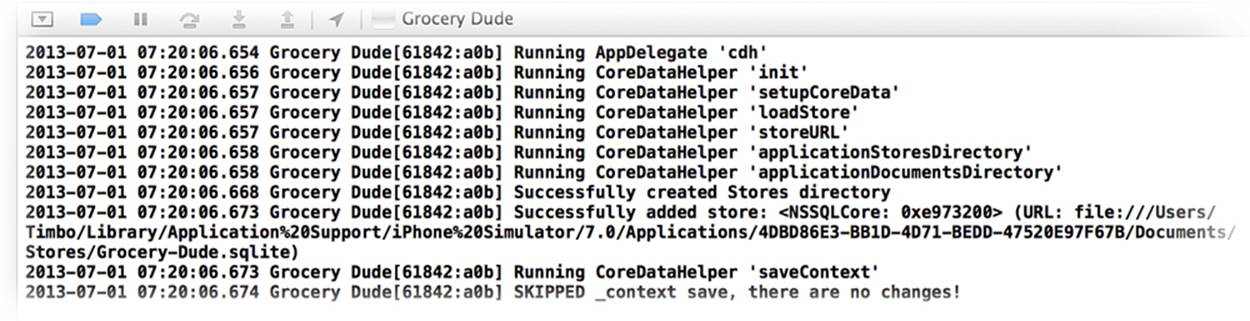
Figure 1.5 The debug log window showing order of execution
Summary
You’ve now been introduced to the key components of Core Data. The sample application Grocery Dude has been updated to include an SQLite persistent store, persistent store coordinator, managed object model, and managed object context. The data model has not been configured, so the application isn’t very interesting yet. Chapter 2 is where the real fun begins with the introduction of data models. If you’re still unclear on the role some parts of Core Data play, don’t worry too much at this stage. As you come to use each component more, it should become easier to understand how they fit together.
Exercises
Why not build on what you’ve learned by experimenting?
1. Add the following code to the top of each method in the application delegate to assist with debugging:
if (debug==1) {
NSLog(@"Running %@ '%@'", self.class, NSStringFromSelector(_cmd));
}
2. Examine the console log to compare the different locations persistent store files are saved to when running the application on a device versus running on the iOS Simulator. This is useful information when it comes time to open the persistent store for troubleshooting.
3. Change the persistent store type in the loadStore method of CoreDataHelper.m from NSSQLStoreType to NSXMLStoreType and try running the application. You won’t be able to run the application because this store type is not available on iOS.