iOS 6 Application Development For Dummies (2013)
Part IV. The Model and Application Structure
In this part . . .
Now you begin to get down to the real work. You find out about Split View controllers and popovers (when building the iPad version of the storyboard file) and also add navigation to the application. You also add the application model, which provides both the data and the logic you need to create an application that delivers real value to the user. Finally, you finish the iPad and iPhone storyboard files so that you can see your basic application flow.
Chapter 11. The Trip Model
In This Chapter
![]() Recognizing the importance of models
Recognizing the importance of models
![]() Working with property lists
Working with property lists
![]() Starting the Trip class implementation
Starting the Trip class implementation
![]() Displaying variable content in the debugger
Displaying variable content in the debugger
It’s time to add some content to RoadTrip. As I explain in Chapter 4, the owner of RoadTrip’s data is the model, so I start this chapter with a look at the data you’ll need and how the model will manage it. Then I show you how to add a Trip class that will serve as the interface to the model. Finally, you see how to add the Destination class — which is one of the objects that will be used by the model but is hidden behind the Trip interface.
What’s in the Model
In the Model-View-Controller (MVC) design pattern that is the basis for all iPad and iPhone apps, the model owns the application content logic and data. Therefore, to design your model, the best place to start is with the application design I present in Chapter 4 and consider what will be displayed in the views.
In this first version of RoadTrip, the model needs to provide, for each destination, the following:
![]() The destination name
The destination name
![]() A background image for the destination
A background image for the destination
![]() The destination latitude and longitude, along with a title and subtitle to be displayed in the annotation on a map
The destination latitude and longitude, along with a title and subtitle to be displayed in the annotation on a map
![]() Events that the user might be interested in
Events that the user might be interested in
![]() The latitude and longitude, along with a title and subtitle of sights or places of interest to be displayed in the annotation on a map
The latitude and longitude, along with a title and subtitle of sights or places of interest to be displayed in the annotation on a map
![]() Weather information
Weather information
I’ve made the point (several times) that the model is about the data, so where does the data come from? The easy answer is . . . any place you’d like. Given the iOS model, however, you can take several approaches:
![]() Option 1: Download the data from a web service (or FTP site) and have the model control it in a file or have Core Data (an iOS object persistence mechanism outside the scope of this book) manage it.
Option 1: Download the data from a web service (or FTP site) and have the model control it in a file or have Core Data (an iOS object persistence mechanism outside the scope of this book) manage it.
![]() Option 2: Have a web service manage your data and get what you need as you need it.
Option 2: Have a web service manage your data and get what you need as you need it.
![]() Option 3: Include the data as an application resource.
Option 3: Include the data as an application resource.
![]() Option 4: Access the data on the web as an HTML page.
Option 4: Access the data on the web as an HTML page.
Although I really like Option 2 (and explain that in iOS Cloud Development For Dummies, it is beyond the scope of this book, so the Trip model uses both Options 3 and 4.
Although the preceding answers most of the model’s “Show me the data” responsibility, yet another question still has to be answered: How does the model know where the data is? The answer to that question lies in a very useful structure that’s used extensively by not only iOS but also applications: property lists (more commonly known as plists). The RoadTrip plist that you are about to create will have both data used by the Trip model object (Option 3) as well as the URLs for the data you download as HTML pages (Option 4).
Adding the Model Data
For situations in which you need to store relatively small amounts of persistent data — say, less than a few hundred kilobytes — a property list offers a uniform and convenient means of organizing, storing, and accessing the data.
Using property lists
A property list (or plist) is perfect for storing small amounts of data that consist primarily of strings and numbers. What adds to its appeal is the capability to easily read it into your program, use the data, and (although you won’t be doing it in the RoadTrip application) modify the data and then write the property list back out again (see the “Using plists to store data” sidebar, later in this chapter). That’s because iOS provides a small set of objects that have that behavior built right in.
Applications and other system software in OS X and iOS use property lists extensively. For example, the Mac OS X Finder stores file and directory attributes in a property list, and iOS uses them for user defaults. You also get a Property List editor with Xcode, which makes property list files easy to create and maintain in your own programs.
Figure 11-1 shows a property list that I show you how to build — one that contains the data necessary for the RoadTrip app.
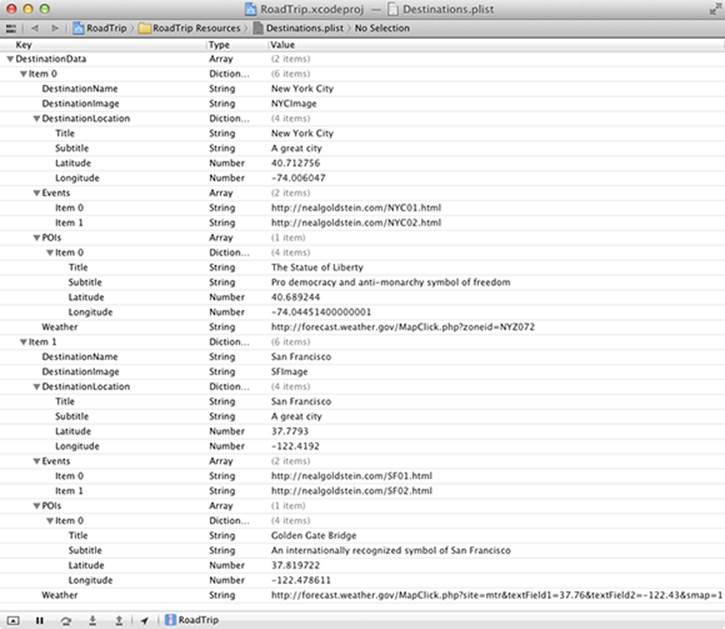
Figure 11-1: The RoadTrip plist.
After you figure out how to work with property lists, it’s actually easy, but like most things, getting there is half the fun.
Property lists hold serializable objects. A serializable object can convert itself into a stream of bits so that it can be stored in a file; it can then reconstitute itself into the object it once was when it’s read back in. (Yes, the phenomenon of “Beam me up, Scotty” does exist, at least on your computer.)
These objects, called property list objects, that you have to work with are as follows, and you find two types (which I explain in an upcoming paragraph):
Primitives:
![]() NSData and NSMutableData
NSData and NSMutableData
![]() NSDate
NSDate
![]() NSNumber
NSNumber
![]() NSString and NSMutableString
NSString and NSMutableString
Containers:
![]() NSArray and NSMutableArray
NSArray and NSMutableArray
![]() NSDictionary and NSMutableDictionary
NSDictionary and NSMutableDictionary
As previously shown in Figure 11-1, the RoadTrip plist is actually an NSDictionary. It has one entry — DestinationData, which is an array of dictionaries — and the data for each one of the destinations is held in a dictionary in that array (Item 0 and Item 1). If you are a little hazy on arrays and dictionaries, check out Objective-C For Dummies (written by Neal and published by Wiley), or the Apple documentation.
Now for that explanation of two kinds of property list objects, as follows:
![]() Primitives: The term primitives isn’t a reflection on how civilized these property list objects are; rather, it describes the simplest kind of object. They are what they are.
Primitives: The term primitives isn’t a reflection on how civilized these property list objects are; rather, it describes the simplest kind of object. They are what they are.
![]() Containers: Containers can hold primitives as well as other containers.
Containers: Containers can hold primitives as well as other containers.
One important feature of property list object containers (such as NSArray and NSDictionary), besides their ability to hold other objects, is that they both have a writeToFile: method that writes the property list to a file, and a corresponding initWithContentsOfFile:, which initializes the object with the contents of a file. So if I create an array or dictionary and fill it chock-full of objects of the property list type, all I have to do to save that array or dictionary to a file is tell it to go save itself — or create an array or dictionary and then tell it to initialize itself from a file.
Primitives NSString and NSData and their mutable counterparts also can write and read themselves to and from a file.
NSData and NSMutableData are wrappers (a wrapper is an object whose basic purpose is to turn something into an object) in which you can dump any kind of data and then have that data act as an object.
 The containers can contain other containers as well as the primitive types. Thus, you might have an array of dictionaries, and each dictionary might contain other arrays and dictionaries as well as the primitive types.
Adding a property list to your project
Given the versatility of property lists, you’re sure to turn to them time and time again. Follow these steps to incorporate a plist into your Xcode project:
1. In the Project navigator, select the RoadTrip Resources group, right-click the selection, and then choose New File from the menu that appears to get the New File dialog.
Or select the RoadTrip Resources group and choose File⇒New⇒New File from the main menu (or press ![]() +N).
+N).
2. In the left column of the New File dialog, select Resource under the iOS heading, select the Property List template in the top-right pane, and then click Next.
A Save sheet will appear.
3. Enter Destinations in the Save As field.
4. Click Create (and make sure that the Target field has the RoadTrip text box selected).
5. In the newly created Property List, right-click in the editor (the blank page) to show the context-sensitive menu; then choose Add Row, as shown in Figure 11-2.
You can also choose Editor⇒Add Item to add a row.
A new row appears, as shown in Figure 11-3.
6. Enter DestinationData in the Key field, replacing New Item (which should be highlighted).
7. Click in the up and down arrows in the Type field and then choose Array from the pop-up menu that appears, as shown in Figure 11-4.
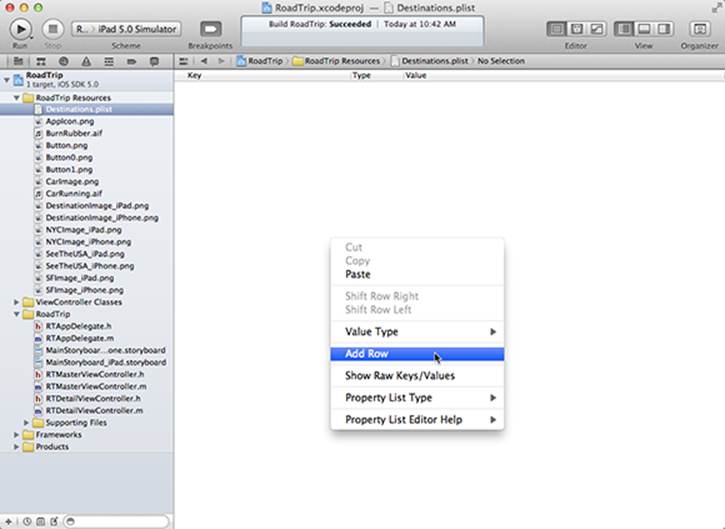
Figure 11-2: Add a row to the new plist file.
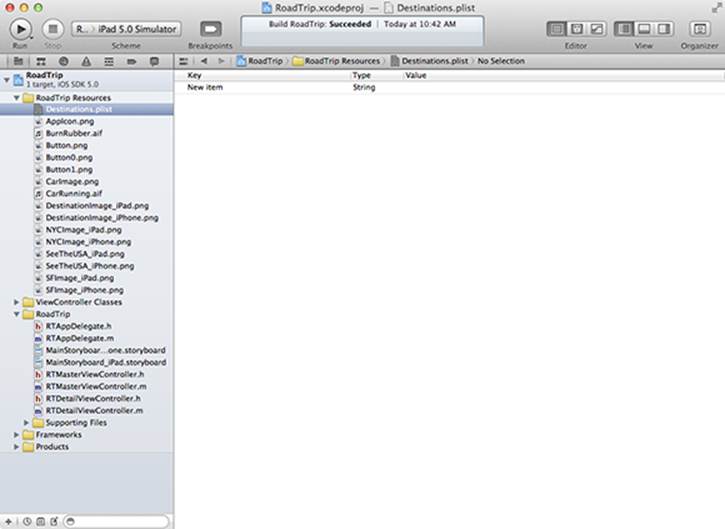
Figure 11-3: A new row.
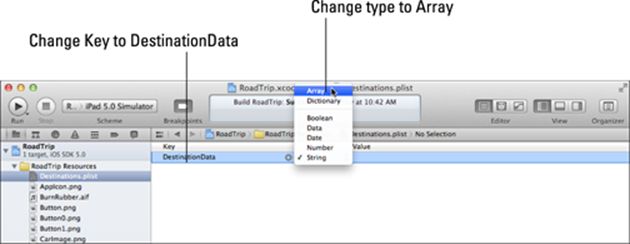
Figure 11-4: Change the New Item to Array.
8. Click the disclosure triangle in front of the DestinationData key so it is pointing down and click the + (plus) button, as shown in Figure 11-5. A new entry appears.
DestinationData is an array of dictionaries that will hold all your destination-specific information, with Item 0 being the first one.
In Figure 11-5, I’ve added the row, and you can see the + (plus) button in the new row.
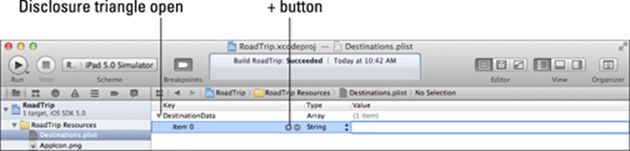
Figure 11-5: Add an entry.
9. Make Item 0 a dictionary by selecting Dictionary in the Type pop-up menu (in the same way you select Array in Step 7).
Your new entry is made into a dictionary, as shown in Figure 11-6.
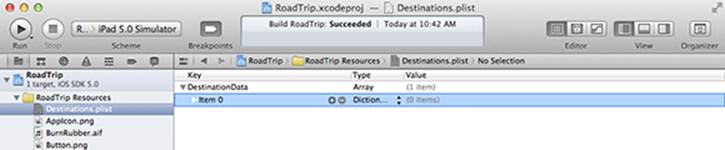
Figure 11-6: A dictionary entry.
10. Click the disclosure triangle in front of the Item 0 key so that it points down, and click the + (plus) button as you did in Step 7 to add a new entry to the dictionary.
You see a new entry under the dictionary like the one in Figure 11-7.
These disclosure triangles work the same way as those in the Finder and the Xcode editor. The Property List editor interprets what you want to add based on the triangle. So if the items are revealed (that is, the triangle is pointing down), the editor assumes that you want to add a sub item or child. If the sub items are not revealed (that is, the triangle is pointing sideways), the editor assumes that you want to add an item at that level (sibling). In this case, with the arrow pointing down, you add a new entry — a sub item — to the dictionary. If the triangle were pointing sideways, you would be entering a new entry under the root.
Only arrays and dictionaries have children.
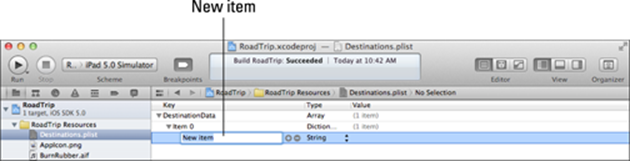
Figure 11-7: A new entry in the dictionary.
11. In the Key field of your (newest) entry, enter DestinationName, leave the Type as String, and then double-click (or tab to) the Value field and enter New York City, as shown in Figure 11-8.

Figure 11-8: A dictionary entry.
12. Click the + button in the row you just entered, and you get a new entry (a sibling of the previous row). In the Key field, enter DestinationImage, leave the Type as String, and then double-click (or tab to) the Value field and enter NYCImage.
13. Click the + button in the row you just entered, and you get a new entry (a sibling of the previous row). In the Key field, enter DestinationLocation and select Dictionary in the Type pop-up menu.
14. Click the disclosure triangle in front of the DestinationLocation key so it’s facing down, and click the + button.
You see a new entry under the dictionary, as you can see in Figure 11-9.
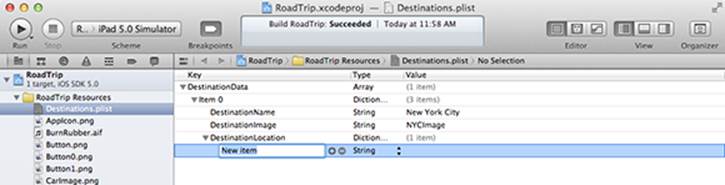
Figure 11-9: A new dictionary with another entry.
15. In the Key field, enter Title, and enter New York City in the Value field.
16. Add these three keys with their corresponding type and value:
|
Key |
Type |
Value |
|
Subtitle |
String |
A great city |
|
Latitude |
Number |
40.712756 |
|
Longitude |
Number |
-74.006047 |
When you’re done, your plist should look like Figure 11-10.

Figure 11-10: The DestinationLocation entries.
17. Click the disclosure triangle to hide the DestinationLocation dictionary entries, and add a new array named Events as a sibling of the DestinationLocation, as shown in Figure 11-11.
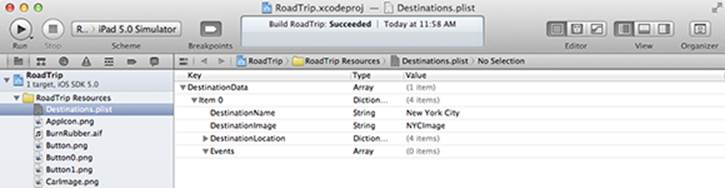
Figure 11-11: The Events dictionary entry is an array.
As explained previously, when the disclosure triangle is closed, you add a sibling entry.
18. Continue filling out the plist to make it match Figure 11-12 and Table 11-1.
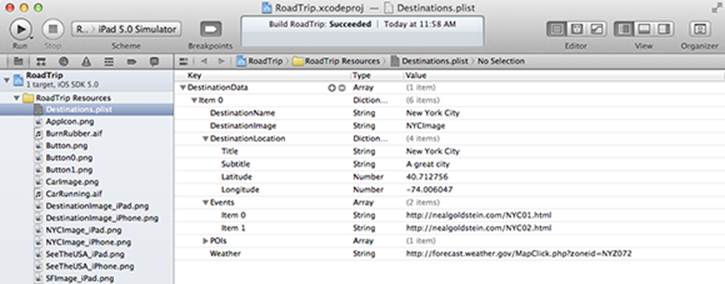
Figure 11-12: The New York City destination entry.
Table 11-1 New York City plist Keys and Values
|
Key |
Type |
Value |
|
DestinationName |
String |
New York City |
|
DestinationImage |
String |
NYCImage |
|
DestinationLocation |
Dictionary |
|
|
Title |
String |
New York City |
|
Subtitle |
String |
A great city |
|
Latitude |
Number |
40.712756 |
|
Longitude |
Number |
-74.006047 |
|
Events |
Array |
|
|
Item 0 |
String |
http://nealgoldstein.com/NYC01.html |
|
Item 1 |
String |
http://nealgoldstein.com/NYC02.html |
|
POIs |
Array |
|
|
Item 0 |
String |
|
|
Title |
String |
The Statue of Liberty |
|
Subtitle |
String |
Pro-democracy and anti-monarchy symbol of freedom |
|
Latitude |
Number |
40.689244 |
|
Longitude |
Number |
-74.044514 |
|
Weather |
String |
http://forecast.weather.gov/MapClick.php?zoneid=NYZ072 |
After you finish entering these items, close Item 0 under DestinationData and go through Steps 8 through 18 again to add the San Francisco entry using the keys and values in Table 11-2. If you want to save some typing, you can copy and paste Item 0 and then expand the new Item 1 and simply replace the values. (That’s what I did.)
Table 11-2 San Francisco plist Keys and Values
|
Key |
Type |
Value |
|
DestinationName |
String |
San Francisco |
|
DestinationImage |
String |
SFImage |
|
DestinationLocation |
Dictionary |
|
|
Title |
String |
San Francisco |
|
Subtitle |
String |
A great city |
|
Latitude |
Number |
37.7793 |
|
Longitude |
Number |
-122.4192 |
|
Events |
Array |
|
|
Item 0 |
String |
http://nealgoldstein.com/SF01.html |
|
Item 1 |
String |
http://nealgoldstein.com/SF02.html |
|
POIs |
Array |
|
|
Item 0 |
Dictionary |
|
|
Title |
String |
Golden Gate Bridge |
|
Subtitle |
String |
An internationally recognized symbol of San Francisco |
|
Latitude |
Number |
37.819722 |
|
Longitude |
Number |
-122.478611 |
|
Weather |
String |
http://forecast.weather.gov/MapClick.php?site=mtr&textField1=37.76&textField2=-122.43&smap=1 |
 Make sure that you spell the entries exactly as specified or else you won’t be able to access them using the examples in this book. Be especially careful of trailing spaces.
When you’re done, refer to Figure 11-1 to see how your plist should look.
You may wonder why you’re using this specific data (title and subtitle, for example). You’ll understand that when you explore maps in Chapter 17.
Now that you have the information needed by the model to locate the data it’s responsible for, it’s time to start adding some model classes, which I cover in the following section.
Using plists to store data
Although you won’t do it here, you can also modify a plist to store data. The only restriction of note is that you can’t modify a plist you’ve created in your bundle. You need to save it in the file system instead. For example:
NSArray *paths = NSSearchPathForDirectoriesInDomains
(NSDocumentDirectory, NSUserDomainMask, YES);
NSString *documentsDirectory = [paths objectAtIndex:0];
NSString *filePath = [documentsDirectory
stringByAppendingPathComponent:state];
[updatedDestinations writeToFile:filePath atomically:YES];
Adding the First Two Model Classes
The first model class I have you add is the Trip class. This will become the only model object visible to the view controllers. Although the Trip object will use other objects to carry out its responsibilities, hiding them behind the Trip object results in the loose coupling I explain in the next section and in “The importance of loose coupling” sidebar, later in this chapter.
Here is how to create your first two model classes:
1. Create a new group to keep your model classes in by going to the Project navigator, selecting the RoadTrip group (not the RoadTrip project, which is at the top), and right-clicking and choosing New Group from the menu that appears.
Or you can select the RoadTrip group and choose File⇒New⇒New Group from the main menu.
You’ll see a new group. (It looks like a folder.)
2. Name your new group Model Classes.
 To change a file’s group, select the file and drag it to the group you want it to occupy. The same goes for groups as well. (After all, they can go into other groups.)
3. In the Project navigator, select the Model Classes group, right-click the selection, and then choose New File from the menu that appears to open the New File dialog.
Or you can select the Model Classes group and choose File⇒New⇒New File from the main menu (or press ![]() +N).
+N).
You’ll see a dialog that enables you to select a file type.
4. In the left column of the dialog, select Cocoa Touch under the iOS heading. Next, select the Objective-C class template in the top-right pane; then click Next.
5. In the Class field, enter Trip. In the Subclass Of drop-down menu, select NSObject. Click Next.
A Save sheet will appear.
6. In the Save sheet, click Create.
7. Repeat Steps 2–6 to create the Destination class.
You’ll also be using the MapKit and CoreLocation frameworks, so add them as well:
1. In the Project navigator, select the RoadTrip Project at the top of the Project navigator area to display the Project editor.
2. In the Targets section, select RoadTrip.
3. On the Summary tab, scroll down to the Linked Frameworks and Libraries section.
4. Expand the Linked Frameworks and Libraries section, if it isn’t already expanded, by clicking the disclosure triangle.
5. Click the + button underneath the list of current project frameworks.
A list of frameworks appears.
6. Scroll down and select both MapKit.framework and CoreLocation.framework from the list of frameworks.
7. Click the + button.
You’ll see the framework added to the Linked Frameworks and Libraries section.
8. Close the Linked Frameworks and Libraries section.
9. In the Project navigator (don’t do this from the Linked Frameworks and Libraries section!), drag the MapKit.framework and CoreLocation.framework files to the Frameworks group.
If you make a mistake and want to delete a file, right-click and choose Delete from the menu that appears or select the file and press Delete. Whichever method you choose, you’ll see the dialog in Figure 11-13.
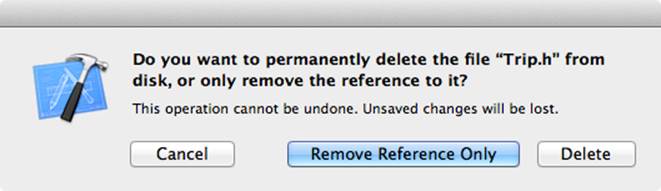
Figure 11-13: What would you like to do?
Remove Reference Only removes the file from the Project navigator but leaves it in your project folder on the disk. You can’t copy a new file with that name to that project until you delete that file from your project on the disk as well.
When you use the template to create a class, it adds the methods it thinks you may need. As a result, there will be some methods you won’t need and that appear to sit around doing nothing. You can delete them or just leave them in case you do need them. This is especially true of initialization methods because initialization in this app will be (mostly) taken care of by the storyboard.
Understanding the Trip Interface
Following is what the Trip interface will eventually become:
#import <Foundation/Foundation.h>
#import <MapKit/MapKit.h>
@class Annotation;
@interface Trip : NSObject
- (UIImage *) destinationImage;
- (NSString *) destinationName;
- (CLLocationCoordinate2D) destinationCoordinate;
- (id)initWithDestinationIndex:(int)destinationIndex;
- (NSString *)weather;
- (int)numberOfEvents;
- (NSString *)getEvent:(int)index;
- (NSArray *)createAnnotations;
- (NSString *)mapTitle;
- (void)addLocation:(NSString *)findLocation
completionHandler:(void (^)(Annotation *annotation,
NSError* error)) completion;
@end
As you can see, this code contains a lot of stuff, and I explain it as you add functionality to the Trip class along the way.
Earlier in the chapter, I mention that Trip is the model interface, and I say this because in many cases more than one class will be involved in delivering the necessary functionality of the model. For example, in this chapter you just added a Destination class that will be responsible for the information about your destination. An Events class that you will add in Chapter 16 will be responsible for managing the list of things going on at your destination, and an Annotation class (coming in Chapter 17) will provide the information you need to plot annotations (places to see) on a map. Hiding additional model objects behind the Trip object is known as loose coupling and is an important object-oriented design principle (see the nearby “The Importance of loose coupling” sidebar).
You might be tempted to have the view controllers create the model classes they’ll use (for example, a WeatherController would create the Weather object, and so on). The problem with that approach is that it makes the coupling between controller objects and the model much tighter.
One advantage of the Model-View-Controller (MVC) design pattern that I explain in Chapter 4 is that it allows you to assign (most) classes into one of three groups in your application and work on them individually. If each group has a well-defined interface, it encapsulates many of the kinds of changes that are often made so that they don’t affect the other groups. This little fact is especially true of the model and view controller relationship.
If the view controllers have minimal knowledge about the model, you can change the model objects with minor impact on the view controllers. So although the Trip class will provide this functionality to the various view controllers, as I said, it won’t be doing all the work on its own. What makes this possible is a well-defined interface, which I showed you at the start of this section. You create an interface between the model and the controllers by using a technique called composition, which is a useful way to create interfaces.
 I’m a big fan of composition because it’s another way to hide what’s really going on behind the curtain. It keeps the objects that use the composite object (in this case, Trip is the composite object) ignorant of the objects that the composite object uses and actually makes the components ignorant of each other, allowing you to switch components in and out at will.
So you’ll have Trip create the model objects, encapsulating the knowledge of what objects make up the model from the object that uses it. Trip hides all implementation knowledge from a view controller; it will know only about the Trip object. Again, this setup makes everything loosely coupled and makes your app more extensible and easier to change.
The importance of loose coupling
While millions of words have been spoken about how to design object-oriented applications, one of the most important is loose coupling. A loosely coupled system is one in which each of its components has little or no knowledge (or makes no use of the knowledge it may have) of other components. The term loose coupling refers to the degree of direct knowledge that one class has of another. This isn’t about encapsulation or one class’s knowledge of another class’s attributes or implementation, but rather knowledge of that other class itself.
Applying loose coupling means presenting a minimum interface to other objects. The client deals with the fewest number of objects as possible. So although you may want to break down a function into smaller pieces (for example, by using composition), you never want the client to know that. Clients are happy dealing with one object, even if that object then turns around and redistributes that work to other objects.
Implementing the Trip Class
In this chapter, I show you how to implement the Trip model functionality that will enable you to choose between multiple destinations (although you won’t be doing the choosing until Chapter 20). You also implement the Trip functionality that will be needed by the Master View controller (you add that in Chapter 12) — the name of the destination and its background image.
Start by adding the bolded code in Listing 11-1 to Trip.h.
Listing 11-1: Updating the Trip Interface
#import <Foundation/Foundation.h>
#import <MapKit/MapKit.h>
@interface Trip : NSObject
- (id)initWithDestinationIndex:(int)destinationIndex;
- (UIImage *) destinationImage;
- (NSString *) destinationName;
- (CLLocationCoordinate2D) destinationCoordinate;
@end
As you can see, the code in Listing 11-1 contains an initialization method. This method will enable the Trip object to set itself up for the selected destination. (Allow me to explain initialization and a few other things).
Initialization is the logical place to start, but first you need to add some instance variables and import the Destination header file if you’re going to use it (which you are, in the Trip implementation). Add the bolded code in Listing 11-2 to Trip.m.
Listing 11-2: Updating the Trip Implementation
#import “Trip.h”
#import “Destination.h”
@interface Trip () {
NSDictionary *destinationData;
Destination* destination;
}
@end
@implementation Trip
Now you can add the initWithDestinationIndex: method in Listing 11-3 to Trip.m.
Listing 11-3: Adding initWithDestinationIndex:
- (id)initWithDestinationIndex:(int)destinationIndex {
if ((self = [super init])) {
NSString *filePath = [[NSBundle mainBundle]
pathForResource:@”Destinations” ofType:@”plist”];
NSDictionary *destinations =
[NSDictionary dictionaryWithContentsOfFile:filePath];
NSArray *destinationsArray =
destinations[@”DestinationData”];
destinationData =
destinationsArray[destinationIndex];
destination = [[Destination alloc]
initWithDestinationIndex:destinationIndex];
}
return self;
}
Before I explain the logic in these listings, I want to explain initialization in general. (And yes, you’ll see compiler warnings, and you’ll be fixing them as you go along.)
Initializing objects
Initialization is the procedure that sets the instance variables of an object (including pointers to other objects) to a known initial state. Essentially, you need to initialize an object in order to assign initial values to these variables. Initialization isn’t required in every class in every app; if you can live with all the instance variables initialized to 0 and nil, you need do nothing. Trip, however, will need to create the objects it will be using, and you’ll do that during initialization.
An initialization method doesn’t have to include an argument for every instance variable, because some will become relevant only during the course of your object’s existence. You must make sure, however, that all the instance variables your object uses, including other objects that it needs to do its work, are in a state that enables your object to respond to the messages it receives.
You may think that the main job in initialization is to, well, initialize the variables in your objects (hence the name), but more is involved when you have a superclass and a subclass chain.
To see what I mean, start by looking at the initializer I use for the Trip class in Listing 11-3 (shown previously). By convention, initialization methods begin with the abbreviation init. (This is true, however, only for instance — as opposed to class — methods.) If the method takes no arguments, the method name is just init. If it takes arguments, labels for the arguments follow the init prefix. As you can see, the initializer in Listing 11-3 has a return type of id. You discover the reason for that in the next section.
Initialization involves these three steps:
1. Invoke the superclass init method.
2. Initialize instance variables.
3. Return self.
The following sections explain each step.
Invoking the superclass’s init method
Here is the type of statement you use to get the init method up and running:
self = [super init];
if (self) {
[super init] does nothing more than invoke the superclass init method. By convention, all initializers are required to assign self. self is the “hidden” variable accessible to methods in an object that points its instance variables to whatever object you get back from the superclass initializer, which explains self = [super init].
The if statement can be a little confusing to people. You may not get an object returned from the super class init method. If that’s the case, you don’t want to do any further initialization.
Although the scenario just described is possible, it isn’t common and won’t happen in this book (and in general). You might find it in classes that need certain resources to initialize themselves, and if they aren’t present, the object can’t be created.
There’s actually a lot to initialization that I don’t cover in this book, but you can find out more in Neal’s book Objective-C For Dummies, as well as in Apple’s Objective-C documentation.
Initializing instance variables
Initializing instance variables, including creating the objects you need, is what you probably thought initialization is about. Notice that you’re initializing your instance variable after your superclass’s initialization, which you can see in Listing 11-3 (shown previously). Waiting until afteryour superclass does its initialization gives you the opportunity to actually change something your superclass may have done during its initialization, but more importantly, it allows you to perform initialization knowing that what you have inherited is initialized and ready to be used.
In your initWithDestinationIndex: method, you start by finding the plist that holds the Trip data or location of the data you need:
NSString *filePath = [[NSBundle mainBundle]
pathForResource:@”Destinations” ofType:@”plist”];
Next, you create a dictionary to hold the data. You use the method initWithContentsOfFile:, which does all the heavy lifting for you. It reads in the Destinations plist file and creates a dictionary for you. The plist, as I said previously, is really a dictionary with a single entry with the keyDestinationData. The dictionaryWithContentsOfFile: method creates a dictionary from the plist (and objects and keys for all of its entries) with dictionary keys that are the keys you specified in the plist.
This method also allocates and initializes all the elements in the dictionary (including other dictionaries), so when it’s done, you’re ready to roll:
NSDictionary *destinations =
[NSDictionary dictionaryWithContentsOfFile:filePath];
 NSDictionary, NSMutableDictionary, NSArray, and NSMutableArray all have the methods initWithContentsOfFile: and writeToFile:: that read themselves in from a file and write themselves out to a file, respectively. This is one of the capabilities that makes property list objects so useful.
Property list containers — and only property list containers (and NSString and NSData) — can read themselves in from and write themselves out to a file. The other property list objects can only store themselves, without any effort on your part, as part of a file.
Your next step in initializing instance variables is to use the destinationIndex to get the right element in the array of dictionaries in the DestinationData entry based on the destination chosen by the user. (You’ll specify that in the RTAppDelegate in Listing 11-11, later in this chapter, where you’ll allocate the Trip object.)
NSArray *destinationsArray =
destinations[@”DestinationData”];
destinationData =
destinationsArray[destinationIndex];
Finally, you allocate and initialize the Destination object:
destination = [[Destination alloc]
initWithDestinationIndex:destinationIndex];
Returning self
Earlier in this chapter, I explain that the self = statement ensures that self is set to whatever object you get back from the superclass initializer. No matter what you get back from invoking the superclass initializer in the initialization method, you need to set self to that value and then return it to the invoking method — the method that wants to instantiate the object or a subclass that invoked the superclass’s init method.
After the code block that initializes the variables, you insert the following:
return self;
The reason the return type is an id is that sometimes what you ask for isn’t what you get. But don’t worry; that becomes transparent to you if you follow the rules for initialization I just explained.
The reason that you may get back a different class than what you asked for is that under certain circumstances when you allocate a framework object, what you may get back may be a class optimized for your use based on the context.
So where do the braces go?
If you look in the code provided by the template, sometimes you see a method implementation that looks like this:
- (void)viewDidLoad
{
and sometimes you’ll see one that looks like this:
- (IBAction)testDrive(id)sender {
I personally prefer the latter — with the bracket on the same line as the method — and will use it in the methods I have you add.
Quite frankly, it doesn’t matter to the compiler, but it can raise itself to a religious issue among programmers. Do what you’d like.
Initializing the Destination Class
Now it’s time to turn to the Destination class and its initialization. Add the bolded code in Listing 11-4 to Destination.h to update its interface to add the header files, the properties you’ll be using, and the method declarations.
Listing 11-4: Updating the Destination Interface
#import <Foundation/Foundation.h>
#import <MapKit/MapKit.h>
@interface Destination : NSObject
@property (nonatomic, readwrite)
CLLocationCoordinate2D coordinate;
@property (nonatomic, readwrite, copy) NSString *title;
@property (nonatomic, readwrite, copy) NSString *subtitle;
@property (nonatomic, strong) NSString *destinationName;
@property (nonatomic, strong) UIImage *destinationImage;
- (id)initWithDestinationIndex:
(NSUInteger)destinationIndex;
@end
As you saw in Chapter 4, you’ll be displaying the destination on a map with an annotation (that pop-up window that displays information about the location when you touch the pin on the map). Doing that requires a coordinate property of type CLLocationCoordinate2d (that’s why you need to include the MapKit and CoreLocation frameworks) and optional title and subtitle properties. Although you won’t be doing anything with this part of Destination until Chapter 17, I have you initialize Destination with what is described in the plist but defer the explanation untilChapter 17.
When you’re done, you can add the initWithDestinationIndex: method in Listing 11-5 to Destination.m.
Listing 11-5: Add initWithDestinationIndex:
- (id)initWithDestinationIndex:
(NSUInteger)destinationIndex {
self = [super init];
if (self) {
NSString *filePath = [[NSBundle mainBundle]
pathForResource:@”Destinations” ofType:@”plist”];
NSDictionary *destinations = [NSDictionary
dictionaryWithContentsOfFile:filePath];
NSArray *destinationsArray =
destinations[@”DestinationData”];
NSDictionary *data =
destinationsArray[destinationIndex];
NSString *imageName;
if ([[UIDevice currentDevice] userInterfaceIdiom] ==
UIUserInterfaceIdiomPad)
imageName =
[NSString stringWithFormat:@”%@_iPad.png”,
data[@”DestinationImage”]];
else
imageName =
[NSString stringWithFormat:@”%@_iPhone.png”,
data[@”DestinationImage”]];
self.destinationImage =
[UIImage imageNamed:imageName];
self.destinationName =
data[@”DestinationName”];
NSDictionary* destinationLocation =
data[@”DestinationLocation”];
CLLocationCoordinate2D destinationCoordinate;
destinationCoordinate.latitude =
[destinationLocation[@”Latitude”] doubleValue];
destinationCoordinate.longitude =
[destinationLocation
[@”Longitude”] doubleValue];
self.coordinate = destinationCoordinate;
self.title =
destinationLocation[@”Title”];
self.subtitle =
destinationLocation[@”Subtitle”];
}
return self;
}
Destination initializes itself more or less the same way that Trip did. It starts by loading its data:
NSString *filePath = [[NSBundle mainBundle]
pathForResource:@”Destinations” ofType:@”plist”];
NSDictionary *destinations =
[NSDictionary dictionaryWithContentsOfFile: filePath];
NSArray *destinationsArray =
destinations[@”DestinationData”];
NSDictionary *data =
destinationsArray[destinationIndex];
Then it uses the dictionary data to initialize its properties:
NSString *imageName;
if ([[UIDevice currentDevice] userInterfaceIdiom] ==
UIUserInterfaceIdiomPad)
imageName = [NSString stringWithFormat:@”%@_iPad.png”,
data[@”DestinationImage”]];
else
imageName = [NSString stringWithFormat:@”%@_iPhone.png”,
data[@”DestinationImage”]];
self.destinationImage =
[UIImage imageNamed:imageName];
Because the view sizes are different on the iPhone and iPad, you need different images for the destination. To actually determine the image name, you have to take the name specified in the plist and add an iPad or iPhone suffix.
self.destinationName =
data[@”DestinationName”];
NSDictionary* destinationLocation =
data[@”DestinationLocation”];
CLLocationCoordinate2D destinationCoordinate;
destinationCoordinate.latitude =
[destinationLocation[@”Latitude”] doubleValue];
destinationCoordinate.longitude =
[destinationLocation
[@”Longitude”] doubleValue];
self.coordinate = destinationCoordinate;
self.title = destinationLocation[@”Title”];
self.subtitle =
destinationLocation[@”Subtitle”];
The initialization of the properties is simply done by using the keys you specified when you created the plist, which turn into dictionary keys when you load the dictionary (and its dictionaries) from the plist file.
Now you can add the Trip methods destinationImage, destinationName, and destinationCoordinate, which use the Destination object. Add the methods in Listing 11-6 to Trip.m.
Listing 11-6: Adding destinationImage, destinationName, and destinationCoordinate
- (UIImage *) destinationImage {
return destination.destinationImage;
}
- (NSString *) destinationName {
return destination.destinationName;
}
- (CLLocationCoordinate2D) destinationCoordinate {
return destination.coordinate;
}
These Trip methods will be used by the Master View controller to request the data it needs for its view.
Interestingly, in this case, all Trip does is turn around and send the request to the Destination object. This is, of course, an example of loose coupling, which I explain earlier.
In this case, there isn’t that much for Destination to do, so you could’ve simply had Trip manage the data. But in a more robust app (like one worth 99 cents), it would likely have more to do. In fact, you could start by having Trip manage all the data and add a Destination object when you felt you needed to. And when you did add the Destination object, doing so would have no impact on the objects needing that data — ah, loose coupling in action.
Creating the Trip Object
Finally, you have to create the Trip object. You need to make it accessible to the view controllers that need to use it, so you’ll make it an RTAppDelegate property. As you saw earlier, in Chapter 6, any object in your app can find the RTAppDelegate, and from it get a pointer to the Tripobject.
Add the bolded code in Listing 11-7 to RTAppDelegate.h.
Listing 11-7: Updating the RTAppDelegate Interface
#import <UIKit/UIKit.h>
@class Trip;
@interface RTAppDelegate : UIResponder <UIApplicationDelegate>
@property (strong, nonatomic) UIWindow *window;
@property (nonatomic, strong) Trip *trip;
- (void) createDestinationModel:(int)destinationIndex;
@end
createDestinationModel: is the method that actually creates the Trip object.
@class is a compiler directive to let the compiler know that Trip is a class (or type). You need to import the header to actually use it in your code, however, and you’ll do that by adding the bolded code in Listing 11-8 to RTAppDelegate.m.
Listing 11-8: Updating the RTAppDelegate Implementation
#import “RTAppDelegate.h”
#import “Reachability.h”
#import “Trip.h”
@implementation RTAppDelegate
You also declare a method that will actually create the Trip object. Add the bolded code in Listing 11-9 to application:didFinishLaunchingWithOptions: in RTAppDelegate.m to use that method.
Listing 11-9: Updating application:didFinishLaunchingWithOptions:
- (BOOL)application:(UIApplication *)application
didFinishLaunchingWithOptions:
(NSDictionary *)launchOptions
{
UINavigationController *navigationController;
if ([[UIDevice currentDevice] userInterfaceIdiom] ==
UIUserInterfaceIdiomPad) {
UISplitViewController *splitViewController =
(UISplitViewController *)
self.window.rootViewController;
splitViewController.presentsWithGesture = NO;
UINavigationController *detailNavigationController
[splitViewController.viewControllers lastObject];
splitViewController.delegate =
(id)detailNavigationController.topViewController;
navigationController =
[splitViewController.viewControllers objectAtIndex:0];
}
else {
navigationController = (UINavigationController *)
self.window.rootViewController;
}
NetworkStatus networkStatus = [[Reachability reachabilityForInternetConnection] currentReachabilityStatus];
if (networkStatus == NotReachable) {
UIAlertView *alert = [[UIAlertView alloc]
initWithTitle:@”Network Unavailable”
message:@”RoadTrip requires an Internet connection”
delegate:nil
cancelButtonTitle:@”OK”
otherButtonTitles:nil];
[alert show];
}
[[UIApplication sharedApplication]
setStatusBarStyle:UIStatusBarStyleBlackOpaque
animated:NO];
navigationController.navigationBar.barStyle =
UIBarStyleBlack;
[navigationController.navigationBar
setTitleTextAttributes:
[NSDictionary dictionaryWithObject:
[UIColor yellowColor]
[[UIButton appearance] setTitleColor:
[UIColor greenColor] forState:UIControlStateNormal];
[[UIBarButtonItem appearanceWhenContainedIn:
[UINavigationBar class], nil]
setTitleTextAttributes:
[NSDictionary dictionaryWithObject:
[UIColor yellowColor]
forKey:UITextAttributeTextColor]
forState:UIControlStateNormal];
[[UIToolbar appearance] setBarStyle:UIBarStyleBlack];
[[UIButton appearanceWhenContainedIn:
[UIAlertView class], nil] setTitleColor:
[UIColor whiteColor] forState:UIControlStateNormal];
[self createDestinationModel:0];
return YES;
}
As you can see, you use the createDestinationModel: method to actually create the model. I have this as a separate method because you’ll need to be able to send the RTAppDelegate a message to create a new Trip when the user chooses a new destination in Chapter 20.
Also notice that, for now, you’ll be defaulting to the first destination in the plist. You’ll fix that in Chapter 20 as well.
Add the createDestinationModel: method in Listing 11-10 to RTAppDelegate.m.
Listing 11-10: Adding createDestinationModel:
- (void) createDestinationModel:(int)destinationIndex {
self.trip = [[Trip alloc] initWithDestinationIndex:destinationIndex];
}
All you do is allocate and initialize the Trip object and assign it to the trip property.
More Debugger Stuff
In this section, I give you something more interesting to look at in the Debugger than you’ve had up to now for this book’s example app. As it stands, you can compile RoadTrip with no errors and it runs, albeit the same way that it did before. So you have no idea if all that code you added really works. Does it really find the Destinations.plist file and create all the dictionaries with their entries correctly?
One way to find out is to put a breakpoint in your code and see what’s there; so go ahead and set a breakpoint in Trip.m on the following line (in the initWithDestinationIndex: method) by clicking in the gutter next to (in front of) the line:
destination = [[Destination alloc]
initWithDestinationIndex:destinationIndex];
Then set another breakpoint in Destination.m (in its initWithDestinationIndex: method) on the following line:
self.subtitle =
destinationLocation[@”Subtitle”];
Run your application.
If your program execution stops at a breakpoint, you can move your pointer over an object or variable in the Source editor to see its contents. In Figure 11-14, I’ve done that with destinationData (and so should you).
destinationData is a pointer to the dictionary that contains the data for the first entry in the Destination plist’s DestinationData array. You’ll have six key/value pairs, as you should have, and if you look in the Variables pane in the Debugger, you’ll see two objects in thedestinationsArray, which is also as it should be.
If you move your pointer into the destinationData variable display in the Source editor and Control-click in the up and down arrow, as I have in Figure 11-15, you see a drop-down menu with a Print Description selection.
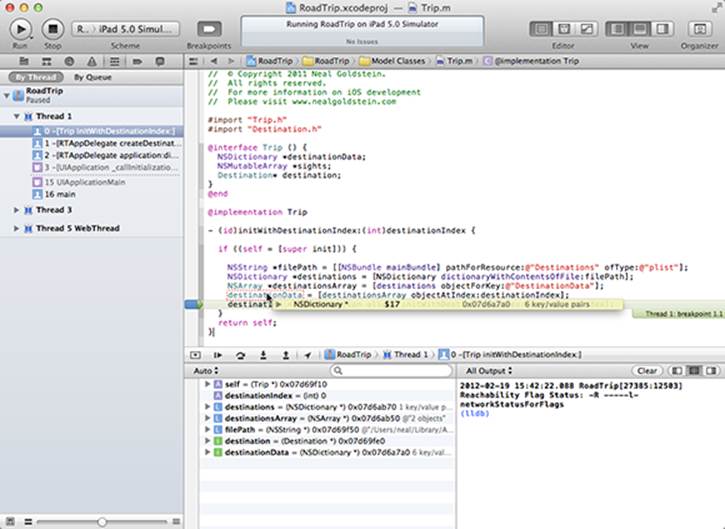
Figure 11-14: Display the contents of a variable in the Source editor.
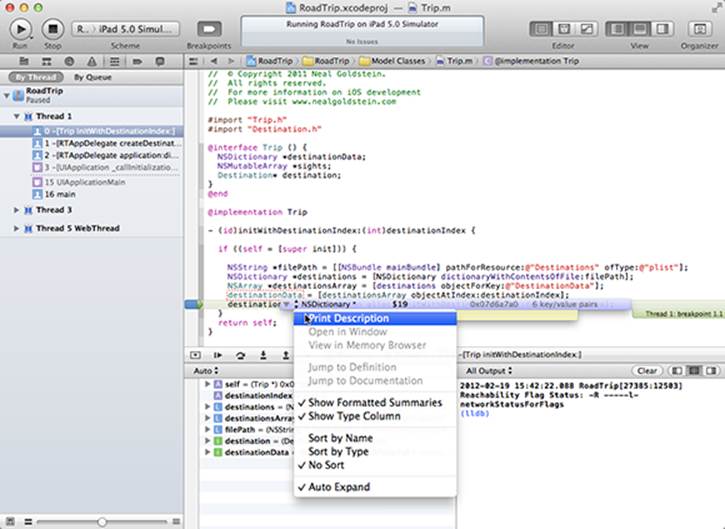
Figure 11-15: You can print the contents of a variable.
If you select Print Description, you’ll see the values in the destinationData dictionary printed (displayed) in the Console pane (see Figure 11-16).
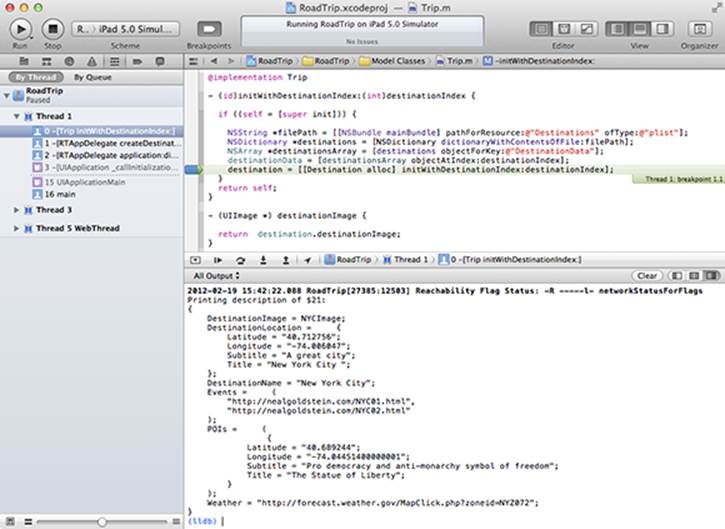
Figure 11-16: Printing the contents of a variable to the Console pane.
You could also have done the same thing by Control-clicking in the Variables pane. One thing you’ll notice is that no instance variables are displayed (at least in this release of Xcode) because you have them in a class extension rather than in the interface. Oh, well, you can’t have everything.
If you select Continue Program Execution in the Debug bar, you can print out variables to be sure that the Destination method initWithDestinationIndex: works as expected.
On a side note, when I was writing this, I found that my code didn’t work. I had inadvertently placed a trailing space in the DestinationLocation key, which I found out by printing the contents of the destinationData dictionary. My discovery of that error was what prompted the trailing space warning in the “Adding a property list to your project” section, earlier in this chapter.
All materials on the site are licensed Creative Commons Attribution-Sharealike 3.0 Unported CC BY-SA 3.0 & GNU Free Documentation License (GFDL)
If you are the copyright holder of any material contained on our site and intend to remove it, please contact our site administrator for approval.
© 2016-2026 All site design rights belong to S.Y.A.