iOS 6 Application Development For Dummies (2013)
Part V. Adding the Application Content
Chapter 20. Selecting a Destination
In This Chapter
![]() Finding an address for a map coordinate and displaying it on the map
Finding an address for a map coordinate and displaying it on the map
![]() Finding the map coordinate from an address and displaying it on the map
Finding the map coordinate from an address and displaying it on the map
In this chapter, you are down to the final parts needed for the RoadTrip app to be complete. Back in Chapter 11, you add multiple destinations to the Destinations.plist, and now it would be nice if the user could select any of the ones you added.
Providing the user with the ability to select a destination is what you implement in this chapter. You also discover more about Table views along the way. I also show you how to work with modal controllers (which present views that require the user to do something) by creating your own protocol.
The Plan
You’re going to add a new view controller that manages a modal Table view that allows the user to select a destination — such as New York or San Francisco. Figure 20-1 shows the results for both the iPad and iPhone.
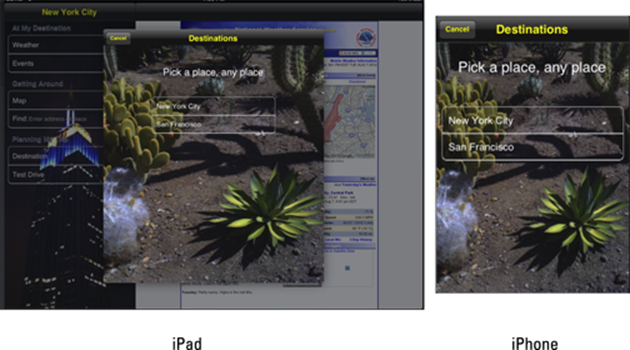
Figure 20-1: The Destinations modal Table view on both the iPad and iPhone.
Setting Up the DestinationController for the iPad Storyboard
If you’ve followed along throughout this book, by now you should know the drill. As you might expect, you need a view controller to implement the Selecting a Destination interface.
Adding the custom view controller
Follow these steps to add a new Objective-C DestinationController class to the RoadTrip project.
1. In the Project navigator, select the View Controller Classes group and then either right-click the selection and choose New File from the menu that appears or choose File⇒New⇒New File from the main menu (or press ![]() +N).
+N).
Whatever method you choose, you’re greeted by the New File dialog.
2. In the left column of the dialog, select Cocoa Touch under the iOS heading, select the Objective-C class template in the top-right pane, and then click Next.
You’ll see a dialog that will enable you to choose the options for your file.
3. Enter DestinationController in the Class field, enter or choose UIViewController from the Subclass Of drop-down menu, make sure that the Target for iPad check box is selected and that With XIB for User Interface is deselected, and then click Next.
4. In the Save sheet that appears, click Create.
The Destination controller will be using a Table view, but it won’t actually use a Table View Controller class. That’s because I show you how to use a Table view with dynamically generated cells (as well as cell selection handled by the controller) as only one element in the view. This is a handy thing to know if you want to take advantage of the power of a Table view without letting a Table view take over the entire screen.
Setting up the DestinationController in the MainStoryboard_iPad
Now that you have a custom view controller, you need to tell the storyboard to load your custom view controller rather than a UIViewController. Follow these steps:
1. In the Project navigator, select the MainStoryboard_iPad file, and in the Document Outline, select View Controller in the View Controller – Destination Scene.
 2. Open the Identity inspector in the Utility area using the Inspector selector bar and then choose DestinationController from the Custom Class section’s Class drop-down menu, as you did in Chapters 15, 16, 17, and 19.
Now when Destination is selected in the Master View controller, DestinationController will be instantiated and initialized and will receive events from the user and connect the view to the Trip model.
In Chapter 14, you left this segue style as modal, and I said I would explain a little more about that in Chapter 20. Well, here we are.
3. Select the segue to the Destination controller on the Canvas.
4. Select the Attributes inspector for the Inspector selector bar.
As I explain in Chapter 4, a modal dialog requires the user to do something (tap a Table View cell or the Cancel button, for example) before returning to the application.
When you have a modal segue, you can choose a transition style.
5. Choose Flip Horizontal in the Transition pop-up menu in the Attributes inspector for the segue.
Actually, you can select whatever transition you’d like, but I’d go for Flip Horizontal.
Make sure that Form Sheet is selected in the Presentation pop-up menus. The Presentation choices include:
![]() Full Screen: The modal view covers the screen.
Full Screen: The modal view covers the screen.
![]() Page Sheet: The height and width are set to the height and width of the screen in Portrait orientation, with the background view dimmed.
Page Sheet: The height and width are set to the height and width of the screen in Portrait orientation, with the background view dimmed.
![]() Form Sheet: The width and height of the modal view are smaller than those of the screen, with the modal view centered on the screen and the background view dimmed.
Form Sheet: The width and height of the modal view are smaller than those of the screen, with the modal view centered on the screen and the background view dimmed.
![]() Current Context: The modal view is the same style as its presenting view controller. But if the presenting view controller is in a popover, you can use this presentation style only when the transition style is UIModalTransitionStyleCoverVertical. If not, you’ll get an exception.
Current Context: The modal view is the same style as its presenting view controller. But if the presenting view controller is in a popover, you can use this presentation style only when the transition style is UIModalTransitionStyleCoverVertical. If not, you’ll get an exception.
After you have the Presentation and the Transition selected in the Attributes inspector, you can get on with formatting the Destination Controller view, which will have a Table view, a Label view, and a very spiffy image as well after you follow these steps:
1. Select the Destination controller in the storyboard Canvas and then drag in a Navigation bar from the Library.
You’re going to need someplace to put the Cancel button.
2. Select the Navigation bar you just added (either in the Destination controller on the Canvas or in the Document Outline) and then choose Black Opaque from the Style drop-down menu in the Attributes inspector.
3. In the Navigation bar on the Canvas, select the Title (field). Still in the Attributes inspector, enter Destinations in the Title field for the selected element (Navigation bar, in this case).
4. Drag a Bar Button item from the Library and place it on the left side of the Navigation bar on the Canvas.
5. Choose Cancel from the Identifier drop-down menu in the Bar Button section of the Attributes Inspector.
You’ll use this button to cancel selecting a new destination.
 You don’t have to select a tint for the button in the Bar Button Tint section of the Attributes inspector. When you selected Black Opaque, you gave all the Bar Button items the right tint as well. (You will, by the way, get yellow text because of how you set the Bar Button appearance in Chapter 9.)
6. Drag an Image view from the Library in the Utility area and place it in the Destination controller on the Canvas so that it takes up the rest of the view.
7. In the Image View section of the Attributes inspector, select DestinationImage_iPad.png from the Image drop-down menu.
The .png file should be in the Resources file you downloaded in Chapter 3.
8. Drag a Label from the Library and add it to the view toward the top of the Image view.
9. With the Label selected, enter Pick a place, any place in the Text field in the Label section of the Attributes inspector.
10. Still in the Attributes inspector, change the font size to System 24 by selecting the Text icon in the Font field (which opens a window in which you can change the font size) or by using the stepper control.
11. Select the label and then choose Editor⇒Size Fit to Content from the Xcode main menu.
The label will expand to fit the text.
12. Position the Pick a place, any place label, as shown in Figure 20-2.
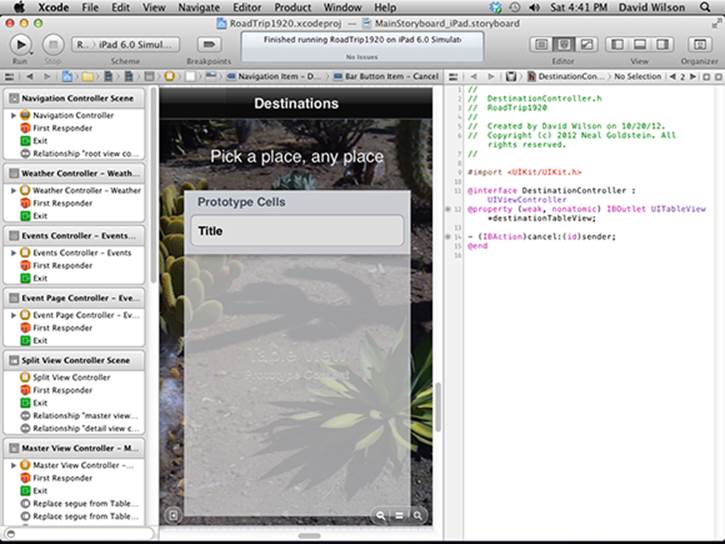
Figure 20-2: Ready to code.
13. Looking nice, but change the text color to white in the Text Color drop-down menu.
A word of warning: You need to follow the next set of steps exactly. You can get the look you want in other ways, but this is the most straightforward. A bit of a bug exists in Interface Builder, and the Table view won’t be transparent; you’ll fix that in viewDidLoad in the “Creating the Table View” section, later in the chapter.
14. Drag a Table view (not Table View controller) from the Library onto the Image view and position it as shown in Figure 20-2.
This is the area in which the Table view will display. If you have more selections than can fit in the visible area, the user will be able to scroll the Table view.
15. With the Table view selected, scroll down the Attributes inspector to reach the View section and then select Clear Color from the Background drop-down menu.
16. Still in the Attributes inspector, scroll back up to the Table View section and choose Grouped from the Style menu.
17. Enter 1 in the Prototype Cells field (or just use the stepper control to get to 1).
Leave these as prototype cells because you’ll provide the content for the cells programmatically.
18. Select the prototype cell, either on the Canvas or in the Document Outline, and then choose Basic from the inspector’s Style menu and enter DestinationCell in the Identifier field.
You will need to have a reuse identifier (which I explain in the section “Displaying the cell,” later in this chapter).
19. Still in the Attributes inspector, scroll down to the View section and select Clear Color from the Background drop-down menu.
20. Select the Table View cell in the Document Outline, open the disclosure triangle, and select the label.
21. In the Attributes inspector, scroll down and then choose Clear Color from the Background drop-down menu.
22. Close the Utility area and select the Assistant in the Editor selector.
23. If the DestinationController.h file doesn’t appear, select it in the Jump bar.
24. Control-drag from the Table view in Document Outline or on the Canvas to the DestinationController.h Interface. Release the mouse button, and in the dialog that pops up, enter destinationTableView.
25. Control-drag from the Cancel button in Document Outline or in the Navigation bar on the Canvas to the DestinationController.h Interface. Release the mouse button, and in the dialog that pops up, select Action in the Connection drop-down menu and enter cancel in the Name field.
When all is said and done, you should see a screen that looks like Figure 20-2.
Adding a Modal View
Modal views are great for those situations when you want the user (or the user wants) to do something outside the application flow. Rather than use a Navigation controller with a Back button, you display a Modal view with controls that allow the user to either select an action or cancel the procedure. (Much of the work in adding the Destination controller to the storyboard spelled out in the steps list in the previous section has to do with enabling the user to either select a destination in the Table view or to press Cancel to leave things as they are.)
The usual way to manage Modal views is by creating an Objective-C protocol that’s adopted by the controller presenting the Modal view. The Modal view, when the user has selected an action or Cancel, calls the presenting controller’s delegate method. The requesting controller then dismisses the Modal controller. Using this approach means that, before it dismisses the Modal controller, the presenting controller can get any data it needs.
You start implementing the Modal view by declaring the protocol and a few other properties you’ll need, as well as the protocols the DestinationController needs to adopt.
To get things started, add the bolded code in Listing 20-1 to DestinationController.h.
Listing 20-1: Updating the Destination Interface
#import <UIKit/UIKit.h>
@protocol DestinationControllerDelegate;
@interface DestinationController : UIViewController
<UITableViewDelegate, UITableViewDataSource>
@property (weak, nonatomic) IBOutlet UITableView *destinationTableView;
@property (strong, nonatomic) id
<DestinationControllerDelegate> delegate;
@property (nonatomic) NSUInteger selectedDestination;
- (IBAction)cancel:(id)sender;
@end
@protocol DestinationControllerDelegate
- (void)destinationController:
(DestinationController *)controller
didFinishWithSave:(BOOL)save;
@end
The Objective-C language provides a way to formally declare a list of methods (including declared properties) as a protocol. You’ve used framework-supplied protocols extensively in this book, and now you’re defining your own protocol.
You declare formal protocols with the @protocol directive. In Listing 20-1, you declared a DestinationControllerDelegate protocol with one method, destinationController:didFinishWithSave:, which is required. Required is the default; if you wanted to declare optional methods, you would use the keyword @optional, and all methods following that keyword would be optional. For example, consider this:
@protocol SimpleDelegate
@optional
- (void)doNothing;
@end
The @protocol DestinationControllerDelegate: statement (at the top) tells the compiler that a protocol is on the way. Like the @class statement, it says, “Trust me, you’ll find the protocol.” You need this here only because you added this:
@property (strong, nonatomic) id
<DestinationControllerDelegate> delegate;
This statement tells the compiler to type check whatever it is you assign to delegate to make sure that it implements the DestinationControllerDelegate protocol.
You also added the selectedDestination property, which you’ll use in the ViewController to determine which destination the user selected. Notice that you have made it read-only because there is no reason for any other object to be able to set it.
You also adopted two protocols, UITableViewDelegate and UITableViewDataSource, which you’ll use to manage the Table view.
Next, you’re going to need to update the DestinationController implementation in Listing 20-2 with the bolded code for some header files you’ll need to use later.
Listing 20-2: Updating the DestinationController Implementation
#import “DestinationController.h”
#import “RTDetailViewController.h”
#import “RTAppDelegate.h”
@interface DestinationController ()
@end
@implementation DestinationController
Now that you have the plumbing in, you can look at what will go on in the DestinationController.
Implementing a Table View
The functionality in the DestinationController is in the Table view. You’ve worked with Table views before — but those used static cells, and all the work was done for you by the storyboard. Now it’s time to branch out on your own and understand what the storyboard was doing for you behind the scenes, as it were.
It’s a good thing to know how Table views work, because Table views are front and center in several applications that come with the iOS devices out of the box; they play a major role in many of the more complex applications that you can download from the App Store. (Obvious examples: Almost all the views in the Mail, Music, and Contacts applications are Table views.) Table views take on such a significant role because, in addition to displaying data, they can also serve as a way to navigate a hierarchy.
If you take a look at an application such as Mail or Music, you find that Table views present a scrollable list of items (or rows or entries — I use all three terms interchangeably) that may be divided into sections. A row can display text or images, so when you select a row, you may be presented with another Table view or with some other view that may display a web page or even controls such as buttons and Text fields. (You can see an illustration of this diversity back in Chapter 4, where Figure 4-6 shows how selecting Map leads to a Map view displaying a map of New York, which is very handy when you roll into town.)
 It’s worth noting that iOS Table views only provide a single column of data — not the two-dimensional tables that you might build in a Microsoft Excel spreadsheet. The Macintosh OS X frameworks do provide a multi-column NSTableView class, but the IOS UITableView only supports a single column. There are open-source grid views available for iOS, such as the DTGridView found on GitHub (http://github.com/danielctull/DTGridView).
To kick off the Table view creation process, you first need to decide what you want to have happen when the user selects a particular row in the Table view of your app. As you saw with static cells, you can have virtually anything happen. You can display a Web view as you do in Weather or even display another Table view.
In this case, however, the Destination View controller will be dismissed, and the user will find herself in the Main view, ready to make another selection.
A Table view is an instance of the class UITableView, where each visible row of the table uses a UITableViewCell to draw its contents. Think of a Table view as the object that creates and manages the table structure, and the Table View cell as being responsible for displaying the content of a single row of the table.
Creating the Table View
Although powerful, Table views are surprisingly easy to work with. To create a Table view, you follow only four — count ’em, four — steps, in the following order:
1. Create and format the view itself.
This includes specifying the Table style and a few other parameters, most of which you do in Interface Builder.
2. Specify the Table view configuration.
Not too complicated, actually. You let UITableView know how many sections you want, how many rows you want in each section, and what you want to call your section headers. You do that with the help of the numberOfSectionsInTableView:, tableView:numberOfRowsInSection:, andtableView:titleForHeaderInSection: methods, respectively.
3. Supply the text (or graphic) for each row.
You return that from the implementation of the tableView:cellForRowAtIndexPath: method. This message is sent for each visible row in the Table view, and you return a Table View cell to display the text or graphic.
4. Respond to a user selection of the row.
You use the tableView:didSelectRowAtIndexPath: method to take care of this task. In this method, you can create a view controller and push it onto the stack (as the storyboard does in a segue), or you can even send a message to the controller that presented a Modal View controller (or any other object).
A UITableView object must have a data source and a delegate:
![]() The data source supplies the content for the Table view.
The data source supplies the content for the Table view.
![]() The delegate manages the appearance and behavior of the Table view.
The delegate manages the appearance and behavior of the Table view.
The data source adopts the UITableViewDataSource protocol, and the delegate adopts the UITableViewDelegate protocol — no surprises there. Of the preceding methods, only tableView:didSelectRowAtIndexPath: is included in the UITableViewDelegate protocol. All the other methods that I list earlier are included in the UITableViewDataSource protocol.
The data source and the delegate are often (but not necessarily) implemented in the same object, which is often a subclass of UITableViewController. UITableViewController adopts the necessary protocols and even furnishes some method stubs for you. In this case, the Table view is just another object in the DestinationController view. I had you do that when creating DestinationController earlier in the chapter so I could explain the real guts of Table views and because I wanted you to be able to display that Pick a Destination label, which you couldn’t have done if you had made this a UITableView subclass.
Implementing these five (count ’em, five) methods (in the four steps earlier) is all you need to do to implement a Table view.
Not bad.
I already had you adopt the Table View delegate and Data Source protocols in Listing 20-1, so you are already partway there.
Add the bolded code in Listing 20-3 to the DestinationController.m file’s viewDidLoad method.
Listing 20-3: Updating viewDidLoad
- (void)viewDidLoad
{
[super viewDidLoad];
self.destinationTableView.delegate = self;
self.destinationTableView.dataSource = self;
}
As you might surmise, this makes the DestinationController both the delegate and the data source.
You’ll remember back in Chapter 8 I had you make the title in the Navigation bar yellow. But in that case it was just for that specific Navigation bar because I wanted to show you how to customize control appearance on a control-by-control basis. Here is an example of why I would want to set the appearance for all controls of a certain type. To set the title color to yellow for all Navigation bars, go back into application:didFinishLaunchingWithOptions: in RTAppDelegate.m and replace
[navigationController.navigationBar
setTitleTextAttributes:
[NSDictionary dictionaryWithObject:[UIColor yellowColor]
forKey:UITextAttributeTextColor]];
with
[[UINavigationBar appearance] setTitleTextAttributes:
@{UITextAttributeTextColor: [UIColor yellowColor]}];
Adding sections
In a grouped Table view, each group is referred to as a section.
The two methods you need to implement to start things off are as follows:
numberOfSectionsInTableView:(UITableView *)tableView
tableView:(UITableView *)tableView
numberOfRowsInSection:(NSInteger)section
Each of these methods returns an integer, and that integer tells the Table view something — the number of sections and the number of rows in a given section, respectively.
Add the methods in Listing 20-4 to DestinationController.m to create a Table view that has one section with the number of rows equal to the number of destinations you have in your Destinations.plist. You will get compiler errors that you will fix with code in the next Listing.
Listing 20-4: Implementing numberOfSectionsInTableView: and tableView:numberOfRowsInSection:
- (NSInteger)numberOfSectionsInTableView:
(UITableView *)tableView {
return 1;
}
- (NSInteger)tableView:(UITableView *)tableView
numberOfRowsInSection:(NSInteger)section {
NSString *filePath = [[NSBundle mainBundle]
pathForResource:@”Destinations” ofType:@”plist”];
NSDictionary *destinations =
[NSDictionary dictionaryWithContentsOfFile: filePath];
destinationsArray = destinations[@”DestinationData”];
return [destinationsArray count];
}
The numberOfSectionsInTableView: method is obvious. In the tableView:numberOfRowsInSection: method, you do what you did in both the Trip and Events classes — you access Destination.plist to extract what you need. In this case, it’s the DestinationData array, which, to refresh your memory, is an array of dictionaries that have the data for each destination and return the count.
Keep in mind that the first section is zero, as is the first row. This means, of course, that whenever you want to use an index to get to the first row or section, you need to use 0, not 1 — and an index of 1 for the second row and so on.
You’ll get an Xcode Live Issue warning here because you need to add the new destinationsArray instance variable (you’ll use this same array later in tableView:cellForRowAtIndexPath:). To do that, add the bolded code in Listing 20-5 to DestinationController.m.
Listing 20-5: Updating the DestinationController Implementation
#import “DestinationController.h”
@interface DestinationController () {
NSArray *destinationsArray;
}
@end
Displaying the cell
To display the cell content, your delegate is sent the tableView:cellForRowAtIndexPath: message. Add this method in Listing 20-6 to DestinationController.m.
Listing 20-6: Implementing tableView:cellForRowAtIndexPath:
- (UITableViewCell *)tableView:(UITableView *)tableView
cellForRowAtIndexPath:(NSIndexPath *)indexPath {
static NSString *CellIdentifier = @”DestinationCell”;
UITableViewCell *cell = [tableView dequeueReusableCellWithIdentifier:CellIdentifier];
NSDictionary * destinationData = destinationsArray[indexPath.row];
NSAttributedString *attributedString = [[NSAttributedString alloc]
initWithString:destinationData[@”DestinationName”]
attributes:@{ NSFontAttributeName : [UIFont systemFontOfSize:17.0f],
NSForegroundColorAttributeName: [UIColor whiteColor]}];
cell.textLabel.attributedText = attributedString;
return cell;
}
Walking through Listing 20-6, you see that one of the first things you do is determine whether any cells that you can use are lying around. You may remember that, although a Table view can display quite a few rows at a time on the iPad’s screen, the table itself can conceivably hold a lot more. A large table can eat up a lot of memory, however, if you create cells for every row. Fortunately, Table views are designed to reuse cells. As a Table view’s cells scroll off the screen, they’re placed in a queue of cells available to be reused.
If the system runs low on memory, the Table view gets rid of the cells in the queue, but as long as it has some available memory for them, it holds on to them in case you want to use them again.
You create a string to use as a cell identifier to indicate what cell type you’re using:
static NSString *CellIdentifier = @”DestinationCell”;
You recall that this is what you entered in the Identifier field of the Prototype cell in Step 18 in the “Setting up the DestinationController in the MainStoryboard_iPad” section, earlier in this chapter.
 It is critical that the CellIdentifier and the Identifier field of the Prototype cell in Step 18 are the same. If they are not, you won’t get a transparent cell you specified in the storyboard. (It’s happened to me more than once.)
Table views support multiple cell types, which makes the identifier necessary. In this case, you need only one cell type, but sometimes you may want more than one.
You ask the Table view for a specific reusable cell object by sending it a dequeueReusableCellWithIdentifier: message:
UITableViewCell *cell = [tableView
dequeueReusableCellWithIdentifier:CellIdentifier];
This determines whether any cells of the type you want are available. If no cells are lying around, this method will create a cell using the cell identifier that you specified. You now have a Table View cell that you can return to the Table view.
You have several choices on how to format the Table View cell. Although you’re going to be using UITableViewCellStyleDefault, you can choose from a number of different styles, listed as follows:
![]() UITableViewCellStyleDefault: Gives you a simple cell with a Text label (black and left-aligned) and an optional Image view.
UITableViewCellStyleDefault: Gives you a simple cell with a Text label (black and left-aligned) and an optional Image view.
![]() UITableViewCellStyleValue1: Gives you a cell with a left-aligned black Text label on the left side of the cell and a right-aligned Text label with smaller blue text on the right side. (The Settings application uses this style of cell.)
UITableViewCellStyleValue1: Gives you a cell with a left-aligned black Text label on the left side of the cell and a right-aligned Text label with smaller blue text on the right side. (The Settings application uses this style of cell.)
![]() UITableViewCellStyleValue2: Gives you a cell with a right-aligned blue Text label on the left side of the cell and a left-aligned black Text label on the right side of the cell.
UITableViewCellStyleValue2: Gives you a cell with a right-aligned blue Text label on the left side of the cell and a left-aligned black Text label on the right side of the cell.
![]() UITableViewCellStyleSubtitle: Gives you a cell with a left-aligned Text label across the top and a left-aligned Text label below it in smaller gray text. (The Music application uses cells in this style.)
UITableViewCellStyleSubtitle: Gives you a cell with a left-aligned Text label across the top and a left-aligned Text label below it in smaller gray text. (The Music application uses cells in this style.)
With the formatting out of the way, you then set the Label properties that you’re interested in.
You pluck out the name for each destination you’ve stored by accessing the DestinationName in each Destination dictionary. You do that by accessing the dictionary in the (saved) destinationsArray corresponding to the sections and row in indexPath, which contains the section and row information in a single object. To get the row or the section out of an NSIndexPath, you just have to invoke its section method (indexPath.section) or its row method (indexPath.row), either of which returns an int:
NSDictionary * destinationData =
destinationsArray[indexPath.row];
Next, create an attributed string, which can manage both the character strings and attributes such as fonts, colors, and even kerning:
NSAttributedString *attributedString = [[NSAttributedString alloc]
initWithString:destinationData[@”DestinationName”]
attributes:@{ NSFontAttributeName : [UIFont systemFontOfSize:17.0f],
NSForegroundColorAttributeName: [UIColor whiteColor]}];
Now, use this attributed string to format the cell’s text label:
cell.textLabel.attributedText = attributedString;
Finally, return the formatted cell with the text it needs to display in that row:
return cell;
Working with user selections
Now you can look at what happens when the user selects a row with a destination displayed.
When the user taps a Table View entry, what happens next depends on what you want your Table view to do for you.
If you’re using the Table view to display data (as the Albums view in the Music application does, for example), you want a user’s tap to show the next level in the hierarchy, such as a list of songs or a detail view of an item (such as information about a song).
In the case of the RoadTrip app, you want a user’s tap to take you back to the Master view and, behind the scenes, create the correct model so that when you tap the Travel button, the right data is there.
To do that, add the final delegate method you need to implement, tableView:didSelectRowAtIndexPath:. Add the code in Listing 20-7 to DestinationController.m.
Listing 20-7: Implementing tableView:didSelectRowAtIndexPath:
- (void)tableView:(UITableView *)tableView
didSelectRowAtIndexPath:(NSIndexPath *)indexPath
{
[tableView deselectRowAtIndexPath:
indexPath animated:YES];
self.selectedDestination = indexPath.row;
[self.delegate destinationController:self didFinishWithSave:YES];
}
You set the selectedDestination property to the selected row. Notice that you access the instance variable here instead of using the setter because you made the property readonly.
Then you send the delegate the destinationController:didFinishWithSave: message with a value of YES.
Before I explain the destinationController:didFinishWithSave: method, implement the last part of the DestinationController. Add the bolded code in Listing 20-8 to the cancel method (generated when you created the action) in DestinationController.m.
Listing 20-8: Adding cancel:
- (IBAction)cancel:(id)sender {
[self.delegate destinationController:self
didFinishWithSave:NO];
}
When the user taps Cancel, the DestinationController sends the destinationController:didFinishWithSave: message with a value of NO to its delegate — which will be the RTMasterViewController. Now you’ll go back to the RTMasterViewController and implement thedestinationController:didFinishWithSave: message.
You also need to have the RTMasterViewController adopt the DestinationControllerDelegate protocol and declare the destinationController:didFinishWithSave: method. To do that, add the bolded code in Listing 20-9 to RTMasterViewController.h.
Listing 20-9: Updating the RTMasterViewController Interface
#import <UIKit/UIKit.h>
#import “DestinationController.h”
@class RTDetailViewController;
@interface RTMasterViewController : UITableViewController
<UITextFieldDelegate, DestinationControllerDelegate>
@property (strong, nonatomic) RTDetailViewController *detailViewController;
@property (weak, nonatomic) IBOutlet UITextField *findText;
- (void)destinationController:(DestinationController *)
controller didFinishWithSave:(BOOL)save;
Next, add the destinationController:didFinishWithSave: method in Listing 20-10 to RTMasterViewController.m.
Listing 20-10: Adding destinationController:didFinishWithSave:
- (void)destinationController:(DestinationController *)
controller didFinishWithSave:(BOOL)save {
RTAppDelegate *appDelegate =
[[UIApplication sharedApplication] delegate];
if (save) {
[appDelegate createDestinationModel:
controller.selectedDestination];
[self viewDidLoad];
RTDetailViewController* currentDetailViewController;
if ([[self.splitViewController.viewControllers
lastObject]
isKindOfClass:[UINavigationController class]]) {
UINavigationController *navigationController = [self.splitViewController.viewControllers
lastObject];
currentDetailViewController = (RTDetailViewController *)
navigationController.topViewController;
}
else
currentDetailViewController = [self.splitViewController.viewControllers
lastObject];
[currentDetailViewController viewDidLoad];
if (currentDetailViewController.popOverButton) {
if (![[self.splitViewController.viewControllers
lastObject]
isKindOfClass:[UINavigationController class]]) {
NSMutableArray *itemsArray = [currentDetailViewController.toolbar.items
mutableCopy];
[itemsArray removeObjectAtIndex:0];
[currentDetailViewController.toolbar
setItems:itemsArray animated:NO];
}
}
if ([currentDetailViewController isKindOfClass:[MapController class]]) {
NSMutableArray *itemsArray =
[currentDetailViewController.toolbar.items
mutableCopy];
[itemsArray removeLastObject];
[currentDetailViewController.toolbar
setItems:itemsArray animated:NO];
}
}
if (appDelegate.trip == nil)
[appDelegate createDestinationModel:0];
[self dismissModalViewControllerAnimated:YES];
}
If the user has chosen a new destination, you send the app delegate a message to create that model:
[appDelegate
createDestinationModel:controller.selectedDestination];
It determines the selection the user made by accessing the selectedDestination property you set in the tableView:didSelectRowAtIndexPath: method.
As you may recall, createDestinationModel: is an already existing method in the app delegate. As I say back in Chapter 11, the createDestinationModel: method will actually be creating the model, and I made this a separate method because you’ll have to be able to send theRTAppDelegate a message to create a new Trip when the user chooses a new destination in Chapter 20. Well, here it is Chapter 20, and that’s exactly what you’re doing.
You reload the Master view based on the new destination so you can change the Background image.
[self viewDidLoad];
You’ll also need to update the Detail view.
RTDetailViewController* currentDetailViewController;
if ([[self.splitViewController.viewControllers lastObject]
isKindOfClass:[UINavigationController class]]) {
UINavigationController *navigationController =
[self.splitViewController.viewControllers lastObject];
currentDetailViewController = (RTDetailViewController *)
navigationController.topViewController;
}
else
currentDetailViewController =
[self.splitViewController.viewControllers lastObject];
[currentDetailViewController viewDidLoad];
}
You’ll need to determine whether the current Detail view is embedded in a Navigation controller. Then you get the current Detail view and simply send it the viewDidLoad message, which will cause it to reload all its data.
You also need to take a nuance here into account. If the current view controller isn’t embedded in a Navigation controller, that means it has a toolbar. If it already has a Road Trip button, to keep things in sync, you’ll need to remove the Road Trip button, which will then be added back in when the view reloads.
if (currentDetailViewController.popOverButton) {
if (![[self.splitViewController.viewControllers
lastObject] isKindOfClass:
[UINavigationController class]]) {
NSMutableArray *itemsArray =
[currentDetailViewController.toolbar.items
mutableCopy];
[itemsArray removeObjectAtIndex:0];
[currentDetailViewController.toolbar
setItems:itemsArray animated:NO];
}
}
And yet another thing: If the current Detail view is a Map view, you’ll also need to remove the Locate button if it’s on the toolbar:
if ([currentDetailViewController isKindOfClass:[MapController class]]) {
NSMutableArray *itemsArray =
[currentDetailViewController.toolbar.items
mutableCopy];
[itemsArray removeLastObject];
[currentDetailViewController.toolbar
setItems:itemsArray animated:NO];
}
If the user hasn’t chosen a new destination but no model exists yet (when the user first launches the program, for example, no model exists yet — you’ll see how that works in a second), you’ll have the app delegate create a model using a default destination. I have arbitrarily chosen the first one.
You then send the dismissModalViewControllerAnimated: message, which, as you might expect, dismisses the view controller using the transition you specified in the “Setting up the DestinationController in the MainStoryboard_iPad” section, earlier in this chapter.
If the user has canceled, you simply send the dismissModalViewControllerAnimated: message, and the user finds herself back in the Main view.
But you still have some more work to do.
Previously, you added a delegate property to the DestinationController, which it uses when it sends the destinationController:didFinishWithSave: message when the user selects a cell or taps Cancel.
The problem is, how do you set that property? Because you use a segue to take care of creating and initializing the controller, how do you assign the delegate property? If you recall from Chapter 19, when setting up FindController, you didn’t use a segue, so you could assign any property you wanted after you created (but before you added) the FindController to the Split View controller viewControllers in textFieldShouldReturn: (I’ve bolded where you do that in the RTMasterViewController.m code).
- (BOOL)textFieldShouldReturn:(UITextField *)textField {
[textField resignFirstResponder];
if ([[UIDevice currentDevice] userInterfaceIdiom] ==
UIUserInterfaceIdiomPad){
FindController * findController =
[[UIStoryboard storyboardWithName:@”MainStoryboard_iPad”
bundle:nil]
instantiateViewControllerWithIdentifier:@”Find”];
findController.findLocation = textField.text;
…
)
Fortunately, you have a way to use a segue and still be able to pass some data on to the view controller that’s being instituted by the segue.
prepareForSegue:sender: is a view controller method used to notify the view controller that a segue is about to be performed. segue is the UIStoryboardSegue object that contains information about the view controllers involved in the segue. You’ve already used prepareForSegue:sender:to dismiss the popover and assign the popOverButton and masterPopoverController properties.
Now you need to add the code in bold in Listing 20-11 to prepareForSegue:sender: in RTMasterViewController.m. (I’ve omitted the code that was already there.)
Listing 20-11: Update prepareForSegue:sender:
- (void)prepareForSegue:(UIStoryboardSegue *)segue sender:(id)sender {
if ([segue.identifier isEqualToString:@”Destination”]) {
if ([[UIDevice currentDevice] userInterfaceIdiom] ==
UIUserInterfaceIdiomPad) {
RTDetailViewController *currentDetailViewController;
DestinationController *destinationController = (DestinationController *)
segue.destinationViewController;
destinationController.delegate = self;
if ([[self.splitViewController.viewControllers
lastObject]
isKindOfClass:[UINavigationController class]]) {
UINavigationController *navigationController = [self.splitViewController.viewControllers
lastObject];
currentDetailViewController =
(RTDetailViewController *)
navigationController.topViewController;
}
else
currentDetailViewController = [self.splitViewController.viewControllers
lastObject];
if (currentDetailViewController.
masterPopoverController != nil)
[currentDetailViewController.
masterPopoverController
dismissPopoverAnimated:YES];
}
else {
DestinationController *destinationController = (DestinationController *)
segue.destinationViewController;
destinationController.delegate = self;
}
return;
}
... // previous code here
}
You first check to see whether the segue is the Destination segue (see, those identifiers are really useful):
if ([destinationSegue.identifier
isEqualToString:@”Destination”])
If it’s the Destination segue, you check to see whether the device is an iPad. If it is, you go through the usual logic to find the Detail View (Destination) controller and assign its delegate to self.
RTDetailViewController *currentDetailViewController;
DestinationController *destinationController =
(DestinationController *)
[segue.destinationViewController topViewController];
destinationController.delegate = self;
You then go through the usual logic and find the current Detail View controller and dismiss the popover, if one exists.
if ([[self.splitViewController.viewControllers lastObject]
isKindOfClass:[UINavigationController class]]) {
UINavigationController *navigationController =
[self.splitViewController.viewControllers lastObject];
currentDetailViewController = (RTDetailViewController *)
navigationController.topViewController;
}
else
currentDetailViewController =
[self.splitViewController.viewControllers lastObject];
if (currentDetailViewController.
masterPopoverController != nil)
[currentDetailViewController.masterPopoverController
dismissPopoverAnimated:YES];
If you’re on the iPhone, you simply assign the delegate to the segue’s destinationViewController.
DestinationController *destinationController =
destinationSegue.destinationViewController;
destinationController.delegate = self;
Saving the Destination Choice and Selecting a Destination
At this point, if you were to run your project, you would be able to tap the Destination button, choose a destination, and see the data for either New York or San Francisco.
But you’re not done yet.
First, if the application is terminated (and I mean terminated, not running in the background and relaunched), the user will find that the destination she selected has reverted to being the default one. You would like RoadTrip to be in position to save, and then restore, the user’s destination preference. (In Chapter 11, you see how to default to the first destination in the plist. I mention in that chapter that I show you how to allow the user to select a destination in Chapter 20, and here you are.)
Start by adding the destinationPreference property to RTAppDelegate by adding the bolded code in Listing 20-12 to RTAppDelegate.h.
Listing 20-12: Updating the RTAppDelegate Interface
#import <UIKit/UIKit.h>
@class Trip;
@interface AppDelegate : UIResponder
<UIApplicationDelegate>
@property (strong, nonatomic) UIWindow *window;
@property (nonatomic, strong) Trip *trip;
@property (nonatomic, strong) NSString *
destinationPreference;
- (void) createDestinationModel:(int)destinationIndex;
@end
Apple provides NSUserDefaults object — available to any app — that you can use to store user preferences, or any small data values that should be saved by your app. In this section, you use the NSUserDefaults object to save the destination preference, so if the user chooses “San Francisco” the first time they use the app, “San Francisco” will be the location used when the app is next launched.
Data is stored in the user defaults object as a key-value pair. The value will be the destinationPreference string (which will be @”0” or @”1”. The key will be the static DestinationPreferenceKey that you should now add to RTAppDelegate.m, as shown by the bolded code in Listing 20-13.
Listing 20-13: Updating the RTAppDelegate Implementation
#import “RTAppDelegate.h”
#import “Reachability.h”
#import “Trip.h”
static NSString *DestinationPreferenceKey =
@”DestinationPreferenceKey”;
@implementation RTAppDelegate
You’re adding a key (string) that you’ll need to use when you save the preference.
What you would like to do is direct the user to select a destination rather than using the default one. I’ll have you post an alert to the users that they need to do that. More elegant ways are available to get the users to select the initial destination, but I’ll leave that as an exercise for the reader.
Start by adding the bolded code in Listing 20-14 to viewDidLoad in RTMasterViewController.m.
Listing 20-14: Adding to viewDidLoad
- (void)viewDidLoad
{
[super viewDidLoad];
RTAppDelegate* appDelegate = [[UIApplication sharedApplication] delegate];
self.title = appDelegate.trip.destinationName;
UIImageView* imageView = [[UIImageView alloc]
initWithImage:[appDelegate.trip destinationImage]];
self.tableView.backgroundView = imageView;
UISwipeGestureRecognizer *swipeGesture =
[[UISwipeGestureRecognizer alloc] initWithTarget:self
action:@selector(handleSwipeGesture:)];
swipeGesture.direction = UISwipeGestureRecognizerDirectionLeft;
[self.view addGestureRecognizer:swipeGesture];
self.findText.delegate = self;
if(appDelegate.destinationPreference == nil) {
UIAlertView *alert = [[UIAlertView alloc]
initWithTitle:@”Welcome to Road Trip”
message:@”Please select a Destination from the
Road Trip Menu”
delegate:nil
cancelButtonTitle:@”OK”
otherButtonTitles:nil];
[alert show];
}
}
As you can see, if the appDelegate.destinationPreference property is nil, you’ll post the Please select a destination from the Road Trip menu alert.
Unfortunately, every time you compile and run your app (or launch it), you’ll see the alert because you will never have anything other than nil in the appDelegate.destinationPreference property.
In Listing 20-15, you fix that problem. At application launch, you’ll check to see whether a user preference is saved. If one is, you assign it to destinationPreference. If no preference is saved, you leave that preference as nil, and the alert to the user to select a destination will be posted by the RTMasterViewController.
Add the bolded code in Listing 20-15 to application:didFinishLaunchingWithOptions: in RTAppDelegate.m and delete the one line of code that’s commented out in, bold, italic, and underline.
Listing 20-15: Updating application:didFinishLaunchingWithOptions:
- (BOOL)application:(UIApplication *)application
didFinishLaunchingWithOptions:
(NSDictionary *)launchOptions
{
… // previous code here
self.destinationPreference = [[NSUserDefaults standardUserDefaults] objectForKey:DestinationPreferenceKey];
if ( self.destinationPreference == nil) {
NSDictionary *currentDestinationDict = @{DestinationPreferenceKey: @”0”};
[[NSUserDefaults standardUserDefaults]
registerDefaults:currentDestinationDict];
}
else
[self createDestinationModel:
[self.destinationPreference intValue]];
//[self createDestinationModel:0];
return YES;
}
At application launch, you check an NSUserDefaults object to see whether an entry exists with a key of DestinationPreferenceKey (you added this previously in Listing 20-13):
self.destinationPreference =
[[NSUserDefaults standardUserDefaults]
objectForKey:DestinationPreferenceKey];
You use NSUserDefaults to read and store preference data to a defaults database, using a key value, just as you access keyed data from an NSDictionary. In this case, the preference is the destination.
NSUserDefaults is implemented as a singleton, meaning that only one instance of NSUserDefaults is running in your application. To get access to that one instance, I invoke the class method standardUserDefaults:
[NSUserDefaults standardUserDefaults]
standardUserDefaults returns the NSUserDefaults object. As soon as you have access to the standard user defaults, you can store data there and then get it back when you need it.
objectForKey: is an NSUserDefaults method that returns the object associated with the specified key, or nil if the key wasn’t found.
Obviously, the first time the app is launched, no data is there, so you create a dictionary with the default value:
NSDictionary *currentDestinationDict =
@{DestinationPreferenceKey: @”0”};
Note that you save the value as an NSString. That’s because the NSUserDefaults requires a property list object.
You then send the NSUserDefaults object the registerDefaults message. This creates a new entry in the NSUserDefaults database that you can later access and update using the key you provided in the dictionary.
Because destinationPreference is still nil, when viewDidLoad executes, it will launch the Destination controller.
If a value exists in NSUserDefaults, you create the Destination model by sending the createDestinationModel: message with the value you had stored — which will be, as you will see, the index of the destination in the Destinations plist:
[self createDestinationModel:
[self.destinationPreference intValue]];
Note that you use an NSString method intValue. This method returns the value in a string as an int, which is handy because that’s what the createDestinationModel: method expects.
You also could’ve made the currentDestinationIndex an NSNumber. It’s an object wrapper for any C scalar (numeric) type. It defines a set of methods that allow you to set and access the value in many different ways, including as a signed or unsigned int, double, float, BOOL, and others. Also, NSNumber defines a compare: method to determine the ordering of two NSNumber objects.
If no destinationPreference exists, the user will see a blank Detail view with a default Master view (it looks a little different on the iPhone) and the alert asking her to select a destination. As I said, you have more elegant ways of doing this.
The last step in saving the Destination preference is actually storing destinationPreference itself, and you do that in createDestinationModel:. Add the bolded code in Listing 20-16 to createDestinationModel: in RTAppDelegate.m.
Listing 20-16: Updating createDestinationModel:
- (void) createDestinationModel:(int)destinationIndex {
NSString *selectedDestinationIndex =
[NSString stringWithFormat: @”%i”,destinationIndex];
if(![selectedDestinationIndex
isEqualToString:self.destinationPreference]) {
self.destinationPreference = selectedDestinationIndex;
[[NSUserDefaults standardUserDefaults]
setObject:self.destinationPreference
forKey:DestinationPreferenceKey];
}
self.trip = [[Trip alloc] initWithDestinationIndex:destinationIndex];
}
You start out in Listing 20-16 by converting the destinationIndex parameter to a string and comparing it to see whether the Destination preference is the same as the one just selected by the user. (The user may have chosen the same destination again in the Destination controller):
NSString *selectedDestinationIndex =
[NSString stringWithFormat: @”%i”,destinationIndex];
if(![selectedDestinationIndex
isEqualToString:self.destinationPreference]) {
If the destination isn’t the same, you assign the new value to the destinationPreference:
self.destinationPreference = selectedDestinationIndex;
and then you save the new value in NSUserDefaults:
[[NSUserDefaults standardUserDefaults]
setObject:self.destinationPreference
forKey:DestinationPreferenceKey];
To store data, you use the setObject:forKey: method. The first argument, setObject:, is the object I want NSUserDefaults to save. This object must be NSData, NSString, NSNumber, NSDate, NSArray, or NSDictionary. In this case, savedData is an NSString, so you’re in good shape.
The second argument is forKey:. To get the data back (and for NSUserDefaults to know where to save it), you have to be able to identify it to NSUserDefaults. You can, after all, have a number of preferences stored in the NSUserDefaults database, and the key tells NSUserDefaults which one you’re interested in.
Next, you create the model passing in the destination index:
self.trip = [[Trip alloc]
initWithDestinationIndex:destinationIndex];
Displaying the Destination Table
One remaining problem is that the Destination table should appear automatically when the user dismisses the UIAlertView — the one that displays the “Welcome to Road Trip” message the first time the app is launched. The best way to handle this is to provide a method that will be called when the Alert is dismissed by the user, and then display the Destination table in that method. Here are the steps to do that:
1. Add UIAlertViewDelegate to the RTMasterViewController’s comma-separated list of delegates in RTMasterViewController.h.
2. Designate the RTMasterViewController as the UIAlertViewDelegate by adding the line of code shown in Listing 20-17 to the viewDidLoad method in RTMasterViewController.m.
3. Add the alertView:clickedButtonAtIndex: method to RTMasterViewController.m. The simple code shown in Listing 20-18 displays the Destination table as desired.
Listing 20-17: Designating the Master View Controller as the Alert Delegate
- (void) createDestinationModel:(int)destinationIndex {
… // previous code
if(appDelegate.destinationPreference == nil) {
UIAlertView *alert = [[UIAlertView alloc]
initWithTitle:@”Welcome to Road Trip”
message:@”Please select a Destination from the
Road Trip Menu”
delegate:nil
cancelButtonTitle:@”OK”
otherButtonTitles:nil];
alert.delegate = self;
[alert show];
}
Listing 20-18: Displaying the Destination Table
- (void)alertView:(UIAlertView *)alertView clickedButtonAtIndex:(NSInteger)buttonIndex {
[self performSegueWithIdentifier:@”Destination” sender:self];
}
Testing
You’re done. Run your app and test your work.
To test this part of your app, you need to first stop it in the Simulator (or device) by clicking the Stop button on the Xcode toolbar. Then remove RoadTrip from the background by following these steps:
1. Double-click the Home button to display the applications running in the background.
2. Select the RoadTrip icon and hold down the mouse button until the icon starts to wiggle.
3. Click the Remove button, the red circle with the X that appears in the upper-left corner of the icon.
4. Run your app.
To test this part of your app again later, you need to first stop it in the Simulator (or device) by clicking the Stop button on the Xcode toolbar. Then remove RoadTrip and its user defaults from the device by following these steps:
1. Press and hold the RoadTrip icon until it wiggles.
2. Click the app Delete icon, the circle with the X that appears in the upper-left corner of the icon.
3. Press the Delete button when asked if you should delete the app and all of its data.
4. Build and run your app again, with the default destinationPreference again set to nil. This gives you a fresh start.
Adding Destination Support to the iPhone Storyboard
Your goal is to add a Destination scene to your iPhone storyboard in the same way that you added one to your iPad storyboard file. Follow the same directions for creating the Destination Controller scene for iPad storyboard. Steps include the following:
1. Drag a UIViewController into the iPhone storyboard.
2. Use the Inspector to change the class name to DestinationController, and the Storyboard ID to Destination.
3. Drag a Model segue from the Destination table cell in the RTMasterViewController to the DestinationController. Set the segue ID to Destination.
4. Add the Navigation bar, and then place a Cancel button in it.
5. Choose the DestinationController’s cancel action for the Cancel button.
6. Add a UIImageView with an image.
7. Add a Label “Pick a Place, Anyplace.”
8. Add a Table view.
9. Set the Table view’s delegate and dataSource to be the DestinationController.
10. Format the Table View cell as described earlier in the chapter.
The resulting layout is shown in Figure 20-3.
The good news is that you don’t have to change your Objective-C code at all — the same DestinationController code works fine.
A Word about Adding Settings
Although space doesn’t allow me to show you how to implement settings — for example, letting the user choose whether she wants to hear the car sound when she taps the Test Drive button, or to change the speed of the car — you implement such settings in exactly the same way that you just implemented the Destination preference. You add a setting to NSUserDefaults and create an RTAppDelegate property that you check in the car animation messages, for example, before you play the sound. To get even more sophisticated, you could create a Preferences class, in the same way you create a Trip class, that manages all preferences and uses that rather than the RTAppDelegate to provide Preference data to the rest of your app.
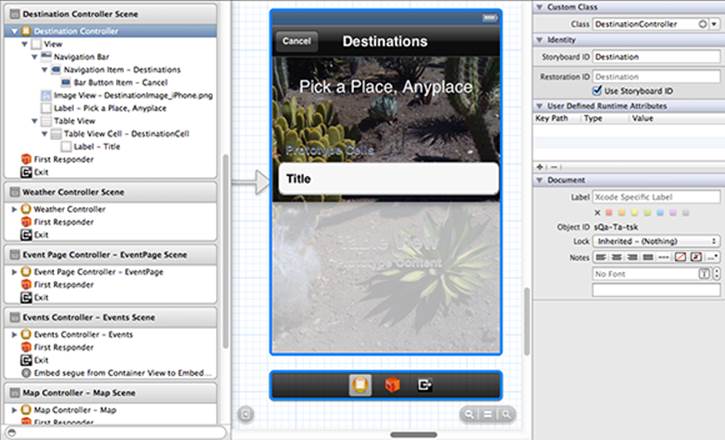
Figure 20-3: The Destination scene in the iPhone storyboard.
What’s Next?
Although this point marks the end of your guided tour of iOS app development, it should also be the start — if you haven’t started already — of your own development work.
Developing for the iPad is one of the most exciting opportunities I’ve come across in a long time. I’m hoping that it ends up being as exciting for you.
Do keep in touch, though. Check out my website, www.nealgoldstein.com, on a regular basis. There you can find the completed RoadTrip Xcode project.
Finally, keep having fun. I hope I have the opportunity to download one of your applications from the App Store someday.