OS X Mavericks For Dummies (2014)
Part II. Mavericks Taming (Or “Organization for Smart People”)
Chapter 9. Organizing Your Life
In This Chapter
![]() Introducing Calendar
Introducing Calendar
![]() Creating and using Calendar calendars
Creating and using Calendar calendars
![]() Creating and organizing Calendar events
Creating and organizing Calendar events
![]() Remembering events with Reminders and Notification Center
Remembering events with Reminders and Notification Center
![]() Taking notes with Notes
Taking notes with Notes
When you buy OS X Mavericks, the folks at Apple generously include applications that can help simplify and organize your everyday affairs — namely Calendar, Reminders, and Notes (to name three you discover in this chapter).
In fact, OS X comes with a whole folder full of applications — software you can use to do everything from surfing the Internet to capturing an image of your Mac’s screen to playing QuickTime movies to checking the time. Technically, most of these applications aren’t even part of OS X. Rather, the vast majority of them are what are known as bundled apps — programs that come with the operating system but are unrelated to its function. Readers (bless them) tend to complain when I skip bundled applications, so I mention almost all of them in this book.
But in this chapter, you get a look at only the applications that help you organize your everyday life: your appointments, to-do items, notes to yourself, and all the various gadgets you may attach to and detach from your Mac.
The applications discussed in this chapter are stored in (where else?) the Applications folder, which you can get to in four ways:
![]() Click the Applications folder in the Sidebar of any Finder window.
Click the Applications folder in the Sidebar of any Finder window.
![]() Choose Go⇒Applications.
Choose Go⇒Applications.
![]() Press
Press ![]() +Shift+A.
+Shift+A.
![]() Click the Launchpad icon in the Dock to see all the applications installed on this Mac (refer to Chapter 7).
Click the Launchpad icon in the Dock to see all the applications installed on this Mac (refer to Chapter 7).
 Other bundled apps you might be especially interested in include Safari (Chapter 10), Contacts and Mail (Chapter 11), iTunes (Chapter 12), a whole handful of multimedia applications that enable you to play video and more on your Mac (Chapter 13), and TextEdit (Chapter 14).
Keeping Track with Calendar
 Calendar is a wonderful program that provides multiple appointment calendars with alerts. More precisely, you can have multiple color-coded calendars, several types of visual, audible, and e-mailed alerts, repeating events, and more. You can publish your calendar(s) on the web for others to view (which requires an iCloud account or other WebDav server), and you can subscribe to calendars published by other Calendar users.
 I love Calendar and keep it open most of the time on my Macs. In the sections that follow, I share some of the features I find most useful.
Navigating Calendar views
Calendar lets you display the main Calendar window just the way you like it:
![]() You can view your calendar by the day, week, month, or year. Figure 9-1 shows a weekly view. To select a view, click the Day, Week, Month, or Year button at the top.
You can view your calendar by the day, week, month, or year. Figure 9-1 shows a weekly view. To select a view, click the Day, Week, Month, or Year button at the top.
![]() To move back or forward, click the arrow buttons on either side of the Today button. You see the previous or next week in Week view, yesterday or tomorrow in day view, and so on.
To move back or forward, click the arrow buttons on either side of the Today button. You see the previous or next week in Week view, yesterday or tomorrow in day view, and so on.
![]() To go to today’s date, click the Go to Today button.
To go to today’s date, click the Go to Today button.
![]() To add a new calendar, click the New Calendar (+) button.
To add a new calendar, click the New Calendar (+) button.
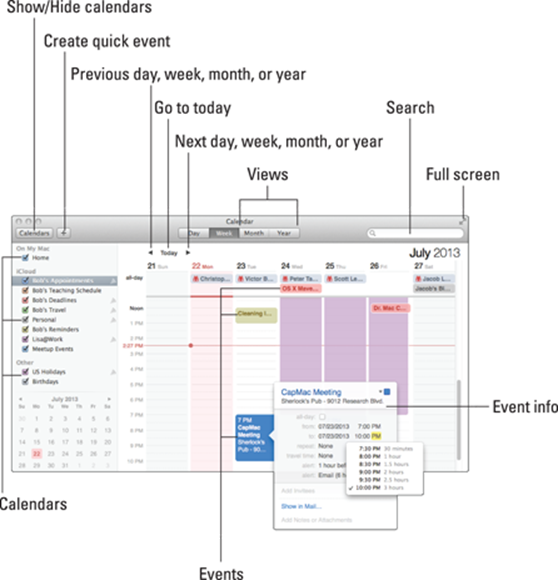
Figure 9-1: The Calendar main window displaying the view I prefer: Week view.
You can find all these items, most of which have shortcuts, in the Calendar application’s View menu, as shown in Figure 9-2. This menu offers almost total control of what you see and how you navigate.
If you want to master Calendar, it would behoove you to spend some time experimenting with these views and with their navigation commands and options.
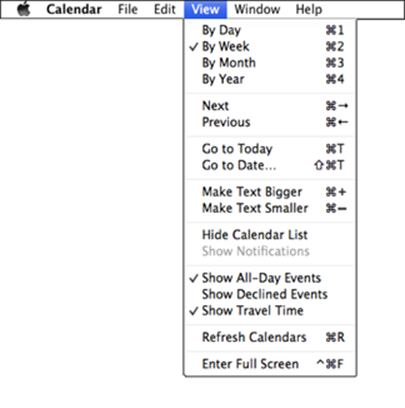
Figure 9-2: The Calendar application’s View menu.
Creating calendars
If you refer to Figure 9-1, you see a list of my calendars in the top-left corner: Bob’s Appointments, Bob’s Teaching Schedule, Bob’s Deadlines, Bob’s Travel, and so on. The check boxes turn the visibility of a calendar on (checked) and off (unchecked).
The calendars appear in three sections — On My Mac, iCloud, and Subscriptions — because all three types of calendars are on my Mac. You can read much more about iCloud in Chapter 10, but for now, if you’re not an iCloud user, your calendars will appear in the On My Mac section instead of the iCloud section. Because I don’t actually have any calendars stored on my Mac (all of my calendars are stored in and synced by iCloud), the Home calendar you see in Figure 9-1 exists solely for this demonstration.
To create a new calendar in Calendar, follow these steps:
1. Choose File⇒New Calendar⇒iCloud or On My Mac.
A new calendar named Untitled is created and added to the appropriate calendar list.
2. To give your calendar a name, select Untitled and type a new name.
3. (Optional) To color-code the entries for this calendar, first select the calendar (by clicking it); choose Edit⇒Get Info or press ![]() +I; and then select a color by clicking and holding the color swatch, as shown in Figure 9-3.
+I; and then select a color by clicking and holding the color swatch, as shown in Figure 9-3.
In my humble opinion, Other is the handy choice because it lets you select thousands of colors — including the lovely shade of fuchsia I’m selecting in Figure 9-3 — in addition to the seven colors available in the menu.
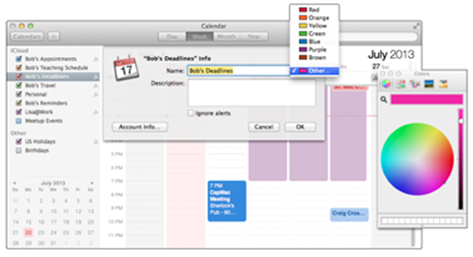
Figure 9-3: Choose Other for even more colors.
Now any item you create while this calendar is selected (in the list that pops up from the Calendars button) appears on the selected calendar in the color you selected. While you’re in the Info sheet, you can also add a description of your calendar.
Grouping calendars
You can also organize calendars in groups that contain more than one calendar. To create a new calendar group in Calendar, follow these steps:
1. Choose File⇒New Calendar Group, or press ![]() +Shift+N.
+Shift+N.
A new calendar group named Group is created and added to the On My Mac section of the calendar list.
2. Give the new group a name by selecting Group and typing a new name.
3. To add calendars to the group, create a new calendar while the group is selected, or drag existing calendars below the group name in the list, as shown in Figure 9-4.
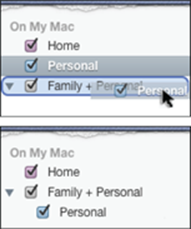
Figure 9-4: Adding the Personal calendar to the Family + Personal group.
When you release the mouse button, the Personal calendar moves below the Family + Personal group. Note that the Personal calendar is indented and the Family + Personal group has a disclosure triangle to its left.
Now you can show or hide all calendars in the group by selecting or deselecting a single check box. You can still show or hide individual calendars by selecting or deselecting their check boxes, of course.
Here’s how you might deploy this feature. You could create individual calendars for each member of your family and put all the individual family calendars in a group called Family. Then you could make all the family-member calendars visible or invisible with a single click of the group calendar’s check box.
If you have an iCloud account (as discussed in Chapter 10), you can publish your calendars and invite others to subscribe to them by choosing Calendar⇒Publish. The others receive an e-mail inviting them to subscribe to your calendar. This is what my family does. Each of us maintains and publishes his or her own calendar and subscribes to everyone else’s. That way, we can all see at a glance who’s doing what and when they’re doing it. This is by far the slickest solution we’ve found.
Deleting a calendar or group
To delete a calendar or calendar group, select it in the list and choose Edit⇒Delete or press ![]() +Delete. If the calendar has events on it or the group has calendars in it, you see an alert box asking if you’re sure you want to delete that calendar or group; if not, the calendar or group will be deleted as soon as you choose Edit⇒Delete or press
+Delete. If the calendar has events on it or the group has calendars in it, you see an alert box asking if you’re sure you want to delete that calendar or group; if not, the calendar or group will be deleted as soon as you choose Edit⇒Delete or press ![]() +Delete.
+Delete.
 When you delete a calendar or group, all the events and reminder items in that calendar or group are also deleted. Although you can Undo a deleted calendar or group (choose Edit⇒Undo or press
 ![]() +Z), you must do so before you quit Calendar. If you quit Calendar without undoing a calendar or calendar-group deletion, everything on that calendar (or calendars) will be gone forever (unless, of course, you have Time Machine or another backup, as I explain in Chapter 18).
+Z), you must do so before you quit Calendar. If you quit Calendar without undoing a calendar or calendar-group deletion, everything on that calendar (or calendars) will be gone forever (unless, of course, you have Time Machine or another backup, as I explain in Chapter 18).
Creating and managing events
The heart of Calendar is the event. To create a new one, follow these steps:
1. Choose File⇒New Event, press ![]() +N, double-click a date on the calendar, or drag up or down anywhere on the calendar.
+N, double-click a date on the calendar, or drag up or down anywhere on the calendar.
If you double-click or click and drag on the day of the event, you can skip Step 2, and you don’t need to specify the date in Step 3.
Alternatively, try the Create Quick Event (+) button. It’s smart enough to interpret commands like “Family Movie 7–10PM Thursday” and create a new event on the proper day and time, as shown in Figure 9-5.
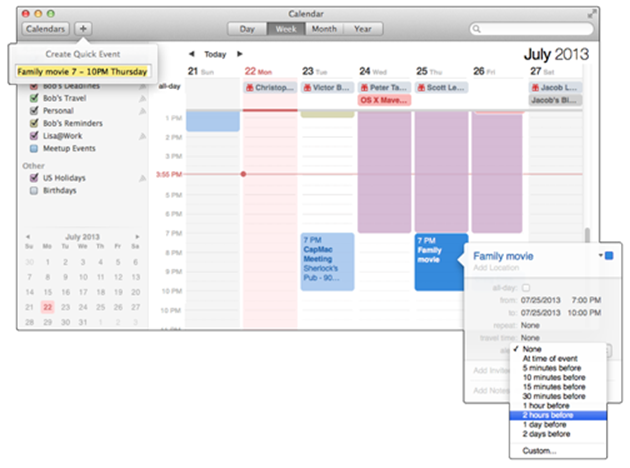
Figure 9-5: Creating a Quick Event (upper left) and the resulting event bubble (lower right) for this three-hour event on my Appointment calendar.
2. If the event doesn’t appear in the proper place, just click it and drag it wherever you like.
3. To edit an event, select it and choose Edit⇒Edit Event, press ![]() +E, or double-click it to open its event bubble, as shown in Figure 9-5.
+E, or double-click it to open its event bubble, as shown in Figure 9-5.
All the items in dark text can be edited. For example, click on the date or time to change it. The other items — Repeat, Travel Time, and Alerts — are pop-up menus. The Alert menu is popped up in Figure 9-5. The blue square in the upper-right corner of the event bubble is also a pop-up menu, which lets you select a different calendar for this event.
 Travel Time is a new feature in Mavericks; it lets you include travel time to and from an event (and blocks out that time on your calendar), while preserving the event’s actual start and end times.
4. When you’re satisfied with all of the event’s items, press Enter or Return or click anywhere outside the event bubble.
If you prefer working in a little window rather than the event bubble, check out the Edit⇒Show Inspector command (![]() +Option+I), which displays the selected event in a window. Click a different event, and its info instantly fills the Inspector window. Try it; you might like it.
+Option+I), which displays the selected event in a window. Click a different event, and its info instantly fills the Inspector window. Try it; you might like it.
 The difference between Get Info and the Inspector is that the Inspector window changes contextually and displays information about the currently selected event. Get Info windows, on the other hand, display info for a specific event. Put another way, a Get Info window displays the info for a specific event, and you can have as many Get Info windows on the screen as you like. There’s only one Inspector window; it displays info for whichever event is currently selected.
Inviting others to attend an event
To invite other people to your event, you can open Contacts or the Calendar Address Panel (Window⇒Address Panel or ![]() +Option+A) and drag the contacts onto the event in Calendar. Alternatively, you can type the first few letters of the name in the Invitees field, and names that match magically appear. In Figure 9-6, I typed the letters st, and Calendar offered me a choice of my two contacts with names that start with st — namely, Stan LeVitus and Stan Lee. Sweet! (If you’re unfamiliar with Contacts, flip to Chapter 11 for details.)
+Option+A) and drag the contacts onto the event in Calendar. Alternatively, you can type the first few letters of the name in the Invitees field, and names that match magically appear. In Figure 9-6, I typed the letters st, and Calendar offered me a choice of my two contacts with names that start with st — namely, Stan LeVitus and Stan Lee. Sweet! (If you’re unfamiliar with Contacts, flip to Chapter 11 for details.)
After you’ve added one or more invitees, click the Send button to invite them to the event. If the invitees have Calendar (or its predecessor iCal), they can open the enclosure (which is included with your invitation e-mail), which adds the event to Calendar with Accept, Decline, and Maybe buttons. All they have to do is click the appropriate button, and you receive an e-mail informing you of their decision along with an enclosure that adds their response to the event in Calendar. Nice, eh?
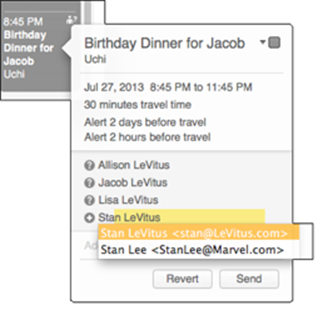
Figure 9-6: Type the first few letters of a contact’s name.
Note that if the recipient is using certain third-party mail clients, such as Mailsmith or Thunderbird to name a couple, don’t send the reply. But the majority of people you know are more likely to use Apple Mail or Microsoft Outlook, which both do the right thing with invitations.
If the invitee doesn’t have Calendar (or doesn’t open the enclosure that was included with the e-mail invitation), he or she has to respond the old-fashioned way: by replying to your e-mail or calling you on the telephone.
Setting an alert
What’s the point of putting an event on your calendar if you forget it? If you set an alert, Calendar won’t let you forget. To set an alert, click the word None (just to the right of the word alert) in the Event info window. A menu appears. Choose the type of alert you want from the menu and change its values to suit your needs. I find the Message with Sound and Email alerts so useful that I use both for almost every event I create.
You can have as many alerts as you like for each event. When you add an alert, a new alert item appears below it. Just click the word None just to the right of the word alert (alert is partly hidden by its pop-up menu in Figure 9-5) to create a second (or third or fifteenth) alert. To remove an alert, click to the right of the word alert and choose None from the pop-up menu.
You can choose separate default alerts for Events, All Day Events, and Birthdays in Calendar Preferences. Choose Calendar⇒Preferences or press ![]() +, (comma), and then click the Alerts tab at the top of the window.
+, (comma), and then click the Alerts tab at the top of the window.
All the features mentioned so far are wonderful, but my very favorite Calendar feature has to be alerts. I rarely miss an important event anymore; Calendar reminds me of them with time to spare. Better still, I sync events and alerts among my Mac and iPhone and iPad. I can create an event or alert, and within a few minutes — through the magic of iCloud — it appears on the other devices.
You don’t have to have iCloud to sync calendars on your Mac and iDevice, but without it, you can synchronize only when you connect your iDevice to your Mac with its included USB cable or perform a wireless sync between your Mac and the iDevice.
Reminders: Protection Against Forgetting
Reminders will be familiar to anyone with an iDevice because it bears more than a passing resemblance to the iOS Reminders app.
 Reminders help you stay organized. Unlike an event, a Reminder item isn’t necessarily associated with a particular day or time (though it can be). Furthermore, Reminders can be location-based, which is handier on an iDevice than a Mac, but a great feature if you have such a device. Finally, Reminders can have a priority level of Low, Medium, High, or None.
If you have an iDevice and use iCloud, your Reminders will appear on all your Apple devices — other Macs, iPhones, iPads, and iPod touches — simultaneously, which means you should never miss a Reminder. Just set a Reminder on your Mac or any iDevice, and you’ll never forget anything.
Getting started with Reminders
Before you create or manage your own Reminders, there are a couple of things you should know, starting with the concept of Lists. Reminders includes a List called Reminders by default. You can delete or rename it if you like, and you can create additional Lists if you care to by choosing File⇒New List, pressing ![]() +L, or clicking the plus button at the bottom of the window.
+L, or clicking the plus button at the bottom of the window.
I like to have two to-do Lists and call them Bob’s To Dos and Bob’s Shopping List. I also have a third List called Completed, which Reminders creates the first time you click the check box to indicate a task is “done,” such as the Advanced iPhone book proposal Reminder shown inFigure 9-7.
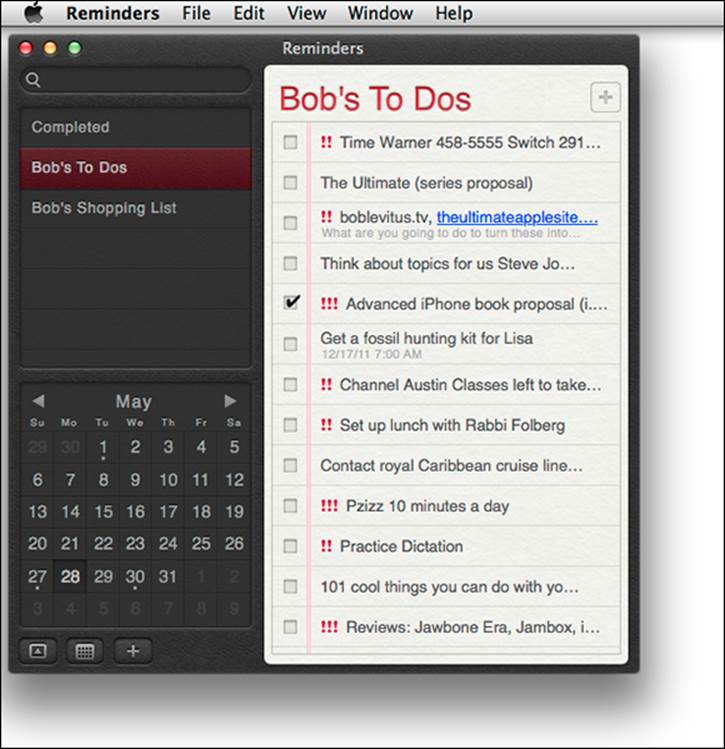
Figure 9-7: Three Lists (upper left) and some of the Reminders on Bob’s To Dos (right).
In other words, when you check the box for an item, the item is moved from whichever List it’s on to the Completed List.
Here are more helpful techniques for working with Lists:
![]() To rename a List: Right-click or Control-click the List, choose Rename from the contextual menu, type the new name, and press Return or Enter when you’re done. Or select the list, press Return or Enter, type the new name, and then press Return or Enter again when you’re done.
To rename a List: Right-click or Control-click the List, choose Rename from the contextual menu, type the new name, and press Return or Enter when you’re done. Or select the list, press Return or Enter, type the new name, and then press Return or Enter again when you’re done.
![]() To display a List in a separate window: Double-click the List’s name; right-click or Control-click the List and choose Open List in New Window from the contextual menu; choose Window⇒Open in New Window; or press
To display a List in a separate window: Double-click the List’s name; right-click or Control-click the List and choose Open List in New Window from the contextual menu; choose Window⇒Open in New Window; or press ![]() +Return or Enter.
+Return or Enter.
![]() To show or hide the little calendar: Choose View⇒Show/Hide Calendar; press
To show or hide the little calendar: Choose View⇒Show/Hide Calendar; press ![]() +Option+K; or click the little calendar button below the little calendar.
+Option+K; or click the little calendar button below the little calendar.
![]() To show or hide the List Sidebar: Choose View⇒Show/Hide Sidebar; press
To show or hide the List Sidebar: Choose View⇒Show/Hide Sidebar; press ![]() +Option+S; or click the little triangle in a button on the left beneath the little calendar.
+Option+S; or click the little triangle in a button on the left beneath the little calendar.
You don’t have to have more than one List. You don’t even have to change the default List’s name from Reminders if you don’t want to. That being said, I like having Reminders organized into separate To Do and Shopping Lists. The point is that you can make a bunch of Lists or dump everything into a single List; just use Lists to organize your Reminders so they make sense to you.
To do or not to do: Setting reminders
The preceding sections tell you pretty much everything about Reminders except how to create one, so it’s time to find out how to create Reminders. It couldn’t be easier: Just choose File⇒New Reminder; press ![]() +N; click the Plus button in the top-right corner of the Reminders window; or click the first blank line in any List and begin typing.
+N; click the Plus button in the top-right corner of the Reminders window; or click the first blank line in any List and begin typing.
Ah, but there’s much more to a Reminder. Reminders can
![]() Remind you at a specific time on a specific date.
Remind you at a specific time on a specific date.
![]() Repeatedly remind you at a specified interval.
Repeatedly remind you at a specified interval.
![]() Remind you at a specific location (great for iPhone and 3G/4G iPad owners).
Remind you at a specific location (great for iPhone and 3G/4G iPad owners).
And Reminders can also have a priority and notes. To access these features, you need to Show Info for the Reminder by choosing View⇒Show Info; pressing ![]() +I; clicking the little “i” that appears on the right side of the Reminder (hover your cursor over the right side of the reminder if you don’t see it); or double-click a blank spot on the Reminder. Show Info for the Pizza and Wings Reminders is shown in Figure 9-8.
+I; clicking the little “i” that appears on the right side of the Reminder (hover your cursor over the right side of the reminder if you don’t see it); or double-click a blank spot on the Reminder. Show Info for the Pizza and Wings Reminders is shown in Figure 9-8.
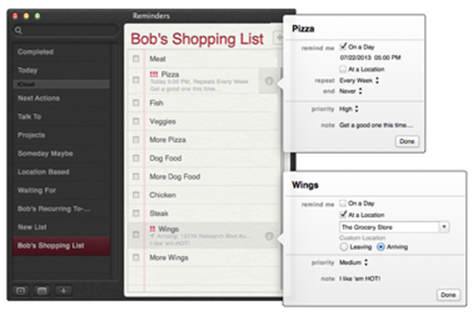
Figure 9-8: A Reminder to get Pizza and a Reminder to get Wings when I’m near the store.
The first time you try to use At a Location, your Mac will present a dialog asking if you want to Enable Location Services to Allow “Reminders” to Use Your Current Location. If you agree, click the Open Privacy Preferences button, select the check box to enable Location Services in Reminders, and then close the System Preferences app. If you don’t want to enable Location Services for the Reminder app, just click the Cancel button.
If you have an iPhone, location-based Reminders are awesome. Give them a try, and I’m sure you’ll be as hooked as I am.
Finally, to reorder Reminders in a List, click a blank spot on any Reminder, drag it up or down, and drop it into its new position.
Everything you need to know about the Notification Center
The item on the right in Figure 9-9 should look familiar to those of you who use an iPhone, iPad, or iPod touch. It’s the Mac Notification Center, and while it was new in Mountain Lion, it’s been part of iOS for years (well, at least a year longer than it’s been on the Mac).
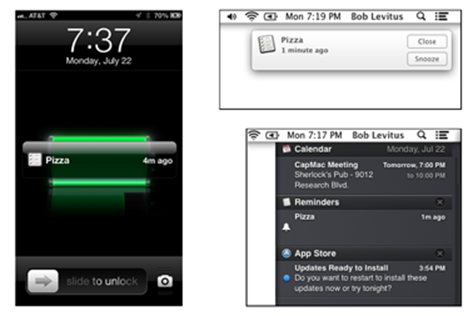
Figure 9-9: This is what the Pizza Reminder looks like on my iPhone (left) and on my Mac (top and bottom right).
![]() Notification Center displays communications from apps that support it. You can make it appear regardless of what application is currently active by clicking its menu bar icon (shown in the margin) or swiping from the left edge to the right on your trackpad.
Notification Center displays communications from apps that support it. You can make it appear regardless of what application is currently active by clicking its menu bar icon (shown in the margin) or swiping from the left edge to the right on your trackpad.
You manage notifications in the Notifications System Preference pane. Choose Apple⇒System Preferences, click System Preferences’ Dock icon, or click the little gear near the bottom of Notification Center, which is a shortcut that opens the Notifications Preference pane. On the left are all the apps on your hard disk that support the Notification Center protocol. To specify settings for an app, click it in the list. When you’ve selected an app, here’s what you can do:
![]() To have an app’s notifications not appear in Notification Center: Either deselect the Show in Notification Center check box or drag the app down to the Not in Notification Center section of the list.
To have an app’s notifications not appear in Notification Center: Either deselect the Show in Notification Center check box or drag the app down to the Not in Notification Center section of the list.
![]() To change how apps are sorted in Notification Center: Choose Manually or By Time from the Sort Notification Center pop-up menu. Choose Manually if you prefer to arrange the order the apps appear in Notification Center by dragging them up or down; choose By Time to sort them with the most recent ones at the top.
To change how apps are sorted in Notification Center: Choose Manually or By Time from the Sort Notification Center pop-up menu. Choose Manually if you prefer to arrange the order the apps appear in Notification Center by dragging them up or down; choose By Time to sort them with the most recent ones at the top.
![]() To specify the alert style for the app: Your choices are Banners, Alerts, or None. Alerts stay onscreen until you dismiss them; Banners appear in the upper-right corner of the screen below the Notification Center icon and fade away a few seconds after they appear.
To specify the alert style for the app: Your choices are Banners, Alerts, or None. Alerts stay onscreen until you dismiss them; Banners appear in the upper-right corner of the screen below the Notification Center icon and fade away a few seconds after they appear.
![]() To see the number of new notifications for the app on its Dock icon: Select the Badge App Icon check box.
To see the number of new notifications for the app on its Dock icon: Select the Badge App Icon check box.
![]() To hear a sound when receiving notifications: Select the Play Sound when Receiving Notifications check box.
To hear a sound when receiving notifications: Select the Play Sound when Receiving Notifications check box.
![]() To specify the number of recent items the Notification Center displays for the app: Click the Show in Notification Center pop-up menu and choose 1, 5, 10, or 20 recent items.
To specify the number of recent items the Notification Center displays for the app: Click the Show in Notification Center pop-up menu and choose 1, 5, 10, or 20 recent items.
Here’s a look at the Notification Center itself:
![]() To temporarily turn off all alerts and banners: Open Notification Center, scroll to the top, and then click the Show Alerts and Banners switch so it’s ON.
To temporarily turn off all alerts and banners: Open Notification Center, scroll to the top, and then click the Show Alerts and Banners switch so it’s ON.
![]() To respond to a notification: Open Notification Center and click the notification to launch its app, or click its banner before it disappears.
To respond to a notification: Open Notification Center and click the notification to launch its app, or click its banner before it disappears.
![]() To repeat a notification in 9 minutes: Click the Snooze button.
To repeat a notification in 9 minutes: Click the Snooze button.
![]() To close all notifications for an app: Hover over the right side of the app’s name (Reminders in Figure 9-9) and click the little x when it appears.
To close all notifications for an app: Hover over the right side of the app’s name (Reminders in Figure 9-9) and click the little x when it appears.
Use Notes for Making Notes
 Notes is an electronic notepad for your Mac. A note is a convenient place to jot quick notes, recipes, phone numbers, or whatever. Some notes are shown in Figure 9-10.
To create a new note, choose File⇒New Note; press ![]() +N; or click the little plus (+) button below the list of notes.
+N; or click the little plus (+) button below the list of notes.
Notes is supremely flexible; here are just a few things you can do:
![]() Double-click a note to open it in its own window so you can drag it around onscreen by its title bar.
Double-click a note to open it in its own window so you can drag it around onscreen by its title bar.
After opening a note in its own window, if you want the note to float in front of other windows so it’s always visible, choose Window⇒Float on Top.
![]() Change text to any font, color, size, and style by selecting it and using the myriad of tools in the Format menu.
Change text to any font, color, size, and style by selecting it and using the myriad of tools in the Format menu.
![]() Search for a word or phrase in any note by typing your query in the Search box.
Search for a word or phrase in any note by typing your query in the Search box.
![]() Create bulleted, numbered, or dashed lists by selecting the text and choosing Format⇒Lists. (Ingredients is a bulleted list and Directions is a numbered list in Figure 9-10.)
Create bulleted, numbered, or dashed lists by selecting the text and choosing Format⇒Lists. (Ingredients is a bulleted list and Directions is a numbered list in Figure 9-10.)
![]() Create folders to organize your notes by choosing File⇒New Folder or pressing
Create folders to organize your notes by choosing File⇒New Folder or pressing ![]() +Shift+N.
+Shift+N.
The Notes window must be selected to create a new folder. If a note in a window is active, the New Folder command will be unavailable. So click the main Notes window if the New Folder command is grayed out.
 Folders in the Notes application are exclusive to Notes. In other words, the folders described in the following bullets aren’t folders in the Finder. You won’t find them on your hard disk; they live only in the Notes app. And also remember that folders are strictly optional. If you don’t have a ton of notes, keeping them all in a single folder and using the Search box to filter them may work for you.
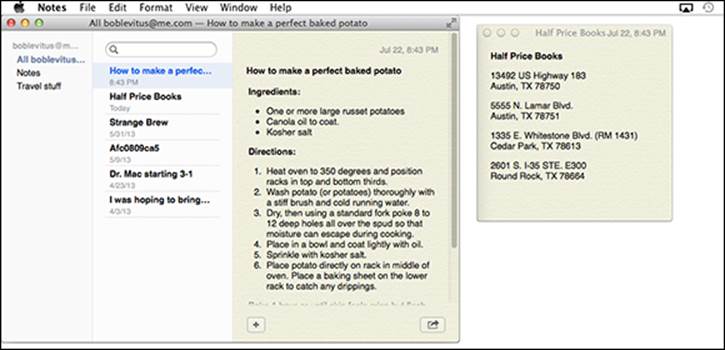
Figure 9-10: Notes is for making notes on your Mac.
![]() Show or hide the Folders List by choosing View⇒Show/Hide Folders List.
Show or hide the Folders List by choosing View⇒Show/Hide Folders List.
![]() Show only Notes in a folder by clicking the folder’s name in the Folders List.
Show only Notes in a folder by clicking the folder’s name in the Folders List.
![]() Automatically sync notes with your iDevice by using iCloud as your default Account (choose Notes⇒Accounts, which will open the Internet Accounts System Preference pane; click iCloud and then enable the check box to sync Notes).
Automatically sync notes with your iDevice by using iCloud as your default Account (choose Notes⇒Accounts, which will open the Internet Accounts System Preference pane; click iCloud and then enable the check box to sync Notes).
![]() Send the contents of a Note via the Mail or Messages apps by choosing File⇒Share or clicking the Share icon.
Send the contents of a Note via the Mail or Messages apps by choosing File⇒Share or clicking the Share icon.
![]() Print a note by choosing File⇒Print or pressing
Print a note by choosing File⇒Print or pressing ![]() +P.
+P.
Anything that you type on a Note is saved automatically as you type, so it has no Save, Save As, or Duplicate command.
Other Notes goodies include a spell checker, spoken notes, text substitutions (such as Smart Quotes and Smart Dashes), and transformations (such as Make Upper or Lowercase). You can find all these options in the Edit menu.