OS X Mavericks For Dummies (2014)
Part II. Mavericks Taming (Or “Organization for Smart People”)
Chapter 7. Four Terrific Timesaving Tools
In This Chapter
![]() Taking a quick look inside files with Quick Look
Taking a quick look inside files with Quick Look
![]() Finding your files and folders, fast
Finding your files and folders, fast
![]() Taking charge with Mission Control
Taking charge with Mission Control
![]() Learning to love Mavericks’ Launchpad
Learning to love Mavericks’ Launchpad
In this chapter, I show you the ins and outs of four terrific timesaving tools: Quick Look, Spotlight, Mission Control, and Launchpad. Each is designed to let you use your Mac better, faster, and more elegantly. Yes, you can use your mouse and click your way to any file or folder on any disk. But these features are built into Mavericks for your convenience.
At the risk of repeating myself, Apple frequently provides more than one way to accomplish a task in OS X, so there’s duplication and overlap among and between the tools in this chapter and tools you’ve read about elsewhere in this book. Don’t worry. Take what you need, and leave the rest. Most users love Quick Look, but some never use it. Some people love Spotlight; others rarely invoke it. Mission Control is amazingly helpful, especially on laptops with small screens, but quite a few users don’t care for it at all.
My advice: Try all the tools and techniques in this chapter at least a few times before you decide whether you want or need them.
With a Quick Look
The Quick Look command displays the contents of the selected file in a floating window. The key point is that you can see what’s in a file without double-clicking (to open) it and without launching any application. This is quite handy when you want to peek at the contents of a file without having to open it.
To take a Quick Look yourself, select an icon and do any of the following: Choose File⇒Quick Look; right-click or Control-click the icon and choose Quick Look from its contextual menu; choose Quick Look from the Action button/menu in the toolbar; or use one of its two keyboard shortcuts — ![]() +Y or the easiest shortcut ever, spacebar.
+Y or the easiest shortcut ever, spacebar.
One of my favorite ways to use Quick Look is with a folder full of images, such as the one shown in in Figure 7-1.
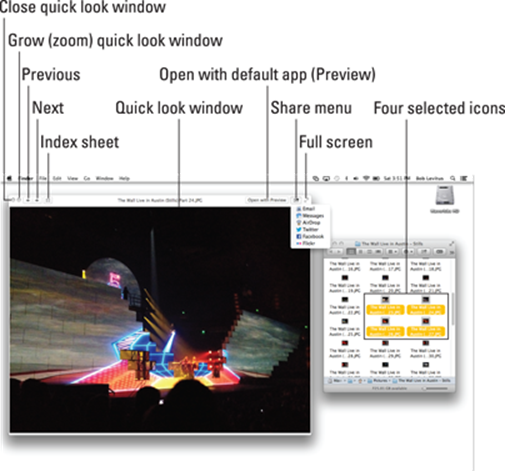
Figure 7-1: The Quick Look window (left) displaying an image from one of the selected icons in my The Wall Live in Austin – Stills folder.
The cool part is that while the Quick Look window is open, you can select different icons in the Finder window and very quickly peek at their contents in the Quick Look window.
The bad news is that while Quick Look works with many types of files — Microsoft Office, Apple iWork, plain-text, PDF, TIFF, GIF, JPEG, PNG, and most types of audio and video — it doesn’t work with all files. You’ll know it didn’t work if Quick Look shows you a big document, folder, or application icon instead of the contents of that file.
If you select multiple items before you invoke Quick Look, as I’ve done in Figure 7-1, three buttons appear at the top of the Quick Look window near the left side — the Next, Previous, and Index Sheet buttons. With these controls you can view all of the selected items at the same time as an index sheet, as shown in Figure 7-2, or view them one at a time by clicking the Next or Previous buttons.
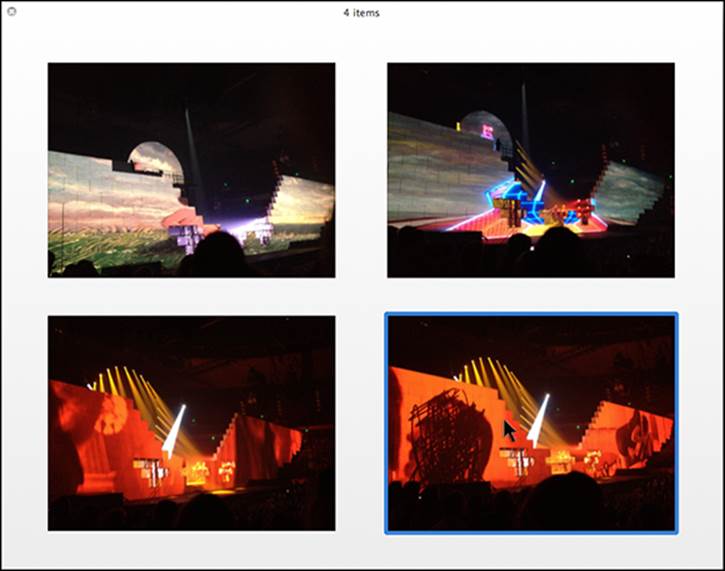
Figure 7-2: Four selected files displayed as a Quick Look index sheet.
The blue outline around the image at the bottom on the right indicates that the cursor is hovering over that image; if I were to click, that image would fill the window, and the icons shown at the top of the Quick Look window in Figure 7-1 would reappear.
Share and share alike with the Share menu
 If you use an Apple iDevice, you’re surely familiar with the rectangular button with an arrow escaping from it, as shown in the margin and in Figure 7-1. It’s called the Share menu and it has as many as seven options (depending upon the type of file you’ve selected):
![]() E-mail: Launches the Mail app and attaches the selected file to a blank message, ready for you to address and send.
E-mail: Launches the Mail app and attaches the selected file to a blank message, ready for you to address and send.
![]() Message: Launches the Messages (formerly iChat) app and puts the selected file in an outgoing message, ready for you to address and send.
Message: Launches the Messages (formerly iChat) app and puts the selected file in an outgoing message, ready for you to address and send.
You become well acquainted with the Messages app in Chapter 11.
![]() AirDrop: Sends the selected file to other Mac users on the same network with a single click. Note that only Lion, Mountain Lion, and Mavericks support AirDrop; earlier versions of OS X didn’t include it. And only recent-vintage Macs (say 2010 or newer) can use it. Also note that iOS 7 will bring AirDrop support to your iDevices as well.
AirDrop: Sends the selected file to other Mac users on the same network with a single click. Note that only Lion, Mountain Lion, and Mavericks support AirDrop; earlier versions of OS X didn’t include it. And only recent-vintage Macs (say 2010 or newer) can use it. Also note that iOS 7 will bring AirDrop support to your iDevices as well.
Note that the next three options appear only when you’ve selected an image file. If you don’t see them when you click your Share menu, you’ve probably selected a PDF or other type of file that can’t be uploaded to Twitter, Facebook, or Flickr.
![]() Twitter: Tweets the selected file to your Twitter account.
Twitter: Tweets the selected file to your Twitter account.
![]() Facebook: Posts the selected file to your Facebook account.
Facebook: Posts the selected file to your Facebook account.
![]() Flickr: Posts the selected file to Flickr, a popular photo-sharing site.
Flickr: Posts the selected file to Flickr, a popular photo-sharing site.
Slide into Slideshow (full-screen) mode
Quick Look really shines in its Slideshow (full-screen) mode, which you can start with any of these techniques:
![]() Hold down Option and choose File⇒Slideshow.
Hold down Option and choose File⇒Slideshow.
![]() Press
Press ![]() +Option+Y.
+Option+Y.
![]() If your file is already open in the Quick Look window, click the double-diagonal-arrow button in the upper-right corner of the window.
If your file is already open in the Quick Look window, click the double-diagonal-arrow button in the upper-right corner of the window.
When you’re in Slideshow mode, a completely different set of controls appears onscreen automatically, as shown in Figure 7-3.
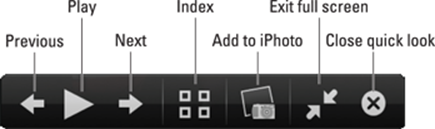
Figure 7-3: The Slideshow controls appear automatically in the full-screen Slideshow mode.
 The Slideshow controls disappear after a few seconds of inactivity; if you don’t see them when you need them, just move the cursor, and they’ll magically reappear.
To exit Slideshow (full-screen) mode, press Esc or click the Exit full-screen button to return to the Quick Look window or the Exit Quick Look button to both exit Slideshow mode and quit Quick Look.
When you’re finished with Quick Look window, click the X button in the top-left corner (refer to Figure 7-1); if you’re in full-screen mode, click the X button in the control bar, as shown in Figure 7-3; or press ![]() +Y, which works in either mode.
+Y, which works in either mode.
One last thing: the Add to iPhoto button will appear only if your Mac has iPhoto in its Applications folder.
Spotlight on Finding Files and Folders Faster
Even if you follow every single bit of advice provided in this chapter, a time will come when you won’t be able to find a file or folder, although you know for certain that it’s right there on your hard drive. Somewhere. Fortunately, Mavericks includes a fabulous technology called Spotlight that can help you find almost anything on any mounted disk in seconds. Spotlight can
![]() Search for files
Search for files
![]() Search for folders
Search for folders
![]() Search for text inside documents
Search for text inside documents
![]() Search for files and folders by their metadata (creation date, modification date, kind, size, and so on)
Search for files and folders by their metadata (creation date, modification date, kind, size, and so on)
Spotlight finds what you’re looking for and then organizes its results logically, all in the blink of an eye (on most Macs).
Spotlight is both a technology and a feature. The technology is pervasive throughout Mavericks — and is the underlying power behind the search boxes in many Apple applications and utilities such as Mail, Contacts, System Preferences, and Finder. You can also use it right from the Spotlight menu — the little magnifying glass at the right end of the menu bar. Also, you can reuse Spotlight searches in the future by turning them into Smart Folders (which I explain in Chapter 6).
Finding files and folders has never been faster or easier than it is in Mavericks. So in the following sections, I look at the two separate but related ways that Spotlight helps you find files, folders, and even text inside document files: the Search box in Finder windows and the Spotlight menu.
Using the Search box in Finder windows
With its power provided by Spotlight, this definitely isn’t your father’s Search box.
Press ![]() +Option+F to move the cursor to the search box of the active window.
+Option+F to move the cursor to the search box of the active window.
The following steps walk you through all the features:
1. Type a single character in the Search box.
The window starts displaying the results, as shown in Figure 7-4.
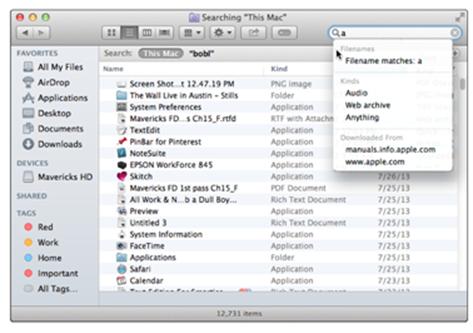
Figure 7-4: As soon as you type one character (a) in the Search box, the magic begins.
Not only does the window become populated with files that match the letter(s) you typed, at the same time, a menu drops down below your cursor to offer search suggestions, such as Filenames, Kinds, and Downloaded From as shown in Figure 7-4, as well as others such as Dates and Sent By (not shown). Typing additional characters narrows the scope, so the more you type, the fewer matches and suggestions you’ll see.
 If you want to change the criteria for one or more of these items, it’s the same as changing criteria for a Smart Folder: Click the item in the Sidebar, and then click the Action-menu button and choose Show Search Criteria. When you’re done changing the search criteria, click the Save button to resave your folder.
2. If the folder or volume you want to search isn’t This Mac or your Home folder, open the folder you want to search, and type your query in the Search box in that folder’s window.
The default is to search files’ contents if it can. Mavericks’ Spotlight can search the contents of files created by most popular applications.
There are also third-party Spotlight plugins that let you search the contents of file types not supported by Mavericks, including old WordPerfect and Quark XPress files and many others. Search the Internet for Spotlight plugins and you’ll find them for dozens of popular apps.
To search for a file by its filename, choose Filename Contains (a in Figure 7-4) from the drop-down menu.
3. When you find the file or folder, you can open any item in the window by double-clicking it.
You can also start a search by choosing File⇒Find (shortcut: ![]() +F).
+F).
Keep these points in mind when you perform a search:
![]() You have a choice of where to search. This Mac is selected in Figure 7-5.
You have a choice of where to search. This Mac is selected in Figure 7-5.
![]() You can choose additional search criteria — such as the kind of file (PDF in Figure 7-5) and the last date the file was opened (Within Last 60 Days in Figure 7-5) — as well as other attributes, including Modification Date, Creation Date, Keywords, Label, File Contents, and File Size.
You can choose additional search criteria — such as the kind of file (PDF in Figure 7-5) and the last date the file was opened (Within Last 60 Days in Figure 7-5) — as well as other attributes, including Modification Date, Creation Date, Keywords, Label, File Contents, and File Size.
![]() To add another criterion, simply click the + button on the right side of the window.
To add another criterion, simply click the + button on the right side of the window.
![]() To save a search for reuse in the future, click the Save button on the right side of the window.
To save a search for reuse in the future, click the Save button on the right side of the window.
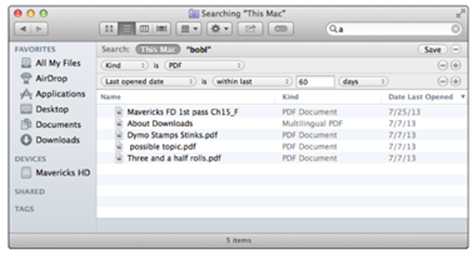
Figure 7-5: Search your whole Mac or a specific folder (and its subfolders) and then narrow your search using one or more criteria.
Try choosing different options from the window’s Arrange menu — Application, Date Last Opened, and so on — to see the search results presented in different ways.
So there you have it — fast searches made easy in the Finder. But there are many ways to access the power of Spotlight, and the Search box in the toolbar of Finder windows is merely one of them.
Using the Spotlight menu and window
Another way to search for files and folders is to use the Spotlight menu itself — the magnifying-glass icon at the far-right end of your menu bar. Click the icon to open the Spotlight Search box, and then type a character, word, or series of words in the Search box to find an item, as shown in Figure 7-6.
Notice that a Quick Look preview appears to the left any item you select in list of search results (Maverick in Figure 7-6), a nice touch.
Memorize and use the super-convenient and easy-to-remember keyboard shortcut for opening the Spotlight Search box, which is ![]() +spacebar by default. If you don’t find
+spacebar by default. If you don’t find ![]() +spacebar appealing as a shortcut, you can change it to whatever you like in the Spotlight System Preference pane.
+spacebar appealing as a shortcut, you can change it to whatever you like in the Spotlight System Preference pane.
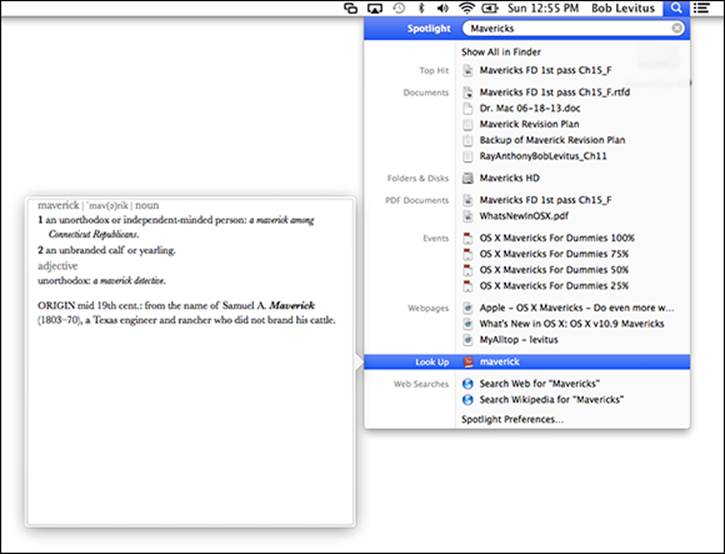
Figure 7-6: Type in the Search box, and your results appear instantly (bottom).
If you highlight (but don’t click) an item in the Spotlight menu’s results list, a preview pops up to its left. I love being able to preview a dictionary definition, like the one in Figure 7-6.
 Spotlight is more than just a menu and Search box; it also uses a technology that’s pervasive throughout OS X and apps including (but certainly not limited to) Mail, Contacts, and many, many more. The reason why it’s so spectacularly speedy is that it “indexes” your files when your Mac is idle. The upshot is that Spotlight knows file locations and contents soon after a file is created or modified.
You can also use the Spotlight window to create and perform more sophisticated searches. You can access this window in two ways:
![]() Click the Show All in Finder item on the Spotlight menu or press
Click the Show All in Finder item on the Spotlight menu or press ![]() +Option+spacebar.
+Option+spacebar.
You can change this shortcut to whatever you like in the Spotlight System Preference pane.
![]() Use the criteria at the top of the window to narrow your search.
Use the criteria at the top of the window to narrow your search.
This is exactly the same process you use to create Smart Folders, as I discuss in Chapter 6! If you want to make a Smart Folder from a search you perform, just click the Save button.
Regardless of which method you choose to invoke it — the Search box in a Finder window, the Spotlight Search box in the menu bar, or the Spotlight window — Spotlight saves you time and effort.
Finding files by other attributes
After you add a search attribute by clicking the + button, choose a search attribute from its pop-up menu: Kind, Last Opened Date, Last Modified Date, Created Date, Name, or Contents by default. Select an item, and its relevant pop-up menus and/or text entry fields appear, as shown inFigure 7-7.
File Size isn’t one of the default search attributes in the pop-up menu; here’s how to choose it and many other attributes not on the menu: Choose Other from the pop-up menu, and a list of dozens of additional search options (including File Size) appears, as shown in Figure 7-8.
In Figure 7-8, I’ve selected the File Size search attribute in the list so I can use it for this search. And, because I expect to use this search attribute fairly often, I’ve also selected its In Menu check box. As a result, the File Size search attribute appears below the Contents attribute in the pop-up menu for easy access, as shown in Figure 7-9.
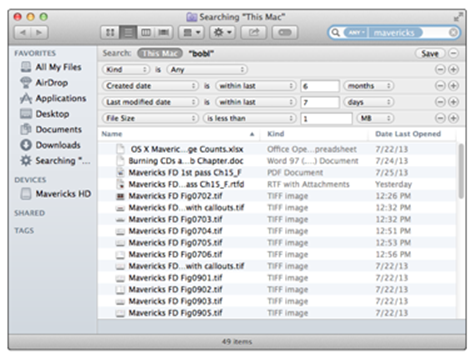
Figure 7-7: Narrowing a search using the Kind, Created Date, Last Modified Date, and File Size search attributes.
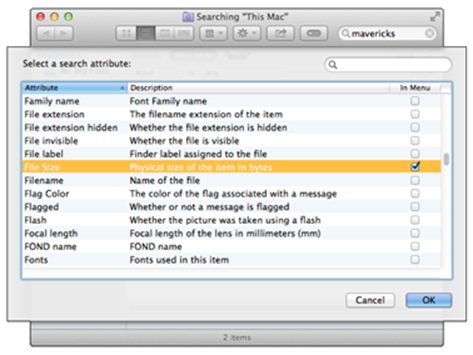
Figure 7-8: Just some of the search attributes that appear when you choose Other.
It takes a few steps to use File Size as a search attribute the first time, but the next time you need it, you just choose it from the pop-up menu and search away.
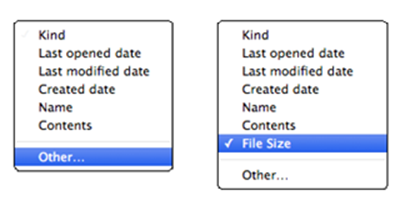
Figure 7-9: The search attribute pop-up menu before (left) and after (right) adding the File Size attribute.
Exposé Yourself to Mission Control
 Two of my favorite tools in Leopard and Snow Leopard were Exposé and Spaces, a positively peachy pair of utilities that went together like peanut butter and chocolate and even had their own System Preference pane, Exposé & Spaces. The preference pane is long gone, but the tools live on in Mission Control. Figure 7-10 shows the Mission Control System Preferences pane in all its glory.
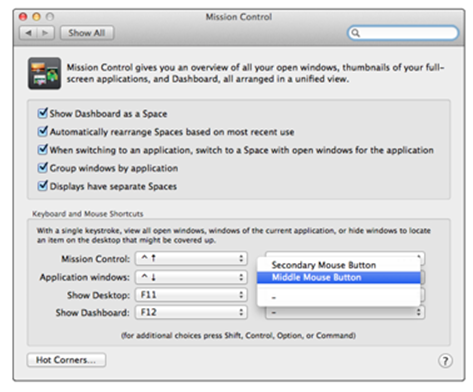
Figure 7-10: The Mission Control System Preferences pane.
The Mission Control pane: It’s painless
The top part of the pane contains five check boxes: Show Dashboard as a Space; Automatically Rearrange Spaces Based on Most Recent Use; When Switching to an Application, Switch to a Space with Open Windows for the Application; Group Windows By Application; and Displays Have Separate Spaces. If you’ve read Chapter 3, you know what Dashboard is all about, but because I haven’t introduced you to Spaces yet (but will shortly), these check boxes will make sense to you only after you read the sections that follow. Suffice it to say that they do what you think they’ll do. You should experiment with the settings, turning them on and off, to see which way you prefer them.
Moving right along, most of this pane handles keyboard and mouse shortcuts for Mission Control. These eight pop-up menus — four each for keyboard and mouse shortcuts — let you specify the trigger for each of the four features with a keystroke or mouse button. The default keyboard shortcuts appear in upcoming text, but yours may differ; to change them, click the appropriate pop-up menu and make a new selection.
Hold down the ![]() , Option, Control, and/or Shift keys when you choose an item from any of the eight shortcut menus to add modifier keys to the shortcuts you create. So, for example, if you were to hold down
, Option, Control, and/or Shift keys when you choose an item from any of the eight shortcut menus to add modifier keys to the shortcuts you create. So, for example, if you were to hold down ![]() +Shift when you select F11 from a pop-up menu, the keyboard shortcut for that feature would be
+Shift when you select F11 from a pop-up menu, the keyboard shortcut for that feature would be ![]() +Shift+F11. Or, if you were to hold down Shift when you select Middle Mouse Button from a pop-up menu, you’d have to hold down Shift and click the middle mouse button to invoke the command.
+Shift+F11. Or, if you were to hold down Shift when you select Middle Mouse Button from a pop-up menu, you’d have to hold down Shift and click the middle mouse button to invoke the command.
Finally, most Apple keyboards made since April 2007 also include dedicated Mission Control and Dashboard shortcut keys (F3 and F4, respectively). If you see a tiny picture that looks like the Mission Control icon on your F3 key or that looks like the Dashboard icon on your F4 key, you can use them in addition to the other shortcuts discussed in this section.
A picture is worth a thousand words, so check out Figures 7-11, 7-12, and 7-13 as you read about each feature.
![]() Figure 7-11 shows a typical jumble of windows from a variety of applications strewn all over my screen.
Figure 7-11 shows a typical jumble of windows from a variety of applications strewn all over my screen.
![]() To see Mission Control, which displays all open windows in all open applications, as shown in Figure 7-12, press Control+
To see Mission Control, which displays all open windows in all open applications, as shown in Figure 7-12, press Control+![]() (up arrow).
(up arrow).
![]() To see all open windows belonging to the current application (TextEdit in Figure 7-13), press Control+
To see all open windows belonging to the current application (TextEdit in Figure 7-13), press Control+![]() (down arrow).
(down arrow).
If you hover over a window on a Mission Control screen (shown in Figures 7-12 and 7-13), a blue border appears around the item you’re hovering over. If you then press the spacebar, you’ll see a preview of the window’s contents, which is especially helpful when a window is partially obscured by another window.
![]() To hide all open windows and display the Desktop, press F11 or fn+F11.
To hide all open windows and display the Desktop, press F11 or fn+F11.
![]() To summon forth the Dashboard (which displays your widgets, as I explain in Chapter 3), press F12 (or fn+F12). Or, if your F4 key has a Dashboard icon printed on it, press F4.
To summon forth the Dashboard (which displays your widgets, as I explain in Chapter 3), press F12 (or fn+F12). Or, if your F4 key has a Dashboard icon printed on it, press F4.
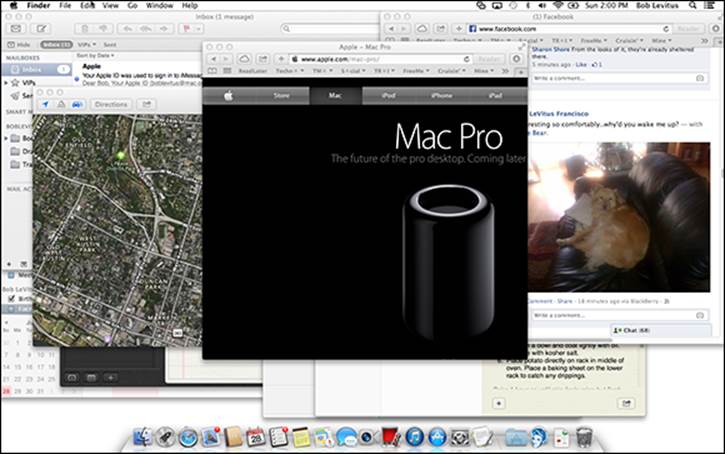
Figure 7-11: On most days, my screen looks something like this, with myriad open windows from numerous apps obscuring one another.
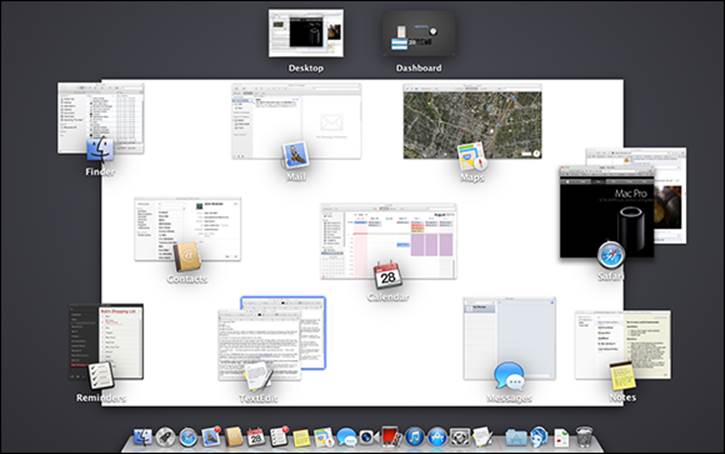
Figure 7-12: After invoking Mission Control (Control+![]() ).
).
Notice that when you’re using Mission Control, windows appear at a reduced size. Identifying information — either the program or window name — appears below the mini-window, making it easier to discern what each item contains. When you click any of these small windows, Mission Control deactivates, and the window you clicked becomes the active window.
Check out the way that Mission Control’s Application Windows screen (see Figure 7-13) includes a row of document icons near the bottom of the screen. They represent the TextEdit documents I created or modified most recently. Click the stack at the right end of the row to see more documents. You read more about TextEdit in Chapter 14, but trust me that this new feature makes it a cinch to reopen documents you’ve used recently.
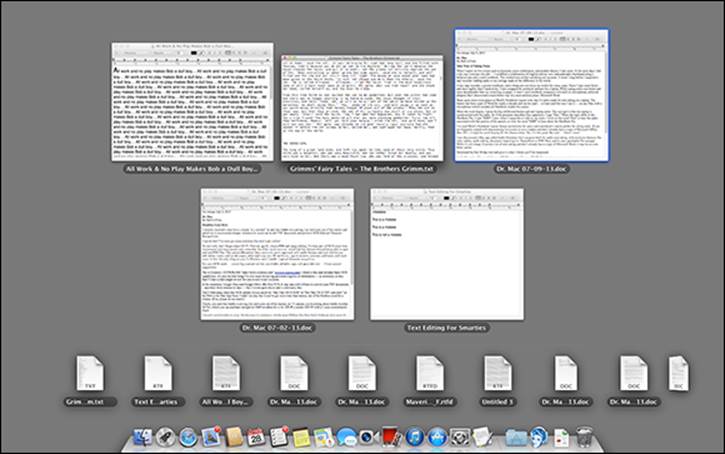
Figure 7-13: After invoking Application Windows (Control+![]() ) when TextEdit was active.
) when TextEdit was active.
Hot corners!
In the bottom-left corner of the Mission Control System Preferences pane is a Hot Corners button, which lets you designate any or all of the corners of your screen as hot spots to trigger Mission Control, Dashboard, Launchpad, Screen Saver, or Display Sleep. Click the menu for a corner, and select the feature you want associated with that corner. Then, whenever you move your cursor onto that corner and leave it there for a second or two, the feature executes.
Hot corners have been part of Mac OS since time immemorial and are still as useful as ever. I like to set the top-right corner to start my screen saver and the bottom-right corner to disable it, for example.
Mission Control is enabled by default, but you can disable any or all of its features by turning off its trigger: Just choose the minus sign from a pop-up menu instead of a keyboard or mouse-button shortcut. In Figure 7-10, the Dashboard mouse trigger is disabled, and I’m changing the Mission Control mouse trigger to Middle Mouse.
Spaces from 30,000 feet (an overview)
If Mission Control lets you manage your windows in real time, its spaces let you manage windows by organizing them in groups called spaces and switch from space to space with a keystroke or gesture.
When you use spaces, only two kinds of windows are shown: windows from applications associated with the active space and windows from applications launched while that space is active.
If you find yourself spending too much time moving and resizing windows onscreen, consider setting up spaces for specific tasks. You might have one space dedicated to a specific project, another for web surfing, and a third for e-mail, each with all its windows arranged just the way you like them.
Think of a space as being a single screen, set up just the way you like it, with its windows arranged just the way you like them. Take, for example, the three spaces shown in Figures 7-14, 7-15, and 7-16. I have one for web surfing (Figure 7-14), one for Mail (Figure 7-15), and one for working in the Finder (Figure 7-16), each one with its windows arranged exactly as I like ’em.
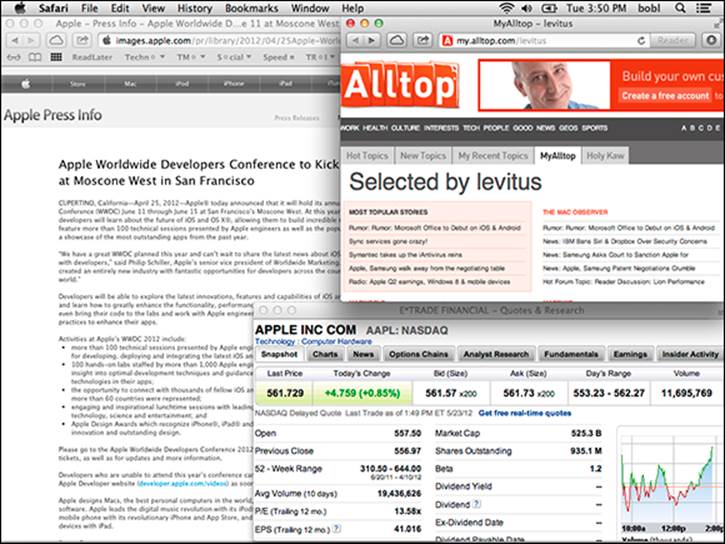
Figure 7-14: My web-surfing space, with three Safari windows (Apple Press Info, my Alltop page, and eTrade) arranged the way I like ’em on my screen.
Moving right along, you manage your spaces with Mission Control, which provides an overview of what’s running on your Mac, including all your spaces, the Dashboard, and all open windows. In a nutshell, this dynamic duo makes it easier than ever to manage and maintain the mélange of Finder and application windows that conspire to clutter and eventually consume your screen.
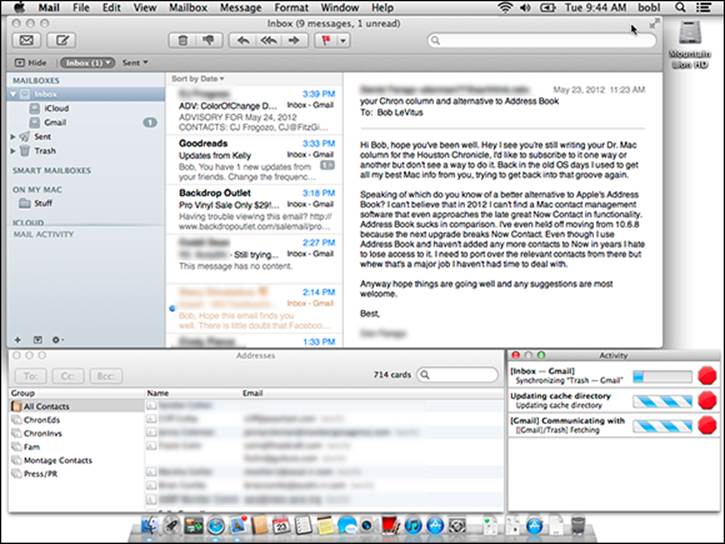
Figure 7-15: My Mail space, with three Mail windows (Message Viewer, Addresses, and Activity) arranged just so.
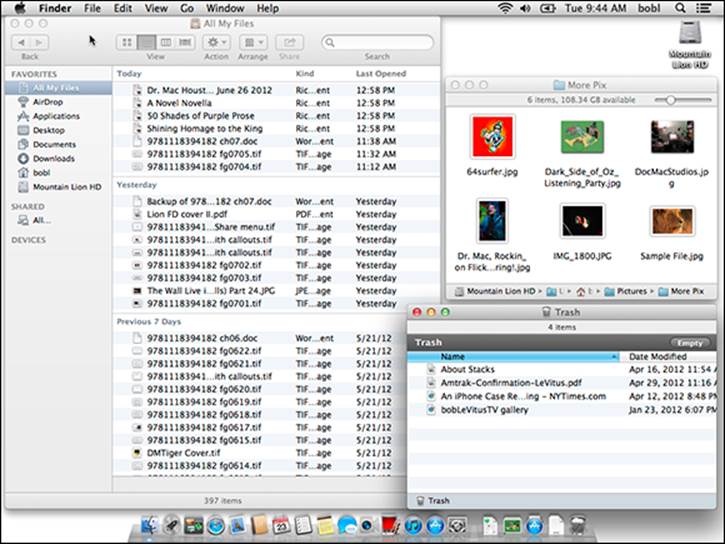
Figure 7-16: My Finder space, with two windows in list view (All My Files and Trash), plus a third window in icon view (More Pix).
To see it in action, press the Mission Control key (Control+![]() by default). If you have a trackpad, you can also swipe upward using three fingers to see Mission Control, which will look something like Figure 7-17 based on the three spaces shown in Figures 7-14 through 7-16.
by default). If you have a trackpad, you can also swipe upward using three fingers to see Mission Control, which will look something like Figure 7-17 based on the three spaces shown in Figures 7-14 through 7-16.
Note that you won’t see the Dashboard in Mission Control if you’ve cleared the Show Dashboard as a Space check box in the Mission Control System Preferences pane.
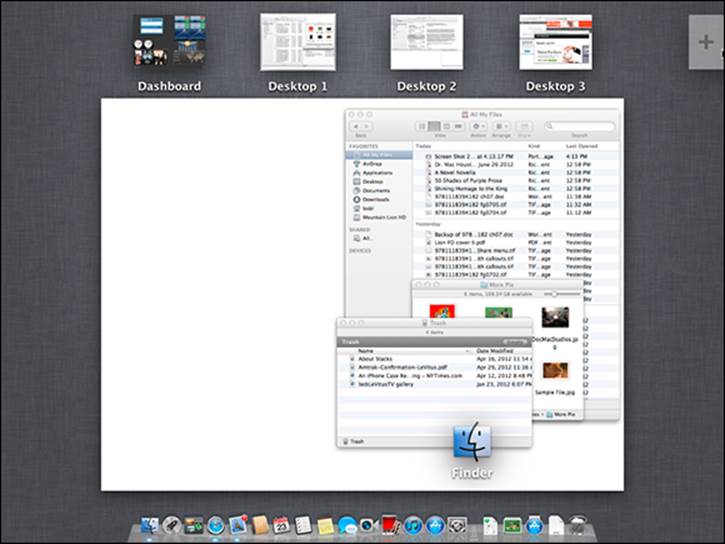
Figure 7-17: Mission Control showing off three spaces (Desktops 1, 2, and 3) and the Dashboard.
 In earlier versions of OS X, these desktops were called spaces. Mission Control, improbably, uses the words spaces and desktop interchangeably, so as you see in Figure 7-17, my three spaces are named Desktop 1, Desktop 2, and Desktop 3. I think it’s dumb, and I’m going to continue to call a space a space regardless of what Mission Control labels them (because calling them desktops would be even more confusing).
By the way, apps running in full-screen mode are considered a space, which bears the name of the app rather than “Desktop X.”
To add a new space, first enter Mission Control; then move the cursor to the top-right corner of the screen and click the Add (+) button. (My tech editor informs me that if you have your Dock on the right side of the screen, the + will appear in the top-left corner instead of the top-right.)
You don’t see a + button? It’s hidden and appears only when your cursor is nearby. You can see it in the top-right corner of Figure 7-17; if you don’t see a + button there on your screen, move the cursor to that general vicinity, and it magically appears.
You can use this technique to add as many spaces as you like. When you’re finished using Mission Control, you can
![]() Click a space at the top of the screen to switch to it.
Click a space at the top of the screen to switch to it.
or
![]() Press the Mission Control key or swipe with three fingers to return to the space you were using when you entered Mission Control.
Press the Mission Control key or swipe with three fingers to return to the space you were using when you entered Mission Control.
These gestures require a Magic Mouse, Magic Trackpad, or laptop with buttonless trackpad.
If you’re using a notebook Mac, I implore you to learn to use gestures with Mission Control. Visit the Trackpad System Preferences pane’s More Gestures tab and make sure you’ve enabled three- or four-finger swipes. I love swiping between Mission Control spaces like the ones in Figures 7-14, 7-15, and 7-16. Swipe and I’ve got Mail; swipe again and I’ve got Safari; swipe again and I’ve got the Finder. Try it — I think you’ll like swiping to switch spaces (a.k.a. desktops) as much as I do.
One last thing: OS X Mavericks takes full advantage of multiple displays no matter how many displays are connected to your Mac. Put another way, there’s no longer any distinction between primary and secondary displays.
Prior to Mavericks, when you put an app into full-screen mode on a Mac with multiple displays, the secondary display was blanked out and rendered unusable until you exited full-screen mode. In Mavericks, you are free to run an app in full-screen mode on one or more displays without blanking the others. For example, you can work in the Finder’s desktop on one display and use a full-screen app on another, as shown in Figure 7-18.
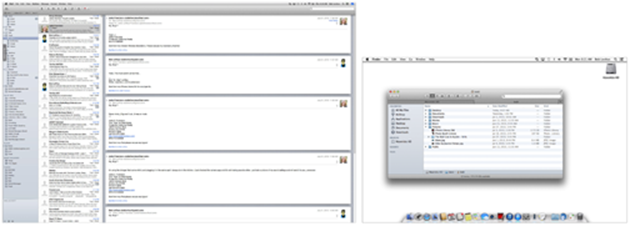
Figure 7-18: Mail is running in full-screen mode on the bigger display on the left; the Finder is running on the MacBook Pro’s internal display on the right.
Another new feature is that each display has its own menu bar and Dock.
And finally, each display has its own Mission Control spaces associated with it. (Mail and Dashboard on the bigger display on the left; Desktops 1 and 2 on the smaller display on the right — as shown in Figure 7-19.
You can drag and drop spaces from one display to another. Try it — it’s way cool!
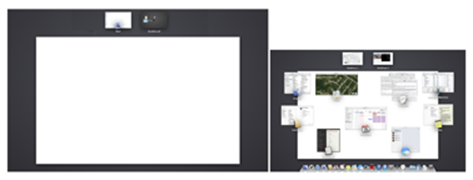
Figure 7-19: Each display has its own set of spaces.
Getting around in space(s)
You just saw one way to move from one space to another — enter Mission Control and click the space you want to use. You can also navigate spaces in the following ways:
![]() Press the Control key and ← (left-arrow key) or → (right-arrow key) to move to the previous or next space.
Press the Control key and ← (left-arrow key) or → (right-arrow key) to move to the previous or next space.
![]() Swipe left or right with three fingers to move to the next or previous space.
Swipe left or right with three fingers to move to the next or previous space.
![]() Press the Control key and the number key for the space you want to use. Pressing Control+2, for example, activates Desktop 2.
Press the Control key and the number key for the space you want to use. Pressing Control+2, for example, activates Desktop 2.
You can enable or disable these keyboard shortcuts in the Keyboard Shortcuts tab of the Keyboard System Preferences pane.
There will be times when you want to move a window from one space to another. To do so:
![]() Drag a window to the left or right edge of the screen, and pause. After a short delay, the window pops into the space on the left or right of the current space.
Drag a window to the left or right edge of the screen, and pause. After a short delay, the window pops into the space on the left or right of the current space.
![]() Press and hold down the mouse button on the window you want to move while pressing the Control key and the
Press and hold down the mouse button on the window you want to move while pressing the Control key and the
• Left-arrow key (←) to move the window to the space on the left of the current space
• Right-arrow key (→) to move the window to the space on the right of the current space
• Number key of the space to move the window to that space
or
![]() Start in the space that has the window you want to move. Enter Mission Control, drag the window from the middle part of the screen onto the space you want to move it to, and then release the mouse button.
Start in the space that has the window you want to move. Enter Mission Control, drag the window from the middle part of the screen onto the space you want to move it to, and then release the mouse button.
It’s often useful to assign a specific application to a specific space. To do so, first launch the application in question; then press and hold its Dock icon, and choose Options, as shown in Figure 7-20.
Here’s the rundown on those options:
![]() To have the application open in every space, choose All Desktops.
To have the application open in every space, choose All Desktops.
When the application is running, it will appear in every space.
![]() To have the application open only in the current space, choose This Desktop.
To have the application open only in the current space, choose This Desktop.
The application opens in this space. If you’re working in a different space and switch to this application, its assigned space scrolls into view.
![]() To have the application open in whatever space you’re using, choose None.
To have the application open in whatever space you’re using, choose None.
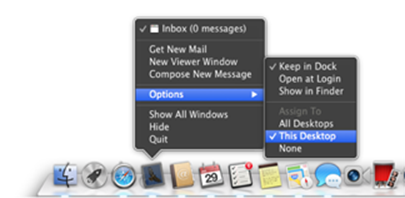
Figure 7-20: Press and hold an application’s Dock icon to assign the application to a specific space (Desktop).
Finally, should you want to delete one or more spaces, simply enter Mission Control, and move the cursor over the space. A Delete button — an X that should look familiar if you use an iPhone, iPad, or iPod touch, or the Dashboard — appears in the top-left corner, as shown in Figure 7-21. Click it to delete that space.
Deleting a space doesn’t delete or quit any applications or close any documents. Applications and windows in a deleted space move to the space called Desktop (the one without a numeric suffix).
The bottom line is that spaces can be particularly useful for those with a smaller display. And now, in Mavericks, it’s even more useful for users with more than one display.
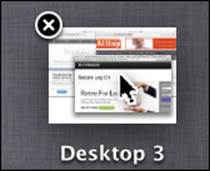
Figure 7-21: Hover the cursor over a space, and a Delete button (X) appears.
Remember that Mission Control can be an acquired taste, so even if you have a small screen or multiple screens, you may not care for it. My advice: Try it for a while, and if you decide that you hate it, turn its triggers off (by selecting the minus sign) and be done with it.
Launchpad: The Place for Applications
Launchpad presents all the applications in your Applications folder in a view that looks like the home screen of any iOS device (that is, iPhone, iPad, or iPod touch). In fact, if you use one of these devices, I suspect that you could skip everything that follows about Launchpad, because it works almost exactly like the home screen on an iPhone or other iDevice.
 Click Launchpad’s Dock icon (shown in the margin). It fills your screen with big, beautiful application icons, as shown in Figure 7-22.
I changed my Desktop picture from plain white to a photograph (of Apple’s Mavericks web page) for Figure 7-22. The photo is actually in focus; the nifty blur effect happens only when Launchpad is active. Sure, it’s just eye candy, but it’s elegant eye candy.
If your Launchpad has more than one page of apps, you can press ![]() + left-arrow (←) or right-arrow (→) to move to the previous or next page. Trackpad users can also use a three-finger swipe left or right to move from page to page.
+ left-arrow (←) or right-arrow (→) to move to the previous or next page. Trackpad users can also use a three-finger swipe left or right to move from page to page.
To launch an app, just click its icon. In a heartbeat, Launchpad disappears, and the app replaces it on your screen.
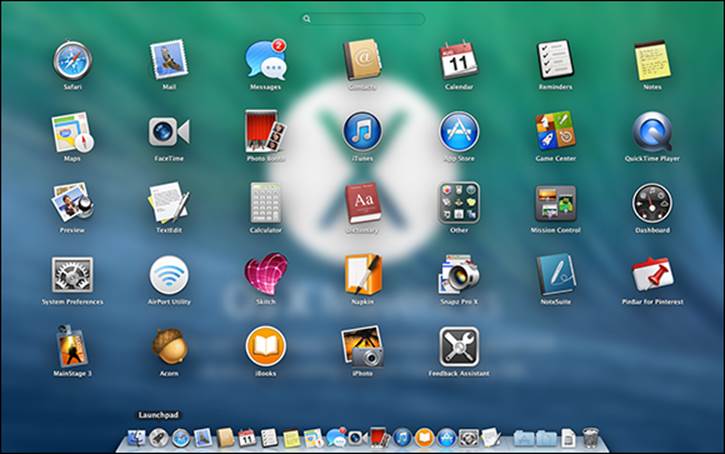
Figure 7-22: Launchpad, in all its glory.
Customizing Your Launchpad
Launchpad is configurable, just like home screens on iDevices. As you’re about to see, you can rearrange app icons on a page, move them from one page to another, organize them in folders, and delete them. Say it all together now: “Just like on iDevices.”
For those who are unfamiliar with iOS or devices that run it, here’s how these things work on your Mac:
![]() To rearrange app icons: Click and drag the app to its new location.
To rearrange app icons: Click and drag the app to its new location.
![]() To move apps to the next or previous page: Click and drag the app to the left or right edge of the screen. When the next page of apps appears, drag the app to its new location on that page.
To move apps to the next or previous page: Click and drag the app to the left or right edge of the screen. When the next page of apps appears, drag the app to its new location on that page.
![]() To add an app to your Dock: Click and drag the app onto the left side of the Dock.
To add an app to your Dock: Click and drag the app onto the left side of the Dock.
![]() To create a folder for apps: Drag one app’s icon on top of another app’s icon to create a folder.
To create a folder for apps: Drag one app’s icon on top of another app’s icon to create a folder.
![]() To add an app to a folder: Drag the app onto that folder to add it.
To add an app to a folder: Drag the app onto that folder to add it.
![]() To move an app out of a folder: Click the folder to open it and drag the app out of the folder.
To move an app out of a folder: Click the folder to open it and drag the app out of the folder.
![]() To change a folder’s name: Click to open the folder, click the current name, and then type a new name.
To change a folder’s name: Click to open the folder, click the current name, and then type a new name.
![]() To uninstall apps: Click an app’s icon, but don’t release the mouse button until all the icons begin to wiggle. Apps that can be uninstalled display a Delete button (X); click to uninstall the app.
To uninstall apps: Click an app’s icon, but don’t release the mouse button until all the icons begin to wiggle. Apps that can be uninstalled display a Delete button (X); click to uninstall the app.
Press Esc to stop the wiggling.
If an icon doesn’t have a Delete button, it’s installed with OS X Mavericks and can’t be uninstalled.
And last but not least, items in the Utilities folder (which you’ll find inside the Applications folder) appear in a folder called Other in Launchpad. Why? Who knows!
![]()