Take Control of FileVault (1.1) (2015)
Appendix A: FileVault on the Command Line
For most users, most of the time, the best way to interact with FileVault and other Core Storage features is through the Security & Privacy pane of System Preferences, or through Disk Utility or the Finder. However, some advanced tasks are possible only on the command line, accessed with Terminal (in /Applications/Utilities). This appendix introduces you to the three command-line tools that interact with FileVault in some way: fdesetup (for FileVault configuration), diskutil (for managing Core Storage volumes), and pmset (for adjusting power management features that affect FileVault).
This appendix doesn’t tell you everything you can do with these tools—that would require its own book! But it does show you how to get started with them and how to perform a few of the most useful tasks.
If you want to learn more about the command line generally, so that you’re more comfortable and confident using commands like these, pick up a copy of my book Take Control of the Mac Command Line with Terminal.
Use fdesetup
The fdesetup command gives you access to all the features of FileVault from the command line—including several that you can’t access in any other way. (The “fde” part of the name stands for full-disk encryption, if you hadn’t already guessed!). It was added to Mac OS X in Mountain Lion.
Tip: For complete documentation on fdesetup, including all its options and parameters, type man fdesetup in Terminal, or visit Apple’s fdesetup(8) Mac OS X Manual Page. (The page applies to Yosemite, too, even though it specifies 10.9.)
To use this command, you type fdesetup followed by one of 19 verbs (some of which have additional parameters), and finally zero or more of 13 possible options. The verbs include enable and disable (to enable or disable FileVault, respectively), list (to list authorized users), and add (to add authorized users). You can access some of the corresponding functions in the FileVault pane of System Preferences too. But there are also some capabilities you won’t see there, such as those reflected by the verbschangerecovery (to modify a recovery key without disabling and reenabling FileVault from scratch), removerecovery (to eliminate a recovery key completely, if you wanted to do that for some reason), remove (to remove authorized users), and authrestart(to Reboot without a Password Prompt).
Here are a few examples of fdesetup commands you might find useful:
Check on FileVault’s current status:
fdesetup status
List all authorized users:
sudo fdesetup list
This displays the usernames and UUIDs (universally unique IDs) of each authorized user.
De-authorize a specific user:
sudo fdesetup remove -user username (where username is replaced with that user’s short username)
Change your recovery key:
sudo fdesetup changerecovery -personal
After entering this command, you’ll have to supply your existing recovery key or password, and a new, random recovery key will be created for you.
Reboot without a Password Prompt
If you need to remotely reboot a Mac that’s protected with FileVault, fdesetup gives you a way to do so without the Mac getting stuck on the EFI Login screen when it turns back on. (I’m assuming your Mac is already set up for remote command-line access and that you can connect to it using SSH; if you don’t know what any of this means, you shouldn’t be using this command!)
First, make sure the remote Mac supports the authrestart command. You can check either by consulting Apple’s support article OS X: Macs that support authenticated restart with FileVault or by connecting to the remote Mac via SSH and entering:
fdesetup supportsauthrestart
If that command returns true, you’re good to go. The command to restart the system immediately without a password prompt afterwards is:
sudo fdesetup authrestart
Enter that, supply your administrator password, and the remote Mac should reboot without any further fuss.
Use diskutil
Just as fdesetup is the command-line version of the FileVault preference pane (with some extra goodies), diskutil is the command-line version of Disk Utility (again, with extra goodies). Apart from all the usual Disk Utility stuff like repairing and partitioning disks, fiskutil has a series of Core Storage verbs that let you create and convert encrypted volumes, among other things. So, to work with encrypted disks, you’ll enter diskutil coreStorage (or diskutil cs for short) followed by one of a dozen verbs and some additional options.
Tip: For complete documentation on diskutil, type man diskutil in Terminal, or visit Apple’s diskutil(8) Mac OS X Manual Page.
As with fdesetup, I’ll give you just a few examples of potentially useful diskutil cs commands.
Get a list of Core Storage volumes:
A good place to start is diskutil cs list, which displays a tree view of all your currently connected Core Storage volumes—that is, both FileVault volumes and encrypted, non-startup volumes. You’ll need some of this information to use other diskutil cscommands.
The display looks something like Figure 23:
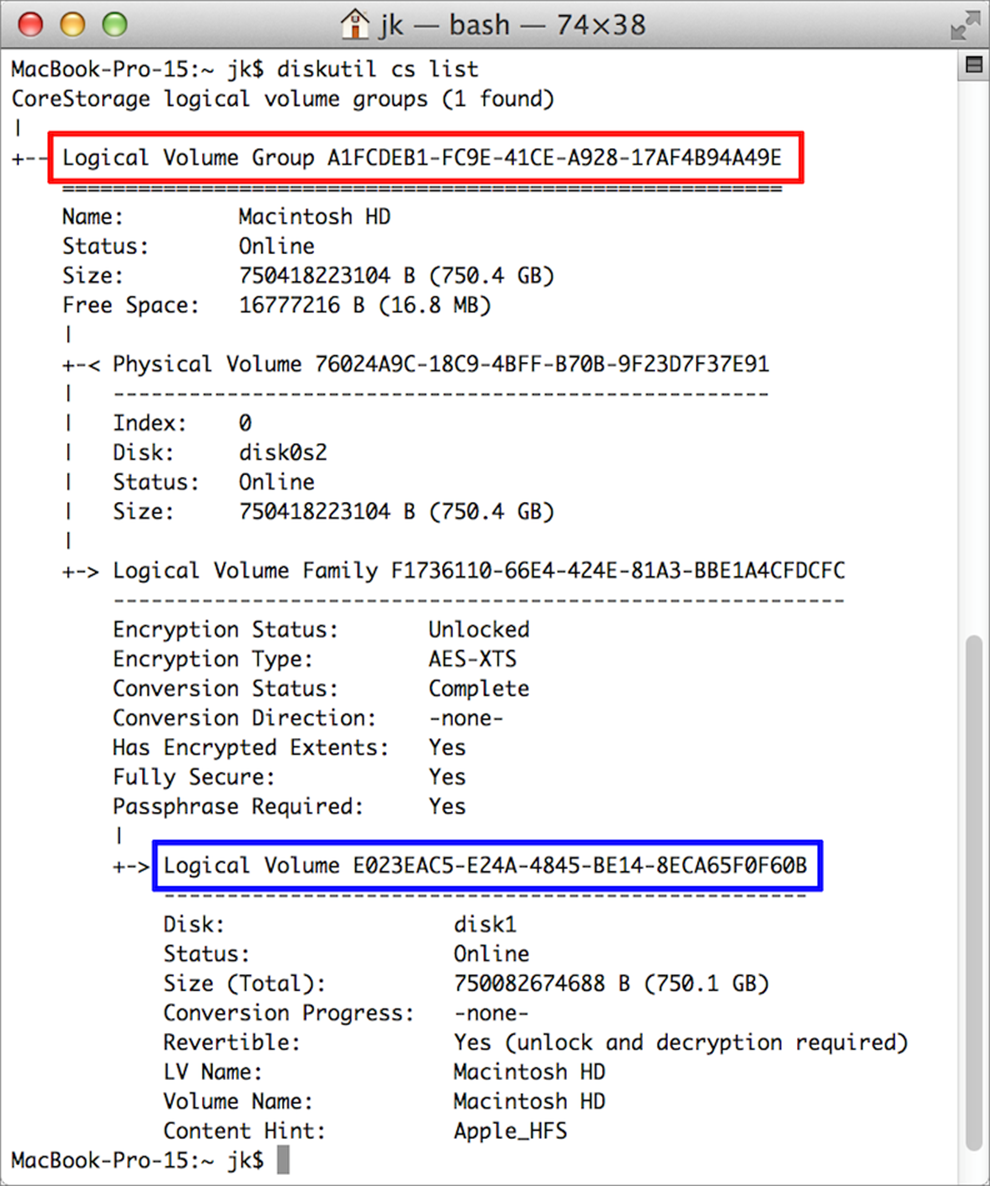
Figure 23: The output of diskutil cs list should look something like this. Notice the highlighted areas for Logical Volume Group and Logical Volume.
Pay particular attention to the highlighted areas. I put a red box around the UUID for the Logical Volume Group and a blue box around Logical Volume. Various other diskutil cs verbs use one or the other of these strings, so your usual procedure would be to look up what the command needs (on the man page or on the Web), run diskutil cs list to get the correct UUID, copy the UUID, and paste it into the command you actually want to run. And how do you know which UUID you need? Well, when the man page says a certain verb takes lvgUUID as an argument, it’s looking for the Logical Volume Group string; lvUUID means Logical Volume.
Note: If you haven’t yet enabled FileVault or encrypted any mounted volumes in the Finder, diskutil cs list won’t display anything. If you want to get the UUID for a volume that isn’t already encrypted, use diskutil list instead.
The diskutil cs list command also shows you the conversion status for any volume, so if you’ve encrypted a volume in the Finder and want to know how close it is to finishing, look for the “Conversion Progress” line.
Change a (non-startup) volume’s password:
The Finder offers no way to change an encrypted volume’s password other than decrypting it and then re-encrypting it. But you can change the password on the command line! Do it like this:
diskutil cs changeVolumePassphrase lvUUID (where lvUUID is the Logical Volume ID you obtained using diskutil cs list)
You’ll then be prompted to enter the volume’s current password, followed by a new password.
Convert a Core Storage volume back to a regular volume:
If you want to decrypt an encrypted volume and change it from Core Storage back to a regular volume, you can use the revert command. Although normally, disabling encryption in the Finder accomplishes this too, I’ve seen some unusual situations in which a volume was encrypted but still considered a Core Storage volume. This can produce symptoms such as being unable to reactivate FileVault after it’s been deactivated. The command looks like this:
diskutil cs revert lvUUID (where lvUUID is the Logical Volume ID you obtained using diskutil cs list)
You’ll be required to provide the volume’s password, so if you don’t have it, you’ll need to take a stronger measure: Delete an entire Core Storage logical volume group (which also deletes all the data on the disk).
Note that you can’t revert a Core Storage volume to a regular volume if it wasn’t converted in the first place. In other words, if you use Disk Utility or diskutil to format a volume as encrypted, it uses Core Storage inherently and can’t be reverted because there’s no previous format to revert to. In such cases, if you want to stop using Core Storage, you must erase and reformat the volume.
Delete an entire Core Storage logical volume group:
Suppose you have a disk that was previously encrypted with FileVault, but you don’t have the password or recovery key, and the recovery key either wasn’t stored with Apple or it wasn’t stored under your account. You can’t retrieve the data from that disk (ever, sorry), and Disk Utility won’t even permit you to repartition it. But you can use diskutil on the command line to delete the entire Core Storage logical volume group, which erases the entire drive so you can start over from scratch, repartition the drive, and set it up however you want. And you can do all this without the disk’s password. Here’s the command:
diskutil cs delete lvgUUID (where lvgUUID is the Logical Volume Group ID you obtained using diskutil cs list)
Use pmset
The pmset command is for changing power management settings. As I mentioned in What Else Can I Do to Increase Security?, one obscure power setting affects FileVault. If you want to avoid ever having your Mac sleep with the FileVault key still stored in firmware, you must (a) force hibernation (also known as “standby”), instead of sleep; and (b) instruct your Mac to destroy the FileVault key from firmware when going into hibernation mode.
I think this is overkill (and excessively inconvenient), because it only prevents hypothetical threats—I’m not aware of any real-world exploits that would be thwarted this way. But if you’re excessively safety conscious (a.k.a. paranoid) and want to leave no potential avenue of attack, you can force hibernation and prevent your Mac from keeping the FileVault key in firmware with a single command:
sudo pmset -a destroyfvkeyonstandby 1 hibernatemode 25
Type that, press Return, and then enter your administrator password. The new setting takes place immediately; the next time your Mac sleeps (such as when you close the lid of a notebook Mac), it’ll hibernate instead and you’ll have to enter the FileVault password to wake it up.
If you do this, you should also disable Power Nap (contrary to what I recommended in Enable Find My Mac), because if Power Nap is still on, your Mac may try to come out of hibernation—but it’ll fail, because it can’t unlock FileVault, and when it realizes it’s stuck, it’ll just turn itself off! You can turn off Power Nap in System Preferences > Energy Saver, or, since you’re already in Terminal, enter this:
sudo pmset -a darkwakes 0
But bear in mind that without Power Nap, the likelihood that you’ll be able to find or remotely wipe a lost or stolen Mac is extremely low.
Tip: For complete documentation on pmset, type man pmset in Terminal, or visit Apple’s pmset(1) Mac OS X Manual Page. (The page applies to Yosemite too, even though it mentions only 10.9.)