Head First iPhone and iPad Development (2013)
Chapter 5. Multiview Applications: It’s all about the details
Most iOS apps have more than one view. We’ve gotten this app off to a quick start using built-in templates and doing some really nice updates to the table view. Now it’s time to dive into the details, setting up the new view and working with the navigation between them. Because most of the widely used apps up on the store are giving you a good and easy way to work through a lot of data. Spin City is doing just that—giving users an easier way to get through the records than flipping through boxes!
An app with a view...
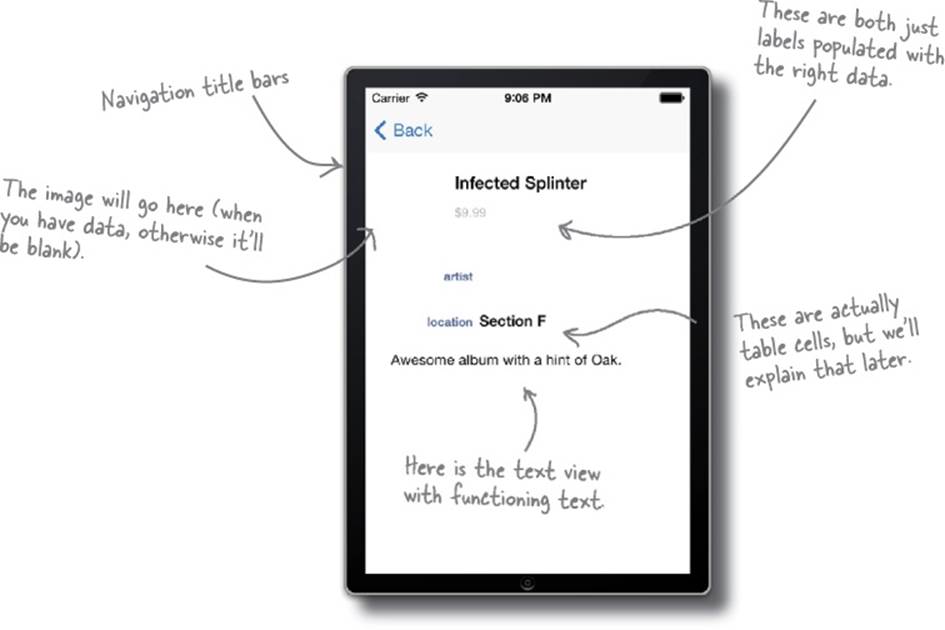
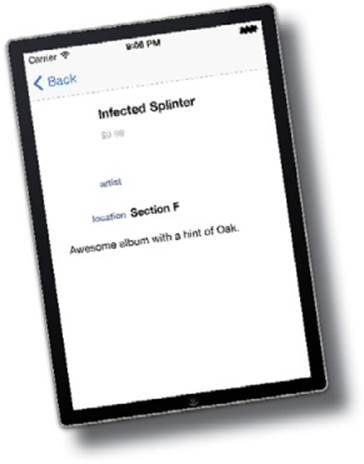
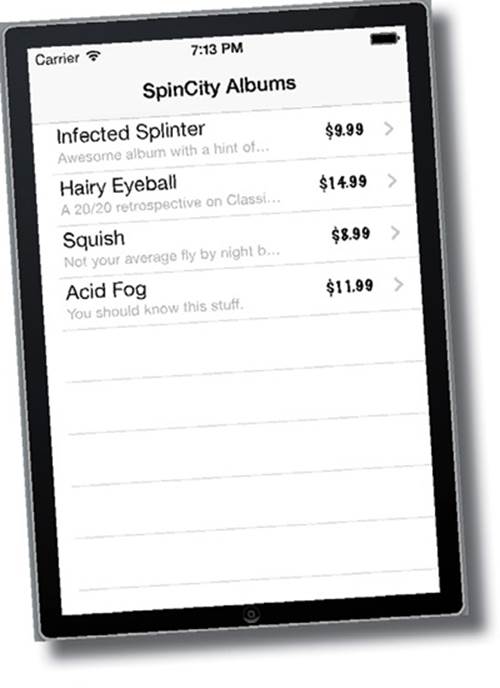
Spin City’s app is up and running with a nice table view and the data in the app. Now that we have the overview of the data, it’s time to get into some details. This is the detail view that we came up with earlier.
Detail views are everywhere
Lots of applications use detail views and anybody who’s used them has a rough idea of what they’re about. It’s zooming in on data, which means for the most part it’s the bottom of the hierarchical view stack and gives information down to the finest grain detail the app can provide.
They are also used to shift the user into a different mode of the application (think going into your wall in the Facebook app and leaving your news feed). Because applications have become more complicated, there can be extra types of interaction with an application and they are frequently accessed through completely different detail views.
Our application has a lot of information about the album in the table view, and that’s good, but we need to be able to display more details so that the customers can learn as much as they want about Rob’s fantastic artists.

Always look for built-in views whenever possible.
You can lay things out by hand and that’ll work, but there’s a better way, especially for so much text-based information.
Table views can be customized to make the layout a bit prettier, but you get to keep all the advantages of the table view. Since you’re such a pro from working in the last chapter, setting that up shouldn’t be too hard.
BRAIN POWER
Check out some apps on your iPhone or iPad. Can you tell which ones use table views for their details and which ones don’t?
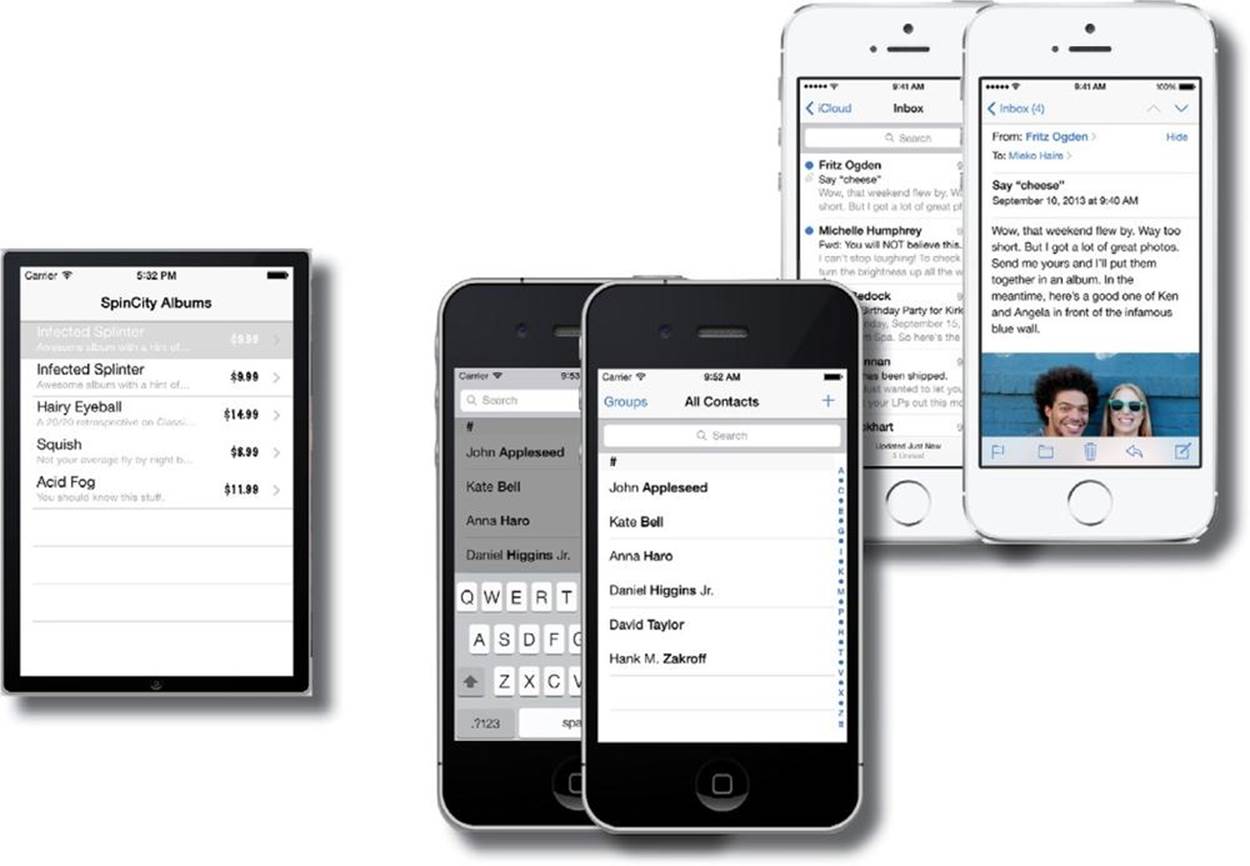
Table views don’t always look like...tables
You’ve seen one table view already for our master view. If you think about it, as long as you can’t select anything, tables are just a great way to lay things out and keep them neat—like using a table in a text document or using a spreadsheet.
If you work with the Apple Mail app or Contacts, when you dive into the detail views they don’t really look like tables, but they are....
NOTE
But tables don’t have to look like this!
THERE ARE NO DUMB QUESTIONS
|
Q: |
Q: What do we gain by using a table view instead of laying out a detail view? |
|
A: |
A: Easy layout and all those nice, built-in tools. The table view already comes with scrolling and the navigation is built right in; you can also hook in new views to the app later on without much trouble. |
|
Q: |
Q: How often do applications do this? What does Apple think? |
|
A: |
A: All the time! We gave you some examples already, but just go using your apps and you’ll see they’re probably more common in productivity and business applications than custom views. Apple uses them in their own apps all the time... |

Joe: OK, so we need to create a detail view. Where do we even start?
Frank: I think we should go back into the storyboard, right?
Jim: But then what? This thing needs to be a tableview now. The one that the template came with is just a plain DetailViewController.
Joe: We’ll need to change that just like we did for the table cells, right? You think we can just use the UIKit table view controller?
Frank: The default table view was what we just changed to get the master view looking the way we wanted. It’s going to be another new custom class.
Jim: Oh right, but we’ll subclass the default table view controller and then we can use all of the built-in support plus tweak the layout, right?
Frank: Exactly. And we can build a custom storyboard to handle the actual layout.
Joe: What about actually displaying the data?
Jim: I have some ideas on how to make that work, when we get there.
Joe: If you say so. Into the storyboard file then...
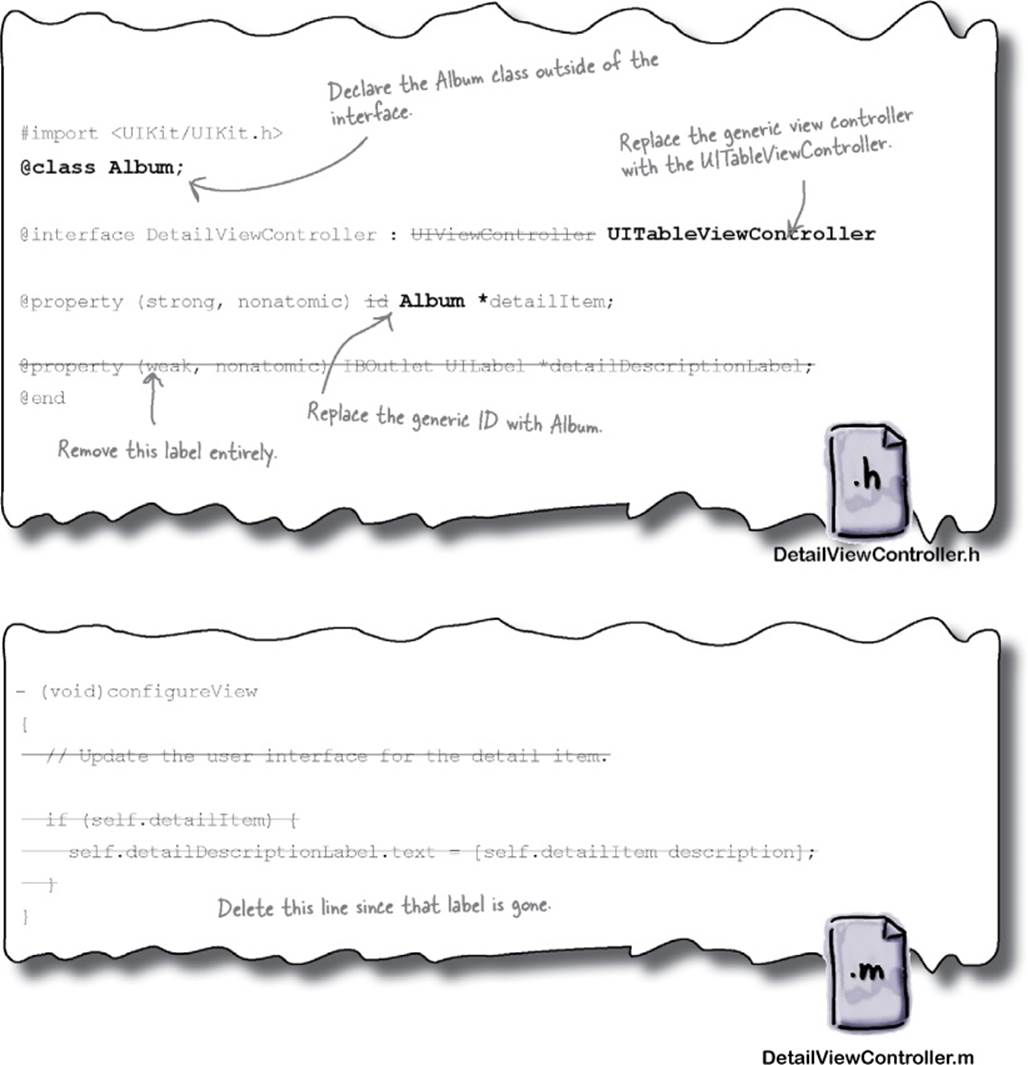
Change your UIViewController to a UITableView Controller
Since the master detail template came with just a basic detail view, we need to change the class for that view to get all the table view goodness for free. Just like we did for the table cells, we need to use the attributes inspector.
WHAT DOES WHAT?
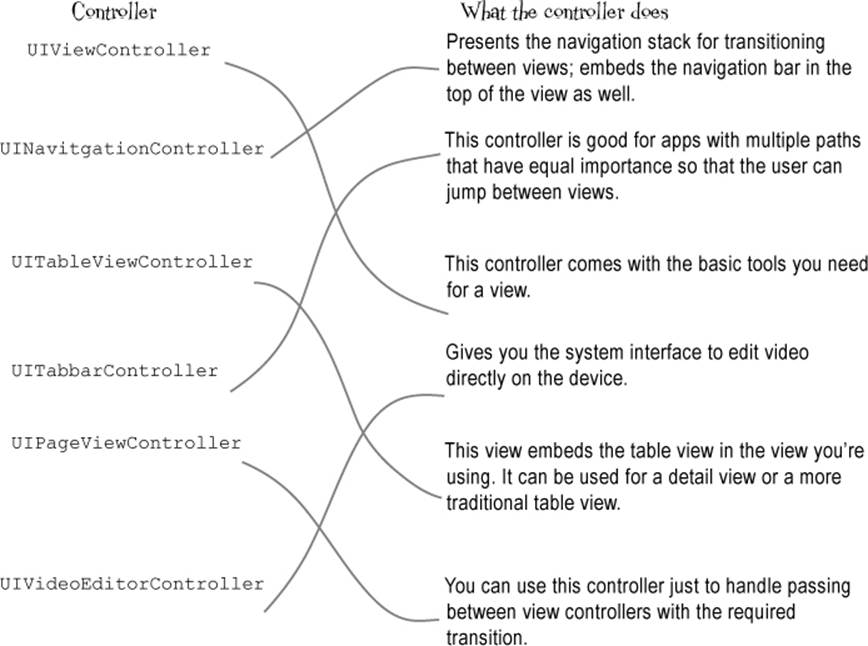
Match each controller to what it does.
|
Controller |
What the controller does |
|
UIViewController |
Presents the navigation stack for transitioning between views; embeds the navigation bar in the top of the view as well. |
|
UINavitgationController |
This view embeds the table view in the view you’re using. It can be used for a detail view or a more traditional table view. |
|
UITableViewController |
This controller is good for apps with multiple paths that have equal importance so that the user can jump between views. |
|
UITabbarController |
This controller comes with the basic tools you need for a view. |
|
UIPageViewController |
Gives you the system interface to edit video directly on the device. |
|
UIVideoEditorController |
You can use this controller just to handle passing between view controllers with the required transition. |
![]() Answers in Who Does What? Solution.
Answers in Who Does What? Solution.
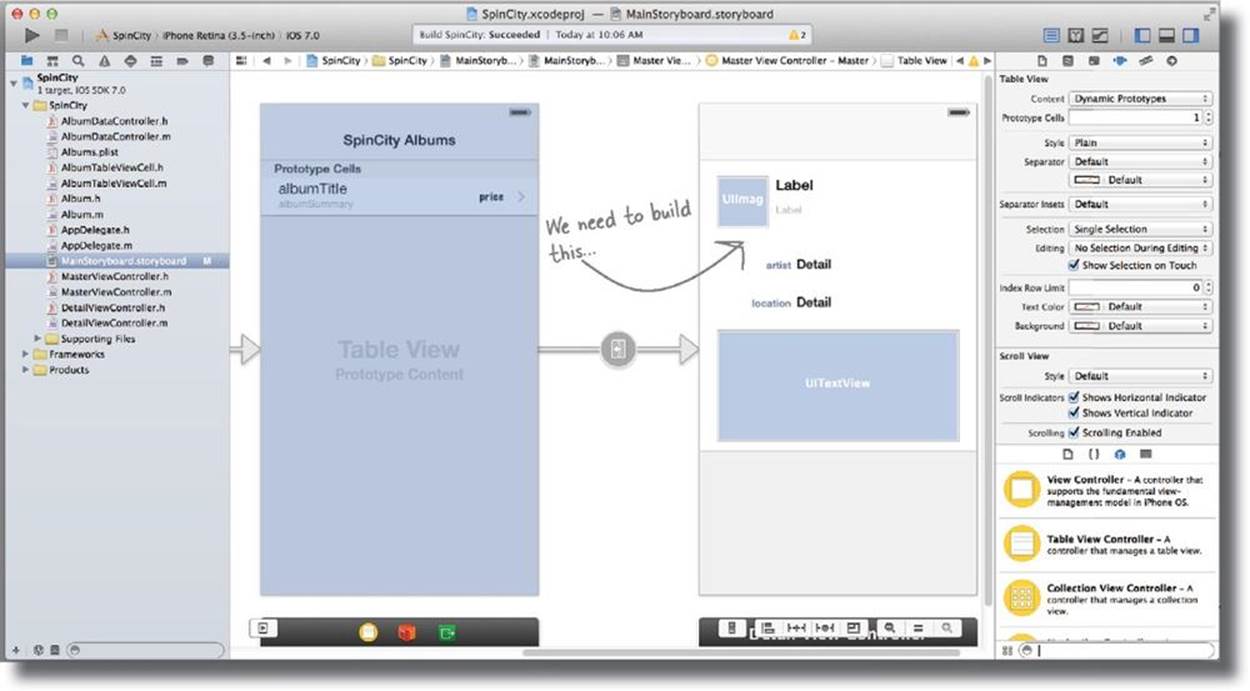
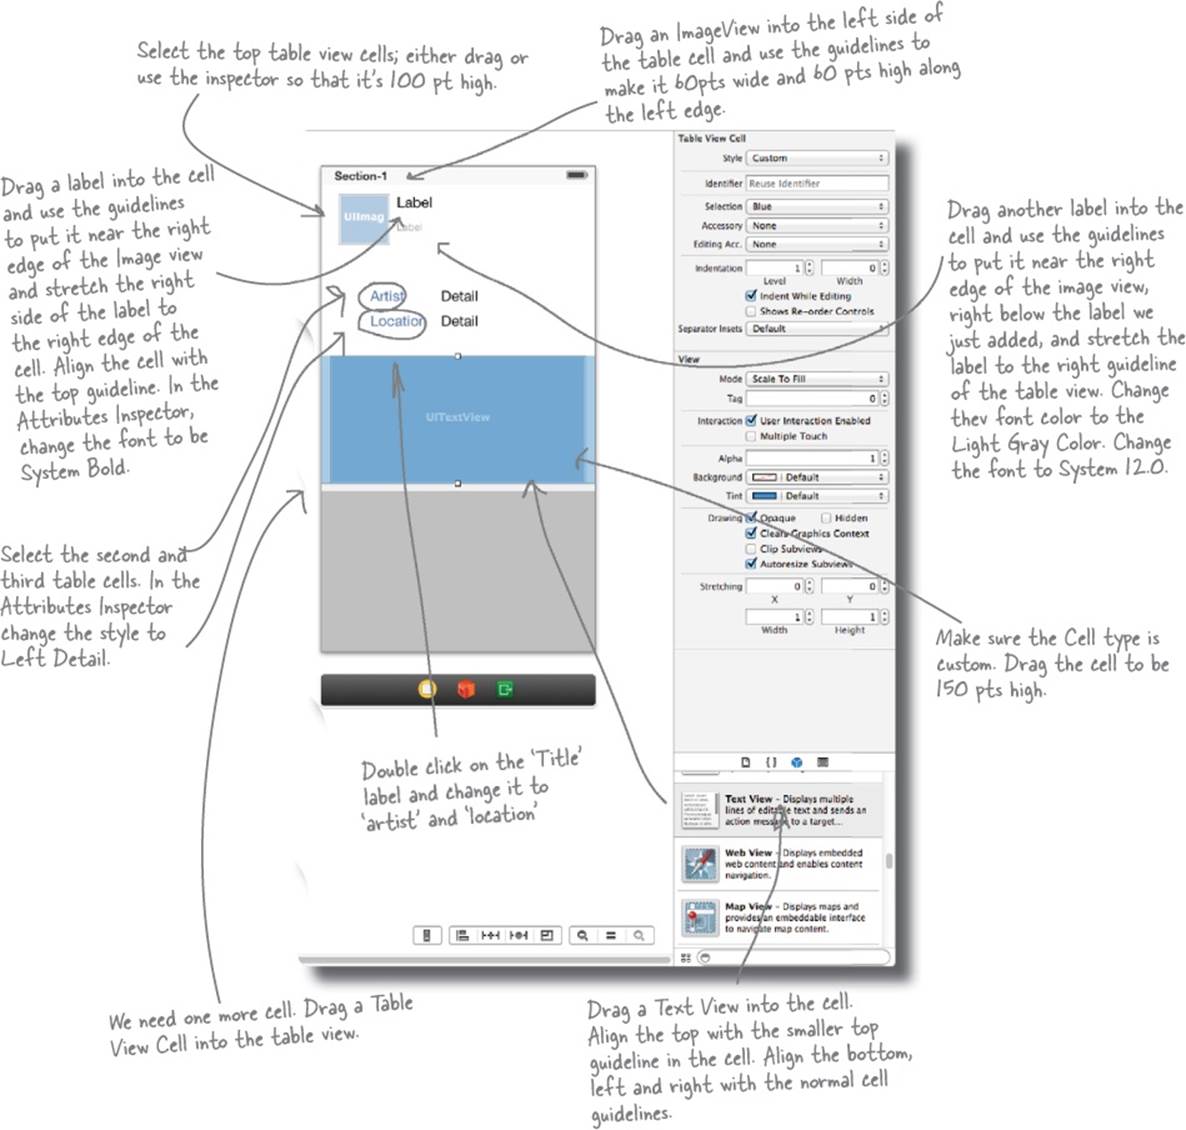
Layout for the new detail view
Based on our existing sketch and now that the app knows it’s talking to a UITableViewController and not a UIViewController, we can get the view elements set up in the storyboard.
|
|
The detail view needs to get changed into a table view on the storyboard. |
|
|
We’ll need to properly transition between the new detail view and the table view. |
|
|
Then the view needs to get laid out the way we designed it. |
Layout your view within the storyboard
Because this process is a little involved, we’re going to need to detail it out carefully. We’re breaking away from the template here, so we need to get into some details about both the view and how we get to it. First off, to complete the work that we did in code earlier.
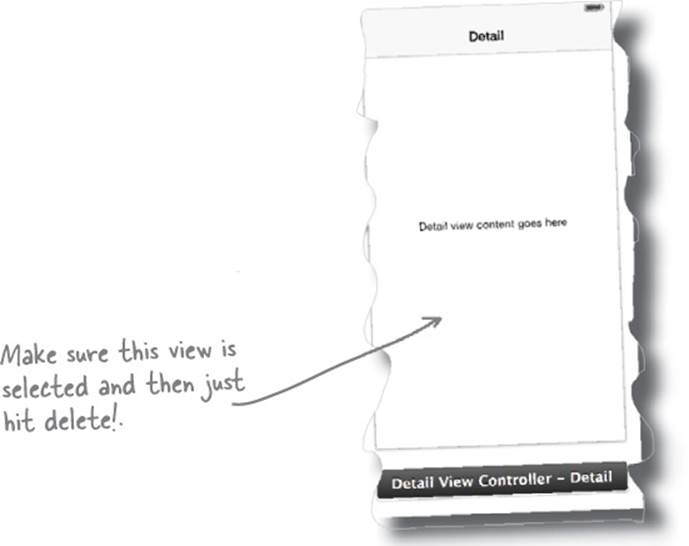
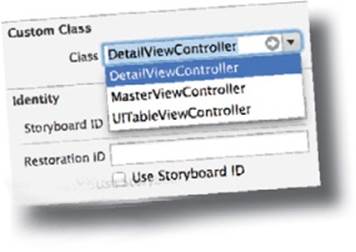
1. In the Main.storyboard, delete the entire Detail View Controller Scene.
In Xcode, make sure that you select the entire detail view and then delete the whole thing.
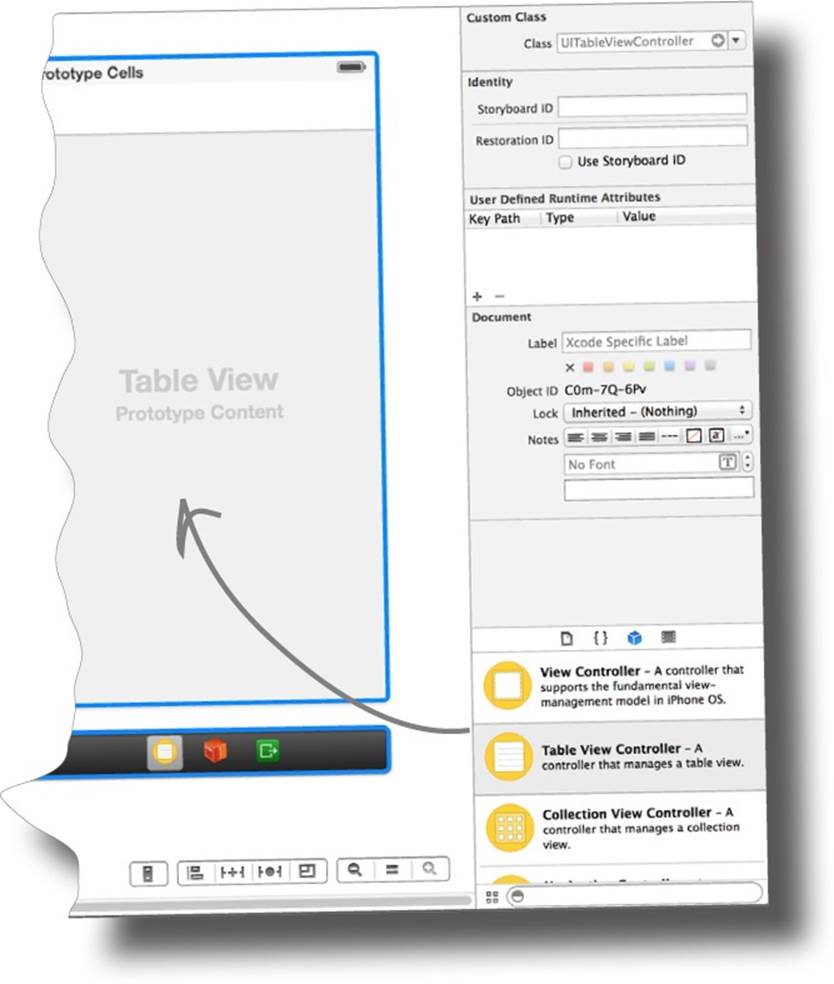
2. Drag a Table View Controller onto the storyboard to replace the detail view.
If you try to select the window, you will select the view, you must select the black box underneath to select the view controller.
SHARPEN YOUR PENCIL
Which class should you select for this new view?
|
|
MasterViewController |
|
|
DetailViewController |
|
|
UITableViewController |
|
Why? ____________________________________ |
|
|
_________________________________________ |
SHARPEN YOUR PENCIL
Which class should you select for this new view?
|
|
MasterViewController |
|
|
DetailViewController |
|
|
UITableViewController |
|
Why? You’re selecting a detail view here that is both a detail view and a table view. |
|
|
The class level needs to be a detail view first, table view second. |
Design the rest of the view dynamically
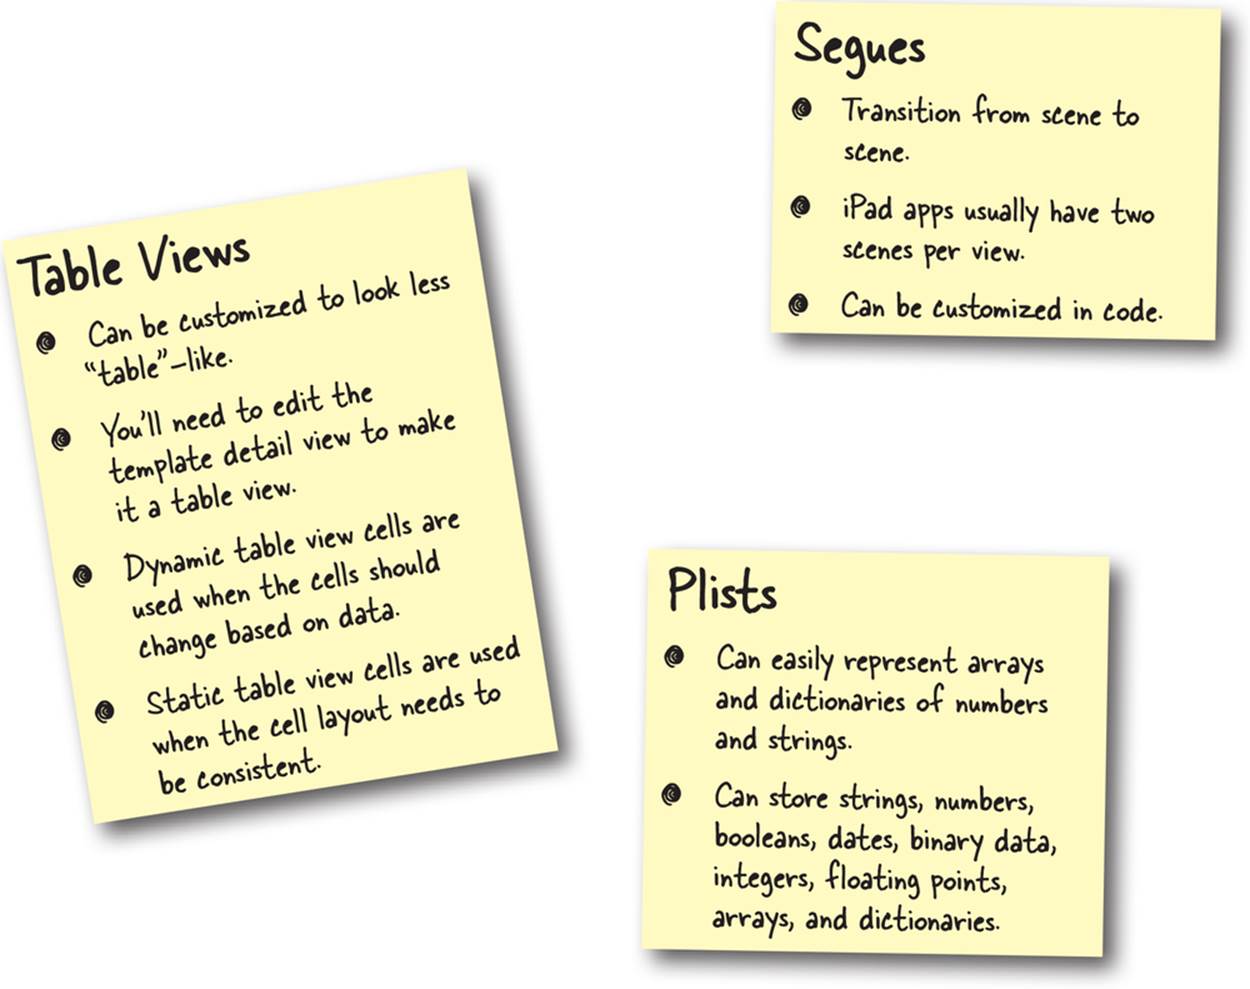
Now we need to layout the new table view. Unlike the last table view we used, where we didn’t know how many rows we needed, in this one we know exactly what we want to show and are using the table view to help us with layout. In this case, we want to use a static table instead of a dynamic one.
Dynamic is the default for table views, and it’s used when the table view layout changes based on the data. Since we have the same information coming in and want the view to be laid out consistently, it’s static.
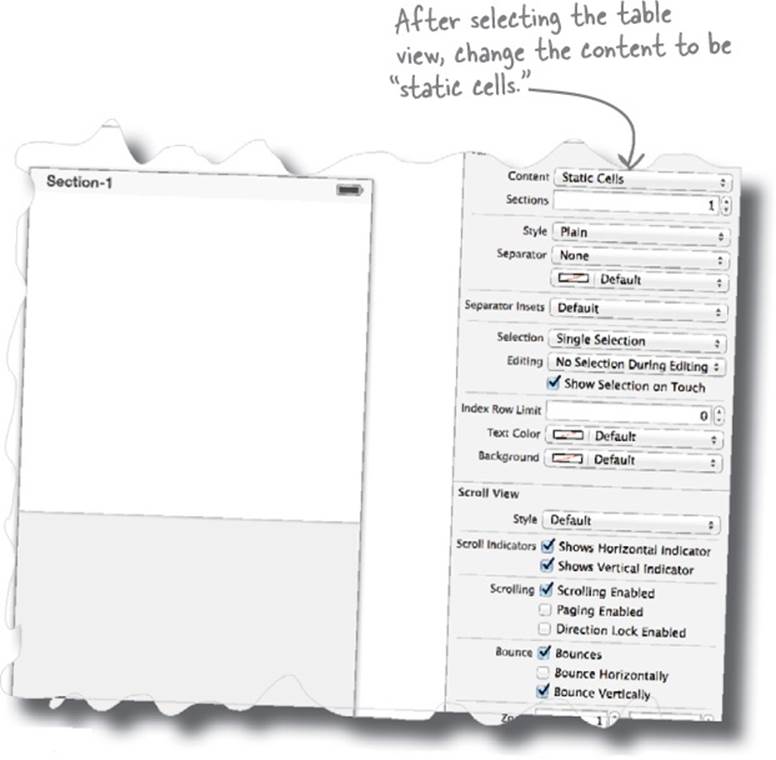
GEEK BITS
We’re going to change the separator type here too. That’s the biggie for faking the table view to look like a detail view. Normally there is a single line separating the cells, but once you remove that, the user won’t be able to see any difference.
It’s in the inspector under Separator Insets.
Let’s run it!
TEST DRIVE

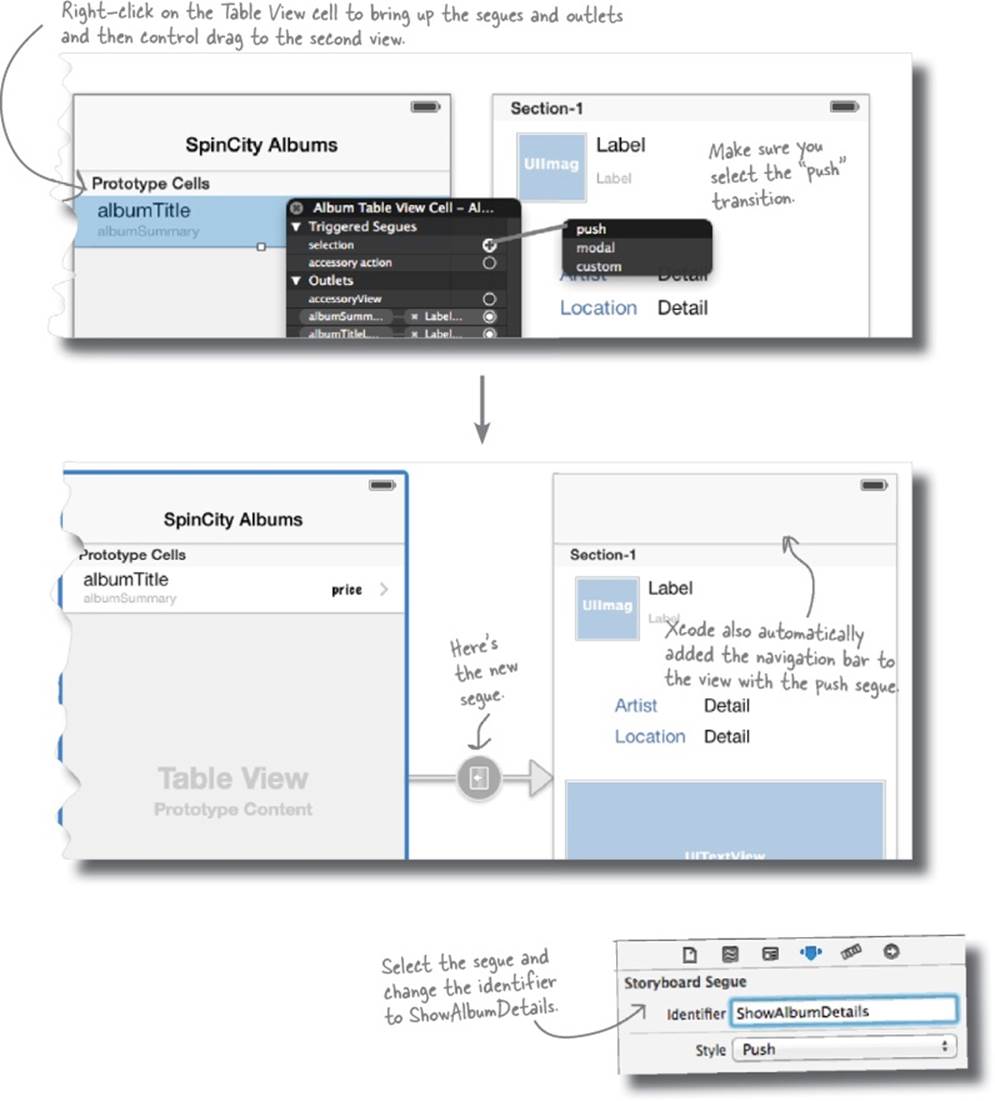
You have to segue from your master view to your detail view.
When we deleted the view, we also deleted the transition into the view as well. The storyboard can support more than just editing the views, it also supports adding a transition to that view.
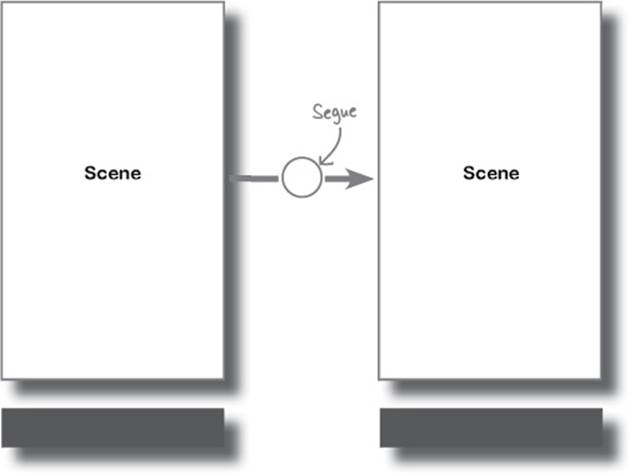
Segues connect view controllers
NOTE
These appear as scenes in your storyboard.
A segue is how the transition between views is represented on the storyboard. They are relatively new (they appeared in iOS 6), and give a lot of options for configuring these transitions. We have talked about the transition between views, but in the storyboard editor there is also a concept called a scene. On iPhone, a scene is mapped to one view controller and on iPad you can have multiple scenes and multiple view controllers on the screen at once (think about views where you have a fixed pane and one that changes, like mail). A segue serves as the way to get from scene to scene, not view to view.
There are a number of standard segues (which we’ll use for Spin City), but you can also write custom segues. iOS creates segues for you when one is triggered by your app. First, the destination scene is created, then the segue object gets created; the source view callsprepareForSegue:sender:. Finally, the segue’s perform method is called and the transition is complete.
NOTE
Segues transition from scene to scene, not necessarily view to view.
Now let’s make it work...
Connect your scenes in your storyboard
Back in Spin City, we have two scenes that aren’t connected, so we can’t get to that newly laid-out detail view. We’re going to work in the storyboard editor so that we can add the new transition.
THERE ARE NO DUMB QUESTIONS
|
Q: |
Q: Why are scenes important? It seems like one more thing... |
|
A: |
A: Because that’s the level of granularity you have with control for the transitions. If you want to dictate how things move between one view and the next, you can do that! Transitioning between views is such a core part of most applications that support for it is built into the framework. |
|
Q: |
Q: What do segues get us besides linking scenes? |
|
A: |
A: The segue pattern wraps up and eliminates a bunch of boilerplate code in applications. Segues give you a clean way to pass data to an incoming view, they provide hooks for cleaning up before a vew is about to leave, and provide a nice clean place to configure how views should transition in and out visually. |
|
Q: |
Q: Why did including the segue add the navigation control bar at the top of the detail view? |
|
A: |
A: We picked a push transition, which will be realized through a Navigation Controller. Xcode will set up the space needed for the Navigation Bar for us. |
TEST DRIVE
Run it!
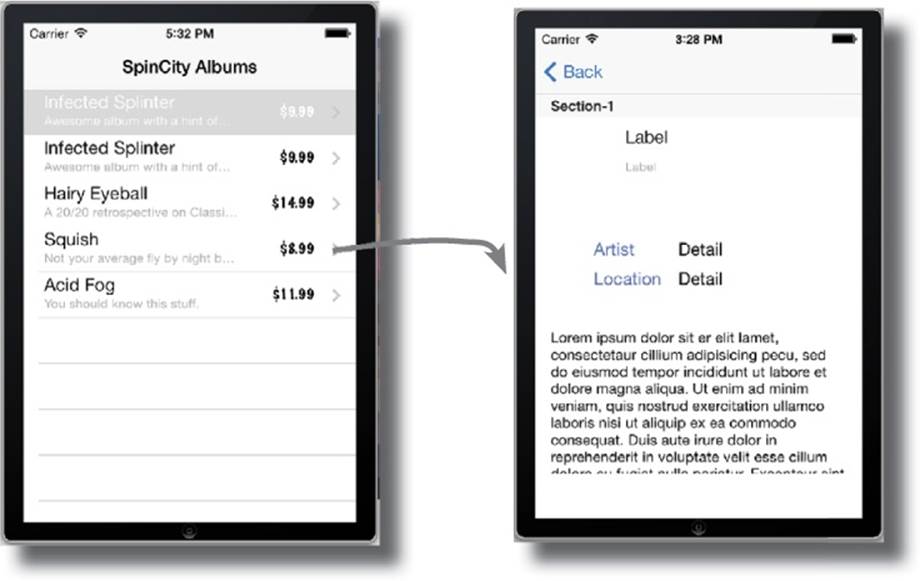
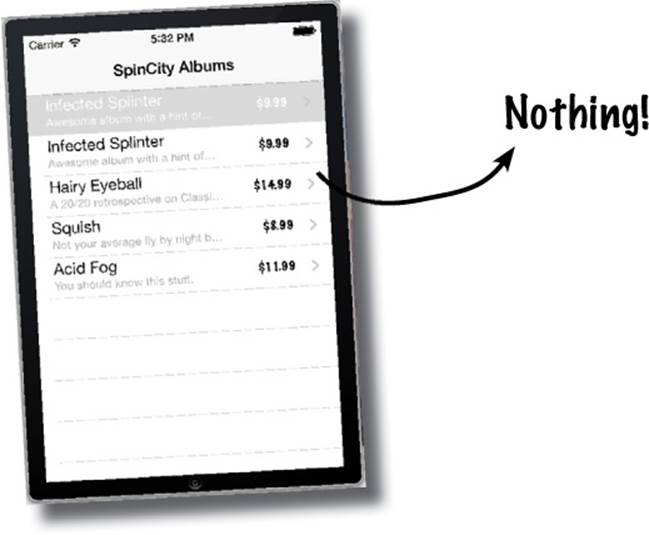
It works, but...

We just need to populate it like we did before!
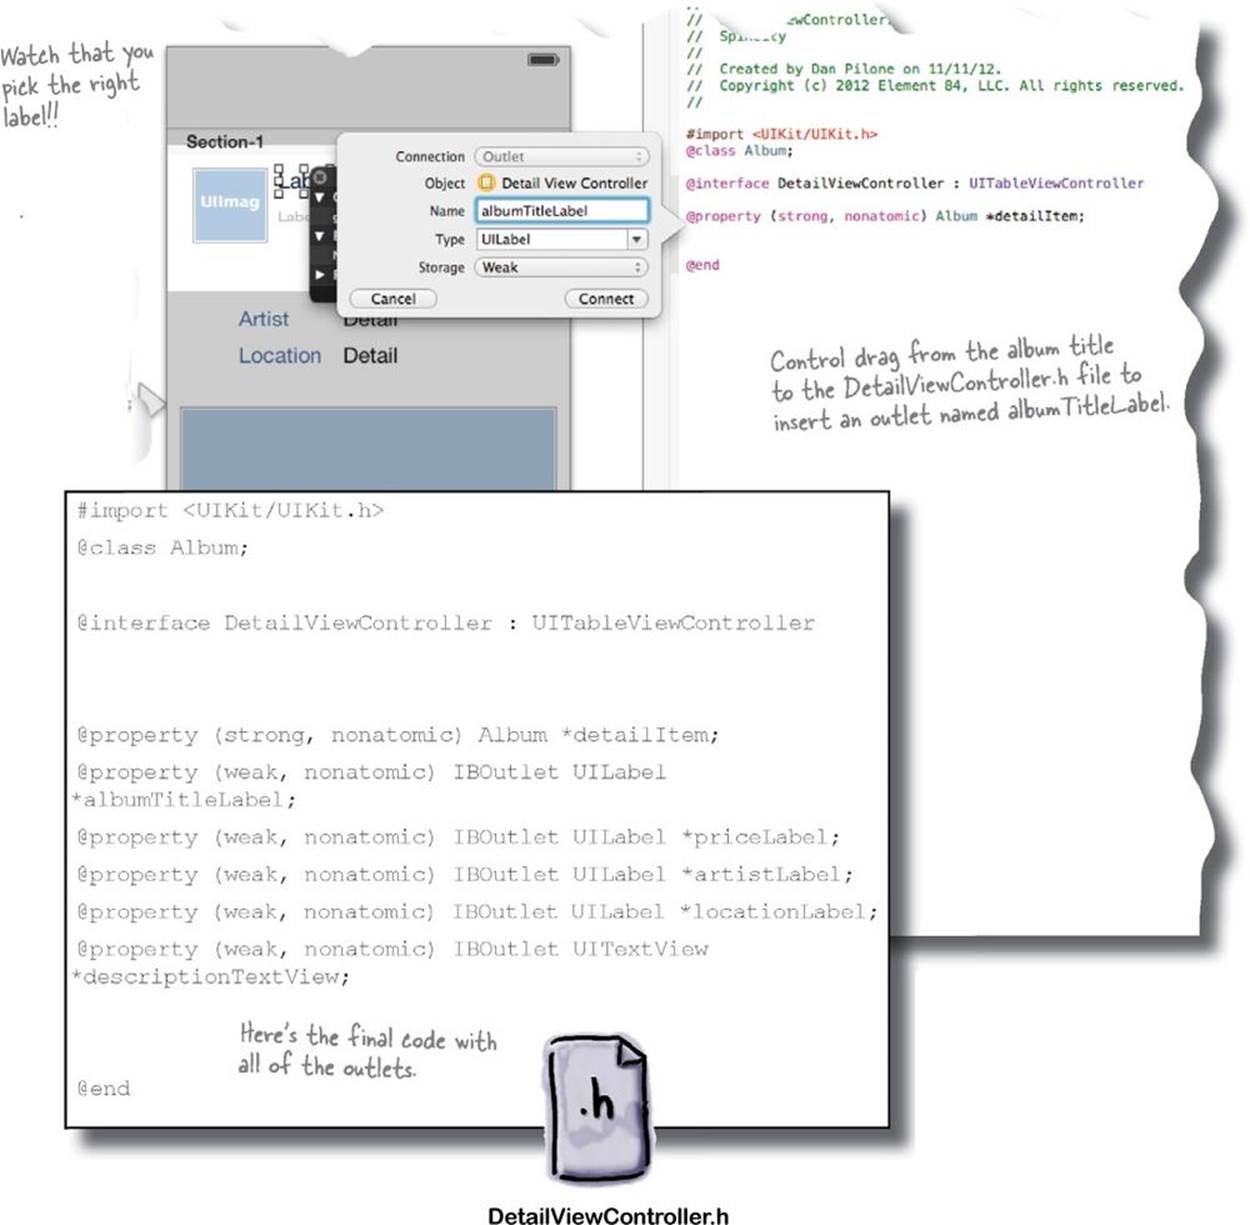
The detail view is there, but we haven’t added the actions and outlets and attached the fields to the data. Just like we did for Marco Pollo in his app, we need to get the data into the view.
EXERCISE
You know this; run through Xcode and get the detail view all wired up.
1. Use the assistant editor.
Make sure that you can see the Detail View Controller in the storyboard and DetailViewController.h in the assistant pane.
2. Set up some outlets in the Detail View.
We need outlets for labels in the view. The albumTitleLabel, priceLabel, artistLabel, locationLabel, and descriptionTextView.
EXERCISE SOLUTION
Here’s how you should’ve gotten your views set up.
1. Use the assistant editor.
Make sure that you can see the Detail View Controller in the storyboard and DetailViewController.h in the assistant pane.
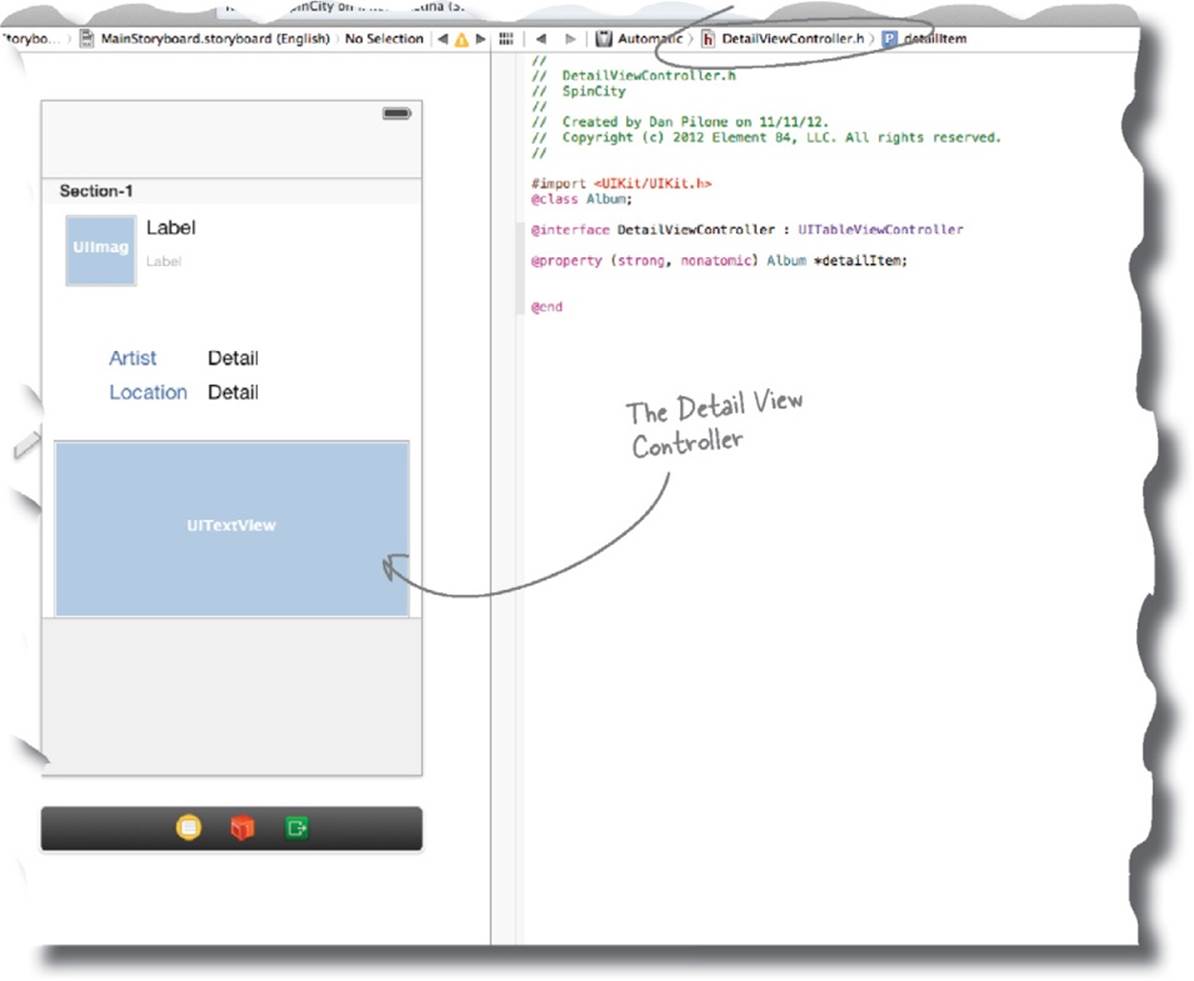
2. Set up some outlets in the Detail View.
We need outlets for labels in the view. The albumTitleLabel, priceLabel, artistLabel, locationLabel, and descriptionTextView.
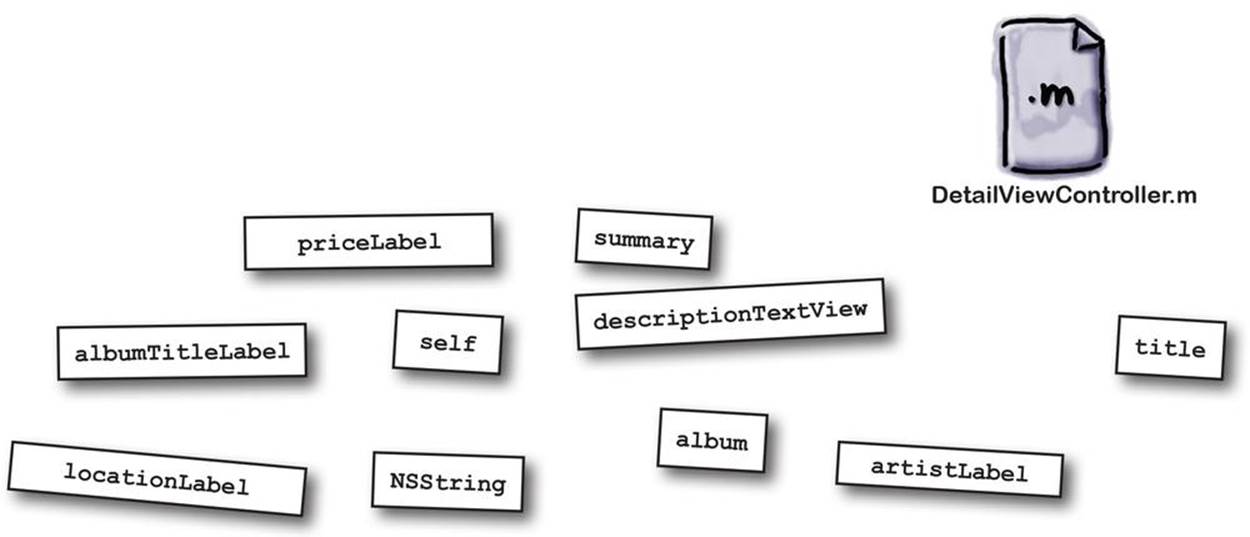
The outlets are in the header file, but not the implementation file...
IOS MAGNETS
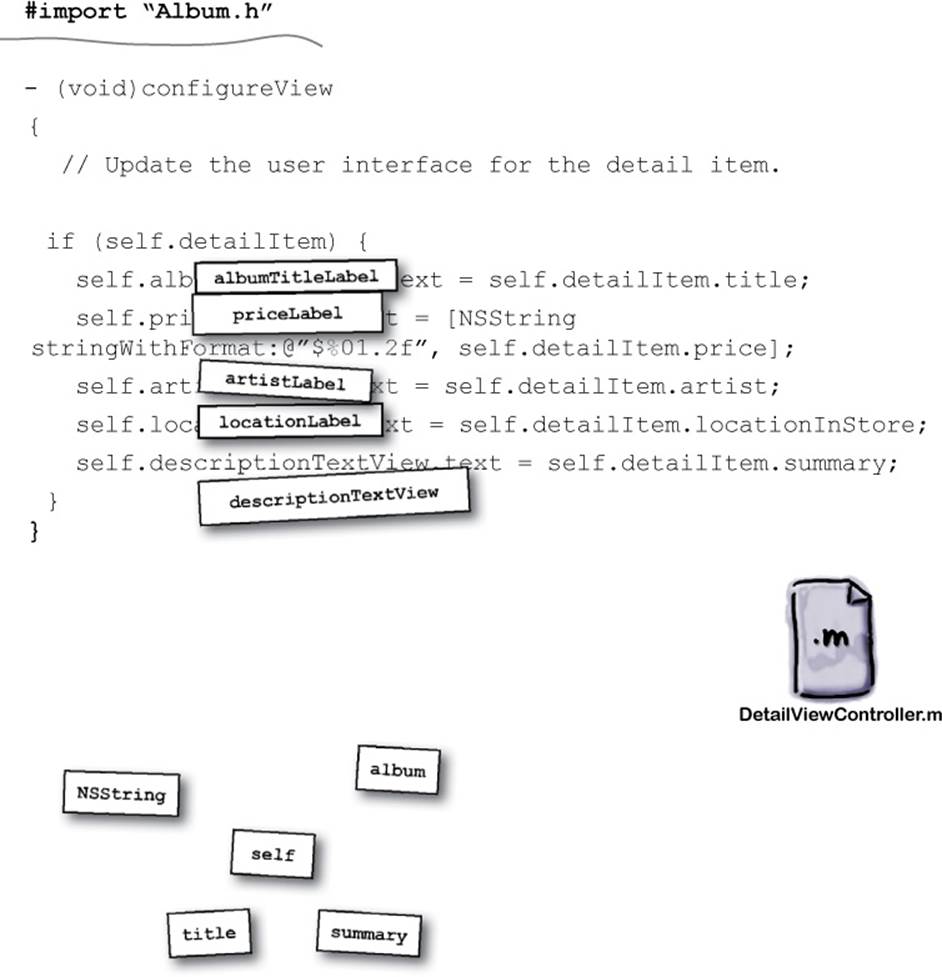
Here’s the code to access the properties of an album in the DetailViewController.m file.
- (void)configureView
{
// Update the user interface for the detail item.
if (self.detailItem) {
self._________________.text = self.detailItem.title;
self._________________.text = [NSString
stringWithFormat:@"$%01.2f", self.detailItem.price];
self._________________.text = self.detailItem.artist;
self._________________.text = self.detailItem.
locationInStore;
self._________________.text = self.detailItem.summary;
}
}
THERE ARE NO DUMB QUESTIONS
|
Q: |
Q: Why did we call the field “summary” on the album but use descriptionTextView. Why not call the field description on the Album? |
|
A: |
A: “description” is actually a method on NSObject already that is supposed to return a text overview of the NSObject itself. By default it returns the class name at the hex address of the object. You can override that method to return something else, a meaningful overview of the object, but it really isn’t the same as an album summary like you might find on the back of a CD. We didn’t want to hijack the “description” method so we named it summary. |
BRAIN BARBELL
Why won’t this work yet? The view still isn’t quite ready to populate. Any thoughts on that? Hint: it’s something that we’ve already talked about in this chapter...
IOS MAGNETS SOLUTION
Fill in the code necessary to link up the data with the detail view.
The missing link is that segue again!
Segues let you prepare for a new scene
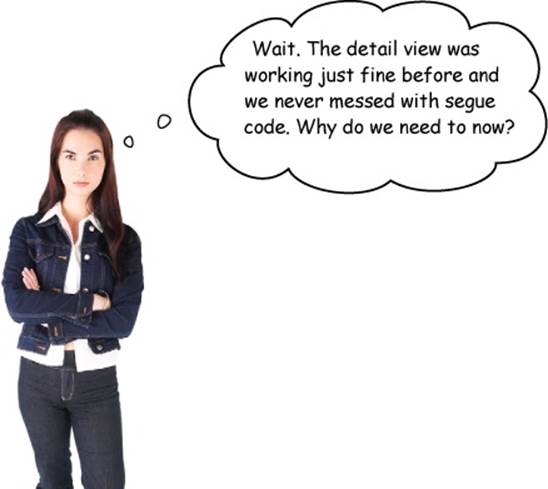
Segues contain more than just how to perform the transition between scenes; they also include the data that needs to be passed between scenes. In our case, we need to pass the information that was in the table cell that is selected by the user and pass that information into the detail view. From there, the detail view can make sure it’s accessing the right record and displaying the correct data.
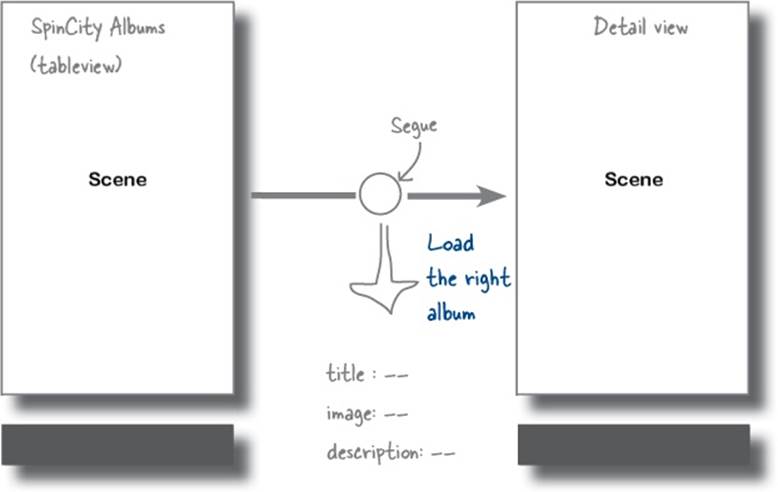
By default, segues are handled.
The standard way that segues are triggered involves the view controller, and is set up at the storyboard level. There are some tweaks, however, that you can make with segues when you call them programmatically.
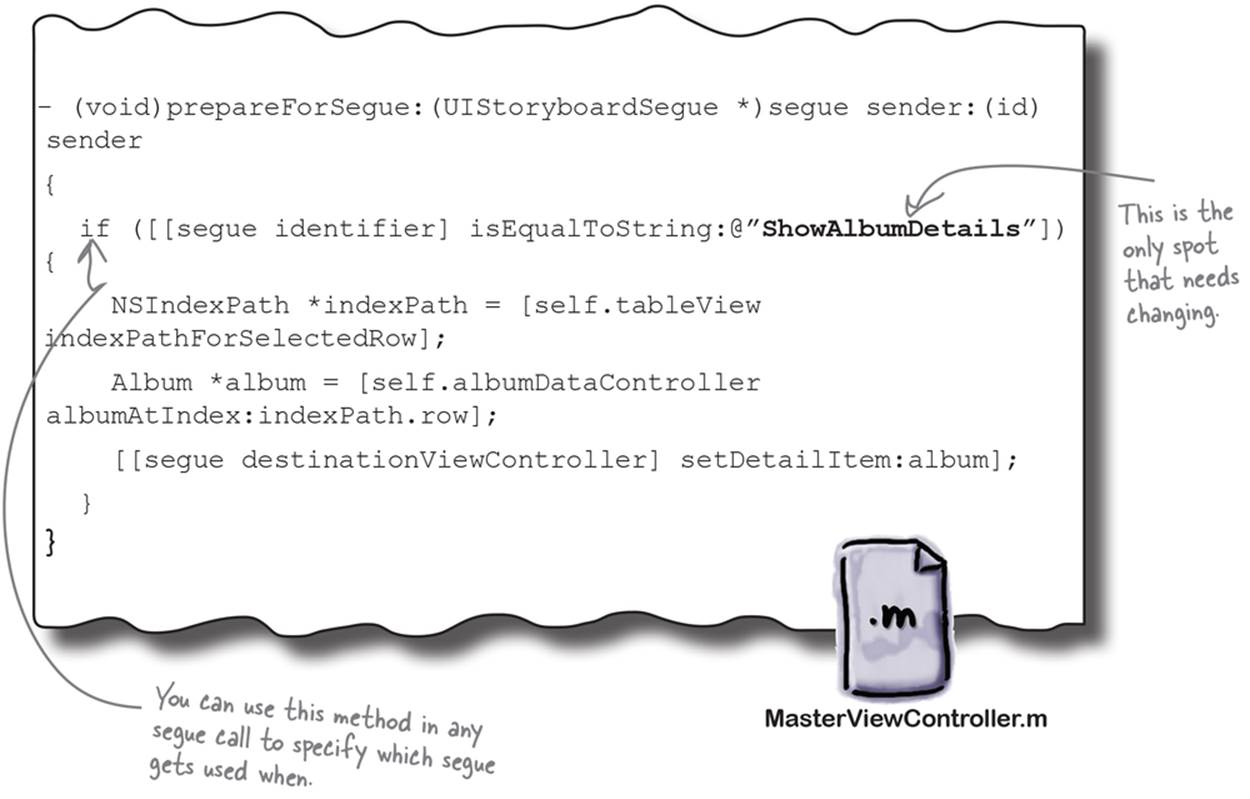
Update your prepareforSegue callback
prepareforSegue and performSegueWithIdentifier are two methods that iOS uses to let you work programmatically with segues. While the view controller handles it normally, sometimes you have flow within the app that needs to be clarified (more than one transition can get you to a view, for example). If there’s some awesome custom transition that you worked up, it can be used instead too.
performSegueWithIdentifier allows you to get to any segue in code by referencing the string identifier that you set up in the storyboard. prepareForSegue is already in our code, by default it will be overridden by the view controller at run time but in our case we want to specify which view controllers are involved and what data we need.
TEST DRIVE
At this point, your code should all be compiling and acting nice. Go ahead and run it. When you select a cell in the main view...

BULLET POINTS
§ Segues provide a way to control the transitions between scenes.
§ By default, segues are handled by editing the storyboard file.
§ Segues can be customized and called manually in code.
§ On iPhone, a scene is mapped to one view controller and on iPad you can have multiple scenes and multiple view controllers on the screen at once.

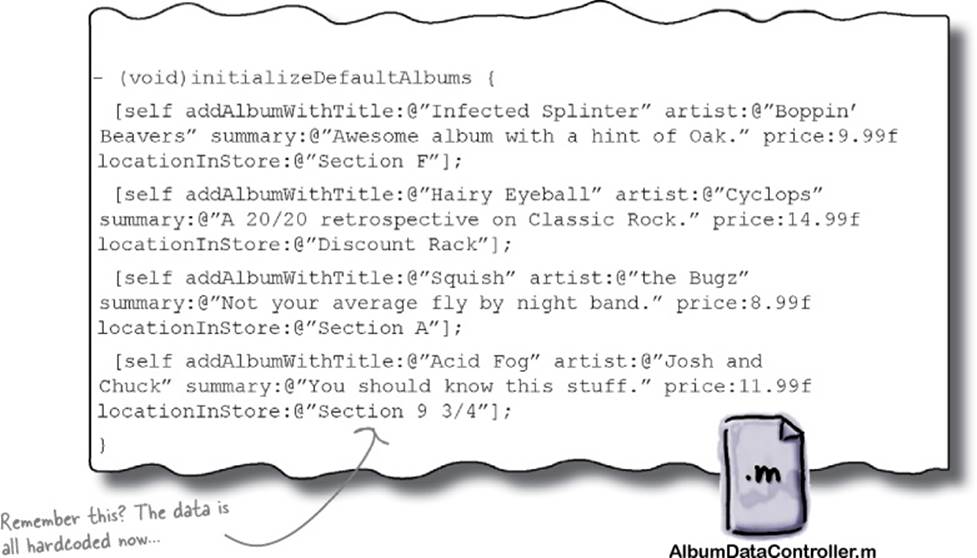
You can only add records by going into the code right now.
In an effort to get the seed data into the app, we just went ahead and typed it right in there. Now we need to figure out a way to be smarter about things. We have the data class properly segmented out, but it’s time to get the data out into something more data friendly. Like a plist!
There’s an app a list for that
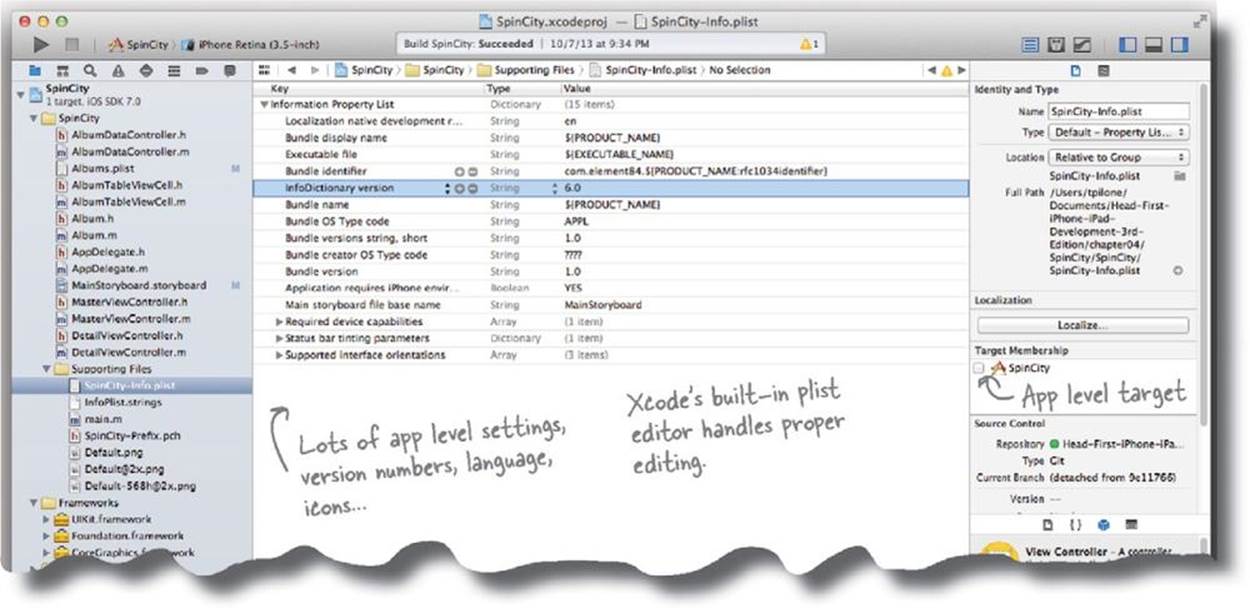
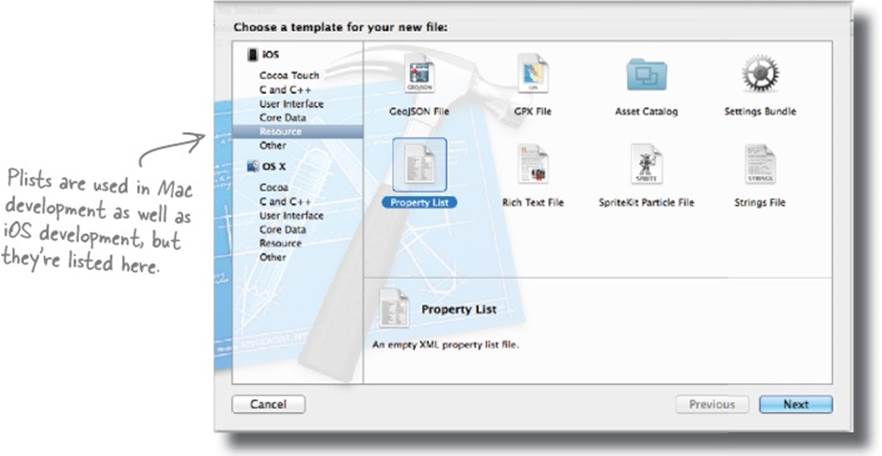
Plist stands for “property list” and has been around for quite a while with OS X. In fact, there are a number of plists already in use in your application. We’ve already worked with the most important plist, the Info.plist for our app. This is created by Xcode when you first create your project, and besides the app icons, it stores things like the main storyboard file to load when the application starts, the application version, and more. Xcode can create and edit these plists like any other file. Click on SpinCity-Info.plist to take a look at what’s inside.
THERE ARE NO DUMB QUESTIONS
|
Q: |
Q: What does plist stand for? |
|
A: |
A: Property list and it’s specific to Mac and iOS programming, although it comes from NeXTSTEP and GNUstep frameworks. They can organize data based on Core Foundation types: CFString, CFNumber, CFBoolean, CFDate, CFData, and CFDictionary. From there, the editor can convert them to XML or a binary format. |
|
Q: |
Q: Are we going to be dealing with XML in our app? |
|
A: |
A: No, we’re going to use the iOS frameworks to load the plist (and parse it, etc.). Once loaded, we’ll just see an array of dictionaries that make it really easy to work with our album data. |
Create a new property list
All of the built-in types we’ve been using, like NSArray and NSString, can be loaded or saved from plists automatically. They do this through the NSCoding protocol. We can take advantage of this and move our album list out of our source code and into a plist.
1. Create the empty plist.
Go back into Xcode and expand the Supporting Filesfolder. Right-click on Supporting Files and select New file→Mac OS X Resource, and Property List. Call the new list AlbumArray.plist.
2. Change the plist to an array.
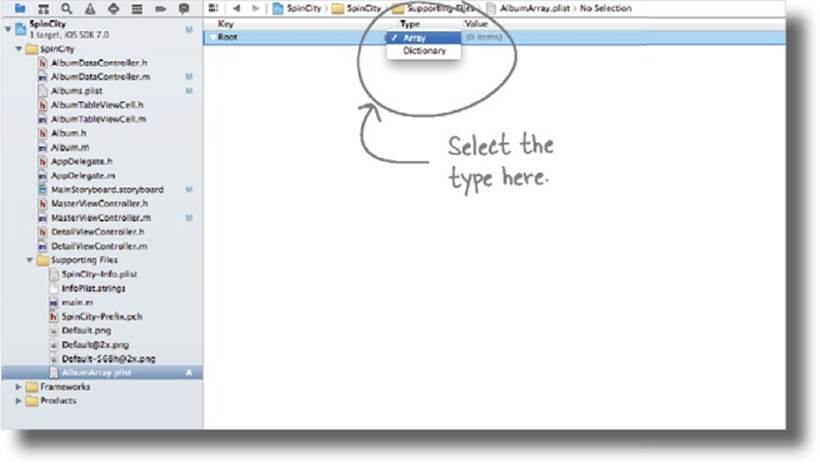
Go back into Xcode and open up the new AlbumArray.plist file. In the editor, select the type and change it to an array.
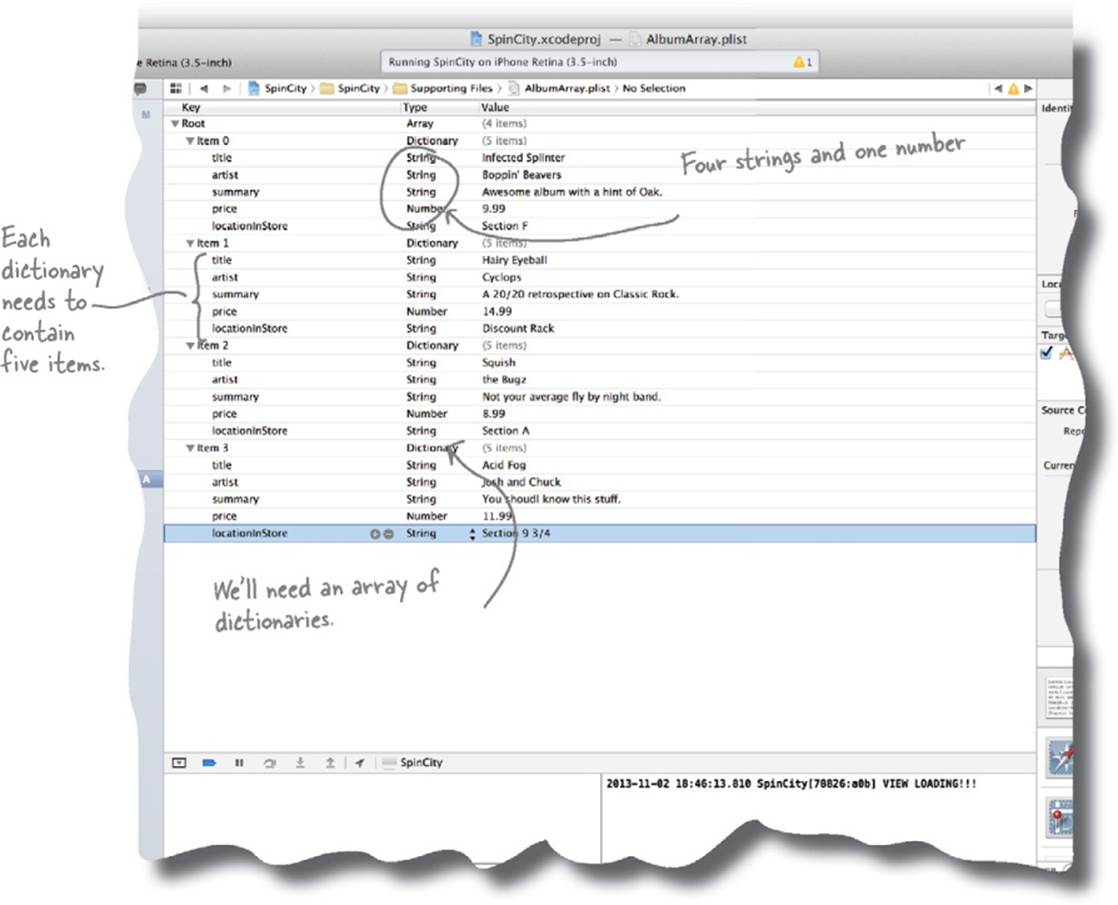
3. Put your data into the plist.
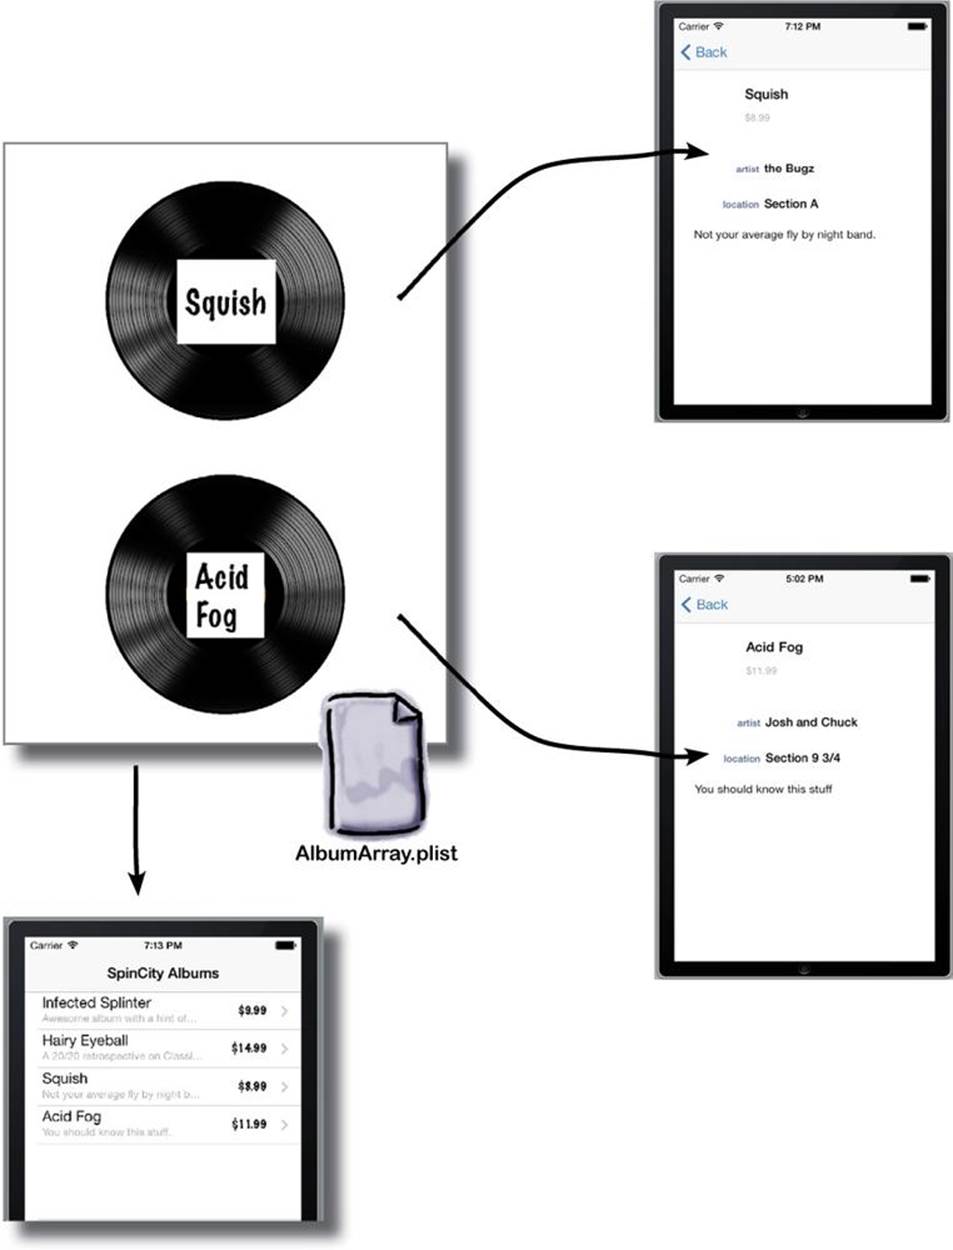
Since we’re going to be pulling all the album information from the plist, we need to move the information that is resident in code into the AlbumArray.plist file.
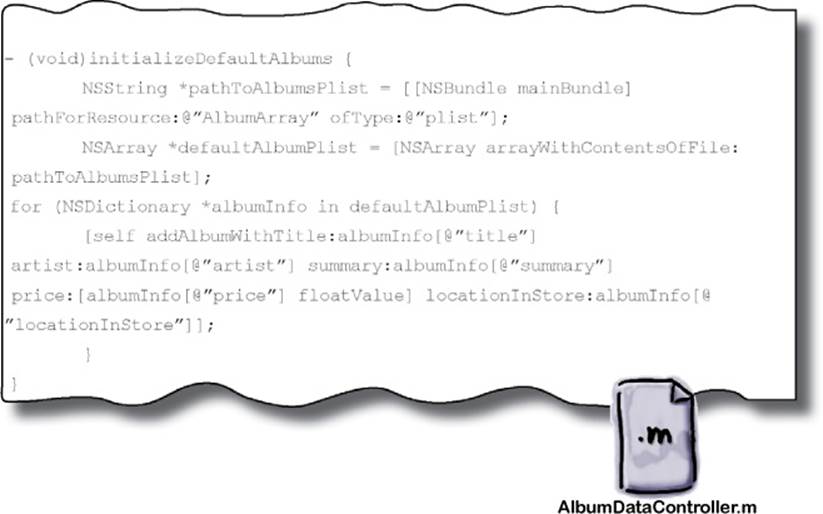
You need to load each album from the plist
When we implemented all the code in the AlbumDataController we used the initializeDefaultAlbums method to generate an array called _albumList. Now we’re going to have it generate an array from the new plist. It’s going to be an array of dictionaries...
Convert your data to plists in one easy step
Since everything is set up to go through the initializeDefaultAlbums method in AlbumDetailController.m, we just need to change that method to match the one below.
TEST DRIVE
Go ahead and see if it works...
Rob is even more happy!

VIEW CROSS
Let's make sure that you have all the lingo under your belt.

|
Across |
Down |
|
2. Signals that the compiler will retain the object. 3. This is sent between objects 5. In Objective-C, a _______ is made up of a .h and a .m file. 8. Automatic methods 10. Arguments can have an _______ and external name. 11. Objective-C tries to match your message to an existing _________. |
1. This incorporates another file 2. You send messages to _______. 4. Unique names for methods after Objective-C translation are _________. 6. This property creates a setter for the basic types. 7. This tells the compiler to skip mutexes. 9. _________ management is important for iPhone apps. |
SHARPEN YOUR PENCIL
Which reasons below are true facts about plists and why you should use them?
|
|
It’s one of the easier data storage options to use when you’re getting started. |
|
Plists can’t support more complex types of data, only strings. |
|
|
It’s a database structure. |
|
Plists are an XML format. |
VIEW CROSS SOLUTION
Let's make sure that you have all the lingo under your belt.

|
Across |
Down |
|
2. Signals that the compiler will retain the object. [RETAIN] 3. This is sent between objects [MESSAGE] 5. In Objective-C, a _______ is made up of a .h and a .m file. [CLASS] 8. Automatic methods [@PROPERTIES] 10. Arguments can have an _______ and external name. [INTERNAL] 11. Objective-C tries to match your message to an existing _________. [METHOD] |
1. This incorporates another file [IMPORT] 2. You send messages to _______. [RECEIVERS] 4. Unique names for methods after Objective-C translation are _________. [SELECTORS] 6. This property creates a setter for the basic types. [ASSIGN] 7. This tells the compiler to skip mutexes. [NONATOMIC] 9. _________ management is important for iPhone apps. [MEMORY] |
WHO DOES WHAT? SOLUTION
Match each controller to what it does.
SHARPEN YOUR PENCIL SOLUTION
Which reasons below are true facts about plists and why you should use them?
|
|
It’s one of the easier data storage options to use when you’re getting started. |
|
Plists can’t support more complex types of data, only strings. |
|
|
It’s a database structure. Plists are XML files. We’ll talk more about DB types, but the easiest is SQLite. |
|
Plists are an XML format. |
Your View toolbox
You’ve got Chapter 5 under your belt and now you’ve added mulitiview applications to your toolbox.
BULLET POINTS
§ Segues provide a way to control the transitions between scenes.
§ By default, segues are handled by editing the storyboard file.
§ Segues can be customized and called manually in code.
§ On iPhone, a single scene is a single view. On iPad, there can be multiple views in one scene.