Building Applications with iBeacon (2015)
Chapter 3. Setting Up Your Own Beacons
There are many ways to get a beacon running. With such a simple protocol, all that a beacon needs to do is transmit its UUID, major number, and minor number at a fixed interval. Any device with Bluetooth 4.0 (or later) hardware is capable of acting as a beacon, whether it is a software application on a laptop, a software app on a mobile device, or a host computer with a USB interface.
Types of Hardware
Creating a beacon does not require any specialized type of hardware. You might already have suitable hardware lying around to create a beacon. If not, the investment required is only a few dollars.
Dedicated Beacon Hardware
The advantage of dedicated beacon hardware is that it is cheaper than using general-purpose hardware, and it is optimized for the beacon task. Here are a couple popular options:
Estimote
One of the earliest developers of beacon technology, Estimote sells a developer kit that includes three beacons for $99. Interestingly, Estimote beacons have fixed configuration parameters and, in particular, administrators cannot set the UUID.
RadBeacon
RadBeacon is a $29 USB dongle that performs the transmission functions of an iBeacon. All you have to supply is USB power. Configuration of the beacon’s numbers is done through an app.
Kontakt
Kontakt sells an ARM-based iBeacon as well as tools for managing iBeacons and analyzing user interactions with them.
Gelo
Gelo’s Beacons are waterproof and designed for both indoor and outdoor use, and the batteries can be replaced manually using simple tools.
Some dedicated iBeacon hardware runs on batteries, either coin cell or something with a higher capacity, such as AA.12 The iBeacon protocol is simple, and the hardware was designed to run on small batteries for extended periods of time.
One of the major reasons for designing such a simple protocol is that it allows beacons to be made cheaply. Additionally, such a simple protocol can run on battery power for extended lengths of time, which enables proximity applications to be developed for areas that might otherwise be inaccessible if beacons were required to be connected to a higher-power source.
Within Apple’s iBeacon specification, the advertisement interval is fixed at 100 ms. That is, an iBeacon will always transmit 10 times per second. This decision embodies a trade-off. Frequent beacon advertisements enable more immediate actions to be taken by an app, while extended advertisement intervals prolong battery life. The iBeacon specification requires all devices to adhere to the same advertisement interval, regardless of how the beacon is being used.
The specification’s requirement for a relatively high fixed transmit interval ensures that applications will react promptly, because beacon transmissions will be readily available. It also will enable iBeacon-powered applications on enduser mobile devices to save power, because the search for beacon advertisements can be much shorter. The downside to a relatively high advertisement interval is reduced battery life. If iBeacons are battery powered, the operational lifetime between battery changes may be quite short.
General-Purpose Hardware
Rather than use specialized hardware, beacons can be generated using general-purpose hardware, such as the following examples:
Macs
Newer Mac laptops and desktops include BLE chipsets and can act as an iBeacon. iBeacon capability came to the MacBook Air in 2011, the iMac and MacBook Pro in 2012, and the Mac Pro in 2013. When using OS X, a program is needed to program the BLE chipset to act as an iBeacon, such as the $10 MacBeacon program.
iOS devices
Newer iOS devices (running iOS 7)—including iPhone 4S or later, iPad 3 or later, iPad mini, and fifth generation iPod touch—can act as beacons by using one of the many free programs that use the BLE hardware through the appropriate development frameworks.
Raspberry Pi
The Raspberry Pi ($15 for USB 4.0 interface, plus the Raspberry Pi) is a tiny Linux machine, capable of running a Bluetooth stack. With the addition of a Bluetooth 4.0 USB adapter, a Raspberry Pi can act as an iBeacon.
Arduino
Kytelabs BLEduino, a Kickstarter-funded project, promises to add iBeacon functionality to the Arduino world when the project ships. The RedBearLab BLE Mini can be used to add iBeacon functions to development platforms with a serial interface.
Nordic Semiconductor
The Nordic Semi nRF1822 is a tiny 20 mm diameter iBeacon reference design.
These options often provide a useful way to test the interaction of apps with a beacon, because they can be used for proof-of-concept work.
Activating a Beacon
Once you have identified the supporting hardware, making it act as an iBeacon is straightforward.
iOS Devices
Newer iOS devices (see “General-Purpose Hardware”) have the ability to use the built-in BLE hardware to become an iBeacon. With the radio hardware and a stack, any application can activate iBeacon capabilities to add proximity information. For example, a kiosk application could act as an iBeacon, automatically signing in end users who come into the vicinity of the kiosk.
If all you want is a test iBeacon, though, many applications can offer that functionality. The one I use most is Locate Beacon by Radius Networks, available free from the App Store.
After starting up the application, tap the iBeacon Transmitter button to bring up a list of configured iBeacon transmitters, as shown in Figure 3-1. One configuration can be set for transmission, which is indicated with a green lightning bolt to the left of the name.
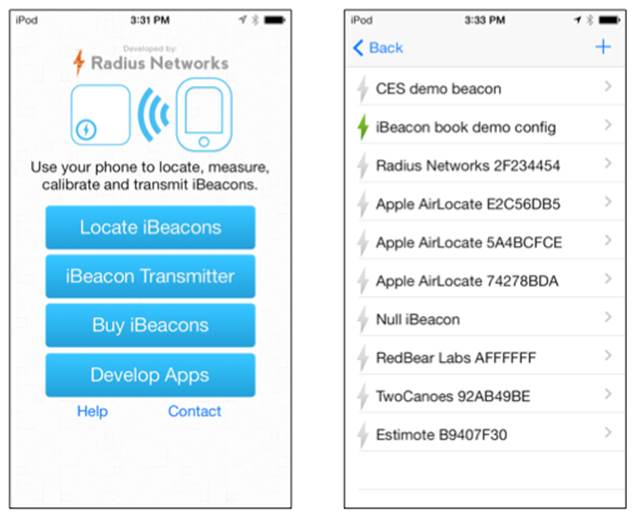
Figure 3-1. Locate Beacon’s main screen and transmit list
To add a new iBeacon configuration, tap the plus sign in the upper-right corner. You will be taken to the iBeacon transmitter configuration screen shown in Figure 3-2.
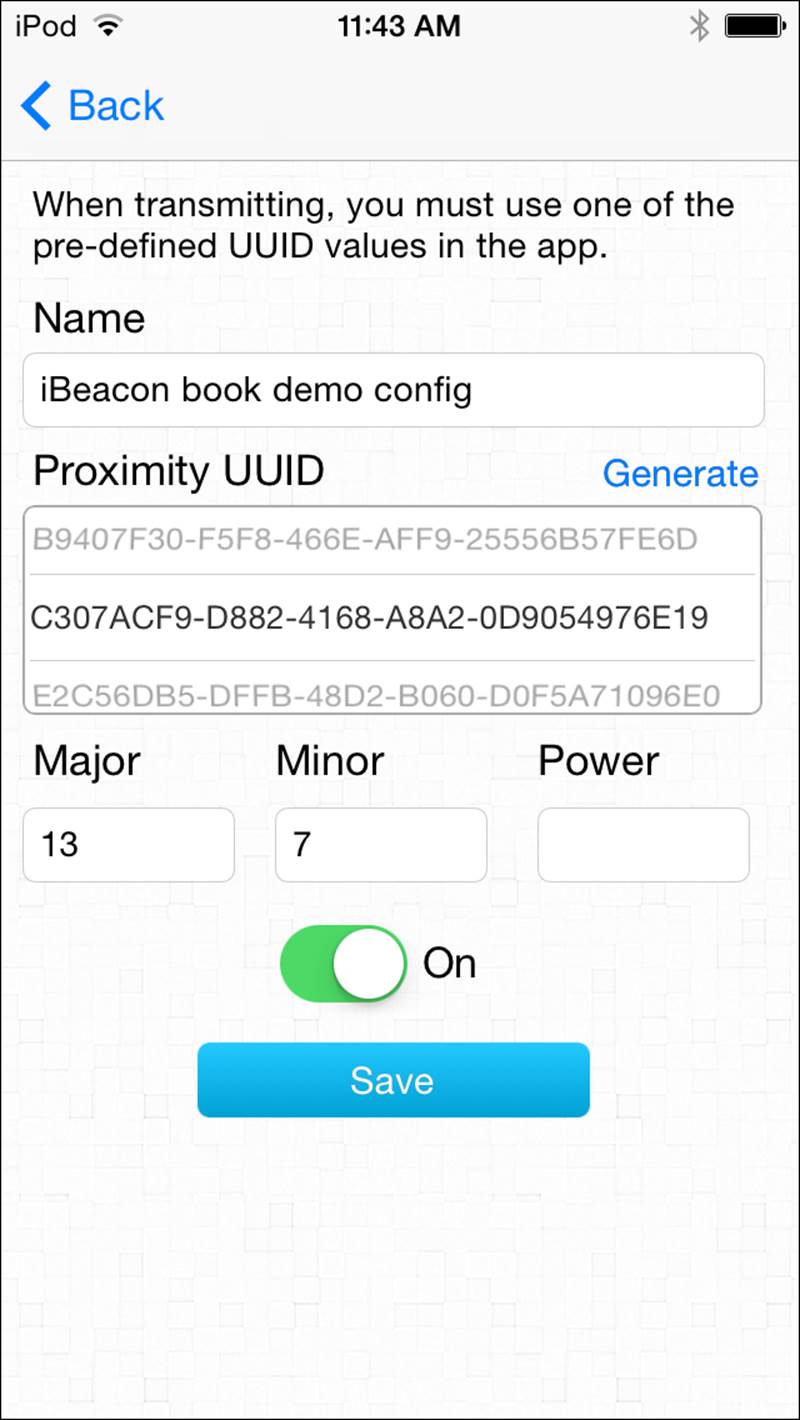
Figure 3-2. Locate Beacon transmitter configuration
The elements on the transmitter screen are straightforward:
Name
This is a string identifier held within the application. It has no effect on any parameters transmitted on the BLE interface.
UUID
Every iBeacon must have at least a UUID. If you are configuring a specific UUID, it can be typed into this field. If you are generating a first-time iBeacon for use with an application, use the Generate link above the UUID field to generate a random UUID for use with your application.
Major and minor numbers
These are the major and minor numbers transmitted in the iBeacon advertisement packets. As a two-byte number, the range must be between 0 and 65,535. If they are left blank, a zero will be transmitted.
Power
The value of this field ranges between –1 and –255, representing the measured power field in the iBeacon. If left blank, it will default to –59 dBm.
Transmitter switch
By default, a newly configured iBeacon will be off. If you switch on the configuration, the iOS device will act as a beacon for the current configuration only and will switch from any active configuration.
Not surprisingly, the controls on the application correspond with the mutable fields in the iBeacon protocol, plus a switch to trigger transmission. With a simple protocol, a one-screen configuration is easy to achieve.
RadBeacon
The Radius Networks RadBeacon is a USB-powered iBeacon that is configured over Bluetooth. The advantage of USB power is that power adapters are cheap and plentiful, and an iBeacon can be placed anywhere that USB power is available. It is a good test device for demonstration purposes or for work with application development, because it is inexpensive and most people will have a USB charger lying around.
Figure 3-3 shows a RadBeacon inserted into an Apple USB power adapter. I often store my RadBeacon attached to power, because it is easy to remove the RadBeacon if I need power.
To configure the RadBeacon, install the free RadBeacon app from the App Store on an iOS device. The app will activate and look for RadBeacons in its vicinity. From the list, you can drill into any single RadBeacon to set its configuration.
You can change the parameters of RadBeacons directly from the app using the screen shown in Figure 3-4. The main configuration will of course be the numerical identifiers placed in the advertising packets.
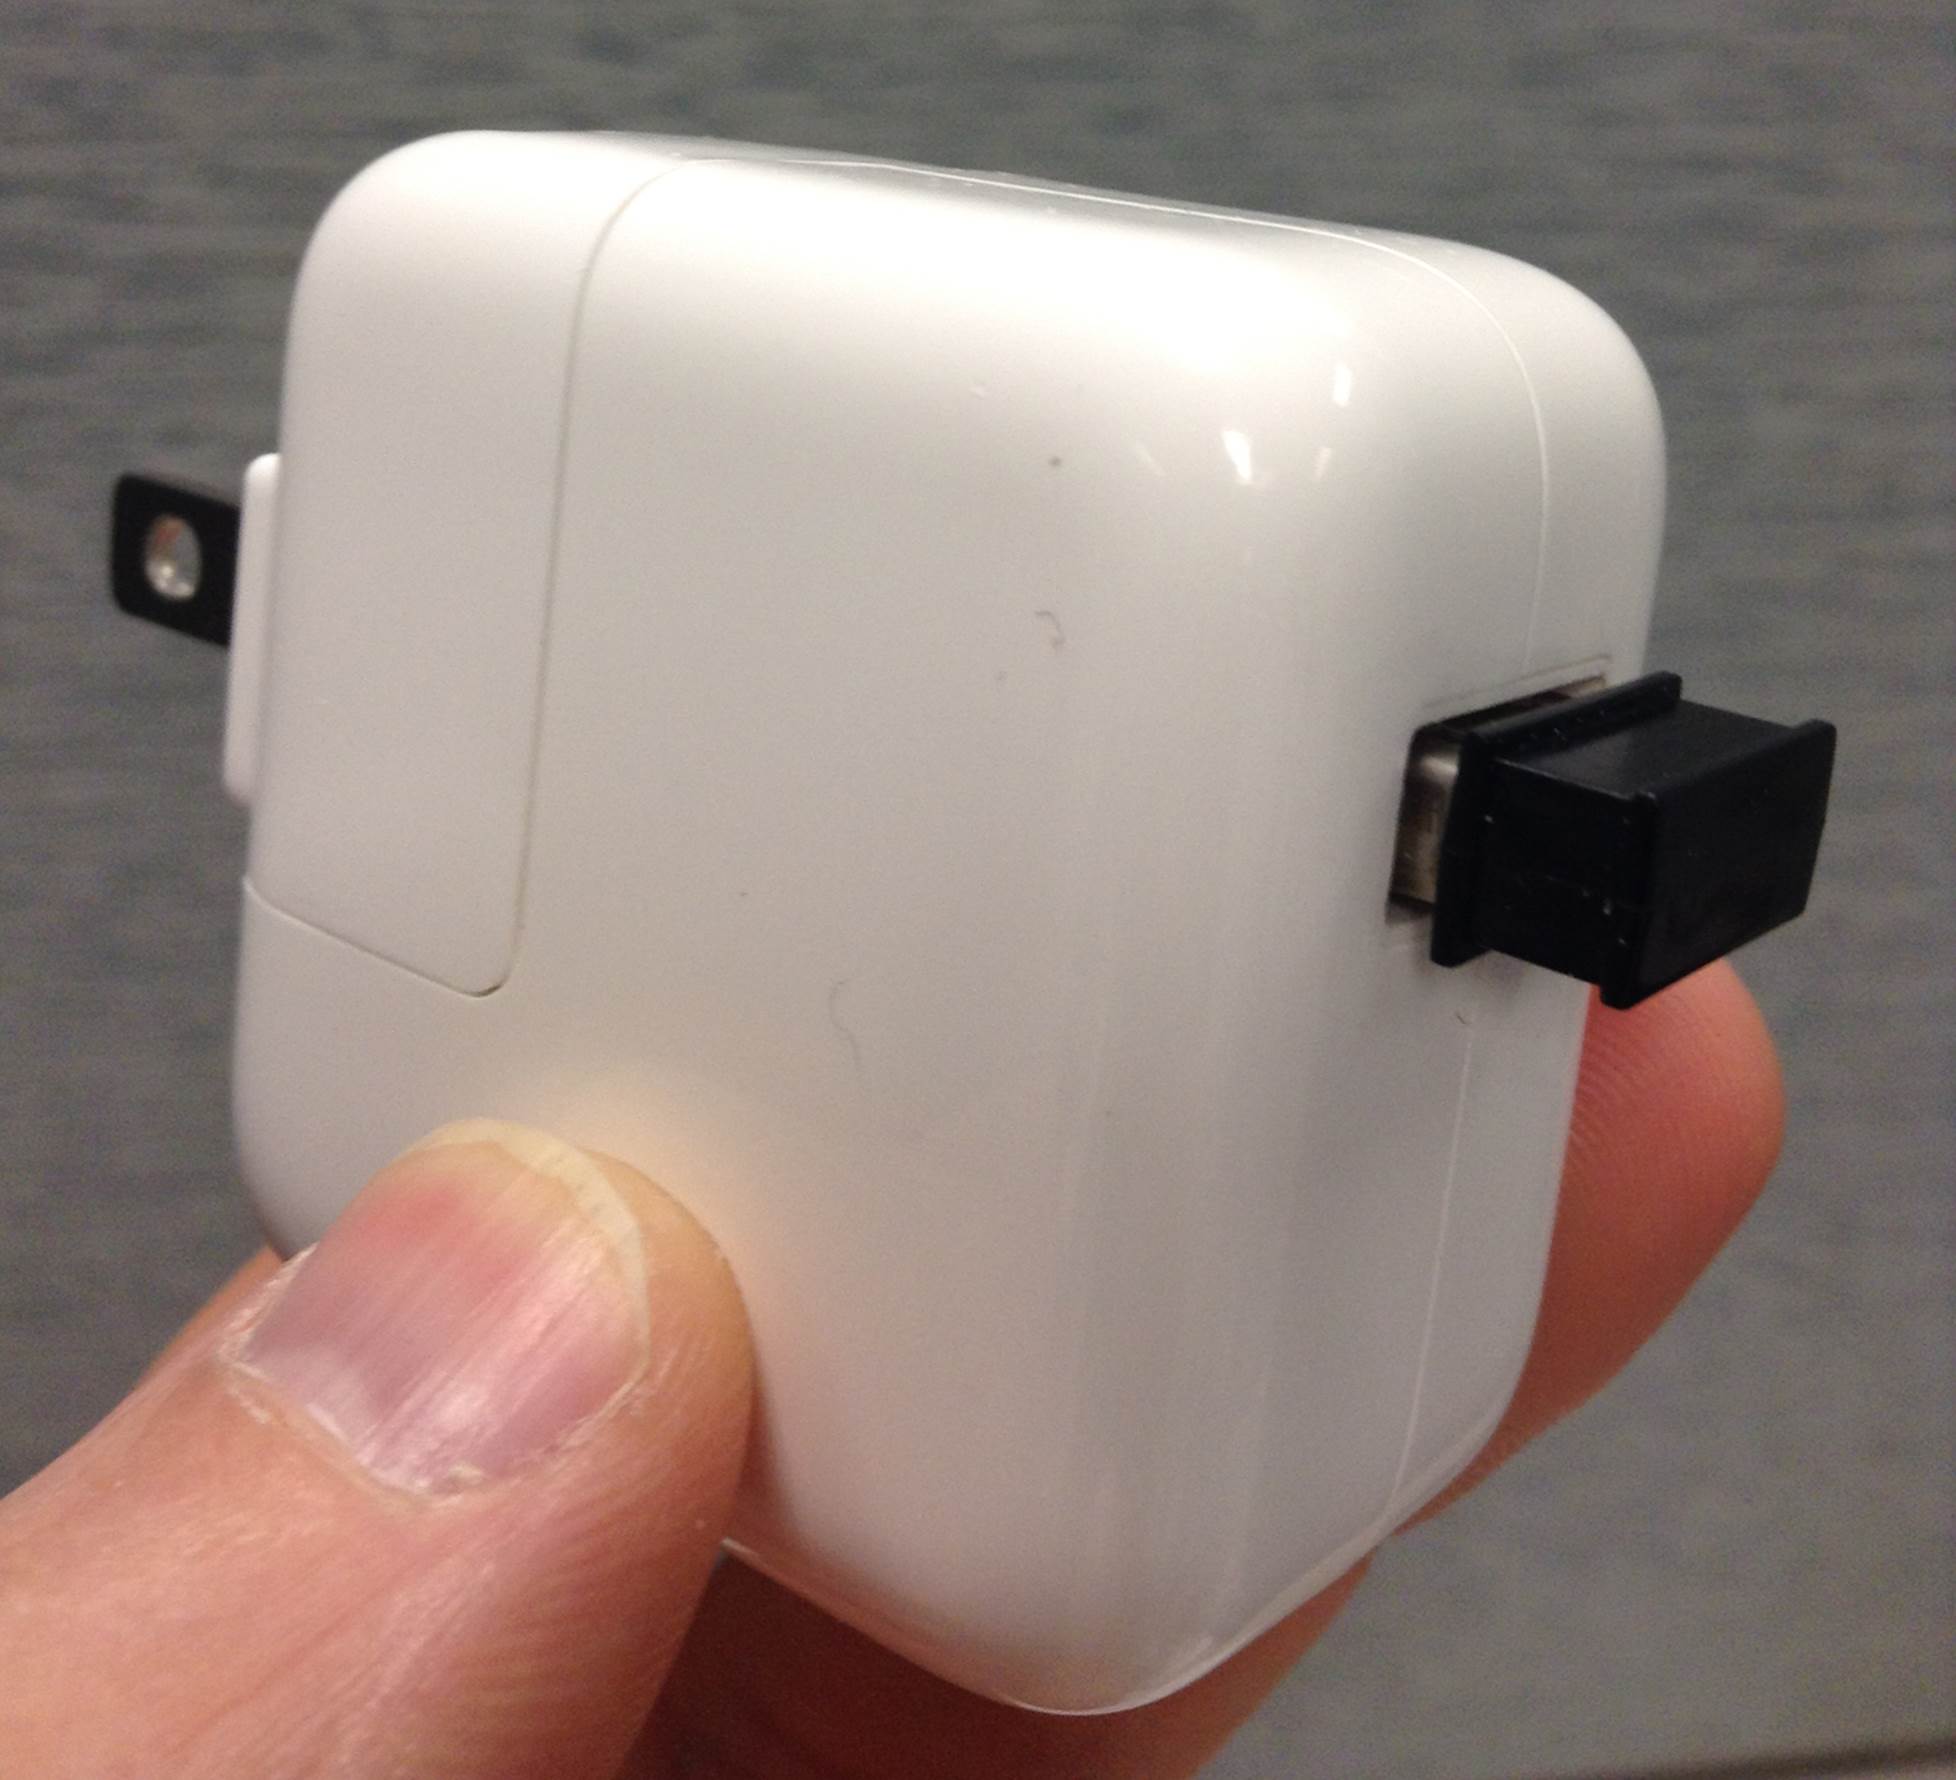
Figure 3-3. A RadBeacon plugged into a USB power adapter
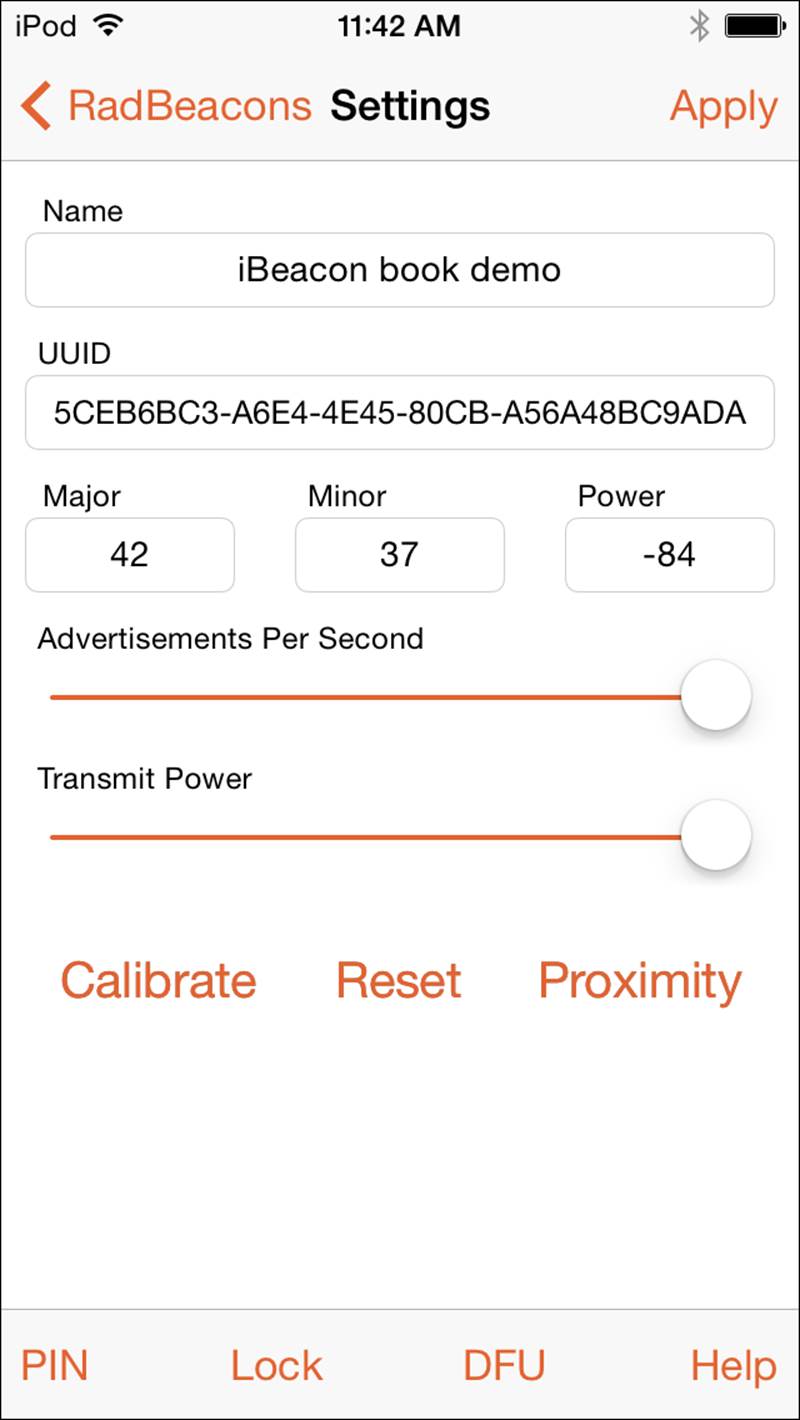
Figure 3-4. RadBeacon parameters
For security reasons, a RadBeacon can have its configuration changed only within the first 30 minutes after powering up. After that, you must turn the power off and turn it back on, which can be as simple as unplugging the RadBeacon from its USB host to cause it to reboot.
Raspberry Pi
The Raspberry Pi has taken the world by storm as a cheap prototyping platform because it has relatively high capabilities, plus the programmability of Linux, at a price that would have been unthinkably low even just a few years ago.
Raspberry Pi iBeacon hardware
It doesn’t take much to set up a Pi as an iBeacon. The hardware shopping list has only four items, and even if you are starting from scratch, you probably have one or two of them lying around:
Raspberry Pi (about $35)
Either a Model A or a Model B will work. I use a Model B, because it has a built-in Ethernet port and two USB ports. You will be using one USB port for the Bluetooth adapter, so if you also want to have a Wi-Fi interface, you will need to have the Model B with its two USB ports.
Bluetooth interface (about $15)
The IOGEAR GBU521 is a common choice, because it is affordable and uses one of the major Bluetooth chips on the market: the Broadcom BCM20702A0 chipset. This adapter supports both classic Bluetooth as well as BLE; setting it up as an iBeacon will use only the BLE mode. When purchasing a Bluetooth adapter, ensure that it is a Bluetooth 4.0 adapter. Earlier Bluetooth adapters are still readily available, but they do not support iBeacon functions.
SD card
The SD card will act as the disk for the Linux installation. It must be at least 4 GB, but much larger disks are still quite inexpensive. When I assembled my first Raspberry Pi iBeacon, a 16 GB card was around $10.
A micro-USB power adapter (about $15)
To run multiple USB devices, get a high-current adapter capable of supplying 2 amps.
In addition to the Raspberry Pi, you will want the following tools:
§ USB keyboard and mouse and a monitor with HDMI for the initial configuration (in a pinch, a television with an HDMI input can serve as the monitor)
§ HDMI cable
§ Software tool (as described in “Installation and setup”) to watch for iBeacons to verify that it is working
Once you have everything in one place, it is time to get started. Setting up a Raspberry Pi is simple, but there are enough steps that I would budget an hour or two for the entire process.
Installation and setup
Several forms of Linux can run on Raspberry Pi. This example uses the Raspbian distribution, which is available from the Raspberry Pi support site.
The core software required to set up an iBeacon is the BlueZ stack, which added support for Bluetooth Low Energy in the 5.x series. BlueZ is not part of the Raspbian distribution and needs to be compiled before it will run.
The process for getting the Pi running as an iBeacon is straightforward:
1. Download Raspbian (or your preferred Linux distribution).
2. Write Linux onto a digital memory card. This process varies depending on the operating system of the computer that is creating the memory card.
3. Boot your Pi and perform an initial configuration. For the purpose of starting up an iBeacon, the main configuration you’ll probably want to do is to enable SSH access. If the Pi is connecting to the Internet with Wi-Fi, the wireless interface will need to be configured, too.
4. Update Raspbian. Although Raspbian is released frequently, I usually begin by updating to the most recent software available by using the package system:
5. mmmpi$ sudo apt-get update
6. mmmpi$ sudo apt-get upgrade
7. Install the support libraries. Several USB libraries are required to run Bluetooth interfaces, and they can all be installed with one command. The downloads are not substantial and should take only a few minutes:
8. mmmpi$ sudo apt-get install libusb-dev libdbus-1-dev
9. libglib2.0-dev libudev-dev libical-dev libreadline-dev
10.Download and install the BlueZ stack to control the Bluetooth interface:
11.mmmpi$ cd bluez-5.18
12.mmmpi$ sudo ./configure --disable-systemd
13.mmmpi$ sudo make
14.mmmpi$ sudo make install
WARNING
At the time this book was written, the version of BlueZ in the package system was quite old. You need to install version 5 or later, so you might need to compile it.
15.Shut down the Pi, insert the dongle, and restart. Once it reboots, check if the device is discoverable, both by looking at the USB devices and by running hciconfig. The IOGEAR module uses a Broadcom chip and appears last:
16.mmmpi$ lsusb
17.Bus 001 Device 002: ID 0424:9512 Standard Microsystems Corp.
18.Bus 001 Device 001: ID 1d6b:0002 Linux Foundation 2.0 root hub
19.Bus 001 Device 003: ID 0424:ec00 Standard Microsystems Corp.
20.Bus 001 Device 004: ID 0a5c:21e8 Broadcom Corp.
21.mmmpi$ hciconfig
22.hci0: Type: BR/EDR Bus: USB
23. BD Address:00:02:72:C8:B2:EB ACL MTU:1021:8 SCO MTU:64:1
24. DOWN
25. RX bytes:547 acl:0 sco:0 events:27 errors:0
26. TX bytes:384 acl:0 sco:0 commands:27 errors:0
27.Bring up the Bluetooth interface and configure the iBeacon data. Make sure scanning is turned off before configuring the beacon. To check, run hciconfig and make sure the SCAN flag is not present.
CLI tools can be used to configure iBeacon data, which must be in hex format. The beacon data must be entered directly as a string of numbers, as shown in the following command:
mmmpi$ hciconfig hci0 up
mmmpi$ sudo hcitool -i hci0 cmd 0x08 0x0008 1e 02 01 1a 1a
ff 4c 00 02 15 e2 c5 6d b5 df fb 48 d2 b0 60 d0 f5 a7 10 96
e0 00 00 00 00 c5 00 00 00 00 00 00 00 00 00 00 00 00 00
< HCI Command: ogf 0x08, ocf 0x0008, plen 44
1E 02 01 1A 1A FF 4C 00 02 15 E2 C5 6D B5 DF FB 48 D2 B0 60
D0 F5 A7 10 96 E0 00 00 00 00 C9 00 00 00 00 00 00 00 00 00
00 00 00 00
> HCI Event: 0x0e plen 4
01 08 20 00
28.Finally, turn on the Bluetooth advertising capability to begin sending out the iBeacon data:
29.mmmpi$ sudo hciconfig hci0 leadv 3
Once again, the hciconfig command is used to control the interface. The command uses leadv to activate low-energy advertising, and the number 3 to indicate nonconnectable advertising, which is what is required by the specification.
With the last step complete, you now have a functioning iBeacon that can be used to trigger an application to take actions.
12 A January 2014 teardown of the Estimote beacon in Make magazine noted that approximately a fifth of the battery capacity was consumed in a month. Tests since seem to indicate that battery life claims are often optimistic.
All materials on the site are licensed Creative Commons Attribution-Sharealike 3.0 Unported CC BY-SA 3.0 & GNU Free Documentation License (GFDL)
If you are the copyright holder of any material contained on our site and intend to remove it, please contact our site administrator for approval.
© 2016-2026 All site design rights belong to S.Y.A.