Building Applications with iBeacon (2015)
Chapter 5. iOS and iBeacons
This chapter describes how to make iOS devices work with iBeacons. In keeping with the simple protocol, the APIs that serve iBeacon applications are also quite simple, though deceptively so. APIs provide support for the major protocol operations described in the previous two chapters: understanding when a device is near iBeacons, determining the identity of those iBeacons, and recognizing when the number and identity of iBeacons changes. It is also possible to use built-in features of iOS to interact with iBeacons, most notably, Passbook passes.
iBeacon Development on iOS with Core Location
Most of the iBeacon functions supported on iOS are provided through the iOS Core Location framework.20 Core Location has long enabled devices to use physical location attributes in an application, and iBeacon proximity functions were added in iOS 7.0.21
Users allow applications to make use of the Core Location framework. In the Privacy panel within iOS, shown in Figure 5-1, the device’s owner can block all applications from using Core Location functions, including iBeacon support, or selectively block applications from using Core Location. Naturally, devices must have hardware support for the underlying Bluetooth Low Energy functions, which in practice means an iPhone 4S or later iOS device. Macs sold since late 2011 also have the required Bluetooth hardware.
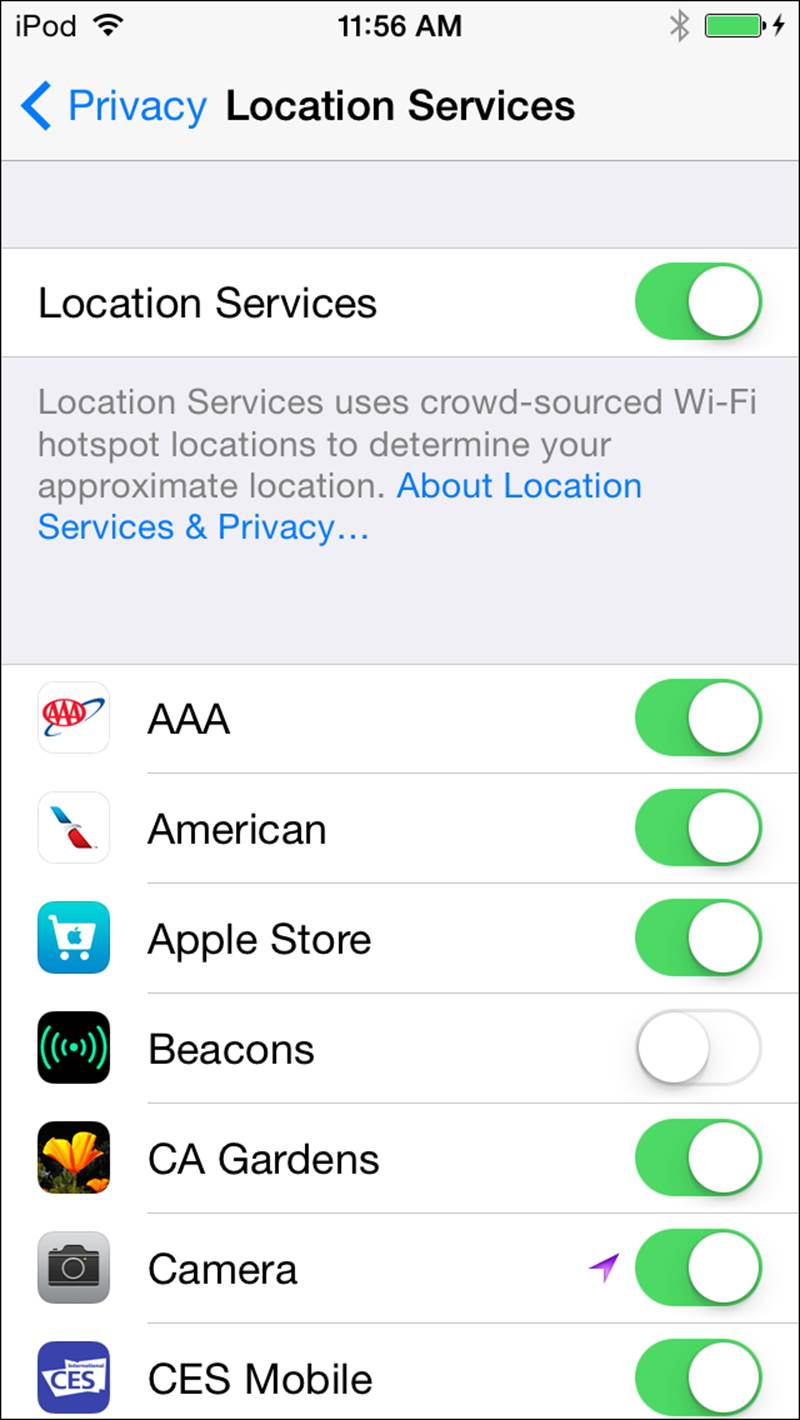
Figure 5-1. iOS Location Services control panel
NOTE
iBeacon support is provided only in iOS 7 and later.
Core Location provides the conceptual bridge between a beacon’s radio transmissions in the physical world and actions taken on a device to interact with the world. The core capabilities offered by the programming API are straightforward: notifying when a device has entered or left the area defined by a beacon’s transmission, and estimating the distance between a device and a beacon.
iBeacon Monitoring with Core Location
Monitoring, performed in both the foreground and the background on iOS, is used to determine when a device has entered or left an iBeacon’s coverage area. In the context of the framework, an iBeacon defines a region through its transmissions. In Core Location, a region is the space in which a specified combination of UUID, major number, and minor number is received. Devices are in the region when they receive and are able to decode the beacon and the numerical identifiers match.
When a region is set up for monitoring purposes, the framework requires that it be identified. Identification is, not surprisingly, accomplished by matching the numbers that a beacon transmits. The framework imposes a hierarchy and permits only three types of filter:
UUID only
Any time an iBeacon’s transmissions match the UUID, report the match. In this case, a region might be quite large and consist of several iBeacons, because anything with the UUID will match regardless of major or minor number. In practice, this likely corresponds to any iBeacon installed in support of an application anywhere in the universe.
UUID plus major number
This option narrows the region by requiring a match of both the UUID and major numbers. Like the UUID-only option, it is likely to match several iBeacons, most likely installed at one particular location.
UUID plus major and minor numbers
The most specific of the three options, this region type requires a match between the UUID, major number, and minor number. In most cases, this option will match only one specific iBeacon.
Pseudocode for setting up iBeacon monitoring is simple:
1. Create a CLBeaconRegion object.22 This object is defined by the UUID, major number, and minor number. In the following code, the iBeacon to monitor has the UUID 24F7B8B3-D124-4B7B-A180-CBA317CC1BB6 (generated specifically for this book by the uuidgen tool) and has the major and minor numbers of 42 and 105, respectively. To monitor more generically, create the CLBeaconRegion object with only the numerical parameters desired—for example, only the UUID.
2. Create a CLLocationManager to monitor for that region to obtain notifications when the device crosses region boundaries.
3. Take action based on the region boundary crossings. These actions are developer-defined and likely involve interaction with something else to make the application respond or react. It can be as simple as displaying a message, but the type of action is limited only by the developer’s imagination.
Translating the pseudocode into source code yields something like the following:
NSUUID *myUUID =
[[NSUUID alloc]
initWithUUIDString:@"24F7B8B3-D124-4B7B-A180-CBA317CC1BB6"];
CLBeaconMajorValue myMajor = 42;
CLBeaconMinorValue myMinor = 105;
// This region matches on anything with the UUID
CLBeaconRegion *uuidMatch = [[CLBeaconRegion alloc]
initWithProximityUUID:myUUID
identifier:@"uuidMatch" ];
// This region matches on one specific beacon in the UUID
CLBeaconRegion *matchThree = [[CLBeaconRegion alloc]
initWithProximityUUID:myUUID
major:myMajor
minor:myMinor
identifier:@"matchThree" ];
CLLocationManager *myLocationManager =
[[CLLocationManager alloc] init];
// Check that hardware supports monitoring
if ([CLLocationManager
isMonitoringAvailableForClass:[CLBeaconRegion class]])
{
// Monitor for a UUID
[myLocationManager startMonitoringForRegion:uuidMatch];
// Change to monitor for a specific iBeacon within that UUID
[myLocationManager stopMonitoringForRegion:uuidMatch];
[myLocationManager startMonitoringForRegion:matchThree];
}
This sample code defines the three numerical values for the region and then defines two regions based on those values. The first region monitors only for a UUID, while the second region monitors for an iBeacon that uses all three numbers.
Monitoring for the region is simple. Call a CLLocationManager to start monitoring. To change from monitoring the UUID-only region to look for a specific trio of numbers, stop monitoring and restart it with a more restrictive parameter set.
In practice, before passing a region to a location manager, check to see that it actually implements monitoring. Not all iOS devices have iBeacon-compatible Bluetooth hardware, and users can disable iBeacon functions in the privacy panel. Call the isMonitoringAvailableForClassmethod to determine if monitoring is available. In the sample code above, the function is used to determine that iBeacon functions are available before proceeding with calls to the monitoring methods.
Taking Action
Noticing that a device has crossed a region boundary is the first step in taking action. Upon entering a region, one common action to take might be to begin ranging, as described in “Ranging”.
The operating system delivers region events in three ways. Location managers can include one of the following delegated methods when events occur:
§ The location manager can define a method for didEnterRegion, which is called when a device crosses the boundary to enter a region.
§ The location manager can define a method for didExitRegion, which is called when a device crosses the boundary to leave a region.
§ If the requestStateForRegion method is called, region-crossing events will be delivered as they occur and will call the didDetermineState method.
An application can take any action triggered by the program. Commonly, the application will display a notification, though it could also lock the screen or trigger a web service call to proceed further. Applications have a few seconds to execute these tasks.
Continuing our example, the application might need to first determine whether it is within the coverage area of a given UUID and then try to lock on to a particular beacon. Naturally, the code could also begin ranging beacons or could even change the monitoring list to look for a specific beacon.
This sample code displays a simple message to indicate the motion relative to an iBeacon’s region:
// Delegated location manager method called when
// iBeacon region is entered
- (void)locationManager:(CLLocationManager *)manager
didEnterRegion:(CLRegion *)region {
// Tell the user the device has entered the region
UILocalNotification *message =
[[UILocalNotification alloc] init];
message.alertBody = @"You are here, and I am happy!";
message.soundName = @"Default";
[[UIApplication sharedApplication]
scheduleLocalNotification:message];
}
// Delegated location manager method called when the
// device departs the region
- (void)locationManager:(CLLocationManager *)manager
didExitRegion:(CLRegion *)region {
// Tell the user the device has left the region
UILocalNotification *message =
[[UILocalNotification alloc] init];
message.alertBody = @"Leaving beacons makes me sad."
message.soundName = @"Default";
[[UIApplication sharedApplication]
scheduleLocalNotification:message];
}
Using didEnterRegion and didExitRegion requires writing and maintaining two methods. The operating system can also pass the programmer a list of region entry and exit events and use one method to take action.
By using didDetermineState, a programmer can combine the two actions together in one method, though it will probably be necessary to use the CLRegionStateInside variable to determine if a device is inside or outside the region:
- (void)locationManager:(CLLocationManager *)manager
didDetermineState:(CLRegionState)state forRegion:(CLRegion *)region
{
if (state == CLRegionStateInside)
{
// Perform tasks for entering the region
}
else
{
// Perform tasks when exiting the region
}
}
Monitoring for iBeacons is the fundamental capability that allows for interaction between an application and the physical environment. Core Location makes triggering actions simple, with a well-designed framework for writing a wide variety of custom triggers that could be required by an application.>
Monitoring Limitations
The Core Location framework does not always provide immediate updates of region boundary-crossing events. When devices are at the edge of an iBeacon’s range, reception is marginal. Rather than send rapid-fire events as a receiver is at the ragged edge, the Core Location framework will damp out excessive numbers of triggered events.
iOS can monitor for up to 20 UUIDs in the background, so complex applications might need to modify the monitor list to add more specific monitoring when a device is in proximity to the UUID. For example, an application can monitor for a UUID and, only once that UUID is detected, add monitoring for particular major and minor numbers.
NOTE
iOS 7.1 brought a major change in monitoring. Prior to iOS 7.1, monitoring could be performed by an app only when it was running. In the 7.1 update, monitoring can now be used to launch an application that is not running.
Monitoring requires that a user enable location services on iOS and, if necessary, also enable location information for the specific application.
Regions are tracked by the operating system, not the application. Even when applications are not running, iOS may deliver region-crossing events. If an application has stopped or is running in the background, the OS can relaunch or awaken the app to handle the event.
Ranging
The second major type of interaction with an iBeacon is ranging, which is used to determine the distance between a device and a particular iBeacon. Like monitoring, ranging is conceptually simple with Core Location:
1. As with monitoring, create a CLBeaconRegion object.
2. Create a CLLocationManager, but rather than monitoring for region boundaries, ask it to perform ranging. Range updates are supplied every second.
The Core Location framework summarizes the range into a general description of immediate (within a few centimeters), intermediate (a few meters), and far (the iBeacon’s transmissions are received, but it is more than a few meters away).
The following code creates a CLBeaconRegion object and starts ranging:
NSUUID *myUUID =
[[NSUUID alloc]
initWithUUIDString:@"24F7B8B3-D124-4B7B-A180-CBA317CC1BB6"];
CLBeaconMajorValue myMajor = 42;
CLBeaconMinorValue myMinor = 105;
// This region matches on one specific beacon in the UUID
CLBeaconRegion *matchThree = [[CLBeaconRegion alloc]
initWithProximityUUID:myUUID
major:myMajor
minor:myMinor
identifier:@"matchThree" ];
CLLocationManager *myLocationManager =
[[CLLocationManager alloc] init];
// Change to monitor for a specific iBeacon within that UUID
[myLocationManager startRangingForBeaconsInRegion:matchThree];
To access ranging data, the framework will trigger the didRangeBeacons method. An array of iBeacons that have ranging data will be passed to the delegated method, along with the region in which they were detected. It is also possible to use the received signal strength indicator (RSSI) to estimate a range in meters, which is a property of the CLBeacon object in the array.
The following simple method loops over each iBeacon’s data and prints out a message based on how far away it is:
- (void)locationManager:(CLLocationManager *)manager
didRangeBeacons:(NSArray *)beacons
inRegion(CLRegion *)region
{
UILocalNotification *message =
[[UILocalNotification alloc] init];
message.soundName = @"Default";
for (CLBeacon *eachBeacon in beacons)
{
if (eachBeacon.proxmity == CLProximityImmediate) {
message.alertBody = @"On top of the beacon!";
} else if (eachBeacon.proxmity == CLProximityNear)
{
message.alertBody = @"Near the beacon!";
} else // proximity is "far" if you get here!
{
message.alertBody = @"This beacon is in range!";
}
}
[[UIApplication sharedApplication]
scheduleLocalNotification:message];
}
iOS places two important limitations on ranging. Most importantly, ranging must be done in the foreground. Applications running in the background cannot perform ranging.23 Furthermore, the Core Location framework cannot perform triggering based on ranging, so it is not possible to take an action when a device is a certain distance away from a beacon.
IBEACON TRIGGERS FOR PASSBOOK
iBeacons can trigger actions from applications running on the device, but not every organization has the time, expertise, desire, and funding to develop an application. To provide basic interactions, the Passbook application has the ability to create passes that interact with iBeacons.
When the device is near an iBeacon, a pass with the iBeacon’s identification information can be displayed on the lock screen, and the pass can be updated based on the visit. The first step in updating a pass based on proximity is to activate the pass when it enters the range of an iBeacon.
One method, shown in Figure 5-2, is embedding an iBeacon’s identifying information into the pass. The right side of the figure illustrates the location parameters that will be embedded into the pass. When the pass is within range of the UUID, major number, and minor number, the user will receive an alert. With additional support from a network service, the pass can be updated based on any information available to the computer systems.
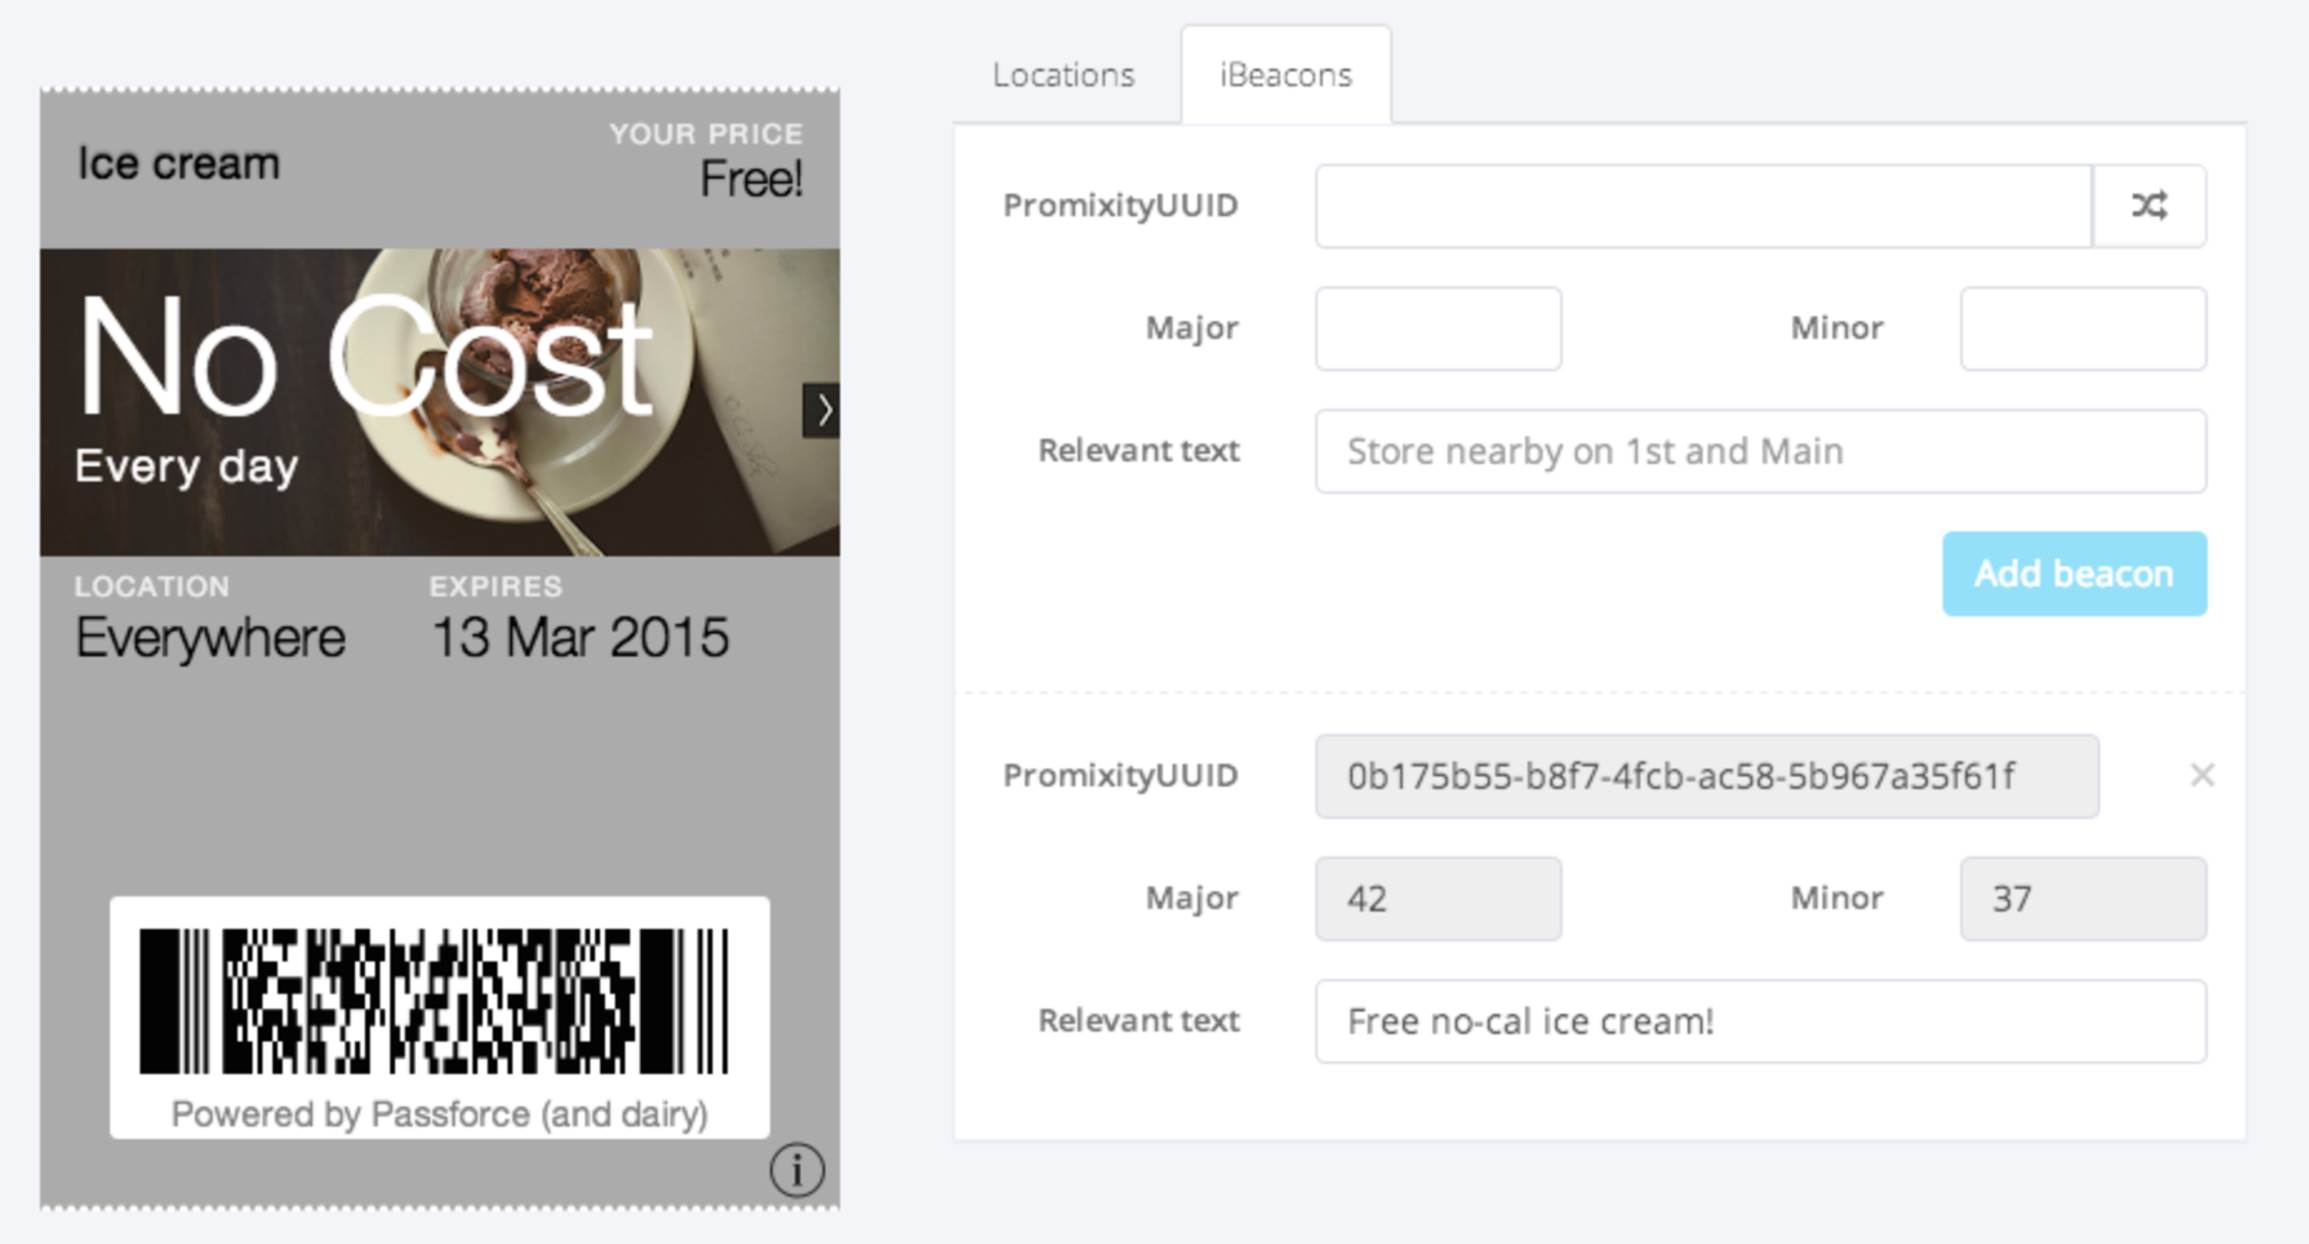
Figure 5-2. Linking a Passbook pass to an iBeacon
Regardless of whether your choice is to write a full application, or to go with a simpler pass-based interaction, correctly planning out the support network is an important consideration.
20 For the purposes of this book, the terms framework and API are used interchangeably. Formally, a framework consists of libraries and support code, in addition to the interface, and is a superset of an API, which is the public interface to use functionality exposed by the framework.
21 The iOS Core Location developer documentation describes both the location functions and the new proximity functions. For more information on developing for iBeacons, look at the beacon classes.
22 For full details on CLBeaconRegion, see the Apple developer documentation.
23 Ranging operations require much more activity in the Bluetooth hardware and draw significant power, because the Bluetooth interface is much more active when ranging.