Pro iOS Persistence: Using Core Data (2014)
Chapter 5. Integrating with the User Interface
The vaunted Model View Controller (MVC) pattern, which has spawned derivatives such as Model View Presenter (MVP) and Model View ViewModel (MVVM), separates an application’s data (the model) from the display of that data (the view). Core Data, both by name and intent, covers the application data, or model, concerns of applications. Storing data usually doesn’t suffice, however—applications usually must present that data onscreen. This chapter discusses some classes that take data from your Core Data stores and present that data onscreen efficiently and responsively. In this chapter, we cover the following:
· Using a fetched results controller (NSFetchedResultsController) to display data from a Core Data store in a table view
· Using Core Data’s ability to store images outside the Core Data store for better performance
· Integrating a search display controller (UISearchDisplayController) with a table view
The application we build in this chapter is a bug tracker called CoreDump. The first screen, the Master view, shows a list of projects—each with a name and a uniform resource locator (URL). We group the displayed projects by their URLs’ domain names, so that BitBucket projects are grouped together, GitHub projects are grouped together, and so on. We can then drill into any project to see a list of bugs associated with that project. We can add bugs to a project as well. By the end of this chapter, you’ll have a bug tracker with some glaring deficiencies—you won’t be able to delete or close bugs, for example—but you’ll be more proficient at integrating Core Data with your user interfaces (UIs).
Displaying Table Data with NSFetchedResultController
From the iPhone’s introduction, many (if not most) iOS applications displayed lists of data. Opting to call these single-column lists “tables,” iOS offers a table view class (UITableView) and a controller (UITableViewController) that displays lists, allows fast scrolling through the data, and even provides mechanisms for tapping cells to drill further into a data hierarchy. This approach is so fundamental and essential to displaying data that all iOS developers know how to use this class and the classes that support it to display lists of data.
When using table views to display data from a Core Data store, you could simply fetch your data into an array and keep the table view ecosystem ignorant of the origin of your data, and indeed many applications do just that. The iOS SDK, however, provides a class calledNSFetchedResultsController, which bridges table views and Core Data. NSFetchedResultsController pulls managed objects from the persistent store, from the entity you specify, caches them to improve performance, and gives them to the table view as necessary for display. It also manages adding, removing, and moving rows in the table in response to data changes.
Creating a Fetched Results Controller
You create a fetched results controller with four parameters.
· A fetch request (NSFetchRequest instance)
· A managed object context (NSManagedObjectContext instance)
· (Optional) A section name key path
· (Optional) A cache name
The following sections explain these parameters.
The Fetch Request
The fetch request that NSFetchedResultsController uses defines which data to fetch to display in the table. It is almost the same as any fetch request you’ve used throughout this book and in any of your Core Data development. It works with the entity in your data model that you specify and can optionally have a predicate (NSPredicate) to filter what it fetches. The one difference in this fetch request is that it must have at least one sort descriptor or your application will crash with the following message:
'NSInvalidArgumentException', reason: 'An instance of NSFetchedResultsController requires a fetch request with sort descriptors.'
This is because the fetched results controller works within the constraints of a table, which displays cells in a predictable order, so the fetched results controller must also have the data in a predictable order. A sort descriptor provides the mechanism required to help sort the data.
The Managed Object Context
This is a normal managed object context that holds the managed objects. Saving the context saves all the objects in it. You typically use your application’s managed object context for this parameter.
The Section Name Key Path
iOS divides table views into sections, with some number of rows in each section. This structure is fundamental to the operation of table views. A fetched results controller is optimized to work in that environment and can divide its data into sections that correspond to the table sections. The section name key path, set as the sectionNameKeyPath parameter, specifies a key path into your Core Data model that divides the managed objects for the fetch request’s entity into these sections. Typically, you make this sectionNameKeyPath parameter point to one of the properties of the entity this table displays. Note that if you specify a value for the sectionNameKeyPath parameter, you also must sort your fetch by that value, or else your application will crash with an error. If your table view contains only one section, you can pass nil for thesectionNameKeyPath parameter.
The Cache Name
The cache name parameter specifies a name for the cache that the fetched results controller uses to cache the managed objects it fetches and feeds to the table. In the 3.x versions of iOS, you were encouraged to make this cache name unique across fetch results controllers, but your application would still work if you shared the cache name with other fetch results controllers. As of iOS 4.0, however, your application will not work correctly if you share cache names across fetched results controllers. Make sure your cache names are unique.
Note that this parameter is optional; you can set the cache to nil and the fetched results controller won’t cache the data. This will slow down data display and application responsiveness, of course, so you usually won’t set the cache to nil.
Creating the Fetched Results Controller Delegate
It’s now time to create the fetched results controller delegate.
Building the CoreDump Application
To begin exploring fetched results controllers, create a new iOS Master-Detail Application project and call it CoreDump. Choose your language and checkUse Core Data, as shown in Figure 5-1.
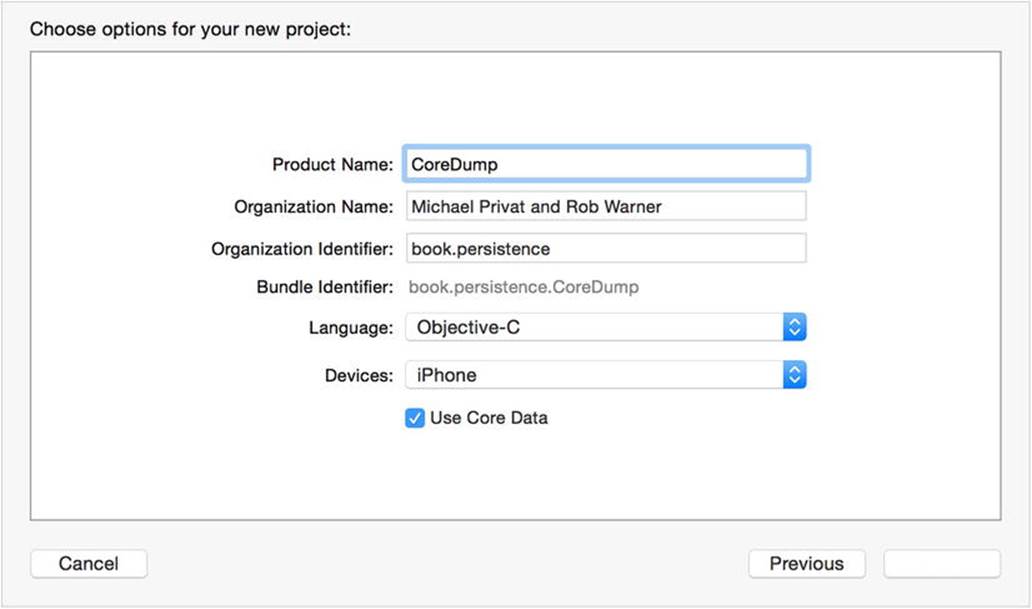
Figure 5-1. Creating the CoreDump application
Xcode creates a project with a storyboard tying together a master and a detail screen, a Core Data model containing a single entity (Event), and an NSFetchedResultsController to feed data from the Core Data store to the table view on the master screen. Go ahead and run the application, create a few events, drill down into them, and get a feel for how the generated application works. Also, poke around in the code to see what’s going on. As usual, the Xcode-generated code provides both a good starting point for your applications and an excellent way to learn how to use Apple’s technologies.
Examining the NSFetchedResultsController in the CoreDump Application
Let’s make sure we understand how CoreDump implements the fetched results controller in the generated code. If you’re building this project in Objective-C, open MasterViewController.h to see the declaration of the MasterViewController class, as shown in Listing 5-1.
Listing 5-1. MasterViewController.h
#import <UIKit/UIKit.h>
#import <CoreData/CoreData.h>
@interface MasterViewController : UITableViewController <NSFetchedResultsControllerDelegate>
@property (strong, nonatomic) NSFetchedResultsController *fetchedResultsController;
@property (strong, nonatomic) NSManagedObjectContext *managedObjectContext;
@end
You can see that the MasterViewController class subclasses UITableViewController and that it implements the NSFetchedResultsControllerDelegate protocol. It also has an NSFetchedResultsController property calledfetchedResultsController, and an NSManagedObjectContext property called managedObjectContext.
If you’re building CoreDump in Swift, you can find these same elements in MasterViewController.swift, although they’re not all grouped together so you must search a little to find the elements that Listing 5-2 shows.
Listing 5-2. The Same Elements in MasterViewController.swift
import UIKit
import CoreData
class MasterViewController: UITableViewController, NSFetchedResultsControllerDelegate {
var managedObjectContext: NSManagedObjectContext? = nil
...
var _fetchedResultsController: NSFetchedResultsController? = nil
...
}
The implementation of MasterViewController references the fetchedResultsController several times. The next few sections examine these references.
Accessing fetchedResultsController
The MasterViewController implementation overrides the accessor for fetchedResultsController to create, initialize, and return it, as shown in Listing 5-3 (Objective-C) and Listing 5-4 (Swift).
Listing 5-3. The fetchedResultsController Accessor (Objective-C)
- (NSFetchedResultsController *)fetchedResultsController {
if (_fetchedResultsController != nil) {
return _fetchedResultsController;
}
NSFetchRequest *fetchRequest = [[NSFetchRequest alloc] init];
// Edit the entity name as appropriate.
NSEntityDescription *entity = [NSEntityDescription entityForName:@"Event" inManagedObjectContext:self.managedObjectContext];
[fetchRequest setEntity:entity];
// Set the batch size to a suitable number.
[fetchRequest setFetchBatchSize:20];
// Edit the sort key as appropriate.
NSSortDescriptor *sortDescriptor = [[NSSortDescriptor alloc] initWithKey:@"timeStamp" ascending:NO];
NSArray *sortDescriptors = @[sortDescriptor];
[fetchRequest setSortDescriptors:sortDescriptors];
// Edit the section name key path and cache name if appropriate.
// nil for section name key path means "no sections".
NSFetchedResultsController *aFetchedResultsController = [[NSFetchedResultsController alloc] initWithFetchRequest:fetchRequest managedObjectContext:self.managedObjectContext sectionNameKeyPath:nil cacheName:@"Master"];
aFetchedResultsController.delegate = self;
self.fetchedResultsController = aFetchedResultsController;
NSError *error = nil;
if (![self.fetchedResultsController performFetch:&error]) {
// Replace this implementation with code to handle the error appropriately.
// abort() causes the application to generate a crash log and terminate. You should not use this function in a shipping application, although it may be useful during development.
NSLog(@"Unresolved error %@, %@", error, [error userInfo]);
abort();
}
return _fetchedResultsController;
}
Listing 5-4. The fetchedResultsController Accessor (Swift)
var fetchedResultsController: NSFetchedResultsController {
if _fetchedResultsController != nil {
return _fetchedResultsController!
}
let fetchRequest = NSFetchRequest()
// Edit the entity name as appropriate.
let entity = NSEntityDescription.entityForName("Event", inManagedObjectContext: self.managedObjectContext!)
fetchRequest.entity = entity
// Set the batch size to a suitable number.
fetchRequest.fetchBatchSize = 20
// Edit the sort key as appropriate.
let sortDescriptor = NSSortDescriptor(key: "timeStamp", ascending: false)
let sortDescriptors = [sortDescriptor]
fetchRequest.sortDescriptors = [sortDescriptor]
// Edit the section name key path and cache name if appropriate.
// nil for section name key path means "no sections".
let aFetchedResultsController = NSFetchedResultsController(fetchRequest: fetchRequest, managedObjectContext: self.managedObjectContext!, sectionNameKeyPath: nil, cacheName: "Master")
aFetchedResultsController.delegate = self
_fetchedResultsController = aFetchedResultsController
var error: NSError? = nil
if !_fetchedResultsController!.performFetch(&error) {
// Replace this implementation with code to handle the error appropriately.
// abort() causes the application to generate a crash log and terminate. You should not use this function in a shipping application, although it may be useful during development.
//println("Unresolved error \(error), \(error.userInfo)")
abort()
}
return _fetchedResultsController!
}
In the typical pattern, the code checks to see whether the fetchedResultsController property has been created and initialized. If it has, the code returns it. Otherwise, it creates the property and initializes it, doing the following:
· Sets the entity to retrieve to the Event entity.
· Adds a sort descriptor for the timeStamp attribute of Event.
· Creates the fetched results controller with the application’s Core Data managed object context, no section name key path, and the cache name “Master.”
· Sets the fetched result controller’s delegate to its parent MasterViewController instance.
· Fetches the results it’s configured to fetch.
Displaying Data in the Table
The data source and delegate for the table view owned by MasterViewController is the MasterViewController itself, which you can confirm by opening the storyboard, selecting the table view in the Master view, and clicking the Connections Inspector, as shown in Figure 5-2.
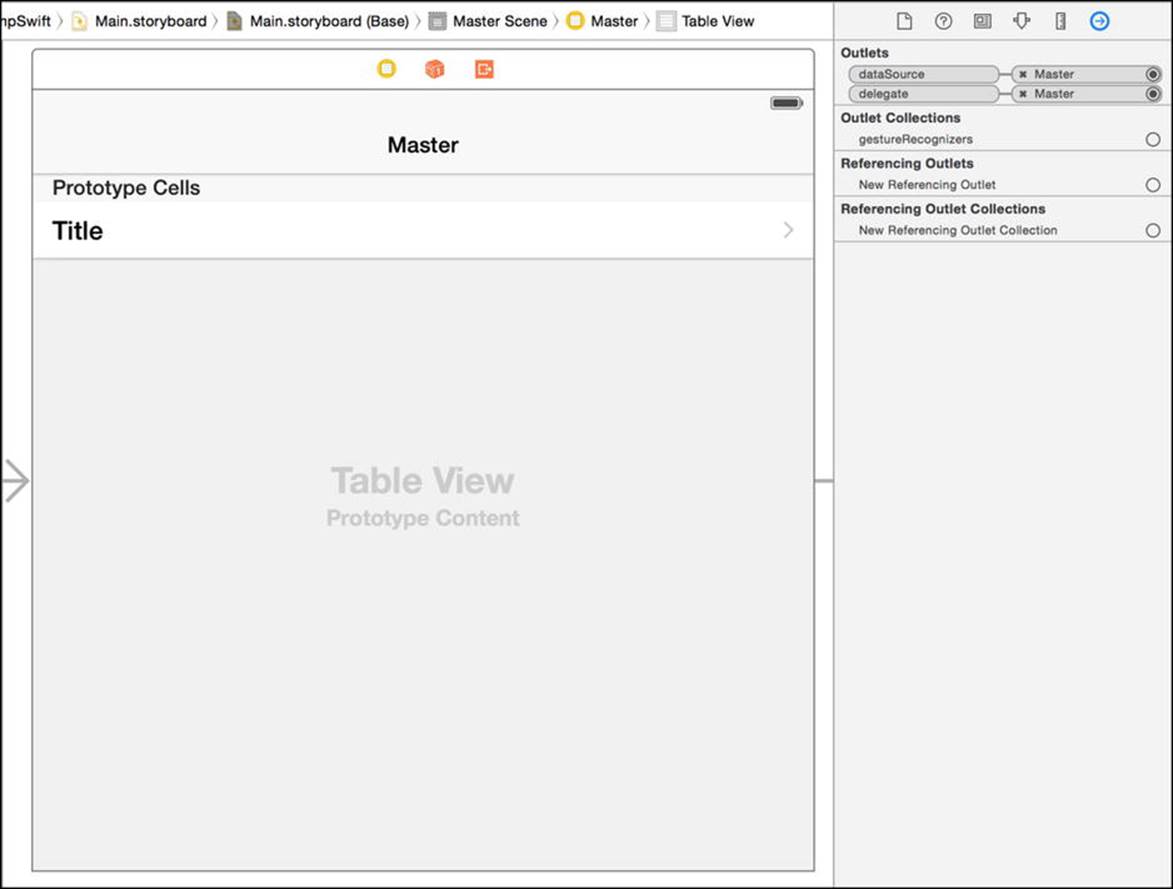
Figure 5-2. Verifying the data source and delegate for the table view
The implementations of the data source and delegate methods use fetchedResultsController extensively. For example, to calculate the number of sections in the table, the numberOfSectionsInTableView: method returns the count of fetchedResultsController’ssection property, as shown in Listing 5-5 (Objective-C) and Listing 5-6 (Swift).
Listing 5-5. Calculating the Number of Table Sections (Objective-C)
- (NSInteger)numberOfSectionsInTableView:(UITableView *)tableView {
return [[self.fetchedResultsController sections] count];
}
Listing 5-6. Calculating the Number of Table Sections (Swift)
override func numberOfSectionsInTableView(tableView: UITableView) -> Int {
return self.fetchedResultsController.sections?.count ?? 0
}
The sections property is an NSArray containing NSFetchedResultsSectionInfo instances. The NSFetchedResultsSectionInfo protocol provides methods to retrieve information about the table section to which it corresponds.
· name—the name to display in the section header
· indexTitle—the title to use in the index that runs down the right side of the table, if shown
· numberOfObjects—the number of objects in the section
· objects—the actual objects in the section
To calculate the number of rows in a given section, the tableView:numberOfRowsInSection: method gets the NSFetchedResultsSectionInfo instance for the requested section and returns its numberOfObjects property, as shown in Listing 5-7 (Objective-C) andListing 5-8 (Swift).
Listing 5-7. Calculating the Number of Rows in a Section (Objective-C)
- (NSInteger)tableView:(UITableView *)tableView numberOfRowsInSection:(NSInteger)section {
id <NSFetchedResultsSectionInfo> sectionInfo = [self.fetchedResultsController sections][section];
return [sectionInfo numberOfObjects];
}
Listing 5-8. Calculating the Number of Rows in a Section (Swift)
override func tableView(tableView: UITableView, numberOfRowsInSection section: Int) -> Int {
let sectionInfo = self.fetchedResultsController.sections![section] as NSFetchedResultsSectionInfo
return sectionInfo.numberOfObjects
}
The method for returning the actual cell to display in the table, tableView:cellForRowAtIndexPath:, creates a cell and calls a method named configureCell:atIndexPath: to configure it. This method retrieves the managed object, an Event instance, for the cell fromfetchedResultsController. It then sets the managed object’s timeStamp value as the cell’s text. Listing 5-9 (Objective-C) and Listing 5-10 (Swift) show this code.
Listing 5-9. Configuring the Cell (Objective-C)
- (void)configureCell:(UITableViewCell *)cell atIndexPath:(NSIndexPath *)indexPath {
NSManagedObject *object = [self.fetchedResultsController objectAtIndexPath:indexPath];
cell.textLabel.text = [[object valueForKey:@"timeStamp"] description];
}
Listing 5-10. Configuring the Cell (Swift)
func configureCell(cell: UITableViewCell, atIndexPath indexPath: NSIndexPath) {
let object = self.fetchedResultsController.objectAtIndexPath(indexPath) as NSManagedObject
cell.textLabel.text = object.valueForKey("timeStamp")!.description
}
Adding an Event
When you click the + button on the right of the navigation bar, the insertNewObject: method is called (as configured in the viewDidLoad) method. The insertNewObject method, shown in Listing 5-11 (Objective-C) and Listing 5-12 (Swift), does the following:
1. Gets the managed object context from fetchedResultsController.
2. Gets the entity from fetchedResultsController.
3. Inserts a new managed object of the appropriate entity type into the managed object context.
4. Configures the managed object.
5. Saves the managed object context.
Listing 5-11. Inserting a New Object (Objective-C)
- (void)insertNewObject:(id)sender {
NSManagedObjectContext *context = [self.fetchedResultsController managedObjectContext];
NSEntityDescription *entity = [[self.fetchedResultsController fetchRequest] entity];
NSManagedObject *newManagedObject = [NSEntityDescription insertNewObjectForEntityForName:[entity name] inManagedObjectContext:context];
// If appropriate, configure the new managed object.
// Normally you should use accessor methods, but using KVC here avoids the need to add a custom class to the template.
[newManagedObject setValue:[NSDate date] forKey:@"timeStamp"];
// Save the context.
NSError *error = nil;
if (![context save:&error]) {
// Replace this implementation with code to handle the error appropriately.
// abort() causes the application to generate a crash log and terminate. You should not use this function in a shipping application, although it may be useful during development.
NSLog(@"Unresolved error %@, %@", error, [error userInfo]);
abort();
}
}
Listing 5-12. Inserting a New Object (Swift)
func insertNewObject(sender: AnyObject) {
let context = self.fetchedResultsController.managedObjectContext
let entity = self.fetchedResultsController.fetchRequest.entity
let newManagedObject = NSEntityDescription.insertNewObjectForEntityForName(entity.name, inManagedObjectContext: context) as NSManagedObject
// If appropriate, configure the new managed object.
// Normally you should use accessor methods, but using KVC here avoids the need to add a custom class to the template.
newManagedObject.setValue(NSDate.date(), forKey: "timeStamp")
// Save the context.
var error: NSError? = nil
if !context.save(&error) {
// Replace this implementation with code to handle the error appropriately.
// abort() causes the application to generate a crash log and terminate. You should not use this function in a shipping application, although it may be useful during development.
//println("Unresolved error \(error), \(error.userInfo)")
abort()
}
}
Note that inserting a new object causes the controllerWillChangeContent: method from the NSFetchedResultsControllerDelegate to be called. Remember that the delegate for fetchedResultsController is the MasterViewController instance, which implements that method to tell its table view that updates are about to begin, as shown in Listing 5-13 (Objective-C) and Listing 5-14 (Swift).
Listing 5-13. The controllerWillChangeContent: Method (Objective-C)
- (void)controllerWillChangeContent:(NSFetchedResultsController *)controller {
[self.tableView beginUpdates];
}
Listing 5-14. The controllerWillChangeContent: Method (Swift)
func controllerWillChangeContent(controller: NSFetchedResultsController) {
self.tableView.beginUpdates()
}
Next, another method from the NSFetchedResultsControllerDelegate protocol is called: controller:didChangeObject:atIndexPath:forChangeType:newIndexPath. MasterViewController implements that method to animate the insertion of the row in the table, as shown in Listing 5-15 (Objective-C) and Listing 5-16 (Swift). This method also handles animations for deleting or moving a row.
Listing 5-15. Method Called When an Object Changes (Objective-C)
- (void)controller:(NSFetchedResultsController *)controller didChangeObject:(id)anObject
atIndexPath:(NSIndexPath *)indexPath forChangeType:(NSFetchedResultsChangeType)type
newIndexPath:(NSIndexPath *)newIndexPath {
UITableView *tableView = self.tableView;
switch(type) {
case NSFetchedResultsChangeInsert:
[tableView insertRowsAtIndexPaths:@[newIndexPath] withRowAnimation:UITableViewRowAnimationFade];
break;
case NSFetchedResultsChangeDelete: [tableView deleteRowsAtIndexPaths:@[indexPath] withRowAnimation:UITableViewRowAnimationFade];
break;
case NSFetchedResultsChangeUpdate:
[self configureCell:[tableView cellForRowAtIndexPath:indexPath] atIndexPath:indexPath];
break;
case NSFetchedResultsChangeMove:
[tableView deleteRowsAtIndexPaths:@[indexPath] withRowAnimation:UITableViewRowAnimationFade];
[tableView insertRowsAtIndexPaths:@[newIndexPath] withRowAnimation:UITableViewRowAnimationFade];
break;
}
}
Listing 5-16. Method Called When an Object Changes (Swift)
func controller(controller: NSFetchedResultsController, didChangeObject anObject: AnyObject, atIndexPath indexPath: NSIndexPath, forChangeType type: NSFetchedResultsChangeType, newIndexPath: NSIndexPath) {
switch type {
case .Insert:
tableView.insertRowsAtIndexPaths([newIndexPath], withRowAnimation: .Fade)
case .Delete:
tableView.deleteRowsAtIndexPaths([indexPath], withRowAnimation: .Fade)
case .Update:
self.configureCell(tableView.cellForRowAtIndexPath(indexPath)!, atIndexPath: indexPath)
case .Move:
tableView.deleteRowsAtIndexPaths([indexPath], withRowAnimation: .Fade)
tableView.insertRowsAtIndexPaths([newIndexPath], withRowAnimation: .Fade)
default:
return
}
}
In the insertion case, the NSFetchedResultsChangeInsert section of the switch statement is called. This is how the table view updates to display the new Event managed object.
Finally, the controllerDidChangeContent: method from the NSFetchedResultsControllerDelegate is called. MasterViewController’s implementation tells the table view to end its updates, as shown in Listing 5-17 (Objective-C) and Listing 5-18 (Swift).
Listing 5-17. The controllerDidChangeContent: Method (Objective-C)
- (void)controllerDidChangeContent:(NSFetchedResultsController *)controller {
[self.tableView endUpdates];
}
Listing 5-18. The controllerDidChangeContent: Method (Swift)
func controllerDidChangeContent(controller: NSFetchedResultsController) {
self.tableView.endUpdates()
}
Deleting an Event
The generated application allows you to delete the Event instances from the Master table, either by swiping left on the table cell and tapping the Delete button that appears or by tapping the Edit link on the left of the navigation bar, tapping the Delete icon to the left of the table cell, and then tapping the Delete button. Don’t forget to tap the Done link when you’re done.
When you delete a row from the table, your tableView:commitEditingStyle:forRowAtIndexPath: method is called with the UITableViewCellEditingStyleDelete editing style. The implementation checks for that style, deletes the corresponding object fromfetchedResultsController, and saves the managed object context. Listing 5-19 (Objective-C) and Listing 5-20 (Swift) show this code.
Listing 5-19. Deleting a Row from the Table and Core Data Store (Objective-C)
- (void)tableView:(UITableView *)tableView commitEditingStyle:(UITableViewCellEditingStyle)editingStyle forRowAtIndexPath:(NSIndexPath *)indexPath {
if (editingStyle == UITableViewCellEditingStyleDelete) {
NSManagedObjectContext *context = [self.fetchedResultsController managedObjectContext];
[context deleteObject:[self.fetchedResultsController objectAtIndexPath:indexPath]];
NSError *error = nil;
if (![context save:&error]) {
// Replace this implementation with code to handle the error appropriately.
// abort() causes the application to generate a crash log and terminate. You should not use this function in a shipping application, although it may be useful during development.
NSLog(@"Unresolved error %@, %@", error, [error userInfo]);
abort();
}
}
}
Listing 5-20. Deleting a Row from the Table and Core Data Store (Swift)
override func tableView(tableView: UITableView, commitEditingStyle editingStyle: UITableViewCellEditingStyle, forRowAtIndexPath indexPath: NSIndexPath) {
if editingStyle == .Delete {
let context = self.fetchedResultsController.managedObjectContext
context.deleteObject(self.fetchedResultsController.objectAtIndexPath(indexPath) as NSManagedObject)
var error: NSError? = nil
if !context.save(&error) {
// Replace this implementation with code to handle the error appropriately.
// abort() causes the application to generate a crash log and terminate. You should not use this function in a shipping application, although it may be useful during development.
//println("Unresolved error \(error), \(error.userInfo)")
abort()
}
}
}
As with adding a row, deleting a row triggers calls to the three NSFetchedResultsControllerDelegate protocol methods discussed in a previous section, “Adding an Event.”
Showing the Detail
You can find the last reference to fetchedResultsController in MasterViewController in the prepareForSegue:sender: method, which is called when you tap one of the rows in the Master view’s table. This implementation extracts the managed object fromfetchedResultsController for the tapped row and hands it to the Detail view controller for display, as shown in Listing 5-21 (Objective-C) and Listing 5-22 (Swift).
Listing 5-21. The prepareForSegue:sender: Method (Objective-C)
- (void)prepareForSegue:(UIStoryboardSegue *)segue sender:(id)sender {
if ([[segue identifier] isEqualToString:@"showDetail"]) {
NSIndexPath *indexPath = [self.tableView indexPathForSelectedRow];
NSManagedObject *object = [[self fetchedResultsController] objectAtIndexPath:indexPath];
[[segue destinationViewController] setDetailItem:object]; }
}
Listing 5-22. The prepareForSegue:sender: Method (Swift)
override func prepareForSegue(segue: UIStoryboardSegue, sender: AnyObject?) {
if segue.identifier == "showDetail" {
if let indexPath = self.tableView.indexPathForSelectedRow() {
let object = self.fetchedResultsController.objectAtIndexPath(indexPath) as NSManagedObject
(segue.destinationViewController as DetailViewController).detailItem = object
}
}
}
Now we’re ready to build the CoreDump application on top of the generated application’s foundation.
Updating the Core Data Model
To build the CoreDump application, we must alter the Core Data model to store the data we want for our bug tracker. CoreDump will store a list of projects and a list of bugs for each project. For each project, we store
· Project name
· Project URL
· Hosting service
For each bug, we store
· Bug title
· Bug details
Delete the Event entity from the Core Data model and create two entities: Project and Bug. For Project, add the following properties:
· name—an attribute of type String
· url—an attribute of type String
· host—an attribute of type String
· bugs—an optional, to many relationship to Bug, with the Delete Rule set to Cascade
For the Bug entity, add the following properties:
· title—an attribute of type String
· details—an attribute of type String
· project—a Required, to one relationship to Project, with the Delete Rule set to Nullify. Don’t forget to set the Inverse Relationship to bugs.
When you have finished updating your Core Data model, it should look like Figure 5-3.
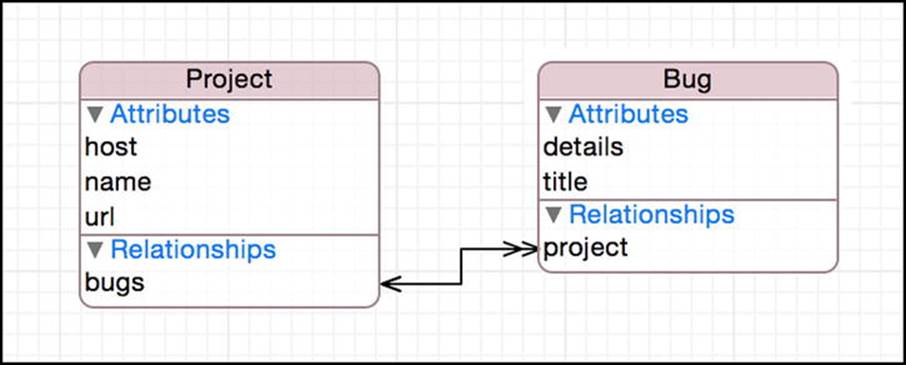
Figure 5-3. The updated Core Data model
Don’t forget to delete the database generated by the old data model, or your application will crash when you try to run it.
Generating the Model Classes
Although we could use raw NSManagedObject instances throughout the CoreDump application, we instead will generate classes from the Core Data model. Create a new NSManagedObject subclass, select the CoreDump data model, and select both the Project and Bug entities to generate the Project and the Bug classes. If you’re using Swift, remember to fix the namespaces in the generated classes. Your options are:
· Put the project name in the Core Data model, in the Class field of each entity (i.e., CoreDump.Project and CoreDump.Bug)
· Use the @objc keyword in the generated class files (i.e., @objc(Project) and @objc(Bug)
Updating the Fetched Results Controller
The fetched results controller currently tries to fetch using the Event entity, which no longer exists. Instead, you want to fetch the Project entity. Also, you want to display the projects in sections by hosting service. To do this, you must specify a section name key path corresponding to thehost property. You must also sort by host, and then within each section sort by name. Locate the fetchedResultsController accessor and update it with the following changes:
· Change the entity to Project.
· Add a sort descriptor for host.
· Change the existing sort descriptor to use name.
· Change the section name key path to use host.
Listing 5-23 (Objective-C) and Listing 5-24 (Swift) show the updated fetchedResultsController accessor.
Listing 5-23. The Updated fetchedResultsController Accessor (Objective-C)
- (NSFetchedResultsController *)fetchedResultsController {
if (_fetchedResultsController != nil) {
return _fetchedResultsController;
}
NSFetchRequest *fetchRequest = [[NSFetchRequest alloc] init];
// Edit the entity name as appropriate.
NSEntityDescription *entity = [NSEntityDescription entityForName:@"Project" inManagedObjectContext:self.managedObjectContext];
[fetchRequest setEntity:entity];
// Set the batch size to a suitable number.
[fetchRequest setFetchBatchSize:20];
// Edit the sort key as appropriate. NSSortDescriptor *hostSortDescriptor = [[NSSortDescriptor alloc] initWithKey:@"host" ascending:YES];
NSSortDescriptor *nameSortDescriptor = [[NSSortDescriptor alloc] initWithKey:@"name" ascending:YES];
NSArray *sortDescriptors = @[hostSortDescriptor, nameSortDescriptor];
[fetchRequest setSortDescriptors:sortDescriptors];
// Edit the section name key path and cache name if appropriate.
// nil for section name key path means "no sections".
NSFetchedResultsController *aFetchedResultsController = [[NSFetchedResultsController alloc] initWithFetchRequest:fetchRequest managedObjectContext:self.managedObjectContext sectionNameKeyPath:@"host"cacheName:@"Master"];
aFetchedResultsController.delegate = self;
self.fetchedResultsController = aFetchedResultsController;
NSError *error = nil;
if (![self.fetchedResultsController performFetch:&error]) {
// Replace this implementation with code to handle the error appropriately.
// abort() causes the application to generate a crash log and terminate. You should not use this function in a shipping application, although it may be useful during development.
NSLog(@"Unresolved error %@, %@", error, [error userInfo]);
abort();
}
return _fetchedResultsController;
}
Listing 5-24. The Updated fetchedResultsController Accessor (Swift)
var fetchedResultsController: NSFetchedResultsController {
if _fetchedResultsController != nil {
return _fetchedResultsController!
}
let fetchRequest = NSFetchRequest(entityName: "Project")
// Set the batch size to a suitable number.
fetchRequest.fetchBatchSize = 20
// Edit the sort key as appropriate.
let hostSortDescriptor = NSSortDescriptor(key: "host", ascending: true)
let nameSortDescriptor = NSSortDescriptor(key: "name", ascending: true)
let sortDescriptors = [hostSortDescriptor, nameSortDescriptor]
fetchRequest.sortDescriptors = [sortDescriptors]
// Edit the section name key path and cache name if appropriate.
// nil for section name key path means "no sections".
let aFetchedResultsController = NSFetchedResultsController(fetchRequest: fetchRequest, managedObjectContext: self.managedObjectContext!, sectionNameKeyPath:"host", cacheName: "Master")
aFetchedResultsController.delegate = self
_fetchedResultsController = aFetchedResultsController
var error: NSError? = nil
if !_fetchedResultsController!.performFetch(&error) {
// Replace this implementation with code to handle the error appropriately.
// abort() causes the application to generate a crash log and terminate. You should not use this function in a shipping application, although it may be useful during development.
//println("Unresolved error \(error), \(error.userInfo)")
abort()
}
return _fetchedResultsController!
}
Displaying a Project in the Table
The cells in the table are currently configured to show Event objects. You must change them to show Project objects instead. In each cell, you want to display the project’s name and its URL. Tapping the project should drill down into its associated bugs, so you still want the disclosure indicator. You want to be able to edit the project’s name and URL as well, so when the Master view is in editing mode, you want to show the detail disclosure accessory.
Additionally, you want to display the projects by hosting service, using the section names you configured in the fetched results controller. The following sections walk you through the changes.
Updating the Table View Cell to Show Projects
Open the storyboard file, Main.storyboard, and select the table view cell in the master screen. Select the Attributes inspector, and do the following:
· Change the Style toSubtitle.
· Change the Editing Acc. toDetail Disclosure.
See Figure 5-4 for the appropriate changes in the Attributes inspector.
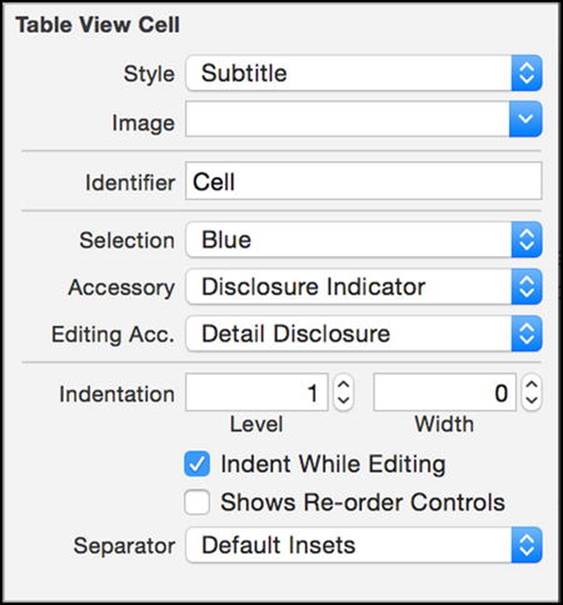
Figure 5-4. Configuring the attributes for the table view cell
Now you can update the configureCell:atIndexPath: method to use a Project object instead of an Event object. If you’re building Objective-C, import the Project header file in MasterViewController.m.
#import "Project.h" // Objective-C
Now, update the cell to show the project’s name and its URL, as shown in Listing 5-25 (Objective-C) and Listing 5-26 (Swift).
Listing 5-25. The Updated configureCell:atIndexPath: Method (Objective-C)
- (void)configureCell:(UITableViewCell *)cell atIndexPath:(NSIndexPath *)indexPath {
Project *project = [self.fetchedResultsController objectAtIndexPath:indexPath];
cell.textLabel.text = project.name;
cell.detailTextLabel.text = project.url;
}
Listing 5-26. The Updated configureCell:atIndexPath: Function (Swift)
func configureCell(cell: UITableViewCell, atIndexPath indexPath: NSIndexPath) {
let project = self.fetchedResultsController.objectAtIndexPath(indexPath) as Project
cell.textLabel.text = project.name
cell.detailTextLabel?.text = project.url
}
Updating the Table to Group by Hosting Service
Currently, the table style is Plain. To display sections, we must change it to Grouped, so open Main.storyboard, select the table, and show the Attributes inspector. Change the style to Grouped.
Additionally, you must provide the names for the sections. Recall that the NSFetchedResultsSectionInfo protocol provides a name property that corresponds to the sectionNameKeyPath parameter used when creating a fetched results controller. We simply tell our table to use that value for section names, as shown in Listing 5-27 (Objective-C) and Listing 5-28 (Swift).
Listing 5-27. Displaying Section Names in the Table (Objective-C)
- (NSString *)tableView:(UITableView *)tableView titleForHeaderInSection:(NSInteger)section {
id <NSFetchedResultsSectionInfo> sectionInfo = [self.fetchedResultsController sections][section];
return [sectionInfo name];
}
Listing 5-28. Displaying Section Names in the Table (Swift)
override func tableView(tableView: UITableView, titleForHeaderInSection section: Int) -> String? {
if tableView == self.tableView {
var sectionInfo = self.fetchedResultsController.sections![section] as NSFetchedResultsSectionInfo
return sectionInfo.name
}
else {
return nil
}
}
Creating the Add and Edit Project Screen
The generated application didn’t require a screen to accept input when adding a new Event object. When you tapped to add an Event, the application just created the object, stuffed the current time into its timeStamp attribute, and returned. We can’t do that when creating a Projectobject, since we must collect a name and a URL. In this section, we create a screen to add (and, later, edit) a Project object.
Creating the View Controller for Adding and Editing a Project
We first create the view controller responsible for the Add/Edit Project screen. Create a new Cocoa Touch Class file called ProjectViewController and make it a subclass of UIViewController. Check the Also create XIB file check box, choose your language, and follow the steps to create the new file. Open ProjectViewController.h (Objective-C) or ProjectViewController.swift (Swift) and add the following:
· A property for the Project to edit (note: will be nil when adding a Project)
· A property for the fetched results controller
· An outlet for the project name text field
· An outlet for the project URL text field
· An initializer that takes a Project and a fetched results controller
· An action to save the Project
· An action to cancel adding or editing
Listing 5-29 (Objective-C) and Listing 5-30 (Swift) show the edited file.
Listing 5-29. ProjectViewController.h
#import <UIKit/UIKit.h>
#import <CoreData/CoreData.h>
@class Project;
@interface ProjectViewController : UIViewController
@property (strong, nonatomic) Project *project;
@property (strong, nonatomic) NSFetchedResultsController *fetchedResultsController;
@property (weak, nonatomic) IBOutlet UITextField *name;
@property (weak, nonatomic) IBOutlet UITextField *url;
- (id)initWithProject:(Project *)project fetchedResultsController:(NSFetchedResultsController *)fetchedResultsController;
- (IBAction)save:(id)sender;
- (IBAction)cancel:(id)sender;
@end
Listing 5-30. ProjectViewController.swift
import UIKit
import CoreData
class ProjectViewController: UIViewController {
var fetchedResultsController: NSFetchedResultsController? = nil
var project: Project? = nil
@IBOutlet weak var name: UITextField!
@IBOutlet weak var url: UITextField!
...
}
Now edit ProjectViewController.m (Objective-C) or continue editing ProjectViewController.swift (Swift) to implement the desired behaviors. If you’re editing ProjectViewController.m, import Project.h at the top of the file, and then in the new initializer method, shown in Listing 5-31 (Objective-C) and Listing 5-32 (Swift), store the project and fetchedResultsController parameters in the properties.
Listing 5-31. The initWithProject:fetchedResultsController: Method (Objective-C)
- (id)initWithProject:(Project *)project fetchedResultsController:(NSFetchedResultsController *)fetchedResultsController
{
self = [super init];
if (self) {
self.project = project;
self.fetchedResultsController = fetchedResultsController;
}
return self;
}
Listing 5-32. The initWithProject:fetchedResultsController: Method (Swift)
convenience init(project: Project?, fetchedResultsController: NSFetchedResultsController) {
self.init(nibName: "ProjectViewController", bundle: nil)
self.fetchedResultsController = fetchedResultsController
self.project = project
}
In the viewWillAppear: method, if the project property is non-nil, transfer the pertinent values from project to the appropriate text fields, as shown in Listing 5-33 (Objective-C) and Listing 5-34 (Swift).
Listing 5-33. The viewWillAppear: Method (Objective-C)
- (void)viewWillAppear:(BOOL)animated {
[super viewWillAppear:animated];
if (self.project != nil) {
self.name.text = self.project.name;
self.url.text = self.project.url;
}
}
Listing 5-34. The viewWillAppear: Method (Swift)
override func viewWillAppear(animated: Bool) {
super.viewWillAppear(animated)
if let project = self.project {
self.name.text = project.name
self.url.text = project.url
}
}
The cancel: method is simple: simply dismiss the modal window, as shown in Listing 5-35 (Objective-C) and Listing 5-36 (Swift).
Listing 5-35. The cancel: Method (Objective-C)
- (IBAction)cancel:(id)sender {
[self dismissViewControllerAnimated:YES completion:nil];
}
Listing 5-36. The cancel: Method (Swift)
@IBAction func cancel(sender: AnyObject) {
self.dismissViewControllerAnimated(true, completion: nil)
}
In the save: method, you determine whether we’re adding a project (project is nil) or editing an existing project (project is non-nil). If we’re adding a project, insert a new managed object into the Project entity. In both cases, transfer the name and URL from the text fields into the project object. Then, determine the name of the hosting service in a method called host that we will implement momentarily. Save the managed object context, and then dismiss the modal view. Listing 5-37 (Objective-C) and Listing 5-38 (Swift) show the save: method.
Listing 5-37. The save: Method (Objective-C)
- (IBAction)save:(id)sender {
NSManagedObjectContext *context = [self.fetchedResultsController managedObjectContext];
if (self.project == nil) {
NSEntityDescription *entity = [[self.fetchedResultsController fetchRequest] entity];
self.project = [NSEntityDescription insertNewObjectForEntityForName:[entity name] inManagedObjectContext:context];
}
self.project.name = self.name.text;
self.project.url = self.url.text;
self.project.host = [self host];
// Save the context.
NSError *error = nil;
if (![context save:&error]) {
// Replace this implementation with code to handle the error appropriately.
// abort() causes the application to generate a crash log and terminate. You should not use this function in a shipping application, although it may be useful during development.
NSLog(@"Unresolved error %@, %@", error, [error userInfo]); abort();
}
[self dismissViewControllerAnimated:YES completion:nil];
}
Listing 5-38. The save: Method (Swift)
@IBAction func save(sender: AnyObject) {
if let context = fetchedResultsController?.managedObjectContext {
if self.project == nil {
var entity = self.fetchedResultsController?.fetchRequest.entity
self.project = NSEntityDescription.insertNewObjectForEntityForName(entity!.name!, inManagedObjectContext: context) as? Project
}
self.project?.name = self.name.text
self.project?.url = self.url.text
self.project?.host = self.host()
var error: NSError? = nil
if context.hasChanges && !context.save(&error) {
// Replace this implementation with code to handle the error appropriately.
// abort() causes the application to generate a crash log and terminate. You should not use this function in a shipping application, although it may be useful during development.
NSLog("Unresolved error \(error), \(error!.userInfo)")
abort()
}
self.dismissViewControllerAnimated(true, completion: nil)
}
}
The host method uses a regular expression to pluck the host name from the URL. For example, if the URL were https://github.com/hoop33/wry, the method would return “github.com.” If the regular expression finds no matches, it just returns the URL. Listing 5-39 (Objective-C) and Listing 5-40 (Swift) show the host method.
Listing 5-39. The host Method (Objective-C)
- (NSString *)host {
NSRegularExpression *regex = [NSRegularExpression regularExpressionWithPattern:@".*?//(.*?)/.*"
options:0 error:nil];
NSTextCheckingResult *match = [regex firstMatchInString:self.project.url
options:0
range:NSMakeRange(0, [self.project.url length])];
if (match) {
return [self.project.url substringWithRange:[match rangeAtIndex:1]];
} else {
return self.project.url;
}
}
Listing 5-40. The host Function (Swift)
func host() -> String {
let url : NSString = self.project!.url
let regex = NSRegularExpression(pattern: ".*?//(.*?)/.*", options: nil, error: nil)
let match = regex!.firstMatchInString(url, options: NSMatchingOptions.ReportCompletion, range: NSMakeRange(0, url.length))
if match != nil {
let range = match?.rangeAtIndex(1)
if let range = range {
return url.substringWithRange(range)
}
else {
return url
}
}
else {
return url
}
}
The view controller is ready, but the corresponding XIB isn’t. In the next section, we piece together the view in the XIB.
Creating the Screen for Adding and Editing a Project
Open ProjectViewController.xib and do the following:
· Drag a Navigation Bar from the Object Library to the top of the view, 20 pixels from the top.
· Change the bar’s title to Project.
· Drag two Bar Button Items to the Navigation Bar, one in each corner, and change their titles to Cancel and Save, respectively.
· Wire the Bar Button Items to the cancel: and save: actions.
· Drag two Labels to the view and make one read Name and the other read URL.
· Drag two Text Fields to the view and wire them to the name and url properties.
· With the View selected, select the “Resolve Auto Layout Issues” button and select Add Missing Constraints in the All Views in View section.
Your view should match Figure 5-5.
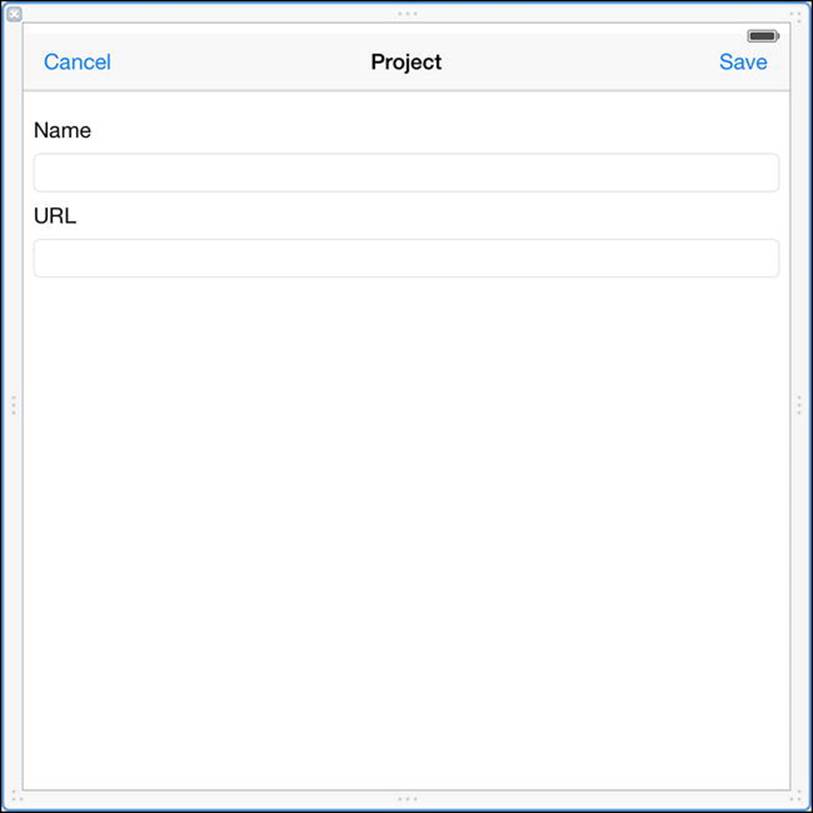
Figure 5-5. The Add and Edit Project screen
Showing the Project Screen for Adding a Project
When the user taps the + button to add a new project, the insertNewObject: method is called. You must change this method to show the Add/Edit Project screen, so add an import for ProjectViewController.h in MasterViewController.m, if you’re doing Objective-C, and then update the method as shown in Listing 5-41 (Objective-C) and Listing 5-42 (Swift).
Listing 5-41. The updated insertNewObject: Method (Objective-C)
- (void)insertNewObject:(id)sender {
ProjectViewController *projectViewController = [[ProjectViewController alloc] initWithProject:nil fetchedResultsController:self.fetchedResultsController];
[self presentViewController:projectViewController animated:YES completion:nil];
}
Listing 5-42. The updated insertNewObject: Function (Swift)
func insertNewObject(sender: AnyObject) {
let projectViewController = ProjectViewController(project: nil, fetchedResultsController: self.fetchedResultsController)
self.presentViewController(projectViewController, animated: true, completion: nil)
}
Showing the Project Screen for Editing a Project
When the user taps the Edit button on the master screen, the disclosure accessory for each cell changes to a detail disclosure accessory. If the user taps the detail disclosure accessory, the tableView:accessoryButtonTappedForRowWithIndexPath: method fromUITableViewDelegate is called. In that method, we want to display the Project screen, but this time we pass the Project object for the tapped row. We do this only when the table is in editing mode; otherwise, we want the drill-down behavior to occur. Listing 5-43 (Objective-C) andListing 5-44 (Swift) show the tableView:accessoryButtonTappedForRowWithIndexPath: implementation.
Listing 5-43. The tableView:accessoryButtonTappedForRowWithIndexPath: Method (Objective-C)
- (void)tableView:(UITableView *)tableView accessoryButtonTappedForRowWithIndexPath:(NSIndexPath *)indexPath {
if (tableView.editing) {
Project *project = [self.fetchedResultsController objectAtIndexPath:indexPath];
ProjectViewController *projectViewController = [[ProjectViewController alloc] initWithProject:project fetchedResultsController:self.fetchedResultsController];
[self presentViewController:projectViewController animated:YES completion:nil];
}
}
Listing 5-44. The tableView:accessoryButtonTappedForRowWithIndexPath: Function (Swift)
override func tableView(tableView: UITableView, accessoryButtonTappedForRowWithIndexPath indexPath: NSIndexPath) {
if tableView.editing {
let project = self.fetchedResultsController.objectAtIndexPath(indexPath) as? Project
let projectViewController = ProjectViewController(project: project, fetchedResultsController: self.fetchedResultsController)
self.presentViewController(projectViewController, animated: true, completion: nil)
}
}
Seeing the Projects in the Table
At this point, you can run the CoreDump application, as long as you promise not to try to drill down into a project to see its bugs. We haven’t updated the Detail view yet, so drilling down will cause the application to crash.
Run the application and add a few projects. Tap the Edit button to go into editing mode, and then tap the detail disclosure accessory to edit projects. Delete projects. Rename projects. Change URLs to see how they’re grouped into sections. Figure 5-6 shows the application after adding a few projects.
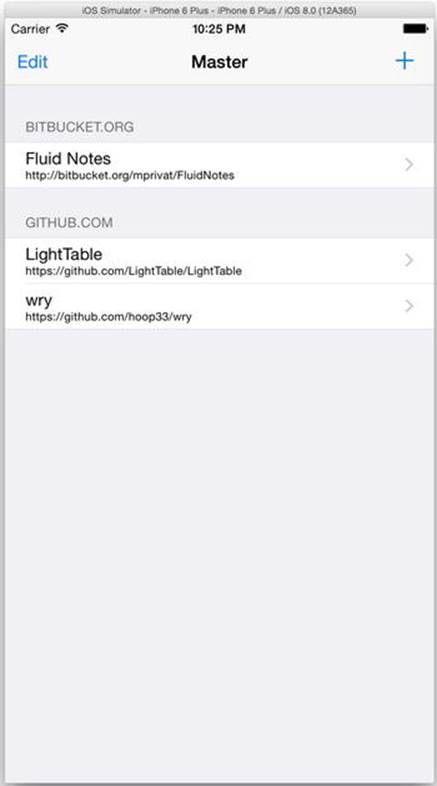
Figure 5-6. The Master view with projects
Updating the Detail View to Show Bugs in a Table
The current Detail view just shows a label: “Detail view content goes here.” We want instead to show a table, similar to the Master view, but with Bug objects instead of Project objects. Start by updating the DetailViewController class header file to subclassUITableViewController instead of UIViewController. You can also get rid of the two properties, detailItem and detailDescriptionLabel, and add a property to store the parent Project object for the bugs. Listing 5-45 shows the updated header file for Objective-C, and Listing 5-46 shows the changes for Swift.
Listing 5-45. DetailViewController.h
#import <UIKit/UIKit.h>
@class Project;
@interface DetailViewController : UITableViewController
@property (strong, nonatomic) Project *project;
@end
Listing 5-46. DetailViewController.swift
import UIKit
class DetailViewController: UITableViewController {
var project: Project? = nil
...
}
You also must update the implementation file to handle the table view. We don’t have a fetched results controller this time—we have a Project object that the fetched results controller gave us. The Project object has a set of Bug objects that we can sort into an array. Using this array to populate a table is standard fare in iOS development. We also want to reload the table anytime the view will appear, and set the title in the navigation bar to the project name. Finally, we want to show a + button on the right of the navigation bar to insert a new bug, although we’ll leave the implementation blank for now. Listing 5-47 shows the updated DetailViewController.m file, and Listing 5-48 shows the updated DetailViewController.swift file.
Listing 5-47. DetailViewController.m
#import "DetailViewController.h"
#import "Project.h"
#import "Bug.h"
@interface DetailViewController ()
@end
@implementation DetailViewController
- (void)viewDidLoad {
[super viewDidLoad];
UIBarButtonItem *addButton = [[UIBarButtonItem alloc] initWithBarButtonSystemItem:UIBarButtonSystemItemAdd target:self action:@selector(insertNewObject:)];
self.navigationItem.rightBarButtonItem = addButton;
}
- (void)viewWillAppear:(BOOL)animated {
[super viewWillAppear:animated];
self.title = self.project.name;
[self.tableView reloadData];
}
- (void)didReceiveMemoryWarning {
[super didReceiveMemoryWarning];
// Dispose of any resources that can be recreated.
}
- (void)insertNewObject:(id)sender {
}
#pragma mark - Table View
- (NSInteger)numberOfSectionsInTableView:(UITableView *)tableView {
return 1;
}
- (NSInteger)tableView:(UITableView *)tableView numberOfRowsInSection:(NSInteger)section {
return [self.project.bugs count];
}
- (UITableViewCell *)tableView:(UITableView *)tableView cellForRowAtIndexPath:(NSIndexPath *)indexPath {
UITableViewCell *cell = [tableView dequeueReusableCellWithIdentifier:@"DetailCell" forIndexPath:indexPath];
[self configureCell:cell atIndexPath:indexPath];
return cell;
}
- (void)configureCell:(UITableViewCell *)cell atIndexPath:(NSIndexPath *)indexPath {
Bug *bug = [self sortedBugs][indexPath.row];
cell.textLabel.text = bug.title;
}
- (NSArray *)sortedBugs {
NSSortDescriptor *sortDescriptor = [[NSSortDescriptor alloc] initWithKey:@"title" ascending:YES];
return [self.project.bugs sortedArrayUsingDescriptors:@[sortDescriptor]];
}
@end
Listing 5-48. DetailViewController.swift
import UIKit
class DetailViewController: UITableViewController {
var project: Project? = nil
func configureView() {
var addButton = UIBarButtonItem(barButtonSystemItem: .Add, target: self, action: "insertNewObject:")
self.navigationItem.rightBarButtonItem = addButton
}
func insertNewObject(sender: AnyObject?) {
}
override func viewDidLoad() {
super.viewDidLoad()
// Do any additional setup after loading the view, typically from a nib.
self.configureView()
}
override func viewWillAppear(animated: Bool) {
super.viewWillAppear(animated)
self.title = self.project?.name
self.tableView.reloadData()
}
override func didReceiveMemoryWarning() {
super.didReceiveMemoryWarning()
// Dispose of any resources that can be recreated.
}
//MARK: Table View
override func numberOfSectionsInTableView(tableView: UITableView) -> Int {
return 1
}
override func tableView(tableView: UITableView, numberOfRowsInSection section: Int) -> Int {
let result = self.project?.bugs.count
return result!
}
override func tableView(tableView: UITableView, cellForRowAtIndexPath indexPath: NSIndexPath) -> UITableViewCell {
let cell = tableView.dequeueReusableCellWithIdentifier("DetailCell") as UITableViewCell
self.configureCell(cell, atIndexPath: indexPath)
return cell
}
func configureCell(cell: UITableViewCell, atIndexPath indexPath: NSIndexPath) {
let bug = sortedBugs()?[indexPath.row]
cell.textLabel.text = bug?.title
}
func sortedBugs() -> [Bug]? {
let sortDescriptor = NSSortDescriptor(key: "title", ascending: true)
let results = self.project?.bugs.sortedArrayUsingDescriptors([sortDescriptor])
return results as [Bug]?
}
}
We must also update the interface in the storyboard. Open the storyboard, Main.storyboard, and select the Detail view. Delete the existing View object and drag a Table View onto the view to replace it. Connect its dataSource and delegate properties to the Detail View Controller.
Next, drag a Table View Cell onto the Table View and set its style to Basic and its accessory to Detail Disclosure in the Attributes inspector. Also, set the identifier to DetailCell. Figure 5-7 shows the new layout.
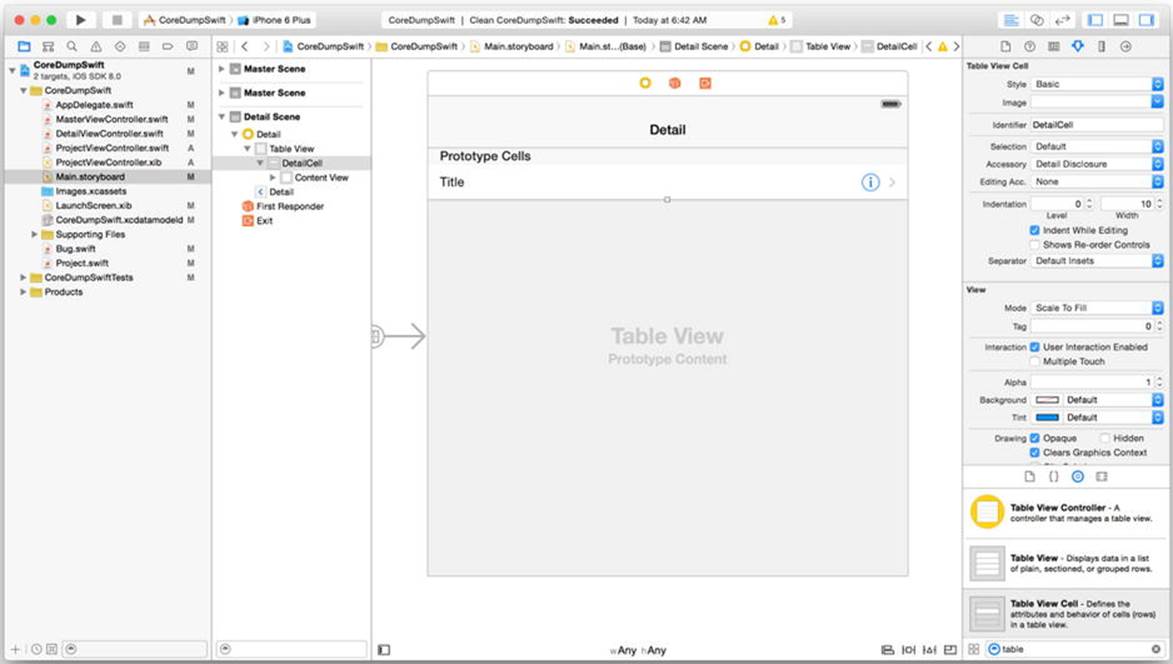
Figure 5-7. The Detail view with a table
Update the prepareForSegue:sender: method in MasterViewController.m or MasterViewController.swift to get the selected Project and set it on the Detail View Controller, as shown in Listing 5-49 (Objective-C) and Listing 5-50 (Swift).
Listing 5-49. Setting project Before the Segue (Objective-C)
- (void)prepareForSegue:(UIStoryboardSegue *)segue sender:(id)sender {
if ([[segue identifier] isEqualToString:@"showDetail"]) {
NSIndexPath *indexPath = [self.tableView indexPathForSelectedRow];
Project *project = [[self fetchedResultsController] objectAtIndexPath:indexPath];
[[segue destinationViewController] setProject:project];
}
}
Listing 5-50. Setting project Before the Segue (Swift)
override func prepareForSegue(segue: UIStoryboardSegue, sender: AnyObject?) {
var project : Project?
if segue.identifier == "showDetail" {
if let indexPath = self.tableView.indexPathForSelectedRow() {
project = self.fetchedResultsController.objectAtIndexPath(indexPath) as? Project
(segue.destinationViewController as DetailViewController).project = project
}
}
}
You can run the project now, and even drill down into a project without crashing. Without a way to add bugs, however, you can’t see any bugs in the Detail view. In the next section, we create the screen to add and edit bugs. This screen will mimic the screen to add and edit projects created earlier in this chapter.
Creating the Add and Edit Bug Screen
As with the Add and Edit Project screen, you must create a screen that accepts input for adding a bug or editing an existing bug. The next few sections walk you through the steps for creating this screen.
Creating the View Controller for Adding and Editing a Bug
Create a new Cocoa Touch Class file called BugViewController and make it a subclass of UIViewController. Check the Also create XIB file check box, select your language, and follow the prompts to create the file. Open BugViewController.h orBugViewController.swift and add the following:
· A property for the Bug to edit (note: will be nil when adding a Bug)
· A property for the parent Project
· An outlet for the bug title text field (note that we call it bugTitle to avoid clash with existing title property of UIViewController)
· An outlet for the bug details text view
· An initializer that takes a Bug and a parent Project
· An action to save the Bug
· An action to cancel adding or editing
Listing 5-51 shows the edited BugViewController.h file, and Listing 5-52 shows the edited BugViewController.swift file.
Listing 5-51. BugViewController.h
#import <UIKit/UIKit.h>
@class Bug;
@class Project;
@interface BugViewController : UIViewController
@property (strong, nonatomic) Bug *bug;
@property (strong, nonatomic) Project *project;
@property (weak, nonatomic) IBOutlet UITextField *bugTitle;
@property (weak, nonatomic) IBOutlet UITextView *details;
- (id)initWithBug:(Bug *)bug project:(Project *)project;
- (IBAction)save:(id)sender;
- (IBAction)cancel:(id)sender;
@end
Listing 5-52. BugViewController.swift
import UIKit
class BugViewController: UIViewController {
var project: Project? = nil
var bug: Bug? = nil
@IBOutlet weak var bugTitle: UITextField!
@IBOutlet weak var details: UITextView!
...
}
If you’re working with Objective-C, open BugViewController.m and import the header files for Project and Bug, as Listing 5-53 shows. Then, add the new initializer to store the bug and project parameters, as shown in Listing 5-54. If you’re working with Swift, add the initializer shown in Listing 5-55 to BugViewController.swift.
Listing 5-53. Adding the Imports
#import "Project.h"
#import "Bug.h"
Listing 5-54. The initWithBug:project: Method
- (id)initWithBug:(Bug *)bug project:(Project *)project {
self = [super init];
if (self) {
self.bug = bug;
self.project = project;
}
return self;
}
Listing 5-55. The init Function
convenience init(project: Project, andBug bug: Bug?) {
self.init(nibName: "BugViewController", bundle: nil)
self.project = project
self.bug = bug
}
In the viewWillAppear: method, if the bug property is non-nil, transfer the values from bug to the appropriate text field and text view. Otherwise, clear out any text from the text view. See Listing 5-56 for the Objective-C version and Listing 5-57 for the Swift version.
Listing 5-56. The viewWillAppear: Method (Objective-C)
- (void)viewWillAppear:(BOOL)animated {
[super viewWillAppear:animated];
if (self.bug != nil) {
self.bugTitle.text = self.bug.title;
self.details.text = self.bug.details;
} else {
self.details.text = @"";
}
}
Listing 5-57. The viewWillAppear: Function (Swift)
override func viewWillAppear(animated: Bool) {
super.viewWillAppear(animated)
if let bug = self.bug {
self.bugTitle.text = bug.title
self.details.text = bug.details
}
else {
self.details.text = ""
}
}
Again, the cancel: method simply dismisses the modal window, as shown in Listing 5-58 (Objective-C) and Listing 5-59 (Swift).
Listing 5-58. The cancel: Method (Objective-C)
- (IBAction)cancel:(id)sender {
[self dismissViewControllerAnimated:YES completion:nil];
}
Listing 5-59. The cancel: Function (Swift)
@IBAction func cancel(sender: AnyObject) {
self.dismissViewControllerAnimated(true, completion: nil)
}
In the save: method, you determine whether we’re adding a bug (bug is nil) or editing an existing bug (bug is non-nil). Create a new Bug managed object if adding, and then update the properties appropriately. Also, if you’re doing this project in Swift, be sure to import Core Data appropriately:
import CoreData // Swift
Listing 5-60 (Objective-C) and Listing 5-61 (Swift) show the save: method.
Listing 5-60. The save: Method (Objective-C)
- (IBAction)save:(id)sender {
if (self.bug == nil) {
self.bug = [NSEntityDescription insertNewObjectForEntityForName:@"Bug" inManagedObjectContext:self.project.managedObjectContext];
}
self.bug.project = self.project;
self.bug.title = self.bugTitle.text;
self.bug.details = self.details.text;
// Save the context.
NSError *error = nil;
if (![self.project.managedObjectContext save:&error]) {
// Replace this implementation with code to handle the error appropriately.
// abort() causes the application to generate a crash log and terminate. You should not use this function in a shipping application, although it may be useful during development.
NSLog(@"Unresolved error %@, %@", error, [error userInfo]);
abort();
}
[self dismissViewControllerAnimated:YES completion:nil];}
}
Listing 5-61. The save: Function (Swift)
@IBAction func save(sender: AnyObject) {
if let context = self.project?.managedObjectContext {
if bug == nil {
self.bug = NSEntityDescription.insertNewObjectForEntityForName("Bug", inManagedObjectContext: context) as? Bug
}
self.bug?.project = self.project!
self.bug?.title = self.bugTitle.text
self.bug?.details = self.details.text
var error: NSError? = nil
if context.hasChanges && !context.save(&error) {
// Replace this implementation with code to handle the error appropriately.
// abort() causes the application to generate a crash log and terminate. You should not use this function in a shipping application, although it may be useful during development.
NSLog("Unresolved error \(error), \(error!.userInfo)")
abort()
}
}
self.dismissViewControllerAnimated(true, completion: nil)
}
Creating the Screen for Adding and Editing a Bug
Open BugViewController.xib and do the following:
· Drag a Navigation Bar from the Object Library to the top of the view, 20 pixels from the top.
· Change the bar’s title to Bug.
· Drag two Bar Button Items to the Navigation Bar, one in each corner, and change their titles to Cancel and Save, respectively.
· Connect the Bar Button Items to the cancel: and save: actions.
· Drag two Labels to the view and make one read Title and the other read Details.
· Drag a Text Field to the view and connect it to the bugTitle property.
· Drag a Text View to the view and connect it to the details property.
· With the View selected, select the “Resolve Auto Layout Issues” button and select Add Missing Constraints in the All Views in View section.
Your view should match Figure 5-8.
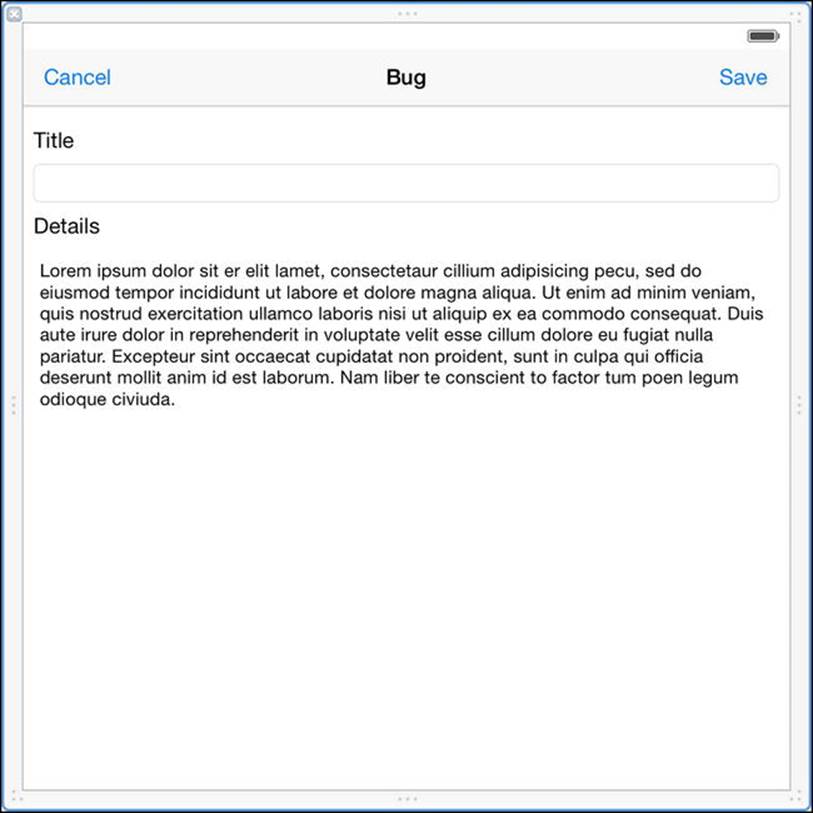
Figure 5-8. The Add and Edit Bug screen
Showing the Bug Screen for Adding a Bug
When the user taps the + button to add a new bug, the insertNewObject: method in DetailViewController.m or DetailViewController.swift is called. We need to update insertNewObject: to display an instance of BugViewController. If you’re using Objective-C, import BugViewController.h in DetailViewController.m.
#import "BugViewController.h"
Then, change insertNewObject: to show the Add/Edit Bug screen, as shown in Listing 5-62 (Objective-C) and Listing 5-63 (Swift).
Listing 5-62. The Updated insertNewObject: Method (Objective-C)
- (void)insertNewObject:(id)sender {
BugViewController *bugViewController = [[BugViewController alloc] initWithBug:nil project:self.project];
[self presentViewController:bugViewController animated:YES completion:nil];
}
Listing 5-63. The Updated insertNewObject: Function (Swift)
func insertNewObject(sender: AnyObject?) {
let bugViewController = BugViewController(project: self.project!, andBug: nil)
self.presentViewController(bugViewController, animated: true, completion: nil)
}
Showing the Bug Screen for Editing a Bug
When the user taps the detail disclosure accessory for a row in the table, the tableView:accessoryButtonTappedForRowWithIndexPath: method from UITableViewDelegate is called. In that method, we want to display the Bug screen, but this time we pass the Bugobject for the tapped row. Listing 5-64 (Objective-C) and Listing 5-65 (Swift) show the tableView:accessoryButtonTappedForRowWithIndexPath: implementation.
Listing 5-64. The tableView:accessoryButtonTappedForRowWithIndexPath: Method (Objective-C)
- (void)tableView:(UITableView *)tableView accessoryButtonTappedForRowWithIndexPath:(NSIndexPath *)indexPath {
Bug *bug = [self sortedBugs][indexPath.row];
BugViewController *bugViewController = [[BugViewController alloc] initWithBug:bug project:self.project];
[self presentViewController:bugViewController animated:YES completion:nil];
}
Listing 5-65. The tableView:accessoryButtonTappedForRowWithIndexPath: Function (Swift)
override func tableView(tableView: UITableView, accessoryButtonTappedForRowWithIndexPath indexPath: NSIndexPath) {
let bug = sortedBugs()?[indexPath.row]
let bugViewController = BugViewController(project: self.project!, andBug: bug)
self.presentViewController(bugViewController, animated: true, completion: nil)
}
Displaying and Adding Bugs
You should now be able to run CoreDump, drill down into a project, and add and edit bugs. Figure 5-9 shows the list of bugs for a project.

Figure 5-9. A list of bugs
Storing Images
Core Data offers a Binary Data type for attributes that stores binary data in any format, so it would seem a natural fit for storing images. This approach works, and in the case of small images, it probably works well. Storing larger images in Core Data, however, can create performance problems, as any access to those managed objects must load the image data, whether they’re used or not.
To address the potential performance problems of storing images in Binary Data attributes in Core Data, many developers have instead opted to store the images in files in their applications’ Documents directory, and then to store the path for each image in a String attribute in Core Data. This approach works as well, and it has the advantage that accessing a managed object doesn’t load the entire image into memory. Instead, you load the image only when you explicitly want it. This two-step approach to loading images (get the image path from Core Data, then load that image from disk) has two disadvantages.
· Your code becomes a little more complicated, and
· Your application can run a little slower, especially in the case of loading several small images.
So, which approach should you use? Should you store your images in Binary Data attributes in Core Data? Or should you store your images on disk, and just store their paths in String attributes in Core Data? And why should you have to decide, anyway? Aren’t iPhones and iPads computers? And aren’t computers better at deciding these kinds of things?
As of iOS 5.0, you can indeed tell Core Data to make this decision for you. If your attribute type is Binary Data, a check box appears in the Xcode modeler with the label Allows External Storage, as shown in Figure 5-10. This check box corresponds to theallowsExternalBinaryDataStorage property of NSAttributeDescription. If you check that box, Core Data will decide whether to store your image (or any other type of binary data) in the data store or in an external file, and it will manage all access seamlessly.
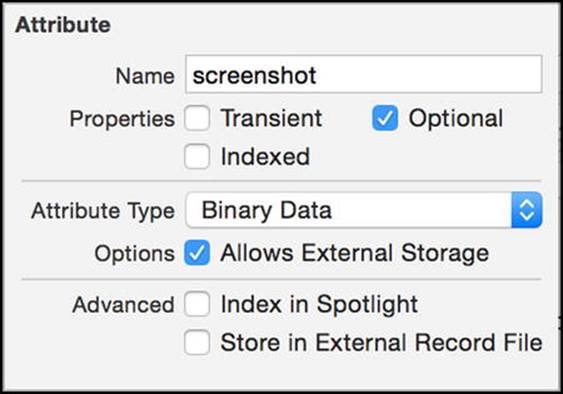
Figure 5-10. Setting an attribute to Allows External Storage in the Attributes inspector
Adding Screenshots to CoreDump
A textual description of a bug can help communicate to the developer what’s going wrong and what must be fixed, but an actual screenshot displaying the bug and its consequences can really help. In the next few sections, we add the ability to store screenshots with the bugs in CoreDump.
Updating the Model to Store Images
We want to be able to store an optional screenshot with each Bug managed object in CoreDump. We also want to take advantage of Core Data’s ability to seamlessly decide whether to store each image inside the Core Data store or in an external record. Open the Core Data model and add an attribute called screenshot to the Bug entity. Make it optional, and set the type to Binary Data. Check the Allows External Storage check box. Finally, regenerate the Bug class files. Note that, as of this writing, Xcode doesn’t actually regenerate the files, even if you select to replace the existing files, so be sure to check the files for the inclusion of the new screenshot property. Listing 5-66 shows the updated header file, and Listing 5-67 (Objective-C) and Listing 5-68 (Swift) show the updated implementation files. You can see that the only difference is a new property called screenshot of type NSData. Nowhere in the class files does it refer to allowing external storage, or whether an object is in the Core Data store or in a separate file. That’s all part of the Core Data model and runtime, and you remain completely oblivious to those complexities. If you’d like, you can open the file CoreDump.xcdatamodeld/CoreDump.xcdatamodel/contents, and you’ll see that a line that looks like the following has been added:
<attribute name="screenshot" optional="YES" attributeType="Binary" allowsExternalBinaryDataStorage="YES" syncable="YES"/>
You can see that the allowsExternalBinaryDataStorage property of the screenshot attribute has been set to YES.
Listing 5-66. Bug.h
#import <Foundation/Foundation.h>
#import <CoreData/CoreData.h>
@class Project;
@interface Bug : NSManagedObject
@property (nonatomic, retain) NSString * title;
@property (nonatomic, retain) NSString * details;
@property (nonatomic, retain) NSData * screenshot;
@property (nonatomic, retain) Project *project;
@end
Listing 5-67. Bug.m
#import "Bug.h"
#import "Project.h"
@implementation Bug
@dynamic title;
@dynamic details;
@dynamic screenshot;
@dynamic project;
@end
Listing 5-68. Bug.swift
import Foundation
import CoreData
@objc(Bug)
class Bug: NSManagedObject {
@NSManaged var title: String
@NSManaged var details: String
@NSManaged var screenshot: NSData
@NSManaged var project: Project
}
Adding Screenshots to the User Interface
Updating the UI for screenshots presents the following use cases:
· In the Bug view, I can add or replace a screenshot.
· In the Bug view, I can see the current screenshot.
To enable these user stories, we add a UIImageView instance to the Bug view screen that displays the image stored in the screenshot attribute. We also make the UIImageView tappable. When tapped, we allow selection of an image from the photo library to store in screenshot. Open BugViewController.xib in Interface Builder and adjust the width of the Details text view so that you can put an Image view beside it and both will be visible when the keyboard shows. Then, drag an image view into your view, as shown in Figure 5-11, and be sure to check the User Interaction Enabled checkbox.
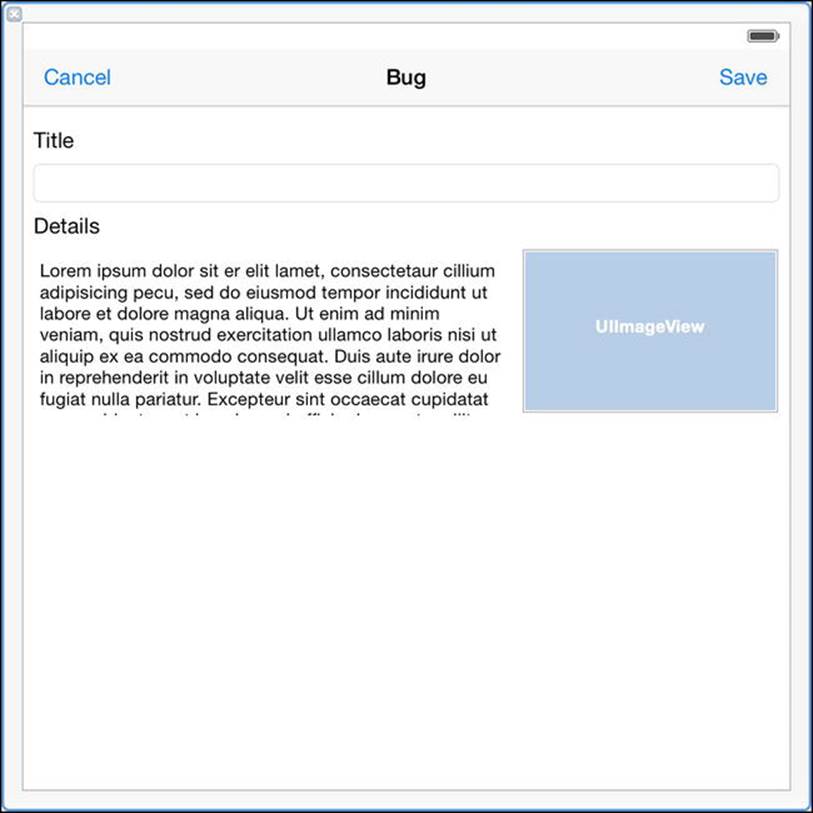
Figure 5-11. Adding the Image view to the Bug view
In BugViewController.h or BugViewController.swift, you do two things.
· Add an outlet (IBOutlet) to connect to the Image view you just added to the view.
· Declare that BugViewController adheres to the UINavigationControllerDelegate and UIUmagePickerControllerDelegate protocols, so that you can allow users to select images when they tap the Image view.
Your updated BugViewController.h should match Listing 5-69, and your updated BugViewController.swift should match Listing 5-70.
Listing 5-69. BugViewController.h with the Outlet and Protocol Declarations
#import <UIKit/UIKit.h>
@class Bug;
@class Project;
@interface CDBugViewController : UIViewController <UINavigationControllerDelegate, UIImagePickerControllerDelegate>
@property (strong, nonatomic) Bug *bug;
@property (strong, nonatomic) Project *project;
@property (weak, nonatomic) IBOutlet UITextField *bugTitle;
@property (weak, nonatomic) IBOutlet UITextView *details;
@property (weak, nonatomic) IBOutlet UIImageView *screenshot;
...
@end
Listing 5-70. BugViewController.swift with the Outlet and Protocol Declarations
class BugViewController: UIViewController, UINavigationControllerDelegate, UIImagePickerControllerDelegate {
var project: Project? = nil
var bug: Bug? = nil
@IBOutlet weak var bugTitle: UITextField!
@IBOutlet weak var details: UITextView!
@IBOutlet weak var screenshot: UIImageView!
...
}
In Interface Builder, connect the screenshot outlet to the Image view. Then, open BugViewController.m or BugViewController.swift to implement the code for the images. You add code to do the following:
· Display a border around the Image view so that it’s apparent when it’s empty.
· Display the selected image in the Image view.
· Save the image to Core Data when the bug is saved.
· Launch an image picker when the user taps the Image view.
· Handle the save or cancel appropriately when the user dismisses the image picker.
Listing 5-71 shows the updates to BugViewController.m, and Listing 5-72 shows the updates to BugViewController.swift.
Listing 5-71. Handling Screenshots in BugViewController.m
#import "BugViewController.h"
#import "Project.h"
#import "Bug.h"
@interface BugViewController ()
@end
@implementation BugViewController
- (id)initWithBug:(Bug *)bug project:(Project *)project {
self = [super init];
if (self) {
self.bug = bug;
self.project = project;
}
return self;
}
- (void)viewWillAppear:(BOOL)animated {
[super viewWillAppear:animated];
if (self.bug != nil) {
self.bugTitle.text = self.bug.title;
self.details.text = self.bug.details;
self.screenshot.image = [UIImage imageWithData:self.bug.screenshot];
} else {
self.details.text = @"";
}
}
- (void)viewDidLoad {
[super viewDidLoad];
self.screenshot.layer.borderColor = [UIColor blackColor].CGColor;
self.screenshot.layer.borderWidth = 1.0f;
UITapGestureRecognizer *tapGestureRecognizer = [[UITapGestureRecognizer alloc] initWithTarget:self action:@selector(screenshotTapped:)];
[self.screenshot addGestureRecognizer:tapGestureRecognizer];
}
- (void)didReceiveMemoryWarning
{
[super didReceiveMemoryWarning];
// Dispose of any resources that can be recreated.
}
- (void)screenshotTapped:(id)sender {
UIImagePickerController *imagePickerController = [[UIImagePickerController alloc] init];
imagePickerController.delegate = self;
imagePickerController.sourceType = UIImagePickerControllerSourceTypePhotoLibrary;
imagePickerController.allowsEditing = YES;
[self presentViewController:imagePickerController animated:YES completion:nil];
}
- (IBAction)cancel:(id)sender {
[self dismissViewControllerAnimated:YES completion:nil];
}
- (IBAction)save:(id)sender {
if (self.bug == nil) {
self.bug = [NSEntityDescription insertNewObjectForEntityForName:@"Bug" inManagedObjectContext:self.project.managedObjectContext];
}
self.bug.project = self.project;
self.bug.title = self.bugTitle.text;
self.bug.details = self.details.text;
self.bug.screenshot = UIImagePNGRepresentation(self.screenshot.image);
// Save the context.
NSError *error = nil;
if (![self.project.managedObjectContext save:&error]) {
// Replace this implementation with code to handle the error appropriately.
// abort() causes the application to generate a crash log and terminate. You should not use this function in a shipping application, although it may be useful during development.
NSLog(@"Unresolved error %@, %@", error, [error userInfo]);
abort();
}
[self dismissViewControllerAnimated:YES completion:nil];
}
#pragma mark - Image picker
- (void)imagePickerControllerDidCancel:(UIImagePickerController *)picker {
[self dismissViewControllerAnimated:YES completion:nil];
}
- (void)imagePickerController:(UIImagePickerController *)picker didFinishPickingMediaWithInfo:(NSDictionary *)info {
[self dismissViewControllerAnimated:YES completion:nil];
UIImage *image = info[UIImagePickerControllerEditedImage];
dispatch_async(dispatch_get_main_queue(), ^{
self.screenshot.image = image;
});
}
@end
Listing 5-72. Handling Screenshots in BugViewController.swift
import UIKit
import CoreData
class BugViewController: UIViewController, UINavigationControllerDelegate, UIImagePickerControllerDelegate {
var project: Project? = nil
var bug: Bug? = nil
@IBOutlet weak var bugTitle: UITextField!
@IBOutlet weak var details: UITextView!
@IBOutlet weak var screenshot: UIImageView!
convenience init(project: Project, andBug bug: Bug?) {
self.init(nibName: "BugViewController", bundle: nil)
self.project = project
self.bug = bug
}
override func viewWillAppear(animated: Bool) {
super.viewWillAppear(animated)
if let bug = self.bug {
self.bugTitle.text = bug.title
self.details.text = bug.details
self.screenshot.image = UIImage(data: bug.screenshot)
}
else {
self.details.text = ""
}
}
override func viewDidLoad() {
super.viewDidLoad()
self.screenshot.layer.borderColor = UIColor.blackColor().CGColor
self.screenshot.layer.borderWidth = 1
let tapGestureRecognizer = UITapGestureRecognizer(target: self, action: Selector("screenshotTapped:"))
self.screenshot.addGestureRecognizer(tapGestureRecognizer)
}
override func didReceiveMemoryWarning() {
super.didReceiveMemoryWarning()
// Dispose of any resources that can be recreated.
}
func screenshotTapped(recognizer: UITapGestureRecognizer) {
let imagePickerController = UIImagePickerController()
imagePickerController.delegate = self
imagePickerController.sourceType = .PhotoLibrary
imagePickerController.allowsEditing = true
self.presentViewController(imagePickerController, animated: true, completion: nil)
}
@IBAction func cancel(sender: AnyObject) {
self.dismissViewControllerAnimated(true, completion: nil)
}
@IBAction func save(sender: AnyObject) {
if let context = self.project?.managedObjectContext {
if bug == nil {
self.bug = NSEntityDescription.insertNewObjectForEntityForName("Bug", inManagedObjectContext: context) as? Bug
}
self.bug?.project = self.project!
self.bug?.title = self.bugTitle.text
self.bug?.details = self.details.text
if self.screenshot.image != nil {
self.bug?.screenshot = UIImagePNGRepresentation(self.screenshot.image)
}
var error: NSError? = nil
if context.hasChanges && !context.save(&error) {
// Replace this implementation with code to handle the error appropriately.
// abort() causes the application to generate a crash log and terminate. You should not use this function in a shipping application, although it may be useful during development.
NSLog("Unresolved error \(error), \(error!.userInfo)")
abort()
}
}
self.dismissViewControllerAnimated(true, completion: nil)
}
func imagePickerControllerDidCancel(picker: UIImagePickerController) {
self.dismissViewControllerAnimated(true, completion: nil)
}
func imagePickerController(picker: UIImagePickerController, didFinishPickingMediaWithInfo info: [NSObject : AnyObject]) {
self.dismissViewControllerAnimated(true, completion: nil)
let image = info[UIImagePickerControllerEditedImage] as UIImage
dispatch_async(dispatch_get_main_queue(), { () -> Void in
self.screenshot.image = image
})
}
}
Launch the CoreDump application, add a bug, and then add a screenshot to the bug using your new interface. Your Bug view should resemble Figure 5-12.
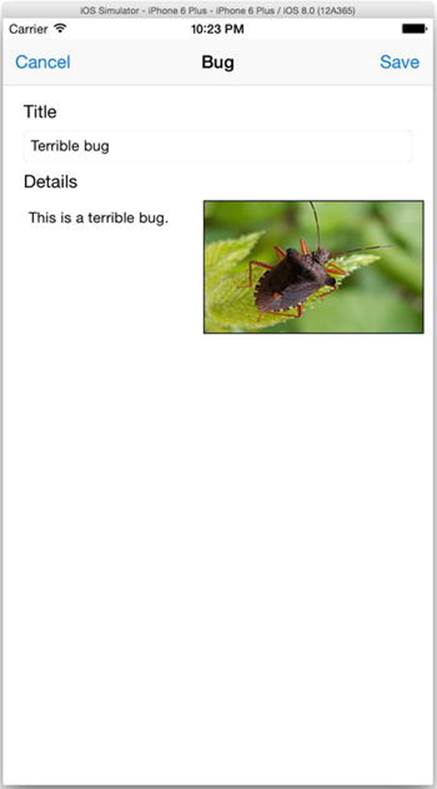
Figure 5-12. A Bug with a screenshot
Verifying the External Storage
Depending on the size of the image you’ve selected, Core Data may have stored the screenshot as an external record, with a unique identifier in the SQLite database. If the file has been stored externally, you can find it inside a subdirectory, in the same directory as your SQLite database file, called .CoreDump_SUPPORT/_EXTERNAL_DATA. For example, for the bug shown in the screenshot in Figure 5-12, we can see that Core Data has stored an identifier in SQLite that points to an external file.
sqlite> select * from zbug;1|1|5|1|This is a terrible bug|Terrible Bug|FC88541E-A362-40E2-8680-5D4553764B86
We can see that file at .CoreDump_SUPPORT/_EXTERNAL_DATA/FC88541E-A362-40E2-8680-5D4553764B86, and can open it in Preview to see that it is, indeed, the image we stored.
Searching the Fetched Results in the Table
If you have a lot of projects in the Master view, you may have difficulty finding the project you’re looking for. Users expect to be able to search through data and filter the results to narrow the result set and more quickly locate their targets. For searching in tables, iOS 8 deprecates the old Search Bar and Search Display Controller (UISearchDisplayController) and introduces a new class for searching: UISearchController. In the next few sections, we show you how to add searching capabilities using UISearchController to CoreDump’s Master view.
Adding the Search Controller
Interface Builder hasn’t yet added the new UISearchController, so you must add this form of search support via code. Start by declaring that MasterViewController conforms to the UISearchResultsUpdating protocol, either in MasterViewController.h or inMasterViewController.swift. While you’re editing that file, add a property called searchController for the UISearchController instance. Also, for reasons we’ll describe shortly, add a property to store an NSPredicate instance we’ll call searchPredicate.Listing 5-73 (Objective-C) and Listing 5-74 (Swift) show these changes.
Listing 5-73. Updating MasterViewController.h for UISearchController (Objective-C)
@interface MasterViewController : UITableViewController <NSFetchedResultsControllerDelegate, UISearchResultsUpdating>
...
@property (strong, nonatomic) UISearchController *searchController;
@property (strong, nonatomic) NSPredicate *searchPredicate;
...
@end
Listing 5-74. Updating MasterViewController.swift for UISearchController (Swift)
class MasterViewController: UITableViewController, NSFetchedResultsControllerDelegate, UISearchResultsUpdating {
...
var searchController: UISearchController!
var searchPredicate: NSPredicate? = nil
...
}
In your viewDidLoad: method, create your UISearchController instance and assign it to searchController. The initializer takes a parameter for the view controller that displays the search results; passing nil will display results in the same view that you’re searching, which in our case is the table view that displays the projects. We also do a few more things:
· Tell the background not to dim during search
· Set the search results updater (the class responsible for updating the search results) to our MasterViewController instance
· Size the search bar to fit
· Set the search bar as the header of our table
· Set the delegate of our table view to our MasterViewController instance, so we get taps whether we’re searching or not
· Set ourselves as defining a presentation context
Listing 5-75 shows the Objective-C viewDidLoad: method, and Listing 5-76 shows the Swift viewDidLoad: function.
Listing 5-75. Creating the UISearchController (Objective-C)
- (void)viewDidLoad {
[super viewDidLoad];
self.navigationItem.leftBarButtonItem = self.editButtonItem;
UIBarButtonItem *addButton = [[UIBarButtonItem alloc] initWithBarButtonSystemItem:UIBarButtonSystemItemAdd target:self action:@selector(insertNewObject:)];
self.navigationItem.rightBarButtonItem = addButton;
// Create the search controller with this controller displaying the search results
self.searchController = [[UISearchController alloc] initWithSearchResultsController:nil];
self.searchController.dimsBackgroundDuringPresentation = NO;
self.searchController.searchResultsUpdater = self;
[self.searchController.searchBar sizeToFit];
self.tableView.tableHeaderView = self.searchController.searchBar;
self.tableView.delegate = self;
self.definesPresentationContext = YES;
}
Listing 5-76. Creating the UISearchController (Swift)
override func viewDidLoad() {
super.viewDidLoad()
self.navigationItem.leftBarButtonItem = self.editButtonItem()
let addButton = UIBarButtonItem(barButtonSystemItem: .Add, target: self, action: "insertNewObject:")
self.navigationItem.rightBarButtonItem = addButton
// Create the search controller with this controller displaying the search results
self.searchController = UISearchController(searchResultsController: nil)
self.searchController.dimsBackgroundDuringPresentation = false
self.searchController.searchResultsUpdater = self
self.searchController.searchBar.sizeToFit()
self.tableView.tableHeaderView = self.searchController?.searchBar
self.tableView.delegate = self
self.definesPresentationContext = true
}
Retrieving the Search Results
Don’t be tempted to scurry back to your Core Data store to get results for search queries. The Internet abounds with advice to create a second fetch results controller for retrieving search results, but this isn’t necessary. You already have a fetched results controller with all the results you want to search. You just want to narrow down the result set from all objects to the ones that match the search query.
The fetched results controller has a property, fetchedObjects, that contains all the results. We can use that, along with our knowledge of predicates, to filter the fetched objects to just those that match the search query. For CoreDump, when users search, we want to display only the projects whose names or URLs contain the search text, case-insensitive. We create a new method on MasterViewController called updateSearchResultsForSearchController: to fulfill our promise to conform to the UISearchResultsUpdating protocol. This method, which is called when the search bar gains focus or the search text changes, creates the predicate that performs the filtering. It first grabs the search text, which is contained in self.searchController.searchBar.text, and if it finds any text, it creates an appropriate predicate and stores it in searchPredicate. Then, it reloads the table. Listing 5-77 (Objective-C) and Listing 5-78 (Swift) show the updateSearchResultsForSearchController: method.
Listing 5-77. Creating the Search Predicate in MasterViewController.m
- (void)updateSearchResultsForSearchController:(UISearchController *)searchController {
NSString *searchText = self.searchController.searchBar.text;
self.searchPredicate = searchText.length == 0 ? nil : [NSPredicate predicateWithFormat:@"name contains[c] %@ or url contains[c] %@", searchText, searchText];
[self.tableView reloadData];
}
Listing 5-78. Creating the Search Predicate in MasterViewController.swift
func updateSearchResultsForSearchController(searchController: UISearchController) {
let searchText = self.searchController?.searchBar.text
if let searchText = searchText {
self.searchPredicate = searchText.isEmpty ? nil : NSPredicate(format: "name contains[c] %@ or url contains[c] %@", searchText, searchText)
self.tableView.reloadData()
}
}
Displaying the Search Results
Since we use the same table for both the normal results and the search results, to toggle between them we update the methods in the table view datasource to check for a non-nil searchPredicate. If searchPredicate is non-nil, we apply it to the fetchedObjects property in the fetched results controller. Otherwise, we use the existing fetched results controller code.
For the search results, we don’t section the results, so we want to have a single section with no section header. Listing 5-79 (Objective-C) and Listing 5-80 (Swift) show the updated numberOfSectionsInTableView: and tableView:titleForHeaderInSection: methods that return differing results, depending on whether we have a search predicate.
Listing 5-79. Setting Up the Sections for the Table View (Objective-C)
- (NSInteger)numberOfSectionsInTableView:(UITableView *)tableView {
return self.searchPredicate == nil ? [[self.fetchedResultsController sections] count] : 1;
}
- (NSString *)tableView:(UITableView *)tableView titleForHeaderInSection:(NSInteger)section {
if (self.searchPredicate == nil) {
id <NSFetchedResultsSectionInfo> sectionInfo = [self.fetchedResultsController sections][section];
return [sectionInfo name];
} else {
return nil;
}
}
Listing 5-80. Setting Up the Sections for the Table View (Swift)
override func numberOfSectionsInTableView(tableView: UITableView) -> Int {
return self.searchPredicate == nil ? self.fetchedResultsController.sections?.count ?? 0 : 1
}
override func tableView(tableView: UITableView, titleForHeaderInSection section: Int) -> String? {
if self.searchPredicate == nil {
let sectionInfo = self.fetchedResultsController.sections![section] as NSFetchedResultsSectionInfo
return sectionInfo.name
} else {
return nil
}
}
For determining the number of rows for a section, we again check for a non-nil searchPredicate to determine whether to apply a predicate to the fetched results controller’s fetched objects. Listing 5-81 (Objective-C) and Listing 5-82 (Swift) show the updatedtableView:numberOfRowsInSection: method.
Listing 5-81. Returning the Number of Rows for a Section (Objective-C)
- (NSInteger)tableView:(UITableView *)tableView numberOfRowsInSection:(NSInteger)section {
if (self.searchPredicate == nil) {
id <NSFetchedResultsSectionInfo> sectionInfo = [self.fetchedResultsController sections][section];
return [sectionInfo numberOfObjects];
} else {
return [[self.fetchedResultsController.fetchedObjects filteredArrayUsingPredicate:self.searchPredicate] count];
}
}
Listing 5-82. Returning the Number of Rows for a Section (Swift)
override func tableView(tableView: UITableView, numberOfRowsInSection section: Int) -> Int {
if self.searchPredicate == nil {
let sectionInfo = self.fetchedResultsController.sections![section] as NSFetchedResultsSectionInfo
return sectionInfo.numberOfObjects
} else {
let filteredObjects = self.fetchedResultsController.fetchedObjects?.filter() {
return self.searchPredicate!.evaluateWithObject($0)
}
return filteredObjects == nil ? 0 : filteredObjects!.count
}
}
For returning the cell to display in the table, we leave the existing tableView:cellForRowAtIndexPath: method intact, and simply update the configureCell:atIndexPath: method to determine whether to grab the project from the filtered or the unfiltered fetched objects, again depending on the presence of a search predicate. Listing 5-83 (Objective-C) and Listing 5-84 (Swift) show how to do that.
Listing 5-83. Configuring the Cell (Objective-C)
- (void)configureCell:(UITableViewCell *)cell atIndexPath:(NSIndexPath *)indexPath {
Project *project = nil;
if (self.searchPredicate == nil) {
project = [self.fetchedResultsController objectAtIndexPath:indexPath];
} else {
project = [self.fetchedResultsController.fetchedObjects filteredArrayUsingPredicate:self.searchPredicate][indexPath.row];
}
cell.textLabel.text = project.name;
cell.detailTextLabel.text = project.url;
}
Listing 5-84. Configuring the Cell (Swift)
func configureCell(cell: UITableViewCell, atIndexPath indexPath: NSIndexPath) {
let project = self.searchPredicate == nil ?
self.fetchedResultsController.objectAtIndexPath(indexPath) as Project :
self.fetchedResultsController.fetchedObjects?.filter() {
return self.searchPredicate!.evaluateWithObject($0)
}[indexPath.row] as Project
cell.textLabel.text = project.name
cell.detailTextLabel?.text = project.url
}
Since we don’t allow editing of the search results, we update the tableView:canEditRowAtIndexPath: method to return YES or true only when the search predicate is nil, as Listing 5-85 (Objective-C) and Listing 5-86 (Swift) show.
Listing 5-85. Allowing Editing Only for the Unfiltered Results (Objective-C)
- (BOOL)tableView:(UITableView *)tableView canEditRowAtIndexPath:(NSIndexPath *)indexPath {
return self.searchPredicate == nil;
}
Listing 5-86. Allowing Editing Only for the Unfiltered Results (Swift)
override func tableView(tableView: UITableView, canEditRowAtIndexPath indexPath: NSIndexPath) -> Bool {
return self.searchPredicate == nil
}
Since we don’t allow editing in the search view, we can ignore all the methods that respond to a table view in edit mode.
The last change you must make is to the prepareForSegue:sender: method, to get the correct project to set into the detail controller. As with the configureCell:atIndexPath: method, you use the presence of a search predicate to determine whether to use the filtered objects. Listing 5-87(Objective-C) and Listing 5-88 (Swift) show the updated prepareForSegue:sender: method.
Listing 5-87. Handling Filtered Results When a Project is Tapped (Objective-C)
- (void)prepareForSegue:(UIStoryboardSegue *)segue sender:(id)sender {
if ([[segue identifier] isEqualToString:@"showDetail"]) {
NSIndexPath *indexPath = [self.tableView indexPathForSelectedRow];
Project *project = nil;
if (self.searchPredicate == nil) {
project = [self.fetchedResultsController objectAtIndexPath:indexPath];
} else {
project = [self.fetchedResultsController.fetchedObjects filteredArrayUsingPredicate:self.searchPredicate][indexPath.row];
}
[[segue destinationViewController] setProject:project];
}
}
Listing 5-88. Handling Filtered Results When a Project is Tapped (Swift)
override func prepareForSegue(segue: UIStoryboardSegue, sender: AnyObject?) {
if segue.identifier == "showDetail" {
if let indexPath = self.tableView.indexPathForSelectedRow() {
let project = self.searchPredicate == nil ?
self.fetchedResultsController.objectAtIndexPath(indexPath) as Project :
self.fetchedResultsController.fetchedObjects?.filter() {
return self.searchPredicate!.evaluateWithObject($0)
}[indexPath.row] as Project
(segue.destinationViewController as DetailViewController).project = project
}
}
}
You should be able to run CoreDump now and use the search bar to filter results, as shown in Figure 5-13.
Figure 5-13. Searching for “github”
Conclusion
The CoreDump application is woefully incomplete, but it demonstrates how to easily integrate data and images from a Core Data store into a table view–based application. Since most iOS applications use tables and images, you’ll use fetched results controllers and external records many times in your application development to create applications that perform well.