The Core iOS Developer’s Cookbook, Fifth Edition (2014)
Chapter 12. A Taste of Core Data
iOS’s Core Data framework provides persistent data solutions. Your applications can query and update Core Data’s managed data stores. With Core Data, you gain a Cocoa Touch–based object interface that brings relational data management out from SQL queries and into the Objective-C world of iOS development. Core Data delivers the perfect technology to power your table view and collection view instances.
This chapter introduces Core Data. It provides just enough how-to to give you a taste of the technology, offering a jumping-off point for further Core Data learning. By the time you finish reading through this chapter, you’ll have seen Core Data for iOS in action and gotten an overview of the technology.
Introducing Core Data
Core Data simplifies the way your applications create and use persisted objects, known as managed objects. Until the 3.x SDK, all data management and SQL access were left to a fairly low-level library. It wasn’t pretty, and it wasn’t easy to use. Since then, Core Data has joined the Cocoa Touch framework family, bringing powerful data management solutions to iOS. Core Data provides a flexible infrastructure, offering tools for working with persistent data stores and generating solutions for the complete object life cycle.
Core Data lives in the model portion of the Model–View–Controller (MVC) paradigm. It understands that application-specific data must be defined and controlled outside the application’s GUI, even as it powers that interface. Core Data integrates beautifully with table view and collection view instances. Cocoa Touch’s fetched-results controller class was designed and built with these kinds of classes in mind. It offers useful properties and methods that support data source and delegate integration.
Entities and Models
Entities live at the top of the Core Data hierarchy. They describe objects stored inside your database. Entities provide the virtual cookie cutters that specify how each data object is created. When you build new objects, entities detail the attributes and relationships that make up each object. Every entity has a name, which Core Data uses to retrieve entity descriptions as your application runs.
You build entities inside model files. Each project that links against the Core Data framework includes one or more model files. These .xcdatamodeld files define entities, their attributes, and their relationships.
Building a Model File
Create your model in Xcode by laying out a new data model file. Some iOS templates allow you to include Core Data as part of the project. Otherwise, you create these Xcode model files by selecting File > New > File from the Xcode menu and then choosing iOS, Core Data, Data Model, and Next. Enter a name for your new file (this example uses Person), check the targets for your project, and click Save. Xcode creates and then adds the new model file to your project (for example, Person.xcdatamodeld). Click the xcdatamodeld file in the File Navigator to open it in the editor window shown in Figure 12-1.
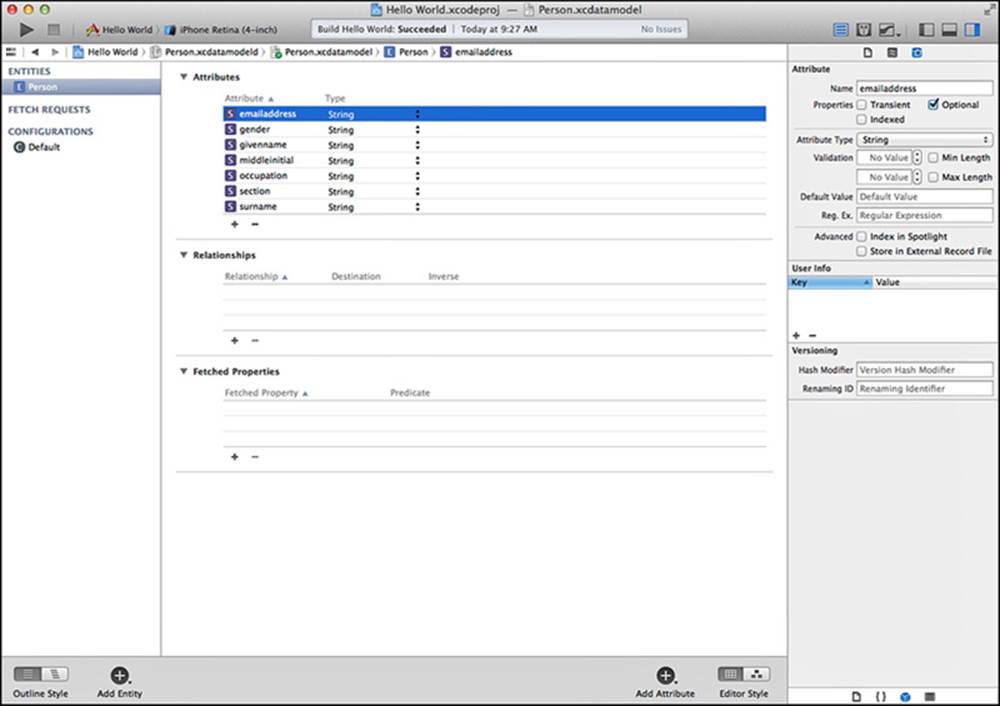
Figure 12-1 Xcode’s editor enables you to build managed object definitions for your Core Data applications.
You add new entities (basically classes of objects) to the left list in the editor window by clicking the Add Entity button near the bottom left. Add attributes (essentially instance variables for entities) by clicking the Add Attribute button at the bottom right. Double-click any individual entity or attribute name to change it; use the Type pop-up to set an attribute’s type.
Use the center portion of the editor to customize your attributes and relationships. Relationships are the optional ways entities relate to each other in the database. An inspector to the right provides context-specific settings. In Figure 12-1, it’s showing details for the Person entity’semailaddress attribute.
The Entity editor provides two layout styles. Toggle between the table view and an object graph by tapping the Editor Style buttons at the bottom right of the editor pane.
The detail table style shown in Figure 12-1 provides a list of each entity, attribute, and relationship defined in the model. The object graph offers a grid-based visual presentation of the entities you have defined, allowing you to visualize and edit entity relationships—the way entities relate to each other. For example, a parent can have several children and one spouse. A department may include members, and a manager may serve on several committees.
Attributes and Relationships
Each entity may include attributes, which store information such as a name, a birth date, a designation, and so forth. The Objective-C object that corresponds to an entity expresses properties defined by these attributes.
Each entity may also define relationships, which are links between one object and another. These relationships can be single, using a one-to-one relationship (spouse, employer), or they can be multiple (children, credit card accounts), using a one-to-many relationship. In addition, relationships should be reciprocal, providing an inverse relationship (my child, his parent).
Select an entity to start adding attributes. With the entity selected, tap the Add Attribute button at the bottom right of the editor pane. (Or tap and hold this button to choose either Add Attribute, Add Relationship, or Add Fetched Property.) Each attribute has a name and a data type, just as you would define an instance variable.
Relationships provide pointers to other objects. When working with the Graph editor, you can Control-drag to create them. Arrows represent the relationships between the various kinds of entities in a project.
At the simplest level, you can work with just one entity and without relationships, even though Core Data offers a fully powered relational database. Most iOS applications do not require a high level of sophistication. A flat database with section attributes is all you need to power table views and collection views.
To build the model in Figure 12-1, create a Person entity and add these seven attributes: emailaddress, gender, givenname, middleinitial, occupation, surname, and section. Set each type to String.
Building Object Classes
After creating your entity definition, save your changes to the data model file. Select an entity in the column on the left and from the Xcode menu, choose Editor > Create NSManagedObject Subclass. Select your data model and the entity (or entities) you intend to manage. Save to your project folder, select the group you want to add the classes to, and click Create. Xcode generates class files from your entity description. Here is what the automatically generated Person class looks like:
@interface Person : NSManagedObject
@property (nonatomic, strong) NSString *section;
@property (nonatomic, strong) NSString *emailaddress;
@property (nonatomic, strong) NSString *gender;
@property (nonatomic, strong) NSString *givenname;
@property (nonatomic, strong) NSString *middleinitial;
@property (nonatomic, strong) NSString *occupation;
@property (nonatomic, strong) NSString *surname;
@end
@implementation Person
@dynamic section;
@dynamic emailaddress;
@dynamic gender;
@dynamic givenname;
@dynamic middleinitial;
@dynamic occupation;
@dynamic surname;
@end
Each attribute corresponds to a string property. When you use other attribute types, their properties correspond accordingly (for example, NSDate, NSNumber, NSData). If you were to add a one-to-many relationship, you’d see a set. The @dynamic directive creates property accessors at runtime.
Creating Contexts
In Core Data, entities provide descriptions. Objects are actual class instances that you create from entity specifications. These instances all descend from the NSManagedObject class and represent entries in the database.
Core Data objects live within a managed object context. These contexts, which are instances of NSManagedObjectContext, each represent an object space within your application. This chapter uses a single object context, although more complex implementations may be required in your own apps, primarily to support multithreaded Core Data access.
In this single-object-context example, you establish your context as you start up your application and use that context for all object fetch requests from the stored data. The context story begins by loading any models you have created from the application bundle. You do not need to specify any names:
// Init the model
NSManagedObjectModel *managedObjectModel =
[NSManagedObjectModel mergedModelFromBundles:nil];
Next, create a store coordinator and connect it to a file (a store) in the app sandbox. The coordinator manages the relationship between the managed object model in your application and a local file. You provide a file URL that specifies where to save the data. This snippet usesNSSQLiteStoreType, which creates a file using the standard SQLite binary format:
// Create the store coordinator
NSPersistentStoreCoordinator *persistentStoreCoordinator =
[[NSPersistentStoreCoordinator alloc]
initWithManagedObjectModel:managedObjectModel];
// Connect to the data store (on disk)
NSURL *url = [NSURL fileURLWithPath:dataPath];
if (![persistentStoreCoordinator
addPersistentStoreWithType: NSSQLiteStoreType
configuration:nil URL:url options:nil error:&error])
{
NSLog(@"Error creating persistent store coordinator: %@",
error.localizedFailureReason);
return;
}
Finally, you create the actual context and set a property to the coordinator you just created:
// Create a context and assign to the context property
_context = [[NSManagedObjectContext alloc] init];
_context.persistentStoreCoordinator = persistentStoreCoordinator;
Adding Data
The NSEntityDescription class enables you to insert new objects into your context. This lets you add new data entries to populate your file. Provide an entity name and the context you’re working with:
// Create new object
- (NSManagedObject *)newObject
{
NSManagedObject *object = [NSEntityDescription
insertNewObjectForEntityForName:_entityName
inManagedObjectContext:_context];
return object;
}
The request returns a new managed object for you to work with. After you receive the new managed object, you customize it however you like and then save the context:
// Save
- (BOOL)save
{
NSError __autoreleasing *error;
BOOL success;
if (!(success = [_context save:&error]))
NSLog(@"Error saving context: %@", error.localizedFailureReason);
return success;
}
A typical call pattern goes like this: Create one or more new objects, set their properties, and save. You could use the above methods to insert a new Person entity in the database as follows:
Person *person = (Person *)[dataHelper newObject];
person.givenname = @"Chris";
person.surname = @"Zahn";
person.section = [[person.surname substringFromIndex:0] substringToIndex:1];
person.occupation = @"Editor";
[dataHelper save]
Notice that the section property here derives from the surname. In nearly every basic iOS application, you’ll want to add a section property to allow Core Data to group entries together by some common connection. The property name does not matter; you pass it as an argument.section is easy to recognize and remember. Advanced users will write a method to provide their grouping criteria instead of hard-coding it as this example does.
This snippet creates a group-by-surname-initial approach. When you want to group by some other property, either iterate through your data to update the property you use for sections or supply a different attribute to your fetch request. This flexibility makes it easy to change from grouping by last initial to grouping by occupation. A section later in this chapter discusses fetch requests and querying your Core Data store.
Don’t confuse iOS sections (used for table views and collection views) with sorting, which is another concept you encounter with Core Data. Sections specify groupings within your object collection. Sorting controls how items are ordered within each section.
Examining the Data File
If you run the preceding code in the simulator, you can easily inspect the SQLite file that Core Data creates. Navigate to the simulator folder (~/Library/Application Support/iPhone Simulator/Firmware/Applications, where Firmware is the current firmware release; for example, 7.0) and then into the folder for the application itself.
Stored in the Documents folder (depending on the URL used to create the persistent store), an SQLite file contains the database representation you’ve created. The command-line sqlite3 utility enables you to inspect the contents by performing a .dump operation:
% sqlite3 Person.sqlite
SQLite version 3.7.13 2012-07-17 17:46:21
Enter ".help" for instructions
Enter SQL statements terminated with a ";"
sqlite> .dump
PRAGMA foreign_keys=OFF;
BEGIN TRANSACTION;
CREATE TABLE ZPERSON ( Z_PK INTEGER PRIMARY KEY, Z_ENT INTEGER, Z_OPT INTEGER,
ZEMAILADDRESS VARCHAR, ZGENDER VARCHAR, ZGIVENNAME VARCHAR, ZMIDDLEINITIAL VARCHAR,
ZOCCUPATION VARCHAR, ZSECTION VARCHAR, ZSURNAME VARCHAR );
INSERT INTO "ZPERSON" VALUES(1,1,1,'ChristopherLRobinson@foomail.com','male','Christop
her','L','Home care aide','C','Robinson');
INSERT INTO "ZPERSON" VALUES(2,1,1,'NicholasJGrant@spambob.com','male','Nicholas','J',
'Steadicam operator','N','Grant');
INSERT INTO "ZPERSON" VALUES(3,1,1,'JosephJTreece@spambob.
com','male','Joseph','J','Shoe machine operator','J','Treece');
INSERT INTO "ZPERSON" VALUES(4,1,1,'HelenEShaffer@dodgit.
com','female','Helen','E','Coin vending and amusement machine servicer
repairer','H','Shaffer');
CREATE TABLE Z_PRIMARYKEY (Z_ENT INTEGER PRIMARY KEY, Z_NAME VARCHAR, Z_SUPER INTEGER,
Z_MAX INTEGER);
INSERT INTO "Z_PRIMARYKEY" VALUES(1,'Person',0,3000);
CREATE TABLE Z_METADATA (Z_VERSION INTEGER PRIMARY KEY, Z_UUID VARCHAR(255), Z_PLIST
BLOB);
INSERT INTO "Z_METADATA" VALUES(1,'85E928DB-1464-4C3B-BCEA-
9277B8817A04',X'62706C6973743030D601020304050607090A0D0E0F5F101E4E5353746F72654D6F646
56C56657273696F6E4964656E746966696572735F101D4E5350657273697374656E63654672616D65776F
726B56657273696F6E5F10194E5353746F72654D6F64656C56657273696F6E4861736865735B4E5353746
F7265547970655F10125F4E534175746F56616375756D4C6576656C5F10204E5353746F72654D6F64656C
56657273696F6E48617368657356657273696F6EA1085011019AD10B0C56506572736F6E4F1020D261E38
54795D61A5D69048846ECC3DCFEAC4861D9FCD1540A071C875FE89EA95653514C69746551321003081536
56727E93B6B8B9BCBFC6E9F0F200000000000001010000000000000010000000000000000000000000000
000F4');
COMMIT;
sqlite> .quit
%
Here you see several SQL table definitions that store the information for each object plus the insert commands used to store the instances built in your code. Although you are thoroughly cautioned against directly manipulating the Core Data store with sqlite3, it offers a valuable insight into what’s going on under the Core Data hood.
Querying the Database
Retrieve objects from the database by performing fetch requests. A fetch request describes your search criteria for selecting objects. It’s passed through to Core Data and used to initialize a results object that contains an array of fetched objects that meet those criteria. Here is a sample fetch method that saves the resulting fetched results to a local instance variable (_fetchedResultsController) associated with a helper class property:
- (void)fetchItemsMatching:(NSString *)searchString
forAttribute:(NSString *)attribute
sortingBy:(NSString *)sortAttribute
{
// Build an entity description
NSEntityDescription *entity = [NSEntityDescription
entityForName:_entityName inManagedObjectContext:_context];
// Init a fetch request
NSFetchRequest *fetchRequest = [[NSFetchRequest alloc] init];
fetchRequest.entity = entity;
[fetchRequest setFetchBatchSize:0];
// Apply an ascending sort for the items
NSString *sortKey = sortAttribute ? : _defaultSortAttribute;
NSSortDescriptor *sortDescriptor = [[NSSortDescriptor alloc]
initWithKey:sortKey ascending:YES selector:nil];
NSArray *descriptors = @[sortDescriptor];
fetchRequest.sortDescriptors = descriptors;
// Optional setup predicate
if (searchString && attribute) fetchRequest.predicate =
[NSPredicate predicateWithFormat:@"%K contains[cd] %@",
attribute, searchString];
// Perform the fetch
NSError __autoreleasing *error;
_fetchedResultsController = [[NSFetchedResultsController alloc]
initWithFetchRequest:fetchRequest managedObjectContext:_context
sectionNameKeyPath:@"section" cacheName:nil];
if (![_fetchedResultsController performFetch:&error])
NSLog(@"Error fetching data: %@", error.localizedFailureReason);
}
Setting Up the Fetch Request
A fetch request describes how you want to search through data. This process starts by retrieving an entity description for a given entity name. For the Person entity, that name is @"Person". The description specifies what kinds of data you want to search for.
Create a new fetch request, initializing it with the entity description you just retrieved and a batch size. A 0 batch size corresponds to an indefinite request. If you want to limit the number of returned results, set the batch size to a positive number.
Each request must contain at least one sort descriptor. This method sorts in ascending order (ascending:YES), using a sort key. As with the entity name, the sort key is a string (for example, @"surname"). Set the fetch request’s sortDescriptors property with an array of descriptors.
Fetch requests use optional predicates to narrow the results to items that match certain rules. When callers supply the appropriate searchString and attribute parameters, this method creates a predicate of the form attribute contains[cd] searchString.
This form creates a non-case-sensitive text match; the [cd] after contains refers to non-case-sensitive and non-diacritic-sensitive matching. Diacritics are small marks that accompany a letter, such as the dots of an umlaut (¨) or the tilde (~) above a Spanish n.
The %@ format includes an item directly in the predicate, such as the search string used here. The %K format specifies an entity attribute. If you fail to use it, the predicate 'surname' contains[cd] 'u' will always return true because the second letter in surname is u. Use %K to match the property, not the name of the property.
For more complex queries, you could assign a compound predicate. Compound predicates allow you to combine simple predicates using standard logical operations such as AND, OR, and NOT. The NSCompoundPredicate class builds compound predicates out of component predicates. You can also skip the compound predicate class and include AND, OR, and NOT notation directly in simple NSPredicate text.
Note
Predicates provide a powerful mechanism to filter and search data. Apple’s Predicate Programming Guide provides an exhaustive review of creating and using predicates. Seehttps://developer.apple.com/library/ios/DOCUMENTATION/Cocoa/Conceptual/Predicates/predicates.html.
Performing the Fetch
Create a new fetched results controller for each query. Initialize it with the fetch request, the context, and the section name key path. You can always use @"section" and make sure to define a section attribute for the objects; often, the needs are not complex.
The controller also uses a cache name parameter. Caching reduces overhead associated with producing data that’s structured with sections and indexes. Multiple fetch requests are ignored when the data has not changed, minimizing the cost associated with fetch requests over the lifetime of an application. The name used for the cache is arbitrary. Either use nil to prevent caching or supply a name in the form of a string. This method uses nil to avoid errors related to mutating a fetch request.
Finally, perform the fetch. If it is successful, the method returns true. If not, it updates the error that you pass by reference, so you can see why the fetch failed.
The fetch is synchronous. When this method returns, you can use the array of objects in the fetched results controller’s fetchedObjects property right away. Here’s an example of using this method to fetch data, where the request searches for surnames matching a text field’s string and lists the matching data in a text view:
- (void)list
{
if (!textField.text.length) return;
[dataHelper fetchItemsMatching:textField.text
forAttribute:@"surname" sortingBy:@"surname"];
NSMutableString *string = [NSMutableString string];
for (Person *person in dataHelper.fetchedResultsController.fetchedObjects)
{
NSString *entry = [NSString stringWithFormat: @"%@, %@ %@: %@\n",
person.surname, person.givenname,
person.middleinitial, person.occupation];
[string appendString:entry];
}
textView.text = string;
}
Removing Objects
Removing objects from a flat database is straightforward: Just tell the context to delete an object and save the results. Here are two methods that delete either one object or all objects from a database:
// Delete one object
- (BOOL)deleteObject:(NSManagedObject *)object
{
[self fetchData];
if (!_fetchedResultsController.fetchedObjects.count) return NO;
[_context deleteObject:object];
return [self save];
}
// Delete all objects
- (BOOL)clearData
{
[self fetchData];
if (!_fetchedResultsController.fetchedObjects.count) return YES;
for (NSManagedObject *entry in
_fetchedResultsController.fetchedObjects)
[_context deleteObject:entry];
return [self save];
}
Working with relationships can prove slightly more difficult than simply removing objects. Core Data ensures internal consistency before writing data out, and it throws an error if it cannot. Some models that use cross-references get complicated. In some data models, you must clear lingering references before the object can safely be removed from the persistent store. If you don’t clear the references, objects may point to deleted items and unexpected failure cases.
To avoid this problem, set Core Data delete rules in the data model inspector. Delete rules control how an object responds to an attempted delete. You can Deny delete requests to ensure that a relationship has no connection before allowing object deletion. Nullify resets inverse relationships before deleting an object. Cascade deletes an object plus all its relationships; for example, you could delete an entire department (including its members) all at once with a cascade. No Action ensures that the objects pointed to by a relationship remain unaffected, even if those objects point back to the item that is about to be deleted.
Xcode issues warnings when it detects nonreciprocal relationships. Avoid unbalanced relationships to simplify your code and provide better internal consistency. If you cannot avoid nonreciprocal items, you need to take them into account when you create your delete methods.
Recipe: Using Core Data for a Table Data Source
Core Data on iOS works closely with table views. The NSFetchedResultsController class includes features that simplify the integration of Core Data objects with table data sources. As you can see in the following subsections, many of the fetched results class’s properties and methods are designed from the ground up for table support.
Index Path Access
The fetched results class offers object–index path integration in two directions. You can recover objects from a fetched object array using index paths by calling objectAtIndexPath:. You can query for the index path associated with a fetched object by callingindexPathForObject:. These two methods work with both sectioned tables and tables that are flat—that is, that use only a single section for all their data.
Section Key Path
The sectionNameKeyPath property links a managed object attribute to section names. This property helps determine which section each managed object belongs to. You can set this property directly at any time, or you can initialize it when you set up your fetched results controller.
Recipe 12-1 uses an attribute named section to distinguish sections, although you can use any attribute name for this key path. For this example, this attribute is set to the first character of each object name to assign a managed object to a section. Set the key path to nil to produce a flat table without sections.
Section Groups
Recover section subgroups with the controller’s sections property. This property returns a collection of sections, each of which stores the managed objects whose section attribute maps to the same letter.
Each returned section implements the NSFetchedResultsSectionInfo protocol. This protocol ensures that sections can report their objects and numberOfObjects, their name, and an indexTitle—that is, the title that appears on the quick reference index optionally shown above and at the right of the table.
Index Titles
The fetched results controller’s sectionIndexTitles property generates a list of section titles from the sections within the fetched data. For Recipe 12-1, that array includes single-letter titles. The default implementation uses the value of each section key to return a list of all known sections.
Two further instance methods, sectionIndexTitleForSectionName: and sectionForSectionIndexTitle:atIndex:, provide section title lookup features. The first returns a title for a section name. The second looks up a section via its title. Override these to use section titles that do not match the data stored in the section name key.
Table Readiness
As the properties and methods you’ve learned about reveal, fetched results instances are table-ready. Recipe 12-1 presents all the standard table methods, adapted to Core Data fetched results. As you can see, each method used for creating and managing sections is tiny. The built-in Core Data access features reduce these methods to one or two lines each. That’s because all the work in creating and accessing the sections is handed over directly to Core Data. The call that initializes each fetched data request specifies what data attribute to use for the sections. Core Data then takes over and performs the rest of the work.
Figure 12-2 shows the interface that Recipe 12-1 builds. It offers a full-featured table, complete with section headers and a floating index.
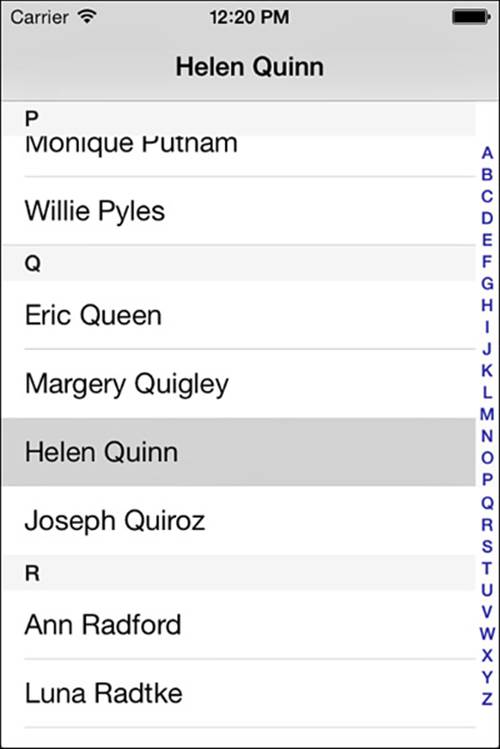
Figure 12-2 Recipe 12-1 creates a full-featured table with an absolute minimum of programming. Core Data powers all these features, from cell contents to section headers to the index.
Note
Reset the simulator or delete the Hello World app from your devices between recipes in this chapter because they all use the same database file (Person.sqlite), which will persist in the Documents folder.
Recipe 12-1 Building a Sectioned Table with Core Data
#pragma mark Data Source
// Number of sections
- (NSInteger)numberOfSectionsInTableView:
(UITableView *)tableView
{
return dataHelper.fetchedResultsController.sections.count;
}
// Rows per section
- (NSInteger)tableView:(UITableView *)tableView
numberOfRowsInSection:(NSInteger)section
{
id <NSFetchedResultsSectionInfo> sectionInfo =
dataHelper.fetchedResultsController.sections[section];
return sectionInfo.numberOfObjects;
}
// Return the title for a given section
- (NSString *)tableView:(UITableView *)aTableView
titleForHeaderInSection:(NSInteger)section
{
NSArray *titles = [dataHelper.fetchedResultsController
sectionIndexTitles];
if (titles.count <= section)
return @"Error";
return titles[section];
}
// Section index titles
- (NSArray *)sectionIndexTitlesForTableView:
(UITableView *)aTableView
{
return [dataHelper.fetchedResultsController
sectionIndexTitles];
}
// Populate a cell for the index path
- (UITableViewCell *)tableView:(UITableView *)tableView
cellForRowAtIndexPath:(NSIndexPath *)indexPath
{
UITableViewCell *cell =
[tableView dequeueReusableCellWithIdentifier:
@"cell" forIndexPath:indexPath];
Person *person =
(Person *)[dataHelper.fetchedResultsController
objectAtIndexPath:indexPath];
cell.textLabel.text = person.fullname;
return cell;
}
#pragma mark Delegate
- (void)tableView:(UITableView *)tableView
didSelectRowAtIndexPath:(NSIndexPath *)indexPath
{
// When a row is selected, update title accordingly
Person *person =
(Person *)[dataHelper.fetchedResultsController
objectAtIndexPath:indexPath];
self.title = person.fullname;
}
Get This Recipe’s Code
To find this recipe’s full sample project, point your browser to https://github.com/erica/iOS-7-Cookbook and go to the folder for Chapter 12.
Recipe: Search Tables and Core Data
Core Data stores are designed to work efficiently with NSPredicates. Predicates allow you to create fetch requests that select only managed objects that match the predicate’s rule or rules. Adding a predicate to a fetch request limits the fetched results to matching objects. Recipe 12-2 takes advantage of the predicates introduced earlier in this chapter to add searching to a table view.
Users may search for entries whose last names match the search string they type. As the text in the search bar at the top of the table changes, the search bar’s delegate receives a searchBar:textDidChange: callback. In turn, that callback method performs a new fetch, using that string as the basis for searching.
Only a few changes to Recipe 12-1 are required to support search within your table, as shown in Recipe 12-2:
![]() The loadView method adds a search controller; the viewDidAppear: method scrolls the search field out of sight.
The loadView method adds a search controller; the viewDidAppear: method scrolls the search field out of sight.
![]() The section index expands to include a search icon, and the section for indexing method respects that icon by scrolling the search controller frame into view.
The section index expands to include a search icon, and the section for indexing method respects that icon by scrolling the search controller frame into view.
![]() The search bar delegate methods fetch new results whenever the search field contents change. They submit a new Core Data fetch requests and use those results to populate the table view.
The search bar delegate methods fetch new results whenever the search field contents change. They submit a new Core Data fetch requests and use those results to populate the table view.
Together, these few changes create a search field–powered table that responds to user-driven queries. As both Recipes 12-1 and 12-2 show, it takes surprisingly little work to make table views work with Core Data.
Recipe 12-2 Using Fetch Requests with Predicates
// Section index titles plus search
- (NSArray *)sectionIndexTitlesForTableView:
(UITableView *)aTableView
{
if (aTableView == searchController.searchResultsTableView)
return nil;
return [[NSArray arrayWithObject:UITableViewIndexSearch]
arrayByAddingObjectsFromArray:
[dataHelper.fetchedResultsController sectionIndexTitles]];
}
// Allow scrolling to search bar
- (NSInteger)tableView:(UITableView *)tableView
sectionForSectionIndexTitle:(NSString *)title
atIndex:(NSInteger)index
{
if (title == UITableViewIndexSearch)
{
[self.tableView scrollRectToVisible:
searchController.searchBar.frame animated:NO];
return -1;
}
return [dataHelper.fetchedResultsController.sectionIndexTitles
indexOfObject:title];
}
// Return a cell specific to the table being shown
- (UITableViewCell *)tableView:(UITableView *)aTableView
cellForRowAtIndexPath:(NSIndexPath *)indexPath
{
[aTableView registerClass:[UITableViewCell class]
forCellReuseIdentifier:@"cell"];
UITableViewCell *cell =
[aTableView dequeueReusableCellWithIdentifier:@"cell"
forIndexPath:indexPath];
Person *person = [dataHelper.fetchedResultsController
objectAtIndexPath:indexPath];
cell.textLabel.text = person.fullname;
return cell;
}
// Handle cancel by fetching all data
- (void)searchBarCancelButtonClicked:(UISearchBar *)aSearchBar
{
aSearchBar.text = @"";
[dataHelper fetchData];
}
// Handle search field update by fetching matching entries
- (void)searchBar:(UISearchBar *)aSearchBar
textDidChange:(NSString *)searchText
{
[dataHelper fetchItemsMatching:aSearchBar.text
forAttribute:@"surname" sortingBy:nil];
}
// Set up search and Core Data
- (void)loadView
{
self.view = [[UIView alloc] init];
self.tableView = [[UITableView alloc] init];
self.view.backgroundColor = [UIColor whiteColor];
// Create a search bar
UISearchBar *searchBar =
[[UISearchBar alloc] initWithFrame:
CGRectMake(0.0f, 0.0f, 0.0f, 44.0f)];
searchBar.autocorrectionType = UITextAutocorrectionTypeNo;
searchBar.autocapitalizationType = UITextAutocapitalizationTypeNone;
searchBar.keyboardType = UIKeyboardTypeAlphabet;
searchBar.delegate = self;
self.tableView.tableHeaderView = searchBar;
// Create the search display controller
searchController = [[UISearchDisplayController alloc]
initWithSearchBar:searchBar contentsController:self];
searchController.searchResultsDataSource = self;
searchController.searchResultsDelegate = self;
// Establish Core Data
dataHelper = [[CoreDataHelper alloc] init];
dataHelper.entityName = @"Person";
dataHelper.defaultSortAttribute = @"surname";
// Check for existing data
BOOL firstRun = !dataHelper.hasStore;
// Set up Core Data
[dataHelper setupCoreData];
if (firstRun)
[self initializeData];
[dataHelper fetchData];
[self.tableView reloadData];
}
// Hide the search bar
- (void)viewDidAppear:(BOOL)animated
{
[super viewDidAppear:animated];
NSIndexPath *path = [NSIndexPath indexPathForRow:0 inSection:0];
[self.tableView scrollToRowAtIndexPath:path
atScrollPosition:UITableViewScrollPositionTop animated:NO];
}
Get This Recipe’s Code
To find this recipe’s full sample project, point your browser to https://github.com/erica/iOS-7-Cookbook and go to the folder for Chapter 12.
Recipe: Adding Edits to Core Data Table Views
You’ve seen how table views integrate well with static data. Now it’s time to bring that technology to the next level. Recipe 12-3 demonstrates how to add edits to both the table presentation and the Core Data store that’s backing the table.
Much of this recipe should look familiar. Its code is based on the basic edits you read about in Chapter 9, “Creating and Managing Table Views.” Users can add new rows by tapping + and delete them by swiping or entering edit mode. All the remaining features, including the search table and the section index, remain in place.
In this recipe, the new data is loaded from a collection of fake contacts, courtesy of fakenamegenerator.com. When users tap +, the app loads a random name into the database from its collection.
You should make a number of adaptations to bring table edits into the Core Data world. Topics you should consider when building your table implementation include undo/redo support, user control limits, and using controller delegation for data updates.
Adding Undo/Redo Support
Core Data simplifies table undo/redo support to an astonishing degree. It provides automatic support for these operations and requires little programming effort. Add this support by assigning an undo manager when you create a Core Data context:
_context = [[NSManagedObjectContext alloc] init];
_context.persistentStoreCoordinator = persistentStoreCoordinator;
_context.undoManager = [[NSUndoManager alloc] init];
_context.undoManager.levelsOfUndo = 999;
As with all other undo/redo support, your primary controller must become the first responder while it is onscreen. The standard suite of first responder methods includes canBecomeFirstResponder (respond YES), viewDidAppear: (the controller view becomes first responder as soon as it appears), and viewWillDisappear: (the controller view resigns first responder as it leaves the screen):
- (BOOL)canBecomeFirstResponder
{
return YES;
}
- (void)viewDidAppear:(BOOL)animated
{
[super viewDidAppear:animated];
[self becomeFirstResponder];
if (dataHelper.numberOfEntities == 0) return;
// Hide the search bar
NSIndexPath *path = [NSIndexPath indexPathForRow:0 inSection:0];
[self.tableView scrollToRowAtIndexPath:path
atScrollPosition:UITableViewScrollPositionTop animated:NO];
}
- (void)viewWillDisappear:(BOOL)animated
{
[super viewWillDisappear:animated];
[self resignFirstResponder];
}
Notice that this search bar is scrolled offscreen only if the table contains at least one entry. That workaround was not needed in Recipe 12-2. On a table where users have direct control over the contents by adding and removing entries, it is entirely possible that the table is presented without any data at all.
Creating Undo Transactions
Build your Core Data updates into undo transactions by bracketing them into undo groupings. The beginUndoGrouping and endUndoGrouping calls appear before and after context updates. Specify an action name that describes the operation that just took place. This action name is primarily used for shake-to-undo support (for example, “Undo delete?”). It also helps document the action you’re expressing.
The braces used in the following undo-grouping sample are purely stylistic. You do not need to include them in your code. They are provided to highlight the transactional nature that underlies undo groupings:
// Delete request
if (editingStyle == UITableViewCellEditingStyleDelete)
{
NSManagedObject *object = [dataHelper.fetchedResultsController
objectAtIndexPath:indexPath];
NSUndoManager *manager = dataHelper.context.undoManager;
[manager beginUndoGrouping];
[manager setActionName:@"Delete"];
{
[dataHelper.context deleteObject:object];
}
[manager endUndoGrouping];
[dataHelper save];
}
The three calls (begin, end, and setting the action name) in this snippet ensure that Core Data can reverse its operations. For this minimal effort, your application gains a fully realized undo management system, courtesy of Core Data. Be aware that any undo/redo history will not survive quitting your application. The stack resets each time the app launches.
Rethinking Edits
When working with Core Data–powered tables, Recipe 12-3 doesn’t let users reorder rows. That’s because its fetch requests sort the data, not users. Recipe 12-3’s tableView:canMoveRowAtIndexPath: method hard-codes its result to NO. Yes, you can work around this by introducing a custom row position attribute. Much of the time you won’t want to. Recipe 12-3 shows a common use case.
In a similar vein, make sure you coordinate any database edits to your data sources. With Core Data–driven tables, these changes may come from user requests (swiping, pressing +, and so forth) and also from the undo manager. By subscribing to the fetched results controller as its delegate, you’ll know whenever data has updated from undo actions. Use the fetch result delegate callbacks to reload your data whenever data changes occur.
Recipe 12-3 Adapting Table Edits to Core Data
// Update items in the navigation bar
- (void)setBarButtonItems
{
// Expire any ongoing operations
if (dataHelper.context.undoManager.isUndoing ||
dataHelper.context.undoManager.isRedoing)
{
[self performSelector:@selector(setBarButtonItems)
withObject:nil afterDelay:0.1f];
return;
}
UIBarButtonItem *undo = SYSBARBUTTON_TARGET(
UIBarButtonSystemItemUndo,
dataHelper.context.undoManager, @selector(undo));
undo.enabled = dataHelper.context.undoManager.canUndo;
UIBarButtonItem *redo = SYSBARBUTTON_TARGET(
UIBarButtonSystemItemRedo,
dataHelper.context.undoManager, @selector(redo));
redo.enabled = dataHelper.context.undoManager.canRedo;
UIBarButtonItem *add = SYSBARBUTTON(
UIBarButtonSystemItemAdd, @selector(addItem));
self.navigationItem.leftBarButtonItems = @[add, undo, redo];
}
// Refetch data
- (void)refresh
{
// If searching, fetch search results, otherwise all data
if (searchController.searchBar.text)
[dataHelper fetchItemsMatching:
searchController.searchBar.text
forAttribute:@"surname" sortingBy:nil];
else
[dataHelper fetchData];
dataHelper.fetchedResultsController.delegate = self;
// Reload tables
[self.tableView reloadData];
[searchController.searchResultsTableView reloadData];
// Update bar button items
[self setBarButtonItems];
}
// Respond to section changes
- (void)controller:(NSFetchedResultsController *)controller
didChangeSection:(id <NSFetchedResultsSectionInfo>)sectionInfo
atIndex:(NSUInteger)sectionIndex
forChangeType:(NSFetchedResultsChangeType)type
{
if (type == NSFetchedResultsChangeDelete)
[self.tableView deleteSections:
[NSIndexSet indexSetWithIndex:sectionIndex]
withRowAnimation:UITableViewRowAnimationAutomatic];
if (type == NSFetchedResultsChangeInsert)
[self.tableView insertSections:
[NSIndexSet indexSetWithIndex:sectionIndex]
withRowAnimation:UITableViewRowAnimationAutomatic];
sectionHeadersAffected = YES;
}
// Respond to item changes
- (void)controller:(NSFetchedResultsController *)controller
didChangeObject:(id)anObject
atIndexPath:(NSIndexPath *)indexPath
forChangeType:(NSFetchedResultsChangeType)type
newIndexPath:(NSIndexPath *)newIndexPath
{
UITableView *tableView = self.tableView;
if (type == NSFetchedResultsChangeInsert)
[tableView insertRowsAtIndexPaths:@[newIndexPath]
withRowAnimation:UITableViewRowAnimationAutomatic];
if (type == NSFetchedResultsChangeDelete)
[tableView deleteRowsAtIndexPaths:@[indexPath]
withRowAnimation:UITableViewRowAnimationAutomatic];
}
// Prepare for updates
- (void)controllerWillChangeContent:
(NSFetchedResultsController *)controller
{
sectionHeadersAffected = NO;
[self.tableView beginUpdates];
}
// Apply updates
- (void)controllerDidChangeContent:
(NSFetchedResultsController *)controller
{
[self.tableView endUpdates];
// Update section headers if needed
if (sectionHeadersAffected)
[self.tableView reloadSections:
[NSIndexSet indexSetWithIndexesInRange:
NSMakeRange(0, self.tableView.numberOfSections)]
withRowAnimation:UITableViewRowAnimationNone];
[self setBarButtonItems];
}
// Only allow editing on the main table
- (BOOL)tableView:(UITableView *)aTableView
canEditRowAtIndexPath:(NSIndexPath *)indexPath
{
if (aTableView == searchController.searchResultsTableView) return NO;
return YES;
}
// No reordering allowed
- (BOOL)tableView:(UITableView *)tableView
canMoveRowAtIndexPath:(NSIndexPath *)indexPath
{
return NO;
}
- (void)addItem
{
// Surround the "add" functionality with undo grouping
NSUndoManager *manager = dataHelper.context.undoManager;
[manager beginUndoGrouping];
{
Person *person = (Person *)[dataHelper newObject];
[self setupNewPerson:person];
}
[manager endUndoGrouping];
[manager setActionName:@"Add"];
[dataHelper save];
}
// Handle deletions
- (void)tableView:(UITableView *)tableView
commitEditingStyle:(UITableViewCellEditingStyle)editingStyle
forRowAtIndexPath:(NSIndexPath *)indexPath
{
// delete request
if (editingStyle == UITableViewCellEditingStyleDelete)
{
NSManagedObject *object = [dataHelper.fetchedResultsController
objectAtIndexPath:indexPath];
NSUndoManager *manager = dataHelper.context.undoManager;
[manager beginUndoGrouping];
{
[dataHelper.context deleteObject:object];
}
[manager endUndoGrouping];
[manager setActionName:@"Delete"];
[dataHelper save];
}
}
// Toggle editing mode
- (void)setEditing:(BOOL)isEditing animated:(BOOL)animated
{
[super setEditing:isEditing animated:animated];
[self.tableView setEditing:isEditing animated:animated];
NSIndexPath *path = [self.tableView
indexPathForSelectedRow];
if (path)
[self.tableView deselectRowAtIndexPath:path
animated:YES];
[self setBarButtonItems];
}
Get This Recipe’s Code
To find this recipe’s full sample project, point your browser to https://github.com/erica/iOS-7-Cookbook and go to the folder for Chapter 12.
Recipe: A Core Data–Powered Collection View
It takes work to convert Recipe 12-3 from a table to a collection view, but it doesn’t take an overwhelming amount. Ditch the search view controller, get rid of the index view, update the edits a little, and switch out the controller class from table to collection. Figure 12-3 shows the results. This collection view displays the same data as the table did, offering selectable cells, edits, and undo/redo support.
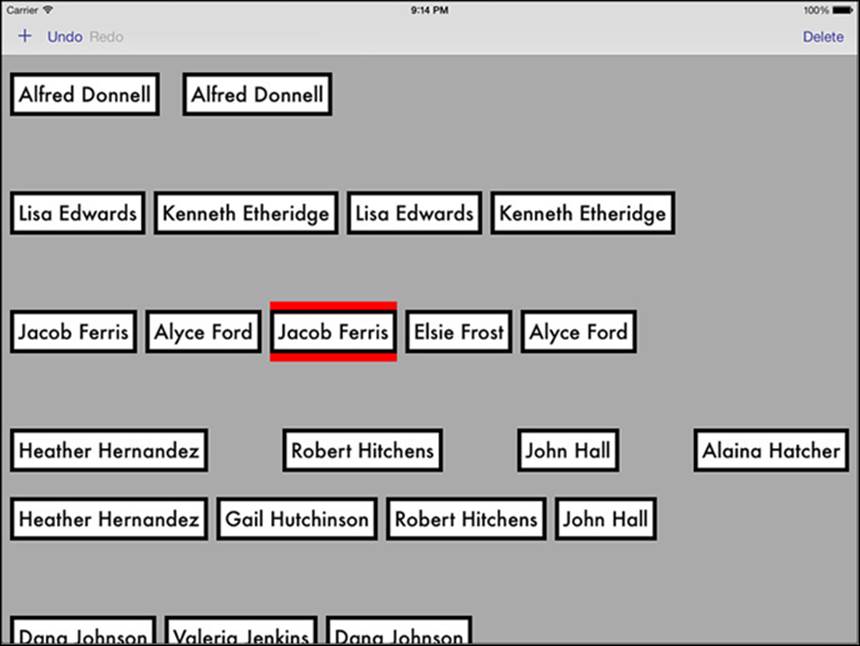
Figure 12-3 Recipe 12-4 builds a collection view powered by Core Data.
The refactoring story begins with the data model. Recipe 12-4 adds a new attribute, a binary data item called imageData. The image is built out of each person’s first and last name and it’s saved in binary format. This extra attribute allows the collection view to present each data entry as a reusable image, sized to fit each name.
The data source methods all update from table view to collection view versions. Some need little work. The section count and items-per-section methods switch to their collection view counterparts, while their internals essentially stay the same.
Others experience a bigger makeover. The cell-for-path method gets a complete refresh as cells are built to present images rather than populate a title with text. Recipe 12-4 does not include the search view controller and the index view and header callbacks. Finally, Recipe 12-4 adds a custom cell size layout method to match each view size to its embedded image size. That layout is an important component in collection views but is not needed in table views.
Edits are affected as well and no longer center around cell animation. Instead of providing deletion support through a table-based commit edits method, Recipe 12-4 adds a standalone deleteItem method that corresponds to the addItem method used in Recipe 12-3.
The bar button on the right that used to switch into and out of edit mode on the table now becomes a Delete button that is activated whenever any item is selected in the collection view. The remaining items in the navigation bar that provide undo and redo support, and the methods that power them, make the jump from tables to collection views unchanged.
Nothing much else changes, which is what you’d expect with MVC development. The Core Data model methods are the same ones used in Recipe 12-3. The UIKit-provided views are stock items. Only the controller part needs or receives updates, which simplifies this refactoring exercise.
Recipe 12-4 Core Data Collection View
#pragma mark Data Source
// Return the number of sections
- (NSInteger)numberOfSectionsInCollectionView:
(UICollectionView *)collectionView
{
if (dataHelper.numberOfEntities == 0) return 0;
return dataHelper.fetchedResultsController.sections.count;
}
// Return the number of items per section
- (NSInteger)collectionView:(UICollectionView *)collectionView
numberOfItemsInSection:(NSInteger)section
{
id <NSFetchedResultsSectionInfo> sectionInfo =
dataHelper.fetchedResultsController.sections[section];
return sectionInfo.numberOfObjects;
}
// This method builds images into collection view cells
- (UICollectionViewCell *)collectionView:
(UICollectionView *) aCollectionView
cellForItemAtIndexPath:(NSIndexPath *)indexPath
{
UICollectionViewCell *cell = [self.collectionView
dequeueReusableCellWithReuseIdentifier:@"cell"
forIndexPath:indexPath];
Person *person = [dataHelper.fetchedResultsController
objectAtIndexPath:indexPath];
UIImage *image = [UIImage imageWithData:person.imageData];
cell.backgroundColor = [UIColor clearColor];
if (![cell.contentView viewWithTag:IMAGEVIEWTAG])
{
UIImageView *imageView =
[[UIImageView alloc] initWithImage:image];
imageView.tag = IMAGEVIEWTAG;
[cell.contentView addSubview:imageView];
}
UIImageView *imageView =
(UIImageView *)[cell.contentView viewWithTag:IMAGEVIEWTAG];
imageView.frame = CGRectMake(0.0f, 10.0f, image.size.width, image.size.height);
imageView.image = image;
cell.selectedBackgroundView = [[UIView alloc] init];
cell.selectedBackgroundView.backgroundColor =
[UIColor redColor];
return cell;
}
// Return the size for layout
- (CGSize)collectionView:(UICollectionView *)collectionView
layout:(UICollectionViewLayout*)collectionViewLayout
sizeForItemAtIndexPath:(NSIndexPath *)indexPath
{
Person *person = [dataHelper.fetchedResultsController
objectAtIndexPath:indexPath];
UIImage *image = [UIImage imageWithData:person.imageData];
return CGSizeMake(image.size.width, image.size.height + 20.0f);
}
#pragma mark Delegate methods
- (void)collectionView:(UICollectionView *)aCollectionView
didSelectItemAtIndexPath:(NSIndexPath *)indexPath
{
[self setBarButtonItems];
}
#pragma mark Editing and Undo
- (void)setBarButtonItems
{
// Delete requires a selected item
self.navigationItem.rightBarButtonItem.enabled =
(self.collectionView.indexPathsForSelectedItems.count != 0);
// Set up undo/redo items
UIBarButtonItem *undo =
SYSBARBUTTON_TARGET(UIBarButtonSystemItemUndo,
self.dataHelper.context.undoManager, @selector(undo));
undo.enabled = self.dataHelper.context.undoManager.canUndo;
UIBarButtonItem *redo =
SYSBARBUTTON_TARGET(UIBarButtonSystemItemRedo,
self.dataHelper.context.undoManager, @selector(redo));
redo.enabled = self.dataHelper.context.undoManager.canRedo;
UIBarButtonItem *add =
SYSBARBUTTON(UIBarButtonSystemItemAdd, @selector(addItem));
self.navigationItem.leftBarButtonItems = @[add, undo, redo];
}
// Refresh the data, update the view
- (void)refresh
{
[dataHelper fetchData];
dataHelper.fetchedResultsController.delegate = self;
[self.collectionView reloadData];
[self performSelector:@selector(setBarButtonItems)
withObject:nil afterDelay:0.1f];
}
- (void)controllerDidChangeContent:
(NSFetchedResultsController *)controller
{
// Respond to data change from undo controller
[self refresh];
}
// Add a new item
- (void)addItem
{
NSUndoManager *manager = dataHelper.context.undoManager;
[manager beginUndoGrouping];
{
Person *person = (Person *)[dataHelper newObject];
[self setupNewPerson:person];
}
[manager endUndoGrouping];
[manager setActionName:@"Add"];
[dataHelper save];
[self refresh];
}
// Delete the selected item
- (void)deleteItem
{
if (!self.collectionView.indexPathsForSelectedItems.count)
return;
NSIndexPath *indexPath =
self.collectionView.indexPathsForSelectedItems[0];
NSManagedObject *object =
[dataHelper.fetchedResultsController
objectAtIndexPath:indexPath];
NSUndoManager *manager = dataHelper.context.undoManager;
[manager beginUndoGrouping];
{
[dataHelper.context deleteObject:object];
}
[manager endUndoGrouping];
[manager setActionName:@"Delete"];
[dataHelper save];
[self refresh];
}
#pragma mark Setup
- (void)viewDidLoad
{
[super viewDidLoad];
[self.collectionView registerClass:
[UICollectionViewCell class]
forCellWithReuseIdentifier:@"cell"];
self.collectionView.backgroundColor =
[UIColor lightGrayColor];
self.collectionView.allowsMultipleSelection = NO;
self.collectionView.allowsSelection = YES;
self.navigationItem.leftBarButtonItem =
SYSBARBUTTON(UIBarButtonSystemItemAdd,
@selector(addItem));
self.navigationItem.rightBarButtonItem =
BARBUTTON(@"Delete", @selector(deleteItem));
self.navigationItem.rightBarButtonItem.enabled = NO;
}
Get This Recipe’s Code
To find this recipe’s full sample project, point your browser to https://github.com/erica/iOS-7-Cookbook and go to the folder for Chapter 12.
Summary
When you are working with table views and collection views, Core Data provides the perfect backing technology. It offers easy-to-use model support that easily integrates into UIKit data sources. This chapter offers just a taste of Core Data’s capabilities. These recipes have shown you how to design and implement basic Core Data support for managed object models. You’ve read about defining a model and implementing fetch requests. You’ve seen how to add objects, modify them, delete them, and save them. You’ve learned about predicates and undo operations. After reading through this chapter, here are a few final thoughts to take away with you:
![]() If you’re not using Core Data with tables and collection views, you’re missing out on one of the most elegant ways to populate and control your data.
If you’re not using Core Data with tables and collection views, you’re missing out on one of the most elegant ways to populate and control your data.
![]() When working with Core Data, you’re not limited to scrolling views of content. Use Core Data to save any kind of tabular information. It offers a relational database solution that goes well beyond the demands of most applications.
When working with Core Data, you’re not limited to scrolling views of content. Use Core Data to save any kind of tabular information. It offers a relational database solution that goes well beyond the demands of most applications.
![]() Always design for undo/redo support. Even if you don’t think you’ll need it right away, having the work done in advance lets you add features later. We’re not big fans of shake-to-undo, but it offers a button-free way to integrate this functionality into otherwise overdesigned interfaces.
Always design for undo/redo support. Even if you don’t think you’ll need it right away, having the work done in advance lets you add features later. We’re not big fans of shake-to-undo, but it offers a button-free way to integrate this functionality into otherwise overdesigned interfaces.
![]() Predicates are one of our favorite SDK features. Spend some time learning how to construct them and use them with all kinds of objects, such as arrays and sets, not just with Core Data.
Predicates are one of our favorite SDK features. Spend some time learning how to construct them and use them with all kinds of objects, such as arrays and sets, not just with Core Data.
![]() iCloud provides a tantalizing match between Core Data and ubiquitous data, extending iOS data to the user’s desktop, to each of his or her devices, and to the cloud as a whole. While Core Data integration with iCloud has been panned in the past due to stability and related issues, Apple insists that iOS 7 includes much-needed improvements. Look up UIManagedDocument to learn more about iCloud and Core Data integration.
iCloud provides a tantalizing match between Core Data and ubiquitous data, extending iOS data to the user’s desktop, to each of his or her devices, and to the cloud as a whole. While Core Data integration with iCloud has been panned in the past due to stability and related issues, Apple insists that iOS 7 includes much-needed improvements. Look up UIManagedDocument to learn more about iCloud and Core Data integration.
![]() Core Data’s capabilities go way beyond the basic recipes you’ve seen in this chapter. Check out Tim Isted and Tom Harrington’s Core Data for iOS: Developing Data-Driven Applications for the iPad, iPhone, and iPod touch (Addison-Wesley Professional) for an in-depth exploration of Core Data and its features.
Core Data’s capabilities go way beyond the basic recipes you’ve seen in this chapter. Check out Tim Isted and Tom Harrington’s Core Data for iOS: Developing Data-Driven Applications for the iPad, iPhone, and iPod touch (Addison-Wesley Professional) for an in-depth exploration of Core Data and its features.