The Core iOS Developer’s Cookbook, Fifth Edition (2014)
Chapter 5. View Constraints
Auto Layout revolutionizes the way developers create user interfaces (UIs). It provides a flexible and powerful system that describes how views and their content relate to each other and to the superviews they occupy. In contrast to the manually managed frame geometry, springs and struts of the past, this technology offers incredible control over layout and a wider range of customization. Apple is driving developers to adopt this technology with new device screen sizes and new APIs that vary the UI dynamically at runtime. Before the advent of Auto Layout, handling these scenarios was difficult or even impossible.
With Auto Layout, laying out views is as straightforward as describing the relationships between views and letting iOS do the hard work of placing the views appropriately. In addition, when you define relationships and dynamic layout properties of views rather than hard code origins and sizes, view objects will behave and react correctly to orientation changes, differing device sizes or aspect ratios, and even the varying sizes of labels due to localization or the preferences of the user with Dynamic Type.
This chapter introduces code-level Auto Layout constraint development. Constraints define how views relate to one another and to the windows and superviews they occupy. iOS processes these constraints to define the actual frame geometry of each view.
Note
Auto Layout is a deep and expansive topic that can easily fill an entire book. It is covered only cursorily here. For a comprehensive look at Auto Layout with vastly deeper analysis and examples, including use within Interface Builder (IB), take a look at the latest edition of Erica Sadun’s Auto Layout Demystified, also published by Addison-Wesley.
What Are Constraints?
Constraints are rules that allow you to describe your view layout to iOS. They limit how views relate to each other and specify how they may be laid out. With constraints, you can say “these items are always lined up in a horizontal row” or “this item resizes itself to match the height of that item.” Constraints provide a layout language that you add to views to describe geometric relationships.
iOS takes charge of meeting those demands via a constraint satisfaction system. The rules must make sense. A view cannot be both to the left and to the right of another view. One of the key challenges when working with constraints is ensuring that the rules are rigorously consistent. When your rules fail, they fail loudly. Xcode provides you with verbose logging that explains what may have gone wrong.
Another key challenge is making sure your rules are specific enough. An underconstrained interface can create unexpected results when faced with many possible layout solutions. You might request that one view lie to the right of the other, but unless you tell the system otherwise, you might end up with the right view at the top of the screen and the left view at the bottom—because that one rule doesn’t say anything about vertical orientation.
Constraints allow you to design resolution-independent apps. A constraint-based application built for the 4-inch iPhone before the introduction of a future magical 5-inch iPhone should require no code updates to work on the new device.
For apps that will be localized, use constraints instead of creating individual XIBs for each language. One constraint-based XIB can adapt to multiple localizations.
Constraints can be declared both visually in IB and programmatically in your application source code. Xcode 5 introduced numerous Auto Layout improvements in IB. The IB approach is simple to use and easy to lay out. This chapter focuses on code. It offers code-centered examples that help you craft common view constraints in Objective-C.
Constraint Attributes
Constraints use a limited geometric vocabulary consisting of attributes and relations. Attributes are the “nouns” of the constraint system, describing positions within a view’s alignment rectangle. Alignment rectangles will be described in detail shortly, but for the moment, you can think of them as being closely related to the view’s frame. Relations are “verbs,” specifying how the attributes compare to each other.
The attribute nouns speak to physical geometry. Constraints offer the following view attribute vocabulary:
![]() left, right, top, and bottom—The edges of a view’s alignment rectangle on the left, right, top, and bottom of the view. These correspond to a view’s minimum X, maximum X, minimum Y, and maximum Y values.
left, right, top, and bottom—The edges of a view’s alignment rectangle on the left, right, top, and bottom of the view. These correspond to a view’s minimum X, maximum X, minimum Y, and maximum Y values.
![]() leading and trailing—The leading and trailing edges of the view’s alignment rectangle. In left-to-right (English-like) systems, these correspond to “left” (leading) and “right” (trailing). In right-to-left linguistic environments like Arabic or Hebrew, these roles flip: Right is leading, and left is trailing.
leading and trailing—The leading and trailing edges of the view’s alignment rectangle. In left-to-right (English-like) systems, these correspond to “left” (leading) and “right” (trailing). In right-to-left linguistic environments like Arabic or Hebrew, these roles flip: Right is leading, and left is trailing.
When internationalizing your applications, always prefer leading and trailing over left and right. This allows your interfaces to flip properly when using right-to-left languages, like Arabic and Hebrew.
![]() width and height—The width and height of the view’s alignment rectangle.
width and height—The width and height of the view’s alignment rectangle.
![]() centerX and centerY—The x-axis and y-axis centers of the view’s alignment rectangle.
centerX and centerY—The x-axis and y-axis centers of the view’s alignment rectangle.
![]() baseline—The alignment rectangle’s baseline, typically a fixed offset above its bottom attribute.
baseline—The alignment rectangle’s baseline, typically a fixed offset above its bottom attribute.
The relation verbs compare values. Constraint math is limited to three relations: setting equality or setting lower and upper bounds for comparison. You can use the following layout relations:
![]() Less-than inequality—NSLayoutRelationLessThanOrEqual
Less-than inequality—NSLayoutRelationLessThanOrEqual
![]() Equality—NSLayoutRelationEqual
Equality—NSLayoutRelationEqual
![]() Greater-than inequality—NSLayoutRelationGreaterThanOrEqual
Greater-than inequality—NSLayoutRelationGreaterThanOrEqual
You might not think that these three relations would give you much to work with. However, these three relations cover all the ground needed for user interface layout. They offer ways to set specific values and apply maximum and minimum limits.
Constraint Math
All constraints, regardless of how they are created, are essentially equations or inequalities in the following form:
y (relation) m * x + b
If you have a math background, you may have seen a form more like this, with R referring to the relation between y and the computed value on the right side:
y R m * x + b
y and x are view attributes of the kind you just read about above, such as width or centerY or top. Here, m is a constant scaling factor, and b is a constant offset. For example, you might say, “View B’s left side should be placed 15 points to the right of View A’s right side.” The relation equation that results is something like this:
View B’s left = View A’s right + 15
Here, the relation is equality, the constant offset (b) is 15, and the scaling factor, or multiplier (m), is 1. We’ve taken care here to keep the equation above from looking like code because, as you’ll see, you do not use code directly to declare your constraints in Objective-C.
Constraints do not have to use strict equalities. They can use inequality relations as well. For example, you might say, “View B’s left side should be placed at least 15 points to the right of View A’s right side,” or
View B’s left >= View A’s right + 15
Offsets lets you place fixed gaps between items, and multipliers let you scale. Scaling is especially useful when laying out grid patterns, letting you multiply by the height of a view rather than just add a fixed distance to the next view.
The Laws of Constraints
Although you can think of constraints as hard “math,” they’re actually just preferences. iOS finds a layout solution that best matches your constraints; this solution may not always be unique. Here are a few basic facts about constraints:
![]() Constraints are relationships, not directional. You don’t have to solve the right side to calculate the left side.
Constraints are relationships, not directional. You don’t have to solve the right side to calculate the left side.
![]() Constraints have priorities. Priorities range numerically from 0 to 1,000. The Auto Layout system uses priorities to sort constraints. Higher priorities are always satisfied before lower priorities. A priority of 99 is always considered after a priority of 100. During layout, the system iterates through any constraints you have added, attempting to satisfy them all. Priorities come into play when deciding which constraint has less sway. The 99 priority constraint will be broken in favor of the 100 priority constraint if the two come into conflict.
Constraints have priorities. Priorities range numerically from 0 to 1,000. The Auto Layout system uses priorities to sort constraints. Higher priorities are always satisfied before lower priorities. A priority of 99 is always considered after a priority of 100. During layout, the system iterates through any constraints you have added, attempting to satisfy them all. Priorities come into play when deciding which constraint has less sway. The 99 priority constraint will be broken in favor of the 100 priority constraint if the two come into conflict.
The highest priority you can assign is “required” (that is, UILayoutPriorityRequired) (value 1,000), which is also the default. A required priority should be satisfied exactly—for example, “This button is exactly this size.” So, when you assign a different priority, you’re actually attenuating that constraint’s sway within the overall layout system.
Even required priorities may be overridden when constraints come into conflict. Don’t be shocked if your 100×100 view ends up being presented at 102×107 if your constraints aren’t perfectly balanced. Table 5-1 details several priority presets and their values.
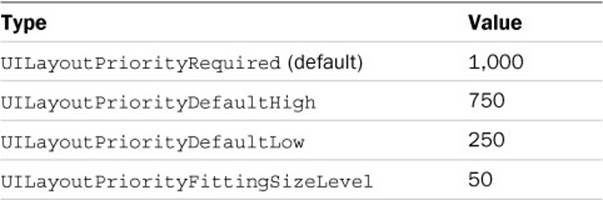
Table 5-1 Priority Constants
![]() Constraints don’t have any natural “order” outside priorities. All constraints of the same priority are considered at the same time. If you need some constraint to take precedence, assign it a higher priority than the others.
Constraints don’t have any natural “order” outside priorities. All constraints of the same priority are considered at the same time. If you need some constraint to take precedence, assign it a higher priority than the others.
![]() Constraints can be approximated. Optional constraints try to optimize their results. Consider the constraint “View 2’s top edge should be at the same position as View 1’s bottom edge.” The constraint system attempts to squeeze these two views together by minimizing their distance. If other constraints prevent them from touching, the system places them as close as it can, minimizing the absolute distance between the two attributes.
Constraints can be approximated. Optional constraints try to optimize their results. Consider the constraint “View 2’s top edge should be at the same position as View 1’s bottom edge.” The constraint system attempts to squeeze these two views together by minimizing their distance. If other constraints prevent them from touching, the system places them as close as it can, minimizing the absolute distance between the two attributes.
![]() Constraints can have cycles. As long as all items are satisfied, it doesn’t matter which elements refer to which. Don’t sweat the cross-references. In this declarative system, circular references are okay, and you will not encounter infinite looping issues.
Constraints can have cycles. As long as all items are satisfied, it doesn’t matter which elements refer to which. Don’t sweat the cross-references. In this declarative system, circular references are okay, and you will not encounter infinite looping issues.
![]() Constraints are animatable. You can use UIView animation to gradually change from one set of constraints to another. In the animation block, call layoutIfNeeded after changing your constraints, and the views will animate from the previous constrained layout to the new layout.
Constraints are animatable. You can use UIView animation to gradually change from one set of constraints to another. In the animation block, call layoutIfNeeded after changing your constraints, and the views will animate from the previous constrained layout to the new layout.
![]() Constraints can refer to view siblings. You can align the center point of one view’s subview with the center point of an entirely different view as long as both views have a common view ancestor. For example, you might create a complex text entry view and align its rightmost button’s right attribute with the right attribute of an embedded image view below it. There’s just one limitation here, which follows next.
Constraints can refer to view siblings. You can align the center point of one view’s subview with the center point of an entirely different view as long as both views have a common view ancestor. For example, you might create a complex text entry view and align its rightmost button’s right attribute with the right attribute of an embedded image view below it. There’s just one limitation here, which follows next.
![]() Constraints should not cross bounds systems. Don’t cross into and out of scroll views, collection views, and table views for alignment. If there’s some sort of content view with its own bounds system, you avoid hopping out of that to an entirely different bounds system in another view. Doing so may not crash your app, but it’s not a good idea, and it’s not well supported by Auto Layout.
Constraints should not cross bounds systems. Don’t cross into and out of scroll views, collection views, and table views for alignment. If there’s some sort of content view with its own bounds system, you avoid hopping out of that to an entirely different bounds system in another view. Doing so may not crash your app, but it’s not a good idea, and it’s not well supported by Auto Layout.
![]() Auto Layout may not play nicely with transforms. Exercise care when mixing transforms with Auto Layout, especially those that include rotation.
Auto Layout may not play nicely with transforms. Exercise care when mixing transforms with Auto Layout, especially those that include rotation.
![]() Auto Layout does not work with iOS 7 UIKit Dynamics. You can use Auto Layout inside any view that’s affected by dynamic behaviors, but you cannot combine Auto Layout view placement with dynamic animator management.
Auto Layout does not work with iOS 7 UIKit Dynamics. You can use Auto Layout inside any view that’s affected by dynamic behaviors, but you cannot combine Auto Layout view placement with dynamic animator management.
![]() Auto Layout works with iOS 7 motion effects. The visual changes applied by UIMotionEffect instances won’t disturb your underlying layout as they only affect the view’s layer.
Auto Layout works with iOS 7 motion effects. The visual changes applied by UIMotionEffect instances won’t disturb your underlying layout as they only affect the view’s layer.
![]() Constraints can fail at runtime. If your constraints cannot be resolved (see the examples at the end of this chapter) and come into conflict, the runtime system chooses which constraints to disregard so it can present whatever view layout it can. This is usually ugly and nearly always not the visual presentation you intended. Auto Layout sends exhaustive descriptions of what went wrong to your Xcode console. Use these reports to fix your constraints and bring them into harmony with each other.
Constraints can fail at runtime. If your constraints cannot be resolved (see the examples at the end of this chapter) and come into conflict, the runtime system chooses which constraints to disregard so it can present whatever view layout it can. This is usually ugly and nearly always not the visual presentation you intended. Auto Layout sends exhaustive descriptions of what went wrong to your Xcode console. Use these reports to fix your constraints and bring them into harmony with each other.
![]() Badly formed constraints will interrupt application execution. Unlike constraint conflicts, which produce error messages but allow your application to continue running, some constraint calls will actually crash your application through unhandled exceptions. For example, if you pass a constraint format string such as @"V[view1]-|" (which is missing a colon after the letter V) to a constraint creation method, you’ll encounter a runtime exception:
Badly formed constraints will interrupt application execution. Unlike constraint conflicts, which produce error messages but allow your application to continue running, some constraint calls will actually crash your application through unhandled exceptions. For example, if you pass a constraint format string such as @"V[view1]-|" (which is missing a colon after the letter V) to a constraint creation method, you’ll encounter a runtime exception:
Terminating app due to uncaught exception 'NSInvalidArgumentException', reason:
'Unable to parse constraint format'
This error cannot be detected during compilation; you must carefully check your format strings by hand. Designing constraints in IB helps avoid bad-typo scenarios.
![]() A constraint must refer to at least one view. You can create a constraint without any items and compile that code without warnings, but the code will raise an exception at runtime.
A constraint must refer to at least one view. You can create a constraint without any items and compile that code without warnings, but the code will raise an exception at runtime.
![]() Beware of invalid attribute pairings. You cannot legally match a view’s left edge to another view’s height. Invalid pairings raise runtime exceptions. Specifically, you shouldn’t mix size attributes with edge attributes. You can generally guess which pairs are problematic because they make no sense.
Beware of invalid attribute pairings. You cannot legally match a view’s left edge to another view’s height. Invalid pairings raise runtime exceptions. Specifically, you shouldn’t mix size attributes with edge attributes. You can generally guess which pairs are problematic because they make no sense.
Note
Working with constraints adds all sorts of wonderful and new ways to crash your apps at runtime. Take extreme care when developing and testing your constraint-based application and build tests to ensure that you check their operations in as many scenarios as possible. Let’s hope that someone builds a constraint validator to catch, at least, simple typos like @"H:[myView", a visual format constraint that is missing a closing square bracket.
Constraints and Frames
Auto Layout constraints work with the same underlying frame geometry introduced in Chapter 4, “Assembling Views and Animations.” Constraints on views ultimately resolve to a frame. Much of the power of Auto Layout revolves around properly handling views with dynamic and varied content when laying out the UI. UIView supports two additional properties—intrinsic content size and alignment rectangles—that extend beyond the traditional frame geometry, allowing Auto Layout to construct the appropriate relationships between views.
Intrinsic Content Size
Under Auto Layout, a view’s content plays as important a role in its layout as its constraints. This is expressed through each view’s intrinsicContentSize. This method describes the minimum space needed to express the full content of the view without squeezing or clipping that data. It derives from the natural properties of the content each view presents.
For an image view, for example, this corresponds to the size of the image it presents. A larger image requires a larger intrinsic content size. For a label, this varies with its font and the amount of text. As the font changes, the label’s intrinsic content height varies. As the text length grows or shrinks in conjunction with the selected font, the label’s intrinsic content width adjusts to match.
A view’s intrinsic size allows Auto Layout to best match a view’s frame to its natural content. Avoiding an underconstrained or ambiguous layout generally requires setting two attributes in each axis. When a view has an intrinsic content size, that size accounts for one of the two attributes. You can, for example, place a text-based control or an image view in the center of its parent, and its layout will not be ambiguous. The intrinsic content size plus the location combine for a fully specified placement. In reality, the intrinsic content size is resolved to actual constraints by the layout system.
When you change a view’s contents, call invalidateIntrinsicContentSize to let Auto Layout know to recalculate at its next layout pass.
Compression Resistance and Content Hugging
Two properties impact how Auto Layout considers the intrinsic content size. As the name suggests, compression resistance refers to the way a view protects its content. A view with a high compression resistance fights against shrinking. It won’t allow that content to clip. The content huggingpriority refers to the way a view prefers to avoid extra padding around its core content or stretching of that core content (as with an image view that uses a scaled content mode). These priorities can be set for each axis on a view (via setContentCompressionResistance-Priority:forAxis: and setContentHuggingPriority:forAxis:).
Alignment Rectangles
Constraints take a different approach to frames than do traditional manual layout. Frames describe where to place views on the screen and how big those views will be. When laying out views, constraints use a related geometric element called an alignment rectangle.
As developers create complex views, they may introduce visual ornamentation such as shadows, exterior highlights, reflections, and engraving lines. As they do, these features usually become attached as subviews or sublayers. As a consequence, a view’s frame, its full extent, grows as items are added.
Unlike frames, a view’s alignment rectangle is limited to a core visual element. Its size remains unaffected as new items join the primary view. Consider Figure 5-1 (left). It depicts a view with an attached shadow and badge, which is placed behind and offset from the main element. When laying out this view, you want Auto Layout to focus on aligning just the core element.

Figure 5-1 A view’s alignment rectangle (center) refers strictly to the core visual element to be aligned, without embellishments.
The center image in Figure 5-1 shows the view’s alignment rectangle. This rectangle excludes all ornamentation, such as a drop shadow and badge. It’s the part of the view you want Auto Layout to consider when it does its work.
Contrast this with the rectangle shown in the right image in Figure 5-1. This version includes all the visual ornamentation, extending the view’s bounds beyond the area that should be considered for alignment. This rectangle encompasses all the view’s visual elements. These ornaments could potentially throw off a view’s alignment features (for example, its center, bottom, and right) if they were considered during layout.
By laying out views based on alignment rectangles instead of the frame, Auto Layout ensures that key information like a view’s edges and center are properly considered during layout.
Declaring Alignment Rectangles
When building ornamented views, such as image views with built-in shadows, you should report geometry details to Auto Layout. Implementing the alignmentRectForFrame: method allows your views to declare accurate alignment rectangles when they use ornamentation such as shadows or reflections.
This method takes one argument: a frame. This argument refers to the destination frame that the view will inhabit; think of the rectangle on the right in Figure 5-1. That frame will encompass the entire view, including any ornamentation attached to the view. It’s up to you to provide an accurate representation of the alignment rectangle with respect to that destination frame and your view’s embedded elements.
Your method returns a CGRect value that specifies the rectangle for your view’s core visual geometry, as the center rectangle in Figure 5-1 does. This is typically the main visual object’s frame and excludes any ornamentation views you have added as subviews or into your view’s layer as sublayers.
When planning for arbitrary transformations, make sure to implement frameForAlignment-Rect: as well. This method describes the inverse relationship, producing the resulting fully ornamented frame (for example, Figure 5-1, right image) when passed a constrained alignment rectangle (for example, Figure 5-1, center image). You extend the bounds to include any ornamentation items in your view, scaling them to the alignment rectangle passed to this method.
Creating Constraints
The NSLayoutConstraint class lets you create constraints in two ways. You can use a rather long method call to constrain one item’s attribute to another, explaining how these attributes relate, or you can apply a rather nifty visual formatting language to specify how items are laid out along vertical and horizontal lines.
This section demonstrates both approaches, allowing you to see what they look like and how they are used. Remember this: Regardless of how you build your constraints, they all produce “y relation mx + b” results. All constraints are members of the NSLayoutConstraint class, no matter how you create them.
Basic Constraint Declarations
The NSLayoutConstraint’s class method constraintWithItem:attribute:relatedBy:toItem:attribute:multiplier:constant: (gesundheit!) creates a single constraint at a time. These constraints relate one item to another.
The creation method produces a strict view.attribute R view.attribute * multiplier + constant relation, where R is an equal-to (==), a greater-than-or-equal-to (>=), or a less-than-or-equal-to (<=) relation.
Consider the following example:
[self.view addConstraint:
[NSLayoutConstraint
constraintWithItem:textfield
attribute:NSLayoutAttributeCenterX
relatedBy:NSLayoutRelationEqual
toItem:self.view
attribute:NSLayoutAttributeCenterX
multiplier:1.0f
constant:0.0f]];
This call adds a new constraint to a view controller’s view (self.view). It horizontally center-aligns a text field within this view. It does this by setting an equality relation (NSLayoutRelationEqual) between the two views’ horizontal centers (NSLayoutAttributeCenterXattributes). The multiplier here is 1, and the offset constant is 0. This relates to the following equation:
[textfield]’s centerX = ([self.view]’s centerX * 1) + 0
It basically says, “Please ensure that my view’s center and the text field’s center are co-aligned at their X positions.” The UIView’s addConstraint: method adds that constraint to the view, where it is stored with any other constraints in the view’s constraints property.
Visual Format Constraints
The preceding section shows you how to create single constraint relations. A second NSLayoutConstraint class method builds constraints using a text-based visual format language. Think of it as ASCII art for Objective-C nerds. Here’s a simple example:
[self.view addConstraints: [NSLayoutConstraint
constraintsWithVisualFormat:@"V:[leftLabel]-15-[rightLabel]"
options:0
metrics:nil
views:NSDictionaryOfVariableBindings(leftLabel, rightLabel)]];
This request creates all the constraints that satisfy the relation or relations specified in the visual format string. These strings, which you will see in many examples in following sections, describe how views relate to each other along the horizontal (H) or vertical (V) axis. This example basically says, “Ensure that the right label appears 15 points below the left label.”
Note several things about how this constraints formatting example is created:
![]() The axis is specified first as a prefix, either H: or V:.
The axis is specified first as a prefix, either H: or V:.
![]() The variable names for views appear in square brackets in the strings.
The variable names for views appear in square brackets in the strings.
![]() The fixed spacing appears between the two as a number constant, -15-.
The fixed spacing appears between the two as a number constant, -15-.
![]() This example does not use any format options (the options parameter), but here is where you would specify whether the alignment is done left to right, right to left, or according to the leading-to-trailing direction for a given locale, discussed earlier in this chapter.
This example does not use any format options (the options parameter), but here is where you would specify whether the alignment is done left to right, right to left, or according to the leading-to-trailing direction for a given locale, discussed earlier in this chapter.
![]() The metrics dictionary, also not used in this example, lets you supply constant numbers into your constraints without having to create custom formats. For example, if you want to vary the spacing between these two text labels, you could replace 15 with a metric name (for example,labelOffset or something like it) and pass that metric’s value in a dictionary. Set the name as the key, the value as an NSNumber. Passing dictionaries (for example, @{@"labelOffset", @15}) is a lot easier than creating a new format NSString instance for each width you might use.
The metrics dictionary, also not used in this example, lets you supply constant numbers into your constraints without having to create custom formats. For example, if you want to vary the spacing between these two text labels, you could replace 15 with a metric name (for example,labelOffset or something like it) and pass that metric’s value in a dictionary. Set the name as the key, the value as an NSNumber. Passing dictionaries (for example, @{@"labelOffset", @15}) is a lot easier than creating a new format NSString instance for each width you might use.
![]() The views: parameter does not, despite its name, pass an array of views. It passes a dictionary of variable bindings. This dictionary associates variable name strings with the views they represent. This indirection allows you to use developer-meaningful symbols like leftLabel andrightLabel in your format strings.
The views: parameter does not, despite its name, pass an array of views. It passes a dictionary of variable bindings. This dictionary associates variable name strings with the views they represent. This indirection allows you to use developer-meaningful symbols like leftLabel andrightLabel in your format strings.
Building constraints with formats strings always creates an array of results. Some format strings are quite complex, and others are simple. It’s not always easy to guess how many constraints will be generated from each string. Be aware that you will need to add the entire collection of constraints to satisfy the format string that you processed.
Variable Bindings
When working with visual constraints, the layout system needs to be able to associate view names like leftLabel and rightLabel with the actual views they represent. Enter variable bindings, via a handy macro defined in NSLayoutConstraint.h, which is part of the UIKit headers.
The NSDictionaryOfVariableBindings() macro accepts an arbitrary number of local variable arguments. As you can see in the earlier example, these need not be terminated with a nil. The macro builds a dictionary from the passed variables, using the variable names as keys and the actual variables as values. For example, this function call:
NSDictionaryOfVariableBindings(leftLabel, rightLabel)
builds this dictionary:
@{@"leftLabel":leftLabel, @"rightLabel":rightLabel}
If you’d rather not use the variable bindings macro, you can easily create a dictionary by hand and pass it to the visual format constraints builder.
Format Strings
The format strings you pass to create constraints follow a basic grammar, which is specified as follows:
(<orientation>:)? (<superview><connection>)? <view>(<connection><view>)*
(<connection><superview>)?
The question marks refer to optional items, and the asterisk refers to an item that may appear zero or more times. Although daunting to look at, these strings are actually quite easy to construct. The next sections offer an introduction to format string elements and provide copious examples of their use.
Orientation
You start with an optional orientation—either H: for horizontal or V: for vertical alignment. This specifies whether the constraint applies left and right or up and down. If omitted, the orientation defaults to horizontal. Consider this constraint: "H:[view1][view2]". It says to place View 2 directly to the right of View 1. The H specifies the alignment that the constraint follows. Figure 5-2 (left) shows an interface that uses this rule.
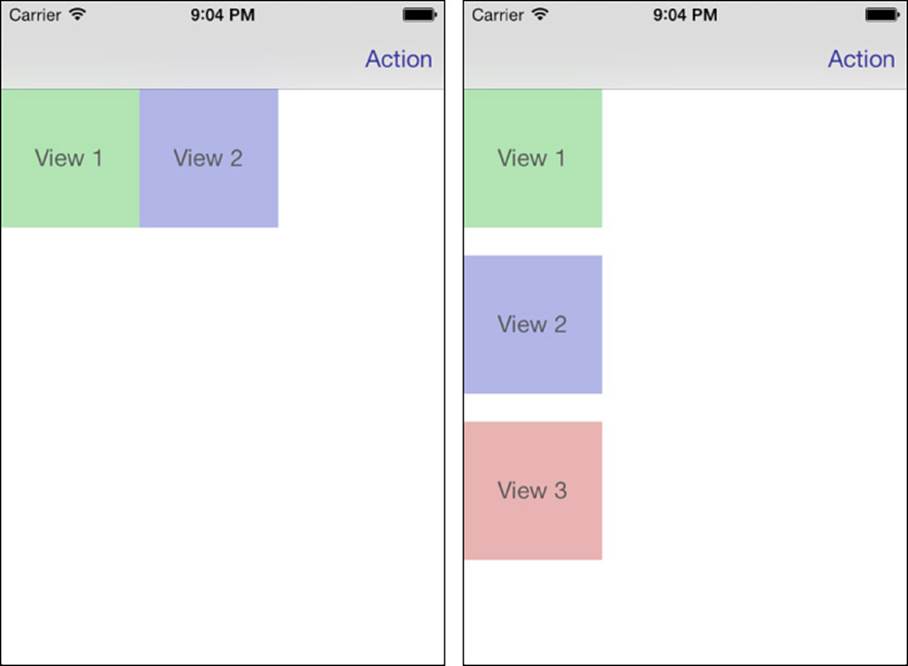
Figure 5-2 Layout results for "H:[view1][view2]" (left) and "V:|[view1]-20-[view2]-20-[view3]" (right).
The following is an example of a vertical layout: "V:|[view1]-20-[view2]-20-[view3]". It leaves a gap of 20 points below View 1 before placing View 2, followed again by a 20-point gap before View 3. Figure 5-2 (right) shows what this might look like.
Without further constraints, these views are severely underconstrained. Auto Layout will do what it thinks you want, but it’s often wrong. In the left image, you should also constrain the vertical layout. In this case, both views are aligned to the top of the superview. In the image to the right, the horizontal layout should be specified—aligning each view to the left, abutting the superview.
Here are the horizontal and vertical constraints, respectively, that were used in separate executions to create the images shown in Figure 5-2:
[self.view addConstraints:[NSLayoutConstraint
constraintsWithVisualFormat:@"H:[view1][view2]"
options:0 metrics:nil
views:NSDictionaryOfVariableBindings(view1, view2)]];
and:
[self.view addConstraints:[NSLayoutConstraint
constraintsWithVisualFormat:@"V:|[view1]-20-[view2]-20-[view3]"
options:0 metrics:nil
views:NSDictionaryOfVariableBindings(view1, view2, view3)]];
Note the use of the vertical bar (|) near the beginning in the format string above. The vertical bar always refers to the superview. You see it only at the beginning or ending of format strings. At the beginning, it appears just after the horizontal or vertical specifier ("V:|..." or "H:|..."). At the end, it appears just before the terminal quote ("...|"). In iOS 7, skipping the vertical bar in this example will cause the views to appear under the status and navigation bars.
Note
During debugging, you can use the constraintsAffectingLayoutForAxis: view method to retrieve all the constraints that affect either the horizontal or vertical layout access. Do not ship code with this method. It is not intended for deployment use, and Apple makes it clear that it is not App Store–safe.
Connections
Place connections between view names to specify the way a layout flows. An empty connection (in other words, one that has been omitted) means “follow on directly.”
The first constraint you saw for Figure 5-2, "H:[view1][view2]", uses an empty connection. There’s nothing specified between the square brackets of View 1 and the brackets of View 2. This tells the constraint to place View 2 directly to the right of View 1.
A hyphen (-) indicates a small fixed space. The constraint "H:[view1]-[view2]" uses a hyphen connection. This constraint leaves a standard (as defined by Apple) gap between View 1 and View 2, as shown in Figure 5-3.
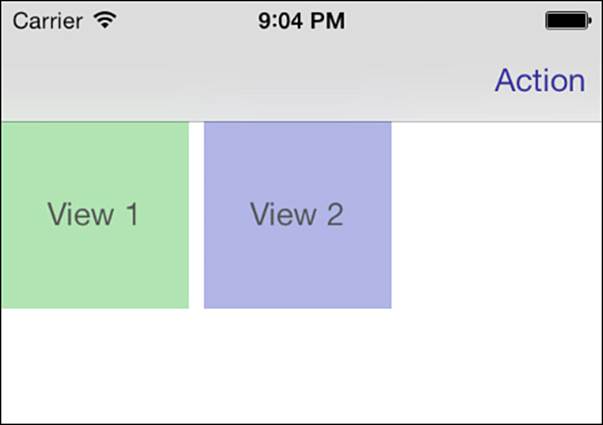
Figure 5-3 "H:[view1]-[view2]" adds a spacer connection.
Place a numeric constant between hyphens to set an exact gap size. The constraint "H:[view1]-30-[view2]" adds a 30-point gap between the two views, as shown in Figure 5-4. This is visibly wider than the small default gap produced by the single hyphen.
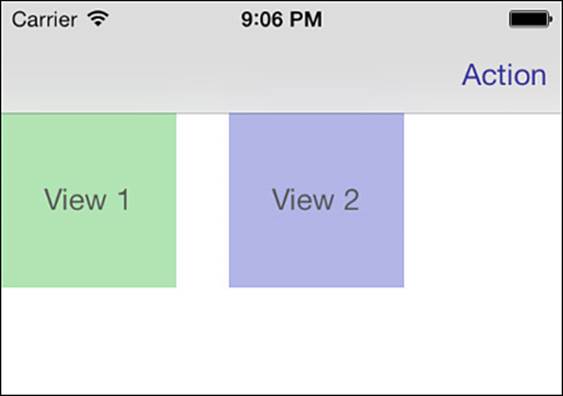
Figure 5-4 "H:[view1]-30-[view2]" uses a fixed-size gap of 30 points, producing a noticeably wider space.
The format "H:|[view1]-[view2]|" specifies a horizontal layout that starts with the superview. The superview is immediately followed by the first view, then a spacer, the second view, and then the superview, which you can see in Figure 5-5.
This constraint left-aligns View 1 and right-aligns View 2 with the superview. To accomplish this, something has to give. Either the left view or the right view must resize to meet these constraints. When we ran the test app for this edition, it happened to be View 1 that adjusted, which is what you see in Figure 5-5. In the previous edition, it happened to be View 2.
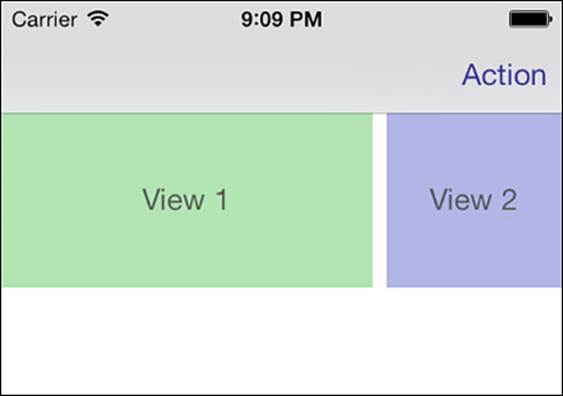
Figure 5-5 "H:|[view1]-[view2]|" tells both views to hug the edges of their superview. With a fixed-size gap between them, at least one of the views must resize to satisfy the constraint.
Often, you don’t want to bang up right against the superview edges. A similar constraint, "H:|-[view1]-[view2]-|", leaves an edge inset between the edges of the superview and the start of View 1 and end of View 2 (see Figure 5-6).

Figure 5-6 "H:|-[view1]-[view2]-|" introduces edge insets between the views and their superviews.
These gaps follow standard IB/Cocoa Touch layout rules and have not yet been exposed in specifics via the iOS API. The inset gaps at the edges are normally slightly larger than the default view-to-view gaps. You can see the gap size differences in the view layout created from this constraint in Figure 5-6.
If your goal is to add a flexible space between views, there’s a way to do that, too. Add a relation rule between the two views (for example, "H:|-[view1]-(>=0)-[view2]-|") to allow the two views to retain their sizes and be separate while maintaining gaps at their edges with the superview, as shown in Figure 5-7. This rule, which equates to “at least 0 points distance,” provides a more flexible way to let the views spread out. It is recommended to use a small number here so that you don’t inadvertently interfere with a view’s other geometry rules.
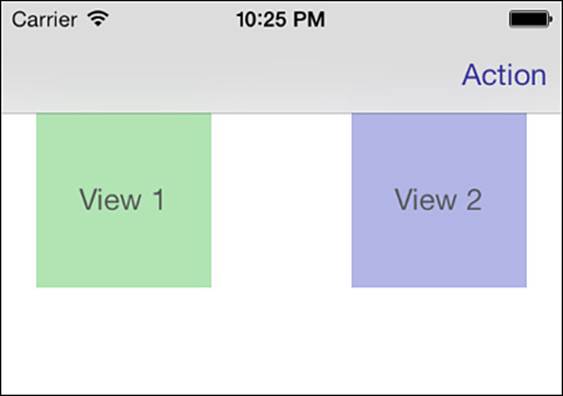
Figure 5-7 "H:|-[view1]-(>=0)-[view2]-|" uses a flexible space between the two views, allowing them to separate, while maintaining their sizes.
These constraints are not, of course, limited to just one or two views. You can easily stick in a third, fourth, or more. Consider this constraint: "H:|-[view1]-[view2]-(>=5)-[view3]-|". It adds a third view, separated from the other two views by a flexible space. Figure 5-8 shows what this might look like.
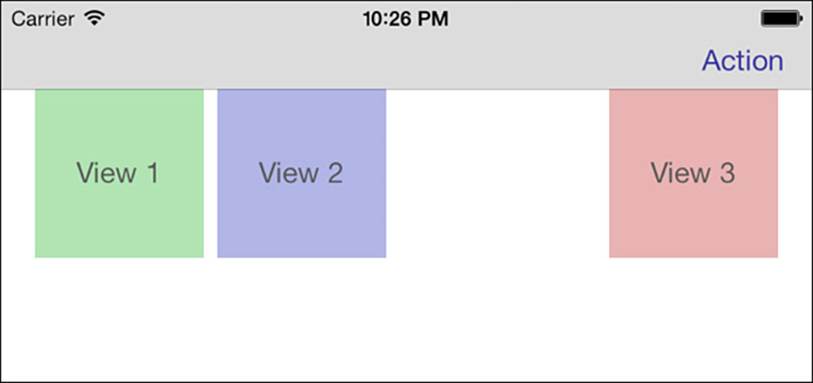
Figure 5-8 "H:|-[view1]-[view2]-(>=5)-[view3]-|" demonstrates a rule that includes three views.
Predicates
The last two examples in the previous section uses relationship rules with comparisons. These are also called predicates, an affirmation of the way a relation works between view elements. Predicates appear in parentheses. For example, you might specify that the size of a view is at least 50 points by using the following format:
[view1(>=50)]
This predicate relates to a single view. Notice that it is included within the view’s square brackets rather than as part of a connection between views. You’re not limited to a single request. For example, you might use a similar approach to let a view’s size range between 50 and 70 points. When adding compound predicates, separate the parts of your rule with commas:
[view1(>=50, <=70)]
Relative relation predicates allow your views to grow. If you want your view to expand across a superview, tell it to size itself to some value greater than zero. The following rule stretches a view horizontally across its superview, allowing only for edge insets at each side:
H:|-[view1(>=0)]-|
Figure 5-9 shows what this constraint looks like when rendered.
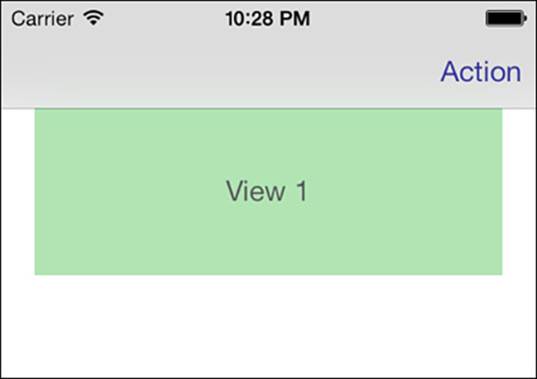
Figure 5-9 "H:|-[view1(>=0)]-|" adds a flexibility predicate to the view, letting it stretch across its parent. Edge insets offset it slightly from the superview’s sides.
When using an equality relationship (==), you can skip the double-equals in your format predicates. For example [view1(==120)] is equivalent to [view1(120)], and [view1]-(==50)-[view2] is the same as [view1]-50-[view2].
Metrics
When you don’t know a constant’s value (like 120 or 50) a priori, use a metrics dictionary to provide the value. This dictionary is passed as one of the parameters to the constraint creation method. Here is an example of a format string that uses a metric stand-in:
[view1(>=minwidth)]
The minwidth stand-in must map to an NSNumber value in the passed metric dictionary. For more examples of metric use, refer to Recipe 5-2’s constrainSize: method. It demonstrates how to use metrics, using values from an associated dictionary in its constraints.
View-to-View Predicates
Predicates aren’t limited to numeric constants. You can relate a view’s size to another view, for example, to ensure that it’s no bigger than that view in the layout. This example limits View 2’s extent to no bigger than that of View 1, along the axis that the constraint is currently using:
[view2(<=view1)]
You can’t do a lot more with format strings and view-to-view comparisons. If you want to establish more complex relationships, like those between centers, tops, and heights, skip the visual format strings and use the item constraint constructor instead.
Priorities
Each constraint may specify an optional priority by adding an at sign (@) and a number or metric. For example, you can say that you want a view to be 500 points wide but that the request has a relatively low priority:
[view1(500@10)]
You place priorities after predicates. Here’s an example of a layout format string with an embedded priority:
[view1]-(>=50@30)-[view2]
Format String Summary
Table 5-2 summarizes format string components used to create constraints with the constraintsWithVisualFormat:options:metrics:views: class method of NSLayoutConstraint.
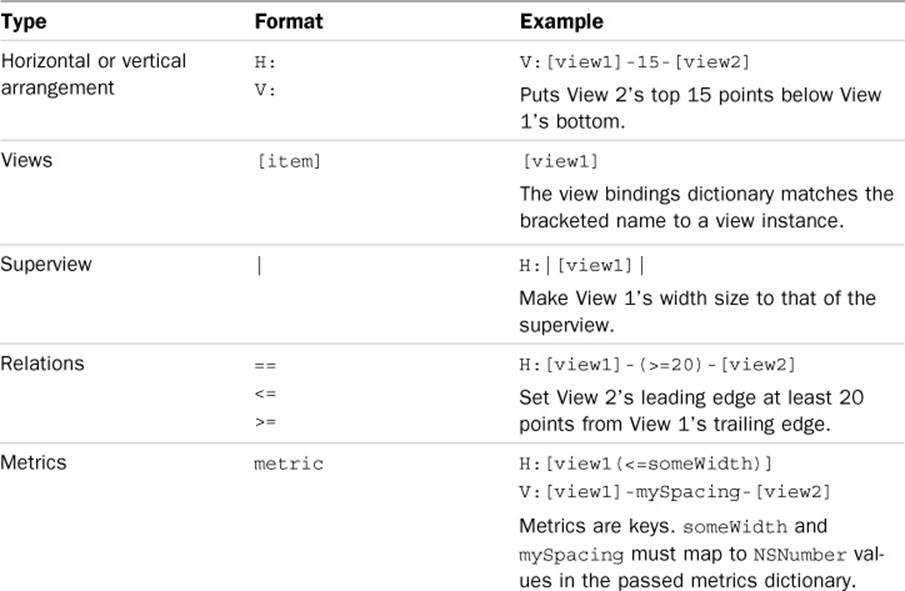
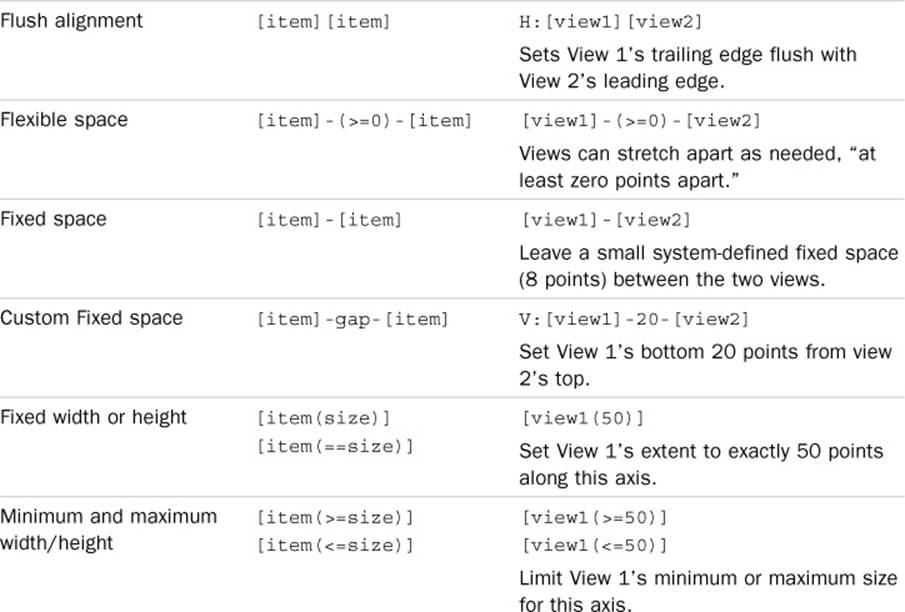
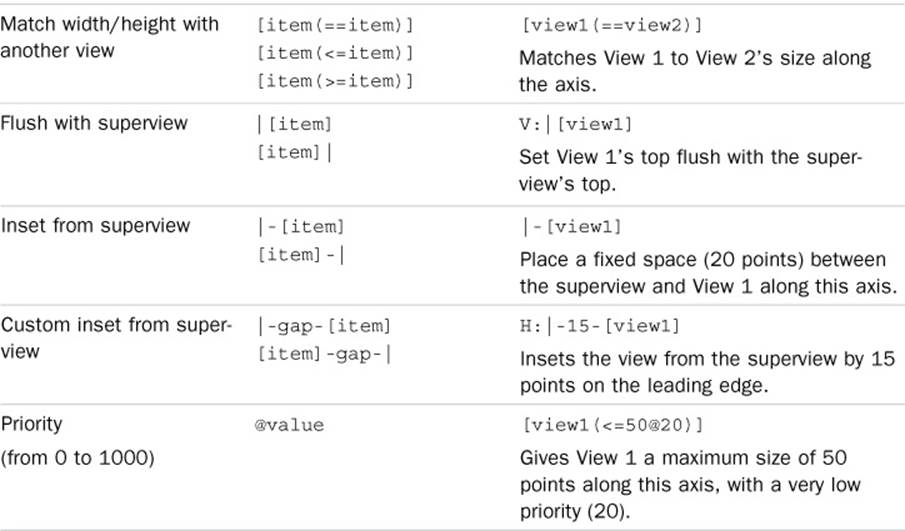
Table 5-2 Visual Format Strings
Aligning Views and Flexible Sizing
It is supremely easy to align views with constraints:
![]() The four format strings "H:|[self]", "H:[self]|", "V:|[self]", and "V:[self]|", respectively, produce left, right, top, and bottom alignment.
The four format strings "H:|[self]", "H:[self]|", "V:|[self]", and "V:[self]|", respectively, produce left, right, top, and bottom alignment.
![]() Add a predicate with a sizing relation, and these format strings become stretch to left, stretch to right, and so on: "H:|[self(>0)]", "H:[self(>0)]|", "V:|[self(>0)]", and "V:[self(>0)]|".
Add a predicate with a sizing relation, and these format strings become stretch to left, stretch to right, and so on: "H:|[self(>0)]", "H:[self(>0)]|", "V:|[self(>0)]", and "V:[self(>0)]|".
![]() A second vertical pipe adds full-axis resizing, allowing views to stretch from left to right or top to bottom: "H:|[self(>0)]|" or "V:|[self(>0)]|".
A second vertical pipe adds full-axis resizing, allowing views to stretch from left to right or top to bottom: "H:|[self(>0)]|" or "V:|[self(>0)]|".
![]() Add edge indicators to inset the stretches: "H:|-[self(>0)]-|" or "V:|-[self(>0)]-|".
Add edge indicators to inset the stretches: "H:|-[self(>0)]-|" or "V:|-[self(>0)]-|".
Constraint Processing
The display of a view’s content proceeds through multiple phases. Prior to Auto Layout, two phases were provided: the layout phase and the rendering phase. Auto Layout augments the traditional two phases by inserting a third phase to kick off the process—the constraint phase.
The layout phase allows a developer to modify the frame geometry of the view’s subviews by implementing the layoutSubviews method. When iOS determines the view’s layout to be invalid, this method will be called, and you can update the manual layout of your subviews. You can also request a relayout by calling setNeedsLayout or layoutIfNeeded. The first method is a polite request that allows iOS to coalesce multiple layout requests and call layoutSubviews at an appropriate time in the future. The second method is more demanding, resulting in a nearly immediate call to layoutSubviews.
The rendering phase allows for complete control over the drawing of the view’s UI by implementing the drawRect: method. When the view’s display is invalidated, the method will be called, allowing for low-level drawing into the view. If the rendering needs to be changed, you can request the view to be redrawn with setNeedsDisplay or setNeedsDisplayInRect:, triggering a call to drawRect:.
With Auto Layout, the constraints phase occurs prior to the preceding phases. This phase allows for the creation or updating of Auto Layout constraints through implementation of the updateConstraints method. Much like the layout phase, the constraints phase can be invalidated by iOS or manually, using the similarly named and behaving setNeedsUpdate-Constraints and updateConstraintsIfNeeded methods.
Importantly, any view that overrides updateConstraints should also call [super updateConstraints] as the final step before returning from the method. After the constraints phase completes, Auto Layout has appropriately calculated the frame geometry of all the subviews in the view.
When any of the above phases resolves, the next phase is triggered. The constraints phase triggers the layout phase, which triggers the rendering phase.
The progression of phases provides a somewhat unexpected opportunity. The layout phase occurs after the constraint phase has calculated and set all the frame geometry based on the assigned constraints. Once in the layout phase, you can make changes to a view’s frame geometry that may contradict the directions set forth by your constraints. You can even use the constraint-generated geometry to make decisions on the final layout of a view. Since the constraints have already been calculated, changing the frame geometry will “stick” until the next constraints phase. Be careful that your layout pass does not make constraint changes and trigger an infinite loop of layout and update constraint calls.
Most of the time, these hooks are not needed. On rare occasions when they’re required, the level of flexibility and control provided is empowering.
Managing Constraints
All constraints belong to the NSLayoutConstraint class, regardless of how they are created. When working with constraints, you can add them to your views either one by one, using addConstraint:, or in arrays by using the addConstraints: instance method (notice the s at the end of the name). In day-to-day work, you often deal with collections of constraints that are stored in arrays.
A constraint always has a natural home in the nearest common ancestor of the views involved in the constraint. A constraint must be installed on a common ancestor of every view referenced. A self-installing category method on NSLayoutConstraint can programmatically determine the natural and correct view for installation. This is left as an exercise for the reader.
Constraints can be added and removed at any time. The two methods, removeConstraint: and removeConstraints:, enable you to remove one or an array of constraints from a given view. Because these methods work on objects, they might not do what you expect them to do when you attempt to remove constraints.
Suppose, for instance, that you build a center-matching constraint and add it to your view. You cannot then build a second version of the constraint with the same rules and expect to remove the first by using a standard removeConstraint: call. They are equivalent constraints, but they are not the same constraint. Here’s an example of this conundrum:
[self.view addConstraint:
[NSLayoutConstraint constraintWithItem:textField
attribute:NSLayoutAttributeCenterX
relatedBy:NSLayoutRelationEqual
toItem:self.view
attribute:NSLayoutAttributeCenterX
multiplier:1.0f constant:0.0f]];
[self.view removeConstraint:
[NSLayoutConstraint constraintWithItem:textField
attribute:NSLayoutAttributeCenterX
relatedBy:NSLayoutRelationEqual
toItem:self.view
attribute:NSLayoutAttributeCenterX
multiplier:1.0f constant:0.0f]];
Executing these two method calls ends up as follows: The self.view instance contains the original constraint, and the attempt to remove the second constraint is ignored. Removing a constraint not held by the view has no effect.
You have two choices for resolving this. First, you can hold onto the constraint when it’s first added by storing it in a local variable. Here’s what that would look like, more or less:
NSLayoutConstraint *myConstraint =
[NSLayoutConstraint constraintWithItem:textField
attribute:NSLayoutAttributeCenterX
relatedBy:NSLayoutRelationEqual
toItem:self.view
attribute:NSLayoutAttributeCenterX
multiplier:1.0f constant:0.0f];
[self.view addConstraint:myConstraint];
// later
[self.view removeConstraint:myConstraint];
Or you can use a method (see Recipe 5-1) that compares constraints and removes a constraint that numerically matches the one you pass.
Knowing whether your constraints will be static (used for the lifetime of your view) or dynamic (updated as needed) helps you decide which approach you need. If you think you might need to remove a constraint in the future, either hold on to it via a local variable so that you can later remove it from your view or use workarounds like the one detailed in Recipe 5-1.
Here are some basic points you need to know about managing constraints:
![]() You can add constraints to and remove constraints from view instances. The core methods are addConstraint: (addConstraints:), removeConstraint: (removeConstraints:), and constraints. The last of these returns an array of constraints stored by the view.
You can add constraints to and remove constraints from view instances. The core methods are addConstraint: (addConstraints:), removeConstraint: (removeConstraints:), and constraints. The last of these returns an array of constraints stored by the view.
![]() Constraints are not limited to container views. Nearly any view can work with constraints. (A class method, requiresConstraintBasedLayout, specifies whether classes depend on constraints to operate properly.)
Constraints are not limited to container views. Nearly any view can work with constraints. (A class method, requiresConstraintBasedLayout, specifies whether classes depend on constraints to operate properly.)
![]() If you want to code a subview with constraints, switch off the subview’s translatesAutoresizingMaskIntoConstraints property. You’ll see this in action in the sample code for this chapter and further discussed in the “Debugging Your Constraints” section toward the end of this chapter.
If you want to code a subview with constraints, switch off the subview’s translatesAutoresizingMaskIntoConstraints property. You’ll see this in action in the sample code for this chapter and further discussed in the “Debugging Your Constraints” section toward the end of this chapter.
Recipe: Comparing Constraints
All constraints use a fixed structure in the following form, along with an associated priority:
view1.attribute (relation) view2.attribute * multiplier + constant
Each element of this equation is exposed through a constraint’s object properties—namely priority, firstItem, firstAttribute, relation, secondItem, secondAttribute, multiplier, and constant. These properties make it easy to compare two constraints.
Views store and remove constraints as objects. If two constraints are stored in separate memory locations, they’re considered unequal, even if they describe the same conditions. To allow your code to add and remove constraints on-the-fly without storing those items locally, use comparisons.
Recipe 5-1 introduces three methods. The constraint:matches: method compares the properties in two constraints to determine whether they match. Note that only the equation is considered, not the priority (although you can easily add this if you want), because two constraints describing the same conditions are essentially equivalent, regardless of the priority a developer has assigned to them.
The two other methods, constraintMatchingConstraint: and removeMatching-Constraint:, respectively, help locate the first matching constraint stored within a view and remove that matching constraint.
In Recipe 5-1, a view is bounced from the top and bottom of its superview by removing a matched constraint and replacing it with a new constraint. In this case, it might be easier to store this constraint as an instance variable for simple removal at a future point. That said, the ability to retrieve and remove a similar constraint can be very useful when working with many constraints or removing specific constraints dynamically.
Note
Recipe 5-1 implements a UIView class category. This category is used and expanded throughout this chapter to provide a set of utility methods you can use in your own applications.
Recipe 5-1 Comparing Constraints
@implementation UIView (ConstraintHelper)
// This ignores any priority, looking only at y (R) mx + b
- (BOOL)constraint:(NSLayoutConstraint *)constraint1
matches:(NSLayoutConstraint *)constraint2
{
if (constraint1.firstItem != constraint2.firstItem) return NO;
if (constraint1.secondItem != constraint2.secondItem) return NO;
if (constraint1.firstAttribute != constraint2.firstAttribute) return NO;
if (constraint1.secondAttribute != constraint2.secondAttribute) return NO;
if (constraint1.relation != constraint2.relation) return NO;
if (constraint1.multiplier != constraint2.multiplier) return NO;
if (constraint1.constant != constraint2.constant) return NO;
return YES;
}
// Find first matching constraint (priority ignored)
- (NSLayoutConstraint *)constraintMatchingConstraint:
(NSLayoutConstraint *)aConstraint
{
for (NSLayoutConstraint *constraint in self.constraints)
if ([self constraint:constraint matches:aConstraint])
return constraint;
for (NSLayoutConstraint *constraint in self.superview.constraints)
if ([self constraint:constraint matches:aConstraint])
return constraint;
return nil;
}
// Remove constraint
- (void)removeMatchingConstraint:(NSLayoutConstraint *)aConstraint
{
NSLayoutConstraint *match =
[self constraintMatchingConstraint:aConstraint];
if (match)
{
[self removeConstraint:match];
[self.superview removeConstraint:match];
}
}
@end
Get This Recipe’s Code
To find this recipe’s full sample project, point your browser to https://github.com/erica/iOS-7-Cookbook and go to the folder for Chapter 5.
Animating Constraints
Recipe 5-1 moves a view by removing a constraint that aligns the view to the top or bottom and adding an inverse constraint. The following snippet from Recipe 5-1 moves the view from the top to the bottom:
NSLayoutConstraint * constraintToMatch =
[NSLayoutConstraint constraintWithItem:view1
attribute:NSLayoutAttributeTop
relatedBy:NSLayoutRelationEqual toItem:self.view
attribute:NSLayoutAttributeTop multiplier:1.0f constant:0];
[self.view removeMatchingConstraint: constraintToMatch];
NSLayoutConstraint * updatedConstraint =
[NSLayoutConstraint constraintWithItem:view1
attribute:NSLayoutAttributeBottom
relatedBy:NSLayoutRelationEqual toItem:self.view
attribute:NSLayoutAttributeBottom multiplier:1.0f constant:0];
[self.view addConstraint:updatedConstraint];
[self.view layoutIfNeeded];
The layoutIfNeeded in the final line forces Auto Layout to reprocess the constraints and render the updated view. Unfortunately, this transition occurs abruptly. Animating the change in constraints is actually quite simple. All that is required is calling layoutIfNeeded from within an animation block:
[UIView animateWithDuration:0.3 animations:^{
[self.view layoutIfNeeded];
}];
The view will now animate from the top to bottom and back in the same manner as if you specified the actual origin values within the animation block manually.
Recipe: Creating Fixed-Size Constrained Views
When working with constraints, start thinking about your views in a new way. You don’t just set a frame and expect the view to stay where and how big you left it. Constraint layout uses an entirely new set of assumptions.
Here’s how you might have written a utility method to create a label before Auto Layout:
- (UILabel *)createLabelTheOldWay:(NSString *)title
{
UILabel *label = [[UILabel alloc]
initWithFrame:CGRectMake(0.0f, 0.0f, 100.0f, 100.0f)];
label.textAlignment = NSTextAlignmentCenter;
label.text = title;
return label;
}
With Auto Layout, you approach code-level view creation in a new way. Your code adds constraints that adjust the item’s size and position instead of building a fixed frame and setting its center.
Disabling Autoresizing Constraints
Autoresizing refers to the struts-and-springs layout tools used in IB and to the autoresizing flags, like UIViewAutoresizingFlexibleWidth, used in code. When you lay out a view’s resizing behavior with these approaches, that view should not be referred to in any constraints you define.
When you move into the constraints world, you start by disabling a view property that automatically translates autoresizing masks into constraints. As a rule, you either enable this, allowing the view to participate in the constraint system via its autoresizing mask, or you disable it entirely and manually add your own constraints.
The constraints-specific property in question is translatesAutoresizingMaskInto-Constraints. Setting this to NO ensures that you can add constraints without conflicting with the automated system. This is pretty important. If you fail to disable the property and start using constraints, you’ll generate constraint conflicts. The autoresizing constraints won’t coexist peacefully with ones you write directly. Here’s an example of a runtime error message that results:
2012-06-24 15:34:54.839 HelloWorld[64834:c07] Unable to simultaneously satisfy
constraints.
Probably at least one of the constraints in the following list is one you don't
want. Try this: (1) look at each constraint and try to figure out which you don't
expect; (2) find the code that added the unwanted constraint or constraints and
fix it. (Note: If you're seeing NSAutoresizingMaskLayoutConstraints that you don't
understand, refer to the documentation for the UIView property
translatesAutoresizingMaskIntoConstraints)
(
"<NSLayoutConstraint:0x6ec9430 H:[UILabel:0x6ec5210(100)]>",
"<NSAutoresizingMaskLayoutConstraint:0x6b8e2a0
h=--& v=--& H:[UILabel:0x6ec5210(0)]>"
)
Will attempt to recover by breaking constraint
<NSLayoutConstraint:0x6ec9430 H:[UILabel:0x6ec5210(100)]>
Break on objc_exception_throw to catch this in the debugger.
Choosing between autoresizing layout and constraints layout is an important part of your coding work.
Starting Within View Bounds
The first method in Recipe 5-2, constrainWithinSuperviewBounds, requests that a view be placed entirely within its superview’s bounds. It creates four constraints to ensure this. One requires that the view’s left side be at or to the right of the superview’s left side, another that the view’s top be at or below the superview’s top, and so forth.
The reason for creating this method is that in a loosely constrained system, it’s entirely possible that your views will disappear offscreen with negative origins. This method basically says, “Please respect the (0,0) origin and the size of the superview when placing my subviews.”
In most real-world development, this set of constraints is not normally necessary. Such constraints are particularly useful, however, when you’re first getting started and want to explore constraints from code. They allow you to test small constraint systems while ensuring that the views you’re exploring remain visible so that you can see how they relate to each other.
In addition, as you get up to speed with constraints, you’ll probably want to add some sort of debugging feedback to let you know where your views end up once your primary view loads and your constraints fire. Consider adding the following loop to your viewDidAppear: method:
- (void)viewDidAppear:(BOOL)animated
{
[super viewDidAppear:animated];
for (UIView *subview in self.view.subviews)
NSLog(@"View (%d) location: %@",
[self.view.subviews indexOfObject:subview],
NSStringFromCGRect(subview.frame));
}
Constraining Size
Recipe 5-2’s second method, constrainSize:, fixes a view’s extent to the CGSize you specify. This is a common task when working with constraints. You cannot just set the frame the way you’re used to setting it. And, again, remember that your constraints are requests, not specific layouts. If your constraints are not well formed, your 100-point-wide text field may end up 107 points wide in deployment—or worse.
You can define constraints that request a specific width or height for a given view, but the sizes for the two constraints can’t be known ahead of time. The method is meant for use across a wide variety of views. Therefore, the sizes are passed to the constraint as metrics. Metrics basically act as numeric constraint variables.
These particular constraints use two metric names: "theHeight" and "theWidth". The names are completely arbitrary. As a developer, you specify the strings, which correspond to keys in the metrics: parameter dictionary. You pass this dictionary as an argument in the constraint-creation call. When working with metrics, each key must appear in the passed dictionary, and its value must be an NSNumber.
The two constraints in this method set the desired horizontal and vertical sizes for the view. The format strings ("H:[self(theWidth)]" and "V:[self(theHeight)]") tell the constraint system how large the view should be along each axis.
A third method, constrainPosition:, builds constraints that fix the origin of a view within its superview. Note the use of the constant to create offsets in this method.
Putting It Together
Using these tools, we can replace the old label-creation method above with a much more powerful variant that uses Auto Layout:
- (UILabel *)createLabelWithTitle:(NSString *)title
onParent:(UIView *)parentView
{
UILabel *label = [[UILabel alloc] init];
label.textAlignment = NSTextAlignmentCenter;
label.text = title;
// Add label to parent view so constraints can be added
[parentView addSubview:label];
// Turn off automatic translation of autoresizing masks into constraints
label.translatesAutoresizingMaskIntoConstraints = NO;
// Add constraints
[label constrainWithinSuperviewBounds];
[label constrainSize:CGSizeMake(100, 100)];
[label constrainPosition:CGPointMake(50, 50)];
return label;
}
Before adding constraints that relate the label above and its superview, the label must be added as a subview to the parent view. Adding constraints to views or relating views that are not in the same view hierarchy will result in unexpected behavior at best or, more likely, a runtime crash. This may require a slight reordering in your view instantiation, such as the variations above that include adding the label to the parent view.
No matter how you restructure your view generation, maintain the following order: Create your views, add them to their parent view, disable the automatic translation of autoresizing masks, and, finally, apply the necessary constraints.
Recipe 5-2 Basic Size Constraints
@implementation UIView (ConstraintHelper)
- (void)constrainWithinSuperviewBounds
{
if (!self.superview) return;
// Constrain the top, bottom, left, and right to
// within the superview's bounds
[self.superview addConstraint:[NSLayoutConstraint
constraintWithItem:self attribute:NSLayoutAttributeLeft
relatedBy:NSLayoutRelationGreaterThanOrEqual
toItem:self.superview attribute:NSLayoutAttributeLeft
multiplier:1.0f constant:0.0f]];
[self.superview addConstraint:[NSLayoutConstraint
constraintWithItem:self attribute:NSLayoutAttributeTop
relatedBy:NSLayoutRelationGreaterThanOrEqual
toItem:self.superview attribute:NSLayoutAttributeTop
multiplier:1.0f constant:0.0f]];
[self.superview addConstraint:[NSLayoutConstraint
constraintWithItem:self attribute:NSLayoutAttributeRight
relatedBy:NSLayoutRelationLessThanOrEqual
toItem:self.superview attribute:NSLayoutAttributeRight
multiplier:1.0f constant:0.0f]];
[self.superview addConstraint:[NSLayoutConstraint
constraintWithItem:self attribute:NSLayoutAttributeBottom
relatedBy:NSLayoutRelationLessThanOrEqual
toItem:self.superview attribute:NSLayoutAttributeBottom
multiplier:1.0f constant:0.0f]];
}
- (void)constrainSize:(CGSize)aSize
{
NSMutableArray *array = [NSMutableArray array];
// Fix the width
[array addObjectsFromArray:[NSLayoutConstraint
constraintsWithVisualFormat:@"H:[self(theWidth@750)]"
options:0 metrics:@{@"theWidth":@(aSize.width)}
views:NSDictionaryOfVariableBindings(self)]];
// Fix the height
[array addObjectsFromArray:[NSLayoutConstraint
constraintsWithVisualFormat:@"V:[self(theHeight@750)]"
options:0 metrics:@{@"theHeight":@(aSize.height)}
views:NSDictionaryOfVariableBindings(self)]];
[self addConstraints:array];
}
- (void)constrainPosition:(CGPoint)aPoint
{
if (!self.superview) return;
NSMutableArray *array = [NSMutableArray array];
// X position
[array addObject:[NSLayoutConstraint constraintWithItem:self
attribute:NSLayoutAttributeLeft relatedBy:NSLayoutRelationEqual
toItem:self.superview attribute:NSLayoutAttributeLeft
multiplier:1.0f constant:aPoint.x]];
// Y position
[array addObject:[NSLayoutConstraint constraintWithItem:self
attribute:NSLayoutAttributeTop relatedBy:NSLayoutRelationEqual
toItem:self.superview attribute:NSLayoutAttributeTop
multiplier:1.0f constant:aPoint.y]];
[self.superview addConstraints:array];
}
@end
Get This Recipe’s Code
To find this recipe’s full sample project, point your browser to https://github.com/erica/iOS-7-Cookbook and go to the folder for Chapter 5.
Recipe: Centering Views
To center views, associate their center properties (centerX and centerY) with the corresponding properties in their container. Recipe 5-3 introduces a pair of methods that retrieve a view’s superview and apply the equality relation between their centers.
Notice that these constraints are added to a parent view and not the child view. This is because constraints cannot reference views outside their own subtree. Here’s the error that’s generated if you attempt to do otherwise:
2012-06-24 16:09:14.736 HelloWorld[65437:c07] *** Terminating app due to uncaught
exception 'NSGenericException', reason: 'Unable to install constraint on view.
Does the constraint reference something from outside the subtree of the view?
That's illegal. constraint:<NSLayoutConstraint:0x6b6ebf0 UILabel:0x6b68e40.centerY
== UIView:0x6b64a00.centerY> view:<UILabel: 0x6b68e40; frame = (0 0; 0 0); text =
'View 1'; clipsToBounds = YES; userInteractionEnabled = NO; layer = <CALayer:
0x6b67220>>'
libc++abi.dylib: terminate called throwing an exception
Here are a couple of simple rules:
![]() When creating constraints, add them to the superview when the superview is mentioned, as either the first or second item of the constraint.
When creating constraints, add them to the superview when the superview is mentioned, as either the first or second item of the constraint.
![]() When working with format strings, add to the superview when the string contains the superview vertical pipe symbol anywhere.
When working with format strings, add to the superview when the string contains the superview vertical pipe symbol anywhere.
Recipe 5-3 Centering Views with Constraints
@implementation UIView (ConstraintHelper)
- (void)centerHorizontallyInSuperview
{
if (!self.superview) return;
[self.superview addConstraint:[NSLayoutConstraint
constraintWithItem:self attribute:NSLayoutAttributeCenterX
relatedBy:NSLayoutRelationEqual
toItem:self.superview attribute:NSLayoutAttributeCenterX
multiplier:1.0f constant:0.0f]];
}
- (void)centerVerticallyInSuperview
{
if (!self.superview) return;
[self.superview addConstraint:[NSLayoutConstraint
constraintWithItem:self attribute:NSLayoutAttributeCenterY
relatedBy:NSLayoutRelationEqual
toItem:self.superview attribute:NSLayoutAttributeCenterY
multiplier:1.0f constant:0.0f]];
}
@end
Get This Recipe’s Code
To find this recipe’s full sample project, point your browser to https://github.com/erica/iOS-7-Cookbook and go to the folder for Chapter 5.
Recipe: Setting Aspect Ratio
Constraint multipliers, the m of the y = m * x + b equation, can help set aspect ratios for your views. Recipe 5-4 demonstrates how to do this by relating a view’s height (y) to its width (x) and setting the m value to the aspect. Recipe 5-4 builds an NSLayoutRelationEqual relationship between the width and height of a view, using the aspect ratio as the multiplier.
The recipe applies its aspect updates by managing a fixed constraint, which it stores locally in an NSLayoutConstraint variable called aspectConstraint. Each time the user toggles the aspect from 16:9 to 4:3 or back, this recipe removes the previous constraint and creates and then stores another one. It builds this new constraint by setting the appropriate multiplier and then adds it to the view.
To allow the view’s sides some flexibility, while keeping the view reasonably large, the createLabel method in this recipe does two things. First, it uses width and height predicates. These request that each side exceed 300 points in length. Second, it prioritizes its requests. These priorities are high (750) but not required (1000), so the constraint system retains the power to adjust them as needed. The outcome is a system that can change aspects in real time and dynamically change its layout definition at runtime.
For readability, the aspect ratio constraint creation is embedded in the code in Recipe 5-4, but it can easily be added to the ConstraintHelper category.
Aspect ratio constraints can also be used for great effect with images to maintain the natural image aspect ratio. A view’s content mode may not sufficiently preserve its natural image aspect. Utilize the size property provided by UIImage to build a natural aspect ratio constraint by dividing its width by its height.
Recipe 5-4 Creating Aspect Ratio Constraints
- (UILabel *)createLabelWithTitle:(NSString *)title onParent:(UIView *)parentView
{
UILabel *label = [[UILabel alloc] init];
label.textAlignment = NSTextAlignmentCenter;
label.text = title;
label.backgroundColor = [UIColor greenColor];
[parentView addSubview:label];
// Turn off automatic translation of autoresizing masks into constraints
label.translatesAutoresizingMaskIntoConstraints = NO;
// Add constraints
[label constrainWithinSuperviewBounds];
[label addConstraints:[NSLayoutConstraint
constraintsWithVisualFormat:@"H:[label(>=theWidth@750)]"
options:0 metrics:@{@"theWidth":@300.0}
views:NSDictionaryOfVariableBindings(label)]];
[label addConstraints:[NSLayoutConstraint
constraintsWithVisualFormat:@"V:[label(>=theHeight@750)]"
options:0 metrics:@{@"theHeight":@300.0}
views:NSDictionaryOfVariableBindings(label)]];
[label centerInSuperview];
return label;
}
- (void)toggleAspectRatio
{
if (aspectConstraint)
[self.view removeConstraint:aspectConstraint];
if (useFourToThree)
aspectConstraint = [NSLayoutConstraint
constraintWithItem:view1
attribute:NSLayoutAttributeWidth
relatedBy:NSLayoutRelationEqual toItem:view1
attribute:NSLayoutAttributeHeight
multiplier:(4.0f / 3.0f) constant:0.0f];
else
aspectConstraint = [NSLayoutConstraint
constraintWithItem:view1
attribute:NSLayoutAttributeWidth
relatedBy:NSLayoutRelationEqual toItem:view1
attribute:NSLayoutAttributeHeight
multiplier:(16.0f / 9.0f) constant:0.0f];
[self.view addConstraint:aspectConstraint];
useFourToThree = !useFourToThree;
}
Get This Recipe’s Code
To find this recipe’s full sample project, point your browser to https://github.com/erica/iOS-7-Cookbook and go to the folder for Chapter 5.
Recipe: Responding to Orientation Changes
A device’s screen geometry may influence how you want to lay out interfaces. For example, a landscape aspect ratio may not provide enough vertical range to fit in all your content. Consider Figure 5-10. The portrait layout places the iTunes album art on top of the album name, the artist name, and a Buy button, with the album price. The landscape layout moves the album art to the left and places the album name, artist, and Buy button in the lower-right corner.

Figure 5-10 The same content in portrait and landscape layouts.
To accomplish this, your layout constraints must be orientation aware. The updateViewControllerConstraints method in Recipe 5-5 refreshes your constraints, based on the current orientation. This includes removing all existing constraints and setting new constraints. Call this method in willAnimateRotationToInterfaceOrientation:duration:. This creates a smooth visual update that matches the animation of the rest of the interface. In addition, this rotation method occurs after the view controller’s interfaceOrientation property has been set to the new orientation (unlike willRotateToInterfaceOrientation: duration:). When interface orientation is evaluated in the update method to generate the appropriate constraints, it will be set correctly.
Recipe 5-5 uses a number of constraint macros that are detailed near the end of the chapter.
Recipe 5-5 Updating View Constraints
- (void)updateViewControllerConstraints
{
[self.view removeConstraints:self.view.constraints];
NSDictionary *bindings = NSDictionaryOfVariableBindings(
imageView, titleLabel, artistLabel, button);
if (IS_IPAD ||
UIDeviceOrientationIsPortrait(self.interfaceOrientation) ||
(self.interfaceOrientation == UIDeviceOrientationUnknown))
{
for (UIView *view in @[imageView,
titleLabel, artistLabel, button])
{
CENTER_VIEW_H(self.view, view);
}
CONSTRAIN_VIEWS(self.view, @"V:|-80-[imageView]-30-\
[titleLabel(>=0)]-[artistLabel]-15-[button]-(>=0)-|",
bindings);
}
else
{
// Center image view on left
CENTER_VIEW_V(self.view, imageView);
// Lay out remaining views
CONSTRAIN(self.view, imageView, @"H:|-[imageView]");
CONSTRAIN(self.view, titleLabel, @"H:[titleLabel]-15-|");
CONSTRAIN(self.view, artistLabel, @"H:[artistLabel]-15-|");
CONSTRAIN(self.view, button, @"H:[button]-15-|");
CONSTRAIN_VIEWS(self.view, @"V:|-(>=0)-[titleLabel(>=0)]\
-[artistLabel]-15-[button]-|", bindings);
// Make sure titleLabel doesn't overlap
CONSTRAIN_VIEWS(self.view,
@"H:[imageView]-(>=0)-[titleLabel]", bindings);
}
}
// Catch rotation changes
- (void)willAnimateRotationToInterfaceOrientation:
(UIInterfaceOrientation)toInterfaceOrientation
duration:(NSTimeInterval)duration
{
[super willAnimateRotationToInterfaceOrientation:
toInterfaceOrientation duration:duration];
[self updateViewControllerConstraints];
}
Get This Recipe’s Code
To find this recipe’s full sample project, point your browser to https://github.com/erica/iOS-7-Cookbook and go to the folder for Chapter 5.
Debugging Your Constraints
The most common problems you encounter when adding constraints programmatically are ambiguous and unsatisfiable layouts. Expect to spend a lot of time at the Xcode debugging console and don’t be surprised when you see a large dump of information that starts with the phrase “Unable to simultaneously satisfy constraints.”
iOS does its best at runtime to let you know which constraints could not be satisfied and which constraints it has to break in order to proceed. Often, it suggests a list of constraints that you should evaluate to see which item is causing the problem. This usually looks something like this:
Probably at least one of the constraints in the following list is one you don't
want. Try this: (1) look at each constraint and try to figure out which you don't
expect; (2) find the code that added the unwanted constraint or constraints and
fix it. (Note: If you're seeing NSAutoresizingMaskLayoutConstraints that you don't
understand, refer to the documentation for the UIView property
translatesAutoresizingMaskIntoConstraints)
(
"<NSAutoresizingMaskLayoutConstraint:0x6e5bc90 h=-&- v=-&-
UILayoutContainerView:0x6e540f0.height == UIWindow:0x6e528a0.height>",
"<NSAutoresizingMaskLayoutConstraint:0x6e5a5e0 h=-&- v=-&-
UINavigationTransitionView:0x6e55650.height ==
UILayoutContainerView:0x6e540f0.height>",
"<NSAutoresizingMaskLayoutConstraint:0x6e592f0 h=-&- v=-&-
UIViewControllerWrapperView:0x6bb90d0.height ==
UINavigationTransitionView:0x6e55650.height - 64>",
"<NSAutoresizingMaskLayoutConstraint:0x6e57b90 h=-&- v=-&-
UIView:0x6baef20.height == UIViewControllerWrapperView:0x6bb90d0.height>",
"<NSAutoresizingMaskLayoutConstraint:0x6e5cd40 h=--- v=---
V:[UIWindow:0x6e528a0(480)]>",
"<NSAutoresizingMaskLayoutConstraint:0x6bbe890 h=--& v=--&
UILabel:0x6bb3730.midY ==>",
"<NSLayoutConstraint:0x6bb8cc0 UILabel:0x6bb3730.centerY ==
UIView:0x6baef20.centerY>"
)
If you get a message like this, most likely, you have forgotten to switch off translatesAutoresizingMaskIntoConstraints for one of your views. If you see an NSAutoresizingMaskLayoutConstraint listed, and it’s associated with, for example, a UILabel that you’re laying out (as is the case here), this is a big hint about where your problem lies. The two constraints that are causing the issue are highlighted in the preceding snippet.
In other cases, you might have required constraints that are simply in conflict with each other because one contradicts what the other one is saying. In the dump above, constraints required a view be both center-aligned and left-aligned. To keep going, the layout system had to make a choice. It decided to cancel the y-centering requirement, allowing the view to align with the top of its parent:
Will attempt to recover by breaking constraint
<NSLayoutConstraint:0x6e94250 UILabel:0x6b90e00.centerY ==
UIView:0x6b8ca50.centerY>
Although constraint dumps can be scary, certain strategies lend a hand. First, when working in code, develop your constraints a little at a time. This helps you determine when things start to break. Second, consider using the macros from the upcoming Listing 5-1. There’s no reason to clutter up your code with “align with superview” and “set size to n by m” over and over again. Finally, if you’re not required to set your constraints in code, consider using the IB tools provided to make your visual layout life easier.
Recipe: Describing Constraints
When developing and debugging constraints, you may find it useful to produce human-readable descriptions of arbitrary NSLayoutConstraints. Recipe 5-6 builds concise strings that describe constraints as equations, as follows:
![]() (1000)[UILabel:6bb32a0].right <= [self].right
(1000)[UILabel:6bb32a0].right <= [self].right
![]() (750)[self].width == ([self].height * 1.778)
(750)[self].width == ([self].height * 1.778)
![]() (750)[UILabel:6bb32a0].leading == ([UILabel:6ed2e70].trailing + 60.000)
(750)[UILabel:6bb32a0].leading == ([UILabel:6ed2e70].trailing + 60.000)
This recipe transforms constraint instances into these textual presentations. It does so in the context of the view whose constraints are being considered (and hence the references to self and superview, in addition to specific subviews that are listed by class and memory address).
Notice that not every constraint includes two items. A constraint may refer only to itself (as in the second example, which sets its width as a multiplier of its height). In these cases, the item2 property is invariably nil.
Recipe 5-6 Describing Constraints
@implementation UIView (ConstraintHelper)
// Return a string that describes an attribute
- (NSString *)nameForLayoutAttribute:(NSLayoutAttribute)anAttribute
{
switch (anAttribute)
{
case NSLayoutAttributeLeft: return @"left";
case NSLayoutAttributeRight: return @"right";
case NSLayoutAttributeTop: return @"top";
case NSLayoutAttributeBottom: return @"bottom";
case NSLayoutAttributeLeading: return @"leading";
case NSLayoutAttributeTrailing: return @"trailing";
case NSLayoutAttributeWidth: return @"width";
case NSLayoutAttributeHeight: return @"height";
case NSLayoutAttributeCenterX: return @"centerX";
case NSLayoutAttributeCenterY: return @"centerY";
case NSLayoutAttributeBaseline: return @"baseline";
case NSLayoutAttributeNotAnAttribute: return @"not-an-attribute";
default: return @"unknown-attribute";
}
}
// Return a name that describes a layout relation
- (NSString *)nameForLayoutRelation:(NSLayoutRelation)aRelation
{
switch (aRelation)
{
case NSLayoutRelationLessThanOrEqual: return @"<=";
case NSLayoutRelationEqual: return @"==";
case NSLayoutRelationGreaterThanOrEqual: return @">=";
default: return @"unknown-relation";
}
}
// Describe a view in its own context
- (NSString *)nameForItem:(id)anItem
{
if (!anItem) return @"nil";
if (anItem == self) return @"[self]";
if (anItem == self.superview) return @"[superview]";
return [NSString stringWithFormat:@"[%@:%d]", [anItem class], (int) anItem];
}
// Transform the constraint into a string representation
- (NSString *)constraintRepresentation:(NSLayoutConstraint *)aConstraint
{
NSString *item1 = [self nameForItem:aConstraint.firstItem];
NSString *item2 = [self nameForItem:aConstraint.secondItem];
NSString *relation =
[self nameForLayoutRelation:aConstraint.relation];
NSString *attr1 =
[self nameForLayoutAttribute:aConstraint.firstAttribute];
NSString *attr2 =
[self nameForLayoutAttribute:aConstraint.secondAttribute];
NSString *result;
if (!aConstraint.secondItem)
{
result = [NSString stringWithFormat:@"(%4.0f) %@.%@ %@ %0.3f",
aConstraint.priority, item1, attr1,
relation, aConstraint.constant];
}
else if (aConstraint.multiplier == 1.0f)
{
if (aConstraint.constant == 0.0f)
result = [NSString stringWithFormat:@"(%4.0f) %@.%@ %@ %@.%@",
aConstraint.priority, item1, attr1,
relation, item2, attr2];
else
result = [NSString stringWithFormat:
@"(%4.0f) %@.%@ %@ (%@.%@ + %0.3f)",
aConstraint.priority, item1, attr1, relation,
item2, attr2, aConstraint.constant];
}
else
{
if (aConstraint.constant == 0.0f)
result = [NSString stringWithFormat:
@"(%4.0f) %@.%@ %@ (%@.%@ * %0.3f)",
aConstraint.priority, item1, attr1, relation,
item2, attr2, aConstraint.multiplier];
else
result = [NSString stringWithFormat:
@"(%4.0f) %@.%@ %@ ((%@.%@ * %0.3f) + %0.3f)",
aConstraint.priority, item1, attr1, relation,
item2, attr2, aConstraint.multiplier,
aConstraint.constant];
}
return result;
}
- (void)showConstraints
{
NSString *viewName = [NSString stringWithFormat:
@"[%@:%d]", [self class], (int) self];
NSLog(@"View %@ has %d constraints",
viewName, self.constraints.count);
for (NSLayoutConstraint *constraint in self.constraints)
NSLog(@"%@", [self constraintRepresentation:constraint]);
printf("\n");
}
@end
Get This Recipe’s Code
To find this recipe’s full sample project, point your browser to https://github.com/erica/iOS-7-Cookbook and go to the folder for Chapter 5.
Constraint Macros
Constraints provide reliable components for view layout. That said, in their native form, constraints are both overly verbose and fundamentally redundant. You end up implementing the same complex hard-to-read calls over and over again.
Debugging constraints is a real pain. Simple typos take too much effort, and constraints tend to be the same from app to app. A repository of predefined macros saves time and increases the readability and reliability of the view layout sections. Instead of centering a view inside another view and having to debug that layout each time you implement it, a single CENTER_VIEW macro does the job consistently each time.
Creating macros, as shown in Listing 5-1, shifts the work from producing exact constraint definitions to ensuring that constraints are consistent and sufficient across each entire view. These two conditions should form the focus of your view layout work.
Macros
Listing 5-1 shows a comprehensive set of macro definitions. These have been tested and are used in many recipes in this book, although they approach constraints in a fairly simple manner. Note that these macros do not return the constraints but actually add the constraints to the appropriate view. If you need to maintain access to newly created constraints for later removal, you can easily add macros that return the constraints or use the functionality in Recipe 5-1 to locate and remove constraints.
Another addition is not included in Listing 5-1 due to space limitations but is occasionally handy: variants that accept constraint constants. Such a variant can be particularly useful when aligning views to their parent and is trivial to add to your constraint macros library. You need to gauge the level of complexity and flexibility you need to expose in your constraint code and amend as necessary.
For the macro-averse, possible alternatives include using a function library or creating a constraint category on UIView. Decide what works best for your code style and layout needs and then build and refine your utility library over time.
Listing 5-1 Constraint Macros
// Prepare Constraint Compliance
#define PREPCONSTRAINTS(VIEW) \
[VIEW setTranslatesAutoresizingMaskIntoConstraints:NO]
// Add a visual format constraint
#define CONSTRAIN(PARENT, VIEW, FORMAT) \
[PARENT addConstraints:[NSLayoutConstraint \
constraintsWithVisualFormat:(FORMAT) options:0 metrics:nil \
views:NSDictionaryOfVariableBindings(VIEW)]]
#define CONSTRAIN_VIEWS(PARENT, FORMAT, BINDINGS) \
[PARENT addConstraints:[NSLayoutConstraint \
constraintsWithVisualFormat:(FORMAT) options:0 metrics:nil \
views:BINDINGS]]
// Stretch across axes
#define STRETCH_VIEW_H(PARENT, VIEW) \
CONSTRAIN(PARENT, VIEW, @"H:|["#VIEW"(>=0)]|")
#define STRETCH_VIEW_V(PARENT, VIEW) \
CONSTRAIN(PARENT, VIEW, @"V:|["#VIEW"(>=0)]|")
#define STRETCH_VIEW(PARENT, VIEW) \
{STRETCH_VIEW_H(PARENT, VIEW); STRETCH_VIEW_V(PARENT, VIEW);}
// Center along axes
#define CENTER_VIEW_H(PARENT, VIEW) \
[PARENT addConstraint:[NSLayoutConstraint \
constraintWithItem:VIEW attribute: NSLayoutAttributeCenterX \
relatedBy:NSLayoutRelationEqual \
toItem:PARENT attribute:NSLayoutAttributeCenterX \
multiplier:1.0f constant:0.0f]]
#define CENTER_VIEW_V(PARENT, VIEW) \
[PARENT addConstraint:[NSLayoutConstraint \
constraintWithItem:VIEW attribute: NSLayoutAttributeCenterY \
relatedBy:NSLayoutRelationEqual \
toItem:PARENT attribute:NSLayoutAttributeCenterY \
multiplier:1.0f constant:0.0f]]
#define CENTER_VIEW(PARENT, VIEW) \
{CENTER_VIEW_H(PARENT, VIEW); CENTER_VIEW_V(PARENT, VIEW);}
// Align to parent
#define ALIGN_VIEW_LEFT(PARENT, VIEW) \
[PARENT addConstraint:[NSLayoutConstraint \
constraintWithItem:VIEW attribute: NSLayoutAttributeLeft \
relatedBy:NSLayoutRelationEqual \
toItem:PARENT attribute:NSLayoutAttributeLeft \
multiplier:1.0f constant:0.0f]]
#define ALIGN_VIEW_RIGHT(PARENT, VIEW)
[PARENT addConstraint:[NSLayoutConstraint \
constraintWithItem:VIEW attribute: NSLayoutAttributeRight \
relatedBy:NSLayoutRelationEqual \
toItem:PARENT attribute:NSLayoutAttributeRight \
multiplier:1.0f constant:0.0f]]
#define ALIGN_VIEW_TOP(PARENT, VIEW)
[PARENT addConstraint:[NSLayoutConstraint \
constraintWithItem:VIEW attribute: NSLayoutAttributeTop \
relatedBy:NSLayoutRelationEqual \
toItem:PARENT attribute:NSLayoutAttributeTop \
multiplier:1.0f constant:0.0f]]
#define ALIGN_VIEW_BOTTOM(PARENT, VIEW) \
[PARENT addConstraint:[NSLayoutConstraint \
constraintWithItem:VIEW attribute: NSLayoutAttributeBottom \
relatedBy:NSLayoutRelationEqual \
toItem:PARENT attribute:NSLayoutAttributeBottom \
multiplier:1.0f constant:0.0f]]
// Set Size
#define CONSTRAIN_WIDTH(VIEW, WIDTH) \
[VIEW addConstraint:[NSLayoutConstraint constraintWithItem:VIEW \
attribute:NSLayoutAttributeWidth \
relatedBy:NSLayoutRelationEqual toItem:nil \
attribute:NSLayoutAttributeNotAnAttribute \
multiplier:1.0f constant:WIDTH]];
#define CONSTRAIN_HEIGHT(VIEW, HEIGHT) \
[VIEW addConstraint:[NSLayoutConstraint constraintWithItem:VIEW \
attribute:NSLayoutAttributeHeight \
relatedBy:NSLayoutRelationEqual toItem:nil \
attribute:NSLayoutAttributeNotAnAttribute \
multiplier:1.0f constant:HEIGHT]];
#define CONSTRAIN_SIZE(VIEW, HEIGHT, WIDTH) \
{CONSTRAIN_WIDTH(VIEW, WIDTH); CONSTRAIN_HEIGHT(VIEW, HEIGHT);}
// Set Aspect
#define CONSTRAIN_ASPECT(VIEW, ASPECT) \
[VIEW addConstraint:[NSLayoutConstraint \
constraintWithItem:VIEW attribute:NSLayoutAttributeWidth \
relatedBy:NSLayoutRelationEqual \
toItem:VIEW attribute:NSLayoutAttributeHeight \
multiplier:(ASPECT) constant:0.0f]]
// Item ordering
#define CONSTRAIN_ORDER_H(PARENT, VIEW1, VIEW2) \
[PARENT addConstraints: [NSLayoutConstraint \
constraintsWithVisualFormat: (@"H:["#VIEW1"]->=0-["#VIEW2"]")\
options:0 metrics:nil \
views:NSDictionaryOfVariableBindings(VIEW1, VIEW2)]]
#define CONSTRAIN_ORDER_V(PARENT, VIEW1, VIEW2) \
[PARENT addConstraints:[NSLayoutConstraint \
constraintsWithVisualFormat:(@"V:["#VIEW1"]->=0-["#VIEW2"]")
options:0 metrics:nil
views:NSDictionaryOfVariableBindings(VIEW1, VIEW2)]]
Summary
This chapter provides an introduction to iOS’s Auto Layout features. Before you move on to the next chapter, here are a few thoughts to take along with you:
![]() You may be still thinking in terms of struts, springs, and flexible sizes, but Apple’s Auto Layout system offers better control and tremendous power, with more extensible tools.
You may be still thinking in terms of struts, springs, and flexible sizes, but Apple’s Auto Layout system offers better control and tremendous power, with more extensible tools.
![]() IB provides an excellent set of layout tools. However, constraint-based interfaces in code are viable and easy to use. The layout system gives you excellent control over your views, regardless of whether you specify your constraints visually or programmatically.
IB provides an excellent set of layout tools. However, constraint-based interfaces in code are viable and easy to use. The layout system gives you excellent control over your views, regardless of whether you specify your constraints visually or programmatically.
![]() One of the great things about working with constraints is that you move away from specific-resolution solutions for your interfaces. Yes, your user experience on a tablet is likely to be quite different from that on a member of the iPhone family, but at the same time, these new tools let you design for different window (and possibly screen) sizes within the same mobile family. There’s a lot of flexibility and power hidden within these simple rules.
One of the great things about working with constraints is that you move away from specific-resolution solutions for your interfaces. Yes, your user experience on a tablet is likely to be quite different from that on a member of the iPhone family, but at the same time, these new tools let you design for different window (and possibly screen) sizes within the same mobile family. There’s a lot of flexibility and power hidden within these simple rules.
![]() Start incorporating visual ornaments such as shadows into your regular design routine. Alignment rectangles ensure that your user interfaces will set up properly, regardless of any secondary view elements you add to your frames.
Start incorporating visual ornaments such as shadows into your regular design routine. Alignment rectangles ensure that your user interfaces will set up properly, regardless of any secondary view elements you add to your frames.
![]() Reserve visual format strings for general view layout and use view-to-view relations for detail specifics. Both approaches play important roles, and neither should be omitted from your design playbook.
Reserve visual format strings for general view layout and use view-to-view relations for detail specifics. Both approaches play important roles, and neither should be omitted from your design playbook.