iOS UICollectionView: The Complete Guide, Second Edition (2014)
Chapter 3. Contextualizing Content
Displaying content to users with basic cells lets developers show off some spartan content. We can use supplementary views to spice things up. First, we look at some new delegate methods to customize the layout of individual cells within the collection view. Then, we apply the techniques and practices we learned in the preceding chapter to contextualize our content for our users. We do this with a chapter-long case study, which is called Survey in the sample code.
Supplementary Views
Supplementary views are views that scroll with the cells of a collection view and display some kind of information about the data of that collection. These are “data-driven” views, which stand in contrast to the decoration views we explore in the next chapter. For now, you just need to know that supplementary views provide supplemental information to the user; they must show some data, or else they’re decoration views.
The data source provides the collection view with the information it needs to configure the supplementary views, but the supplementary views are laid out by the UICollection-ViewLayout object. iOS comes with the basic flow layout as a subclass of the general layout. For most cases, using flow layout gives you all the power and flexibility you need.
Built in to the UICollectionViewFlowLayout class are two supplementary views: headers and footers. Although these are the two built-in supplements to collection view cells, supplementary views can be used for much more than just headers and footers; headers and footers are just specific cases of supplementary views. You’ll see more examples of supplementary views that aren’t headers or footers in the next two chapters.
Remember: Any view that isn’t a cell and displays data or metadata about your collection should be a supplementary view.
Supplementary views behave similarly to collection view cells; you register a Class or UINib with the collection view, and the supplementary views are reused over and over again. However, you also must provide a size for the supplementary views.
Suppose, for example, that we have an idea for a start-up, and we need to prototype the interface for our app. We’re going to build an application to present users with a selection of photographs. They’ll select one, and then based on their selections, we’ll present new ones to them that we think they might like. This recommendation engine is completely fake, but we just need to code the user interface to get that sweet, sweet VC cash.
Our faked-out recommendation engine will use two types of models:
![]() A simple wrapper for a name and an image and we’ll call it AFPhotoModel
A simple wrapper for a name and an image and we’ll call it AFPhotoModel
![]() A list of AFPhotoModels we’re asking the user to select from
A list of AFPhotoModels we’re asking the user to select from
Each list represents one section in our collection view. Let’s call this second model AFSelectionModel. Their interfaces are shown in Listing 3.1, but they are straightforward.
Listing 3.1 Interfaces for Models Used in the Survey App
//AFPhotoModel.h
@interface AFPhotoModel : NSObject
+(instancetype)photoModelWithName:(NSString *)name image:(UIImage *)image;
@property (nonatomic, copy) NSString *name;
@property (nonatomic, strong) UIImage *image;
@end
//AFSectionModel.h
extern const NSUInteger AFSelectionModelNoSelectionIndex;
@interface AFSelectionModel : NSObject
+(instancetype)selectionModelWithPhotoModels:(NSArray *)photoModels;
@property (nonatomic, strong, readonly) NSArray *photoModels;
@property (nonatomic, assign) NSUInteger selectedPhotoModelIndex;
@property (nonatomic, readonly) BOOL hasBeenSelected;
@end
The view controller will hold on to an array of section model objects, which are set up for you in the private setupModel method. All the photos come with the sample code. The view controller also knows which section we’re currently prompting the user for, calledcurrentModelArrayIndex.
Let’s say that we want to add a plain supplementary view as a header to a collection view. How would we do that? Well, just like with cells, we’ll create a new class called AFCollectionHeaderView, except this header will subclass UICollection-ReusableView. This superclass provides some of the same functionality as UICollectionViewCell, but is much more lightweight. Supplementary views, out of the box, do not support the advanced features, such as selection and highlighting, that cells do. Listing 3.2 shows the implementation I used for my supplementary view.
Listing 3.2 Supplementary View Implementation
//Header file
@interface AFCollectionHeaderView : UICollectionReusableView
@property (nonatomic, copy) NSString *text;
@end
// Implementation File
@implementation AFCollectionHeaderView
{
UILabel *textLabel;
}
- (id)initWithFrame:(CGRect)frame
{
if (!(self = [super initWithFrame:frame])) return nil;
textLabel = [[UILabel alloc] initWithFrame:CGRectInset(
CGRectMake(0, 0, CGRectGetWidth(frame), CGRectGetHeight(frame)), 30,
10)];
textLabel.backgroundColor = [UIColor clearColor];
textLabel.textColor = [UIColor whiteColor];
textLabel.font = [UIFont boldSystemFontOfSize:20];
textLabel.autoresizingMask = UIViewAutoresizingFlexibleHeight |
UIViewAutoresizingFlexibleWidth;
[self addSubview:textLabel];
return self;
}
-(void)prepareForReuse
{
[super prepareForReuse];
[self setText:@""];
}
-(void)setText:(NSString *)text
{
_text = [text copy];
[textLabel setText:text];
}
@end
Everything is pretty similar to cells, even prepareForReuse. The label’s frame is a little wonky, but we’re just taking our frame and insetting it by 30 points from the left and 10 points from the top. This gives it a nice margin.
Providing Supplementary Views
Now, we need to register the Class object with the collection view so it can create supplementary views for itself (see Listing 3.3). We’ll put this code in viewDidLoad.
Listing 3.3 Registering Supplementary Views
// After we have set up the flow layout
surveyFlowLayout.headerReferenceSize = CGSizeMake(60, 50);
// After we have set up the collection view
[surveyCollectionView registerClass:[AFCollectionHeaderView class]
forSupplementaryViewOfKind:UICollectionElementKindSectionHeader
withReuseIdentifier:HeaderIdentifier];
The HeaderIdentifier is a static NSString, similar to the one that we’ve used before for cells. The second parameter is a string to specify what kind of supplementary view you’re registering. We’re using the built-in header kind, UICollectionElement-KindSectionHeader. There is also UICollectionElementKindSectionFooter. These two supplementary views are provided by the flow layout, but you can specify your own (as you’ll see in later chapters).
The headerReferenceSize tells the collection view layout how large to make the headers. If you forget to set this, the default is zero, so your headers won’t be displayed. This is a common mistake; so if your headers aren’t appearing, check to make sure that you’re specifying a size.
How this size value is interpreted is actually pretty interesting. When scrolling horizontally, only the width of the CGSize you specify is used; the header is stretched vertically to fill its space. When scrolling vertically, only the height of the CGSize is used; the header is stretched horizontally to fill its space. The layout of the headers (and footers) is shown in Figure 3.1. (The green arrows indicate the scroll direction.)
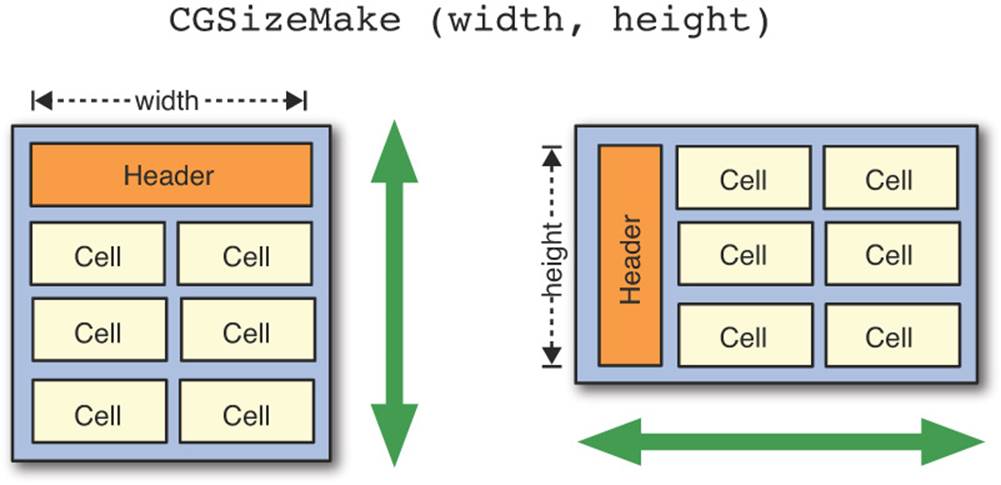
Figure 3.1 Basic collection view using storyboards
Now that we have registered the Class and specified a size, it’s time to actually return the supplementary view. We do this by implementing a new method in UICollectionView-Delegate calledcollectionView:viewForSupplementaryElementOfKind:atIndexPath:. The second parameter is the same “kind” of string we used when registering our header. We only have one type of supplementary view, so we’ll ignore the parameter in this example. However, if you have a collection view with more than one supplementary view type, you’ll have to be careful to only return the correct kind (see Listing 3.4).
Listing 3.4 Providing Supplementary Views
-(UICollectionReusableView *)collectionView:(UICollectionView
*)collectionView viewForSupplementaryElementOfKind:(NSString *)kind
atIndexPath:(NSIndexPath *)indexPath
{
//Provides a view for the headers in the collection view
AFCollectionHeaderView *headerView = (AFCollectionHeaderView
*)[collectionView dequeueReusableSupplementaryViewOfKind:kind
withReuseIdentifier:HeaderIdentifier forIndexPath:indexPath];
if (indexPath.section == 0)
{
//If this is the first header, display a prompt to the user
[headerView setText:@"Tap on a photo to start the recommendation
engine."];
}
else if (indexPath.section <= currentModelArrayIndex)
{
//Otherwise, display a prompt using the selected photo from the previous
section
AFSelectionModel *selectionModel = selectionModelArray[indexPath.section
- 1];
AFPhotoModel *selectedPhotoModel = [self
photoModelForIndexPath:[NSIndexPath
indexPathForItem:selectionModel.selectedPhotoModelIndex
inSection:indexPath.section - 1]];
[headerView setText:[NSString stringWithFormat:@"Because you liked
%@...", selectedPhotoModel.name]];
}
return headerView;
}
If we’re prompting users for the first section, we’ll give them some instructions on what to do. Otherwise, we know what photo they selected last time (it’s stored in our array or AFSelectionModels), so we’ll tell them that, based on their last selection, we think they’ll like these next photos.
Let’s hook up our data source methods to start showing the user some content other than header views (see Listing 3.5).
Listing 3.5 UICollectionViewDataSource Methods for Survey
-(NSInteger)numberOfSectionsInCollectionView:(UICollectionView
*)collectionView
{
// Return the smallest of either our current model index plus one,
// or our total number of sections. This will show 1 section when we
// only want to display section zero, etc.
// It will prevent us from returning 11 when we only have 10 sections.
return MIN(currentModelArrayIndex + 1, selectionModelArray.count);
}
-(NSInteger)collectionView:(UICollectionView *)collectionView
numberOfItemsInSection:(NSInteger)section
{
//Return the number of photos in the section model
return [[selectionModelArray[currentModelArrayIndex] photoModels] count];
}
-(UICollectionViewCell *)collectionView:(UICollectionView *)collectionView
cellForItemAtIndexPath:(NSIndexPath *)indexPath
{
AFCollectionViewCell *cell = (AFCollectionViewCell *)[collectionView
dequeueReusableCellWithReuseIdentifier:CellIdentifier
forIndexPath:indexPath];
//Configure the cell
[self configureCell:cell forIndexPath:indexPath];
return cell;
}
This should be familiar to you by now. The only vexing line is configureCell:forIndexPath:, because we have not yet implemented it or a custom cell subclass. Let’s do both now.
I want the photos to be presented with a white matte border.
After users make a selection, we want the section to look grayed out with the photo they selected staying selected. We’ll make our background color white and place the image view inset by 10 points on all sides. The code for the cell looks like Listing 3.6.
Listing 3.6 UICollectionViewCell Subclass for Survey
//Header File
@interface AFCollectionViewCell : UICollectionViewCell
@property (nonatomic, strong) UIImage *image;
-(void)setDisabled:(BOOL)disabled;
@end
//Implementation File
@implementation AFCollectionViewCell
{
UIImageView *imageView;
}
- (id)initWithFrame:(CGRect)frame
{
if (!(self = [super initWithFrame:frame])) return nil;
imageView = [[UIImageView alloc] initWithFrame:CGRectZero];
imageView.backgroundColor = [UIColor blackColor];
[self.contentView addSubview:imageView];
UIView *selectedBackgroundView = [[UIView alloc] initWithFrame:CGRectZero];
selectedBackgroundView.backgroundColor = [UIColor orangeColor];
self.selectedBackgroundView = selectedBackgroundView;
self.backgroundColor = [UIColor whiteColor];
return self;
}
-(void)prepareForReuse
{
[super prepareForReuse];
[self setImage:nil];
[self setSelected:NO];
}
-(void)layoutSubviews
{
imageView.frame = CGRectInset(self.bounds, 10, 10);
}
-(void)setImage:(UIImage *)image
{
_image = image;
imageView.image = image;
}
-(void)setDisabled:(BOOL)disabled
{
self.contentView.alpha = disabled ? 0.5f : 1.0f;
self.backgroundColor = disabled ? [UIColor grayColor] : [UIColor whiteColor];
}
@end
The implementation is fairly straightforward. We define a setDisabled: method that we’ll use to gray out the cell once the user has make a selection for that section. Everything else should look familiar from Chapter 2, “Displaying Content Using UICollectionView.”
As you can see, in the header implementation, we used autoresizing masks to keep the label stretched to the width of the header. Here, we’re using layoutSubviews to reposition the image view. These are both valid approaches and sometimes autoresizing masks or Autolayout are either too complicated or too cumbersome to use.
Now let’s look at that configureCell:forIndexPath: method (see Listing 3.7).
Listing 3.7 Configuring Cells for Survey
-(void)configureCell:(AFCollectionViewCell *)cell
forIndexPath:(NSIndexPath *)indexPath
{
//Set the image for the cell
[cell setImage:[[self photoModelForIndexPath:indexPath] image]];
//By default, assume the cell is not disabled
//and not selected
[cell setDisabled:NO];
[cell setSelected:NO];
//If the cell is not in our current last index, disable it
if (indexPath.section < currentModelArrayIndex)
{
[cell setDisabled:YES];
//If the cell was selected by the user previously,
//select it now
if (indexPath.row == [selectionModelArray[indexPath.section]
selectedPhotoModelIndex])
{
[cell setSelected:YES];
}
}
}
The code grabs the specific photo model and sets the image from it to the cell. It then checks whether the cell is in a section that’s already had a selection made (to gray it out), and then checks whether the cell was the one that was selected. Notice this isn’t a property; we don’t want the cell to contain information about the model. We just need a convenient method to change its appearance.
Responding to User Interactions
Now comes the fun part! We’re going to write code to respond to user selections. There is a UICollectionViewDelegate method that’s called whenever the user makes a selection (but not when the developer makes a selection programmatically). Take a look at Listing 3.8.
Listing 3.8 Responding to Cell Selection
-(void)collectionView:(UICollectionView *)collectionView
didSelectItemAtIndexPath:(NSIndexPath *)indexPath
{
//The user has selected a cell
//No matter what, deselect that cell
[collectionView deselectItemAtIndexPath:indexPath animated:YES];
if (currentModelArrayIndex >= selectionModelArray.count - 1)
{
//Let's just present some dialogue to indicate things are done.
[[[UIAlertView alloc] initWithTitle:@"Recommendation Engine"
message:@"Based on your selections, we have concluded you have
excellent taste in photography!"
delegate:nil cancelButtonTitle:nil
otherButtonTitles:@"Awesome!", nil] show];
return;
}
//Set the selected photo index
[selectionModelArray[currentModelArrayIndex]
setSelectedPhotoModelIndex:indexPath.item];
[collectionView performBatchUpdates:^{
currentModelArrayIndex++;
[collectionView insertSections:[NSIndexSet
indexSetWithIndex:currentModelArrayIndex]];
[collectionView reloadSections:[NSIndexSet
indexSetWithIndex:currentModelArrayIndex-1]];
} completion:^(BOOL finished) {
[collectionView scrollToItemAtIndexPath:[NSIndexPath indexPathForItem:0
inSection:currentModelArrayIndex]
atScrollPosition:UICollectionViewScrollPositionTop animated:YES];
}];
}
This method is called when a cell has been selected. First, we want to deselect the cell. Then, we’ll check to see if we have completed the survey. If so, we’ll set an ivar to YES and throw up a dialog to the users. If they have not finished, we need to update the model (setting the selected index) and add the next section. This is done in performBatchUpdates:completion:. This is a block-based approach to updating the collection view. Updates we make to the model and the collection view in the first block are executed with simultaneous animations.
Apple’s documentation is clear that the model should be updated first, and then the appropriate changes made to the collection view. We want to reload the section that the user just made the selection in and add the next section. The same approach can be used to remove items or sections, as you’ll see in later chapters. Table 3.1 shows the different methods for modifying collection view content.
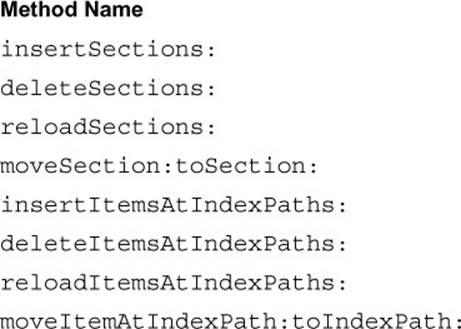
Table 3.1 Methods for Modifying Collection View Content
If we ran the app as it exists right now, we’d get something like Figure 3.2. It’s not a bad start, but if we show this to investors, we won’t get the VC funding we deserve. There are a few things wrong with the app so far.
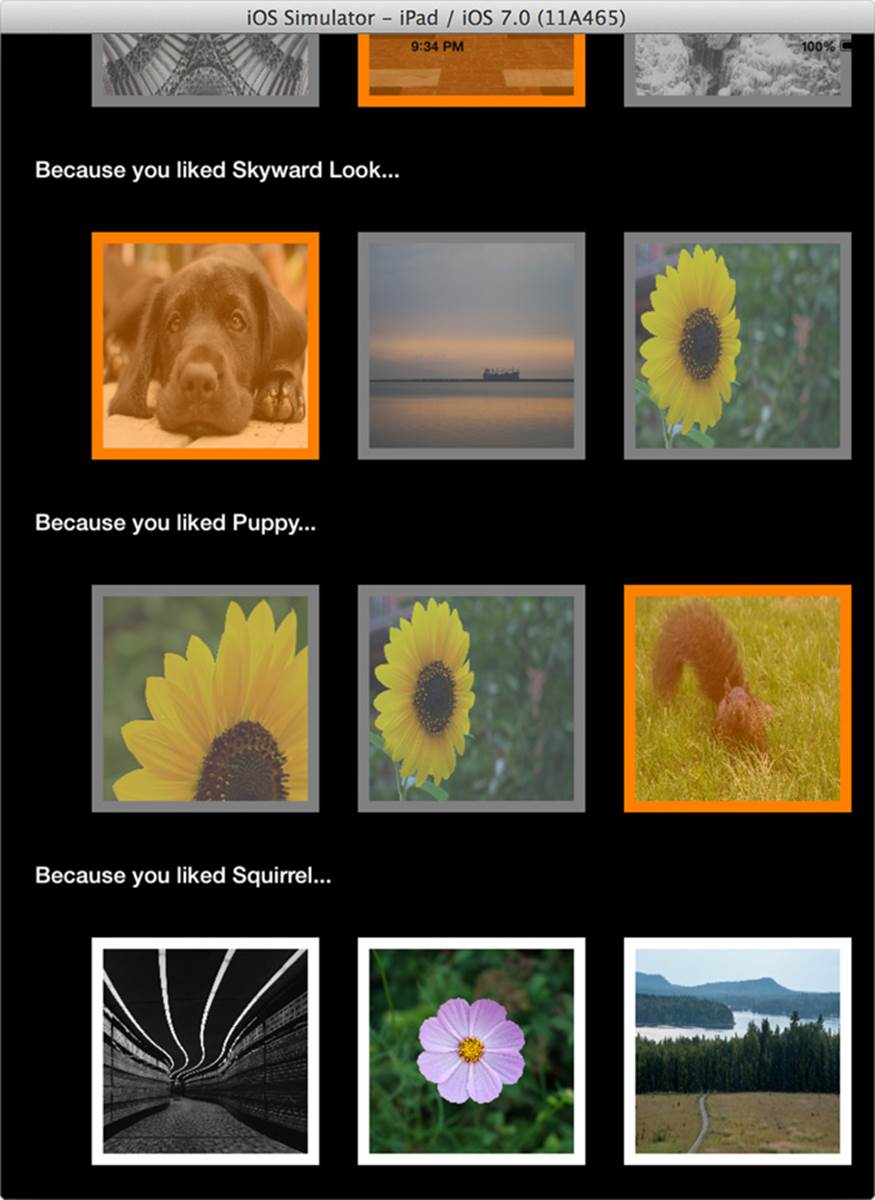
Figure 3.2 Running the Survey application
First thing, the photos are stretched. Unlike in Chapter 2, the photos don’t all have a square aspect ratio. That means that when we put them into square cells, they get stretched. That’s not ideal. What would be ideal is if we could have different cells be different sizes. Now there’s an idea! Your cell size is usually set on the flow layout object. However, the flow object has its own delegate protocol. We can override the settings on the flow layout object by responding to its delegate methods (see Listing 3.9).
Listing 3.9 Providing Different Cell Sizes
-(CGSize)collectionView:(UICollectionView *)collectionView
layout:(UICollectionViewLayout *)collectionViewLayout
sizeForItemAtIndexPath:(NSIndexPath *)indexPath
{
//Provides a different size for each individual cell
//Grab the photo model for the cell
AFPhotoModel *photoModel = [self photoModelForIndexPath:indexPath];
//Determine the size and aspect ratio for the model's image
CGSize photoSize = photoModel.image.size;
CGFloat aspectRatio = photoSize.width / photoSize.height;
//start out with the detail image size of the maximum size
CGSize itemSize = kMaxItemSize;
if (aspectRatio < 1)
{
//The photo is taller than it is wide, so constrain the width
itemSize = CGSizeMake(kMaxItemSize.width * aspectRatio,
kMaxItemSize.height);
}
else if (aspectRatio > 1)
{
//The photo is wider than it is tall, so constrain the height
itemSize = CGSizeMake(kMaxItemSize.width,
kMaxItemSize.height / aspectRatio);
}
return itemSize;
}
This code calculates the aspect ratio of the photo and returns an item size that’s equivalent to an aspect stretch fit content mode. The photos will be scaled to fit within a maximum size. I’ve included landscape, portrait, and square-crop photos in the example to show you that it works (seeFigure 3.3). Let’s look at what the app looks like now.
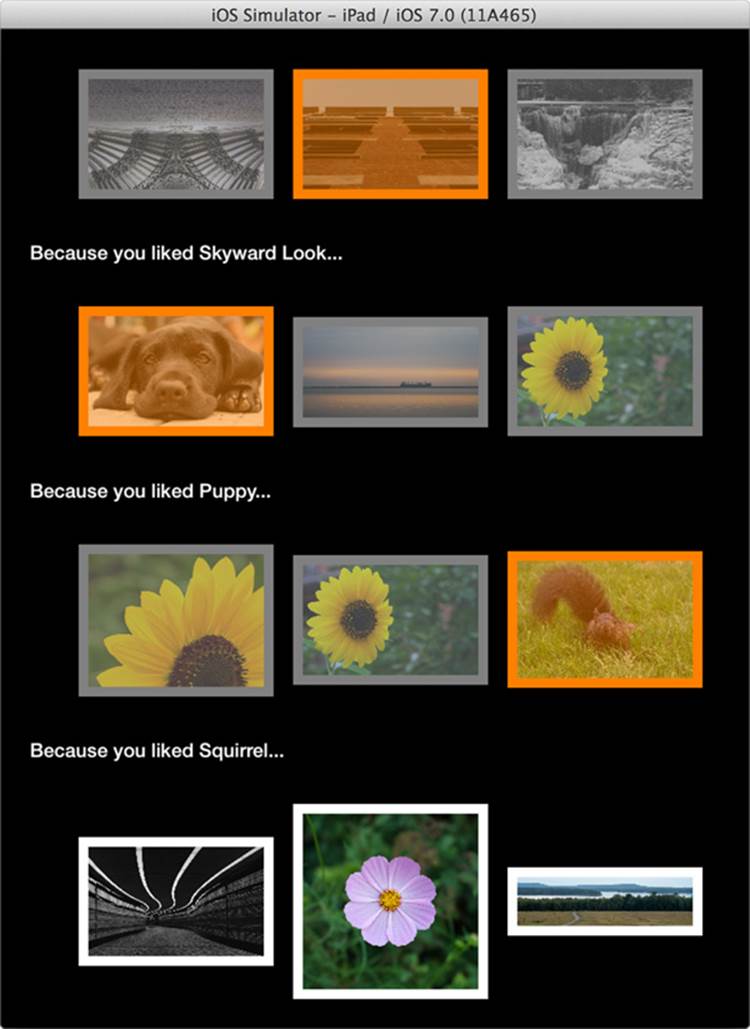
Figure 3.3 Multiple sizes of cells
That’s much better! It would look even more polished if the cells were always evenly spaced, but that requires subclassing the flow layout, so we’ll save it for Chapter 4, “Organizing Content with UICollectionViewFlowLayout.”
Another problem with the app is that you can make selections on sections that have already had selections made. That’s a serious flaw. Luckily, there are a pair of methods that the collection view interrogates before it highlights or selects cells. We’ll only implement the first one to prevent highlighting. Because highlighting is the first step of becoming selected, we won’t need to implement the method to disable selection.
Note
Preventing highlighting and selection applies only to user interaction. Highlighting and selecting programmatically will continue to work.
Listing 3.10 will only allow highlighting if the section is the one we’re currently prompting the user for and so long as the user hasn’t already finished the survey.
Listing 3.10 Disabling Cell Highlighting
-(BOOL)collectionView:(UICollectionView *)collectionView
shouldHighlightItemAtIndexPath:(NSIndexPath *)indexPath
{
return indexPath.section == currentModelArrayIndex && !isFinished;
}
Table 3.2 provides a full list of the ways you can customize the user’s interaction with your collection view.
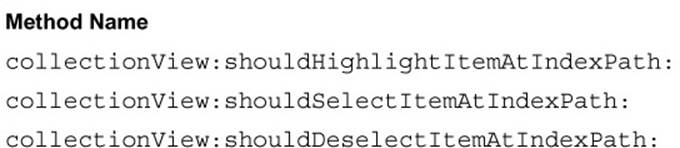
Table 3.2 Methods for Customizing Selection Behavior
Providing Cut/Copy/Paste Support
We’re getting closer to that VC round, I can feel it! However, this chapter is called “Contextualizing Content,” and I think we could make this app more contextually aware. What if users had the ability to copy the name of the photo when they used a tap-and-hold gesture? I know what you’re thinking: “Adding interactivity isn’t until Chapter 6, ‘Adding Interactivity to UICollectionView.’” Well, yes, that’s true. However, copy, cut, and paste are built in to collection view! Let’s take a look at how easy it is to get that functionality.
First, we need to let the collection view know that we support menus. There’s a simple delegate method for this, as shown in Listing 3.11.
Listing 3.11 Enabling Menus for Collection Views
-(BOOL)collectionView:(UICollectionView *)collectionView
shouldShowMenuForItemAtIndexPath:(NSIndexPath *)indexPath
{
return YES;
}
Notice that you can selectively enable the copy/cut/paste menu for individual cells instead of for an entire collection view. Very awesome. Because all of our cells represent photos with names, we’ll just return YES for everything.
Next, the collection view will interrogate its delegate for the different types of actions it can perform. It will call the method in Listing 3.12 over and again for each action it supports. Currently, the only actions are cut:, copy:, and paste:, but Apple may add more later, so write code to accommodate for that.
Listing 3.12 Selectively Enabling Menu Functions for Collection Views
-(BOOL)collectionView:(UICollectionView *)collectionView
canPerformAction:(SEL)action
forItemAtIndexPath:(NSIndexPath *)indexPath
withSender:(id)sender
{
if ([NSStringFromSelector(action) isEqualToString:@"copy:"])
{
return YES;
}
return NO;
}
The method is passed a SEL selector and asked if the delegate can perform that action on the model represented by that index path. We need to turn the selector into its string equivalent and compare it to "copy:", the only selector we want to support.
Next is the easy part—actually performing the copy operation:
-(void)collectionView:(UICollectionView *)collectionView
performAction:(SEL)action
forItemAtIndexPath:(NSIndexPath *)indexPath
withSender:(id)sender
{
if ([NSStringFromSelector(action) isEqualToString:@"copy:"])
{
UIPasteboard *pasteboard = [UIPasteboard generalPasteboard];
[pasteboard setString:[[self photoModelForIndexPath:indexPath] name]];
}
}
We just check again to determine that we want to perform the copy operation, grab the general pasteboard from the system, and set the string.
Now that you understand better the collection view and the data source and delegate protocols, let’s move on to Chapter 4, where we closely examine UICollection-ViewFlowLayout.
All materials on the site are licensed Creative Commons Attribution-Sharealike 3.0 Unported CC BY-SA 3.0 & GNU Free Documentation License (GFDL)
If you are the copyright holder of any material contained on our site and intend to remove it, please contact our site administrator for approval.
© 2016-2026 All site design rights belong to S.Y.A.