iOS 7 Programming Fundamentals: Objective-C, Xcode, and Cocoa Basics (2014)
Part III. Cocoa
Chapter 11. Cocoa Events
None of your code runs until Cocoa calls it. The art of iOS programming consists largely of knowing when and why Cocoa will call your code. If you know this, you can put your code in the correct place, with the correct method name, so that your code runs at the correct moment, and your app behaves the way you intend.
In Chapter 7, for example, we wrote a method to be called when the user taps a certain button in our interface, and we also arranged things so that that method would be called when the user taps that button:
- (void) buttonPressed: (id) sender {
// ... react to the button being pressed
}
This architecture typifies the underpinnings of a Cocoa program. Your code itself is like a panel of buttons, waiting for Cocoa to press one. If something happens that Cocoa feels your code needs to know about and respond to, it presses the right button — if the right button is there. You organize your code with Cocoa’s behavior in mind. Cocoa makes certain promises about how and when it will dispatch messages to your code. These are Cocoa’s events. You know what these events are, and you arrange for your code to be ready when Cocoa delivers them.
Thus, to program for iOS, you must, in a sense, surrender control. Your code never gets to run just whenever it feels like it. It can run only in response to some kind of event. Something happens, such as the user making a gesture on the screen, or some specific stage arriving in the lifetime of your app, and Cocoa dispatches an event to your code — if your code is prepared to receive it. So you don’t write just any old code you want to and put it in any old place. You use the framework, by letting the framework use you. You submit to Cocoa’s rules and promises and expectations, so that your code will be called at the right time and in the right way.
The specific events that you can receive are listed in the documentation. The overall architecture of how and when events are dispatched and the ways in which your code arranges to receive them is the subject of this chapter.
Reasons for Events
Broadly speaking, the reasons you might receive an event may be divided informally into four categories. These categories are not official; I made them up. Often it isn’t completely clear which of these categories an event fits into; an event may well appear to fit two categories. But they are still generally useful for visualizing how and why Cocoa interacts with your code:
User events
The user does something interactive, and an event is triggered directly. Obvious examples are events that you get when the user taps or swipes the screen, or types a key on the keyboard.
Lifetime events
These are events notifying you of the arrival of a stage in the life of the app, such as the fact that the app is starting up or is about to go into the background, or of a component of the app, such as the fact that a UIViewController’s view has just loaded or is about to be removed from the screen.
Functional events
Cocoa is about to do something, and turns to you in case you want to supply additional functionality. I would put into this category things like UIView’s drawRect: (your chance to have a view draw itself) and UILabel’s drawTextInRect: (your chance to modify the look of a label), with which we experimented in Chapter 10.
Query events
Cocoa turns to you to ask a question; its behavior will depend upon your answer. For example, the way data appears in a table (a UITableView) is that whenever Cocoa needs a cell for a row of the table, it turns to you and asks for the cell.
Subclassing
A built-in Cocoa class may define methods that Cocoa itself will call and that you are invited (or required) to override in a subclass, so that your custom behavior, and not (merely) the default behavior, will take place.
An example I gave in Chapter 10 was UIView’s drawRect:. This is what I call a functional event. By overriding drawRect: in a UIView subclass, you dictate the full procedure by which a view draws itself. You don’t know exactly when this method will be called, and you don’t care; when it is, you draw, and this guarantees that the view will always appear the way you want it to. (You never call drawRect: yourself; if some underlying condition has changed and you want the view to be redrawn, you call setNeedsDisplay and let Cocoa call drawRect: in response.)
Built-in UIView subclasses may have other functional event methods you’ll want to customize through subclassing. Typically this will be in order to change the way the view is drawn, without taking command of the entire drawing procedure yourself. In Chapter 10 I gave an example involving UILabel and its drawTextInRect:. A similar example is UISlider, which lets you customize the position and size of the slider’s “thumb” by overriding thumbRectForBounds:trackRect:value:.
UIViewController is a good example of a class meant for subclassing. Of the methods listed in the UIViewController class documentation, just about all are methods you might have reason to override. If you create a UIViewController subclass in Xcode, you’ll see that the template already includes a couple of method overrides to get you started. For example, viewDidLoad is called to let you know that your view controller’s view has loaded, so that you can perform initializations; it’s an obvious example of a lifetime event.
A UIViewController method like supportedInterfaceOrientations is what I call a query event. Your job is to return a bitmask telling Cocoa what orientations your view can appear in at this moment — whenever that may be. You trust Cocoa to call this method at the appropriate moments, so that if the user rotates the device, your app’s interface will or won’t be rotated to compensate, depending on what value you return.
When looking for events that you can receive through subclassing, be sure to look upward though the inheritance hierarchy. For example, if you’re wondering how to be notified when your custom UILabel subclass is embedded into another view, you won’t find the answer in the UILabel class documentation; a UILabel receives the appropriate event by virtue of being a UIView. In the UIView class documentation, you’ll learn that you can override didMoveToSuperview to be informed when this happens.
Even further up the inheritance hierarchy, you’ll find things like NSObject’s initialize class method. Before any class is sent its first class message (including instantiation), it is sent the initialize message. Thus, initialize can be overridden in order to run code extremely early in a class’s lifetime. Your project’s application delegate class, such as AppDelegate in our Empty Window project, is instantiated very early in the app’s lifetime, so its initialize can be a good place to perform very early app initializations, such as setting default values for any user preferences.
When implementing initialize, we must test, as a matter of course, whether self really is the class in question; otherwise there is a chance that initialize will be called again (and our code will run again) if a subclass of this class is used. This is one of the few situations in which we will compare two classes directly against one another; initialize is a class method, so self means “the class to which the initialize message was sent”:
// MyClass.m:
+ (void)initialize {
if (self == [MyClass class]) {
// do stuff
}
}
Notifications
Cocoa provides your app with a single instance of NSNotificationCenter, informally called the notification center, and available as [NSNotificationCenter defaultCenter]. This instance is the basis of a mechanism for sending messages called notifications. A notification includes an instance of NSNotification (a notification object). The idea is that any object can be registered with the notification center to receive certain notifications. Another object can hand the notification center a notification object to send out (this is called posting the notification). The notification center will then send that notification object, in a notification, to all objects that are registered to receive it.
The notification mechanism is often described as a dispatching or broadcasting mechanism, and with good reason. It lets an object send a message without knowing or caring what object or how many objects receive it. This relieves your app’s architecture from the formal responsibility of somehow hooking up instances just so a message can pass from one to the other (which can sometimes be quite tricky or onerous, as discussed in Chapter 13). When objects are conceptually “distant” from one another, notifications can be a fairly lightweight way of permitting one to message the other.
An NSNotification object has three pieces of information associated with it, which can be retrieved by instance methods:
name
An NSString which identifies the notification’s meaning.
object
An instance associated with the notification; typically, the instance that posted it.
userInfo
Not every notification has a userInfo; it is an NSDictionary, and can contain additional information associated with the notification. What information this NSDictionary will contain, and under what keys, depends on the particular notification; you have to consult the documentation. For example, the documentation tells us that UIApplication’s UIApplicationDidChangeStatusBarFrameNotification includes a userInfo dictionary with a key UIApplicationStatusBarFrameUserInfoKey whose value is the status bar’s frame. When you post a notification yourself, you can put anything you like into the userInfo for the notification’s recipient(s) to retrieve.
Cocoa itself posts notifications through the notification center, and your code can register to receive them. You’ll find a separate Notifications section in the documentation for a class that provides them.
Receiving a Notification
To register to receive a notification, you send one of two messages to the notification center. One is addObserver:selector:name:object:. The parameters are as follows:
observer:
The instance to which the notification is to be sent. This will typically be self; it isn’t usual for one instance to register a different instance as the receiver of a notification.
selector:
The message to be sent to the observer instance when the notification occurs. The designated method should return void and should take one parameter, which will be the NSNotification object (so the parameter should be typed as NSNotification* or id). Don’t forget to implement this method! If the notification center sends a notification by sending the message specified as the selector: here, and there is no method implemented to receive this message, your app will crash (see Chapter 3).
name:
The NSString name of the notification you’d like to receive. If this parameter is nil, you’re asking to receive all notifications associated with the object designated in the object: parameter. A built-in Cocoa notification’s name is usually a constant. As I explained in Chapter 1, this is helpful, because if you flub the name of a constant, the compiler will complain, whereas if you enter the name of the notification directly as an NSString literal and you get it wrong, the compiler won’t complain but you will mysteriously fail to get any notifications (because no notification has the name you actually entered) — a very difficult sort of mistake to track down.
object:
The object of the notification you’re interested in, which will usually be the object that posted it. If this is nil, you’re asking to receive all notifications with the name designated in the name: parameter. (If both the name: and object: parameters are nil, you’re asking to receive all notifications!)
For example, in one of my apps I want to change the interface whenever the device’s music player starts playing a different song. The API for the device’s built-in music player belongs to the MPMusicPlayerController class; this class provides a notification to tell me when the built-in music player changes what song is being played, listed under Notifications in the MPMusicPlayerController class documentation as MPMusicPlayerControllerNowPlayingItemDidChangeNotification.
It turns out, looking at the documentation, that this notification won’t be posted at all unless I first call MPMusicPlayerController’s beginGeneratingPlaybackNotifications instance method. This architecture is not uncommon; Cocoa saves itself some time and effort by not sending out certain notifications unless they are switched on, as it were. So my first job is to get an instance of MPMusicPlayerController and call this method:
MPMusicPlayerController* mp = [MPMusicPlayerController iPodMusicPlayer];
[mp beginGeneratingPlaybackNotifications];
Now I register myself to receive the desired playback notification:
[[NSNotificationCenter defaultCenter] addObserver:self
selector:@selector(nowPlayingItemChanged:)
name:MPMusicPlayerControllerNowPlayingItemDidChangeNotification
object:nil];
So now, whenever an MPMusicPlayerControllerNowPlayingItemDidChangeNotification is posted, my nowPlayingItemChanged: method will be called:
- (void) nowPlayingItemChanged: (NSNotification*) n {
MPMusicPlayerController* mp = [MPMusicPlayerController iPodMusicPlayer];
self->_nowPlayingItem = mp.nowPlayingItem;
// ... and so on ...
}
The other way to register to receive a notification is by calling addObserverForName:object:queue:usingBlock:. It returns a value, whose purpose I’ll explain in a moment. The queue: will usually be nil; a non-nil queue: is for background threading. The name: and object:parameters are just like those of addObserver:selector:name:object:. Instead of an observer and a selector, you provide a block consisting of the actual code to be executed when the notification arrives. This block should take one parameter — the NSNotification itself.
This way of registering for a notification has some tremendous advantages. For addObserver:selector:name:object: to work properly, you must get the selector right and make sure you implement the corresponding method. With a block, on the other hand, there is no selector and no separate method; everything happens right there in the block:
MPMusicPlayerController* mp = [MPMusicPlayerController iPodMusicPlayer];
[mp beginGeneratingPlaybackNotifications];
id ob = [[NSNotificationCenter defaultCenter]
addObserverForName:MPMusicPlayerControllerNowPlayingItemDidChangeNotification
object:nil queue:nil usingBlock:^(NSNotification *n) {
self->_nowPlayingItem = mp.nowPlayingItem;
// ... and so on ...
}
}];
Consider how maintainable and understandable that code is. Heavy use of addObserver:selector:name:object: means that your code ends up peppered with methods that exist solely in order to be called by the notification center. But there is nothing about these methods that tells you what they are for — you will probably want to use explicit comments in order to remind yourself — and the methods are separate from the registration call, all of which makes your code very method-heavy and confusing. With a block, on the other hand, the whole purpose of the registration is crystal-clear, because the block accompanies it. And notice how, in the block, I don’t have to redefine mp as I did in the separate method nowPlayingItemChanged:; it is still in scope from where it was defined a couple of lines earlier. Blocks are so convenient!
Unregistering
It is up to you, for every object that you register as a recipient of notifications, to unregister that object before it goes out of existence. If you fail to do this, and if the object does go out of existence, and if a notification for which that object is registered is posted, the notification center will attempt to send the appropriate message to that object, which is now missing in action. The result will be a crash at best, and chaos at worst.
To unregister an object as a recipient of notifications, send the notification center the removeObserver: message. (Alternatively, you can unregister an object for just a specific set of notifications with removeObserver:name:object:.) The object passed as the observer: argument is the object that is no longer to receive notifications. What object that is depends on how you registered in the first place:
You called addObserver:...
You supplied an observer originally; that is the observer you must now unregister.
You called addObserverForName:...
The call to addObserverForName:... returned an observer token object, which you captured as an id variable (its real class and nature are no concern of yours); that is the observer you must now unregister.
The trick is finding the right moment to unregister. The fallback solution is the registered instance’s dealloc method, this being the last lifetime event an instance is sent before it goes out of existence. If you’re using ARC and addObserverForName:..., there are some additional memory management implications that I’ll talk about in Chapter 12.
If you’re calling addObserverForName:... multiple times from the same class, you’re going to end up receiving from the notification center multiple observer tokens, which you need to preserve so that you can unregister all of them later. If your plan is to unregister everything at once, one way to handle this situation is through an instance variable that is a mutable collection. So, for example, I might have an NSMutableSet instance variable called _observers. Early on, I initialize it to an empty set:
self->_observers = [NSMutableSet set];
Each time I register for a notification using a block, I capture the result and add it to the set:
id ob = [[NSNotificationCenter defaultCenter]
addObserverForName:@"whatever" object:nil queue:nil
usingBlock:^(NSNotification *note) {
// ... whatever ...
}];
[self->_observers addObject:ob];
When it’s time to unregister, I enumerate the set:
for (id ob in self->_observers)
[[NSNotificationCenter defaultCenter] removeObserver:ob];
The tedium of arranging all that is a price worth paying in order to take advantage of blocks when using notifications.
WARNING
NSNotificationCenter provides no kind of introspection: you cannot ask an NSNotificationCenter what objects are registered with it as notification recipients. This seems to me to be a major gap in Cocoa’s functionality. I once had a devil of a time understanding why one of my instances was not receiving a notification for which it was registered. Caveman debugging didn’t help. Eventually I realized that some code I’d forgotten about was unregistering my observer prematurely. The moral: keep your registration/unregistration logic extremely simple.
Posting a Notification
Although you’ll mostly be interested in receiving notifications from Cocoa, you can also take advantage of the notification mechanism as a way of communicating between your own objects. As I mentioned before, one reason for doing this might be that two objects are conceptually distant or independent from one another.
To use notifications in this way, your objects must play both roles in the communication chain. One of your objects (or more than one) will register to receive a notification, identified by name or object or both, as I’ve already described. Another of your objects will post a notification, identified in the same way. The notification center will then pass the message along from the poster to the registered recipient.
To post a notification, send to the notification center the message postNotificationName:object:userInfo:.
For example, one of my apps is a simple card game. The game needs to know when a card is tapped. But a card knows nothing about the game; when it is tapped, it simply emits a virtual shriek by posting a notification:
- (void) singleTap: (id) g {
[[NSNotificationCenter defaultCenter]
postNotificationName:@"cardTapped" object:self];
}
The game object has registered for the @"cardTapped" notification, so it hears about this and retrieves the notification’s object; now it knows what card was tapped and can proceed correctly.
NOTE
I am skipping over some other aspects of notifications that you probably won’t need to know about. Read Apple’s Notification Programming Topics for Cocoa if you want the gory details.
NSTimer
A timer (NSTimer) is not, strictly speaking, a notification; but it behaves very similarly. It is an object that gives off a signal (fires) after the lapse of a certain time interval. The signal is a message to one of your instances. Thus you can arrange to be notified when a certain time has elapsed. The timing is not perfectly accurate, but it’s pretty good.
Timer management is not exactly tricky, but it is a little unusual. A timer that is actively watching the clock is said to be scheduled. A timer may fire once, or it may be a repeating timer. To make a timer go out of existence, it must be invalidated. A timer that is set to fire once is invalidated automatically after it fires; a repeating timer repeats until you invalidate it by sending it the invalidate message. An invalidated timer should be regarded as off-limits: you cannot revive it or use it for anything further, and you should probably not send any messages to it.
The straightforward way to create a timer is with the NSTimer class method scheduledTimerWithTimeInterval:target:selector:userInfo:repeats:. This creates the timer and schedules it, so that it begins watching the clock immediately. The target and selector determine what message will be sent to what object when the timer fires; the method in question should take one parameter, which will be a reference to the timer. The userInfo is just like the userInfo of a notification.
For example, one of my apps is a game with a score; I want to penalize the user, by diminishing the score, for every ten seconds after each move that elapses without the user making a further move. So each time the user makes a move, I create a repeating timer whose time interval is ten seconds (and I also invalidate any existing timer); in the method that the timer calls, I diminish the score.
Starting in iOS 7, an NSTimer has a tolerance property, which is a time interval signifying a how long after the timer would fire you’re willing to grant before it really does fire. The documentation suggests that you can improve device battery life and app responsiveness by supplying a value of at least 10 percent of the timeInterval.
Timers have some memory management implications that I’ll discuss in Chapter 12, along with a block-based alternative to a timer.
Delegation
Delegation is an object-oriented design pattern, a relationship between two objects, in which the first object’s behavior is customized or assisted by the second. The second object is the first object’s delegate. No subclassing is involved, and indeed the first object is agnostic about the second object’s class.
As implemented by Cocoa, here’s how delegation works. A built-in Cocoa class has an instance variable, usually called delegate (it will certainly have delegate in its name). For some instance of that Cocoa class, you set the value of this instance variable to an instance of one of yourclasses. At certain moments in its activity, the Cocoa class promises to turn to its delegate for instructions by sending it a certain message: if the Cocoa instance finds that its delegate is not nil, and that its delegate is prepared to receive that message (see Chapter 10 onrespondsToSelector:), the Cocoa instance sends the message to the delegate.
Recall the discussion of protocols from Chapter 10. Delegation is one of Cocoa’s main uses of protocols. In the old days, delegate methods were listed in the Cocoa class’s documentation, and their method signatures were made known to the compiler through an informal protocol (a category on NSObject). Now, though, a class’s delegate methods are usually listed in a genuine protocol with its own documentation. There are over 70 Cocoa delegate protocols, showing how heavily Cocoa relies on delegation. Most delegate methods are optional, but in a few cases you’ll discover some that are required.
Cocoa Delegation
To customize a Cocoa instance’s behavior through delegation, you start with one of your classes, which, if necessary, declares conformance to the relevant delegate protocol. When the app runs, you set the Cocoa instance’s delegate property (or whatever its name is) to an instance of your class. You might do this in code; alternatively, you might do it in a nib, by connecting an instance’s delegate outlet (or whatever it’s called) to an appropriate instance that is to serve as delegate. Your delegate class will probably do other things besides serving as this instance’s delegate. Indeed, one of the nice things about delegation is that it leaves you free to slot delegate code into your class architecture however you like.
Here’s a simple example, involving UIAlertView. If a UIAlertView’s Cancel button is tapped, the alert view is dismissed. But if you want to do something in response to the alert view being dismissed, you need to give it a delegate so that you can receive an event (alertView:didDismissWithButtonIndex:) telling you that the alert view was dismissed. It’s so common to give a UIAlertView a delegate that its designated initializer allows you to supply one; typically, the delegate will be the instance (self) that summoned the alert view in the first place:
- (void) gameWon {
UIAlertView* av =
[[UIAlertView alloc] initWithTitle:@"Congratulations!"
message:@"You won the game. Another game?"
delegate:self
cancelButtonTitle:@"No, thanks."
otherButtonTitles:@"Sure!", nil];
[av show];
}
- (void) alertView:(UIAlertView*) av
didDismissWithButtonIndex: (NSInteger) ix {
if (ix == 1) { // user said "Sure!"
[self newGame];
}
}
An app’s shared application instance ([UIApplication sharedApplication]) has a delegate, which serves such an important role in the life of the app that the Xcode app templates automatically supply one. I described in Chapter 6 how an app gets started by callingUIApplicationMain:
int main(int argc, char *argv[])
{
@autoreleasepool {
return UIApplicationMain(argc, argv, nil,
NSStringFromClass([AppDelegate class]));
}
}
The template has provided the project with files defining an AppDelegate class; that line tells UIApplicationMain to instantiate AppDelegate and make that instance the delegate of the shared application instance (which it has also created). As I pointed out in Chapter 10, AppDelegate formally adopts the UIApplicationDelegate protocol, signifying that it is ready to serve in this role. And, as I also said in Chapter 10, respondsToSelector: is then sent to the app delegate to see what UIApplicationDelegate protocol methods it implements. If it implementsapplication:didFinishLaunchingWithOptions:, it will be sent application:didFinishLaunchingWithOptions:, which is thus one of the earliest opportunities for your code to run.
NOTE
The UIApplication delegate methods are also provided as notifications. This lets an instance other than the app delegate hear conveniently about application lifetime events, by registering for them. A few other classes provide duplicate events similarly; for example, UITableView’s delegate method tableView:didSelectRowAtIndexPath: is matched by a notificationUITableViewSelectionDidChangeNotification.
By convention, many Cocoa delegate method names contain the modal verbs should, will, or did. A will message is sent to the delegate just before something happens; a did message is sent to the delegate just after something happens. A should method is special: it returns a BOOL, and you are expected to respond with YES to permit something or NO to prevent it. The documentation tells you what the default response is; you don’t have to implement a should method if the default response is always acceptable.
In many cases, a property will control some overall behavior, while a delegate message lets you modify that behavior based on circumstances at runtime. For example, whether the user can tap the status bar to make a scroll view scroll quickly to the top is governed by the scroll view’sscrollsToTop property; but even if this property’s value is YES, you can prevent this behavior for a particular tap by returning NO from the delegate’s scrollViewShouldScrollToTop:.
When you’re searching the documentation for how you can be notified of a certain event, be sure to consult the corresponding delegate protocol, if there is one. You’d like to know when the user taps in a UITextField to start editing it? You won’t find anything relevant in the UITextField class documentation; what you’re after is textFieldDidBeginEditing: in the UITextFieldDelegate protocol. You want to respond when the user rearranges items on your tab bar? Look in UITabBarControllerDelegate. And so on.
Implementing Delegation
The Cocoa pattern of a delegate whose responsibilities are described by a protocol is one that you will want to imitate in your own code. Setting up this pattern takes some practice, and can be a little time-consuming, but it is often the most appropriate approach, because of the way it assigns knowledge and responsibility to the various objects involved. A very typical situation is a case of two-way communication: for example, Object A creates and configures Object B; later, before Object B goes out of existence, Object A also needs to hear back from Object B.
The pattern here is that Class B defines a protocol SomeProtocol in its header, along with a delegate property typed as id <SomeProtocol>. That way, Class A imports Class B’s header, which is right and proper because Object A is going to create Object B and configure it, but Class B needn’t know anything about Class A, which is right and proper because it’s just a servant, and should be able to serve any other object. Because Class A imports Class B’s header, it knows about SomeProtocol and can adopt it and implement its required methods. When Object A creates Object B, it also sets itself as Object B’s delegate. Now Object B knows all that it needs to know: it can send SomeProtocol messages to its delegate, regardless of that delegate’s actual class.
To see why this pattern is a good one, consider an actual case. In one of my apps I present a view where the user can move three sliders to choose a color. Appropriately, its code is in a class called ColorPickerController. When the user taps Done or Cancel, the view should be dismissed; but first, the code that presented this view needs to hear about what color the user chose. So I need to send a message from the ColorPickerController instance back to the instance that presented it. Here is the declaration for that message:
- (void) colorPicker:(ColorPickerController*)picker
didSetColorNamed:(NSString*)theName
toColor:(UIColor*)theColor;
The question is: where should this declaration go?
Now, it happens that in my app I know the class of the instance that will in fact present the ColorPickerController’s view: it is a SettingsController. So I could simply declare this method in the interface section of SettingsController’s header file, and have ColorPickerController import SettingsController’s header file. But this feels wrong:
§ It should not be up to SettingsController to declare a method that it is implementing only in deference to ColorPickerController.
§ If SettingsController declares this message in its header file, ColorPickerController will have to import that header file in order to send the message; but this means that ColorPickerController now knows all about SettingsController, whereas the only thing it needs to know about SettingsController is that it implements this one method.
§ It is merely a contingent fact that the instance being sent this message is a SettingsController; it should be open to any class to present and dismiss a ColorPickerController’s view, and thus to be eligible to receive this message.
Therefore we want ColorPickerController itself to declare the method that it itself is going to call; and we want it to send the message blindly to some receiver, without regard to the class of that receiver. Thus there needs to be a linkage, as it were, between the declaration of this method in ColorPickerController and the implementation of this method in the receiver. That linkage is precisely what a protocol creates! The solution, then, is for ColorPickerController to define a protocol in its header file, with this method as part of that protocol, and for the class that presents a ColorPickerController’s view to conform to that protocol. ColorPickerController also has an appropriately typed delegate property; this provides the channel of communication, and tells the compiler that sending this message is legal.
Here’s ColorPickerController’s header file (note the use of the forward declaration I mentioned in Chapter 10):
@protocol ColorPickerDelegate;
@interface ColorPickerController : UIViewController
@property (nonatomic, weak) id <ColorPickerDelegate> delegate;
@end
@protocol ColorPickerDelegate
// color == nil on cancel
- (void) colorPicker:(ColorPickerController *)picker
didSetColorNamed:(NSString *)theName
toColor:(UIColor*)theColor;
@end
When my SettingsController instance creates and configures a ColorPickerController instance, it also sets itself as that ColorPickerController’s delegate. Now, when the user picks a color, the ColorPickerController knows to whom it should sendcolorPicker:didSetColorNamed:toColor:, namely, its delegate; and the compiler allows this, because the delegate has adopted the ColorPickerDelegate protocol:
- (void) dismissColorPicker: (id) sender { // user has tapped our Done button
[self.delegate colorPicker:self
didSetColorNamed:self.colorName
toColor:self.color];
}
If you create a project from Xcode’s own Utility Application template, you will see that it, too, exemplifies exactly this same architecture. We start with a MainViewController. It eventually creates a FlipsideViewController. When the FlipsideViewController is ready to go out of existence, it is going to want to send the flipsideViewControllerDidFinish: message back to whoever created it. So FlipsideViewController defines a FlipsideViewControllerDelegate protocol requiring the flipsideViewControllerDidFinish: method, along with a delegate property typed as id <FlipsideViewControllerDelegate>. When a MainViewController instance creates a FlipsideViewController instance, it specifies that it itself, the MainViewController instance, is the FlipsideViewController’s delegate; and it can do this, because MainViewController does in fact adopt the FlipsideViewControllerDelegate protocol! Problem solved, mission accomplished. If you’re in doubt about how to set up the delegation-and-protocol pattern, make a project based on the Utility Application template and study it.
Data Sources
A data source is like a delegate, except that its methods supply the data for another object to display. The chief Cocoa classes with data sources are UITableView, UICollectionView, UIPickerView, and UIPageViewController. In each case, the data source must formally conform to a protocol with required methods.
It comes as a surprise to some beginners that a data source is necessary at all. Why isn’t a table’s data just part of the table? Or why isn’t there at least some fixed data structure that contains the data? The reason is that such an architecture would violate generality. Use of a data source separates the object that displays the data from the object that manages the data, and leaves the latter free to store and obtain that data however it likes (see on model–view–controller in Chapter 13). The only requirement is that the data source must be able to supply information quickly, because it will be asked for it in real time when the data needs displaying.
Another surprise is that the data source is different from the delegate. But this again is only for generality; it’s an option, not a requirement. There is no reason why the data source and the delegate should not be the same object, and most of the time they probably will be. Indeed, in most cases, data source methods and delegate methods will work closely together; you won’t even be conscious of the distinction.
In this simple example, we implement a UIPickerView that allows the user to select by name a day of the week (the Gregorian week, using English day names). The first two methods are UIPickerView data source methods; the third method is a UIPickerView delegate method. It takes all three methods to supply the picker view’s content:
- (NSInteger) numberOfComponentsInPickerView: (UIPickerView*) pickerView {
return 1;
}
- (NSInteger) pickerView: (UIPickerView*) pickerView
numberOfRowsInComponent: (NSInteger) component {
return 7;
}
- (NSString*) pickerView:(UIPickerView*)pickerView
titleForRow:(NSInteger)row
forComponent:(NSInteger)component {
NSArray* arr = @[@"Sunday",
@"Monday",
@"Tuesday",
@"Wednesday",
@"Thursday",
@"Friday",
@"Saturday"];
return arr[row];
}
Actions
An action is a message emitted by an instance of a UIControl subclass (a control) reporting a significant user event taking place in that control (see Chapter 7). The UIControl subclasses are all simple interface objects that the user can interact with directly, like a button (UIButton), a switch (UISwitch), a segmented control (UISegmentedControl), a slider (UISlider), or a text field (UITextField).
The significant user events (control events) are listed under UIControlEvents in the Constants section of the UIControl class documentation. Different controls implement different control events: for example, a segmented control’s Value Changed event signifies that the user has tapped to select a different segment, but a button’s Touch Up Inside event signifies that the user has tapped the button. Of itself, a control event has no external effect; the control responds visually (for example, a tapped button looks tapped), but it doesn’t share the information that the event has taken place. If you want to know when a control event takes place, so that you can respond to it in your code, you must arrange for that control event to trigger an action message.
Here’s how it works. A control maintains an internal dispatch table: for each control event, there can be any number of target–action pairs, in each of which the action is a message selector (the name of a method) and the target is the object to which that message is to be sent. When a control event occurs, the control consults its dispatch table, finds all the target–action pairs associated with that control event, and sends each action message to the corresponding target (Figure 11-1).
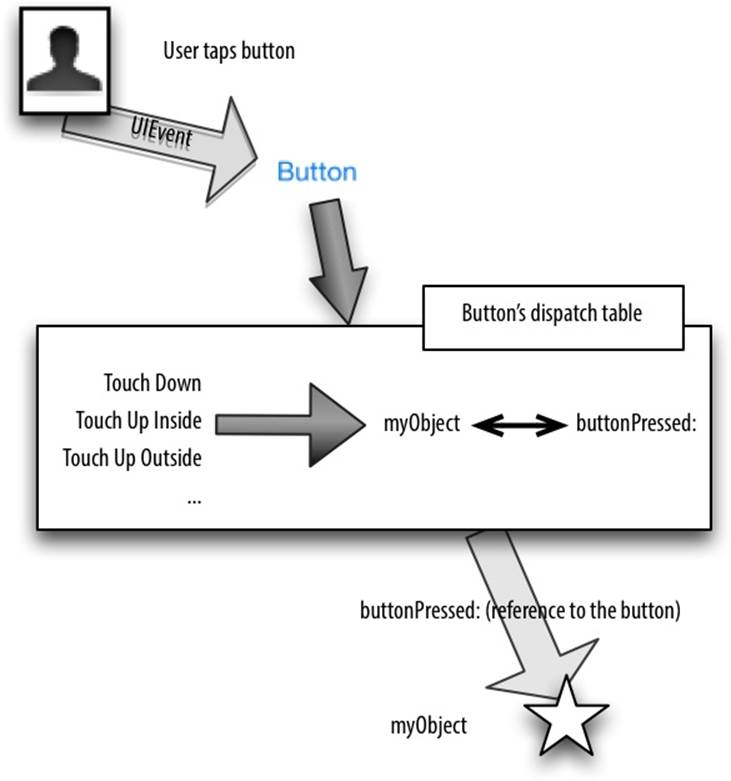
Figure 11-1. The target–action architecture
There are two ways to manipulate a control’s action dispatch table: you can configure an action connection in a nib (as explained in Chapter 7), or you can use code. To use code, you send the control the message addTarget:action:forControlEvents:, where the target: is an object, the action: is a selector, and the controlEvents: are designated by a bitmask (see Chapter 1 if you’ve forgotten how to construct a bitmask). Unlike a notification center, a control also has methods for introspecting the dispatch table.
Recall the example from Chapter 7. We have a buttonPressed: method, whose purpose is to be called when the user taps a certain button in the interface:
- (void) buttonPressed: (id) sender {
UIAlertView* av = [[UIAlertView alloc] initWithTitle:@"Howdy!"
message:@"You tapped me."
delegate:nil
cancelButtonTitle:@"Cool"
otherButtonTitles:nil];
[av show];
}
In Chapter 7, we arranged for that to happen by setting up an action connection in the nib: we connected the button’s Touch Up Inside event to the ViewController buttonPressed: method. In reality, this meant that we were forming a target–action pair — the target was the ViewController instance that would own the nib when it was loaded, and the action was the buttonPressed: selector — and adding it to the button’s dispatch table for the Touch Up Inside control event.
Instead of making that arrangement in the nib, we could have done the same thing in code. Suppose we had never drawn that action connection. And suppose that, instead, we had an outlet connection from the view controller to the button, called button. (In Chapter 7, we did in fact create such an outlet connection.) Then the view controller, after the nib loads, can configure the button’s dispatch table like this:
[self.button addTarget:self action:@selector(buttonPressed:)
forControlEvents:UIControlEventTouchUpInside];
WARNING
A control event can have multiple target–action pairs. You might configure it this way intentionally, but it is also possible to do so accidentally. Unintentionally giving a control event a target–action pair without removing its existing target-action pair is an easy mistake to make, and can cause some very mysterious behavior. For example, if we had formed an action connection in the nib and configured the dispatch table in code, a tap on the button would cause buttonPressed: to be called twice.
The signature for the action selector can be in any of three forms:
§ The fullest form takes two parameters:
§ The control, usually typed as id.
§ The UIEvent that generated the control event.
§ A shorter form, the one most commonly used, omits the second parameter. buttonPressed: is an example; it takes one parameter, sender. When buttonPressed: is called through an action message emanating from the button, sender will be a reference to the button.
§ There is a still shorter form that omits both parameters.
What is the UIEvent, and what is it for? Well, a touch event is generated whenever the user does something with a finger (sets it down on the screen, moves it, raises it from the screen). UIEvents are the lowest-level objects charged with communication of touch events to your app. A UIEvent is basically a timestamp (a double) along with a collection (NSSet) of touch events (UITouch). The action mechanism deliberately shields you from the complexities of touch events, but by electing to receive the UIEvent, you can still deal with those complexities if you want to.
Curiously, none of the action selector parameters provide any way to learn which control event triggered the current action selector call! Thus, for example, to distinguish a Touch Up Inside control event from a Touch Up Outside control event, their corresponding target–action pairs must specify two different action handlers; if you dispatch them to the same action handler, that handler cannot discover which control event occurred.
OS X PROGRAMMER ALERT
If you’re an experienced OS X Cocoa developer, you’ll note that there are some major differences between the OS X implementation of actions and the iOS implementation. In OS X, a control has just one action; in iOS, a control may respond to multiple control events. In OS X, an action has just one target; in iOS, a single event can trigger multiple action messages to multiple targets. In OS X, an action message selector comes in just one form; in iOS, there are three possible forms.
The Responder Chain
A responder is an object that knows how to receive UIEvents directly (see the previous section). It knows this because it is an instance of UIResponder or a UIResponder subclass. If you examine the Cocoa class hierarchy, you’ll find that just about any class that has anything to do with display on the screen is a responder. A UIView is a responder. A UIWindow is a responder. A UIViewController is a responder. Even a UIApplication is a responder. In iOS 5 and later, the app delegate is a responder.
If you look in the documentation for the UIResponder class, you’ll find that it implements four low-level methods for receiving touch-related UIEvents: touchesBegan:withEvent:, touchesMoved:withEvent:, touchesEnded:withEvent: and touchesCancelled:withEvent:. These are called to notify a responder of a touch event. No matter how your code ultimately hears about a user-related touch event — indeed, even if your code never hears about a touch event (because Cocoa reacted in some automatic way to the touch, without your code’s intervention) — the touch was initially communicated to a responder through one of these methods.
The mechanism for this communication starts by deciding which responder the user touched. The UIView methods hitTest:withEvent: and pointInside:withEvent: are called until the correct view (the hit-test view) is located. Then UIApplication’s sendEvent: method is called, which calls UIWindow’s sendEvent:, which calls the correct method of the hit-test view (a responder).
The responders in your app participate in a responder chain, which essentially links them up through the view hierarchy. A UIView can sit inside another UIView, its superview, and so on until we reach the app’s UIWindow (a UIView that has no superview). The responder chain, from bottom to top, looks like this:
1. The UIView that we start with (here, the hit-test view).
2. The UIViewController that controls that UIView, if there is one.
3. The UIView’s superview, and then its UIViewController if there is one. Repeat this step, moving up the superview hierarchy one superview at a time, until we reach…
4. The UIWindow.
5. The UIApplication.
6. The UIApplication’s delegate.
Deferring Responsibility
The responder chain can be used to let a responder defer responsibility for handling a touch event. If a responder receives a touch event and can’t handle it, the event can be passed up the responder chain to look for a responder that can handle it. This can happen in two main ways:
§ The responder doesn’t implement the relevant method.
§ The responder implements the relevant method to call super.
For example, a plain vanilla UIView has no native implementation of the touch event methods. Thus, by default, even if a UIView is the hit-test view, the touch event effectively falls through the UIView and travels up the responder chain, looking for someone to respond to it. In certain situations, it might make logical sense for you to defer responsibility for this touch to the main background view, or even to the UIViewController that controls it.
One of my apps is a game that’s a simple jigsaw puzzle: a rectangular photo is divided into smaller pieces, and the pieces are shuffled. The background view is a UIView subclass called Board; the puzzle pieces are generic UIView objects, and are subviews of the Board. Knowledge of how a piece should respond when tapped resides in the Board, which knows the overall layout of the pieces; thus, I don’t need a puzzle piece to contain any tap detection logic. Therefore I take advantage of the responder chain to defer responsibility: the puzzle pieces don’t implement any touch methods, and a tap on a puzzle piece falls through to the Board, which does perform touch detection and handles the tap, and tells the tapped piece what to do. The user, of course, knows nothing about that: outwardly, you touch a piece and the piece responds.
Nil-Targeted Actions
A nil-targeted action is a target–action pair in which the target is nil. There is no designated target object, so the following rule is used: starting with the hit-test view (the view with which the user is interacting), Cocoa looks up the responder chain for an object that can respond to the action message.
Suppose, for example, that we were to configure a button in code, like this:
[self.button addTarget:nil action:@selector(buttonPressed:)
forControlEvents:UIControlEventTouchUpInside];
That’s a nil-targeted action. So what happens when the user taps the button? First, Cocoa looks in the UIButton itself to see whether it responds to buttonPressed:. If not, it looks in the UIView that is its superview. And so on, up the responder chain. If a responder is found that handlesbuttonPressed:, the action message is sent to that object; otherwise, the message goes unhandled (with no penalty).
Thus, in the app we posited earlier, where self is the view controller that owns the view that contains the button, and where the class of this view controller does in fact implement buttonPressed:, tapping the button will cause buttonPressed: to be called!
To create a nil-targeted action in a nib, you form a connection to the First Responder proxy object (in the dock). This is what the First Responder proxy object is for! The First Responder isn’t a real object with a known class, so before you can connect an action to it, you have to define the action message within the First Responder proxy object, like this:
1. Select the First Responder proxy in the nib, and switch to the Attributes inspector.
2. You’ll see a table (probably empty) of user-defined nil-targeted First Responder actions. Click the Plus button and give the new action a signature; it must take a single parameter (so that its name will end with a colon).
3. Now you can Control-drag from a control, such as a UIButton, to the First Responder proxy to specify a nil-targeted action with the signature you specified.
WARNING
Cocoa uses the term first responder in a confusing way. An arbitrary responder object can be assigned formal first responder status (by sending it becomeFirstResponder, provided that this responder returns YES from canBecomeFirstResponder). But this does not make the object first responder for purposes of handling nil-targeted actions! Cocoa’s hunt for a responder that can handle a nil-targeted action still starts with the control that the user is interacting with (the hit-test view) and goes up the responder chain from there.
Swamped by Events
Your code runs only because Cocoa sends an event and you had previously set up a method ready to receive it. Cocoa has the potential to send lots of events, telling you what the user has done, informing you of each stage in the lifetime of your app and its objects, asking for your input on how to proceed. To receive the events that you need to hear about, your code is peppered with methods that are entry points — methods that you have written with just the right name and in just the right class so that they can be called by Cocoa through events. In fact, it is easy to imagine that in many cases your code for a class will consist almost entirely of entry points.
That fact is one of your primary challenges as an iOS programmer. You know what you want to do, but you have to divide it up and allocate it according to when Cocoa is going to call into your code. Before you’ve written a single line of your own code, the skeleton structure of a class is likely to have been largely mapped out for you by the need to be prepared to receive the events that Cocoa is going to want to send you.
Suppose, for example, that your iPhone app presents an interface consisting of a table view. (This is in fact an extremely probable scenario.) You’re likely to have a corresponding UITableViewController subclass; UITableViewController is a built-in UIViewController subclass, and an instance of your UITableViewController subclass will own and control the table view, plus you’ll probably use this same class as the table view’s data source and delegate. In this single class, then, you’re likely to want to implement at a minimum the following methods:
initWithCoder: or initWithNibName:bundle:
UIViewController lifetime method, where you perform custom instance initializations.
viewDidLoad
UIViewController lifetime method, where you perform view-related initializations.
viewDidAppear:
UIViewController lifetime method, where you set up states that need to apply only while your view is onscreen. For example, if you’re going to register for a notification or set up a timer, this is a likely place to do it.
viewDidDisappear:
UIViewController lifetime method, where you reverse what you did in viewDidAppear:. For example, this would be a likely place to unregister for a notification or invalidate a repeating timer that you set up in viewDidAppear:.
supportedInterfaceOrientations
UIViewController query method, where you specify what device orientations are allowed for this view controller’s main view.
numberOfSectionsInTableView:
tableView:numberOfRowsInSection:
tableView:cellForRowAtIndexPath:
UITableView data source query methods, where you specify the contents of the table.
tableView:didSelectRowAtIndexPath:
UITableView delegate user action method, where you respond when the user taps a row of the table.
dealloc
NSObject lifetime method, where you perform end-of-life cleanup.
Suppose, further, that you did in fact use viewDidAppear: to register for a notification and to set up a timer. Then that notification has a selector (unless you used a block), and the timer has a selector; you must therefore also implement the methods described by those selectors.
We already have, then, about a dozen methods whose presence is effectively a matter of boilerplate. These are not your methods; you are never going to call them. They are Cocoa’s methods, which you have placed here so that each can be called at the appropriate moment in the life story of your app.
The logic of a program laid out in this fashion is by no means easy to understand! I’m not criticizing Cocoa here — indeed, it’s hard to imagine how else an application framework could work — but, purely as an objective matter of fact, the result is that a Cocoa program, even your own program, even while you’re developing it, is hard to read, because it consists of numerous disconnected entry points, each with its own meaning, each called at its own set moment which is not in any way obvious from looking at the program. To understand what our hypothetical class does, you have to know already such things as when viewDidAppear: is called and how it is typically used; otherwise, you don’t even know where to look to find the program’s logic and behavior, let alone how to interpret what you see when you do look there. And this difficulty is greatly compounded when you try to read someone else’s code (this is one reason why, as I mentioned in Chapter 8, sample code is not all that helpful to a beginner).
Looking at the code of an iOS program — even your own code — your eyes can easily glaze over at the sight of all these methods called automatically by Cocoa under various circumstances. To be sure, experience will teach you about such things as the overridden UIViewController methods and the table view delegate and data source methods. On the other hand, no amount of experience will tell you that a certain method is called as a button’s action or through a notification. Comments really help, and I strongly advise you, as you develop any iOS app, to comment every method, quite heavily if need be, saying what that method does and under what circumstances you expect it to be called — especially if it is an entry point, where it is Cocoa itself that will do the calling.
Perhaps the most common kind of mistake in writing a Cocoa app is not that there’s a bug in your code itself, but that you’ve put the code in the wrong place. Your code isn’t running, or it’s running at the wrong time, or the pieces are running in the wrong order. I see questions about this sort of thing all the time on the various online user forums (these are all actual examples that appeared over the course of just two days):
§ “There’s a delay between the time when my view appears and when my button takes on its correct title.” That’s because you put the code that sets the button’s title in viewDidAppear:. That’s too late; your code needs to run earlier, perhaps in viewWillAppear:.
§ “My subviews are positioned in code and they’re turning out all wrong.” That’s because you put the code that positions your subviews in viewDidLoad. That’s too early; your code needs to run later, when your view’s dimensions have been determined.
§ “My view is rotating even though my view controller’s supportedInterfaceOrientations says not to.” That’s because you implemented supportedInterfaceOrientations in the wrong class; it needs to be implemented in the UINavigationController that contains your view controller.
§ “I set up an action connection for Value Changed on a text field, but my code isn’t being called when the user edits.” That’s because you connected the wrong action; a text field emits Editing Changed, not Value Changed.
Adding to your challenges is that fact that you can’t really know precisely when an entry point will be called. The documentation may give you a general sense, but in most cases there are no guarantees about when events will arrive and in what order. What you think is going to happen, and even what the documentation leads you to believe is going to happen, might not be quite what really does happen. Your own code can trigger unintended events. The documentation might not make it clear just when a notification will be sent. There could even be a bug in Cocoa such that events are called in a way that seems to contradict the documentation. And you have no access to the Cocoa source code, so you can’t work out the underlying details. Therefore I also recommend that as you develop your app, you instrument your code heavily with caveman debugging (NSLog; see Chapter 9). As you test your code, keep an eye on the console output and check whether the messages make sense. You may be surprised at what you discover.
For example, in one app that I was developing, I suddenly found that in a UIViewController subclass, viewDidLoad was being called twice as the app started up, which should be impossible. Fortunately, my code was heavily instrumented with NSLog calls, or I would never have discovered this problem. Adding even more NSLog calls, I found that viewDidLoad was being called while I was still in the middle of executing awakeFromNib, which should really be impossible. The reason turned out to be my own mistake: I was referring to my view controller’s view property during awakeFromNib, which was causing viewDidLoad to be called. The problem went away when I corrected my mistake.
Delayed Performance
Some of your code tells Cocoa what to do. But Cocoa is a black box, so what Cocoa actually will do, and precisely when it will do it, is out of your control. Your code was executed in response to some event; but your code in turn may trigger a new event or chain of events. Sometimes this causes bad things to happen: there might be a crash, or Cocoa might appear not to have done what you said to do. One of the chief causes of these difficulties is the chain of triggered events itself. Sometimes you just need to step outside that chain for a moment and wait for everything to settle down before proceeding.
The technique for doing this is called delayed performance. You tell Cocoa to do something not right this moment, but in a little while, when things have settled down. Perhaps you need only a very short delay, possibly even as short as zero seconds, just to let Cocoa finish doing something, such as laying out interface. Technically, you’re allowing the current run loop to finish, completing and unwinding the entire current method call stack, before proceeding further with your own code.
You’re likely to be using delayed performance a lot more than you might expect. With experience, you’ll develop a kind of sixth sense for when delayed performance might be the solution to your difficulties. There are three chief implementations of delayed performance that I use in my own code:
performSelector:withObject:afterDelay:
I mentioned this NSObject method at the end of Chapter 10. It limits you as to the signature of the selector — it must take one parameter or none — so you might have to restructure your own code slightly.
dispatch_after
I mentioned this in Chapter 3. It takes a block, not a selector, which can result in more direct and readable code.
dispatch_async
Often, the delay you’re after doesn’t need to be more than zero. What you’re trying to do is postpone the next step until the consequences of the previous step have worked themselves out. So it suffices to wait until nothing is happening. You can do this with a call to dispatch_asynconto the same queue where everything is happening now, namely the main queue.
In all three cases, what you propose to do will be done later on; you’re deliberately breaking out of your own code’s line-by-line sequence of execution. So a delayed performance call will be the last call in its method (or block), and cannot return any value.
In this example from one of my own apps, the user has tapped a row of a table, and my code responds by creating and showing a new view controller:
- (void) tableView:(UITableView *)tableView
didSelectRowAtIndexPath:(NSIndexPath *)indexPath {
TracksViewController *t =
[[TracksViewController alloc]
initWithMediaItemCollection:(self.albums)[indexPath.row]];
[self.navigationController pushViewController:t animated:YES];
}
Unfortunately, the innocent-looking call to my TracksViewController method initWithMediaItemCollection: can take a moment to complete, so the app comes to a stop with the table row highlighted — very briefly, but just long enough to startle the user. To cover this delay with a sense of activity, I’ve rigged my UITableViewCell subclass to show a spinning activity indicator when it’s selected:
- (void)setSelected:(BOOL)selected animated:(BOOL)animated {
if (selected) {
[self.activityIndicator startAnimating]; // appear and spin
} else {
[self.activityIndicator stopAnimating]; // disappear
}
[super setSelected:selected animated:animated];
}
However, the spinning activity indicator never appears and never spins. The reason is that the events are stumbling over one another here. UITableViewCell’s setSelected:animated: isn’t called until the UITableView delegate method tableView:didSelectRowAtIndexPath: has finished. But the delay we’re trying to paper over is during tableView:didSelectRowAtIndexPath:; the whole problem is that it doesn’t finish fast enough. Delayed performance to the rescue! I’ll rewrite tableView:didSelectRowAtIndexPath: so that it finishes immediately — thus triggering setSelected:animated: immediately and causing the activity indicator to appear and spin — and I’ll use delayed performance to call initWithMediaItemCollection: later on, when the interface has ironed itself out:
- (void) tableView:(UITableView *)tableView
didSelectRowAtIndexPath:(NSIndexPath *)indexPath {
// tiny delay to allow spinner to start spinning
double delayInSeconds = 0.1;
dispatch_time_t popTime =
dispatch_time(DISPATCH_TIME_NOW, delayInSeconds * NSEC_PER_SEC);
dispatch_after(popTime, dispatch_get_main_queue(), ^(void){
TracksViewController *t =
[[TracksViewController alloc]
initWithMediaItemCollection:(self.albums)[indexPath.row]];
[self.navigationController pushViewController:t animated:YES];
});
}