iPad: The Missing Manual (2014)
Part 4. Connections
Chapter 15. iCloud & Continuity
Apple’s free iCloud service stems from Apple’s brainstorm that, since it controls both ends of the connection between a Mac and the Apple Web site, it should be able to create some pretty clever Internet-based features.
This chapter concerns what iCloud can do for you, the iPad owner.
NOTE
To get a free iCloud account if you don’t already have one, sign up in Settings→iCloud.
What iCloud Giveth
So what is iCloud? Mainly, it’s these things:
§ A synchronizing service. It keeps your calendar, address book, and documents updated and identical on all your gadgets: Mac, PC, iPad, iPhone, iPod Touch. Also your Web passwords and credit card numbers. That’s a huge convenience—almost magical.
§ Find My iPhone pinpoints the current location of your iPad on a map (and iPhones, and Macs). In other words, it’s great for helping you find your iPad if it’s been stolen or lost.
You can also make your lost gadget start making a loud pinging sound for a couple of minutes by remote control. That’s brilliantly effective when your iPad has slipped under the couch cushions.
§ An email account. Handy, really: An iCloud account gives you a new email address. If you already have an email address, great! This new one can be a backup account, one you never enter on Web sites so that it never gets overrun with spam. Or vice versa: Let this be your junk account, the address you use for online forms. Either way, it’s great to have a second account.
§ An online locker. Anything you buy from Apple—music, TV shows, ebooks, and apps—is stored online, for easy access at any time. For example, whenever you buy a song or a TV show from the online iTunes Store, it appears automatically on your iPad and computers. Your photos are stored online, too.
§ Back to My Mac. This option lets you access the contents of one Mac from another one across the Internet.
§ Automatic backup. iCloud can back up your iPad—automatically and wirelessly (over WiFi). It’s a quick backup, since iCloud backs up only the changed data.
If you ever want to set up a new i-gadget, or if you want to restore everything to an existing one, life is sweet. Once you’re in a WiFi hotspot, all you have to do is re-enter your Apple ID and password in the setup assistant that appears when you turn the thing on. Magically, your gadget is refilled with everything that used to be on it.
Well, almost everything. An iCloud backup stores everything you’ve bought from Apple (music, apps, books); photos and videos in your Camera Roll; settings, including the layout of your Home screen; text messages; and ringtones. Your mail, and anything that came from your computer (like music/ringtones/videos from iTunes and photos from iPhoto), have to be reloaded.
§ Family Sharing is a broad category of features intended for families (up to six people).
First, everyone can share stuff bought from Apple’s online stores: movies, TV shows, music, ebooks, and so on. It’s all on a single credit card, but you, the all-knowing parent, can approve each person’s purchases—without having to share your account password. That’s a great solution to a long-standing problem.
There’s also a shared family photo album and an auto-shared Family category on the calendar. Any family member can see the location of any other family member, and they can find each other’s lost iPads or iPhones using Find My iPhone.
§ iCloud Drive is Apple’s version of Dropbox. It’s a folder, present on every Mac, iPad, iPhone, and iPod Touch, that lists whatever you’ve put into it—an online “disk” that holds 5 gigabytes (more, if you’re willing to pay money).
The iCloud Drive is a perfect place to put stuff you want to be able to access from any Apple gadget, wherever you go. It’s a great backup, too.
§ Continuity. If you have an iPhone, you’re in for a treat. The set of features Apple calls Continuity turn the iPhone into a part of the iPad. They let you make calls from your iPad as though it were a speakerphone. They let you send and receive text messages from your iPad—to any cellphone on earth. They let you AirDrop files between a Mac, iPhone, and iPad, wirelessly. And more.
So there’s the quick overview. The rest of the chapter covers each of these iCloud features in greater depth.
iCloud Sync
For many people, this may be the killer app for iCloud right here: The iCloud Web site, acting as the master control center, can keep multiple Macs, Windows PCs, and iPads/iPhones/iPod Touches synchronized. That offers both a huge convenience factor—all your stuff is always on all your gadgets—and a safety/backup factor, since you have duplicates everywhere.
It works by storing the master copies of your stuff—email, notes, contacts, calendars, Web bookmarks, and documents—on the Web. (Or “in the cloud,” as the product managers would say.)
Whenever your Macs, PCs, or i-gadgets are online—over WiFi or cellular—they connect to the mother ship and update themselves. Edit an address on your iPad, and shortly thereafter you’ll find the same change in Contacts (on your Mac) and Outlook (on your PC). Send an email reply from your PC at the office, and you’ll find it in your Sent Mail folder on the Mac at home. Add a Web bookmark anywhere and find it everywhere else. Edit a spreadsheet in Numbers on your iPad and find the same numbers updated on your Mac.
Actually, there’s even another place where you can work with your data: on the Web. Using your computer, you can log into www.icloud.com to find Web-based clones of Calendar, Contacts, and Mail.
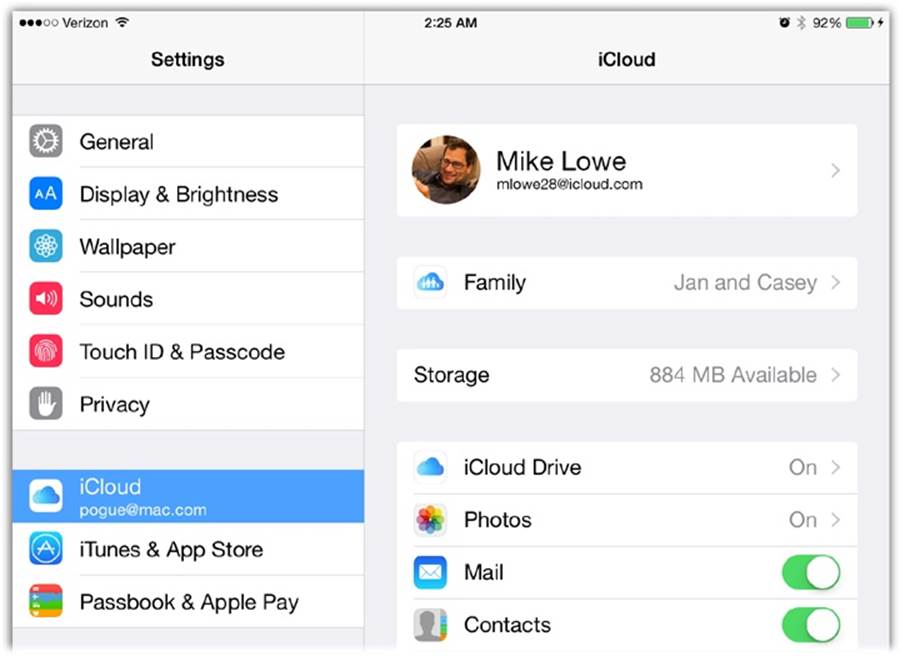
To control the syncing, tap Settings→iCloud on your iPad. Turn on the checkboxes of the stuff you want to be synchronized all the way around:
§ iCloud Drive. This is the on/off switch for the iCloud Drive (The One AirDrop Setting). Look Me Up by Email is a list of apps that permit other iCloud members to find you by looking up your address. And Use Cellular Data lets you prevent a cellular iPad from doing its iCloud Drive synchronization over the cellular network, since you probably get only a limited data allotment each month.
§ Photos. Tap the > button to see four on/off switches.
iCloud Photo Library is Apple’s new online photo storage feature. It stores all your photos and videos online, so you can access them from any Apple gadget; you can read more about it on iCloud Photo Library.
My Photo Stream and iCloud Photo Sharing are the master switches for Photo Streams, which are among iCloud’s marquee features (Chapter 15).
When you hold your finger down on the shutter button, recent iPad models can snap 10 frames a second. That’s burst mode—and all those photos can fill up your iCloud storage. So Apple gives you the Upload Burst Photos option to exclude them from the backup.
§ Mail. “Mail” refers to your actual email messages, plus your account settings and preferences from OS X’s Mail program.
§ Contacts, Calendars. There’s nothing as exasperating as realizing that the address book you’re consulting on your iPad is missing somebody you’re sure you entered—on your iPhone. This option keeps all your address books and calendars synchronized. Delete a phone number on your computer at home, and you’ll find it gone from your iPad. Enter an appointment on your iPad, and you’ll find the calendar updated everywhere else.
§ Reminders. This option refers to the to-do items you create in the iPad’s Reminders app; very shortly, those reminders will show up on your Mac (in Reminders, Calendar, or BusyCal) or PC (in Outlook). How great to make a reminder for yourself in one place and have it reminding you later in another one!
§ Safari. If a Web site is important enough to merit bookmarking while you’re using your iPad, why shouldn’t it also show up in the Bookmarks menu on your desktop PC at home, your Mac laptop, or your iPhone? This option syncs your Safari Reading List, too.
§ Notes. This option syncs the notes from your iPad’s Notes app into the Notes app on the Mac, the email program on your PC, your other i-gadgets, and, of course, the iCloud Web site.
§ Passbook. If you’ve bought tickets for a movie, show, game, or plane flight, you sure as heck don’t want to be stuck without them because you left the barcode on your other gadget.
§ Backup. Your iPad can back itself up online, automatically, so that you’ll never worry about losing your files along with your tablet.
Of course, most of the important stuff is already backed up by iCloud, in the process of syncing it (calendar, contacts—all the stuff described on these pages). So this option just backs up everything else: all your settings, your Health data, your documents, your account settings, and yourphoto library.
There are some footnotes. The wireless backing-up happens only when your iPad is charging and in a WiFi hotspot. And remember that a free iCloud account includes only 5 gigabytes of storage; your iPad probably requires a lot more space than that. Using iCloud Backup may mean paying for more iCloud storage. Apple’s prices are $12 a year for 20 gigabytes, $48 a year for 200 gigs, and so on.)
§ Keychain. The login information for your Web sites (names and passwords), and even your credit card information, can be stored right on your iPad—and synced to your other iPads, iPhones, and Macs (running OS X Mavericks or later).
Now, you could argue that Web-site passwords and credit card numbers are more important than, say, your Reminders. For this category, you don’t want to mess around with security.
Therefore, when you turn on the Keychain switch in Settings, you’re asked to enter your iCloud password.
Then you get a choice of ways to confirm your realness—either by entering a code that Apple texts to you or by using another Apple device to set up this one. Once that’s done, your passwords and credit cards are magically synced across your computers and mobile gadgets, saving you unending headaches. This is a truly great feature that’s worth enduring the setup.
§ Find My iPad. This is the on/off switch for the lifesaving tablet-location feature described on Photo Stream, Photo Sharing. If you don’t turn this feature on here, you won’t be able to use it there.
To set up syncing, turn on the switches for the items you want synced. That’s it. There is no step 2.
NOTE
You may notice that there are no switches here for syncing stuff you buy from Apple, like books, movies, apps, and music. They’re not so much synced as they are stored for you online. You can download them at any time to any of your machines.
Photo Stream, Photo Sharing
These iCloud features are described in glorious detail in Chapter 8—the photos chapter.
Find My iPad
Did you leave your iPad somewhere? Did it get stolen? Has that mischievous 5-year-old left it somewhere in the house again?
Sounds like you’re ready to avail yourself of one of Apple’s finest creations: Find My iPad.
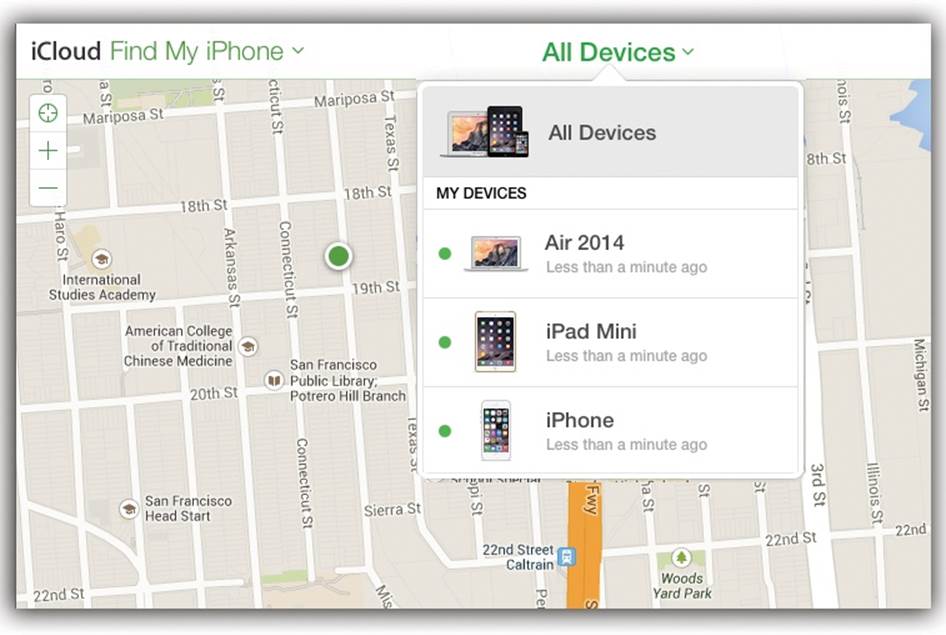
The first step is to log into iCloud.com and click Find My iPhone. Immediately, the Web site updates to show you, on a map, the current location of your iPad—and Macs, iPod Touches, and iPhones. (If they’re not online, or if they’re turned all the way off, you won’t see their current locations.)
If you own more than one, you may have to click All Devices and, from the list, choose the one you’re looking for.
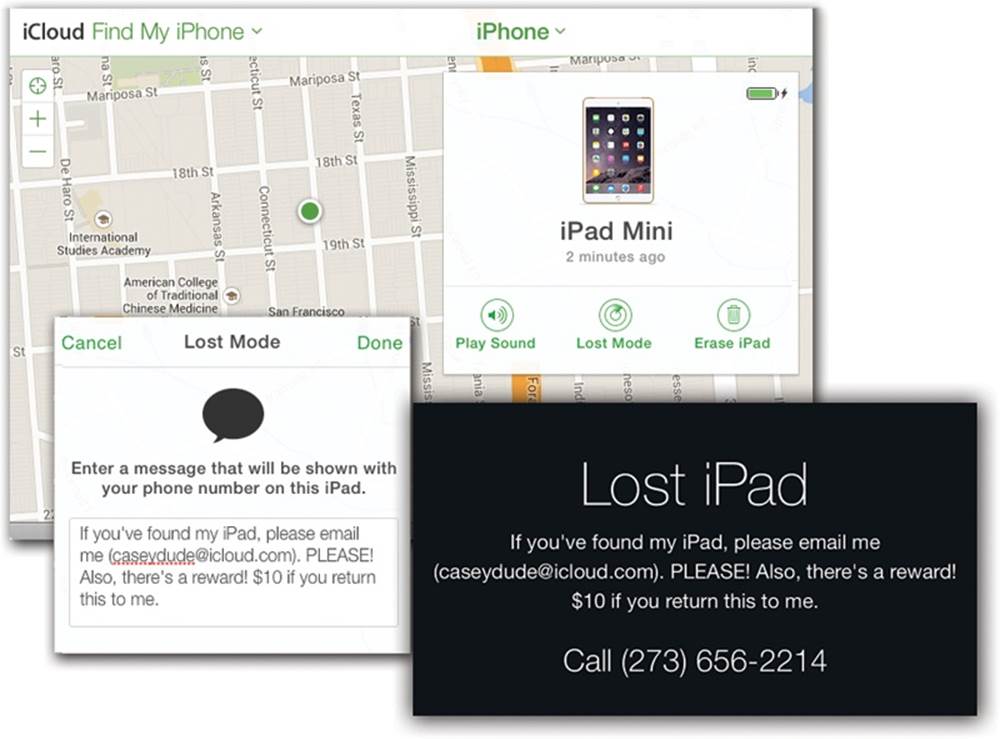
If just knowing where the thing is isn’t enough to satisfy you, then click the dot representing your iPad, click the ![]() next to its name, and marvel at the appearance of these three buttons:
next to its name, and marvel at the appearance of these three buttons:
§ Play Sound. When you click this button, the iPad starts dinging and vibrating loudly for 2 minutes, wherever it is, so you can figure out which backpack you left it in. It beeps even if the ringer switch is off, and even if the iPad is asleep. Once you find the iPad, just wake it in the usual way to make the dinging stop.
§ Lost Mode. When you lose your iPad for real, proceed immediately to Lost Mode. Its first step: Prompting you to password protect it, if you haven’t already. Without the password, the sleazy crook can’t get into your iPad without erasing it. (If your iPad is already password-protected, you don’t see this step.)
The passcode you dream up here works just as though you’d created one yourself on the iPad. That is, it remains in place until you, with the iPad in hand, manually turn it off in Settings→General→Passcode Lock.
Next, the Web site asks for a phone number where you can be reached, and (when you click Next) for a message you want displayed on the iPad’s Lock screen. If you left the thing in a taxi or on some restaurant table, you can use this feature to plead for its return.
When you click Done, your message appears on the iPad’s screen, wherever it is, no matter what app was running, and the iPad locks itself.
Whoever finds it can’t miss the message, and can’t do anything without dismissing the message first.
If the finder of your iPad really isn’t such a nice person, at least you’ll get an automatic email every time the iPad moves from place to place, so you can track the thief’s whereabouts. (Apple sends these messages to your @me.com or @icloud.com address.)
§ Erase iPad. This is the last-ditch security option, for when your immediate concern isn’t so much the iPad as all the private stuff that’s on it. Click this button, confirm the dire warning box, enter your iCloud ID, and click Erase. By remote control, you’ve just erased everything from your iPad, wherever it may be. (If it’s ever returned, you can restore it from your backup.)
Once you’ve wiped the iPad, you can no longer find it or send messages to it using Find My iPad.
TIP
There’s an app for that. Download the Find My iPad app from the App Store. It lets you do everything described above from another iPad, in a tidy, simple control panel.
Send Last Location
Find My iPad works great—as long as your lost iPad has power, is turned on, and is online. Often, though, it’s lying dead somewhere, or it’s been turned off, or there’s no Internet service. In those situations, Find My iPad can’t help you.
Or can it?
Thanks to Send Last Location—a clever iOS 8 enhancement that you turn on in Settings→iCloud→Find My iPad—you have a prayer of finding your iPad again. Before it dies, your iPad will send Apple its location. You have 24 hours to log into iCloud.com and use the Find My iPad feature to see where it was at the time of death. (After that, Apple deletes the location information.) That’s a lot better than the old system, by which Find My iPad drew a blank if the iPad was dead or off.
You definitely want to turn this switch on.
Activation Lock
Thousands of people have found their lost or stolen iPads by using Find My iPad. Yay!
Unfortunately, thousands more will never see their tablets again. Until recently, Find My iPad had a back door the size of Montana: The thief could simply turn it off. Or, if your iPad was password-protected, the thief could just erase it and sell it on the black market, which was his goal all along. Suddenly, your iPad is lost in the wilderness, and you have no way to track or recover it.
That’s why Apple offers the ingenious Activation Lock feature. It’s very simple: Nobody can erase it, or even turn off Find My iPad, without entering your iCloud password (your Apple ID). This isn’t a switch you can turn on or off; it’s always on.
So even if the bad guy has your iPad and tries to sell it, the thing is useless. It’s still registered to you, you can still track it, and it still displays your message and phone number on the Lock screen. Without your iCloud password, your iPad is just a worthless brick. Suddenly, stealing iPads is a much less attractive prospect.
Apple offers an email address as part of each iCloud account. Of course, you already have an email account. So why bother? The first advantage is the simple address: YourName@me.com or YourName@icloud.com.
Second, you can read your me.com email from any computer anywhere in the world, via the iCloud Web site, or on your iPad/iPod Touch/iPhone.
To make things even sweeter, your me.com or icloud.com mail is completely synced. Delete a message on one gadget, and you’ll find it in the Deleted Mail folder on another. Send a message from your iPad, and you’ll find it in the Sent Mail folder on your Mac. And so on.
Video, Music, Apps: Locker in the Sky
Apple, as if you hadn’t noticed, has become a big seller of multimedia files. It has the biggest music store in the world. It has the biggest app store, for both i-gadgets and Macs. It sells an awful lot of TV shows and movies. Its ebook store, iBooks, is no Amazon.com, but it’s chugging along.
Once you buy a song, movie, app, or book, you can download it again as often as you like—no charge. In fact, you can download it to your other Apple equipment, too—no charge. iCloud automates, or at least formalizes, that process. Once you buy something, it’s added to a tidy list of items that you can download to all your other machines.
Here’s how to grab them:
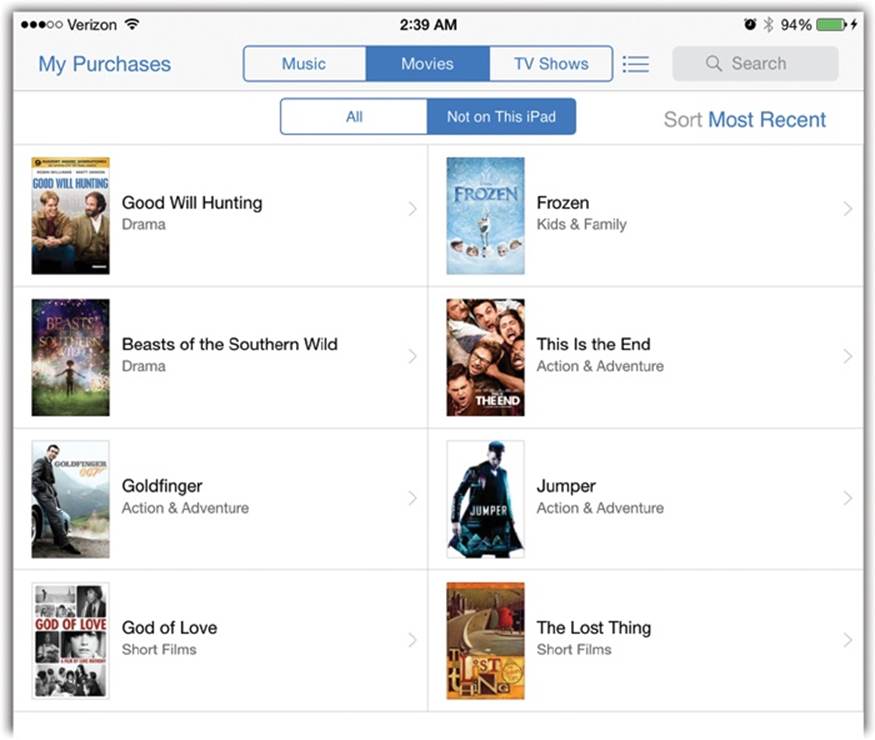
§ iPad, iPhone, iPod Touch. For apps: Open the App Store icon. Tap Purchased. Tap Not on This iPad.
For music, movies, and TV shows: Open the iTunes Store app. Tap Purchased; tap the category you want. Tap Not on This iPad.
There they are: all the items you’ve ever bought, even on your other machines using the same Apple ID. To download anything listed here onto this machine, tap the ![]() button. Or tap an album name to see the list of songs on it so you can download just some of those songs.
button. Or tap an album name to see the list of songs on it so you can download just some of those songs.
You can save yourself all that tapping by opening Settings→iTunes & App Store and turning on Automatic Downloads (for music, apps, and books). From now on, whenever you’re on WiFi, stuff you’ve bought on other Apple machines gets downloaded to this one automatically, in the background.
§ Mac or PC. Open the Mac App Store program (for Mac apps) and click Purchases. Or open the iTunes app (for songs, TV shows, books, and movies). Click Store and then, under Quick Links, click Purchased. There are all your purchases, ready to open or re-download if necessary.
TIP
To make this automatic, open iTunes. Choose iTunes→Preferences→Store. Under Automatic Downloads, turn on Music, Apps, and Books, as you see fit. Click OK. From now on, iTunes will auto-import anything you buy on any of your other machines.
Any bookmark you set in an iBook book is synced to your other gadgets, too. The idea, of course, is that you can read a few pages on your iPad in the doctor’s waiting room and then continue from the same page on your iPad on the train ride home.
iTunes Match
Anything you’ve ever bought from the iTunes music store is now available for playing on any Apple gadget you own. You get it.
A lot of people, however, have music in their collections that didn’t come from the iTunes Store. Maybe they ripped some audio CDs into their computers. Maybe they acquired some music from, ahem, a friend.
What a sad situation! You’ve got some of your music available with you on your iPad and some that’s stranded at home on your computer.
Enter iTunes Match. It’s an Apple service that lets you store your entire collection, including songs that didn’t come from Apple, online, for $25 a year.
The iTunes software analyzes the songs in your collection. If it finds a song that’s also available in iTunes, then—bing!—that song becomes available for your playback pleasure, without your actually having to transfer your copy to Apple. Apple says, in effect: “Well, our copy of the song is just as good as yours, so you’re welcome to listen to our copy on any of your machines.”
Truth is, in fact, that Apple’s copy is probably better than your copy. You get to play back the song at iTunes’ 256 Kbps quality, no matter how grungy your copy.
If there’s a song or two in your collection not among Apple’s 20 million tracks, then you can upload them to Apple.
The advantages of forking over the $25 a year are (a) you can listen to all your music from any computer/iPad/iPhone, (b) you get that audio-quality upgrade, (c) you can listen to iTunes Radio without interruptions from ads, and (d) using the song-matching system saves you huge amounts of uploading time. (The rival services from Google and Amazon require uploading your entire music collection, which can take days.)
The disadvantage: You’re paying $25 a year.
To get started on your iPad, go to Settings→iTunes & App Store. Tap Subscribe to iTunes Match—and follow the instructions.
Once the synchronization process is done, any songs on the iPad that are actually sitting online are marked by a ![]() icon in the Music app. And any song you buy on any machine shows up as available to play on any of them.
icon in the Music app. And any song you buy on any machine shows up as available to play on any of them.
These songs behave exactly like songs that are stored physically on your iPad. (In fact, they often are; if you tap a ![]() song to play it, the iPad downloads and stores it so it won’t have to bother the next time.)
song to play it, the iPad downloads and stores it so it won’t have to bother the next time.)
TIP
Listening to streaming iTunes Match music over a cellular connection eats up your monthly data limit fast! To protect yourself, turn off Settings→iTunes & App Stores→Use Cellular Data; now you can listen only over a WiFi connection.
If you plan to be offline for a while (like on a flight to Tokyo), you can hide the online songs by turning off Settings→Music→Show All Music.
The Price of Free
A free iCloud account gives you 5 gigabytes of online storage. That may not sound like much, especially when you consider how big some music, photo, and video files are.
Fortunately, anything you buy from Apple—like music, apps, books, and TV shows—doesn’t count against that 5-gigabyte limit. Neither do the photos in your Photo Stream.
So what’s left? Some things that don’t take up much space, like settings, documents, and pictures you take with your iPad, iPhone, or iPod Touch—and some things that take up a lot of it, like email, commercial movies, and home videos you transferred to the iPad from your computer. Anything you put on your iCloud Drive eats up your allotment, too. (Your iPad backup might hog space, but you can pare that down in Settings→iCloud→Storage→Manage Storage. Tap an app’s name and then tap Edit.)
You can, of course, expand your storage if you find 5 gigs constricting. You can expand it to 20, 50, 500, or 1,000 gigabytes—for $12, $48, $120, or $240 a year. You can upgrade your storage online, on your computer, or right on the iPad (in Settings→iCloud→Storage→Buy More Storage).
Apple Pay (iPad Air 2, Mini 3)
To most people who’ve even heard of it, “Apple Pay” means paying for things at the cash register by waving your iPhone and walking away.
Unfortunately, that trick depends on a special chip in the latest iPhones: the NFC chip (near-field communication), and the iPad doesn’t have it.
There’s another, more obscure aspect to Apple Pay, though, that you can use on iPads (the latest models, anyway): paying for stuff you’re buying online from within shopping apps. A touch of your finger on the Home button (fingerprint reader) is all the identity checking the app needs to do.
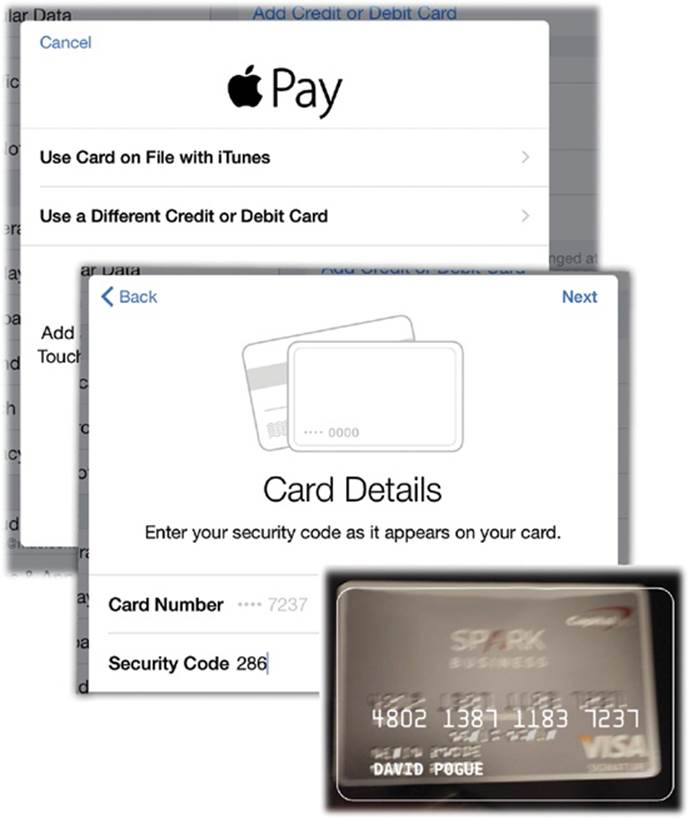
The Setup
To set up Apple Pay, you have to teach your iPad about your credit card. To do that, open Settings→Passbook & Apple Pay.
Tap Add Credit or Debit Card. (If you haven’t already registered your fingerprint, you’re prodded to do that now. In Settings→Touch ID & Passcode, turn on Apple Pay. Then tap Add a Fingerprint and follow the instructions.)
Enter your iCloud password when asked.
If you have a credit card on file with Apple already—for buying stuff from the iTunes store—you save a few steps by tapping Use Card on File with iTunes (next page, top). To confirm that you’re not a bad guy, you then have to type in the three- or four-digit security code. Then you’re ready to go shopping.
Otherwise, tap Use a Different Credit Card or Debit Card. Now enter the card information manually (next page, middle)—or not so manually. If you tap ![]() , you can aim the iPad’s camera at whatever Visa, MasterCard, or American Express card you use most often. Hold steady until the digits of your card blink onto the screen, auto-recognized (bottom). Cool! (You still have to type in the security code.)
, you can aim the iPad’s camera at whatever Visa, MasterCard, or American Express card you use most often. Hold steady until the digits of your card blink onto the screen, auto-recognized (bottom). Cool! (You still have to type in the security code.)
Next, your bank has to verify that all systems are go for Apple Pay. That may involve responding to an email or a text, or typing in a verification code. In any case, it’s generally instantaneous.
NOTE
At the outset, Apple Pay works only with MasterCard, Visa, or American Express, and only the ones issued by certain banks. The big ones are all on board—Citibank, Chase, Bank of America, and so on—and 500 more have agreed to sign on by early 2015.
The Shopping
Once you’ve set up Apple Pay, you can use iPad or iPhone apps that have been upgraded to work with Apple Pay. The time savings: You’re spared all that typing of your name, address, and phone number every time you buy something.
Instead, when you’re staring at the checkout screen for some app, just tap Buy with Apple Pay.
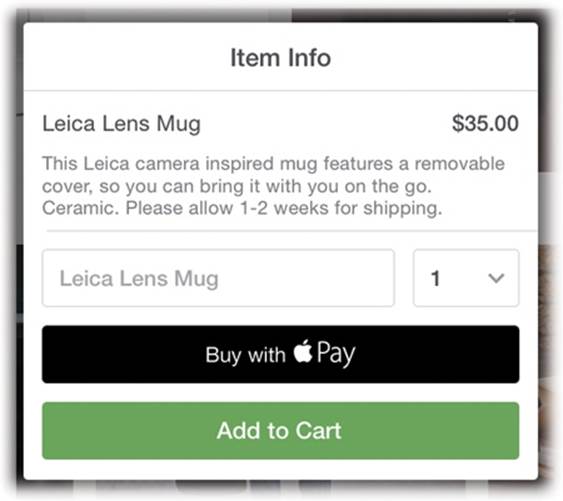
That button appears in a small but growing number of shopping apps, including the apps for Amazon, Lowe’s, Panera Bread, Lululemon, Airbnb, Apple Store, Disney Store, Fancy, Groupon, Hotel Tonight, Houzz, Indiegogo, Lyft, MLB.com, OpenTable, Staples, Starbucks, StubHub, Target, Tickets.com, and Uber.
Family Sharing
It might have taken years, but Apple has finally acknowledged a fundamental fact of American life: Many of us have families.
If you have kids, it’s always been a hassle to manage your Apple life. What if they want to buy a book, movie, or app? They have to use your credit card—and you have to reveal your iCloud password to them.
Or what if they want to see a movie that you bought? Do they really have to buy it again?
Not anymore. Once you’ve turned on Family Sharing and invited your family members, here’s how your life will be different:
§ One credit card to rule them all. Up to six of you can buy books, movies, apps, and music on your master credit card.
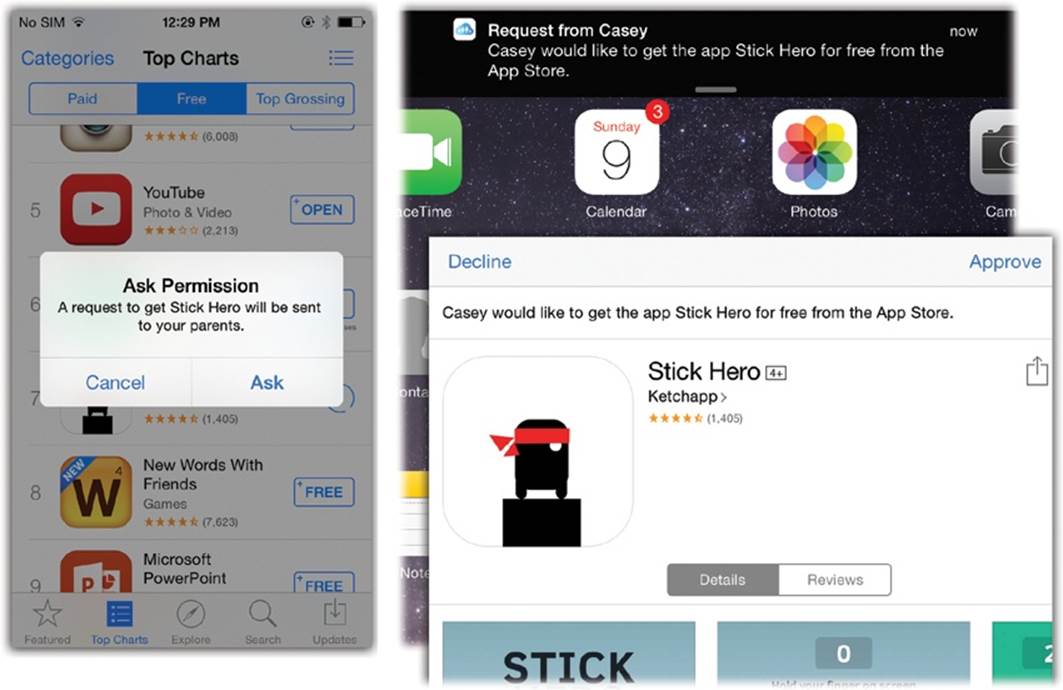
§ Ask before buying. When your kids try to buy stuff, your iPad or iPhone pops up a permission request. You have to approve each purchase.
§ Younger Appleheads. Within Family Sharing, you can now create Apple accounts for tiny tots; 13 is no longer the age minimum.
§ Shared everything. All of you get instant access to one another’s music, video, iBooks, and app purchases—again, without having to know each other’s Apple passwords.
§ Find one another. You can use your iPad to see where your kids are, and vice versa (with permission, of course).
§ Find one another’s phones and iPads. The miraculous Find My iPhone feature (Photo Stream, Photo Sharing) now works for every iPad and iPhone in the family. If your daughter can’t find her iPad, you can find it for her with yours.
§ Mutual photo album, mutual calendar, and mutual reminders. When you turn on Family Sharing, your Photos, Calendar, and Reminders apps each sprout a new category that’s preconfigured to permit access by everyone in your family.
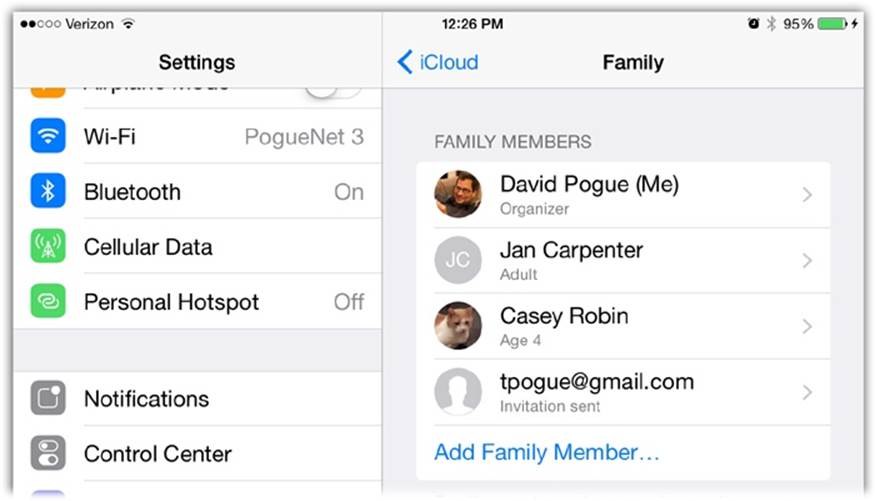
Setting Up Family Sharing
The setup process means wading through a lot of screens, but at least you have to do it only once. You can turn on this feature either on the Mac (in System Preferences→Set Up Family) or on the iPad itself. Since this book is about the iPad, here are the steps to do it that way.
In Settings→iCloud, tap Set Up Family Sharing. Click Get Started. Now the iPad informs you that you, the sage adult, are going to be the Organizer—the one with the power, the wisdom, and the credit card. Continue (unless it’s listing the wrong Apple ID account, in which case, you can fix it now).
On successive screens, you read about the idea of shared Apple Store purchases; you’re shown the credit card that Apple believes you want to use; you’re offered the chance to share your location with the others. Each time, read and tap Continue.
Finally, you’re ready to introduce the software to your family.
§ If the kid is under 13: Tap the tiny print that says Create an Apple ID for a Child. On the screens that follow, you’ll enter the kid’s birth date; agree to a Parent Privacy Disclosure screen; enter the security code for your credit card (to prove that you’re you, and not, for example, your naughty kid); type the kid’s name; set up an iCloud account (name, password, three security questions); decide whether or not to turn on Ask To Buy (each time your youngster tries to buy something online from Apple, you’ll be asked for permission in a notification); decide whether you want the family to be able to see where the kid is at all times; and accept a bunch of legalese.
When it’s all over, the lucky kid’s name appears on the Family screen.
§ If the kid already has an iCloud account and is standing right there with you in person: Tap Add Family Member. Type in her name or email address. (Your child’s name must already be in your Contacts; if not, go add her first. By the way, you’re a terrible parent.)
She can now enter her iCloud password on your iPad to complete her setup. (That doesn’t mean you’ll learn what her password is; your iPad stores it but hides it.) On the subsequent screens, you get to confirm her email address and let her turn on location sharing. In other words: The rest of the family will be able to see where she is (or at least where her iPhone or iPad is).
§ If the kid isn’t with you at the moment: Click Send an Invitation.
Your little darling gets an email at that address. He must open it on his Apple gadget—the Mail app on the iPad or iPhone, or the Mail program on his Mac, for example.
When he hits View Invitation, he can either enter his iCloud name and password (if he has an iCloud account), or get an Apple ID (if he doesn’t).
Once he accepts the invitation, he can choose a picture to represent himself; tap Confirm to agree to be in your family; enter his iCloud password to share the stuff he’s bought from Apple; agree to Apple’s lawyers’ demands; and, finally, opt in to sharing his location with the rest of the family.
You can, of course, repeat this cycle to add additional family members, up to a maximum of six. Their names and ages appear on the Family screen.
From here, you can tap someone’s name to perform stunts like these:
§ Delete a family member. Man, you guys really don’t get along, do you? Anyway, tap Remove.
§ Turn Ask To Buy on or off. This option appears when you’ve tapped a child’s name on your iPad. If you decide your kid is responsible enough not to need your permission for each purchase, you can turn this option off.
NOTE
If you turn off Ask To Buy for someone after she turns 18, you can’t turn it on again.
§ Turn Parent/Guardian on or off. This option appears when you’ve tapped an adult’s name. It gives Ask To Buy approval privileges to someone else besides you—your spouse, for example.
Once kids turn 13, by the way, Apple automatically gives them more control over their own lives. They can, for example, turn off Ask To Buy themselves, on their own phones. They can even express their disgust for you by leaving the Family Sharing group. (On her own iPad or iPhone, for example, your daughter can visit Settings→iCloud→Family, tap her name, and then tap Leave Family. Harsh!)
Life in Family Sharing
Once everything’s set up, here’s how you and your nutty kids will get along.
§ Purchases. Whenever one of your kids (for whom you’ve turned on Ask To Buy) tries to buy music, videos, apps, or books from Apple—even free items—he has to ask you (facing page, left). On your iPad, you’re notified about the purchase—and you can decline it or tap Review to read about it on its Store page (facing page, right). If it seems OK, you can tap Approve. You also have to enter your iCloud password, or supply your fingerprint, to prevent your kid from finding your iPad and approving his own request.
(If you don’t respond within 24 hours, the request expires. Your kid has to ask again.)
Furthermore, each of you can see and download everything that everyone else has bought. To do that, open the appropriate app: App Store, iTunes Store, or iBooks. Tap Purchased, and then tap the family member’s name, to see what she’s got; tap the ![]() to download any of it yourself.
to download any of it yourself.
TIP
Anything you buy, your kids will see. Keep that in mind when you download a book like Tough Love: Sending the Unruly Child to Military School.
However, you have two lines of defense. First, you can hide your purchases so nobody sees them. On your computer, in iTunes (Chapter 14), click iTunes Store; then click the relevant category (![]() ,
, ![]() , whatever). Click Purchased (right side). Point to the thing you want to hide, click the
, whatever). Click Purchased (right side). Point to the thing you want to hide, click the ![]() , and click Hide. (On the iPad, you can hide only one category: apps. In the App Store app, tapUpdates, then Purchased, then My Purchases. Swipe to the left across an app’s name to reveal a Hide button.)
, and click Hide. (On the iPad, you can hide only one category: apps. In the App Store app, tapUpdates, then Purchased, then My Purchases. Swipe to the left across an app’s name to reveal a Hide button.)
Second, remember that you can set up parental control on each kid’s iPad, shielding their impressionable eyes from rated-R movies and stuff. See Restrictions and Parental Controls.
§ Where are you? Open the Find My Friends app to see where in town (or in the world) your posse is right now. Or go to the Find My iPhone app (or Web page; see Photo Stream, Photo Sharing) to see where their phones or iPads are right now, which may or may not be with their owners.
NOTE
If one of you needs secrecy for the afternoon (Apple sweetly gives, as an example, shopping for a gift for your spouse), open Settings→iCloud→Share My Location, and turn off the switch. Now you’re untrackable until you turn the switch on again.
§ Photos, appointments, and reminders. In Calendar, Photos, and Reminders, each of you will find a new category, called Family, that’s auto-shared among you all. (In Photos, it’s on the Shared tab.) You’re all free to make and edit appointments in this calendar, to set up reminders in Reminders (“Flu shots after school!”), or to add photos or videos (or comments) to this album; everyone else will see the changes instantly.
Continuity
Apple products have always been designed to work together. Macs, phones, tablets, watches: Similar software, design, wording, philosophy.
That’s nice for you, of course, because you have less to learn and to troubleshoot. But it’s also nice for Apple, because it keeps you in velvet handcuffs; pretty soon, you’ve got too much invested in its own product “ecosystem” to consider wandering over to a rival.
In iOS 8.1, Apple has taken this gadget symbiosis to an astonishing new extreme. If you have an iPhone, it can be an accessory to your iPad. Suddenly the iPad can be a speakerphone, using the phone as a wireless antenna. Suddenly the iPad can send and receive regular text messages. Suddenly AirDrop lets you drag files back and forth, wirelessly, from tablet to phone to computer. Suddenly a WiFi-only iPad can get onto the Internet with one click, even miles from home.
Apple’s name for this suite of symbiosis is Continuity. And once you’ve got it set up, the iPad game changes in a big way.
These are the primary rules:
§ The iPad and iPhone must be running iOS 8.1 or later. iPads made in 2012 (4th Generation) and later are eligible.
§ The iPad and the phone have to be signed into the same iCloud account. (That’s a security thing—it proves that you’re the owner of both machines, and therefore unlikely to pose a risk to yourself.) You do that in Settings→iCloud. But you should also make sure that you’ve entered the same iCloud address in Settings→Messages and Settings→FaceTime.
§ For some of these features, Bluetooth must be turned on in Settings→Bluetooth. (The modern Bluetooth—called Bluetooth LE, or low energy—doesn’t drain your battery the way it once did, so it’s fine to leave it on. But older iPads don’t have Bluetooth LE, so most Continuity features work only on 2012 and later iPads.)
All right. Setup ready? Time to experience some integration!
iPad as Speakerphone
Continuity is responsible for the ability for your iPad to make and take phone calls—if you also have an iPhone. See One More Safety Measure for details.
Texting from the iPad
You can send and receive text messages (and picture, audio, and video messages) on your iPad, too. See the step-by-steps on Text Messages (SMS).
Instant Hotspot
If you have a cellular iPad, you’re lucky; it can get onto the Internet almost anywhere.
If you have a WiFi-only iPad, you can enjoy the same luxury—if you also have an iPhone. Thanks to a feature called Instant Hotspot, the phone can stay in your pocket. Its name always appears in your iPad’s Settings→WiFi list, ready for choosing at any time—even if the phone is asleep and locked, and even if Personal Hotspot is turned off! Handily enough, the WiFi list also shows the phone’s battery and signal status.
To set up this convenient arrangement, see Instant Hotspot.
Handoff
Handoff is a new feature that passes half-finished documents between the phone, the iPad, and the Mac, wirelessly and automatically.
For example, suppose you’ve been writing an email message on your iPad (next page, top). When you then sit at your Mac, a new icon appears on the Mac’s Dock (next page, middle). When you tap it, the Mac’s Mail program opens, and the half-finished message is there for you to complete (bottom).
It doesn’t have to be an email message, either. If you were reading a Web page or a Map on your phone, then that icon on the Mac opens the same Web page or map. If you were working on a Reminder; a Calendar entry; a Contacts entry; a note in Notes; or a document in Keynote, Numbers, or Pages; you can open the same in-progress item on the Mac.
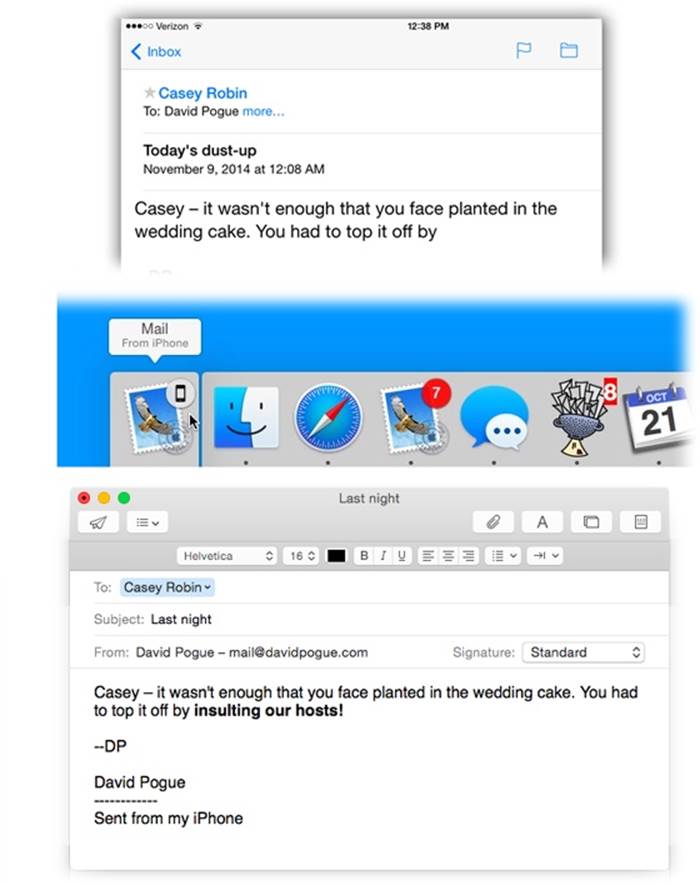
And all of it works in the other direction, too. If you’re working on something on the Mac, but you’re called away, an icon appears on the lower-left corner of your iPad’s Lock screen that opens the same item (below).

Here’s the setup: Once again, both gadgets must be signed into your iCloud account. Both must have Bluetooth turned on, and the iPad and phone have to be sitting within Bluetooth range of each other (about 30 feet).
On the iPad and iPhone, the on/off switch is in Settings→General→Handoff & Suggested Apps.
On the Mac, open System Preferences→General; turn on Allow Handoff between this Mac and your iCloud devices.
Now try it out. Start an email message on your phone. Have a look at the Dock on your iPad: There, on the Lock screen, is the little icon of whatever program can finish the job.
AirDrop Between iPad and Mac
AirDrop has always been pretty great. It lets you shoot photos, videos, maps, Contacts cards, PDF files, Word documents, and all kinds of other stuff—from one iPad/iPhone to another iPad/iPhone. Wirelessly. Without having to set up names, passwords, or permissions. Without even having an Internet connection. See AirDrop for more on this i-device feature.
There was a similar feature on the Mac, designed to let you shoot files wirelessly from one Mac to another.
But until iOS 8 and Yosemite, you couldn’t use AirDrop between a Mac and an iPad. And now you can.
Open whatever it is you want to send to the iPad: a photo, map, Web site, contact…anything with a ![]() button.
button.
When you tap ![]() , you see the AirDrop panel—and, after a moment, the icons of any nearby Yosemite Macs show up, too. Including yours.
, you see the AirDrop panel—and, after a moment, the icons of any nearby Yosemite Macs show up, too. Including yours.
If the Mac’s icon doesn’t show up, it’s probably because its owner hasn’t made the Mac discoverable by AirDrop.
Instruct him to open the AirDrop window on his Mac. (Click AirDrop in the sidebar of any Finder window.) See the small blue controls at the bottom? It governs who can “see” this Mac for AirDrop purposes: No One, Contacts Only (that is, people in the iPad’s address book), or Everyone.

Once that’s set up right, that Mac shows up in the iPad’s AirDrop panel (“David” in this illustration). Tap the Mac’s round icon. (Unlike the AirDrop of Macs gone by, in Yosemite, you don’t have to start by opening the AirDrop window.)
The receiving Mac displays a note like this (right):
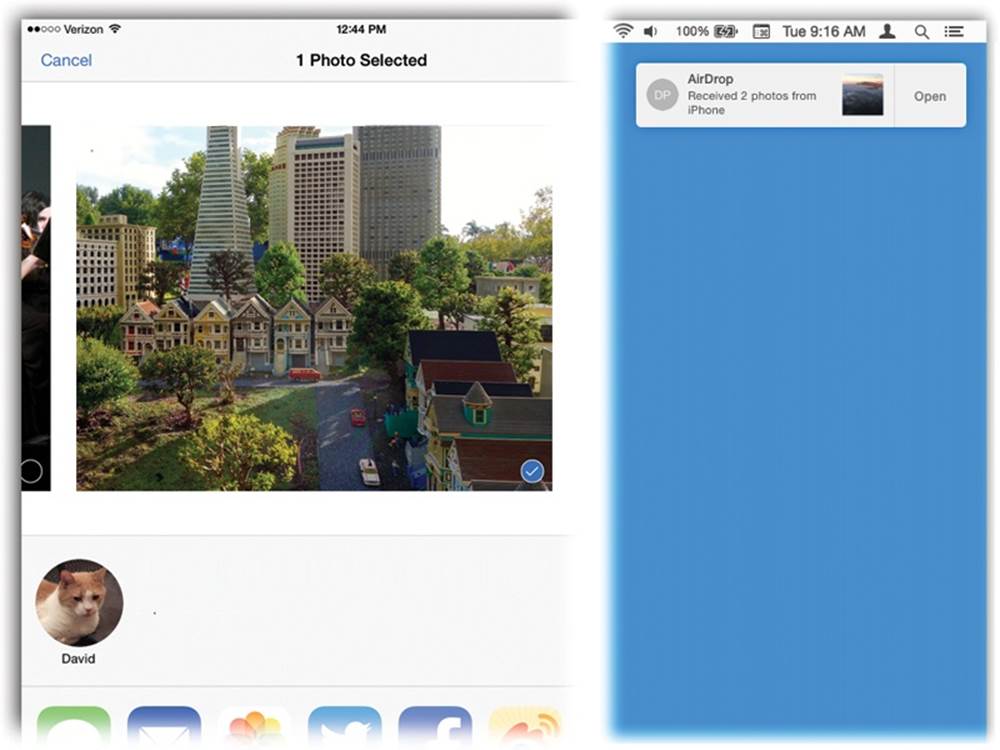
Click Accept (to download the incoming item to your Mac’s Downloads folder) or Decline (to reject it).
TIP
If the iPad and the Mac are both signed into the same iCloud account, then you don’t encounter that Accept/Decline thing. The file goes directly into your Downloads folder without asking. You do get a notification on the Mac that lets you know how many files arrived, and it offers an Open button.
Apple figures that, since you own both the iPad and the Mac, the usual permission routine isn’t necessary. You’re probably not trying to send yourself some evil virus of death.
All materials on the site are licensed Creative Commons Attribution-Sharealike 3.0 Unported CC BY-SA 3.0 & GNU Free Documentation License (GFDL)
If you are the copyright holder of any material contained on our site and intend to remove it, please contact our site administrator for approval.
© 2016-2026 All site design rights belong to S.Y.A.