iPad: The Missing Manual (2014)
Part 1. The iPad Basics
Chapter 4. Calling & FaceTime
The iPad, of course, is not a phone. Most people assume, therefore, that you can’t send and receive regular text messages on it—and that you can’t make voice calls on it, holding the thing up to your head to carry on a conversation. That’s because even the cellular-equipped model doesn’t connect to the cellular voice network; only the cellular data network, for using Internet features.
And yet it’s not quite as poor a communications device as you might think. No, you can’t make traditional cellular voice calls with the iPad alone, but you can make FaceTime audio calls (to other people who have Apple gadgets). You can’t send regular text messages, but you can send iMessages (again, to other Apple devices).
But if you also own an iPhone, then you can make regular tablet calls and send regular texts from the iPad. The phone in your pocket acts as a glorified relay station.
This chapter covers all these tricks.
FaceTime Audio Calls
FaceTime is Apple’s proprietary wireless calling software. It lets you place free audio and video calls from your iPad to any other Apple gadget: phone, tablet, iPod Touch, or Mac. Some people consider it Apple’s version of Skype; others consider it a godsend for communicating with people in other cities or countries for free. In any case, it’s pretty simple and pretty great.
These calls don’t eat into your cell minutes and aren’t transmitted over your cell carrier’s voice network; these are Internet calls.
When you’re in a WiFi hotspot, they’re completely free. When you’re not, your carrier’s data network carries your voice (if you have the cellular iPad). Sold yet?
All right: Here’s how to make free Internet voice and video calls.
The Setup
Before you begin, open Settings→FaceTime, make sure FaceTime is turned on, and sign in with your Apple ID.
Note, furthermore, that—in case you missed it—you can place FaceTime calls only to other iPhones, iPads, iPod Touches, and Macs. Your call recipients must also have FaceTime turned on, and must also have signed in with their Apple IDs.
You have to know their phone number (if it’s an iPhone) or their Apple ID–registered email address (if it’s an iPad, iPod Touch, Mac, or iPhone). You can use either (phone or email) to place a FaceTime call. Weird but true.
Placing a Call
There are starting points for placing a FaceTime call all over iOS 8. For example:
§ From Siri. The quickest way to start a FaceTime call may be simply to say, “FaceTime audio call Mom,” “FaceTime audio call Chris Taylor,” or whatever. The iPad refers to your Contacts app for the right connection info.
§ From the FaceTime app. Open the FaceTime app. It presents a list of your recent FaceTime calls. Tap a name to place a new call to that person, or tap ![]() to view a history of your calls with that person (and buttons for placing new ones).
to view a history of your calls with that person (and buttons for placing new ones).
Or, to find your callee from your own Contacts list, tap the ![]() button. Find a name, tap it, and then tap
button. Find a name, tap it, and then tap ![]() to place the call.
to place the call.
If your future conversation partner isn’t in Contacts yet, then tap where it says Enter name, email, or number, and do just that.
§ From Contacts. In the Contacts app, if you tap a person’s name, you’ll find ![]() buttons that place FaceTime audio calls.
buttons that place FaceTime audio calls.
§ From Messages. If you’re chatting away with somebody by text and you realize that typing is no longer appropriate for the conversation, tap Details at the top of the screen. Tap ![]() .
.
For the call to go through, both devices must be online, either in a WiFi hotspot or, for devices so equipped, in a cellular coverage area.
Answering a Call
When someone calls your iPad, you’ll know it, you hear a ring and see the caller’s name and photo fill that giant screen. (Smell, feel, and taste will have to wait until iOS 9.)
NOTE
For details on choosing a ringtone, see Wallpaper.

How you answer depends on what’s happening at the time:
§ If you’re using the iPad, tap the green Accept button. Tap the red hangup button when you’ve both said enough.
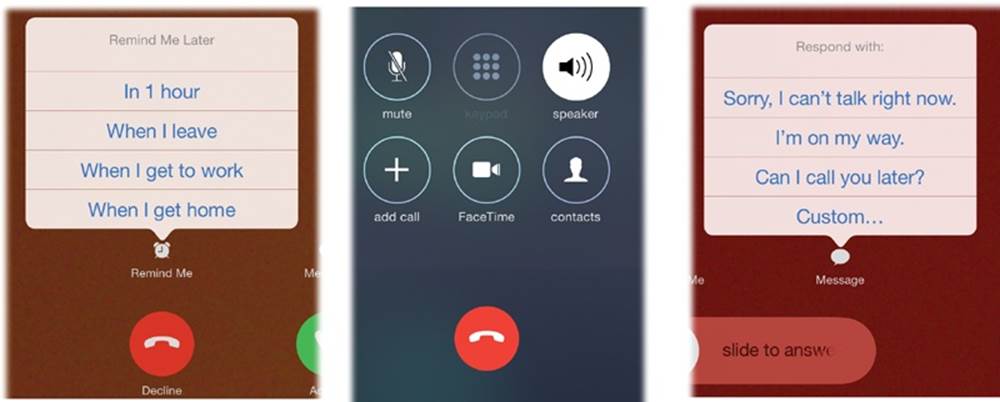
§ If the iPad is asleep or locked, the screen lights up and says slide to answer. If you slide your finger as indicated by the arrow, you simultaneously unlock the tablet and answer the call.
§ If you’re wearing earbuds, the music fades out and then pauses; you hear the ring both through the tablet’s speaker and through your earbuds. Answer by squeezing the clicker on the earbud cord or by using either of the methods described above.
When the call is over, you can click again to hang up—or just wait until the other guy hangs up. Either way, the music fades in again and resumes from the spot where you were so rudely interrupted.
Online and on the Tablet, Together
Don’t forget that the iPad is a multitasking master. Once you’re on a FaceTime call, you can dive into any other program—to check your calendar, for example—without interrupting the call.
You can even use the tablet’s Internet functions (Web, email, apps, and so on) without interrupting your call.
Silencing the Ring
Sometimes you need a moment before you can answer the call; maybe you need to exit a meeting or put in the earbuds, for example. In that case, you can stop the ringing by pressing one of the physical buttons on the edges (the Sleep/Wake button or either volume key). The caller still hears the tablet ringing, and you can still answer, but at least the sound won’t be annoying those around you.
If nobody answers, the call eventually gives up, and a “missed call” note appears on the callee’s screen. There’s no such thing as FaceTime voicemail.
Not Answering Calls
There are all kinds of reasons why you might not want to accept an incoming call. Maybe you’re in a meeting. Maybe you’re driving. Maybe you can see that the call is coming from someone you really don’t want to deal with right now.
Fortunately, you’ve chosen the right tablet. You have all kinds of juicy ways to slam the door in somebody’s face.
If you wait long enough (about 20 rings), the incoming ringing will just give up.
Whenever your tablet rings, though, the screen bears a small white Message button (shown here at right). If you tap it, you get a choice of three canned text messages. Tapping one immediately ends the call and sends the corresponding message to the Apple gadget that’s calling you. If you’re driving or in a meeting, this feature is a lot more polite and responsive than just ignoring the poor slob.
TIP
You can’t edit these three canned messages on the iPad, even though you can on the iPhone.
The fourth button, Custom, lets you type or dictate a new message on the spot. (“I’m in a meeting and, frankly, your call isn’t worth getting fired for” comes to mind.)
Remind Me
Tapping the Remind Me button—another way to decline an incoming call—offers you one time-based option, In 1 Hour (which sets up a reminder to return the call an hour from now), and three location-based options (facing page, left): When I leave, When I get home, and When I get to work. (The home and work options appear only if the iPad knows your home and work addresses—because you’ve entered them in your own card in Contacts.)
These options use the tablet’s GPS circuitry to detect when you’ve left your current inconvenient-to-take-the-call location, whether it’s a job interview, a first date, or an outhouse.
Leave a Message
OK, let’s say you’re the one placing the call. And the dude at the other end doesn’t pick up—or hits Decline because he really doesn’t want to talk to you right now.
You have three options on your iPad’s screen: Cancel, Call Back (that is, try again right now), or Leave a Message. That last option doesn’t really leave a message in the voicemail sense; instead, it opens the Messages app, so you can type or dictate a text message for the person you were trying to reach.
Fun with FaceTime Audio Calls
The iPad makes it pitifully easy to perform stunts like turning on the speakerphone, putting someone on hold, taking a second call, and so on. Here are the options you get when you’re on a call (previous picture, bottom middle).
Mute
Tap this button to mute your own microphone, so the other guy can’t hear you. (You can still hear him, though.) Now you have a chance to yell upstairs, to clear the phlegm from your throat, or to do anything else you’d rather the other party not hear. Tap again to unmute.
Keypad
This button is dimmed on FaceTime calls. It’s available only when you’re making actual phone calls through your iPhone, as described on One More Safety Measure.
Speaker
Tap this button to turn on the iPad’s built-in speakerphone—a great hands-free option when you’re caught without your earbuds or Bluetooth headset. (In fact, the speakerphone doesn’t work if the earbuds are plugged in or if a Bluetooth headset is connected.)
When you tap the button, it turns white to indicate that the speaker is activated. Now you can put the iPad down on a table or a counter and have a conversation with both hands free. Tap speaker again to channel the sound back into the built-in earpiece.
Add Call
Suppose you’re on a call. Here are some of the tricks you can do:
§ Make an outgoing call. Tap add call. The iPad puts the first person on hold—neither of you can hear the other—and opens your Contacts list. You can now make a second call just the way you made the first. The top of the screen makes clear that the first person is still on hold as you talk to the second.
§ Receive an incoming call. What happens when a second FaceTime call comes in while you’re already on a call? You can tap End & Accept (answer the incoming call, hang up on the first), Decline (reject the incoming call), or Hold & Accept (take the incoming call, put the first one on hold).
When you’re on two FaceTime calls at once, the top of the screen identifies both other parties. Two new buttons appear, too:
§ Swap lets you flip between the two calls. At the top of the screen, you see the names of your callers. One says hold (the one who’s on hold, of course) and the other bears a time counter, which lets you know whom you’re actually speaking to.
Think how many TV and movie comedies have relied on the old “Whoops, I hit the wrong button and now I’m bad-mouthing somebody directly instead of behind his back!” gag. That can’t happen on the iPad.
You can swap calls by tapping swap or by tapping the hold person’s name or number.
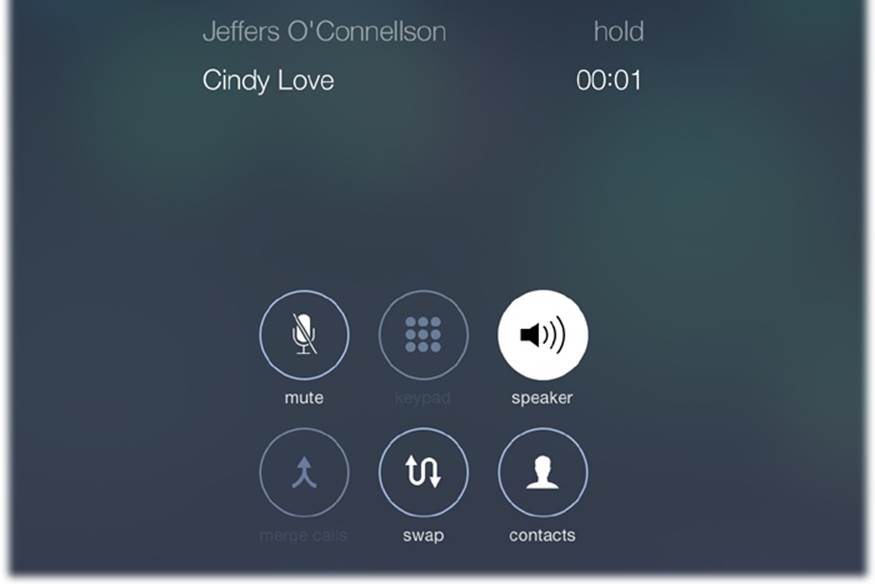
§ Merge Calls is dimmed on FaceTime calls. It, too, is useful only when you’re placing actual phone calls through an iPhone (One More Safety Measure).
Hold
What’s that? You don’t see any button called Hold? Yet it’s there. Hold down the mute button for a couple of seconds. Now the button changes to say hold; neither you nor the other guy can hear anything. Tap again to resume the conversation.
![]()
As you could probably guess, this button ends the call. (If someone was on hold, you now drop back to that call.)
FaceTime Video Calls
Your iPad, as you’re probably aware, has two cameras—one on the back and one on the front. And that can mean only one thing: Video calling has arrived.
These are good video calls, with no sign-up or setup, with a single tap. The picture and audio are generally rock solid, with very little delay, and it works the first time and every time. Now Grandma can see the baby, or you can help someone shop from afar, or you can supervise brain surgery from thousands of miles away (some medical training is recommended).
You can enjoy these Jetsons fantasies when calling between iPhones, iPads, iPod Touches, and Macs. They work over WiFi or cellular (if you have a cellular iPad). You just have to know the other person’s phone number or email address—and that person has to have a free Apple or iCloud account.
Being able to make video calls like a regular phone call is a huge convenience. Never again will you return home from the store and get scolded for buying the wrong size, style, or color.
In any case, FaceTime couldn’t be easier to fire up—in all the usual ways:
§ From Siri. “FaceTime Mom,” “FaceTime Chris Taylor.”
§ When you’re already on a FaceTime audio call with someone. This is a good technique when you want to ask first if the other guy wants to do video, or when you’ve been chatting and suddenly there’s some reason to do video. In any case, there’s nothing to it: Just tap the FaceTimeicon that’s right on the screen. (With one tap, your buddy can either accept—and hang up the audio call in the process—or, if he just got out of the shower, decline.)

§ From the FaceTime app. Tap Video at the top left of the screen, and then tap a name in the Recent Call list. Or tap the ![]() button to find a name in Contacts. Or tap where it says Enter name, email, or number, and do so.
button to find a name in Contacts. Or tap where it says Enter name, email, or number, and do so.
§ From Contacts. In the Contacts app, tap ![]() next to a person’s name.
next to a person’s name.
§ From Messages. If you’re chatting away with somebody by text and you realize that typing is no longer appropriate for the conversation, then tap Details at the top of the screen. Tap ![]() .
.
At this point, the other guy receives an audio and video message inviting him to a chat. If he taps Accept, then you’re on. You’re on each other’s screens, seeing and hearing each other in real time. (You appear on your own screen, too, in a little inset window. It’s spinach-in-your-teeth protection.)
Once the chat has begun, here’s some of the fun you can have:
§ Rotate the screen. FaceTime works in either portrait (upright) or landscape (widescreen) view; just turn your tablet 90 degrees. Of course, if your calling partner doesn’t also turn her gadget, she’ll see your picture all squished and tiny, with big black areas filling the rest of the screen.
TIP
The ![]() (Lock Rotation) button described on Control Center works in FaceTime, too. That is, you can stop the picture from rotating when you turn the tablet—as long as you’re happy with full-time upright (portrait) orientation.
(Lock Rotation) button described on Control Center works in FaceTime, too. That is, you can stop the picture from rotating when you turn the tablet—as long as you’re happy with full-time upright (portrait) orientation.
§ Snap a commemorative photo. You can immortalize a chat by using the screenshot keystroke (Sleep + Home). You wind up with a still photo of your videochat in progress, safely nestled in the Camera Roll of your Photos app.
§ Mute the audio. Tap ![]() to silence the audio that you’re sending. Great when you need to yell at the kids.
to silence the audio that you’re sending. Great when you need to yell at the kids.
§ Mute the video. When you leave the FaceTime app for any reason (press the Home button and then open a different program, if you like), the other guy’s screen goes black. He can’t see what you’re doing when you leave the FaceTime screen. He can still hear you, though.
This feature was designed to let you check your calendar, look something up on the Web, or whatever, while you’re still chatting. But it’s also a great trick when you need to adjust your clothing, pick at your teeth, or otherwise shield your activity from the person on the other end.
In the meantime, the call is, technically, still in progress—and a green banner at the top of the Home screen reminds you of that. Tap there, on the green bar, to return to the video call.
§ Show what’s in front of you. Sometimes, you’ll want to show your friend what you’re looking at. That is, you’ll want to turn on the camera on the back of the iPad, the one pointing away from you, to show off the baby, the artwork, or the broken engine part.
That’s easy enough; just tap ![]() on your screen. The iPad switches from the front camera to the back camera. Now you and your callee can both see what you’re seeing.
on your screen. The iPad switches from the front camera to the back camera. Now you and your callee can both see what you’re seeing.
Tap ![]() again to return to the front camera.
again to return to the front camera.

When you and your buddy have had quite enough, tap End to terminate the call. (Although it’s easy to jump from phone call to videochat, there’s no way to go the other direction.)
And marvel that you were alive to see the day.
Do Not Disturb
When you turn on Do Not Disturb, the iPad is quiet, dark, and still. It doesn’t ring, chirp, light up, or display messages. A ![]() icon appears on the status bar to remind you why it seems to be so uncharacteristically depressed.
icon appears on the status bar to remind you why it seems to be so uncharacteristically depressed.
Yes, Airplane mode does the same thing, but there’s a big difference: In Do Not Disturb mode, the tablet is still online. FaceTime calls, texts, emails, and other communications continue to chug happily away; they just don’t draw attention to themselves.
Do Not Disturb is what you want when you’re in bed each night. You don’t really want to be bothered with chirps for Facebook status updates and Twitter posts, but it’s fine for the tablet to collect them for the morning.
Bedtime is why Do Not Disturb comes with two fantastic additional settings: one that turns it on and off automatically on a schedule, so that the tablet goes dark each night at the same time you do, and another that lets you designate important people whose calls and texts are allowed to get through. You know—for emergencies.
Turning on Do Not Disturb
To turn on Do Not Disturb manually, you have three options:
§ Tell Siri, “Turn on Do Not Disturb.”
§ Swipe upward to open the Control Center, and tap the ![]() icon so that it turns white.
icon so that it turns white.
§ Open Settings, tap Do Not Disturb, and tap Manual.
To set it up on a schedule, visit Settings→Do Not Disturb. Turn on Scheduled, and then tap the From/To block to specify starting and ending hours. (There’s no separate setting for weekends; Do Not Disturb will turn on and off for the same hours every day of the week.)
Allowing Special Callers Through
What if your child, your boss, or your elderly parent needs you urgently in the middle of the night? Turning the tablet off completely, or putting it into Airplane mode, would leave you unreachable in an emergency.
That’s why Apple built in the Allow Calls From option. When you open Settings→Do Not Disturb and then tap Allow Calls From, you’re offered options like Everyone (all FaceTime calls and texts come through) and No One (the tablet is still online, but totally silent).
You can also create an arbitrary group of people—just your mom and sister, just your boss and nephew, whatever. You have to create these address-book groups on your computer (or using an app like Groups by Qbix). Once you’ve done that, their names appear on the Allow Calls From screen under Groups. You can designate any one of them as the lucky exception to Do Not Disturb.
One More Safety Measure
The Do Not Disturb settings screen also offers something called Repeated Calls. If you turn this on, then if anybody tries to FaceTime call you more than once within 3 minutes, he’ll ring through.
The idea here is that nobody would call you multiple times unless she needed to reach you urgently. You certainly wouldn’t want Do Not Disturb to block somebody who’s trying to tell you that there’s been an accident, that you’ve overslept, or that you’ve just won the lottery.
Locked vs. Unlocked
The final option on the settings screen is the Silence option. If you choose Always, then Do Not Disturb works exactly as described above.
But if you choose Only while iPad is locked, then the tablet does ring when you’re using it. Because, obviously, if the tablet is awake, then so are you. It’s a great way to ensure that you don’t miss important FaceTime calls if you happened to have awakened early today and started working.
TIP
In iOS 8, Apple added FaceTime Call Waiting. If you’re on a FaceTime audio or video call, and someone else FaceTime calls you, your tablet rings—and you can either tap Decline or End & Accept. (Group FaceTiming will have to wait for iOS 9.)
Making Actual Phone Calls
You can now make and take actual cellular phone calls on your iPad—if you also have an iPhone. The iPhone, sitting anywhere nearby, can be the cellular module for your tablet—even if that iPhone is asleep and locked.

When a call comes in to your iPhone’s number, your iPad rings, and the screen lights up to show who it is or what the number is:
You can tap to answer it (or decline it); your iPad’s microphone and speaker become your speakerphone.
You can also place a call the same way: Just click any phone number you find on the iPad: in Contacts, in Safari, in an email message, and so on.
To make this work, the iPhone and the iPad must be on the same WiFi network. They both have to be signed into the same iCloud account. And you have to open the FaceTime settings on each device and make sure they’re both set to use the same iCloud account.
After that—it just works. You have exactly the same “Not now” buttons described on Remind Me (Remind Me and Leave a Message). Even call waiting works—if a second call comes in, your iPad notifies you and offers you the chance to put the first one on hold.
Crazy.
TIP
If you own a bunch of Apple machines, it might drive you crazy that they all now ring at once when a call comes in. Fortunately, you can turn off the ringing on each device that you’d rather be peaceful.
To make one of your iPhones, iPads, or iPod Touches stop ringing, turn off Settings→FaceTime→iPhone Cellular Calls. To make a Mac stop ringing, open the FaceTime program; choose FaceTime→Preferences→Settings, and turn off iPhone Cellular Calls.
Contacts
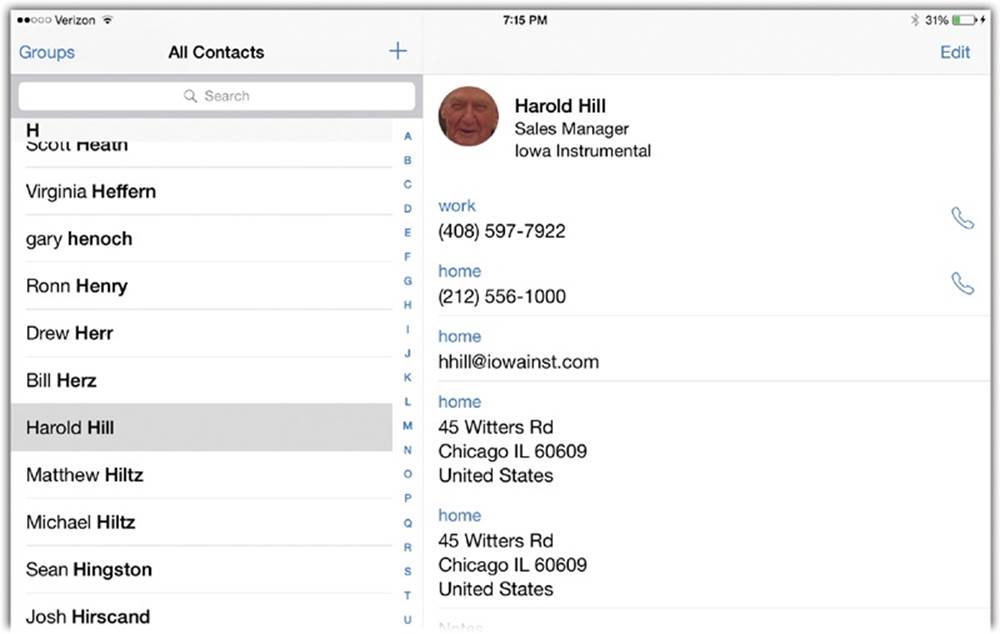
Contacts is your address book—your master phone book.
If your social circle is longer than one screenful, then you can navigate this list in any of three ways:
§ First, you can savor the distinct pleasure of flicking through the left-side master list.
§ Second, if you’re in a hurry to get to the T’s, use the A-to-Z index down the right edge of that column. Just tap the first letter of the last name you’re looking for. Alternatively, you can slide your finger up or down the index. The list scrolls with it.
§ Third, you can tap inside the search box at the top left of the screen. The keyboard appears. As you type, Contacts pares down the list, hiding everyone whose first, last, or company name doesn’t match what you’ve typed so far. It’s a really fast way to pluck one name out of a haystack.
(You can clear the search box by tapping the ![]() at its right end, or restore the full list by tapping Cancel.)
at its right end, or restore the full list by tapping Cancel.)
In any case, when you see the name you want, tap it to open its “card” on the right side of the screen, filled with email addresses, phone numbers, and other info—and, of course, those handy ![]() and
and ![]() buttons for placing phone or FaceTime calls.
buttons for placing phone or FaceTime calls.
Groups
Many computer address book programs, including OS X’s Contacts app, let you place your contacts into groups—subsets like Book Club or Fantasy League Guys. You can’t create or delete groups on the iPad, but at least the groups from your Mac, PC, Exchange server, or iCloud account get synced over to it. To see them, and to switch them all on or off at once, tap Groups at the top of the Contacts list.
Here’s where Groups come into play:
§ If you can’t seem to find someone in the list, you may be looking in the wrong list. Tap Groups at the top-left corner to return to the list of accounts. Tap All Contacts to view a single, unified list of everyone your tablet knows about.
§ If you’ve allowed your iPad to display your contacts from Facebook or Twitter, each of those lists is a group, too. (If your Contacts list seems hideously bloated with hundreds of people you never actually call, it’s probably your Facebook list. Pop into Groups and touch All Facebook to hide them all at once.)
§ If you do use the Groups feature, remember to tap the group name you want before you create a new contact. That’s how you put someone into an existing group. (If not, tap All Contacts instead.)
Adding to the Contacts List
You don’t have to type in all your phone numbers and email addresses one at a time. Instead, the iPad sucks in the entire phone book from your Mac or PC, iCloud, and/or an Exchange server at work.
The iPad also makes it very easy to add someone’s contact information when she FaceTime calls, emails, or text messages you, thanks to a prominent Add to Contacts button.
But if, in a pinch, on the road, at gunpoint, you have to add, edit, or remove a contact manually, here’s how to do it.
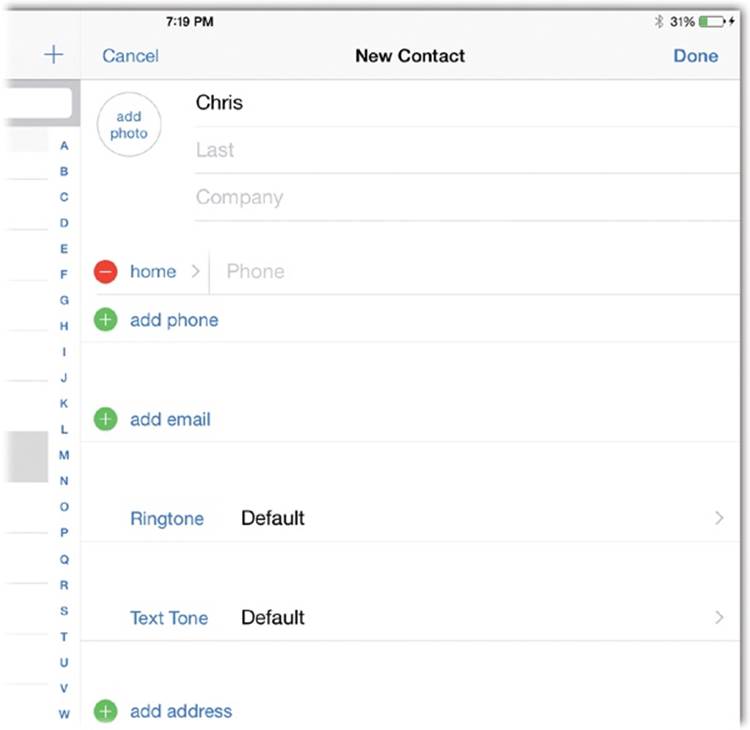
Make sure you’ve selected the right Group or account, as described above. Now, on the Contacts screen, tap ![]() . You arrive at the New Contact screen, which teems with empty boxes.
. You arrive at the New Contact screen, which teems with empty boxes.
It shouldn’t take you very long to figure out how to fill in this form: You tap in a box and type. But there are a few tips and tricks for the data-entry process:
§ The keyboard opens automatically when you tap in a box. And the iPad capitalizes the first letter of each name for you.
§ Phone numbers are special. When you enter a phone number, the iPad adds parentheses and hyphens for you. (You can even enter text phone numbers, like 1-800-GO-BROWNS; the iPad converts them to digits when it dials.)
If you need to insert a pause—for dialing access numbers, extension numbers, or voicemail passwords—type ![]() , which introduces a 2-second pause in the dialing. You can type several to create longer pauses.
, which introduces a 2-second pause in the dialing. You can type several to create longer pauses.
To change the label for a number (“mobile,” “home,” “work,” and so on), tap the label that’s there now. The Label screen shows you your choices.
TIP
If you scroll way down the Label screen, you’ll see that you can also create custom labels. You might prefer someone’s cellphone number to be identified as “cell” instead of “mobile,” for example. Or you might want to create a label that says “Skype,” “Google Voice,” “Line 2,” “Yacht Tablet,” or “Bat Tablet.” The secret: Tap Add Custom Label at the very bottom of the screen.
§ Expand-O-Fields mean you’ll never run out of room. Almost every field (empty box) on a Contacts card is infinitely expanding. That is, the instant you start filling in a field, another empty box (labeled add phone or whatever) appears right below it, so you can immediately addanother phone number, email address, URL, street address, or whatever. (The only non-expanding fields are First, Last, Company, Ringtone, and the oddball fields you add yourself.)
For example, when you first create a card for someone, the phone-number box is labeled “mobile.” If you start entering a phone number into it, a new, second empty phone-number box appears just below it (labeled “iPhone”—Apple’s wishful thinking!), so you’ll have a place to enter a second phone number for this person. When you do that, a third box appears. And so on.
There’s always one empty field, so you can never run out of places to add more phone numbers, addresses, and so on. (Don’t worry—the perpetual empty box doesn’t appear once you’re finished editing the person’s card.)
NOTE
Baffled by the ![]() button that appears next to certain fields? It tells you that tapping that field (or the
button that appears next to certain fields? It tells you that tapping that field (or the ![]() itself) will add new lines to your Contact card. For example, tapping Add new address inserts a new name/street/city/state block. And tapping add field lets you add a new miscellaneous field, like Birthday or Department.
itself) will add new lines to your Contact card. For example, tapping Add new address inserts a new name/street/city/state block. And tapping add field lets you add a new miscellaneous field, like Birthday or Department.
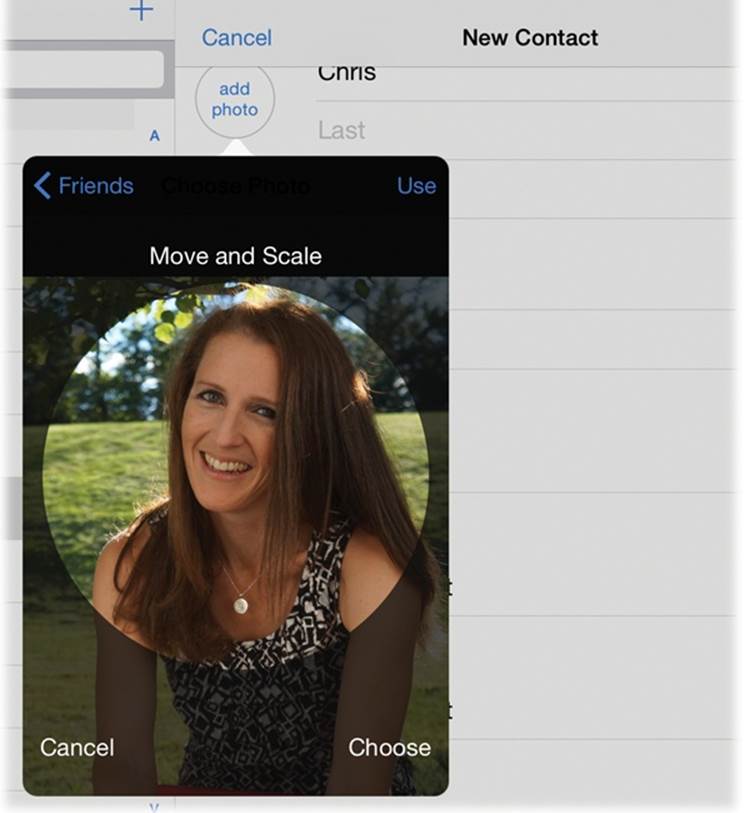
§ You can add a photo of the person, if you like. Tap add photo. If you have a photo of the person already, tap Choose Photo. You’re taken to your photo collection, where you can find a good headshot (Chapter 8).
Alternatively, tap Take Photo to activate the iPad’s camera. Frame the person, and then tap the white camera button to snap the shot.
In any case, you wind up with the Move and Scale screen. Here you can frame up the photo so the person’s face is nicely sized and centered. Spread two fingers to enlarge the photo; drag your finger to move the image within the frame. Tap Choose to commit the photo to the address book’s memory. (Back on the Info screen where you started, a miniature version of the photo now appears. Tap edit if you want to change the photo, take a new one, adjust the Move and Scale screen, or get rid of the photo altogether.)
From now on, this photo will pop up whenever the person calls. It also appears next to the person’s name in your Favorites list (if you haven’t turned that feature off in Settings, of course).
§ Relatives are here. There’s also the social profile field, where you can list somebody’s Twitter, LinkedIn, Flickr, Facebook, and even Myspace addresses. There’s an instant message field, too, where you can record addresses for chat networks like AIM or Yahoo Messenger.
And there’s add related name. Here’s where you can specify this person’s mother, father, spouse, partner, child, manager, sibling, and so on—or even type in a relationship that you make up (tap Add Custom Label).
NOTE
As you discovered in Chapter 3, Siri knows about all your relationships. You can tell her to “Call my mom” or “Text my boss.”
§ You can import photos from Facebook. Here’s a wild guess: Most of the photo boxes in your copy of Contacts are empty. After all, who’s going to go to the trouble of hunting down headshots of 500 acquaintances, just for a fully illustrated Contacts list?
Fortunately, with one click, the iPad can harvest headshots from the world’s largest database of faces: Facebook.
Visit Settings→Facebook. Once you’ve signed in, you see the magical button: Update All Contacts. When you click it, the iPad goes online for a massive research mission. Using your contacts’ names and phone numbers as matching criteria, it ventures off to Facebook, finds the profile photos of everyone who’s also on your Contacts list, and installs them into Contacts automatically. (If you already have a photo for somebody, don’t worry; it doesn’t get replaced.)
As a handy bonus, this operation also adds the @facebook.com email addresses for the people you already had in Contacts.
TIP
Actually, there’s another side effect of this operation: It also adds all your Facebook friends’ names to your main Contacts list.
Now, you may not be crazy about this. Most of these Facebook folk you’ll never need to contact from your iPad—yet here they are, cluttering up the Contacts list.
Fortunately, the Update All Contacts button doesn’t really mix your Facebook friends in with your local Contacts list. It just subscribes to your Facebook address book—adds a new group, which you can turn off with one quick click; see Adding to the Contacts List.
Even if you do choose to hide all their entries, you still get the benefit of the imported headshots and Facebook email addresses for the people you do want to see in Contacts.
§ You can import Twitter addresses. In Settings→Twitter, the Update Contacts button awaits. Its purpose is to fill in the Twitter handles for everyone who’s already in your Contacts, matching them by phone number or email address.
§ You can choose a ringtone. You can choose a different ringtone for each person in your address book. The idea is that you’ll know by the sound of the ring who’s calling you.
NOTE
It’s one tone per person, not per phone number. Of course, if you really want one ringtone for your buddy’s cellphone and another for his home phone, you can always create a different Contacts card for each one.
To choose a ringtone, tap Default. On the next screen, tap any sound in the Ringtones or Alert Sounds lists to sample them. (Despite the separate lists, in this context, these sounds are all being offered as ringtones.) When you’ve settled on a good one, tap Done to return to the Info screen where you started.
§ You can also pick a text-message sound. Just as you can choose sounds for incoming calls, the text tone item lets you choose sounds for incoming text messages and FaceTime invitations.
§ You can add new fields of your own. Very cool: If you tap add field at the bottom of the screen, then you go down the rabbit hole into Field Land, where you can add any of 15 additional info bits about the person whose card you’re editing: a prefix (like Mr. or Mrs.), a suffix (like M.D. or Esq.), a nickname, a job title, a birthday, an instant message address, a phonetic pronunciation for people with weird names, and so on.
When you tap one of these labels, you return to the Info screen, where you’ll see that the iPad has inserted the new, empty field in the most intelligent spot. For example, if you add a phonetic first name, that box appears just below the First Name box. The keyboard opens so you can fill in the blank.
§ You can link and unlink Unified Contacts. As noted earlier, your tablet can sync up with different accounts. Your Contacts app might list four sets of names and numbers: one stored on your tablet, one from an iCloud account, one from Facebook, and a fourth from your corporate Exchange server at work. In the old days, therefore, certain names might have shown up in the All Contacts list two or three times—not an optimal situation.
Now, as a favor to you, the iPad displays each person’s name only once in that master All Contacts list. If you tap that name, you open up a unified information screen for that person. It includes all the details from all the underlying cards from that person.
NOTE
The iPad combines cards in the All Contacts list only if the first and last names are exactly the same. If there’s a difference in name, suffix, prefix, or middle name, no unifying takes place. Remember, too, that you see the unification only if you view the All Contacts list.
To see which cards the iPad is combining for you, scroll to the bottom of the card. There the Linked Contacts section shows you which cards have been unified.
Here you can tap a listing to open the card in the corresponding account. For that matter, you can manually link a card, too; tap Edit, tap link contacts, and then choose a contact to link to this unified card—even if the name isn’t a perfect match.
NOTE
It’s OK to link Joe Carnelia’s card with Joseph Carnelia’s card—they’re probably the same person. But don’t link up different people’s cards. Remember, the whole point is to make the iPad combine all the phone numbers, email addresses, and so on onto a single card—and seeing two sets on one card could get confusing fast.
This stuff gets complex. But, in general, the iPad tries to do the right thing. For example, if you edit the information on the unified card, you’re changing that information only on the card in the corresponding account. (Unless you add information to the unified card. In that case, the new data tidbit is added to all the underlying source-account cards.)
NOTE
To delete any info bit from a Contacts card, tap the ![]() next to it, and then tap the red Delete button to confirm.
next to it, and then tap the red Delete button to confirm.
Editing Someone
To make corrections or changes, tap the person’s name in the Contacts list. In the upper-right corner of the Info card, tap Edit.
You return to the screens already described, where you can make changes. To edit a phone number, for example, tap it and change away. Or, to delete a number (or any other info bit), tap the ![]() button next to it, and then tap Delete to confirm.
button next to it, and then tap Delete to confirm.
After you tap Done (or Cancel), you can return to the Contacts list by swiping to the right.
Deleting Someone
Truth is, you’ll probably add people to your address book far more often than you’ll delete them. After all, you meet new people all the time—but you delete people primarily when they die, move away, or dump you.
To zap someone, tap the name in the Contacts list and then tap Edit. Scroll down, tap Delete Contact, and confirm by tapping Delete Contact again.
Sharing a Contact
There’s a lot of work involved in entering someone’s contact information. It would be thoughtful, therefore, if you could spare the next guy all that effort—by sending a fully formed electronic business card to him. It can be yours or that of anyone in your Contacts list.
To do that, open the contact’s card, find the bottom, and tap Share Contact. On the Share sheet, you’re offered a choice of AirDrop, Message, Mail, and More. (“Message” means an iMessage—Adding to the Contacts List—if it’s a fellow Apple fan, or a text message otherwise. AirDrop is described on Do Not Disturb. And More is a place for new apps to install their sharing options.)
Tap your choice, address the message (to an email address or, for a message, a cellphone number), and send it. The recipient, assuming he has a half-decent smartphone or address-book program on the receiving end, can install that person’s information with a single tap on the attachment.
TIP
Ever meet someone and wish you could just exchange business cards electronically, iPad to iPad? AirDrop is the answer.
Bluetooth Accessories
Bluetooth is a short-range cable elimination technology. It’s designed to untether you from equipment that would ordinarily require a cord.
On an iPad, Bluetooth is primarily useful for transmitting audio to a wireless speaker—and for sending your calls to Bluetooth car stereos and tiny wireless Bluetooth earpieces.
NOTE
This discussion covers monaural Bluetooth earpieces intended for phone calls. But the iPad can also handle Bluetooth stereo headphones, intended for music, as well as Bluetooth speakers. Details are on Multi(music)tasking.
Pairing with a Bluetooth Earpiece or Speaker
Pairing means “marrying” a phone or tablet to a Bluetooth earpiece or speaker so that each works only with the other. If you didn’t do this one-time pairing, then some other guy passing on the sidewalk might hear your conversation through his earpiece. And neither of you would be happy.
The pairing process is different for every tablet and every Bluetooth earpiece. Usually it involves a sequence like this:
1. On the earpiece, turn on Bluetooth. Make the earpiece or speaker discoverable. Discoverable just means that your iPad can “see” it. You’ll have to consult the gadget’s instructions to learn how to do so; it’s usually a matter of holding down some button or combination of buttons until the earpiece blinks.
2. On the iPad, tap Settings→Bluetooth. Turn Bluetooth on. The iPad immediately begins searching for nearby Bluetooth equipment. If all goes well, you’ll see the name of your earpiece or speaker show up on the screen.
3. Tap the gadget’s name. Type in the passcode, if necessary. The passcode is a number, usually four or six digits, that must be typed into the tablet within about a minute. You have to enter this only once, during the initial pairing process. The idea is to prevent some evildoer sitting nearby in the airport lounge, for example, to secretly pair his earpiece with your iPad.

The user’s manual for your earpiece should tell you what the passcode is (if one is even required).
NOTE
The trouble with Bluetooth has always been that it’s a battery hog. Now, though, there’s a new, better technology, alternately called Bluetooth LE (for “low energy”), Bluetooth Smart, or Bluetooth 4.0. Its very smart idea: It turns on only when necessary and then turns off again to save power.
When you’ve paired your iPad with a Bluetooth 4.0 gadget, you’ll see the Bluetooth logo on your status bar (![]() ) light up only when it’s actually exchanging data. Bluetooth LE has made possible a lot of smartwatches and fitness trackers.
) light up only when it’s actually exchanging data. Bluetooth LE has made possible a lot of smartwatches and fitness trackers.
As a handy bonus, Bluetooth LE devices don’t have to be paired in the iPad’s Settings app. Often, you can do the pairing right in the gadget’s companion app, which makes a lot more sense.
To make FaceTime calls using a Bluetooth earpiece (or speaker as a speakerphone), you dial using the iPad itself. You usually use the iPad’s own volume controls, too. You generally press a button on the earpiece or the speaker itself to answer an incoming call, to swap call-waiting calls, and to end a call.
If you’re having any problems making a particular gadget work, Google it. Type “iPad jambox mini,” for example. Chances are good that you’ll find a write-up by somebody who’s worked through the setup and made it work.
Bluetooth Car Systems
The iPad works beautifully with Bluetooth car systems, too. The pairing procedure generally goes exactly as described above: You make the car discoverable, enter the passcode on the iPad, and then make the connection.
Once you’re paired up, you can answer an incoming call by pressing a button on your steering wheel, for example. You hear your caller through the car’s speakers, and a microphone for your own voice is hidden in the rearview mirror or dashboard. You make calls either from the iPad or, in some cars, by dialing the number on the car’s own touchscreen.
NOTE
When Bluetooth is turned on but the earpiece isn’t, or when the earpiece isn’t nearby, the ![]() icon on your iPad’s status bar appears in gray. And when it’s connected and working right, the earpiece’s battery gauge appears on the iPad’s status bar.
icon on your iPad’s status bar appears in gray. And when it’s connected and working right, the earpiece’s battery gauge appears on the iPad’s status bar.
Of course, studies show that it’s the act of driving while conversing that causes accidents—not actually holding a phone. So the hands-free system is less for safety than for convenience and compliance with state laws.
All materials on the site are licensed Creative Commons Attribution-Sharealike 3.0 Unported CC BY-SA 3.0 & GNU Free Documentation License (GFDL)
If you are the copyright holder of any material contained on our site and intend to remove it, please contact our site administrator for approval.
© 2016-2026 All site design rights belong to S.Y.A.