Beginning iPhone Development: Exploring the iOS SDK, Seventh Edition (2014)
Chapter 18. Taps, Touches, and Gestures
The screens of the iPhone, iPod touch, and iPad—with their crisp, bright, touch-sensitive display—are truly things of beauty and masterpieces of engineering. The multitouch screen common to all iOS devices is one of the key factors in the platform’s tremendous usability. Because the screen can detect multiple touches at the same time and track them independently, applications are able to detect a wide range of gestures, giving the user power that goes beyond the interface.
Suppose you are in the Mail application staring at a long list of junk e-mail that you want to delete. You can tap each one individually, tap the trash icon to delete it, and then wait for the next message to download, deleting each one in turn. This method is best if you want to read each message before you delete it.
Alternatively, from the list of messages, you can tap the Edit button in the upper-right corner, tap each e-mail row to mark it, and then hit the Trash button to delete all marked messages. This method is best if you don’t need to read each message before deleting it. Another alternative is to swipe across a message in the list from right to left. That gesture produces a More button and a Trash button for that message. Tap the Trash button, and the message is deleted.
This example is just one of the countless gestures that are made possible by the multitouch display. You can pinch your fingers together to zoom out while viewing a picture or reverse-pinch to zoom in. On the home screen, you can long-press an icon to turn on “jiggly mode,” which allows you to delete applications from your iOS device.
In this chapter, we’re going to look at the underlying architecture that lets you detect gestures. You’ll learn how to detect the most common gestures, as well as how to create and detect a completely new gesture.
Multitouch Terminology
Before we dive into the architecture, let’s go over some basic vocabulary. First, a gesture is any sequence of events that happens from the time you touch the screen with one or more fingers until you lift your fingers off the screen. No matter how long it takes, as long as one or more fingers remain against the screen, you are still within a gesture (unless a system event, such as an incoming phone call, interrupts it). Note that Cocoa Touch doesn’t expose any class or structure that represents a gesture. In some sense, a gesture is a verb, and a running app can watch the user input stream to see if one is happening.
A gesture is passed through the system inside a series of events. Events are generated when you interact with the device’s multitouch screen. They contain information about the touch or touches that occurred.
The term touch refers to a finger being placed on the screen, dragging across the screen, or being lifted from the screen. The number of touches involved in a gesture is equal to the number of fingers on the screen at the same time. You can actually put all five fingers on the screen, and as long as they aren’t too close to each other, iOS can recognize and track them all. Now there aren’t many useful five-finger gestures, but it’s nice to know the iOS can handle one if necessary. In fact, experimentation has shown that the iPad can handle up to 11 simultaneous touches! This may seem excessive, but could be useful if you’re working on a multiplayer game, in which several players are interacting with the screen at the same time.
A tap happens when you touch the screen with a finger and then immediately lift your finger off the screen without moving it around. The iOS device keeps track of the number of taps and can tell you if the user double-tapped, triple-tapped, or even 20-tapped. It handles all the timing and other work necessary to differentiate between two single-taps and a double-tap, for example.
A gesture recognizer is an object that knows how to watch the stream of events generated by a user and recognize when the user is touching and dragging in a way that matches a predefined gesture. The UIGestureRecognizer class and its various subclasses can help take a lot of work off your hands when you want to watch for common gestures. This class nicely encapsulates the work of looking for a gesture and can be easily applied to any view in your application.
In the first part of this chapter, you’ll see the events that are reported when the user touches the screen with one or more fingers, and how to track the movement of fingers on the screen. You can use these events to handle gestures in a custom view or in your application delegate. Next, we’ll look at some of the gesture recognizers that come with the iOS SDK, and finally, you’ll see how to build your own gesture recognizer.
The Responder Chain
Since gestures are passed through the system inside events, and events are passed through the responder chain, you need to have an understanding of how the responder chain works in order to handle gestures properly. If you’ve worked with Cocoa for Mac OS X, you’re probably familiar with the concept of a responder chain, as the same basic mechanism is used in both Cocoa and Cocoa Touch. If this is new material, don’t worry; we’ll explain how it works.
Responding to Events
Several times in this book, we’ve mentioned the first responder, which is usually the object with which the user is currently interacting. The first responder is the start of the responder chain, but it’s not alone. There are always other responders in the chain as well. In a running application, the responder chain is a changing set of objects that are able to respond to user events. Any class that has UIResponder as one of its superclasses is a responder. UIView is a subclass of UIResponder, and UIControl is a subclass of UIView, so all views and all controls are responders.UIViewController is also a subclass of UIResponder, meaning that it is a responder, as are all of its subclasses, such as UINavigationController and UITabBarController. Responders, then, are so named because they respond to system-generated events, such as screen touches.
If a responder doesn’t handle a particular event, such as a gesture, it usually passes that event up the responder chain. If the next object in the chain responds to that particular event, it will usually consume the event, which stops the event’s progression through the responder chain. In some cases, if a responder only partially handles an event, that responder will take an action and forward the event to the next responder in the chain. That’s not usually what happens, though. Normally, when an object responds to an event, that’s the end of the line for the event. If the event goes through the entire responder chain and no object handles the event, the event is then discarded.
Let’s take a more specific look at the responder chain. An event first gets delivered to the UIApplication object, which in turn passes it to the application’s UIWindow. The UIWindow handles the event by selecting an initial responder. The initial responder is chosen as follows:
· In the case of a touch event, the UIWindow object determines the view that the user touched, and then offers the event to any gesture recognizers that are registered for that view or any view higher up the view hierarchy. If any gesture recognizer handles the event, it goes no further. If not, the initial responder is the touched view and the event will be delivered to it.
· For an event generated by the user shaking the device (which we’ll say more about in Chapter 20) or from a remote control device, the event is delivered to the first responder.
If the initial responder doesn’t handle the event, it passes the event to its parent view, if there is one, or to the view controller if the view is the view controller’s view. If the view controller doesn’t handle the event, it continues up the responder chain through the view hierarchy of its parent view controller, if it has one.
If the event makes it all the way up through the view hierarchy without being handled by a view or a controller, the event is passed to the application’s window. If the window doesn’t handle the event, the UIApplication object will pass it to the application delegate, if the delegate is a subclass of UIResponder (which it normally is if you create your project from one of Apple’s application templates). Finally, if the app delegate isn’t a subclass of UIResponder or doesn’t handle the event, then the event goes gently into the good night.
This process is important for a number of reasons. First, it controls the way gestures can be handled. Let’s say a user is looking at a table and swipes a finger across a row of that table. What object handles that gesture?
If the swipe is within a view or control that’s a subview of the table view cell, that view or control will get a chance to respond. If it doesn’t respond, the table view cell gets a chance. In an application like Mail, in which a swipe can be used to delete a message, the table view cell probably needs to look at that event to see if it contains a swipe gesture. Most table view cells don’t respond to gestures, however. If they don’t respond, the event proceeds up to the table view, and then up the rest of the responder chain until something responds to that event or it reaches the end of the line.
Forwarding an Event: Keeping the Responder Chain Alive
Let’s take a step back to that table view cell in the Mail application. We don’t know the internal details of the Apple Mail application; however, let’s assume that the table view cell handles the delete swipe and only the delete swipe. That table view cell must implement the methods related to receiving touch events (discussed shortly) so that it can check to see if that event could be interpreted as part of a swipe gesture. If the event matches a swipe that the table view is looking for, then the table view cell takes an action, and that’s that; the event goes no further.
If the event doesn’t match the table view cell’s swipe gesture, the table view cell is responsible for forwarding that event manually to the next object in the responder chain. If it doesn’t do its forwarding job, the table and other objects up the chain will never get a chance to respond, and the application may not function as the user expects. That table view cell could prevent other views from recognizing a gesture.
Whenever you respond to a touch event, you need to keep in mind that your code doesn’t work in a vacuum. If an object intercepts an event that it doesn’t handle, it needs to pass it along manually. One way to do this is to call the same method on the next responder. Here’s a bit of fictional code:
- (void)respondToFictionalEvent:(UIEvent *)event {
if ([self shouldHandleEvent:event]) {
[self handleEvent:event];
} else {
[[self nextResponder] respondToFictionalEvent:event];
}
}
Notice that we call the same method on the next responder. That’s how to be a good responder-chain citizen. Fortunately, most of the time, methods that respond to an event also consume the event. However, it’s important to know that if that’s not the case, you need to make sure the event is passed along to the next link in the responder chain.
The Multitouch Architecture
Now that you know a little about the responder chain, let’s look at the process of handling gestures. As we’ve indicated, gestures are passed along the responder chain, embedded in events. This means that the code to handle any kind of interaction with the multitouch screen needs to be contained in an object in the responder chain. Generally, that means we can choose to either embed that code in a subclass of UIView or embed the code in a UIViewController.
So, does this code belong in the view or in the view controller?
If the view needs to do something to itself based on the user’s touches, the code probably belongs in the class that defines that view. For example, many control classes, such as UISwitch and UISlider, respond to touch-related events. A UISwitch might want to turn itself on or off based on a touch. The folks who created the UISwitch class embedded gesture-handling code in the class so the UISwitch can respond to a touch.
Often, however, when the gesture being processed affects more than the object being touched, the gesture code really belongs in the relevant view controller class. For example, if the user makes a gesture touching one row that indicates that all rows should be deleted, the gesture should be handled by code in the view controller. The way you respond to touches and gestures in both situations is exactly the same, regardless of the class to which the code belongs.
The Four Touch Notification Methods
Four methods are used to notify a responder about touches. When the user first touches the screen, the system looks for a responder that has a method called touchesBegan:withEvent:. To find out when the user first begins a gesture or taps the screen, implement this method in your view or your view controller. Here’s an example of what that method might look like:
- (void)touchesBegan:(NSSet *)touches withEvent:(UIEvent *)event {
NSUInteger numTaps = [[touches anyObject] tapCount];
NSUInteger numTouches = [event.allTouches count];
// Do something here.
}
This method (and each of the touch-related methods) is passed an NSSet instance called touches and an instance of UIEvent, which has a property called allTouches that is another set of touches. Here’s a simple description of what these two sets of touches contain:
· The allTouches property contains one UITouch object for each finger that is currently pressed against the screen, whether or not that finger is currently moving.
· The NSSet passed as the touches argument contains one UITouch object for each finger that has just been added or removed from the screen or which has just moved or stopped moving. In other words, it tells you what changed between this call and the last time one of your touch notification methods was called.
Each time a finger touches the screen for the first time, a new UITouch object is allocated to represent that finger and added to the set that is delivered in the allTouches property of each UIEvent. All future events that report activity for that same finger will contain the same UITouchinstance in both the allTouches set and in the touches argument (although in the latter case, it will not be present if there is no activity to report for that finger), until that finger is removed from the screen. Thus, to track the activity of any given finger, you need to monitor its UITouchobject.
You can determine the number of fingers currently pressed against the screen by getting a count of the objects in allTouches. If the event reports a touch that is part of a series of taps by any given finger, you can get the tap count from the tapCount property of the UITouch object for that finger. If there’s only one finger touching the screen, or if you don’t care which finger you ask about, you can quickly get a UITouch object to query by using the anyObject method of NSSet. In the preceding example, a numTaps value of 2 tells you that the screen was tapped twice in quick succession by at least one finger. Similarly, a numTouches value of 2 tells you the user has two fingers touching the screen.
Not all of the objects in touches or allTouches may be relevant to the view or view controller in which you’ve implemented this method. A table view cell, for example, probably doesn’t care about touches that are in other rows or that are in the navigation bar. You can get the touches that fall within a particular view from the event:
NSSet *myTouches = [event touchesForView:self.view];
Every UITouch represents a different finger, and each finger is located at a different position on the screen. You can find out the position of a specific finger using the UITouch object. It will even translate the point into the view’s local coordinate system if you ask it to:
CGPoint point = [touch locationInView:self.view];
You can get notified while the user is moving fingers across the screen by implementing touchesMoved:withEvent:. This method is called multiple times during a long drag, and each time it is called, you will get another set of touches and another event. In addition to being able to find out each finger’s current position from the UITouch objects, you can also discover the previous location of that touch, which is the finger’s position the last time either touchesMoved:withEvent: or touchesBegan:withEvent: was called.
When any of the user’s fingers is removed from the screen, another method, touchesEnded:withEvent:, is invoked. When this method is called, you know that the user is finished with a gesture.
There’s one final touch-related method that responders might implement. It’s called touchesCancelled:withEvent:, and it is called if the user is in the middle of a gesture when something happens to interrupt it, like the phone ringing. This is where you can do any cleanup you might need so you can start fresh with a new gesture. When this method is called, touchesEnded:withEvent: will not be called for the current gesture.
OK, enough theory—let’s see some of this in action.
The TouchExplorer Application
We’re going to build a little application that will give you a better feel for when the four touch-related responder methods are called. In Xcode, create a new project using the Single View Application template. Enter TouchExplorer as the Product Name and select Universal from the Devices pop-up.
TouchExplorer will print messages to the screen that indicate the touch and tap count every time a touch-related method is called (see Figure 18-1).
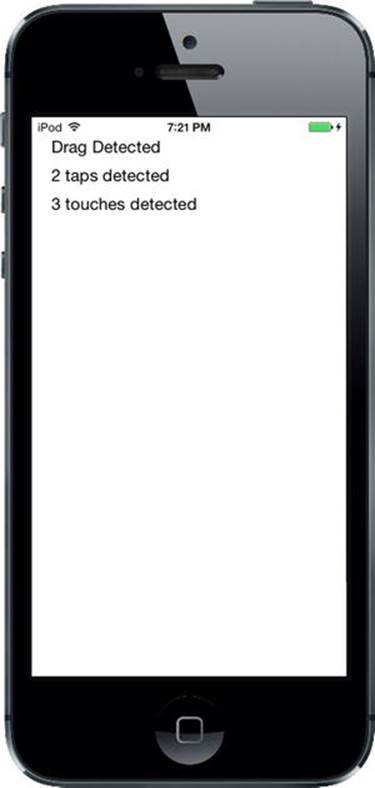
Figure 18-1. The TouchExplorer application
Note Although the applications in this chapter will run on the simulator, you won’t be able to see all the available multitouch functionality unless you run them on a real iOS device. If you have a paid membership in Apple’s iOS Developer Program, you have the ability to run the programs you write on your device of choice. The Apple web site does a great job of walking you through the process of getting everything you need to prepare to connect Xcode to your device.
We need three labels for this application: one to indicate which method was last called, another to report the current tap count, and a third to report the number of touches. Single-click ViewController.m and add three outlets to the class extension at the top of the file:
#import "ViewController.h"
@interface ViewController ()
@property (weak, nonatomic) IBOutlet UILabel *messageLabel;
@property (weak, nonatomic) IBOutlet UILabel *tapsLabel;
@property (weak, nonatomic) IBOutlet UILabel *touchesLabel;
@end
Now select Main.storyboard to edit the GUI. You’ll see the usual empty view contained in all new projects of this kind. Drag a label onto the view, using the blue guidelines to place the label toward the upper-left corner of the view. Hold down the Option key and drag two more labels out from the original, spacing them one below the other. This leaves you with three labels (see Figure 18-1). Feel free to play with the fonts and colors if you’re feeling a bit like Picasso.
Now we need to set the auto layout constraints for the labels. In the Document Outline, Control-drag from the first label to the main view and release the mouse. Hold down the Shift key and select Top Space to Top Layout Guide and Leading Space to Container Margin, and then click outside the pop-up with the mouse. Do the same for the other three labels.
The next step is to connect the labels to their outlets. Control-drag from the View Controller icon to each of the three labels, connecting the top one to the messageLabel outlet, the middle one to the tapsLabel outlet, and the last one to the touchesLabel outlet.
Finally, double-click each label and press the Delete key to get rid of its text.
Next, single-click either the background of the view you’ve been working on or the View icon in the Document Outline, and then bring up the Attributes Inspector (see Figure 18-2). On the Inspector, go to the View section and make sure that both User Interaction Enabled and Multiple Touch are checked. If Multiple Touch is not checked, your controller class’s touch methods will always receive one and only one touch, no matter how many fingers are actually touching the phone’s screen.
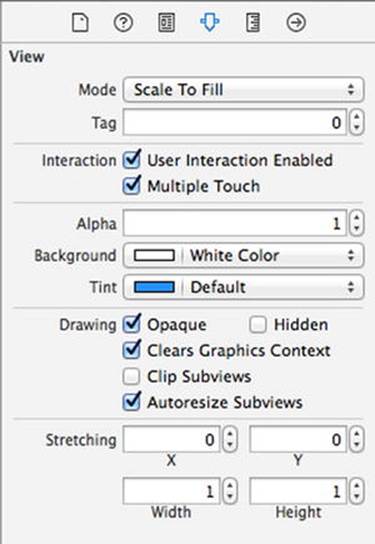
Figure 18-2. In the View attributes, make sure both User Interaction Enabled and Multiple Touch are checked
When you’re finished, switch back ViewController.m and add the following code to the class’s @implementation section:.
@implementation ViewController
- (void)viewDidLoad
{
[super viewDidLoad];
// Do any additional setup after loading the view, typically from a nib.
}- (void)didReceiveMemoryWarning{
[super didReceiveMemoryWarning];
// Dispose of any resources that can be recreated.}
- (void)updateLabelsFromTouches:(NSSet *)touches {
NSUInteger numTaps = [[touches anyObject] tapCount];
NSString *tapsMessage = [[NSString alloc]
initWithFormat:@"%ld taps detected", (unsigned long)numTaps];
self.tapsLabel.text = tapsMessage;
NSUInteger numTouches = [touches count];
NSString *touchMsg = [[NSString alloc] initWithFormat:
@"%ld touches detected", (unsigned long)numTouches];
self.touchesLabel.text = touchMsg;
}
#pragma mark - Touch Event Methods
- (void)touchesBegan:(NSSet *)touches withEvent:(UIEvent *)event {
self.messageLabel.text = @"Touches Began";
[self updateLabelsFromTouches:event.allTouches];
}
- (void)touchesCancelled:(NSSet *)touches withEvent:(UIEvent *)event {
self.messageLabel.text = @"Touches Cancelled";
[self updateLabelsFromTouches: event.allTouches];
}
- (void)touchesEnded:(NSSet *)touches withEvent:(UIEvent *)event {
self.messageLabel.text = @"Touches Ended.";
[self updateLabelsFromTouches: event.allTouches];
}
- (void)touchesMoved:(NSSet *)touches withEvent:(UIEvent *)event {
self.messageLabel.text = @"Drag Detected";
[self updateLabelsFromTouches: event.allTouches];
}
@end
In this controller class, we implement all four of the touch-related methods we discussed earlier. Each one sets messageLabel so the user can see when each method has been called. Next, all four of them call updateLabelsFromTouches: to update the other two labels. TheupdateLabelsFromTouches: method gets the tap count from one of the touches, figures out the number of fingers touch the screen by looking at the count property of the set of touches that it receives, and updates the labels with that information.
Compile and run the application. If you’re running in the simulator, try repeatedly clicking the screen to drive up the tap count. You should also try clicking and holding down the mouse button while dragging around the view to simulate a touch and drag.
You can emulate a two-finger pinch in the iOS simulator by holding down the Option key while you click with the mouse and drag. You can also simulate two-finger swipes by first holding down the Option key to simulate a pinch, moving the mouse so the two dots representing virtual fingers are next to each other, and then holding down the Shift key (while still holding down the Option key). Pressing the Shift key will lock the position of the two fingers relative to each other, enabling you to do swipes and other two-finger gestures. You won’t be able to do gestures that require three or more fingers, but you can do most two-finger gestures on the simulator using combinations of the Option and Shift keys.
If you’re able to run this program on a device, see how many touches you can get to register at the same time. Try dragging with one finger, followed by two fingers, and then three. Try double- and triple-tapping the screen, and see if you can get the tap count to go up by tapping with two fingers.
Play around with the TouchExplorer application until you feel comfortable with what’s happening and with the way that the four touch methods work. When you’re ready, continue on to see how to detect one of the most common gestures: the swipe.
The Swipes Application
The application we’re about to build does nothing more than detect swipes, both horizontal and vertical. If you swipe your finger across the screen from left to right, right to left, top to bottom, or bottom to top, the app will display a message across the top of the screen for a few seconds, informing you that a swipe was detected (see Figure 18-3).
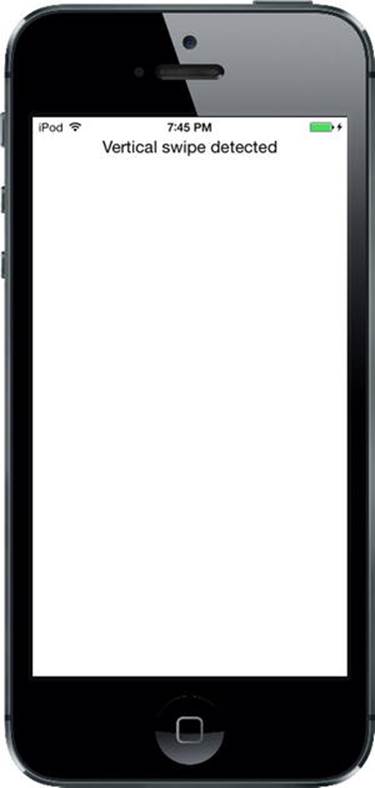
Figure 18-3. The Swipes application will detect both vertical and horizontal swipes
Using Touch Events to Detect Swipes
Detecting swipes is relatively easy. We’re going to define a minimum gesture length in pixels, which is how far the user needs to swipe before the gesture counts as a swipe. We’ll also define a variance, which is how far from a straight line our user can veer and still have the gesture count as a horizontal or vertical swipe. A diagonal line generally won’t count as a swipe, but one that’s just a little off from horizontal or vertical will.
When the user touches the screen, we’ll save the location of the first touch in a variable. We’ll then check as the user’s finger moves across the screen to see if it reaches a point where it has gone far enough and straight enough to count as a swipe. There’s actually a built-in gesture recognizer that does exactly this, but we’re going to use what we’ve learned about touch events to make one of our own. Let’s build it.
Create a new project in Xcode using the Single View Application template, set Devices to Universal, and name the project Swipes.
Single-click ViewController.m and add the following code to the class extension near the top:
#import "ViewController.h"
@interface ViewController ()
@property (weak, nonatomic) IBOutlet UILabel *label;
@property (nonatomic) CGPoint gestureStartPoint;
@end
This code declares an outlet for our one label and a variable to hold the first spot the user touches.
Select Main.storyboard to open it for editing. Make sure that the view controller’s view is set so User Interaction Enabled and Multiple Touch are both checked using the Attributes Inspector, and drag a label from the library and drop it in the upper portion of the View window. Set the text alignment to center and feel free to play with the other text attributes to make the label easier to read. In the Document Outline, Control-drag from the label to the view, release the mouse, hold down Shift and select Top Space to Top Layout Guide and Center Horizontally in Container, and then click outside the pop-up with the mouse. Control-drag from the View Controller icon to the label and connect it to the label outlet. Finally, double-click the label and delete its text.
Then switch over to ViewController.m and add the bold code shown here:
static CGFloat const kMinimumGestureLength = 25;
static CGFloat const kMaximumVariance = 5;
@implementation ViewController
- (void)viewDidLoad
{
[super viewDidLoad];
// Do any additional setup after loading the view, typically from a nib.
}- (void)didReceiveMemoryWarning{
[super didReceiveMemoryWarning];
// Dispose of any resources that can be recreated.}
#pragma mark - Touch Handling
- (void)touchesBegan:(NSSet *)touches withEvent:(UIEvent *)event {
UITouch *touch = [touches anyObject];
self.gestureStartPoint = [touch locationInView:self.view];
}
- (void)touchesMoved:(NSSet *)touches withEvent:(UIEvent *)event {
UITouch *touch = [touches anyObject];
CGPoint currentPosition = [touch locationInView:self.view];
CGFloat deltaX = fabsf(self.gestureStartPoint.x - currentPosition.x);
CGFloat deltaY = fabsf(self.gestureStartPoint.y - currentPosition.y);
if (deltaX >=kMinimumGestureLength && deltaY <= kMaximumVariance) {
self.label.text = @"Horizontal swipe detected";
dispatch_after(dispatch_time(DISPATCH_TIME_NOW, 2 * NSEC_PER_SEC),
dispatch_get_main_queue(),
^{ self.label.text = @""; });
} else if (deltaY >=kMinimumGestureLength &&
deltaX <= kMaximumVariance){
self.label.text = @"Vertical swipe detected";
dispatch_after(dispatch_time(DISPATCH_TIME_NOW, 2 * NSEC_PER_SEC),
dispatch_get_main_queue(),
^{ self.label.text = @""; });
}
}
@end
Let’s start with the touchesBegan:withEvent: method. All we do there is grab any touch from the touches set and store its touch point. We’re primarily interested in single-finger swipes right now, so we don’t worry about how many touches there are; we just grab one of them:
UITouch *touch = [touches anyObject];
self.gestureStartPoint = [touch locationInView:self.view];
We’re using the UITouch objects in the touches argument instead of the ones in the UIEvent because we’re interested in tracking changes as they happen, not in the overall state of all of the active touches.
In the next method, touchesMoved:withEvent:, we do the real work. First, we get the current position of the user’s finger:
UITouch *touch = [touches anyObject];
CGPoint currentPosition = [touch locationInView:self.view];
After that, we calculate how far the user’s finger has moved both horizontally and vertically from its starting position. fabsf() is a function from the standard C math library that returns the absolute value of a float. This allows us to subtract one from the other without needing to worry about which is the higher value:
CGFloat deltaX = fabsf(self.gestureStartPoint.x - currentPosition.x);
CGFloat deltaY = fabsf(self.gestureStartPoint.y - currentPosition.y);
Once we have the two deltas, we check to see if the user has moved far enough in one direction without having moved too far in the other to constitute a swipe. If that’s true, we set the label’s text to indicate whether a horizontal or vertical swipe was detected. We also use the GCDdispatch_async() function to erase the text after it has been on the screen for 2 seconds. That way, the user can practice multiple swipes without needing to worry whether the label is referring to an earlier attempt or the most recent one:
if (deltaX >=kMinimumGestureLength && deltaY <= kMaximumVariance) {
self.label.text = @"Horizontal swipe detected";
dispatch_after(dispatch_time(DISPATCH_TIME_NOW, 2 * NSEC_PER_SEC),
dispatch_get_main_queue(),
^{ self.label.text = @""; });
} else if (deltaY >=kMinimumGestureLength &&
deltaX <= kMaximumVariance){
self.label.text = @"Vertical swipe detected";
dispatch_after(dispatch_time(DISPATCH_TIME_NOW, 2 * NSEC_PER_SEC),
dispatch_get_main_queue(),
^{ self.label.text = @""; });
}
Go ahead and compile and run the application. If you find yourself clicking and dragging with no visible results, be patient. Click and drag straight down or straight across until you get the hang of swiping.
Automatic Gesture Recognition
The procedure we just used for detecting a swipe wasn’t too bad. All the complexity is in the touchesMoved:withEvent: method, and even that wasn’t all that complicated. But there’s an even easier way to do this. iOS includes a class called UIGestureRecognizer, which eliminates the need for watching all the events to see how fingers are moving. You don’t use UIGestureRecognizer directly, but instead create an instance of one of its subclasses, each of which is designed to look for a particular type of gesture, such as a swipe, pinch, double-tap, triple-tap, and so on.
Let’s see how to modify the Swipes app to use a gesture recognizer instead of our hand-rolled procedure. As always, you might want to make a copy of your Swipes project folder and start from there.
Start by selecting ViewController.m and deleting both the touchesBegan:withEvent: and touchesMoved:withEvent: methods. That’s right, you won’t need them. Next, add a couple of new methods in their place:
- (void)reportHorizontalSwipe:(UIGestureRecognizer *)recognizer {
self.label.text = @"Horizontal swipe detected";
dispatch_after(dispatch_time(DISPATCH_TIME_NOW, 2 * NSEC_PER_SEC),
dispatch_get_main_queue(),
^{ self.label.text = @""; });
}
- (void)reportVerticalSwipe:(UIGestureRecognizer *)recognizer {
self.label.text = @"Vertical swipe detected";
dispatch_after(dispatch_time(DISPATCH_TIME_NOW, 2 * NSEC_PER_SEC),
dispatch_get_main_queue(),
^{ self.label.text = @""; });
}
These methods implement the actual “functionality” (if you can call it that) that’s provided by the swipe gestures, just as the touchesMoved:withEvent: did previously. Now add the new code shown here to the viewDidLoad method:
- (void)viewDidLoad
{
[super viewDidLoad];
// Do any additional setup after loading the view, typically from a nib.
UISwipeGestureRecognizer *vertical = [[UISwipeGestureRecognizer alloc]
initWithTarget:self action:@selector(reportVerticalSwipe:)];
vertical.direction = UISwipeGestureRecognizerDirectionUp |
UISwipeGestureRecognizerDirectionDown;
[self.view addGestureRecognizer:vertical];
UISwipeGestureRecognizer *horizontal = [[UISwipeGestureRecognizer alloc]
initWithTarget:self action:@selector(reportHorizontalSwipe:)];
horizontal.direction = UISwipeGestureRecognizerDirectionLeft |
UISwipeGestureRecognizerDirectionRight;
[self.view addGestureRecognizer:horizontal];
}
All we’re doing here is creating two gesture recognizers—one that will detect vertical movement and another to detect horizontal movement. When one of them recognizes its configured gesture, it will call either the reportVerticalSwipe: or the reportHorizontalSwipe:method and we’ll set the label’s text appropriately. There you have it! To sanitize things even further, you can also delete the declaration of the gestureStartPoint property and the two constant values from ViewController.m. Now build and run the application to try out the new gesture recognizers!
In terms of total lines of code, there’s not much difference between these two approaches for a simple case like this. But the code that uses gesture recognizers is undeniably simpler to understand and easier to write. You don’t need to give even a moment’s thought to the issue of calculating a finger’s movement over time because that’s already done for you by the UISwipeGestureRecognizer. And better yet, Apple’s gesture recognition system is extendable, which means that if your application requires really complex gestures that aren’t covered by any of Apple’s recognizers, you can make your own, and keep the complex code (along the lines of what we saw earlier) tucked away in the recognizer class instead of polluting your view controller code. We’ll build an example of just such a thing later in this chapter. Meanwhile, run the application and you’ll see that it behaves just like the previous version.
Implementing Multiple Swipes
In the Swipes application, we worried about only single-finger swipes, so we just grabbed any object out of the touches set to figure out where the user’s finger was during the swipe. This approach is fine if you’re interested in only single-finger swipes, the most common type of swipe used.
But what if you want to handle two- or three-finger swipes? In the earliest versions of this book, we dedicated about 50 lines of code, and a fair amount of explanation, to achieving this by tracking multiple UITouch instances across multiple touch events. Now that we have gesture recognizers, this is a solved problem. A UISwipeGestureRecognizer can be configured to recognize any number of simultaneous touches. By default, each instance expects a single finger, but you can configure it to look for any number of fingers pressing the screen at once. Each instance responds only to the exact number of touches you specify, so what we’ll do is create a whole bunch of gesture recognizers in a loop.
Make another copy of your Swipes project folder.
Edit ViewController.m and modify the viewDidLoad method, replacing it with the one shown here:
- (void)viewDidLoad
{
[super viewDidLoad];
// Do any additional setup after loading the
// view, typically from a nib.
for (NSUInteger touchCount = 1; touchCount <= 5; touchCount++) {
UISwipeGestureRecognizer *vertical;
vertical = [[UISwipeGestureRecognizer alloc]
initWithTarget:self action:@selector(reportVerticalSwipe:)];
vertical.direction = UISwipeGestureRecognizerDirectionUp |
UISwipeGestureRecognizerDirectionDown;
vertical.numberOfTouchesRequired = touchCount;
[self.view addGestureRecognizer:vertical];
UISwipeGestureRecognizer *horizontal;
horizontal = [[UISwipeGestureRecognizer alloc]
initWithTarget:self action:@selector(reportHorizontalSwipe:)];
horizontal.direction = UISwipeGestureRecognizerDirectionLeft |
UISwipeGestureRecognizerDirectionRight;
horizontal.numberOfTouchesRequired = touchCount;
[self.view addGestureRecognizer:horizontal];
}
}
Note that in a real application, you might want different numbers of fingers swiping across the screen to trigger different behaviors. You can easily do that using gesture recognizers, simply by having each of them call a different action method.
Now all we need to do is change the logging by adding a method that gives us a handy description of the number of touches, and then using that in the reporting methods, as shown here. Add this method toward the bottom of the ViewController class, just above the two swipe-reporting methods:
- (NSString *)descriptionForTouchCount:(NSUInteger)touchCount {
switch (touchCount) {
case 1:
return @"Single";
case 2:
return @"Double";
case 3:
return @"Triple";
case 4:
return @"Quadruple";
case 5:
return @"Quintuple";
default:
return @"";
}
}
Next, modify the two swipe-reporting methods as shown:
- (void)reportHorizontalSwipe:(UIGestureRecognizer *)recognizer {
self.label.text = @"Horizontal swipe detected";
self.label.text = [NSString stringWithFormat:@"%@ Horizontal swipe detected",
[self descriptionForTouchCount:[recognizer numberOfTouches]]];
dispatch_after(dispatch_time(DISPATCH_TIME_NOW, 2 * NSEC_PER_SEC),
dispatch_get_main_queue(),
^{ self.label.text = @""; });
}
- (void)reportVerticalSwipe:(UIGestureRecognizer *)recognizer {
self.label.text = @"Vertical swipe detected";
self.label.text = [NSString stringWithFormat:@"%@ Vertical swipe detected",
[self descriptionForTouchCount:[recognizer numberOfTouches]]];
dispatch_after(dispatch_time(DISPATCH_TIME_NOW, 2 * NSEC_PER_SEC),
dispatch_get_main_queue(),
^{ self.label.text = @""; });
}
Compile and run the app. You should be able to trigger double- and triple-swipes in both directions, yet still be able to trigger single-swipes. If you have small fingers, you might even be able to trigger a quadruple- or quintuple-swipe.
Tip In the simulator, if you hold down the Option key, a pair of dots, representing a pair of fingers, will appear. Get them close together, and then hold down the Shift key. This will keep the dots in the same position relative to each other, allowing you to move the pair of fingers around the screen. Now click and drag down the screen to simulate a double-swipe. Cool!
With a multiple-finger swipe, one thing to be careful of is that your fingers aren’t too close to each other. If two fingers are very close to each other, they may register as only a single touch. Because of this, you shouldn’t rely on quadruple- or quintuple-swipes for any important gestures because many people will have fingers that are too big to do those swipes effectively. Also, on the iPad some four- and five-finger gestures are turned on by default at the system level for switching between apps and going to the home screen. These can be turned off in the Settings app, but you’re probably better off just not using such gestures in your own apps.
Detecting Multiple Taps
In the TouchExplorer application, we printed the tap count to the screen, so you’ve already seen how easy it is to detect multiple taps. It’s not quite as straightforward as it seems, however, because often you will want to take different actions based on the number of taps. If the user triple-taps, you get notified three separate times. You get a single-tap, a double-tap, and finally a triple-tap. If you want to do something on a double-tap but something completely different on a triple-tap, having three separate notifications could cause a problem, since you will first receive notification of a double-tap, and then a triple-tap. Unless you write your own clever code to take this into account, you’ll wind up doing both actions.
Fortunately, the engineers at Apple anticipated this situation, and they provided a mechanism to let multiple gesture recognizers play nicely together, even when they’re faced with ambiguous inputs that could seemingly trigger any of them. The basic idea is that you place a restriction on a gesture recognizer, telling it to not trigger its associated method unless some other gesture recognizer fails to trigger its own method.
That seems a bit abstract, so let’s make it real. Tap gestures are recognized by the UITapGestureRecognizer class. A tap recognizer can be configured to do its thing when a particular number of taps occur. Imagine that we have a view for which we want to define distinct actions that occur when the user taps once or double-taps. You might start off with something like the following:
UITapGestureRecognizer *singleTap = [[UITapGestureRecognizer alloc]
initWithTarget:self
action:@selector(doSingleTap)];
singleTap.numberOfTapsRequired = 1;
[self.view addGestureRecognizer:singleTap];
UITapGestureRecognizer *doubleTap = [[UITapGestureRecognizer alloc]
initWithTarget:self
action:@selector(doDoubleTap)];
doubleTap.numberOfTapsRequired = 2;
[self.view addGestureRecognizer:doubleTap];
The problem with this piece of code is that the two recognizers are unaware of each other, and they have no way of knowing that the user’s actions may be better suited to another recognizer. If the user double-taps the view in the preceding code, the doDoubleTap method will be called, but the doSingleMethod will also be called—twice!—once for each tap.
The way around this is to create a failure requirement. We tell singleTap that it should trigger its action only if doubleTap doesn’t recognize and respond to the user input by adding this single line:
[singleTap requireGestureRecognizerToFail:doubleTap];
This means that, when the user taps once, singleTap doesn’t do its work immediately. Instead, singleTap waits until it knows that doubleTap has decided to stop paying attention to the current gesture (that is, the user didn’t tap twice). We’re going to build on this further with our next project.
In Xcode, create a new project with the Single View Application template. Call this new project TapTaps and use the Devices pop-up to choose Universal.
This application will have four labels: one each that informs us when it has detected a single-tap, double-tap, triple-tap, and quadruple-tap (see Figure 18-4).
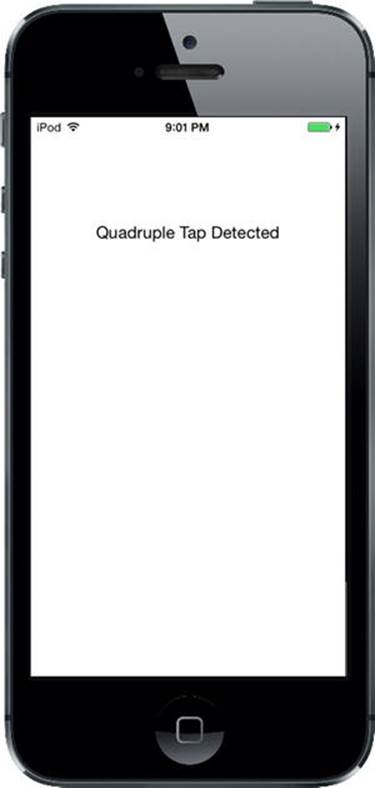
Figure 18-4. The TapTaps application detects up to four sequential taps
We need outlets for the four labels, and we also need separate methods for each tap scenario to simulate what we would have in a real application. We’ll also include a method for erasing the text fields. Open ViewController.m and make the following changes to the class interface near the top:
#import "ViewController.h"
@interface ViewController ()
@property (weak, nonatomic) IBOutlet UILabel *singleLabel;
@property (weak, nonatomic) IBOutlet UILabel *doubleLabel;
@property (weak, nonatomic) IBOutlet UILabel *tripleLabel;
@property (weak, nonatomic) IBOutlet UILabel *quadrupleLabel;
@end
Save the file and select Main.storyboard to edit the GUI. Once you’re there, add four labels to the view from the library and arrange them one above the other. In the Attributes Inspector, set the text alignment for each label to Center. In the Document Outline, Control-drag from the top label to its parent view and release the mouse. Hold down Shift and select Top Space to Top Layout Guide and Center Horizontally in Container, and then click outside the pop-up with the mouse. Do the same for the other three labels to set their auto layout constraints. When you’re finished, Control-drag from the View Controller icon to each label and connect each one to singleLabel, doubleLabel, tripleLabel, and quadrupleLabel, respectively. Finally, make sure you double-click each label and press the Delete key to get rid of any text.
Now select ViewController.m and make the following code changes:
@implementation ViewController
- (void)viewDidLoad
{
[super viewDidLoad];
// Do any additional setup after loading the view, typically from a nib.
UITapGestureRecognizer *singleTap =
[[UITapGestureRecognizer alloc] initWithTarget:self
action:@selector(singleTap)];
singleTap.numberOfTapsRequired = 1;
singleTap.numberOfTouchesRequired = 1;
[self.view addGestureRecognizer:singleTap];
UITapGestureRecognizer *doubleTap =
[[UITapGestureRecognizer alloc] initWithTarget:self
action:@selector(doubleTap)];
doubleTap.numberOfTapsRequired = 2;
doubleTap.numberOfTouchesRequired = 1;
[self.view addGestureRecognizer:doubleTap];
[singleTap requireGestureRecognizerToFail:doubleTap];
UITapGestureRecognizer *tripleTap =
[[UITapGestureRecognizer alloc] initWithTarget:self
action:@selector(tripleTap)];
tripleTap.numberOfTapsRequired = 3;
tripleTap.numberOfTouchesRequired = 1;
[self.view addGestureRecognizer:tripleTap];
[doubleTap requireGestureRecognizerToFail:tripleTap];
UITapGestureRecognizer *quadrupleTap =
[[UITapGestureRecognizer alloc] initWithTarget:self
action:@selector(quadrupleTap)];
quadrupleTap.numberOfTapsRequired = 4;
quadrupleTap.numberOfTouchesRequired = 1;
[self.view addGestureRecognizer:quadrupleTap];
[tripleTap requireGestureRecognizerToFail:quadrupleTap];
}
- (void)didReceiveMemoryWarning
{
[super didReceiveMemoryWarning];
// Dispose of any resources that can be recreated.
}
- (void)singleTap {
self.singleLabel.text = @"Single Tap Detected";
dispatch_after(dispatch_time(DISPATCH_TIME_NOW, 2 * NSEC_PER_SEC),
dispatch_get_main_queue(),
^{ self.singleLabel.text = @""; });
}
- (void)doubleTap {
self.doubleLabel.text = @"Double Tap Detected";
dispatch_after(dispatch_time(DISPATCH_TIME_NOW, 2 * NSEC_PER_SEC),
dispatch_get_main_queue(),
^{ self.doubleLabel.text = @""; });
}
- (void)tripleTap {
self.tripleLabel.text = @"Triple Tap Detected";
dispatch_after(dispatch_time(DISPATCH_TIME_NOW, 2 * NSEC_PER_SEC),
dispatch_get_main_queue(),
^{ self.tripleLabel.text = @""; });
}
- (void)quadrupleTap {
self.quadrupleLabel.text = @"Quadruple Tap Detected";
dispatch_after(dispatch_time(DISPATCH_TIME_NOW, 2 * NSEC_PER_SEC),
dispatch_get_main_queue(),
^{ self.quadrupleLabel.text = @""; });
}
@end
The four tap methods do nothing more in this application than set one of the four labels and use dispatch_async() to erase that same label after 2 seconds.
The interesting part of this is what occurs in the viewDidLoad method. We start off simply enough, by setting up a tap gesture recognizer and attaching it to our view:
UITapGestureRecognizer *singleTap =
[[UITapGestureRecognizer alloc] initWithTarget:self
action:@selector(singleTap)];
singleTap.numberOfTapsRequired = 1;
singleTap.numberOfTouchesRequired = 1;
[self.view addGestureRecognizer:singleTap];
Note that we set both the number of taps (touches in the same position, one after another) required to trigger the action and touches (number of fingers touching the screen at the same time) to 1. After that, we set another tap gesture recognizer to handle a double-tap:
UITapGestureRecognizer *doubleTap =
[[UITapGestureRecognizer alloc] initWithTarget:self
action:@selector(doubleTap)];
doubleTap.numberOfTapsRequired = 2;
doubleTap.numberOfTouchesRequired = 1;
[self.view addGestureRecognizer:doubleTap];
[singleTap requireGestureRecognizerToFail:doubleTap];
This is pretty similar to the previous code, right up until that last line, in which we give singleTap some additional context. We are effectively telling singleTap that it should trigger its action only in case some other gesture recognizer—in this case, doubleTap—decides that the current user input isn’t what it’s looking for.
Let’s think about what this means. With those two tap gesture recognizers in place, a single tap in the view will immediately make singleTap think, “Hey, this looks like it’s for me.” At the same time, doubleTap will think, “Hey, this looks like it might be for me, but I’ll need to wait for one more tap.” Because singleTap is set to wait for doubleTap’s “failure,” it doesn’t send its action method right away; instead, it waits to see what happens with doubleTap.
After that first tap, if another tap occurs immediately, doubleTap says, “Hey, that’s mine all right,” and it fires its action. At that point, singleTap will realize what happened and give up on that gesture. On the other hand, if a particular amount of time goes by (the amount of time that the system considers to be the maximum length of time between taps in a double-tap), doubleTap will give up, and singleTap will see the failure and finally trigger its event.
The rest of the method goes on to define gesture recognizers for three and four taps, and at each point it configures one gesture to be dependent on the failure of the next:
UITapGestureRecognizer *tripleTap =
[[UITapGestureRecognizer alloc] initWithTarget:self
action:@selector(tripleTap)];
tripleTap.numberOfTapsRequired = 3;
tripleTap.numberOfTouchesRequired = 1;
[self.view addGestureRecognizer:tripleTap];
[doubleTap requireGestureRecognizerToFail:tripleTap];
UITapGestureRecognizer *quadrupleTap =
[[UITapGestureRecognizer alloc] initWithTarget:self
action:@selector(quadrupleTap)];
quadrupleTap.numberOfTapsRequired = 4;
quadrupleTap.numberOfTouchesRequired = 1;
[self.view addGestureRecognizer:quadrupleTap];
[tripleTap requireGestureRecognizerToFail:quadrupleTap];
Note that we don’t need to explicitly configure every gesture to be dependent on the failure of each of the higher tap-numbered gestures. That multiple dependency comes about naturally as a result of the chain of failure established in our code. Since singleTap requires the failure ofdoubleTap, doubleTap requires the failure of tripleTap, and tripleTap requires the failure of quadrupleTap. By extension, singleTap requires that all of the others fail.
Compile and run the app. Whether you single-, double-, triple-, or quadruple-tap, you should see only one label displayed at the end of the sequence. After about a second and a half, the label will clear itself and you can try again.
Detecting Pinch and Rotation
Another common gesture is the two-finger pinch. It’s used in a number of applications (e.g., Mobile Safari, Mail, and Photos) to let you zoom in (if you pinch apart) or zoom out (if you pinch together).
Detecting pinches is really easy, thanks to UIPinchGestureRecognizer. This one is referred to as a continuous gesture recognizer because it calls its action method over and over again during the pinch. While the gesture is underway, the recognizer goes through a number of states. When the gesture is recognized, the recognizer is in state UIGestureRecognizerStateBegan and its scale property is set to an initial value of 1.0; for the rest of the gesture, the state is UIGestureRecognizerStateChanged and the scale value goes up and down, relative to how far the user’s fingers move from the start. We’re going to use the scale value to resize an image. Finally, the state changes to UIGestureRecognizerStateEnded.
Another common gesture is the two-finger rotation. This is also a continuous gesture recognizer and is named UIRotationGestureRecognizer. It has a rotation property that is 0.0 by default when the gesture begins, and then changes from 0.0 to 2.0*PI as the user rotates her fingers. In the next example, we’ll use both pinch and rotation gestures.
Create a new project in Xcode, again using the Single View Application template, and call this one PinchMe. First, drag and drop the beautiful yosemite-meadows.png image from the 18 - Image folder in the example source code archive (or some other favorite photo of yours) into your project’s Images.xcassets. Expand the PinchMe folder, single-click ViewController.h, and make the following change:
#import <UIKit/UIKit.h>
@interface ViewController : UIViewController <UIGestureRecognizerDelegate>
@end
The big change here is that we make ViewController conform to the UIGestureRecognizerDelegate protocol in order to allow several gesture recognizers to recognize gestures simultaneously.
Now bounce over to ViewController.m and make the following changes:
#import "ViewController.h"
@interface ViewController ()
@property (strong, nonatomic) UIImageView *imageView;
@end
@implementation ViewController
CGFloat scale, previousScale;
CGFloat rotation, previousRotation;
- (void)viewDidLoad
{
[super viewDidLoad];
// Do any additional setup after loading the view, typically from a nib.
previousScale = 1;
UIImage *image = [UIImage imageNamed:@"yosemite-meadows"];
self.imageView = [[UIImageView alloc] initWithImage:image];
self.imageView.userInteractionEnabled = YES;
self.imageView.center = self.view.center;
[self.view addSubview:self.imageView];
UIPinchGestureRecognizer *pinchGesture =
[[UIPinchGestureRecognizer alloc]
initWithTarget:self action:@selector(doPinch:)];
pinchGesture.delegate = self;
[self.imageView addGestureRecognizer:pinchGesture];
UIRotationGestureRecognizer *rotationGesture =
[[UIRotationGestureRecognizer alloc]
initWithTarget:self action:@selector(doRotate:)];
rotationGesture.delegate = self;
[self.imageView addGestureRecognizer:rotationGesture];
}
- (BOOL)gestureRecognizer:(UIGestureRecognizer *)gestureRecognizer
shouldRecognizeSimultaneouslyWithGestureRecognizer:
(UIGestureRecognizer *)otherGestureRecognizer {
return YES;
}
- (void)transformImageView {
CGAffineTransform t = CGAffineTransformMakeScale(scale * previousScale,
scale * previousScale);
t = CGAffineTransformRotate(t, rotation + previousRotation);
self.imageView.transform = t;
}
- (void)doPinch:(UIPinchGestureRecognizer *)gesture {
scale = gesture.scale;
[self transformImageView];
if (gesture.state == UIGestureRecognizerStateEnded) {
previousScale = scale * previousScale;
scale = 1;
}
}
- (void)doRotate:(UIRotationGestureRecognizer *)gesture {
rotation = gesture.rotation;
[self transformImageView];
if (gesture.state == UIGestureRecognizerStateEnded) {
previousRotation = rotation + previousRotation;
rotation = 0;
}
}- (void)didReceiveMemoryWarning{
[super didReceiveMemoryWarning];
// Dispose of any resources that can be recreated.}
@end
First, we define four instance variables for the current and previous scale and rotation. The previous values are the values from a previously triggered and ended gesture recognizer; we need to keep track of these values as well because the UIPinchGestureRecognizer for scaling andUIRotationGestureRecognizer for rotation will always start at the default positions of 1.0 scale and 0.0 rotation:
@implementation ViewController {
CGFloat scale, previousScale;
CGFloat rotation, previousRotation;
Next, in viewDidLoad, we begin by creating a UIImageView to pinch and rotate, load our Yosemite image into it, and center it in the main view. We must remember to enable user interaction on the image view because UIImageView is one of the few UIKit classes that have user interaction disabled by default.
UIImage *image = [UIImage imageNamed:@"yosemite-meadows"];
self.imageView = [[UIImageView alloc] initWithImage:image];
self.imageView.userInteractionEnabled = YES;
self.imageView.center = self.view.center;
[self.view addSubview:self.imageView];
Next, we set up a pinch gesture recognizer and a rotation gesture recognizer, and we tell them to notify us when their gestures are recognized via the doPinch: and doRotation: methods, respectively. We tell both to use self as their delegate:
UIPinchGestureRecognizer *pinchGesture =
[[UIPinchGestureRecognizer alloc]
initWithTarget:self action:@selector(doPinch:)];
pinchGesture.delegate = self;
[self.imageView addGestureRecognizer:pinchGesture];
UIRotationGestureRecognizer *rotationGesture =
[[UIRotationGestureRecognizer alloc]
initWithTarget:self action:@selector(doRotate:)];
rotationGesture.delegate = self;
[self.imageView addGestureRecognizer:rotationGesture];
In the gestureRecognizer:shouldRecognizeSimultaneoslyWithGestureRecognizer: method (which is the only method from the UIGestureRecognizerDelegate protocol that we need to implement) we always return YES to allow our pinch and rotation gestures to work together; otherwise, the gesture recognizer that starts first would always block the other:
- (BOOL)gestureRecognizer:(UIGestureRecognizer *)gestureRecognizer
shouldRecognizeSimultaneouslyWithGestureRecognizer:
(UIGestureRecognizer *)otherGestureRecognizer {
return YES;
}
Next, we implement a helper method for transforming the image view according to the current scaling and rotation from the gesture recognizers. Notice that we multiply the scale by the previous scale. We also add to the rotation with the previous rotation. This allows us to adjust for pinch and rotation that has been done previously when a new gesture starts from the default 1.0 scale and 0.0 rotation.
- (void)transformImageView {
CGAffineTransform t = CGAffineTransformMakeScale(scale * previousScale,
scale * previousScale);
t = CGAffineTransformRotate(t, rotation + previousRotation);
self.imageView.transform = t;
}
Finally we implement the action methods that take the input from the gesture recognizers and update the transformation of the image view. In both doPinch: and doRotate:, we first extract the new scale or rotation values. Next, we update the transformation for the image view. And finally, if the gesture recognizer reports that its gesture has ended by having a state equal to UIGestureRecognizerStateEnded, we store the current correct scale or rotation values, and then reset the current scale or rotation values to the default 1.0 scale or 0.0 rotation:
- (void)doPinch:(UIPinchGestureRecognizer *)gesture {
scale = gesture.scale;
[self transformImageView];
if (gesture.state == UIGestureRecognizerStateEnded) {
previousScale = scale * previousScale;
scale = 1;
}
}
- (void)doRotate:(UIRotationGestureRecognizer *)gesture {
rotation = gesture.rotation;
[self transformImageView];
if (gesture.state == UIGestureRecognizerStateEnded) {
previousRotation = rotation + previousRotation;
rotation = 0;
}
}
And that’s all there is to pinch and rotation detection. Compile and run the app to give it a try. As you do some pinching and rotation, you’ll see the image change in response (see Figure 18-5). If you’re on the simulator, remember that you can simulate a pinch by holding down the Optionkey and clicking and dragging in the simulator window using your mouse.
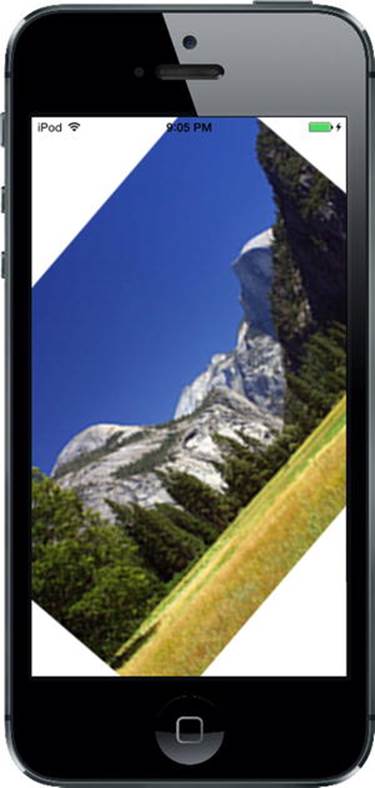
Figure 18-5. The PinchMe application detects the pinch and rotation gesture
Defining Custom Gestures
You’ve now seen how to detect the most commonly used gestures. The real fun begins when you start defining your own custom gestures! You’ve already learned how to use a few of UIGestureRecognizer’s subclasses, so now it’s time to learn how to create your own gestures, which can be easily attached to any view you like.
Defining a custom gesture is a little trickier than using one of the standard ones. You’ve already mastered the basic mechanism, and that wasn’t too difficult. The tricky part is being flexible when defining what constitutes a gesture.
Most people are not precise when they use gestures. Remember the variance we used when we implemented the swipe, so that even a swipe that wasn’t perfectly horizontal or vertical still counted? That’s a perfect example of the subtlety you need to add to your own gesture definitions. If you define your gesture too strictly, it will be useless. If you define it too generically, you’ll get too many false positives, which will frustrate the user. In a sense, defining a custom gesture can be hard because you must be precise about a gesture’s imprecision. If you try to capture a complex gesture like, say, a figure eight, the math behind detecting the gesture is also going to get quite complex.
The CheckPlease Application
In our sample, we’re going to define a gesture shaped like a check mark (see Figure 18-6).
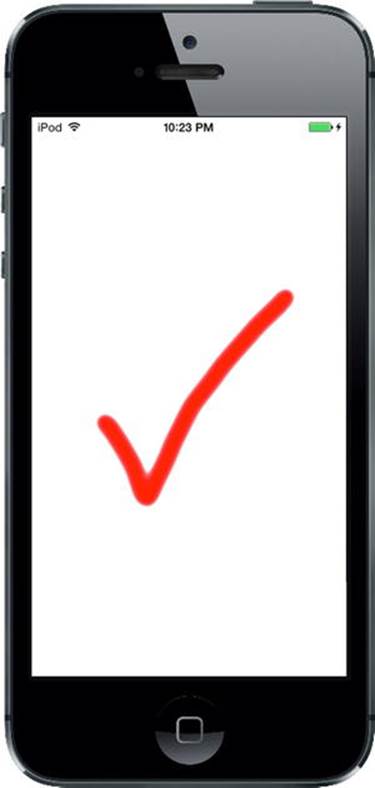
Figure 18-6. An illustration of our check-mark gesture
What are the defining properties of this check-mark gesture? Well, the principal one is that sharp change in angle between the two lines. We also want to make sure that the user’s finger has traveled a little distance in a straight line before it makes that sharp angle. In Figure 18-6, the legs of the check mark meet at an acute angle, just under 90 degrees. A gesture that required exactly an 85-degree angle would be awfully hard to get right, so we’ll define a range of acceptable angles.
Create a new project in Xcode using the Single View Application template and call the project CheckPlease. In this project, we’re going to need to do some fairly standard analytic geometry to calculate such things as the distance between two points and the angle between two lines. Don’t worry if you don’t remember much geometry; we’ve provided you with functions that will do the calculations for you.
Look in the 18 – CheckPlease Utils folder for two files called CGPointUtils.h and CGPointUtils.c. Drag both of these files to the CheckPlease group of your project. Feel free to use the utility functions in these files your own applications. Next, go to the 18 – Image folder and drag the image file CheckImage.png to the Image.xcassets folder in your project.
In Xcode, press ![]() N to bring up the new file assistant and in the iOS section, choose Cocoa Touch Class. Name the new class CheckMarkRecognizer and make it a subclass of UIGestureRecognizer. Now select CheckMarkRecognizer.m in the Project Navigator and make the following changes:
N to bring up the new file assistant and in the iOS section, choose Cocoa Touch Class. Name the new class CheckMarkRecognizer and make it a subclass of UIGestureRecognizer. Now select CheckMarkRecognizer.m in the Project Navigator and make the following changes:
#import "CheckMarkRecognizer.h"
#import "CGPointUtils.h"
#import <UIKit/UIGestureRecognizerSubclass.h>
static CGFloat const kMinimumCheckMarkAngle = 50;
static CGFloat const kMaximumCheckMarkAngle = 135;
static CGFloat const kMinimumCheckMarkLength = 10;
@implementation CheckMarkRecognizer {
CGPoint lastPreviousPoint;
CGPoint lastCurrentPoint;
CGFloat lineLengthSoFar;
}
@end
After importing CGPointUtils.h, the file we mentioned earlier, we import a special header file called UIGestureRecognizerSubclass.h, which contains declarations that are intended for use only by a UIGestureRecognizer subclass. The important thing this does is to make the gesture recognizer’s state property writable. That’s the mechanism our subclass will use to affirm that the gesture we’re watching was successfully completed.
Next, we define the parameters that we use to decide whether the user’s finger-squiggling matches our definition of a check mark. You can see that we’ve defined a minimum angle of 50 degrees and a maximum angle of 135 degrees. This is a pretty broad range; depending on your needs, you might decide to restrict the angle. We experimented a bit with this and found that our practice check-mark gestures fell into a fairly broad range, which is why we chose a relatively large tolerance here. We were somewhat sloppy with our check-mark gestures, and so we expect that at least some of our users will be, as well. As a wise man once said, “Be rigorous in what you produce and tolerant in what you accept.”
Now we declare three instance variables: lastPreviousPoint, lastCurrentPoint, and lineLengthSoFar. Each time we’re notified of a touch, we’re given the previous touch point and the current touch point. Those two points define a line segment. The next touch adds another segment. We store the previous touch’s previous and current points in lastPreviousPoint and lastCurrentPoint, which gives us the previous line segment. We can then compare that line segment to the current touch’s line segment. Comparing these two line segments can tell us whether we’re still drawing a single line or if there’s a sharp enough angle between the two segments that we’re actually drawing a check mark.
Remember that every UITouch object knows its current position in the view, as well as its previous position in the view. In order to compare angles, however, we need to know the line that the previous two points made, so we need to store the current and previous points from the last time the user touched the screen. We’ll use these two variables to store those two values each time this method is called, so that we have the ability to compare the current line to the previous line and check the angle.
We also declare an instance variable to keep a running count of how far the user has dragged the finger. If the finger hasn’t traveled at least 10 pixels (the value defined in kMinimumCheckMarkLength), it doesn’t matter whether the angle falls in the correct range. If we didn’t require this distance, we would receive a lot of false positives.
The CheckPlease Touch Methods
Next, add these two methods to handle touch events sent to the gesture recognizer:
- (void)touchesBegan:(NSSet *)touches withEvent:(UIEvent *)event {
[super touchesBegan:touches withEvent:event];
UITouch *touch = [touches anyObject];
CGPoint point = [touch locationInView:self.view];
lastPreviousPoint = point;
lastCurrentPoint = point;
lineLengthSoFar = 0.0;
}
- (void)touchesMoved:(NSSet *)touches withEvent:(UIEvent *)event {
[super touchesMoved:touches withEvent:event];
UITouch *touch = [touches anyObject];
CGPoint previousPoint = [touch previousLocationInView:self.view];
CGPoint currentPoint = [touch locationInView:self.view];
CGFloat angle = angleBetweenLines(lastPreviousPoint,
lastCurrentPoint,
previousPoint,
currentPoint);
if (angle >=kMinimumCheckMarkAngle && angle <= kMaximumCheckMarkAngle
&& lineLengthSoFar > kMinimumCheckMarkLength) {
self.state = UIGestureRecognizerStateRecognized;
}
lineLengthSoFar += distanceBetweenPoints(previousPoint, currentPoint);
lastPreviousPoint = previousPoint;
lastCurrentPoint = currentPoint;
}
You’ll notice that each of these methods first calls the superclass’s implementation—something we haven’t previously done in any of our touch methods. We need to do this in a UIGestureRecognizer subclass so that our superclass can have the same amount of knowledge about the events as we do. Now let’s move on to the code itself.
In touchesBegan:withEvent:, we determine the point that the user is currently touching and store that value in lastPreviousPoint and lastCurrentPoint. Since this method is called when a gesture begins, we know there is no previous point to worry about, so we store the current point in both. We also reset the length of the line we’re tracking to 0.
In touchesMoved:withEvent:, we calculate the angle between the line from the current touch’s previous position to its current position and the line between the two points stored in the lastPreviousPoint and lastCurrentPoint instance variables. Once we have that angle, we check to see if it falls within our range of acceptable angles and check to make sure that the user’s finger has traveled far enough before making that sharp turn. If both of those are true, we set the gesture recognizer state to UIGestureRecognizerStateRecognized to show that we’ve identified a check-mark gesture. Next, we calculate the distance between the touch’s position and its previous position, add that to lineLengthSoFar, and replace the values in lastPreviousPoint and lastCurrentPoint with the two points from the current touch, so we’ll have them next time through this method.
Now that we have a gesture recognizer of our own to try out, it’s time to connect it to a view, just as we did with the others we used. Switch over to ViewController.m and add the following bold code to the top of the file:
#import "ViewController.h"
#import "CheckMarkRecognizer.h"
@interface ViewController ()
@property (weak, nonatomic) IBOutlet UIImageView *imageView;
@end
Here, we simply import the header for the gesture recognizer we defined, and then add an outlet to an image view that we’ll use to inform the user when we’ve detected a check-mark gesture.
Select Main.storyboard to edit the GUI. Add an Image View from the library to the view, dropping it somewhere near its center and resize it so that it covers the whole view. In the Document Outline, Control-drag from the Image View to the main view, release the mouse, hold down Shiftand select Leading Space to Container Margin, Trailing Space to Container Margin, Top Space to Top Layout Guide, and Bottom Space to Bottom Layout Guide, and then click outside the pop-up with the mouse. Select the image view in the Document Outline and, in the Attributes Inspector, set the Mode property to Center and the Image property to CheckImage. Finally, Control-drag from the View Controller icon to the image view to connect it to the imageView outlet.
Now switch back to ViewController.m and add the following code to the @implementation section:
@implementation ViewController
- (void)doCheck:(CheckMarkRecognizer *)check {
self.imageView.hidden = NO;
dispatch_after(dispatch_time(DISPATCH_TIME_NOW, 2 * NSEC_PER_SEC),
dispatch_get_main_queue(),
^{ self.imageView.hidden = YES; });
}
This gives us an action method to connect our recognizer to. When the gesture is recognized, the image view will be made visible, which will make the check mark appear. Shortly afterward, the image will be hidden again.
Next, edit the viewDidLoad method, adding the following lines, which connect an instance of our new recognizer to the view and ensure that the image view (and hence the check mark) is initially hidden:
- (void)viewDidLoad
{
[super viewDidLoad];
// Do any additional setup after loading the view, typically from a nib.
CheckMarkRecognizer *check = [[CheckMarkRecognizer alloc]
initWithTarget:self
action:@selector(doCheck:)];
[self.view addGestureRecognizer:check];
self.imageView.hidden = YES;
}
Compile and run the app, and try out the gesture.
When defining new gestures for your own applications, make sure you test them thoroughly. If you can, also have other people test them for you, as well. You want to make sure that your gesture is easy for the user to do, but not so easy that it gets triggered unintentionally. You also need to make sure that you don’t conflict with other gestures used in your application. A single gesture should not count, for example, as both a custom gesture and a pinch.
Garçon? Check, Please!
You should now understand the mechanism iOS uses to tell your application about touches, taps, and gestures. You also learned how to detect the most commonly used iOS gestures, and even got a taste of how you might go about defining your own custom gestures. The iOS user interfacerelies on gestures for much of its ease of use, so you’ll want to have these techniques at the ready for most of your iOS development.
When you’re ready to move on, turn the page, and we’ll tell you how to figure out where in the world you are using Core Location.