Beginning iPhone Development: Exploring the iOS SDK, Seventh Edition (2014)
Chapter 20. Whee! Gyro and Accelerometer!
One of the coolest features of the iPhone, iPad, and iPod touch is the built-in accelerometer—the tiny device that lets iOS know how the device is being held and if it’s being moved. iOS uses the accelerometer to handle autorotation, and many games use it as a control mechanism. The accelerometer can also be used to detect shakes and other sudden movement. This capability was extended even further with the introduction of the iPhone 4, which was the first iPhone to include a built-in gyroscope to let developers determine the angle at which the device is positioned around each axis. The gyro and accelerometer are now standard fare on all new iPads and iPod touches. In this chapter, we’re going to introduce you to the use of the Core Motion framework to access the gyro and accelerometer values in your application.
Accelerometer Physics
An accelerometer measures both acceleration and gravity by sensing the amount of inertial force in a given direction. The accelerometer inside your iOS device is a three-axis accelerometer. This means that it is capable of detecting either movement or the pull of gravity in three-dimensional space. In other words, you can use the accelerometer to discover not only how the device is currently being held (as autorotation does), but also to learn if it’s laying on a table and even whether it’s face down or face up.
Accelerometers give measurements in g-forces (g for gravity), so a value of 1.0 returned by the accelerometer means that 1 g is sensed in a particular direction, as in these examples:
· If the device is being held still with no movement, there will be approximately 1 g of force exerted on it by the pull of the earth.
· If the device is being held perfectly upright, in portrait orientation, it will detect and report about 1 g of force exerted on its y axis.
· If the device is being held at an angle, that 1 g of force will be distributed along different axes depending on how it is being held. When held at a 45-degree angle, the 1 g of force will be split roughly equally between two of the axes.
Sudden movement can be detected by looking for accelerometer values considerably larger than 1 g. In normal usage, the accelerometer does not detect significantly more than 1 g on any axis. If you shake, drop, or throw your device, the accelerometer will detect a greater amount of force on one or more axes. (Please do not drop or throw your own iOS device to test this theory, unless you are looking for an excuse to upgrade to the newest model!)
Figure 20-1 shows a graphic representation of the three axes used by the accelerometer. Notice that the accelerometer uses the more standard convention for the y coordinate, with increases in y indicating upward force, which is the opposite of Quartz 2D’s coordinate system (discussed inChapter 16). When you are using the accelerometer as a control mechanism with Quartz 2D, you need to translate the y coordinate. When working with Sprite Kit, which is more likely when you are using the accelerometer to control animation, no translation is required.
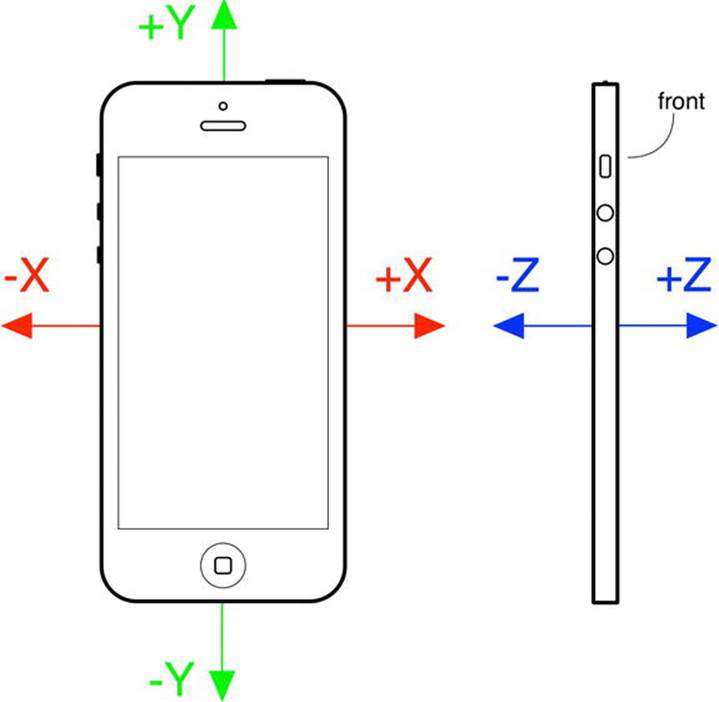
Figure 20-1. The iPhone accelerometer’s axes in three dimensions. The front view of an iPhone on the left shows the x and y axes. The side view on the right shows the z axis
Don’t Forget Rotation
We mentioned earlier that all current devices include a gyroscope sensor, allowing you to read values describing the device’s rotation around its axes.
If the difference between the gyroscope and the accelerometer seems unclear, consider an iPhone lying flat on a table. If you begin to turn the phone around while it’s lying flat, the accelerometer values won’t change. That’s because the forces bent on moving the phone—in this case, just the force of gravity pulling straight down the z axis—aren’t changing. (In reality, things are a bit fuzzier than that, and the action of your hand bumping the phone will surely trigger a small amount of accelerometer action.) During that same movement, however, the device’s rotation values will change—particularly the z-axis rotation value. Turning the device clockwise will generate a negative value, and turning it counterclockwise gives a positive value. Stop turning, and the z-axis rotation value will go back to zero.
Rather than registering an absolute rotation value, the gyroscope tells you about changes to the device’s rotation as they happen. You’ll see how this works in this chapter’s first example, coming up shortly.
Core Motion and the Motion Manager
Accelerometer and gyroscope values are accessed using the Core Motion framework. This framework provides, among other things, the CMMotionManager class, which acts as a gateway for all the values describing how the device is being moved by its user. Your application creates an instance of CMMotionManager and then puts it to use in one of two modes:
· It can execute some code for you whenever motion occurs.
· It can hang on to a perpetually updated structure that lets you access the latest values at any time.
The latter method is ideal for games and other highly interactive applications that need to be able to poll the device’s current state during each pass through the game loop. We’ll show you how to implement both approaches.
Note that the CMMotionManager class isn’t actually a singleton, but your application should treat it like one. You should create only one of these per app, using the normal alloc and init methods. So, if you need to access the motion manager from several places in your app, you should probably create it in your application delegate and provide access to it from there.
Besides the CMMotionManager class, Core Motion also provides a few other classes, such as CMAccelerometerData and CMGyroData, which are simple containers through which your application can access raw accelerometer and gyroscope information; and CMDeviceMotion, a class that combines accelerometer and gyroscope measurements together with attitude information—that is, whether the device is lying flat, tilting upward or to the left, and so on. We’ll be using the CMDeviceMotion class in the examples in this chapter.
Event-Based Motion
We mentioned that the motion manager can operate in a mode where it executes some code for you each time the motion data changes. Most other Cocoa Touch classes offer this sort of functionality by letting you connect to a delegate that gets a message when the time comes, but Core Motion does things a little differently.
Instead of using a set of delegate methods to let us know what happens, CMMotionManager lets you pass in a block to execute whenever motion occurs. We’ve already used blocks a couple of times in this book, and now you’re going to see another application of this technique.
Use Xcode to create a new Single View Application project named MotionMonitor. This will be a simple app that reads both accelerometer data, gyroscope data (if available), and attitude information, and then displays the information on the screen.
Note The applications in this chapter do not function on the simulator because the simulator has no accelerometer. Aw, shucks.
Now select the ViewController.m file and make the following changes:
#import "ViewController.h"
@interface ViewController ()
@property (weak, nonatomic) IBOutlet UILabel *gyroscopeLabel;
@property (weak, nonatomic) IBOutlet UILabel *accelerometerLabel;
@property (weak, nonatomic) IBOutlet UILabel *attitudeLabel;
@end
This provides us with outlets to three labels where we’ll display the information. Nothing much needs to be explained here, so just go ahead and save your changes.
Next, open Main.storyboard in Interface Builder. In the Document Overview, expand the view controller and rename its view to Main View. Now drag out a Label from the library into the view. Resize the label to make it run from the left side of the screen to the right, resize it to be about one-third the height of the entire view, and then align the top of the label to the top blue guideline. Now open the Attributes Inspector and change the Lines field from 1 to 0. The Lines attribute is used to specify the number of lines of text that may appear in the label, and it provides a hard upper limit. If you set it to 0, no limit is applied, and the label can contain as many lines as you like.
Next, drag a second label from the library and drop it directly below the first one. Align its top with the bottom of the first label and align its sides with the left and right edges of the screen. Resize it to be about the same height as the first label. You don’t need to be too exact with this since we will be using auto layout to control the final height of the labels. Drag out a third label, placing it with its top edge along the bottom edge of the second label, and then resize it so that its bottom edge is along the bottom edge of the screen, and align its sides to the left and right edges of the screen. Set the Lines attribute for both labels to 0.
Now let’s fix the positions and sizes of the three labels. In the Document Overview, Control-drag from the top label to Main View and release the mouse. In the context menu, hold down the Shift key and select Leading Space to Container Margin, Top Space to Top Layout Guide, and Trailing Space to Container Margin, and then click outside the context menu with the mouse. Control-drag from the second label to the Main View. In the context menu, hold down Shift and select Leading Space to Container Margin and Trailing Space to Container Margin, and then click outside the context menu with the mouse. Control-drag from the third label to Main View, and this time, holding down Shift, select Leading Space to Container Margin, Bottom Space to Bottom Layout Guide, and Trailing Space to Container Margin.
Now that all three labels are pinned to the edges of Main View, let’s link them to each other. Control-drag from the second label to the first label and select Vertical Spacing from the pop-up menu. Control-drag from the second label to the third label and do the same. Finally, we need to ensure that the labels have the same height. To do this, hold down the Shift key and click all three labels so that they are all selected. Click the Pin button and, in the pop-up, click the Equal Heights check box and press Add 2 Constraints. Click the Resolve Auto Layout Issues button and then clickUpdate All Frames in View Controller. If this item is not available, select the View Controller icon in the Document Outline and try again.
That completes the layout; now let’s connect the labels to their outlets. Open ViewController.m in the assistant editor, and then Control-drag from the top label to gyroscopeLabel and connect the outlet. Do the same with the second label, connecting it to accelerometerLabel and the third label, which should be linked to attituteLabel. Finally, double-click each of the labels and delete the existing text.
This simple GUI is complete, so save your work and get ready for some coding.
Next, select ViewController.m. Now comes the interesting part. Add the following content:
#import "ViewController.h"
#import <CoreMotion/CoreMotion.h>
@interface ViewController ()
@property (weak, nonatomic) IBOutlet UILabel *gyroscopeLabel;
@property (weak, nonatomic) IBOutlet UILabel *accelerometerLabel;
@property (weak, nonatomic) IBOutlet UILabel *attitudeLabel;
@property (retain, nonatomic) CMMotionManager *motionManager;
@property (retain, nonatomic) NSOperationQueue *queue;
@end
@implementation ViewController
- (void)viewDidLoad
{
[super viewDidLoad];
// Do any additional setup after loading the view, typically from a nib.
self.motionManager = [[CMMotionManager alloc] init];
self.queue = [[NSOperationQueue alloc] init];
if (self.motionManager.deviceMotionAvailable) {
self.motionManager.deviceMotionUpdateInterval = 0.1;
[self.motionManager startDeviceMotionUpdatesToQueue:self.queue
withHandler:^(CMDeviceMotion *motion, NSError *error) {
CMRotationRate rotationRate = motion.rotationRate;
CMAcceleration gravity = motion.gravity;
CMAcceleration userAcc = motion.userAcceleration;
CMAttitude *attitude = motion.attitude;
NSString *gyroscopeText = [NSString stringWithFormat:
@"Rotation Rate:\n-----------------\n"
"x: %+.2f\ny: %+.2f\nz: %+.2f\n",
rotationRate.x, rotationRate.y, rotationRate.z];
NSString *acceleratorText = [NSString stringWithFormat:
@"Acceleration:\n---------------\n"
"Gravity x: %+.2f\t\tUser x: %+.2f\n"
"Gravity y: %+.2f\t\tUser y: %+.2f\n"
"Gravity z: %+.2f\t\tUser z: %+.2f\n",
gravity.x, userAcc.x, gravity.y,
userAcc.y, gravity.z,userAcc.z];
NSString *attitudeText = [NSString stringWithFormat:
@"Attitude:\n----------\n"
"Roll: %+.2f\nPitch: %+.2f\nYaw: %+.2f\n",
attitude.roll, attitude.pitch, attitude.yaw];
dispatch_async(dispatch_get_main_queue(), ^{
self.gyroscopeLabel.text = gyroscopeText;
self.accelerometerLabel.text = acceleratorText;
self.attitudeLabel.text = attitudeText;
});
}];
}
}- (void)didReceiveMemoryWarning
{
[super didReceiveMemoryWarning];
// Dispose of any resources that can be recreated.
}
@end
First, we import the header file for working with the Core Motion framework and add two additional properties to the class extension:
@interface ViewController ()
@property (weak, nonatomic) IBOutlet UILabel *gyroscopeLabel;
@property (weak, nonatomic) IBOutlet UILabel *accelerometerLabel;
@property (weak, nonatomic) IBOutlet UILabel *attitudeLabel;
@property (strong, nonatomic) CMMotionManager *motionManager;
@property (strong, nonatomic) NSOperationQueue *queue;
@end
Next, in the viewDidLoad method, we add the code to request device motion updates and update the labels with the gyroscope, accelerometer, and attitude readings as we get them.
Thanks to the power of blocks, it’s all really simple and cohesive. Instead of putting parts of the functionality in delegate methods, you can define behaviors in blocks to see a behavior in the same method where it’s being configured. Let’s take this apart a bit. We start off with this:
self.motionManager = [[CMMotionManager alloc] init];
self.queue = [[NSOperationQueue alloc] init];
This code first creates an instance of CMMotionManager, which we’ll use to monitor motion events. The code then creates an operation queue, which is simply a container for work that needs to be done.
Caution The motion manager wants to have a queue in which it will put the bits of work to be done, as specified by the blocks you will give it, each time an event occurs. It would be tempting to use the system’s default queue for this purpose, but the documentation forCMMotionManager explicitly warns not to do this! The concern is that the default queue could end up chock-full of these events and have a hard time processing other crucial system events as a result.
The next step is to start requesting device motion updates. We first check to make sure the device actually has the required equipment to provide motion information. All handheld iOS devices released so far do, but it’s worth checking in case some future device doesn’t. Next, we set the time interval we want between updates, specified in seconds. Here, we’re asking for a tenth of a second. Note that setting this doesn’t guarantee that we’ll receive updates at precisely that speed. In fact, that setting is really a cap, specifying the best rate the motion manager will be allowed to give us. In reality, it may update less frequently than that:
if (self.motionManager.deviceMotionAvailable) {
self.motionManager.deviceMotionUpdateInterval = 0.1;
Next, we tell the motion manager to start reporting device motion updates. We pass in the block that defines the work that will be done each time an update occurs and the queue where the block will be queued for execution. Remember that a block always starts off with a caret (^), followed by a parentheses-wrapped list of arguments that the block expects to be populated when it’s executed (in this case, a CMDeviceMotion object that contains the most recent motion data and potentially an error to alert us of trouble), and finishes with a curly brace section that contains the code to be executed:
[self.motionManager startDeviceMotionUpdatesToQueue:self.queue
withHandler:^(CMDeviceMotion *motion, NSError *error) {
What follows is the content of the block. It creates strings based on the current motion values and pushes them into the labels. We can’t do that directly here because UIKit classes like UILabel usually work well only when accessed from the main thread. Due to the way this code will be executed, from within an NSOperationQueue, we simply don’t know the specific thread in which we’ll be executing. So, we use the dispatch_async() function to pass control to the main thread before setting the labels’ text properties.
The gyroscope values are accessed through the rotationRate property of the CMDeviceMotion object that was passed into the block. The rotationRate property is of type CMRotationRate, which is just a simple struct containing three float values that represent the rotation rates around the x, y, and z axes. The accelerometer data is a little more complex, since Core Motion reports two different values—the acceleration due to gravity and any additional acceleration caused by forces applied by the user. You get these values from the gravity anduserAcceleration properties, which are both of type CMAcceleration. CMAccelaration is another simple struct that holds the accelerations along the x, y, and z axes. Finally, the device attitude is reported in the attitude property, which is of type CMAttitude. We’ll discuss this further when we run the application.
Before trying out the application, there is one more thing to do. We are going to be moving and rotating the device in various ways to see how the values in the CMDeviceMotion structure correlate to what’s happening to the device. While we’re doing this, we don’t want autorotation to kick in. To prevent this, select the project in the Project Navigator, select the MotionMonitor target, and then the General tab. In the Device Orientation section under Deployment Info, select Portrait and make sure that the other three orientations are not selected. This locks the application to Portrait orientation only.
Now build and run your app on whatever iOS device you have, and then try it out (see Figure 20-2).
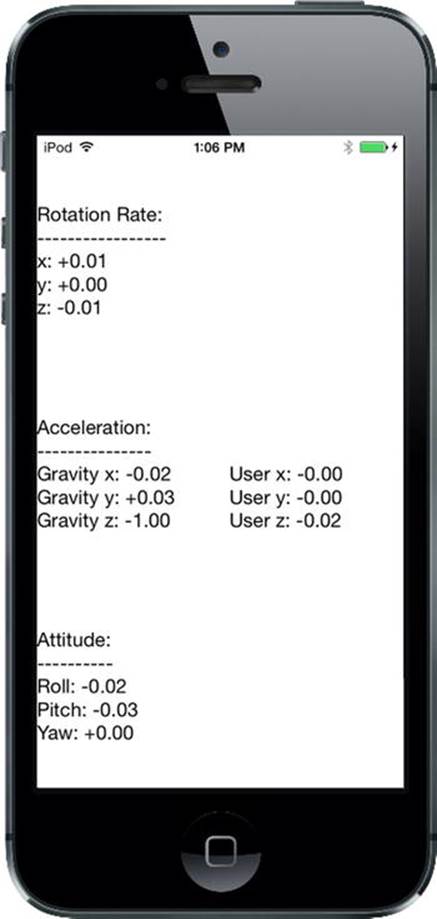
Figure 20-2. MotionMonitor running on an iPhone. Unfortunately, you’ll get no useful information if you run this app in the simulator
As you tilt your device around in different ways, you’ll see how the rotation rate, accelerometer, and attitude values adjust to each new position and will hold steady as long as you hold the device steady. Whenever the device is standing still, no matter which orientation it is in, the rotation values will hover around zero. As you rotate the device, you’ll see that the rotation values change, depending on how you turn it around its various axes. The values will always move back to zero when you stop moving the device. We’ll look more closely at all of the results shortly.
Proactive Motion Access
You’ve seen how to access motion data by passing CMMotionManager blocks to be called as motion occurs. This kind of event-driven motion handling can work well enough for the average Cocoa app, but sometimes it doesn’t quite fit an application’s particular needs. Interactive games, for example, typically have a perpetually running loop that processes user input, updates the state of the game, and redraws the screen. In such a case, the event-driven approach isn’t such a good fit, since you would need to implement an object that waits for motion events, remembers the latest positions from each sensor as they’re reported, and is ready to report the data back to the main game loop when necessary.
Fortunately, CMMotionManager has a built-in solution. Instead of passing in blocks, we can just tell it to activate the sensors using the startDeviceMotionUpdates method. Once we do so, we can simply read the values any time we want, directly from the motion manager!
Let’s change our MotionMonitor app to use this approach, just so you can see how it works. Start by making a copy of your MotionMonitor project folder.
Note You’ll find a completed version of this project in the 20 – MonitorMotion2 folder in the example source code.
Close the open Xcode project and open the one from the new copy instead, heading straight to ViewController.m. The first step is to remove the queue property and add a new property, a pointer to an NSTimer that will trigger all our display updates:
#import "ViewController.h"
#import <CoreMotion/CoreMotion.h>
@interface ViewController ()
@property (weak, nonatomic) IBOutlet UILabel *gyroscopeLabel;
@property (weak, nonatomic) IBOutlet UILabel *accelerometerLabel;
@property (weak, nonatomic) IBOutlet UILabel *attitudeLabel;
@property (strong, nonatomic) CMMotionManager *motionManager;
@property (strong, nonatomic) NSOperationQueue *queue;
@property (strong, nonatomic) NSTimer *updateTimer;
@end
Next, get rid of most of the viewDidLoad method that we had before and replace it with this simpler version:
- (void)viewDidLoad
{
[super viewDidLoad];
// Do any additional setup after loading the view, typically from a nib.
self.motionManager = [[CMMotionManager alloc] init];
}
We’re going to use a timer to collect motion data directly from the motion manager every tenth of a second instead of having it delivered to a code block. We want our timer—and the motion manager itself—to be active only during a small window of time, when the view is actually being displayed. That way, we keep the usage of our main game loop to a bare minimum. We can accomplish this by implementing the viewWillAppear: and viewDidDisappear: methods, as shown here:
- (void)viewWillAppear:(BOOL)animated {
[super viewWillAppear:animated];
if (self.motionManager.deviceMotionAvailable) {
self.motionManager.deviceMotionUpdateInterval = 0.1;
[self.motionManager startDeviceMotionUpdates];
self.updateTimer = [NSTimer
scheduledTimerWithTimeInterval:0.1
target:self
selector:@selector(updateDisplay)
userInfo:nil
repeats:YES];
}
}
- (void)viewDidDisappear:(BOOL)animated {
[super viewDidDisappear:animated];
if (self.motionManager.deviceMotionAvailable) {
[self.motionManager stopDeviceMotionUpdates];
[self.updateTimer invalidate];
self.updateTimer = nil;
}
}
The code in viewWillAppear: calls the motion manager’s startDeviceMotionUpdates method to start it off device motion information, then creates a new timer and schedules it to fire once every tenth of a second, calling the updateDisplay method, which we haven’t created yet. Add this method just below viewDidDisappear:
- (void)updateDisplay {
CMDeviceMotion *motion = self.motionManager.deviceMotion;
if (motion != nil) {
CMRotationRate rotationRate = motion.rotationRate;
CMAcceleration gravity = motion.gravity;
CMAcceleration userAcc = motion.userAcceleration;
CMAttitude *attitude = motion.attitude;
NSString *gyroscopeText = [NSString stringWithFormat:
@"Rotation Rate:\n-----------------\n"
"x: %+.2f\ny: %+.2f\nz: %+.2f\n",
rotationRate.x, rotationRate.y, rotationRate.z];
NSString *acceleratorText = [NSString stringWithFormat:
@"Acceleration:\n---------------\n"
"Gravity x: %+.2f\t\tUser x: %+.2f\n"
"Gravity y: %+.2f\t\tUser y: %+.2f\n"
"Gravity z: %+.2f\t\tUser z: %+.2f\n",
gravity.x, userAcc.x, gravity.y,
userAcc.y, gravity.z,userAcc.z];
NSString *attitudeText = [NSString stringWithFormat:
@"Attitude:\n----------\n"
"Roll: %+.2f\nPitch: %+.2f\nYaw: %+.2f\n",
attitude.roll, attitude.pitch, attitude.yaw];
dispatch_async(dispatch_get_main_queue(), ^{
self.gyroscopeLabel.text = gyroscopeText;
self.accelerometerLabel.text = acceleratorText;
self.attitudeLabel.text = attitudeText;
});
}
}
This is a copy of the code from the closure in the previous version of this example, except that the CMDeviceMotion object is obtained directly from the motion manager. Notice the check for nil; this is required because the timer may fire before the motion manager has acquired its first data sample.
Build and run the app on your device, and you should see that it behaves exactly like the first version. Now you’ve seen two ways of accessing motion data. Use whichever suits your application best.
Gyroscope and Attitude Results
The gyroscope measures the rate at which the device is rotating about the x, y, and z axes. Refer to Figure 20-1 to see how the axes relate to the body of the device. First, lay the device flat on a table. While it’s not moving, all three rotation rates will be close to zero and you’ll see that the roll, pitch, and yaw values are also close to zero. Now gently rotate the device clockwise. As you do, you’ll see that the rotation rate around the z axis becomes negative. The faster you rotate the device, the larger the absolute value of the rotation rate will be. When you stop rotating, the rotation rate will return to zero, but the yaw does not. The yaw represents the angle through which the device has been rotated about the z axis from its initial rest position. If you rotate the device clockwise, the yaw will increase through negative values until the device is 180° from its rest position, when its value will be around –3. If you continue to rotate the device clockwise, the yaw will jump to a value slightly larger than +3 and then decrease to zero as you rotate it back to its initial position. If you start by rotating counterclockwise, the same thing happens, except that the yaw is initially positive. The yaw angle is actually measured in radians, not degrees. A rotation of 180° is the same as a rotation by π radians, which is why the maximum yaw value is about 3 (since π is a little larger than 3.14).
With the device flat on the table again, hold the top edge and rotate it upward, leaving the base on the table. This is a rotation around the x axis, so you’ll see the x rotation rate increase through positive values until you hold the device steady, at which point it returns to zero. Now look at the pitch value. It has increased by an amount that depends on the angle through which you have lifted the top edge of the device. If you lift the device all the way to the vertical, the pitch value will be around 1.5. Like yaw, pitch is measured in radians, so when the device is vertical, it has rotated through 90°, or π/2 radians, which is a little over 1.5. If you lay the device flat again and repeat—but this time lift the bottom edge and leave the top on the table, you are performing a counterclockwise rotation about the x axis and you’ll see a negative rotation rate and a negative pitch.
Finally, with the device flat on the table again, lift its left edge, leaving the right edge on the table. This is a rotation about the y axis and you’ll see this reflect in the y-axis rotation rate. You can get the total rotation angle at any point from the roll value. It will be about 1.5 (actually π/2) radians when the device is standing upright on its right edge and it will increase all the way to π radians if you turn it on its face; although, of course, you’ll need a glass table to be able to see this.
In summary, use the rotation rates to see how fast the device is rotating about each axis and the yaw, pitch, and roll values to get its current total rotation about these axes, relative to its starting orientation.
Accelerometer Results
We mentioned earlier that the iPhone’s accelerometer detects acceleration along three axes, and it provides this information using two CMAcceleration structs. Each CMAcceleration has an x, y, and z field, each of which holds a floating-point value. A value of 0 means that the accelerometer detects no movement on that particular axis. A positive or negative value indicates force in one direction. For example, a negative value for y indicates that a downward pull is sensed, which is probably an indication that the phone is being held upright in portrait orientation. A positive value for y indicates some force is being exerted in the opposite direction, which could mean the phone is being held upside down or that the phone is being moved in a downward direction. The CMDeviceMotion object separately reports the acceleration along each axis due to gravity and any additional forces caused by the user. For example, if you hold the device flat, you’ll see that gravity value is close to –1 along the z axis and the user acceleration components are all close to zero. Now if you quickly raise the device, keeping it level, you’ll see that the gravity values remain about the same, but there is positive user acceleration along the z axis. For some applications, it is useful to have separate gravity and user acceleration values, while for others, you need the total acceleration, which you can get by adding together the components of thegravity and userAcceleration properties of the CMDeviceMotion object.
Keeping the diagram in Figure 20-1 in mind, let’s look at some accelerometer results (see Figure 20-3). This figure shows the reported acceleration due to gravity while the device is in a given attitude and not moving. Note that in real life you will almost never get values this precise, as the accelerometer is sensitive enough to sense even tiny amounts of motion, and you will usually pick up at least some tiny amount of force on all three axes. This is real-world physics, not high-school physics.
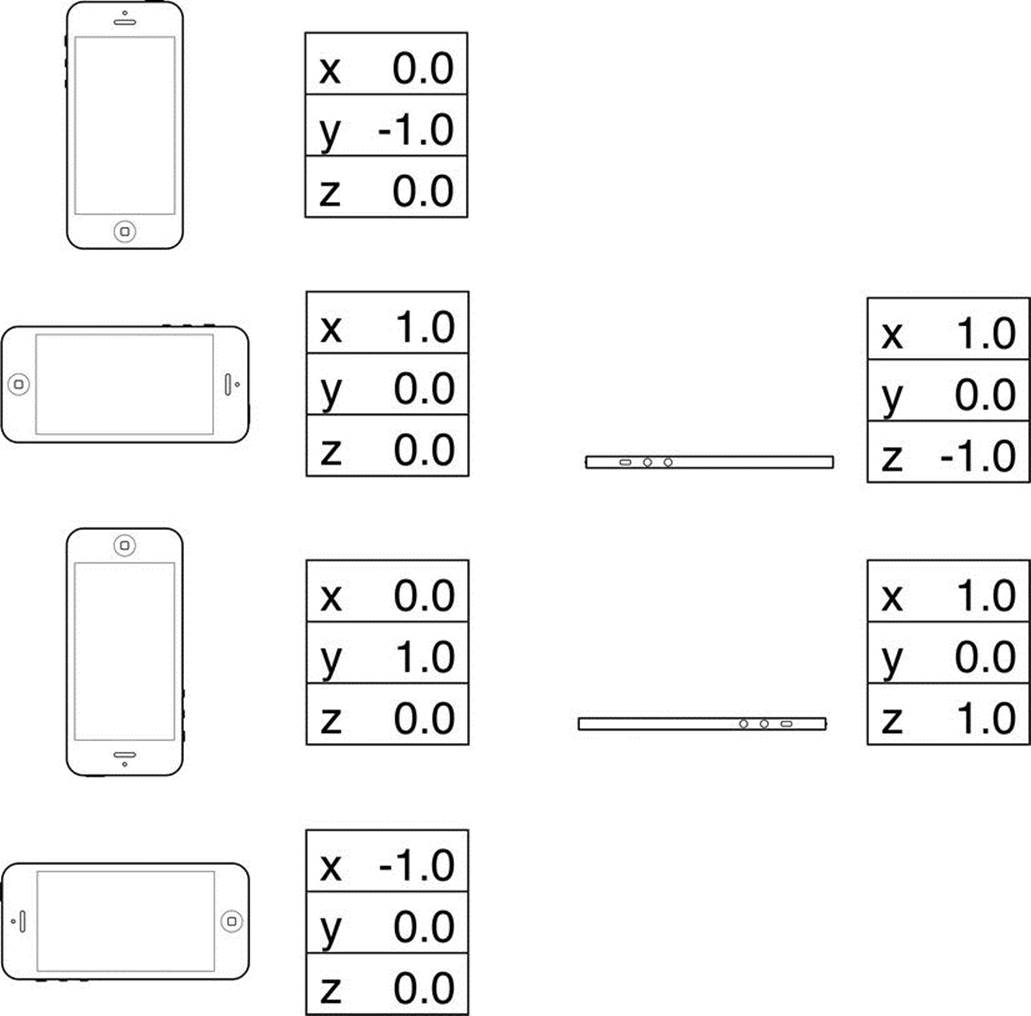
Figure 20-3. Idealized gravity acceleration values for different device orientations
The most common usage of the accelerometer in third-party applications is probably as a controller for games. We’ll create a program that uses the accelerometer for input a little later in the chapter, but first we’ll look at another common accelerometer use: detecting shakes.
Detecting Shakes
Like a gesture, a shake can be used as a form of input to your application. For example, the drawing program GLPaint, which is one of Apple’s iOS sample code projects, lets users erase drawings by shaking their iOS device, sort of like an Etch A Sketch.
Detecting shakes is relatively trivial. All it requires is checking for an absolute value of user acceleration on one of the axes that is greater than a set threshold. During normal usage, it’s not uncommon for one of the three axes to register values up to around 1.3 g, but getting values much higher than that generally requires intentional force. The accelerometer seems to be unable to register values higher than around 2.3 g (at least in our experience), so you don’t want to set your threshold any higher than that.
To detect a shake, you could check for an absolute value greater than 1.5 for a slight shake and 2.0 for a strong shake, by adding code like this to the motion manager callback block in the MotionMonitor example:
CMAcceleration userAcc = motion.userAcceleration;
if (fabsf(userAcc.x) > 2.0
|| fabsf(userAcc.y) > 2.0
|| fabsf(userAcc.z) > 2.0) {
// Do something here...
}
This code would detect any movement on any axis that exceeded two g-forces.
Baked-In Shaking
There’s actually another, much simpler way to check for shakes—one that’s baked right into the responder chain. Remember back in Chapter 18 when we implemented methods like touchesBegan:withEvent: to detect touches? Well, iOS also provides three similar responder methods for detecting motion:
· When motion begins, the motionBegan:withEvent: method is sent to the first responder and then on through the responder chain, as discussed in Chapter 18.
· When the motion ends, the motionEnded:withEvent: method is sent to the first responder.
· If the phone rings, or some other interrupting action happens during the shake, the motionCancelled:withEvent: message is sent to the first responder.
The first argument to each of these methods is an event subtype, one of which is UIEventSubtypeMotionShake. This means that you can actually detect a shake without using CMMotionManager directly. All you need to do is override the appropriate motion-sensing methods in your view or view controller, and they will be called automatically when the user shakes the phone. Unless you specifically need more control over the shake gesture, you should use the baked-in motion detection rather than the manual method described previously. However, we thought we would show you the basics of the manual method in case you ever do need more control.
Now that you have the basic idea of how to detect shakes, we’re going to break your phone.
Shake and Break
Okay, we’re not really going to break your phone, but we’ll write an application that detects shakes, and then makes your phone look and sound as if it broke as a result of the shake.
When you launch the application, the program will display a picture that looks like the iPhone home screen (see Figure 20-4). Shake the phone hard enough, though, and your poor phone will make a sound that you never want to hear coming out of a consumer electronics device. What’s more, your screen will look like the one shown in Figure 20-5. Why do we do these evil things? Not to worry. You can reset the iPhone to its previously pristine state by touching the screen.

Figure 20-4. The ShakeAndBreak application looks innocuous enough. . .
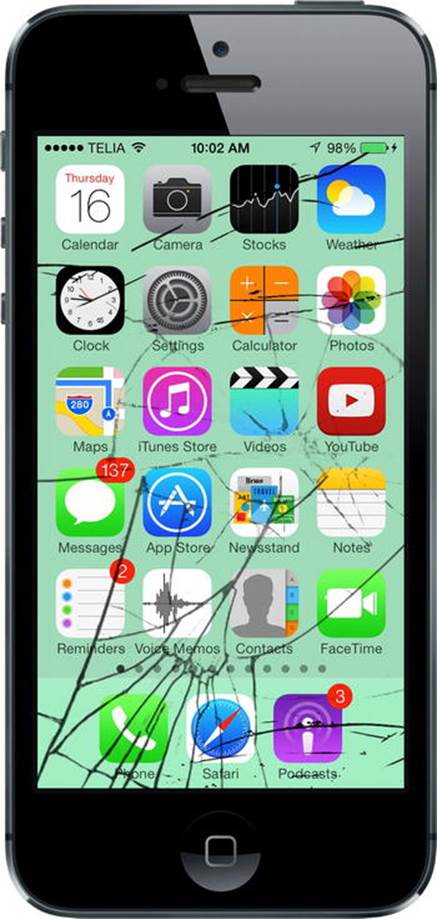
Figure 20-5. . . . but handle it too roughly and—oh no!
Create a new project in Xcode using the Single View Application template. Make sure that the device type is set to iPhone—unlike most of the other examples in this book, this one only works on iPhone because the images are of the correct size for an iPhone 5 screen. Of course, it’s easy to extend this project to iPad if you create additional images. Call the new project ShakeAndBreak. In the 20 – Images and Sounds folder of the example source code, we’ve provided the two images and the sound file you need for this application. In Images.xcassets, create an image set calledhome and drag home.png into it, and then create another image set called homebroken and drag homebroken.png, into it. Drag glass.wav to your project.
Now let’s start creating our view controller. We’re going to need to create an outlet to point to an image view so that we can change the displayed image. Single-click ViewController.m and add the following property declaration to the class extension:
#import "ViewController.h"
@interface ViewController ()
@property (weak, nonatomic) IBOutlet UIImageView *imageView;
@end
Save the file. Now select Main.storyboard to edit the file in Interface Builder and drag an Image View over from the library to the view in the layout area. The image view should automatically resize to take up the full window, so just place it so that it sits perfectly within the window. In the Document Overview, Control-drag from the Image View to its parent View, hold down Shift, and in the context menu, select Leading Space to Container Margin, Trailing Space to Container Margin, Top Space to Top Layout Guide, and Bottom Space to Bottom Layout Guide, and then click outside the context menu with the mouse to lock the size and position of the image view. Finally, Control-drag from the View Controller icon to the image view and select the imageView outlet, and then save the storyboard.
Next, go back to the ViewController.m file. We’re going to add some additional properties for both of the images we’re going to display, to track whether we’re showing the broken image. We’re also adding an audio player object that we’ll use to play our breaking glass sound. The following bold lines go near the top of the file:
#import "ViewController.h"
#import <AVFoundation/AVFoundation.h>
@interface ViewController ()
@property (weak, nonatomic) IBOutlet UIImageView *imageView;
@property (strong, nonatomic) UIImage *fixed;
@property (strong, nonatomic) UIImage *broken;
@property (assign, nonatomic) BOOL brokenScreenShowing;
@property (strong, nonatomic) AVAudioPlayer *crashPlayer;
@end
Add the following code to the viewDidLoad method:
@implementation ViewController
- (void)viewDidLoad
{
[super viewDidLoad];
// Do any additional setup after loading the view, typically from a nib.
NSURL *url = [[NSBundle mainBundle] URLForResource:@"glass"
withExtension:@"wav"];
NSError *error = nil;
self.crashPlayer = [[AVAudioPlayer alloc] initWithContentsOfURL:url
error:&error];
if (!self.crashPlayer) {
NSLog(@"Audio Error! %@", error.localizedDescription);
}
self.fixed = [UIImage imageNamed:@"home"];
self.broken = [UIImage imageNamed:@"homebroken"];
self.imageView.image = self.fixed;
}
At this point, we’ve created an NSURL object pointing to our sound file and initialized an instance of AVAudioPlayer, a class that will simply play the sound. After a quick sanity check to make sure the audio player was set up correctly, we loaded both images we need to use and put the first one in place. Next, add the following new method:
- (void)motionEnded:(UIEventSubtype)motion withEvent:(UIEvent *)event {
if (!self.brokenScreenShowing && motion == UIEventSubtypeMotionShake) {
self.imageView.image = self.broken;
[self.crashPlayer play];
self.brokenScreenShowing = YES;
}
}
This method will be called whenever a shake happens. After checking to make sure the broken screen isn’t already showing and that the event we’re looking at really is a shake event, the method shows the broken image and plays our shattering noise.
The last method is one you should already be familiar with by now. It’s called when the screen is touched. All we need to do in that method is set the image back to the unbroken screen and set brokenScreenShowing back to NO:
- (void)touchesBegan:(NSSet *)touches withEvent:(UIEvent *)event {
self.imageView.image = self.fixed;
self.brokenScreenShowing = NO;
}
Compile and run the application, and take it for a test shake. For those of you who don’t have the ability to run this application on your iOS device, you can still give this a try. The simulator does not simulate the accelerometer hardware, but it does include a menu item that simulates the shake event, so this will work with the simulator, too.
Go have some fun with it. When you’re finished, come on back, and you’ll see how to use the accelerometer as a controller for games and other programs.
Accelerometer As Directional Controller
Instead of using buttons to control the movement of a character or object in a game, developers often use an accelerometer to accomplish this task. In a car-racing game, for example, twisting the iOS device like a steering wheel might steer your car, while tipping it forward might accelerate, and tipping it back might brake.
Exactly how you use the accelerometer as a controller will vary greatly, depending on the specific mechanics of the game. In the simplest cases, you might just take the value from one of the axes, multiply it by a number, and add that to one of the coordinates of the controlled objects. In more complex games where physics are modeled more realistically, you would need to make adjustments to the velocity of the controlled object based on the values returned from the accelerometer.
The one tricky aspect of using the accelerometer as a controller is that the delegate method is not guaranteed to call back at the interval you specify. If you tell the motion manager to read the accelerometer 60 times a second, all that you can say for sure is that it won’t update more than 60 times a second. You’re not guaranteed to get 60 evenly spaced updates every second. So, if you’re doing animation based on input from the accelerometer, you must keep track of the time that passes between updates and factor that into your equations to determine how far objects have moved.
Rolling Marbles
For our next trick, we’re going to let you move a sprite around the iPhone’s screen by tilting the phone. This is a very simple example of using the accelerometer to receive input. We’ll use Quartz 2D to handle our animation.
Note As a general rule, when you’re working with games and other programs that need smooth animation, you’ll probably want to use Sprite Kit or OpenGL ES. We’re using Quartz 2D in this application for the sake of simplicity and to reduce the amount of code that’s unrelated to using the accelerometer.
In this application, as you tilt your iPhone, the marble will roll around as if it were on the surface of a table (see Figure 20-6). Tip it to the left, and the ball will roll to the left. Tip it farther, and it will move faster. Tip it back, and it will slow down, and then start going in the other direction.
Figure 20-6. The Ball application lets you roll a marble around the screen
In Xcode, create a new project using the Single View Application template. Set the device type to Universal and call the project Ball. In the 20 – Images and Sounds folder in the example source code, you’ll find an image called ball.png. Create an image set called ball in Images.xcassets and drag ball.png into it.
Next, select the Ball project in the Project Navigator, and then the General tab of the Ball target. In the Device Orientation section under Deployment Info, select Portrait and deselect all of the other check boxes, as you did for the MotionMonitor application earlier in this chapter. This disables the default interface orientation changes; we want to roll our ball and not change the interface orientation as we move our device around.
Now single-click the Ball folder and select File ![]() New
New ![]() File. . . . Select Cocoa Touch Class from the iOS section, and click Next. Make the new class a subclass of UIView and name it BallView, and then click Create. We’ll get back to editing this class a little later.
File. . . . Select Cocoa Touch Class from the iOS section, and click Next. Make the new class a subclass of UIView and name it BallView, and then click Create. We’ll get back to editing this class a little later.
Select Main.storyboard to edit the file in Interface Builder. Single-click the View icon and use the identity inspector to change the view’s class from UIView to BallView. Next, switch to the Attributes Inspector and change the view’s Background to Light Gray Color. Finally, save the storyboard.
Now it’s time to edit ViewController.m. Add the following lines at the top of the file:
#import "ViewController.h"
#import "BallView.h"
#import <CoreMotion/CoreMotion.h>
#define kUpdateInterval (1.0f / 60.0f)
@interface ViewController ()
@property (strong, nonatomic) CMMotionManager *motionManager;
@property (strong, nonatomic) NSOperationQueue *queue;
@end
@implementation ViewController
Next, populate viewDidLoad with this code:
- (void)viewDidLoad
{
[super viewDidLoad];
// Do any additional setup after loading the view, typically from a nib.
self.motionManager = [[CMMotionManager alloc] init];
self.queue = [[NSOperationQueue alloc] init];
self.motionManager.deviceMotionUpdateInterval = kUpdateInterval;
__weak ViewController *weakSelf = self;
[self.motionManager startDeviceMotionUpdatesToQueue:self.queue
withHandler: ^(CMDeviceMotion *motionData, NSError *error) {
BallView *ballView = (BallView *)weakSelf.view;
[ballView setAcceleration:motionData.gravity];
dispatch_async(dispatch_get_main_queue(), ^{
[ballView update];
});
}];
}
Note After entering this code, you will see an error as a result of BallView not being complete. We’re doing the bulk of our work in the BallView class, and it’s up next.
The viewDidLoad method here is similar to some of what we’ve done elsewhere in this chapter. The main difference is that we are using a much higher update interval of 60 times per second. In the block that we tell the motion manager to execute when there are accelerometer updates to report, we pass the acceleration object along to our view. We then call a method named update, which updates the position of the ball in the view based on acceleration and the amount of time that has passed since the last update. Since that block can be executed on any thread, and the methods belonging to UIKit objects (including UIView) can be safely used only from the main thread, we once again force the update method to be called in the main thread.
Writing the Ball View
Select BallView.h. Here, you’ll need to import the Core Motion header file and add the property that our controller will use to pass along an acceleration value and a method that it will call to update the ball’s position:
#import <UIKit/UIKit.h>
#import <CoreMotion/CoreMotion.h>
@interface BallView : UIView
@property (assign, nonatomic) CMAcceleration acceleration;
- (void)update;
@end
Switch over to BallView.m and add a class extension with the following code near the top:
#import "BallView.h"
@interface BallView ()
@property (strong, nonatomic) UIImage *image;
@property (assign, nonatomic) CGPoint currentPoint;
@property (assign, nonatomic) CGPoint previousPoint;
@property (assign, nonatomic) CGFloat ballXVelocity;
@property (assign, nonatomic) CGFloat ballYVelocity;
@end
Let’s look at the properties and talk about what we’re doing with each of them. The first is a UIImage that will point to the sprite that we’ll be moving around the screen:
UIImage *image;
After that, we keep track of two CGPoint variables. The currentPoint property will hold the current position of the ball. We’ll also keep track of the last point where we drew the sprite. That way, we can build an update rectangle that encompasses both the new and old positions of the ball, so that it is drawn at the new spot and erased at the old one:
CGPoint currentPoint;
CGPoint previousPoint;
We also have two variables to keep track of the ball’s current velocity in two dimensions. Although this isn’t going to be a very complex simulation, we do want the ball to move in a manner similar to a real ball. We’ll calculate the ball movement in the next section. We’ll get acceleration from the accelerometer and keep track of velocity on two axes with these variables.
CGFloat ballXVelocity;
CGFloat ballYVelocity;
Now let’s write the code to draw and move the ball around the screen. First, add the following methods at the beginning of the @implementation section in BallView.m:
@implementation BallView
- (void)commonInit {
self.image = [UIImage imageNamed:@"ball"];
self.currentPoint = CGPointMake((self.bounds.size.width / 2.0f) +
(self.image.size.width / 2.0f),
(self.bounds.size.height / 2.0f) +
(self.image.size.height / 2.0f));
}
- (id)initWithCoder:(NSCoder *)coder {
self = [super initWithCoder:coder];
if (self) {
[self commonInit];
}
return self;
}
- (id)initWithFrame:(CGRect)frame {
self = [super initWithFrame:frame];
if (self) {
[self commonInit];
}
return self;
}
Both the initWithCoder: and the initWithFrame: methods call our commonInit method. Our view that is created in a storyboard file will be initialized with the initWithCoder: method. We call the commonInit method from both initializer methods so that our view class can safely be created both from code and from a nib file. This is a nice thing to do for any view class that may be reused, such as this fancy ball rolling view.
Now uncomment the commented-out drawRect: method and give it this simple implementation:
- (void)drawRect:(CGRect)rect
{
// Drawing code
[self.image drawAtPoint:self.currentPoint];
}
Next, add these methods to the end of the class:
#pragma mark -
- (void)setCurrentPoint:(CGPoint)newPoint {
self.previousPoint = self.currentPoint;
_currentPoint = newPoint;
if (self.currentPoint.x < 0) {
_currentPoint.x = 0;
self.ballXVelocity = 0;
}
if (self.currentPoint.y < 0){
_currentPoint.y = 0;
self.ballYVelocity = 0;
}
if (self.currentPoint.x > self.bounds.size.width - self.image.size.width) {
_currentPoint.x = self.bounds.size.width - self.image.size.width;
self.ballXVelocity = 0;
}
if (self.currentPoint.y >
self.bounds.size.height - self.image.size.height) {
_currentPoint.y = self.bounds.size.height - self.image.size.height;
self.ballYVelocity = 0;
}
CGRect currentRect =
CGRectMake(self.currentPoint.x, self.currentPoint.y,
self.currentPoint.x + self.image.size.width,
self.currentPoint.y + self.image.size.height);
CGRect previousRect =
CGRectMake(self.previousPoint.x, self.previousPoint.y,
self.previousPoint.x + self.image.size.width,
self.currentPoint.y + self.image.size.width);
[self setNeedsDisplayInRect:CGRectUnion(currentRect, previousRect)];
}
- (void)update {
static NSDate *lastUpdateTime = nil;
if (lastUpdateTime != nil) {
NSTimeInterval secondsSinceLastDraw =
[[NSDate date] timeIntervalSinceDate:lastUpdateTime];
self.ballYVelocity = self.ballYVelocity -
(self.acceleration.y * secondsSinceLastDraw);
self.ballXVelocity = self.ballXVelocity +
(self.acceleration.x * secondsSinceLastDraw);
CGFloat xAccel = secondsSinceLastDraw * self.ballXVelocity * 500;
CGFloat yAccel = secondsSinceLastDraw * self.ballYVelocity * 500;
self.currentPoint = CGPointMake(self.currentPoint.x + xAccel,
self.currentPoint.y + yAccel);
}
// Update last time with current time
lastUpdateTime = [[NSDate alloc] init];
}
@end
Calculating Ball Movement
Our drawRect: method couldn’t be much simpler. We just draw the image we loaded in commonInit: at the position stored in currentPoint. The currentPoint accessor is a standard accessor method. The setCurrentPoint: mutator is another story, however.
The first things we do in setCurrentPoint: are to store the old currentPoint value in previousPoint and assign the new value to currentPoint:
self.previousPoint = self.currentPoint;
self.currentPoint = newPoint;
Next, we do a boundary check. If either the x or y position of the ball is less than 0 or greater than the width or height of the screen (accounting for the width and height of the image), then the acceleration in that direction is stopped:
if (self.currentPoint.x < 0) {
_currentPoint.x = 0;
self.ballXVelocity = 0;
}
if (self.currentPoint.y < 0){
_currentPoint.y = 0;
self.ballYVelocity = 0;
}
if (self.currentPoint.x > self.bounds.size.width - self.image.size.width) {
_currentPoint.x = self.bounds.size.width - self.image.size.width;
self.ballXVelocity = 0;
}
if (self.currentPoint.y >
self.bounds.size.height - self.image.size.height) {
_currentPoint.y = self.bounds.size.height - self.image.size.height;
self.ballYVelocity = 0;
}
Tip Do you want to make the ball bounce off the walls more naturally, instead of just stopping? It’s easy enough to do. Just change the two lines in setCurrentPoint: that currently read self.ballXVelocity = 0; to self.ballXVelocity = - (self.ballXVelocity / 2.0);. And change the two lines that currently read self.ballYVelocity = 0; to self.ballYVelocity = - (self.ballYVelocity / 2.0);. With these changes, instead of killing the ball’s velocity, we reduce it in half and set it to the inverse. Now the ball has half the velocity in the opposite direction.
After that, we calculate two CGRects based on the size of the image. One rectangle encompasses the area where the new image will be drawn, and the other encompasses the area where it was last drawn. We’ll use these two rectangles to ensure that the old ball is erased at the same time the new one is drawn:
CGRect currentRect =
CGRectMake(self.currentPoint.x, self.currentPoint.y,
self.currentPoint.x + self.image.size.width,
self.currentPoint.y + self.image.size.height);
CGRect previousRect =
CGRectMake(self.previousPoint.x, self.previousPoint.y,
self.previousPoint.x + self.image.size.width,
self.currentPoint.y + self.image.size.width);
Finally, we create a new rectangle that is the union of the two rectangles we just calculated and feed that to setNeedsDisplayInRect: to indicate the part of our view that needs to be redrawn:
[self setNeedsDisplayInRect:CGRectUnion(currentRect, previousRect)];
The last substantive method in our class is update, which is used to figure out the correct new location of the ball. This method is called from the accelerometer method of its controller class after it feeds the view the new acceleration object. The first thing this method does is to declare a static NSDate variable that will be used to keep track of how long it has been since the last time the update method was called. The first time through this method, when lastUpdateTime is nil, we don’t do anything because there’s no point of reference. Because the updates are happening about 60 times a second, no one will ever notice a single missing frame:
static NSDate *lastUpdateTime = nil;
if (lastUpdateTime != nil) {
Every other time through this method, we calculate how long it has been since the last time this method was called. The NSDate instance returned by [NSDate date] represents the current time. By asking it for the time interval since lastUpdateDate, we get a number representing the number of seconds between the current time and lastUpdateTime:
NSTimeInterval secondsSinceLastDraw =
[[NSDate date] timeIntervalSinceDate:lastUpdateTime];
Next, we calculate the new velocity in both directions by adding the current acceleration to the current velocity. We multiply acceleration by secondsSinceLastDraw so that our acceleration is consistent across time. Tipping the phone at the same angle will always cause the same amount of acceleration:
self.ballYVelocity = self.ballYVelocity –
(self.acceleration.y * secondsSinceLastDraw);
self.ballXVelocity = self.ballXVelocity +
(self.acceleration.x * secondsSinceLastDraw);
After that, we figure out the actual change in pixels since the last time the method was called based on the velocity. The product of velocity and elapsed time is multiplied by 500 to create movement that looks natural. If we didn’t multiply it by some value, the acceleration would be extraordinarily slow, as if the ball were stuck in molasses:
CGFloat xDelta = secondsSinceLastDraw * self.ballXVelocity * 500;
CGFloat yDelta = secondsSinceLastDraw * self.ballYVelocity * 500;
Once we know the change in pixels, we create a new point by adding the current location to the calculated acceleration and assign that to currentPoint. By using self.currentPoint, we use that accessor method we wrote earlier, rather than assigning the value directly to the instance variable:
self.currentPoint = CGPointMake(self.currentPoint.x + xDelta,
self.currentPoint.y + yDelta);
That ends our calculations, so all that’s left is to update lastUpdateTime with the current time:
lastUpdateTime = [[NSDate alloc] init];
Before you build the app, add the Core Motion framework using the technique mentioned earlier. Once it’s added, go ahead and build and run the app.
If all went well, the application will launch, and you should be able to control the movement of the ball by tilting the phone. When the ball gets to an edge of the screen, it should stop. Tip the phone back the other way, and it should start rolling in the other direction. Whee!
Rolling On
Well, we’ve certainly had some fun in this chapter with physics and the amazing iOS accelerometer and gyro. We created a great April Fools’ prank, and you got to see the basics of using the accelerometer as a control device. The possibilities for applications using the accelerometer and gyro are nearly as endless as the universe. So now that you have the basics down, go create something cool and surprise us!
When you feel up to it, we’re going to get into using another bit of iOS hardware: the built-in camera.
All materials on the site are licensed Creative Commons Attribution-Sharealike 3.0 Unported CC BY-SA 3.0 & GNU Free Documentation License (GFDL)
If you are the copyright holder of any material contained on our site and intend to remove it, please contact our site administrator for approval.
© 2016-2026 All site design rights belong to S.Y.A.