Adaptive Code via C#. Agile coding with design patterns and SOLID principles (2014)
Appendix A. Adaptive tools
This appendix gives you an introduction to source control with Git, which is required to use the code samples for this book. If you have used Git before, you’re already aware of its deserved reputation as the foremost source control software. If you have not encountered Git before, this appendix will bring you up to a level at which you can interact with local and remote repositories of code. These skills will translate to working with any codebase that is stored in Git; the content herein is not limited to the code samples for this book. Many popular open-source projects use Git, and it is being adopted by companies to manage their proprietary code, too.
In all contexts, the concept of continuous integration (CI) is an important part of keeping code synchronized between various contributors, so a section of this appendix briefly discusses the concept of CI and a common workflow for its implementation.
Source control with Git
Source control evolved slowly for a long time before being revolutionized with the advent of distributed source control systems such as Mercurial and Git. I would argue that any source control is better than no source control, but my preference is certainly for Git.
The purpose of source control in general is to track changes in code over time, making it easy to travel forward and backward in time through the code. It also provides a ready-made backup of the source.
With Git, every developer has his own repository that contains the full source code (see Figure A-1). To make edits to the source, developers should create local branches to which they can commit successive changes. Each branch should have a clearly delineated purpose—to fix a defect, implement a new feature, or make some experimental changes. Whatever their purpose, these changes remain local to the developer’s repository until the developer elects to push the branch elsewhere.
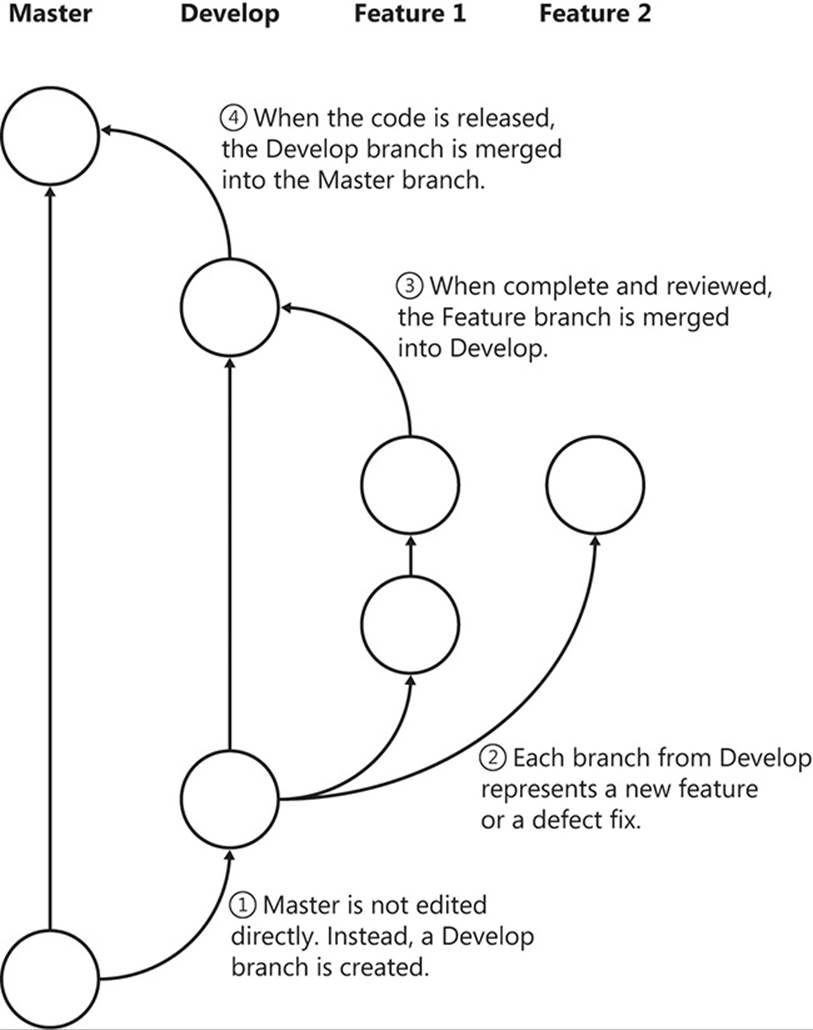
FIGURE A-1 A possible branching strategy for using Git.
Although it is not necessary to have a central repository, it is common to consider one of the repositories the authoritative location for the source. Take a look at Figure A-2. By pushing branches to this repository, developers can subsequently request that their changes be pulled into the main branch of the code. This is called a pull request and is often the catalyst for a code review by a developer’s peers, which helps to maintain the quality of the code. Each peer who reviews the code can approve or reject the pull request, as appropriate. Each peer can also functionally test the code by pulling the branch to her local repository, compiling it, and testing it locally. If the code is rejected, the original developer can continue to make edits and push the changes back to the central repository until it is accepted. The accepted pull request is then merged into a main development branch, and the other developers will receive those changes when they next update their local repositories with the main branches. They will also need to merge any changes with those of their own in-progress branches.
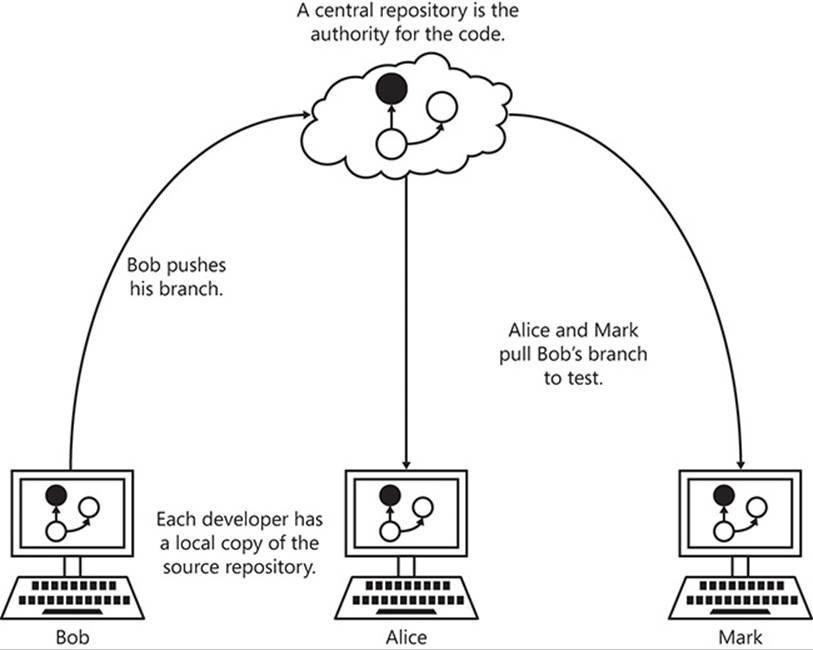
FIGURE A-2 Distributed source control is a peer-to-peer system, but it often uses a central repository.
Git lessons
Git for Windows can be downloaded from http://git-scm.com/download/win.
All of the code listings in this book are available on GitHub, which is a community centered on Git repositories. Appendix B, “GitHub code samples” (available online), provides a reference for each chapter’s code listings and the Git branch to which they belong.
For those who are new to Git, the following subsections provide a short orientation for navigating code stored in a Git repository. This is far from an extensive introduction to Git, but it should provide you with enough knowledge to follow the code examples and compile them. For more information, the Git Reference1 is an excellent introduction.
1 http://gitref.org/
If you don’t like working with the command line, there are several good GUIs available for Git. They are available from http://git-scm.com/downloads/guis. Atlassian’s SourceTree is the best-in-class at the time of this writing.
Cloning a repository
The first step is to clone a repository. All Git commands are provided as parameters to the git command-line application. The clone command requires the address of a repository to clone. The following command clones the repository for this book into a local repository. Remember that Git is distributed source control, so many repositories can exist. You will have full read access to the remote repository but will only be able to write to your own local clone.
git clone https://github.com/garymcleanhall/AdaptiveCode.git
This command creates a new directory called AdaptiveCode under the current working directory. By default, the master branch is selected. Each of the samples in this book are, however, located on different branches, so you need to be able to switch branches.
Switching to a different branch
After cloning a new repository, change the directory to your local clone by using the change directory command.
cd AdaptiveCode
The currently selected branch is the default, which for this repository is master. There is not much on the master branch for this repository. Instead, the code is located on other branches. Initially, only the master branch is replicated locally. The rest of the branches are still remote. To view which branches are available locally, supply git with the branch command.
git branch
This lists only the master branch. To list all of the branches that are available remotely, add the remote switch to the branch command.
git branch --remote
This lists all of the branches that are available in this repository. Note that all of the branches start with the prefix origin/, which specifies the remote location on which these branches reside. Each repository can have multiple remotes, with origin being the name designated for the remote from which this local repository was cloned.
As a personal preference, I have prefixed every branch with a chX- short code (although branch names can be pretty much anything). This indicates the chapter number to which the branch relates. The rest of the branch name is a more free-form description of its content. Appendix B provides a reference of code listings as they correspond to branch names. Now, by using the checkout command, you can create a local version of the remote branch and move onto it.
git checkout ch9-problem-statement
This creates a local version of the remote branch origin/ch9-problem-statement and alters the current working directory so that the changes present on that branch are brought in. If you list the contents of the current directory, as shown in the following listing, there is now a new directory called DependencyInjectionMvc, which, in turn, contains a Microsoft Visual Studio solution file and some more directories for its constituent projects.
C:\dev\AdaptiveCode [ch9-problem-statement]> ls
Directory: C:\dev\AdaptiveCode
Mode LastWriteTime Length Name
---- ------------- ------ ----
d---- 3/16/2014 12:47 PM DependencyInjectionMvc
-a--- 3/16/2014 12:47 PM 1522 .gitignore
-a--- 3/16/2014 12:30 PM 84 README.md
If you move back to the master branch, this folder will no longer be relevant and will be deleted.
Updating local branches
If the remote version of the branch changes at some point, you will want to retrieve the latest changes. The fetch command downloads any changes to remote branches.
git fetch
If you don’t supply a branch name, the command downloads changes to all branches, including newly created branches. You can also specify the name of the branch you want to fetch.
git fetch origin master
Note that the name of the remote is also specified, because the master branch might exist on more than one remote.
After you have downloaded the changes by using the fetch command, you can switch to the target branch by using the checkout command.
git checkout ch9-problem-statement
From here, the local branch is out of sync with the remote branch because the changes have not been replicated locally. The merge command is able to apply any changes made to a remote branch onto the local branch.
git merge origin/ch9-problem-statement
When the merge command is finished, the local branch is identical to the remote and all updates have been applied.
Continuous integration
Whenever a developer’s code is pushed to a central repository, it is common for that code to be compiled on the server. This continuous integration of developers’ changes provides invaluable feedback about the state of the code base. If the source fails to compile, it has failed to meet the first prerequisite to the pull request being accepted: without a working build, the request will be summarily denied.
However, compiling the code is often insufficient to confirm that the developer has not broken anything as he was fixing a defect or implementing a new feature. Thus, after compiling the code, the CI server runs all unit tests, and then checks that enough of the code is covered by unit tests. After that, it might even attempt to generate deployment packages from the output of the build.
All of these steps are carried out serially, with the success of each step being a requirement for continuing with the build process. There is no value in running unit tests if the code won’t compile; similarly, it makes no sense to check unit test coverage if the unit tests failed, or to generate deployment packages if the unit test coverage was insufficient. A CI server set up to build each pushed branch in this way relieves developers of a great burden. Instead of taking the significant additional time that such checks add to their tasks, they can just compile the code and run the unit tests that they have written, leaving the rest up to the CI. Figure A-3 shows a flowchart for such a continuous integration build process.

FIGURE A-3 A simplified workflow diagram for a continuous integration service.