Adaptive Code via C#. Agile coding with design patterns and SOLID principles (2014)
Part I: An Agile foundation
Chapter 4. Unit testing and refactoring
After completing this chapter, you will be able to
![]() Define unit testing and refactoring and explain why both are very useful techniques.
Define unit testing and refactoring and explain why both are very useful techniques.
![]() Understand how unit testing and refactoring are intrinsically linked.
Understand how unit testing and refactoring are intrinsically linked.
![]() Write code in a test-first fashion, focusing on implementing only that which the tests require.
Write code in a test-first fashion, focusing on implementing only that which the tests require.
![]() Refactor production code to improve its overall design.
Refactor production code to improve its overall design.
![]() Recognize overspecified unit tests and refactor them.
Recognize overspecified unit tests and refactor them.
This chapter focuses on two different techniques that are current programming best practices: unit testing and refactoring.
Unit testing is the discipline of writing code that tests other code. Unit tests themselves, being source code, can be compiled and executed. As each unit test runs, it reports the test’s success or failure with a simple true or false, often a green or a red visual indicator. If all of the unit tests pass, the production code that they test is considered to possibly be working. If even a single unit test fails—out of possibly thousands—the production code overall is deemed to certainly be broken.
Refactoring is the process of incrementally improving the design of existing code. It is analogous to writing various drafts of code, much like I have written various drafts of this book. By acknowledging that we developers rarely get things right the first time, refactoring frees us to do the simplest thing first and gradually, through incremental improvements, arrive at a better solution later.
The freedom to refactor with impunity is made possible by unit testing. When you unit test as early as possible in the process—that is, before you write any production code—you create a safety net to catch any subsequent errors when you refactor code. If a unit test transitions from a passing state to a failing state, you know that the last change you made is responsible for breaking the code. The process of writing unit tests and then refactoring toward better design is an upward spiral whereby the code quality increases while you simultaneously make progress with implementing new features.
Unit testing
To some degree, unit testing should be considered a mandatory part of every programmer’s daily discipline. For some developers, the ideal situation is when production code—the code that forms the basis of the software product—is entirely the result of the tests that were written to verify theapplication’s behavior. Later in this chapter, you will learn how this can be achieved through test-driven development, but bear in mind that the aim is to be pragmatic rather than purist: it is surely better to ship something and accept some prudent technical debt than it is to be late for the sake of writing more unit tests. That said, every project is unique in its tolerance for timeliness versus completeness.
There are some recognized unit testing patterns and guidelines that will result in repeatable success. These patterns and guidelines are no longer new but expected, tried, and tested. The arrangement and naming of unit tests and, most of all, how to ensure the testability of the code are all primary concerns. If these concerns are neglected, unit tests will no longer be synchronized with the code that they test, test failures will be tolerated, and the safety net will wither and break.
Arrange, Act, Assert
Every unit test is composed of three distinct parts:
![]() The arrangement of the preconditions of the test
The arrangement of the preconditions of the test
![]() The performance of the act that is being tested
The performance of the act that is being tested
![]() The assertion that the expected behavior occurred
The assertion that the expected behavior occurred
These three parts form the Arrange, Act, Assert (AAA) pattern. Every test that you write should follow this pattern so that other people can read your unit tests.
![]() Note
Note
Some readers might be more familiar with this pattern expressed as Given, When, Then. This is directly analogous to Arrange, Act, Assert, but it goes like this: given some preconditions, when the target of the test is executed, then some expected behavior should have occurred.
Arranging the preconditions
Before you can execute the action that you need to test, you must set up the scenario that you are testing. For some tests, this will be as simple as constructing the system under test (SUT). The SUT is the class that you are testing. Without a valid instance of the class, you will not be able to test any of its methods.
Listing 4-1 shows a minimal Arrange section of a test for an Account class that represents a customer’s balance and transactions. For this example, I am using MSTest. This chapter will continue to build on this example for the Act and Assert parts of the test, too. The test method’s name,AddingTransactionChangesBalance(), succinctly describes the intent of the test—to ensure that whenever a transaction is added to the account, the balance of the account is changed to include this new transaction.
LISTING 4-1 Constructing the SUT is a common first step in arranging a unit test.
[TestClass]
public class AccountTest
{
[TestMethod]
public void AddingTransactionChangesBalance()
{
// Arrange
var account = new Account();
}
}
The Arrange step taken here is simple enough. The only precondition to this test is a new instance of the Account class. You create this directly in your test by calling the new operator. From here, you can move on to the next step in the AAA pattern.
Performing the testable act
Now that you have the system under test in a fit state to be acted on, you can execute the method that you are testing. Each test’s Act phase should consist of just one interaction with the system under test—one method call or property get or set, for instance. This ensures that the tests are simple to both read and write and have clearly delineated execution paths.
Listing 4-2 shows the addition of the Act part of the test. In keeping with the test method’s name, the test calls the account.AddTransaction() method.
LISTING 4-2 Every Act phase should consist of only one interaction with the SUT.
[TestClass]
public class AccountTest
{
[TestMethod]
public void AddingTransactionChangesBalance()
{
// Arrange
var account = new Account();
// Act
account.AddTransaction(200m);
}
}
The test has passed a value into the AddTransaction method. This represents the monetary amount of the transaction that you are adding to the account. It is a decimal value, meaning that it has very high precision, but there is no currency value associated with this amount. For simplicity, the assumption is that all accounts and transactions are in US dollars.
With the Arrange and Act phases complete, you can move on to the final part of the test.
Asserting the expectations
Both of the phases up to this point have really been a preamble to the crux of this and every unit test: the assertion. This is the part that will give you the green indicator of success or the red indicator of failure of the test as a whole. The test method name is again the reference point for the assertion that you are making—that the account balance has changed. In this case, the assertion is going to be a comparison of an actual value and an expected value. This is a common kind of assertion in state-based tests, which are tests whose assertions depend on the state of the SUT. This particular assertion is going to require the actual and expected values to be equal.
The Account class’s Balance property will be queried for the actual value, and you will provide the expected value as a constant. This means that you must have prior knowledge of the expected value, which is a key factor to consider when writing tests. Rather than deriving the expected value in code, you should know what the expected value is ahead of time. In this scenario, it is easy. Given a new account, whose opening balance is unspecified and thus zero, if you add $200.00 to that account, what should the expected balance be?
$0.00 + $200.00 = $200.00
Thus, you can write your Assert phase and complete your AAA test, as shown in Listing 4-3.
LISTING 4-3 An assertion of expected behavior has been added to the unit test.
[TestClass]
public class AccountTest
{
[TestMethod]
public void AddingTransactionChangesBalance()
{
// Arrange
var account = new Account();
// Act
account.AddTransaction(200m);
// Assert
Assert.AreEqual(200m, account.Balance);
}
}
This test is now ready to run. By running the test, you can verify whether or not the system under test behaves as expected.
Running the tests
When the test is complete, you need to run it by using a unit test runner. Unit tests are contained in test projects whose output is assemblies, not executables. This means that the test projects cannot be run by themselves but must instead be provided as input to a unit test runner. Microsoft Visual Studio supports MSTest unit tests with its integrated test runner, whereas some other kinds of unit tests require plugins to provide integrated support in Visual Studio.
In Visual Studio, you can run MSTest unit tests by selecting one of the options from the Test > Run menu. For now, you can select the All Tests option, which is aliased to the keyboard shortcut Ctrl+R, A. The output of running the AAA unit test is shown in Figure 4-1.
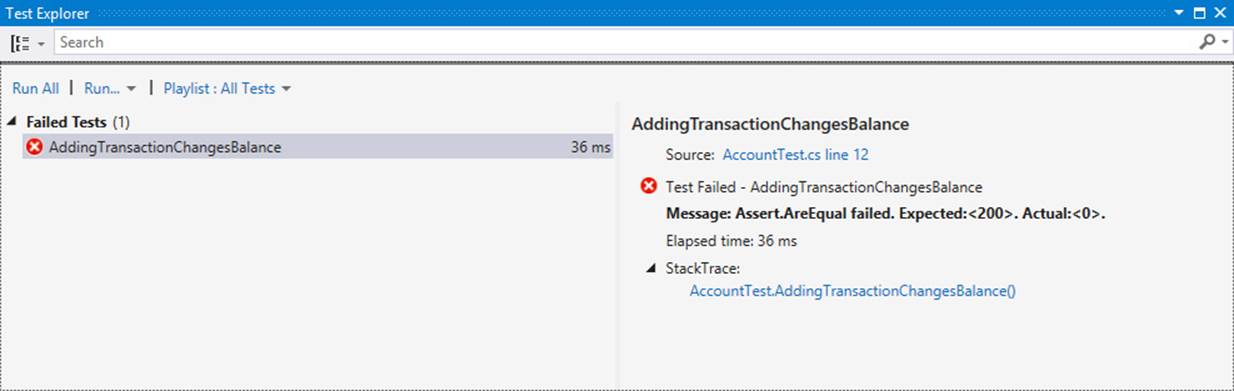
FIGURE 4-1 Running the unit test in the Visual Studio integrated MSTest unit test runner.
The test runner shows a master details view of the unit tests that you have chosen to run. The list of tests is enumerated in the left pane, with more details about the selected test shown in the right pane. You can tell that the test took 14 milliseconds to execute, which is not much at all. This is precisely one of the advantages of writing unit tests—it does not take long to run thousands of unit tests, compared to the effort required to test manually.
However, notice that the test assertion has failed because the expected value of 200 did not match the actual value provided. The account.Balance property was used for the actual value of the assertion, and it returned 0.
This is because you have not yet implemented the Account class. Listing 4-4 shows the minimal Account class implementation that was required up to this point.
LISTING 4-4 The system under test does not need to be implemented before the unit test.
public class Account
{
public void AddTransaction(decimal amount)
{
}
public decimal Balance
{
get;
private set;
}
}
As you can tell, this class does nothing with the provided transaction amount in the Add-Transaction method, and the Balance is just a default auto-property, though with a private setter. To make this test pass, you have to implement the Account class so that it meets your current expectations.
Test-driven development
To implement a unit test, you do not have to have a complete implementation of the system under test. In test-driven development (TDD), it is preferential not to have a working system under test before you write the unit tests. When you use a TDD approach to writing software, you write the unit tests and the production code in tandem, with a failing test written for every expected behavior exhibited by every method of every class in the production code. The failing test fails only because the production code does not exist yet. The test states—asserts—that the production code should act in some way, but because it does not yet, the test fails. After the production code is implemented in the simplest way possible to satisfy the test’s requirements, the test will succeed.
Red, green, refactor!
What has been produced so far with the AAA AddingTransactionChangesBalance() test is the first part of a three-phase process called red, green, refactor.
1. Write a failing test that targets the expected behavior of the SUT.
2. Implement just enough of the SUT so that the new test passes without breaking existing successful tests.
3. If any refactoring can be done on the SUT to improve its design or overall quality, now is the time to do so.
The first phase generates a failing test, which test runners indicate with a red icon. The second phase makes that failing test succeed, turning the icon green. The third phase allows you to incrementally improve the production code piece by piece without fear of breaking its functionality.
To turn the failing test from red to green (from failure to success), you need to look at the second phase of the process: implement just enough of the SUT so that the test passes. Because this is currently the only test, you need not concern yourself with breaking any existing successful tests.
The behavior asserted with the test was that the balance was 200 after a transaction for that amount was added to a new account. Listing 4-5 shows the bare minimum needed to make the unit test pass.
LISTING 4-5 Always do the bare minimum when transitioning a test from red to green.
public class Account
{
public Account()
{
Balance = 200m;
}
public void AddTransaction(decimal amount)
{
}
public decimal Balance
{
get;
private set;
}
}
The changed code is highlighted in bold. To transition the test from red to green, the code has introduced a default constructor to the Account class that initializes the Balance property to 200m. To prove that this works—that the test now passes—Figure 4-2 shows a screenshot of the Visual Studio test runner after the failing test was rerun.
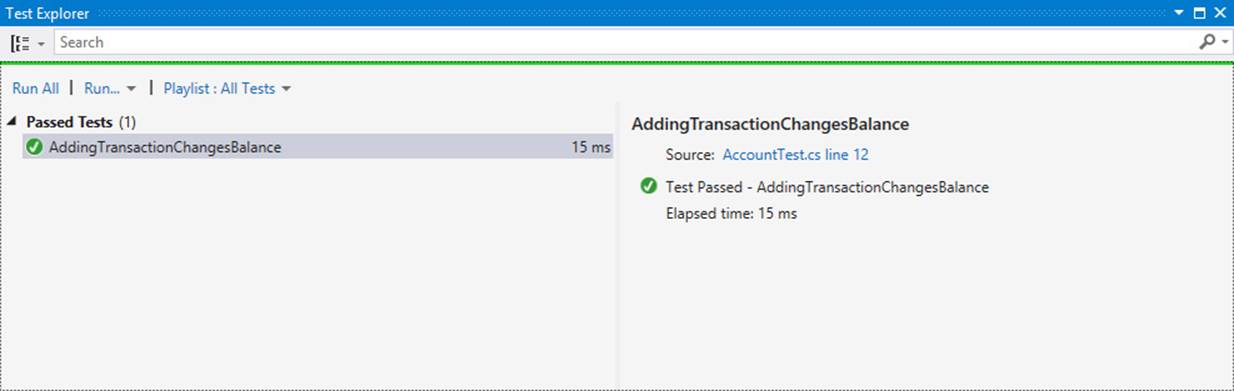
FIGURE 4-2 The test does, indeed, now pass—but is it correct?
Before you pat yourself on the back and move on to the final refactoring phase, you should assess whether this is the correct way to implement the expected behavior that the test specified. You can prove that it is not the correct implementation by adding another expectation in the form of another unit test.
The test to be added defines the expected value for the Balance field given a newly created Account object. Recall how the expected value of the Balance field was calculated after a transaction of $200 was added to the account; it included the assumption that an unspecified opening balance was zero. This is an expected behavior, just like any other, and so you should write a test that asserts that your expectations of the code are correctly implemented. Listing 4-6 shows the AAA pattern applied to such a unit test.
LISTING 4-6 The Arrange part of this test is omitted.
[TestMethod]
public void AccountsHaveAnOpeningBalanceOfZero()
{
// Arrange
// Act
var account = new Account();
// Assert
Assert.AreEqual(0m, account.Balance);
}
First, notice that the name of the test method is again descriptive of the expected behavior that it asserts. In this case, though, the Arrange part of the unit test is blank, meaning that this part of the AAA syntax is optional. The part of the SUT that is being tested is the behavior of its default constructor, which is the only interaction with the SUT as part of the Act phase. The assertion, finally, codifies the previously stated assumption that a new Account will have a balance of 0m.
The fact that this unit test fails, even though the first unit test passes, indicates that the implementation of the expectations of the first unit test was erroneous. Figure 4-3 shows the output from the MSTest runner.
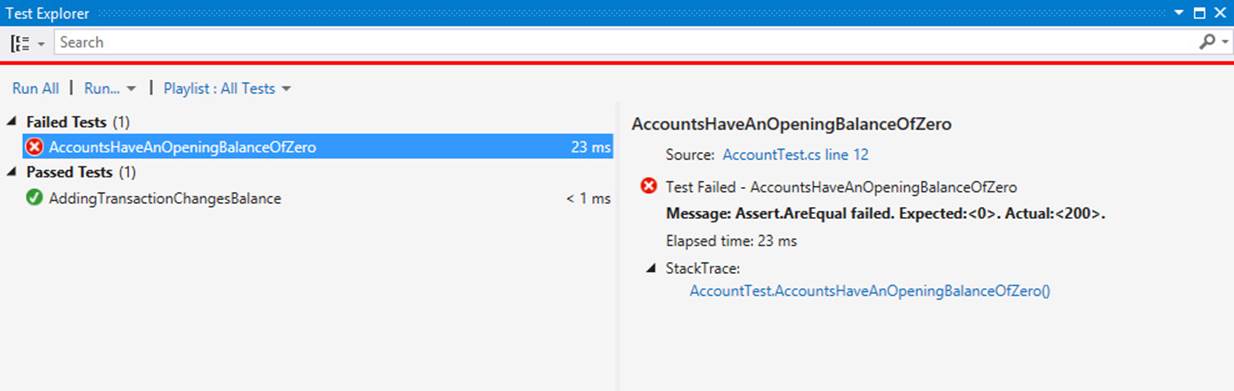
FIGURE 4-3 The second unit test fails because of the implementation of the first unit test’s expectations.
From this position, if you revert your previous changes to the Account class, you will transition your failing opening balance test from red to green, while correctly causing your adding transaction test to fail again. By doing this, you have proven that you have the correct implementation of the Account class for the opening balance test, but the wrong implementation for the adding transaction test.
The effect of adding each new test is that further constraints are created on viable implementations of the SUT. Each test carries with it an expectation of behavior, and each expectation requires balancing in the SUT. The alternative simplest possible implementation to ensure that both tests pass is shown in Listing 4-7.
LISTING 4-7 Both tests now pass with this implementation, but is it correct?
public class Account
{
public void AddTransaction(decimal amount)
{
Balance = 200m;
}
public decimal Balance
{
get;
private set;
}
}
The balance of a new account will now be zero on creation but will change to 200m when a call is made to AddTransaction. Of course, despite the fact that both tests now pass, intuition should tell you that this is absolutely wrong. The point of writing the simplest thing first—rather than jumping directly to the obvious correct solution—is to derive coded assertions from your intuition. Can you write another unit test that fails and proves that this implementation is not right? Listing 4-8 shows an example.
LISTING 4-8 This test is identical to the prior version but has a different amount value.
[TestMethod]
public void Adding100TransactionChangesBalance()
{
// Arrange
var account = new Account();
// Act
account.AddTransaction(100m);
// Assert
Assert.AreEqual(100m, account.Balance);
}
This test method does the same job as the first, which tested adding a transaction, but it adds a transaction of $100 rather than $200. Although the differentiating factor is small, it is sufficient to prove that the Account.AddTransaction method is wrong.
As expected, this new test fails. If you alter the Account class so that the value 100m is hardcoded into the AddTransaction method, you will fail the original test and transition this test from red to green. Instead, you can now implement the correct solution, as Listing 4-9 shows.
LISTING 4-9 All three tests pass with this implementation, but it is still wrong!
public class Account
{
public void AddTransaction(decimal amount)
{
Balance = amount;
}
public decimal Balance
{
get;
private set;
}
}
With this implementation in place and all three of your unit tests passing—all having previously failed—the sun is shining and everything is right in the world. Except that it isn’t! Again, the expectations of the AddTransaction method do not match up to the reality of the implementation. A fourth unit test highlights the problem, as Listing 4-10 shows.
LISTING 4-10 This unit test should finally help crack the AddTransaction method.
[TestMethod]
public void AddingTwoTransactionsCreatesSummationBalance()
{
// Arrange
var account = new Account();
account.AddTransaction(50m);
// Act
account.AddTransaction(75m);
// Assert
Assert.AreEqual(125m, account.Balance);
}
This test finally allows you to discover the absolutely right functionality of the AddTransaction method—at least for the moment. The point is that, with requirements changing and new features being added, you need to codify your expectations of your classes so that you can fall back on existing unit tests, which form a safety net. Without this, you could easily make a change to your code that appears to work in the narrow circumstances under which you are manually testing it, but that breaks under unusual input or breaks something ostensibly unrelated elsewhere.
The test you have added asserts that an account’s balance is the summation of all of its transactions. Previously, your most correct implementation would set the balance to the value of the last transaction that occurred, meaning that this test will fail and your implementation is not yet right.Listing 4-11 shows the implementation of the AddTransaction method that allows all four unit tests to pass.
LISTING 4-11 This implementation is so far the best for AddTransaction.
public class Account
{
public void AddTransaction(decimal amount)
{
Balance += amount;
}
public decimal Balance
{
get;
private set;
}
}
After the transition from red to green for each unit test, you had the opportunity to refactor the implementation of the SUT, but this example was very simple. This phase of the process becomes more important with each new method added to the SUT. Refactoring in this manner is covered in more detail later in this chapter.
More complex tests
The previous example involved unit testing a class that forms part of the domain model of an application in a test-first manner. As described in Chapter 2, “Dependencies and layering,” the domain model is an implementation of a business logic layer that sits between the user interface and the data access layers.
Specification
For the next set of tests, which build on this Account class, you will test a different part of the business logic layer: a service. The user interface for this hypothetical application could be tethered to any framework—ASP.NET MVC, Windows Presentation Foundation (WPF), or Windows Forms—and your service should be reusable regardless of the framework. This means that the service will contain no dependency specific to any of these frameworks, but it will depend on the Account class, though indirectly. Figure 4-4 shows the dependencies between the layers and classes that will form this example.
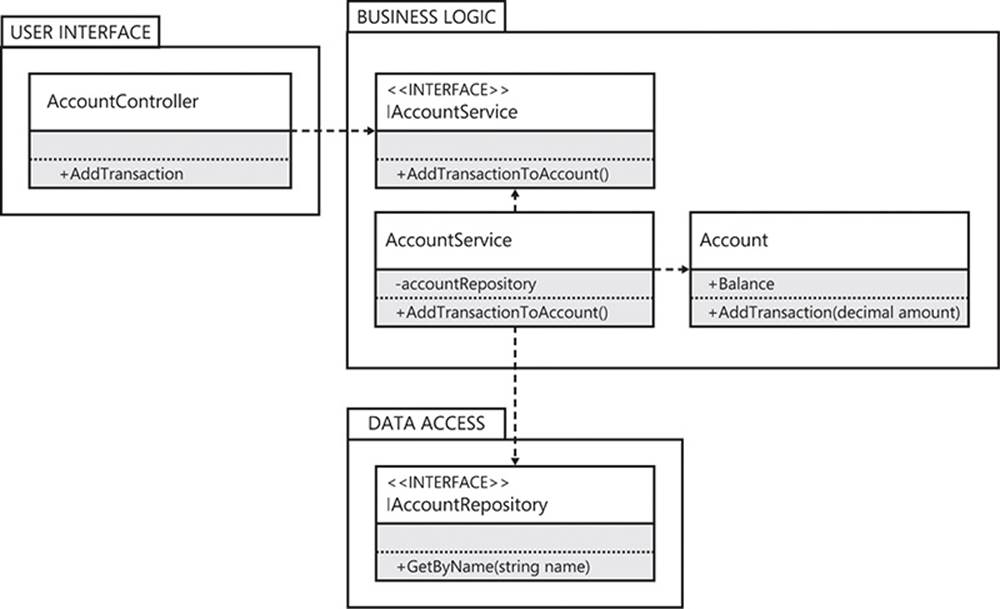
FIGURE 4-4 The dependencies and implementations that form the subsystem you will now test.
The Unified Modeling Language (UML) diagram shows the three packages that make up the three-layered architecture that you will create. The user interface will contain Model-View-Controller (MVC) controllers, although these could be view models or presenters for Model-View-ViewModel (MVVM) or Model-View-Presenter (MVP), respectively. Specifically, the AccountController will have a handler for the user interface action of adding a transaction to an account. This controller has a dependency on the interface of the AccountService that you are preparing to implement.
The AccountService lives in the business logic layer, along with its interface and the domain model, represented by the Account class that was previously implemented. Note that the packages represent the logical layers of the application, as opposed to mapping directly to Visual Studio projects and, therefore, to assemblies. This means that you are still preferring the Stairway pattern over the Entourage anti-pattern. The AccountService will require some way to retrieve Account instances from whichever persistent storage you are using. Because you are using a domain model in the business logic layer, the data access layer is implemented by using an Object/Relational Mapper (ORM).
A repository interface is used to hide the specific persistence logic from client code. The IAccountRepository is responsible for returning Account instances. The service depends on this interface because it will need to retrieve an account as part of its implementation.
Designing the test
The tests for the AccountService.AddTransactionToAccount method are written by using TDD and AAA, exactly as before. First, you need to think of what to expect of the method: that it delegates to the correct Account instance’s AddTransaction method, passing in the correct value for the transaction amount. Let’s specify the Arrange, Act, and Assert phases:
![]() Arrange Ensure that there is an available instance of the SUT—the AccountService class.
Arrange Ensure that there is an available instance of the SUT—the AccountService class.
![]() Act Call the AddTransactionToAccount method.
Act Call the AddTransactionToAccount method.
![]() Assert The SUT calls the AddTransaction method on an Account instance, passing in the correct amount value.
Assert The SUT calls the AddTransaction method on an Account instance, passing in the correct amount value.
Listing 4-12 shows a first attempt at writing this test.
LISTING 4-12 The first attempt at this new test is incomplete.
[TestClass]
public class AccountServiceTests
{
[TestMethod]
public void AddingTransactionToAccountDelegatesToAccountInstance()
{
// Arrange
var sut = new AccountService();
// Act
sut.AddTransactionToAccount("Trading Account", 200m);
// Assert
Assert.Fail();
}
}
Everything looks fine until you get to the assertion. The assertion is that a certain method is called on an object and a particular value is passed in, but how do you assert that? This is where mocks come in.
Testing with fakes
The first requirement before you can write your assertion is an Account instance to assert against. The IAccountRepository interface will be used by the AccountService to retrieve the Account that it will interact with, so you cannot just give the AccountService such an instance. Instead, you need to give the AccountService an IAccountRepository—but you do not have any implementations available. Because you depend on interfaces, instead of classes, you can write a fake implementation of an interface that will be sufficient only for the test.Listing 4-13 shows such a class, which lives in the unit testing assembly.
LISTING 4-13 A very simple implementation of a repository that is only for testing purposes.
public class FakeAccountRepository : IAccountRepository
{
public FakeAccountRepository(Account account)
{
this.account = account;
}
public Account GetByName(string accountName)
{
return account;
}
private Account account;
}
You can now edit your account service implementation so that you can provide this fake repository. Listing 4-14 shows the new implementation of the AccountService class.
LISTING 4-14 The present state of the account service class.
public class AccountService : IAccountService
{
public AccountService(IAccountRepository repository)
{
this.repository = repository;
}
public void AddTransactionToAccount(string uniqueAccountName, decimal
transactionAmount)
{
}
private readonly IAccountRepository repository;
}
The unit test can now be completed, with new Arrange criteria:
![]() Ensure that there is an Account instance available to assert against.
Ensure that there is an Account instance available to assert against.
![]() Ensure that there is a fake IAccountRepository instance available to pass to the service on construction.
Ensure that there is a fake IAccountRepository instance available to pass to the service on construction.
These criteria, and the correct assertion, form the failing test in Listing 4-15.
LISTING 4-15 This test fails for the right reasons: the service method is not yet implemented.
[TestClass]
public class AccountServiceTests
{
[TestMethod]
public void AddingTransactionToAccountDelegatesToAccountInstance()
{
// Arrange
var account = new Account();
var fakeRepository = new FakeAccountRepository(account);
var sut = new AccountService(fakeRepository);
// Act
sut.AddTransactionToAccount("Trading Account", 200m);
// Assert
Assert.AreEqual(200m, account.Balance);
}
}
First you create an account that has an opening balance of zero. You then create an instance of your fake account repository, passing into it your account. Because the fake implements the interface of an account repository, the fake can easily be passed to the AccountService class, your SUT.
After calling the method that is the target of the test, you then assert that the account has the expected balance of 200m. As demonstrated by Figure 4-5, this assertion fails because the target method has not yet been implemented.
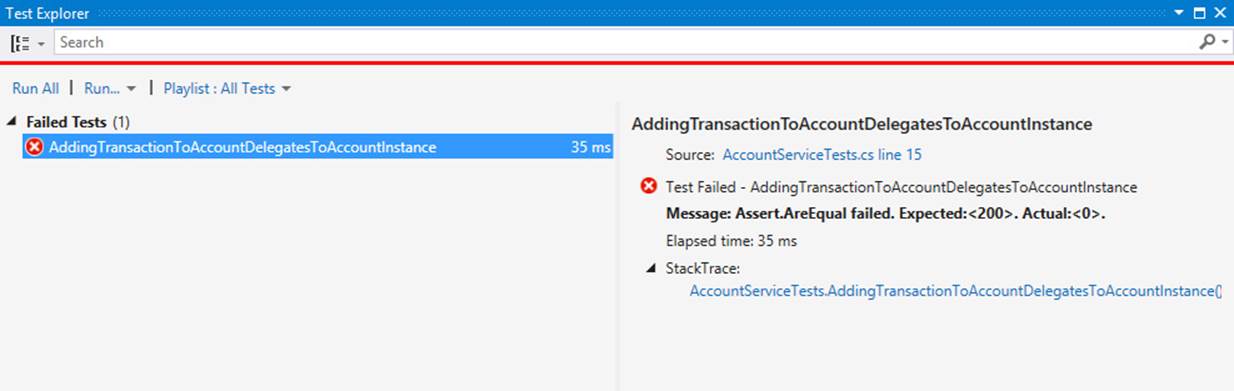
FIGURE 4-5 Continuing the red-to-green transition, you have your failing test.
Now that you have a unit test that specifies some behavior that is missing from your production code, you can do the simplest thing possible to make the unit test pass, as shown in Listing 4-16.
LISTING 4-16 This implementation of the AccountService makes the test pass.
public class AccountService : IAccountService
{
public AccountService(IAccountRepository repository)
{
this.repository = repository;
}
public void AddTransactionToAccount(string uniqueAccountName, decimal
transactionAmount)
{
var account = repository.GetByName(uniqueAccountName);
account.AddTransaction(transactionAmount);
}
private readonly IAccountRepository repository;
}
The unit test has guided you into doing the right thing in this implementation. You had to use the repository to retrieve the account, and you had to call the AddTransaction method on that account to mutate the read-only Balance property. If anyone subsequently breaks this method so that it no longer matches the expectations set out in the unit test, you will know about it very quickly.
Testing with mocks
It requires little power of the imagination to realize that mocking by writing fakes can quickly become laborious. Imagine all of the permutations of unit tests that you might write, and all of the different interfaces that your SUTs might need. This is a lot of extra code just to support your unit test.
There is another way to mock the IAccountRepository, but it requires the use of an external mocking framework. One positive aspect of writing fakes is that you can write them in isolation without requiring any third-party dependencies. However, mocking frameworks are commonplace nowadays, and there are many to choose from. The following example uses one of the most popular: Moq. This is variously pronounced Moh-kyoo and Mok.
By using NuGet, you can quickly add your reference to Moq by searching for its package on the online feed. The magic behind Moq is that it can create dynamic proxies of any interface that you ask it to mock. You will edit your existing test to use a Moq mock instead of your manual fake, as shown in Listing 4-17.
LISTING 4-17 Mocking frameworks such as Moq allow you to create mocks very easily.
[TestMethod]
public void AddingTransactionToAccountDelegatesToAccountInstance()
{
// Arrange
var account = new Account();
var mockRepository = new Mock<IAccountRepository>();
mockRepository.Setup(r => r.GetByName("Trading Account")).Returns(account);
var sut = new AccountService(mockRepository.Object);
// Act
sut.AddTransactionToAccount("Trading Account", 200m);
// Assert
Assert.AreEqual(200m, account.Balance);
}
The changes to the test are highlighted in bold. Rather than instantiating your own fake repository, you now create a new Mock<IAccountRepository>() object. This object is very powerful and allows you to set all sorts of expectations and behavior on your mocked interfaces. This class does not implement your interface, so, unlike your fake, it is not directly a viable instance of the IAccountRepository. This is because the Common Language Runtime (CLR) does not allow classes to inherit from generic parameters. Instead, there is a composition relationship between the mock and the proxy instance that it creates. The Object property allows you to access the underlying mocked interface, which is passed in to the AccountService in this example.
Before you provide your mock to the SUT, you need to specify how it should behave. By default, Moq defines loose mocks, which means that all of their return values are default. The default for any reference type is null and this applies to the Account class. The alternative to the loose mock is the strict mock, which will throw an exception whenever it is faced with a method call or property access that you have not already specified. Neither of these options is what you need, so you have to set up some expected behavior manually.
The Setup method of a Mock instance is very clever. It accepts a lambda expression that provides an instance of the underlying mocked type as a context parameter. By calling a method on the type, you are effectively specifying that you want something to happen when the method is called, with the exact arguments provided. What you choose to specify depends on your test situation. Moq lets you set the following expectations on a method call:
![]() Call some other lambda expression.
Call some other lambda expression.
![]() Return a specific value.
Return a specific value.
![]() Throw a specified type of exception.
Throw a specified type of exception.
![]() Verify that this method was called.
Verify that this method was called.
For this test, you want the second option: return a specified value. The fluent interface of the Mock.Setup method call allows you to chain the call to the Returns method. This improves readability and reduces what is already becoming a rather large Arrange phase of the test. TheReturns method is given the Account instance that you have already created, and with this you have completed setting your expectations of this mock. In brief, you have given the mock the following instruction:
When the GetByName method is called for this IAccountRepository instance, and the account name provided is “Trading Account”, return this instance of the Account class.
When you run your test again it will pass, just as before, as proven by Figure 4-6.
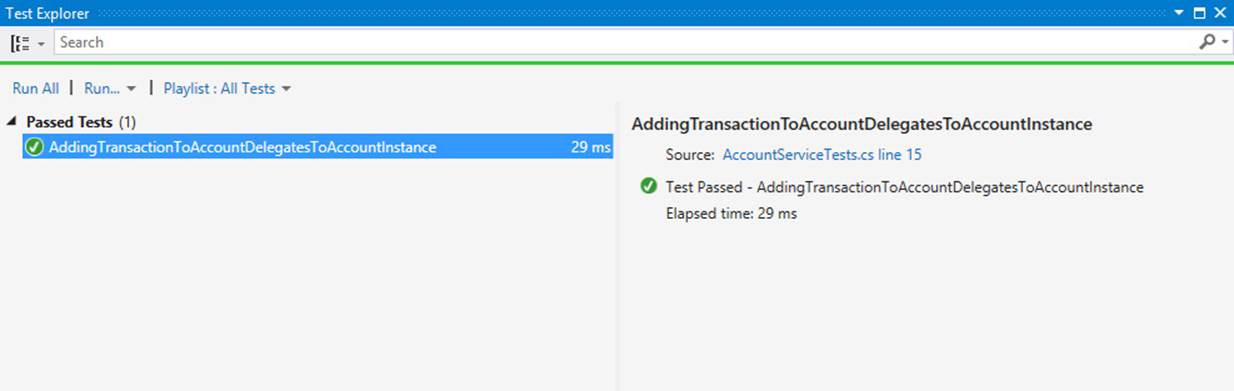
FIGURE 4-6 After being mocked with stubs, the test passes again.
Before you rejoice, you need to acknowledge that you have cheated. You have edited a unit test and not transitioned it from red to green. The test was already successful and, perhaps despite the change, it is still successful. In order to fail this test and then verify that it only passes as a result of a correctly implemented SUT, you should remove the code inside the AddTransactionToAccount method. When you do so, the test will pass, and reinstating the code causes the test to succeed. This is an important part of the unit test editing process that avoids false positives—that is, it prevents you from writing a test that succeeds despite not being implemented correctly.
Mocks and test over-specification
Testing with mocks is a common but potentially onerous practice. Tests that rely on mocks can easily become over-specified. An over-specified test is fragile, but you can avoid this fragility by changing what you assert. The problem arises when the test includes intimate knowledge of how the system under test (SUT) works. In other words, a test is over-specified when it has knowledge of the SUT’s implementation rather than its expected behavior.
A unit test that uses mocks might need to know how the SUT is implemented. However, you should always remember that a unit test is a specification of expected behavior, so you should avoid introducing tests against implementation details. Such details include calls to other interfaces on which the SUT might depend. If you assert that a method on an interface must be called, the test has become wedded not to a certain behavior but to a specific implementation.
Over-specified tests are undesirable because they prevent refactoring of the production code that they test. A suite of passing unit tests accompanying a method or class is a signal that the implementation of the method or class can be altered with impunity: the only way that the tests will fail is if the expected behavior of the code is broken. Over-specified tests do not provide such a guarantee, because they will fail if the implementation of the method or class has changed—even if the expected behavior remains intact.
There are two options for avoiding test over-specification when testing with mocks. The first is to test behavior only. State-based tests are the best example of testing expected behavior. If a method accepts data as input and returns altered data as output, the method can be treated as a black box for testing purposes. If the method accepts inputs A, B, and C and returns outputs X, Y, and Z, it is irrelevant to the test how it arrived at such answers. The method can then be refactored without breaking the unit tests.
The second option is less attractive but is sometimes the only option. You can treat the unit test and the implementation that it tests as one atomic unit: if one changes, so must the other. This is akin to accepting that the unit test is over-specified and planning to throw away the unit test along with the production implementation if a refactor is ever required. This isn’t quite as wasteful as it might seem. As you’ll see in Part II, “Writing SOLID code,” SOLID code yields smaller, more directed classes that are never altered anyway.
Further tests
Your first attempt at completing a working AccountService by using a TDD approach has been successful. There are potential problems that will require further tests to ensure that this method is much more robust. So far, you have tested only the Happy Path: the execution path through the code that yields no errors and causes no problems. There are a few gaps that need to be addressed:
![]() What if the account repository is a null reference?
What if the account repository is a null reference?
![]() What if the repository cannot find the account?
What if the repository cannot find the account?
![]() What if the account method throws an exception?
What if the account method throws an exception?
With each extra test that you write, you either uncover a defect that exists in your implementation (if the test fails) or you add extra confidence that your implementation is correct not only for the Happy Path, but also for error paths (if the test succeeds).
Under what circumstances might the account repository be a null reference? This will occur only if the AccountService is constructed with a null passed in as its constructor parameter. Because a valid account repository is a required dependency for the account service, you could say that this is a precondition of the constructor. Thus, you can write the test in Listing 4-18.
LISTING 4-18 No Arrange and no Assert, yet this is a valid test pattern for exceptions.
[TestMethod]
[ExpectedException(typeof(ArgumentNullException))]
public void CannotCreateAccountServiceWithNullAccountRepository()
{
// Arrange
// Act
new AccountService(null);
// Assert
}
This test is slightly different from the previous ones; the assertion is not in the usual place. MSTest requires you to apply the ExpectedExceptionAttribute to the test method with a parameter describing the type of exception that you require. What this test is specifying is that you expect an ArgumentNullException to be thrown if you construct an AccountService with a null reference for the IAccountRepository instance. This is precisely the precondition that you need, to ensure that in any method of the account service, you always have a valid instance of the repository and do not need to handle the case where it is null. This test fails for the right reasons, as shown here.
Test method ServiceTests.AccountServiceTests.CannotCreateAccountServiceWithNullAccountRepository
did not throw an exception. An exception was expected by attribute
Microsoft.VisualStudio.TestTools.UnitTesting.ExpectedExceptionAttribute defined on the test
method.
To make this test pass, you need to implement the precondition. The manual approach is shown in Listing 4-19.
LISTING 4-19 Passing a null account repository into the constructor will cause an exception.
public AccountService(IAccountRepository repository)
{
if (repository == null) throw new ArgumentNullException("repository", "A valid account
repository must be supplied.");
this.repository = repository;
}
The added line is in bold. This is an example of ensuring that you fail fast. Without this precondition, an exception would eventually have been thrown, but it would have been a NullReference-Exception and it would have occurred whenever you first tried to access the nullrepository.
With your constructor test passing, you can move on to the next test case: when the repository cannot find the account. Assume that your repository does not implement the Null Object pattern, which, as described in Chapter 3, “Interfaces and design patterns,” would mean that it never returned a null object or threw an exception if the repository could not find the account requested. Instead, your repository should return a null reference for the account. Listing 4-20 shows the unit test that enforces the expected behavior for this case.
LISTING 4-20 No expected exception attribute and no assertion!
[TestMethod]
public void DoNotThrowWhenAccountIsNotFound()
{
// Arrange
var mockRepository = new Mock<IAccountRepository>();
var sut = new AccountService(mockRepository.Object);
// Act
sut.AddTransactionToAccount("Trading Account", 100m);
// Assert
}
The Assert phase of this test is blank, and there is no ExpectedException attribute, either. This is because your expectations are that there should not be an exception thrown during the Act phase of the test. If an exception is thrown at that point, the test fails. If an exception is not thrown—and there are no other assertions that could potentially fail—the test will pass, by default.
In the Arrange phase of the test, you mock the repository and pass it to the SUT (avoiding the precondition by providing a valid instance of the repository) but set up no expectations. This means that the call to IAccountRepository.GetByName() will return null. The next thing that you do with this return value is attempt to call Account.AddTransaction(). Because the instance is null, this causes a NullReferenceException and this test fails. To transition this test to green, you need to prevent this exception from being thrown in your method, asListing 4-21 shows.
LISTING 4-21 The if statement protects this method from a NullReferenceException.
public void AddTransactionToAccount(string uniqueAccountName, decimal transactionAmount)
{
var account = repository.GetByName(uniqueAccountName);
if (account != null)
{
account.AddTransaction(transactionAmount);
}
}
By adding a simple if statement that ensures that the account is not null before attempting to use it, you prevent the exception from being thrown, and the test passes.
The final extra test case required involves the behavior expected of the account service when the call to the account’s AddTransaction method throws an exception. To avoid leaking dependencies between layers, it is good practice to wrap an exception thrown at a lower layer in a new exception for this layer. Figure 4-7 exemplifies this principle.
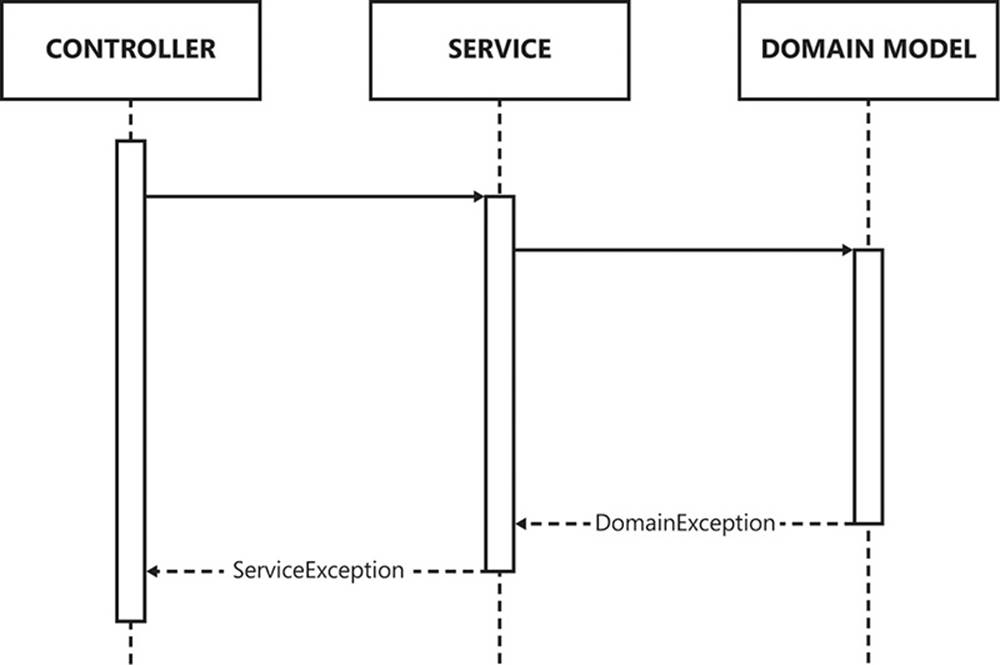
FIGURE 4-7 Each layer defines an exception type for wrapping exceptions at lower levels.
The exceptions that the domain model throws will be specific to that layer. If the service layer allows this to propagate up to the controller, the controller will have to have knowledge of the Domain-Exception type to effectively catch and handle these exceptions. This introduces a dependency between the controller and the domain model layer, which you want to avoid. Instead, the service will catch the domain model exceptions and wrap them in ServiceException instances before throwing them up to the controller. Due to the controller’s dependency on the service layer, it is able to catch the exceptions that it defines. It is important to acknowledge that the ServiceException contains the DomainException as an inner exception—without this, you lose valuable context about why the original exception was thrown. Listing 4-22 shows the unit test required to enforce this behavior between your collaborating classes.
LISTING 4-22 The mock account is told to throw an exception when called.
[TestMethod]
[ExpectedException(typeof(ServiceException))]
public void AccountExceptionsAreWrappedInThrowServiceException()
{
// Arrange
var account = new Mock<Account>();
account.Setup(a => a.AddTransaction(100m)).Throws<DomainException>();
var mockRepository = new Mock<IAccountRepository>();
mockRepository.Setup(r => r.GetByName("Trading Account")).Returns(account.Object);
var sut = new AccountService(mockRepository.Object);
// Act
sut.AddTransactionToAccount("Trading Account", 100m);
// Assert
}
The expected exception attribute is used to assert that the SUT throws a ServiceException, whereas the account mock is told to throw a DomainException. Therefore, it is up to the SUT to convert one to the other. Your method is not currently doing this, so this test correctly fails, as shown here.
Test method ServiceTests.AccountServiceTests.AccountExceptionsAreWrappedInThrowServiceException
threw exception Domain.DomainException, but exception Services.ServiceException was expected.
Exception message: Domain.DomainException: Exception of type 'Domain.DomainException' was
thrown.
The expected exception attribute has determined that the exception thrown is not of the correct type compared to that which was specified. The code in Listing 4-23 shows the changes required to the AddTransactionToAccount method.
LISTING 4-23 The try/catch block is introduced to map one exception with another.
public void AddTransactionToAccount(string uniqueAccountName, decimal transactionAmount)
{
var account = repository.GetByName(uniqueAccountName);
if (account != null)
{
try
{
account.AddTransaction(transactionAmount);
}
catch(DomainException)
{
throw new ServiceException();
}
}
}
Although the introduction of the try/catch block transitions your test from red to green, there is an expectation missing, which means that this is still incomplete.
Writing tests for defect fixes
Imagine that you receive a defect report relating to the current example code. The report states:
I received a ServiceException when adding a transaction to my account.
You proceed to reproduce the problem and discover the exception that is thrown—this is the proximate cause. But, because the DomainException has been replaced with the ServiceException, it is very difficult to understand the ultimate cause of the error. Your original expectation that the new exception should wrap the existing one has not been fulfilled because you missed an assertion in your unit tests.
When a defect arises in this manner, the first thing you should do is to write a failing unit test that captures two things: the exact reproduction steps required to force the defect to occur, and the expected behavior that is not currently enforced. Listing 4-24 shows both of these elements in a unit test that fails.
LISTING 4-24 You are now manually asserting against the thrown exception.
[TestMethod]
public void AccountExceptionsAreWrappedInThrowServiceException()
{
// Arrange
var account = new Mock<Account>();
account.Setup(a => a.AddTransaction(100m)).Throws<DomainException>();
var mockRepository = new Mock<IAccountRepository>();
mockRepository.Setup(r => r.GetByName("Trading Account")).Returns(account.Object);
var sut = new AccountService(mockRepository.Object);
// Act
try
{
sut.AddTransactionToAccount("Trading Account", 100m);
}
catch(ServiceException serviceException)
{
// Assert
Assert.IsInstanceOfType(serviceException.InnerException, typeof(DomainException));
}
}
For this test, the ExpectedException attribute alone is insufficient. You need to examine the InnerException property of the thrown exception and assert that it is a DomainException. This proves that you have wrapped the domain exception, preserving the original error that occurred. All software defects can be viewed as the result of a missing unit test: an incomplete specification of expected behavior. Listing 4-25 shows how to make the test pass by editing the production code.
LISTING 4-25 The original exception is now wrapped properly by the new exception.
public void AddTransactionToAccount(string uniqueAccountName, decimal transactionAmount)
{
var account = repository.GetByName(uniqueAccountName);
if (account != null)
{
try
{
account.AddTransaction(transactionAmount);
}
catch(DomainException domainException)
{
throw new ServiceException("An exception was thrown by a domain object",
domainException);
}
}
}
By making this test pass, you can then go back and reproduce the original exception from the defect report and, this time, determine the ultimate cause of the problem.
Test setup
Let’s take stock of the tests you have written so far. Each has progressively become more complex, with more code required to set up your expectations. It would be nice if you could factor this out somewhere in order to clean up the tests and shorten them a little. MSTest, like other unit testing frameworks, allows you to write a special initialization method that will be called at the start of every test in your test class. This setup method can be called anything you want, but it must be tagged with the TestInitialize attribute.
The code to put into this method is the code common to nearly all of the unit tests: instantiating the mock objects. You can store mock objects as private fields in the class so that they are still available to each test. You can also do the same with the SUT, because that only requires the mock repository as a constructor parameter and its construction doesn’t depend on anything specific to each unit test. Listing 4-26 shows the changes required to the test class to support the setup method.
LISTING 4-26 The mock objects and the SUT can be constructed in a setup method.
[TestClass]
public class AccountServiceTests
{
[TestInitialize]
public void Setup()
{
mockAccount = new Mock<Account>();
mockRepository = new Mock<IAccountRepository>();
sut = new AccountService(mockRepository.Object);
}
private Mock<Account> mockAccount;
private Mock<IAccountRepository> mockRepository;
private AccountService sut;
}
With these objects constructed as part of a test initialization method, which is called individually for each test method, you can simplify some of the unit test code by removing this object construction. Listing 4-27 shows the changes made to the most recent unit test,AccountExceptionsAreWrappedInThrowServiceException.
LISTING 4-27 This test is a little shorter and a little easier to read.
[TestMethod]
public void AccountExceptionsAreWrappedInThrowServiceException()
{
// Arrange
mockAccount.Setup(a => a.AddTransaction(100m)).Throws<DomainException>();
mockRepository.Setup(r => r.GetByName("Trading Account")).Returns(mockAccount.Object);
// Act
try
{
sut.AddTransactionToAccount("Trading Account", 100m);
}
catch(ServiceException serviceException)
{
// Assert
Assert.IsInstanceOfType(serviceException.InnerException, typeof(DomainException));
}
}
Three lines might not be a huge amount of code to remove, but the cumulative effect on all of the unit tests is more readable code. You know that, by convention, any variable with the prefix mock will be a mocked object, whereas the variable sut is your system under test.
Refactoring
Your code will be more robust if you follow a TDD process that writes a failing unit test before moving on to implement the expected behavior. However, this code might not be as organized or understandable as it could be. There are many times during the course of writing code when you should stop writing unit tests and code, and instead focus on refactoring.
Refactoring is the process of improving the design of existing code—after it has already been written. Each refactor differs in size and scope. A refactor could be a small tweak to a variable name to aid clarity, or it could be a more sweeping architectural change such as splitting user interface logic from domain logic when the two have become inappropriately intimate.
Changing existing code
In the rest of this chapter, you are going to make incremental changes to a class that will, at every step, improve the code in some meaningful way. The Account class is the target for refactoring, but it has gained a new method since its previous use: CalculateRewardPoints. As with many companies, your clients want to reward customer loyalty through the accumulation of reward points. These points are earned by the customer depending on a variety of criteria. Listing 4-28 shows the new Account class.
LISTING 4-28 The new class tracks reward points in addition to the account’s balance.
public class Account
{
public Account(AccountType type)
{
this.type = type;
}
public decimal Balance
{
get;
private set;
}
public int RewardPoints
{
get;
private set;
}
public void AddTransaction(decimal amount)
{
RewardPoints += CalculateRewardPoints(amount);
Balance += amount;
}
public int CalculateRewardPoints(decimal amount)
{
int points;
switch(type)
{
case AccountType.Silver:
points = (int)decimal.Floor(amount / 10);
break;
case AccountType.Gold:
points = (int)decimal.Floor((Balance / 10000 * 5) + (amount / 5));
break;
case AccountType.Platinum:
points = (int)decimal.Ceiling((Balance / 10000 * 10) + (amount / 2));
break;
default:
points = 0;
break;
}
return Math.Max(points, 0);
}
private readonly AccountType type;
}
The most important changes to the class are summarized thus:
![]() A new property tracks the number of reward points that the customer has linked to this account.
A new property tracks the number of reward points that the customer has linked to this account.
![]() Each account has a type code that indicates the tier of the account: Silver, Gold, or Platinum.
Each account has a type code that indicates the tier of the account: Silver, Gold, or Platinum.
![]() Whenever a transaction is added to the account, the customer earns reward points.
Whenever a transaction is added to the account, the customer earns reward points.
![]() The number of reward points earned is dependent on multiple factors, which complicate the calculation method:
The number of reward points earned is dependent on multiple factors, which complicate the calculation method:
• The account type—more points are earned at higher tiers.
• The amount of the transaction—the more customers spend, the more points they earn.
• The current balance of the account—the Gold and Platinum tiers give customers more points for keeping their balance high.
Assuming that this code has been written alongside its unit tests, those tests will help greatly by ensuring that changes do not affect the specified behavior. This is an important point—refactoring changes the arrangement of the code, not the outcome. If you tried to refactor without unit tests, how would you know if you inadvertently broke the expected behavior? You would not fail fast but much later at run time during testing or, worse, after deployment.
Replacing “magic numbers” with constants
The first refactor is a simple but nonetheless important improvement to the readability of the code. There are a lot of “magic numbers” littering the CalculateRewardPoints method. Six distinct numbers are used without any context as to what they mean or why they are required. To the person who wrote the code, their significance might be obvious because that person has prior knowledge of what it all means. In reality, that will probably only be true for a week, perhaps two, before the person’s memory starts to fade and he loses track of what that 5, or that 2, means.Listing 4-29 shows the changes made to the class as a result of this refactor.
LISTING 4-29 This code is more readable to people unfamiliar with it.
public class Account
{
public int CalculateRewardPoints(decimal amount)
{
int points;
switch(type)
{
case AccountType.Silver:
points = (int)decimal.Floor(amount / SilverTransactionCostPerPoint);
break;
case AccountType.Gold:
points = (int)decimal.Floor((Balance / GoldBalanceCostPerPoint) + (amount
/ GoldTransactionCostPerPoint));
break;
case AccountType.Platinum:
points = (int)decimal.Ceiling((Balance / PlatinumBalanceCostPerPoint) +
(amount / PlatinumTransactionCostPerPoint));
break;
default:
points = 0;
break;
}
return Math.Max(points, 0);
}
private const int SilverTransactionCostPerPoint = 10;
private const int GoldTransactionCostPerPoint = 5;
private const int PlatinumTransactionCostPerPoint = 2;
private const int GoldBalanceCostPerPoint = 2000;
private const int PlatinumBalanceCostPerPoint = 1000;
}
Each of the “magic numbers” has been replaced with an equivalent variable. There is a set of three variables for the cost-per-point denominator of the transaction amount, one per account type. Then there are two variables for the cost-per-point denominator of the balance amount, for the Gold and Platinum account types, which are the only two account types that offer this incentive.
The benefit of this refactor is that the code is now understandable to people who are unfamiliar with it, because you have explained what the values mean through the variable names. It would not be an improvement if you merely replaced the “magic numbers” with variables named A, B, or X. Try to choose variable names that explain concisely their purpose. Never be afraid of verbosity, and take every opportunity to self-document code through variable, class, and method names.
Replacing a conditional expression with polymorphism
The next refactor is more involved. The switch statement, which alters the CalculateRewards algorithm depending on the account type, is problematic for two reasons. First, it adversely affects readability but, more pressingly, it introduces a maintenance burden. Imagine that you are given a new requirement at some time in the future: a new account type. It has been decided that not enough people are meeting the criteria for the Silver account, so you need to create a new Bronze account. To add the Bronze account, you would need to edit the Account class and add tests to it. Editing existing code in this way, after it has been verified and deployed, should be avoided. Instead, you should look to other ways that you can extend code so that it is adaptable without being editable.
What you are aiming to achieve is to make it easier to add a new account type while improving the readability of the code. For this, you will take advantage of polymorphism. You will model the account types as different subclasses of the Account class. The Gold account type will be represented by the GoldAccount class, and the same is true of the SilverAccount and PlatinumAccount.
The first step is to define these classes, as shown in Listing 4-30.
LISTING 4-30 Each account type is now a distinct class.
public class SilverAccount
{
public int CalculateRewardPoints(decimal amount)
{
return Math.Max((int)decimal.Floor(amount / SilverTransactionCostPerPoint), 0);
}
private const int SilverTransactionCostPerPoint = 10;
}
// ...
public class GoldAccount
{
public decimal Balance
{
get;
set;
}
public int CalculateRewardPoints(decimal amount)
{
return Math.Max((int)decimal.Floor((Balance / GoldBalanceCostPerPoint) + (amount /
GoldTransactionCostPerPoint)), 0);
}
private const int GoldTransactionCostPerPoint = 5;
private const int GoldBalanceCostPerPoint = 2000;
}
// ...
public class PlatinumAccount
{
public decimal Balance
{
get;
set;
}
public int CalculateRewardPoints(decimal amount)
{
return Math.Max((int)decimal.Ceiling((Balance / PlatinumBalanceCostPerPoint) +
(amount / PlatinumTransactionCostPerPoint)), 0);
}
private const int PlatinumTransactionCostPerPoint = 2;
private const int PlatinumBalanceCostPerPoint = 1000;
}
Note that, at this stage, the original Account class has not been changed. These classes have been created as stand-alone classes. The unit tests for these classes would mirror the expectations of the CalculateRewardPoints class, but with a different SUT for each account type. The algorithms for determining the reward points due on the Platinum and Gold classes have a dependency on the current balance; that has been included so that these classes compile in isolation. The Balance property is also publically settable, which enables unit testing with different values. The UML class diagram in Figure 4-8 explains how these classes are related.
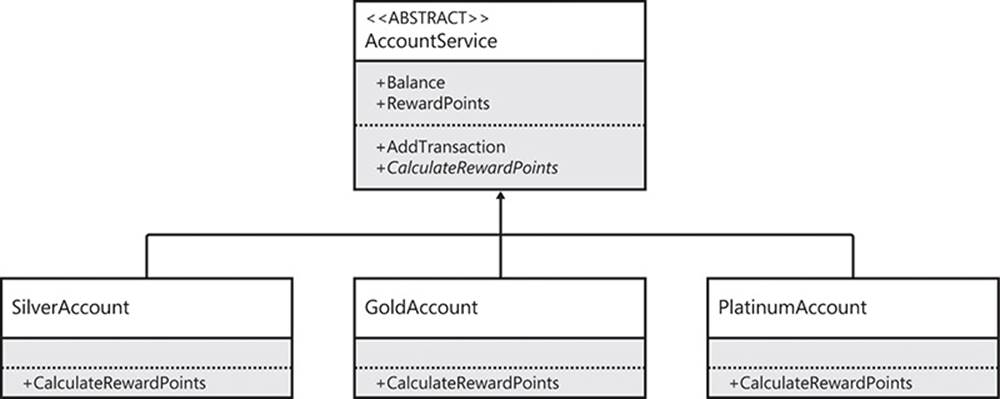
FIGURE 4-8 The Account class will become abstract with an abstract CalculateRewardPoints method.
This is merely an objective on the way to completing the goal of replacing the switch statement, of course. It is important not to do too much all at once, so that you can verify that you are on the right track with a succession of smaller changes. The next change, in Listing 4-31, is to link all four classes into an inheritance hierarchy.
LISTING 4-31 The complexity has been removed from the Account class.
public abstract class AccountBase
{
public decimal Balance
{
get;
private set;
}
public int RewardPoints
{
get;
private set;
}
public void AddTransaction(decimal amount)
{
RewardPoints += CalculateRewardPoints(amount);
Balance += amount;
}
public abstract int CalculateRewardPoints(decimal amount);
}
Without the switch statement, there is no reason for this class to be aware of its “type” anymore, so the constructor has been removed, too. The class is abstract due to the abstract calculation method, but this means that you can no longer instantiate it and, consequently, you can no longer test it.
An object instance is needed for the unit tests to work, so the next step is to link the three account types as subclasses of this base. A useful naming convention—along with prefixing interface names with a capital I—is to suffix abstract classes with Base. This a quick clue that the class cannot be instantiated and has associated subclasses.
When the three subclasses are created, you can remove the Balance property from the Gold-Account and PlatinumAccount because they will inherit the Balance and AddTransaction members from this base. Listing 4-32 shows all three classes after this step.
LISTING 4-32 Completing the refactor by inheriting from the base class.
public class SilverAccount : AccountBase
{
public override int CalculateRewardPoints(decimal amount)
{
return Math.Max((int)decimal.Floor(amount / SilverTransactionCostPerPoint), 0);
}
private const int SilverTransactionCostPerPoint = 10;
}
// . . .
public class GoldAccount : AccountBase
{
public override int CalculateRewardPoints(decimal amount)
{
return Math.Max((int)decimal.Floor((Balance / GoldBalanceCostPerPoint) + (amount /
GoldTransactionCostPerPoint)), 0);
}
private const int GoldTransactionCostPerPoint = 5;
private const int GoldBalanceCostPerPoint = 2000;
}
// . . .
public class PlatinumAccount : AccountBase
{
public override int CalculateRewardPoints(decimal amount)
{
return Math.Max((int)decimal.Ceiling((Balance / PlatinumBalanceCostPerPoint) +
(amount / PlatinumTransactionCostPerPoint)), 0);
}
private const int PlatinumTransactionCostPerPoint = 2;
private const int PlatinumBalanceCostPerPoint = 1000;
}
The refactor is now complete. From this point, it is easy to add a new account type by creating a subclass of the AccountBase and providing an implementation of the required CalculateRewardPoints method. No existing code would have to be changed; you would just have to write a few unit tests to exercise the new algorithm for calculating reward points.
Replacing a constructor with a factory method
During the course of improving the Account class, there has probably been an adverse effect elsewhere in the code. Clients of the class were expecting to construct the account objects by using the Account constructor, and to pass in the type of account required. What will you now provide them by way of creating the correct account subclass for their situation?
The AccountType enumeration can be reused as a parameter to a new factory method on the AccountBase. Whereas a constructor, in conjunction with the new operator, returns an instance of the type in which it resides, a factory method is able to return many different types of object, all of which belong to the same inheritance hierarchy. Listing 4-33 shows such a factory method implemented on the base class.
LISTING 4-33 The switch statement returns, but in simplified form.
public abstract class AccountBase
{
public static AccountBase CreateAccount(AccountType type)
{
AccountBase account = null;
switch(type)
{
case AccountType.Silver:
account = new SilverAccount();
break;
case AccountType.Gold:
account = new GoldAccount();
break;
case AccountType.Platinum:
account = new PlatinumAccount();
break;
}
return account;
}
}
There are two key features of the factory method that alleviate the burden on clients. First, it is static, meaning that clients call it on the type, rather than on an instance of that type. Second, the return type is the base class, allowing you to hide the subclass accounts from clients. In fact, you can hide them to the degree that they are internal and therefore invisible outside of this assembly. This disallows clients from directly constructing the subclasses, eliminating the new operator as a potential code smell. Listing 4-34 compares how a client would interact with the account before and after the refactor.
Although a switch statement still remains, it is far simpler in this instance and facilitates the prior refactor where it was replaced with polymorphism.
LISTING 4-34 How the AccountService creates a new account before and after the refactor.
public void CreateAccount(AccountType accountType)
{
var newAccount = new Account(accountType);
accountRepository.NewAccount(newAccount);
}
// . . .
public void CreateAccount(AccountType accountType)
{
var newAccount = AccountBase.CreateAccount(accountType);
accountRepository.NewAccount(newAccount);
}
This code is an example of how a client—in this case, the AccountService—would construct a new account before and after the refactor. The difference is negligible, but note that the new operator has been removed and replaced with the static call to the factory method. This is a common way to replace something very rigid with something much more adaptive. Factory methods open up many more possibilities because of what they can return, compared to methods that always return the same type.
Observant readers will note that the choice of a static factory method is suboptimal—it is a skyhook rather than a crane and thus affects the testability and adaptability of the code. A better implementation would place the CreateAccount method on a suitable interface, as explored in the next section.
Replacing a constructor with a factory class
There is an alternative to the factory method: the factory class. In fact, you do not need to couple clients to the implementation of a stand-alone factory, you can just give them the interface, as in Listing 4-35.
LISTING 4-35 The account factory hides the implementation details of creating an account instance.
public interface IAccountFactory
{
AccountBase CreateAccount(AccountType accountType);
}
The interface of the method is actually identical to that of the factory method, except for the fact that it is an instance method. The implementation could be identical to the previous method body, meaning that it has perfect knowledge of all of the different types of account. TheAccountService, and other clients, would then require this interface as a constructor parameter, as shown in Listing 4-36.
LISTING 4-36 The service now receives a factory as a constructor parameter and uses it to create the account.
public class AccountService
{
public AccountService(IAccountFactory accountFactory, IAccountRepository
accountRepository)
{
this.accountFactory = accountFactory;
this.accountRepository = accountRepository;
}
public void CreateAccount(AccountType accountType)
{
var newAccount = accountFactory.CreateAccount(accountType);
accountRepository.NewAccount(newAccount);
}
private readonly IAccountRepository accountRepository;
private readonly IAccountFactory accountFactory;
}
This service is starting to look as it should: an orchestration of more fine-grained interfaces designed to achieve a larger goal for the user interface layer. It is, for reasons of brevity and clarity, missing some guard clauses on the constructor, to prevent null dependencies, and some try/catch blocks on the CreateAccount method, to marshal domain exceptions to service exceptions.
A new account type
At this point, can you be confident enough that a request for a new account type results in minimal changes to existing code? Yes and no. In one case, you can trivially add an account, but in another, you will find that your current model makes some wrong assumptions that form technical debt.
A new reward account
Imagine that your client wants to add another kind of account—a Bronze account—that earns half of the reward points that the Silver account does. There are only two changes that need to be made to support this in the domain layer. First, you need to create a new subclass of theAccountBase class, as in Listing 4-37.
LISTING 4-37 The Bronze account is added as a new account type.
internal class BronzeAccount : AccountBase
{
public override int CalculateRewardPoints(decimal amount)
{
return Math.Max((int)decimal.Floor(amount / BronzeTransactionCostPerPoint), 0);
}
private const int BronzeTransactionCostPerPoint = 20;
}
This is a simple change that involves new unit tests to provide your expectations, and a new class that provides the algorithm for calculating reward points for this class.
Whether you have a factory class or a factory method, you need to change it to support your new account type, along with the enumeration that defines possible account types to be created. Listing 4-38 shows how a factory class would change to support the new Bronze account.
LISTING 4-38 The switch statement has a new case added to it that handles creating Bronze accounts.
public AccountBase CreateAccount(AccountType accountType)
{
AccountBase account = null;
switch (accountType)
{
case AccountType.Bronze:
account = new BronzeAccount();
break;
case AccountType.Silver:
account = new SilverAccount();
break;
case AccountType.Gold:
account = new GoldAccount();
break;
case AccountType.Platinum:
account = new PlatinumAccount();
break;
}
return account;
}
Before moving on to the next new account for the client, is there any way you can refactor this method so that you do not have to amend it for every account? You cannot use the refactor detailed earlier in the “Replacing a conditional expression with polymorphism” section, because this is a result of such a refactor. Instead, is there a way to construct an AccountBase from an accountType name without directly referencing each value and subclass? Listing 4-39 provides the answer.
LISTING 4-39 If the accounts follow a certain naming convention, this factory will suffice for all account subclasses.
public AccountBase CreateAccount(string accountType)
{
var objectHandle = Activator.CreateInstance(null, string.Format("{0}Account",
accountType));
return (AccountBase)objectHandle.Unwrap();
}
Note that the enumeration has been dropped in favor of a more flexible string value. This could be a problem, because any string value could be provided, rather than only those that match valid account types. Of course, this is the point of the exercise.
This sort of refactor is a little risky because it is in danger of creating a leaky abstraction of the factory—it might not work in all required scenarios. Several things have to be true before this sort of code is viable:
![]() Each account type must follow a naming convention of [Type]Account, where the [Type] prefix is the value of the enumeration.
Each account type must follow a naming convention of [Type]Account, where the [Type] prefix is the value of the enumeration.
![]() Each account type must be contained in the same assembly as this factory method.
Each account type must be contained in the same assembly as this factory method.
![]() Each account type must have a public default constructor—the types cannot be parameterized with any values.
Each account type must have a public default constructor—the types cannot be parameterized with any values.
Due to these constraints, this usually means that you have refactored too much, and it causes problems later when one of these constraints needs to be circumvented. Proceed with caution.
Code smell: Refused bequest
Sometime after the launch of the new reward card scheme, the client’s marketing department asks how many people are assigned to each account type. Your answer leads them to conclude that they have a 100-percent uptake in the reward card scheme: that every single customer has either a Bronze, Silver, Gold, or Platinum reward card. But this is not so. There was no provision made for creating an account that was not part of the reward card scheme, thus everyone was given a Bronze account by default. As a result of this conversation, another new account type is required: the Standard account.
This account serves a different purpose—it does not earn any reward points. There are two ways of modeling this. First, you can create a new AccountBase subclass, show in Listing 4-40, which does nothing in its CalculateRewardPoints override but return zero, effectively accumulating no points.
LISTING 4-40 A simple account without any reward point calculation.
internal class StandardAccount : AccountBase
{
public override int CalculateRewardPoints(decimal amount)
{
return 0;
}
}
The alternative solution is to acknowledge that not all accounts have reward points and, in fact, there are two different types in the domain model. In such a circumstance, rather than provide a “default implementation” for the CalculateRewardPoints method, the subclass effectivelyrefuses what the superclass has bequeathed to it—hence the code smell “refused bequest.” In the prior example, the StandardAccount has refused to implement the interface rather than to ignore it, whereas the next refactor will refuse the interface altogether.
Replacing inheritance with delegation
In practice, this means that you need to split the AccountBase class into two parts. Some of the interface will remain on the account, with some of it moving to a new class hierarchy to represent reward cards. In this way, the inheritance of accounts is replaced with delegation to reward cards.
The first change is to introduce a new IRewardCard interface to define the properties and behavior of each reward card, as shown in Listing 4-41.
LISTING 4-41 The reward points and their calculation have moved away from the Account class.
public interface IRewardCard
{
int RewardPoints
{
get;
}
void CalculateRewardPoints(decimal transactionAmount, decimal accountBalance);
}
Previously, these two members were part of the AccountBase class, but they have been moved out because they are wholly dependent on the presence of reward cards. Note that the interface of CalculateRewardPoints has changed in two ways. First, there is no longer a return value on this method, because it is expected to mutate the RewardPoints property directly. Second, you must pass in the account balance as a parameter to this method because it is no longer available. This is an important side effect of splitting the two objects up in this manner: any context not directly encapsulated by the reward card object will need to be handed to it. This might cause the interface of this method to change in the future.
Listing 4-42 shows the implementations of this interface for the Bronze and Platinum cards after the refactor.
LISTING 4-42 Examples of the reward card implementations.
internal class BronzeRewardCard : IRewardCard
{
public int RewardPoints
{
get;
private set;
}
public void CalculateRewardPoints(decimal transactionAmount, decimal accountBalance)
{
RewardPoints += Math.Max((int)decimal.Floor(transactionAmount /
BronzeTransactionCostPerPoint), 0);
}
private const int BronzeTransactionCostPerPoint = 20;
}
// . . .
internal class PlatinumRewardCard : IRewardCard
{
public int RewardPoints
{
get;
private set;
}
public void CalculateRewardPoints(decimal transactionAmount, decimal accountBalance)
{
RewardPoints += Math.Max((int)decimal.Ceiling((accountBalance / PlatinumBalanceCostPerPoint) + (transactionAmount / PlatinumTransactionCostPerPoint)), 0);
}
private const int PlatinumTransactionCostPerPoint = 2;
private const int PlatinumBalanceCostPerPoint = 1000;
}
These classes are very similar to their previous incarnation, with an extra local RewardPoints property.
As shown in Listing 4-43, the Account class is no longer abstract and therefore no longer requires the Base suffix. For construction, it accepts an IRewardCard instance and delegates to this when adding a transaction. Overall, this account looks more like it used to before the initial requirement for capturing reward points.
LISTING 4-43 Each account contains a reward card.
public class Account
{
public Account(IRewardCard rewardCard)
{
this.rewardCard = rewardCard;
}
public decimal Balance
{
get;
private set;
}
public void AddTransaction(decimal amount)
{
rewardCard.CalculateRewardPoints(amount, Balance);
Balance += amount;
}
private readonly IRewardCard rewardCard;
}
To model a Standard account—an account without a reward card—you can either pass in null for the reward card constructor dependency (and protect against a NullReferenceException by testing for null before delegating) or you can model a NullRewardCard. The latter would be an implementation of the Null Object pattern that would not accumulate any reward points when CalculateRewardPoints was called.
Conclusion
This chapter has been a hybrid of unit testing and refactoring because the two should be paired together and performed in tandem.
Each unit test you write should represent an expectation of the code that, ideally, should be communicable to a layperson. Although as code they are technical artifacts, unit tests enforce real-world behavior in objects, just as those objects encapsulate real-world concepts.
When you diligently follow a test-first approach, you write no new production code without first constructing a failing unit test. Then you write the simplest production code possible to transition the unit test from a red failure state to a green success state. Taken to its logical conclusion, the production code becomes a natural side effect of fulfilling the expectations of its unit tests.
When you unit test code, you give yourself a firm foundation to subsequently alter the production code to make it clearly more adaptive to future requirements. The refactoring of code is an incremental process of improving the code’s design. There are many options for refactoring, only some of which were explored in this chapter. Each option available might represent a tradeoff in one area for a certain improvement in another, and—as with many aspects of programming—the process is quite subjective.
With this chapter complete, the Agile foundation part of this book is closed. Next you will look at SOLID code and how it will help to further increase the adaptability of your code.