Beginning ASP.NET-4.5 in C# and VB (2013)
Chapter 19
Deploying Your Website
WHAT YOU WILL LEARN IN THIS CHAPTER:
- How to ease the deployment process through simple changes to your code and configuration
- How to publish your site from Visual Studio
- How to install and configure a web server and your website on your target machine
- How to avoid common errors you may get when deploying a site
- How to copy data stored in your SQL Server database to the target server
WROX.COM CODE DOWNLOADS FOR THIS CHAPTER
You can find the wrox.com code downloads for this chapter on the Download Code tab at www.wrox.com/go/begaspnet451. The code is in the Chapter 19 folder.
Congratulations! The fact that you’re reading this chapter probably means you now have a full-featured, database-driven ASP.NET website that is ready for release into the wild. It’s an exciting time for you and your project. Pretty soon your application will be used and judged by your target audience.
To make your website accessible to users worldwide, you need to publish it to a production server that is connected to the Internet. What kind of server this is and where it is located depends on your own requirements and budget. You can host the site on a home server in your attic with a private Internet connection (as I used to do with http://imar.spaanjaars.com) or you can host it with an external (and often commercial) party with a direct connection to the Internet backbone.
Either way, you need to do some work to get your site from its development location at C:\BegASPNET\Site to a location where it’s accessible over the Internet.
This chapter deals with a few topics related to successfully deploying your website. You learn about the process from preparing your site in the development environment to actually running and testing it at your production server.
The chapter then ends with a list of things you need to take care of when deploying your site. You can use this checklist to make sure you configure your production site in the most secure and optimal way.
PREPARING YOUR WEBSITE FOR DEPLOYMENTWhen you’re working on the first edition of your website in a development environment, managing the site and its source code is pretty straightforward. You have only a single version of the site’s source, making it easy to maintain. However, as soon as you put your site in production, you have two versions of it: one running in the production environment and the one you use for development. This makes it difficult to keep things synchronized. For example, you probably use a different database and connection string in your production environment. You’re also likely to use different e-mail addresses for the e-mail that is sent by the site. Finally, you may want to disable sending the error e-mails from the Global.asax files in a development environment. If you make all of these changes in the code directly when you put your site on a production server, there’s a fair chance that you’ll overwrite some settings during the next update, which can lead to unwanted results.
This section shows you how to make managing different versions of the same website a little easier. You see how to move some of the hardcoded settings, such as e-mail addresses, to the Web.config file. The code in your application then reads these values at run time. The only difference between your development and production environments is then a single configuration file, making it easy to have different settings in both environments. You’ll see later how you can let VS generate a Web.config file for the production environment.
So far, the pages and user controls you have built use some hard-coded settings for things like e-mail addresses. For example, ContactForm.ascx, the user control that sends out an e-mail, uses the following code to set the recipient and sender information:
VB.NET
myMessage.From = New MailAddress("you@example.com", "Planet Wrox")
myMessage.To.Add(New MailAddress("you@example.com", "Planet Wrox"))
C#
myMessage.From = New MailAddress("you@example.com", "Planet Wrox");
myMessage.To.Add(New MailAddress("you@example.com", "Planet Wrox"));
Hard-coding settings in this manner makes it difficult to give them different values in different environments. Every time you want to roll out your site to production, you need to make sure you’re not accidentally overwriting settings you changed for the production environment.
Fortunately, ASP.NET comes with a great solution to avoid these kinds of problems: the Web.config file, expression syntax, and the WebConfigurationManager class you use to read from Web.config.
You’ve used the Web.config file a number of times in this book to store information about connection strings, membership, roles and profile information, and more. You also briefly saw the <appSettings> element that enables you to store data in a key/value pair using<add> elements. The <appSettings> element enables you to store simple information, such as an e-mail address, and retrieve that value by its key. For example, to store an e-mail address, you can add the following to the Web.config file:
<appSettings> <add key="FromAddress" value="webmaster@example.com" /></appSettings>The <appSettings> element is placed outside the <system.web> element in the Web.config file, yet still within the parent <configuration> element.
Obviously, you need a way to access the data in <appSettings> at run time. You can do this in a couple of ways, including expression syntax and the WebConfigurationManager class, both of which are discussed next.
Expression syntax enables you to bind control properties to resources, such as those found in the <appSettings> element in Web.config, connection strings, localization resource files, and various routing settings used in URL rewrite scenarios. To display data from the<appSettings> element, you use the following syntax, where AppSettingKeyName refers to a key you define in Web.config:
<%$ AppSettings:AppSettingKeyName%>
For example, to display a copyright notice on your pages in a Literal control, you can add the following setting to Web.config:
<add key="Copyright" value="Copyright by Wrox" />You can then display this text in a Literal control like this:
<asp:Literal ID="Copyright" runat="server" Text="<%$ AppSettings:Copyright %>" />To make it even easier to set properties like Text as in the preceding example, Visual Studio comes with the Expression Editor. To access this dialog box, select a control in Design or Markup View, open its Properties Grid, and click the ellipsis for the (Expressions) item, shown in Figure 19-1. You may find that the (Expressions) item does not always show up when in Markup View. If that’s the case, switch to Split View or Design View first.
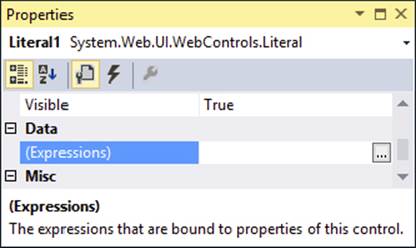
FIGURE 19-1
The Expressions dialog for the Literal control opens, enabling you to bind control properties to expressions. Visual Studio limits the list of properties of the control to those that can be bound using an expression. To bind the Text property of the Literal control to an application setting, first click Text on the left side of the dialog box, choose AppSettings from the Expression Type drop-down list on the right, and finally, choose the desired AppSetting from the drop-down list in the Expression Properties section. Figure 19-2 shows the complete Expressions dialog box for a Literal control used to display the copyright text.
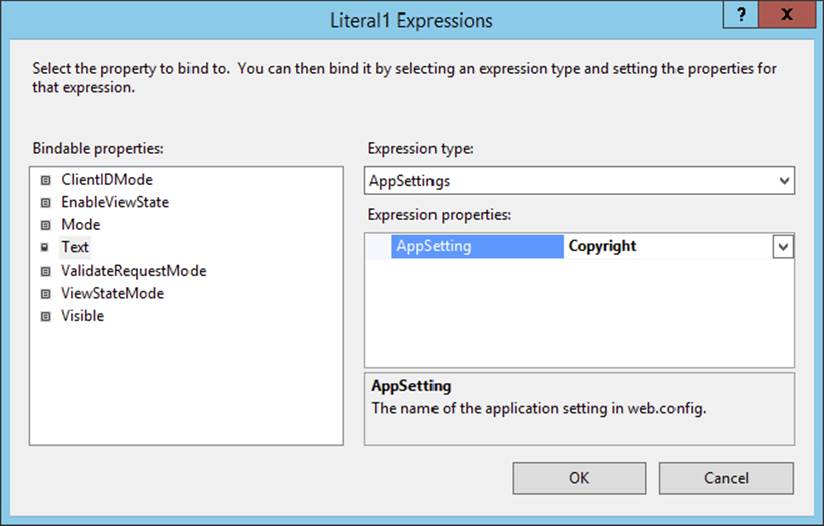
FIGURE 19-2
When you click OK, Visual Studio modifies the Text property of the Literal control so it contains a reference to the correct application setting.
Getting values from the Web.config using expression syntax is useful, but may not cover all your needs. Therefore, it’s good to know that you can retrieve the values programmatically as well. To do this, you can use the WebConfigurationManager class.
The WebConfigurationManager class from the System.Web.Configuration namespace provides access to data that is stored in configuration files. It has special support for the appSettings and connectionStrings elements of the Web.config file, enabling you to retrieve data from those sections with a single line of code. The following snippet shows you how to retrieve the FromAddress value you saw earlier from the <appSettings> element:
VB.NET
Imports System.Web.Configuration...Dim fromAddress As String = WebConfigurationManager.AppSettings.Get("FromAddress")C#
using System.Web.Configuration;...string fromAddress = WebConfigurationManager.AppSettings.Get("FromAddress");The Get method always returns data as a string, so you’ll need to convert it to a proper type if you’re expecting anything other than a string. For example, if you have stored a boolean value in Web.config like this:
<add key="SendMailOnError" value="true" />you need to use the following code to retrieve and convert the value:
VB.NET
Dim sendMail As Boolean = Convert.ToBoolean(WebConfigurationManager.AppSettings.Get("SendMailOnError"))C#
bool sendMail = Convert.ToBoolean(WebConfigurationManager.AppSettings.Get("SendMailOnError"));Although you can access the WebConfigurationManager class in the Code Behind of your Web Forms and user controls directly (provided you have imported the System.Web.Configuration namespace), I prefer to create static, read-only properties in a custom configuration class that accesses the Web.config file to get the values. You see how to do this in the following exercise.
In this Try It Out, you create a class with a few properties that get their values from the Web.config file. You then use the properties of this class in your code to replace the hard-coded values that were used earlier.
1. Inside the App_Code folder, create a new class file and call it AppConfiguration.vb or AppConfiguration.cs. In C#, remove the constructor code, shown in the following code block:
2.public AppConfiguration()
3.{
4.//
5.// TODO: Add constructor logic here
6.//
}Because the class is going to have static properties exclusively, you don’t need the constructor.
7. At the top of the class file, add an Imports/using statement for the System.Web.Configuration namespace:
VB.NET
Imports System.Web.ConfigurationC#
using System.Web.Configuration;8. Add a new Shared (static in C#), read-only property to this class that returns the FromAddress from the Web.config file. Recall from Chapter 5 that a Shared/static member (like a method or a property) operates on the class itself, and not on an instance of that class.
VB.NET
Public Class AppConfigurationPublic Shared ReadOnly Property FromAddress() As String
Get Dim result As String = WebConfigurationManager.AppSettings.Get("FromAddress") If Not String.IsNullOrEmpty(result) Then Return result End If Throw New Exception("AppSetting FromAddress not found in web.config file.") End Get End PropertyEnd ClassC#
public class AppConfiguration{public static string FromAddress
{ get { string result = WebConfigurationManager.AppSettings.Get("FromAddress"); if (!string.IsNullOrEmpty(result)) { return result; } throw new Exception("AppSetting FromAddress not found in web.config file."); } }}9. Repeat the previous step, but this time create the following three properties by creating a copy of FromAddress:
· FromName
· ToAddress
· ToName
Don’t forget to rename all three occurrences of FromAddress to the new property name.
10.Still inside the AppConfiguration class, create a boolean property called SendMailOnError:
VB.NET
Public Shared ReadOnly Property SendMailOnError() As Boolean Get Dim result As String = WebConfigurationManager.AppSettings.Get("SendMailOnError") If Not String.IsNullOrEmpty(result) Then Return Convert.ToBoolean(result) End If Throw New Exception( "AppSetting SendMailOnError not found in web.config file.") End GetEnd PropertyC#
public static bool SendMailOnError{ get { string result = WebConfigurationManager.AppSettings.Get("SendMailOnError"); if (!string.IsNullOrEmpty(result)) { return Convert.ToBoolean(result); } throw new Exception( "AppSetting SendMailOnError not found in web.config file."); }}11.When you’re ready with the five properties, save and close the AppConfiguration file.
12.Open the Code Behind of ContactForm.ascx in the Controls folder, locate the code that sets the From and To addresses, and replace the hard-coded values with their AppConfiguration counterparts:
VB.NET
myMessage.From = New MailAddress(AppConfiguration.FromAddress, AppConfiguration.FromName)myMessage.To.Add(New MailAddress(AppConfiguration.ToAddress, AppConfiguration.ToName))C#
myMessage.From = new MailAddress(AppConfiguration.FromAddress, AppConfiguration.FromName);myMessage.To.Add(new MailAddress(AppConfiguration.ToAddress, AppConfiguration.ToName));Notice how IntelliSense helps you pick the correct property of your AppConfiguration class.
13.This is also a good moment to delete the line of code that calls the Sleep method (near the end of the SendButton_Click method) that you added there in Chapter 10 to simulate a slow mail server. On your production site, you want this to go as fast as possible.
14.Save your changes and close the file.
15.Open the Global.asax file and wrap the entire code in Application_Error in an If check so the code only runs when SendMailOnError is set to True. Additionally, change the hard-coded e-mail addresses to use the FromAddress and ToAddress from theAppConfiguration class instead:
VB.NET
Sub Application_Error(ByVal sender As Object, ByVal e As EventArgs)If AppConfiguration.SendMailOnError Then
If HttpContext.Current.Server.GetLastError() IsNot Nothing Then ...Dim myMessage As MailMessage = New MailMessage(AppConfiguration.FromAddress,
AppConfiguration.ToAddress, mailSubject, message) ... End IfEnd If
End SubC#
void Application_Error(object sender, EventArgs e){if (AppConfiguration.SendMailOnError)
{ if (HttpContext.Current.Server.GetLastError() != null) { ...MailMessage myMessage = new MailMessage(AppConfiguration.FromAddress,
AppConfiguration.ToAddress, mailSubject, message); ... }}
}16.Open Web.config and add the following elements to the <appSettings> element. Change the e-mail addresses for FromAddress and ToAddress to your own:
17.<configuration>
18.<appSettings>
19....
20.<add key="FromAddress" value="planetwrox@example.com" />
21.<add key="FromName" value="Planet Wrox" />
22.<add key="ToAddress" value="planetwrox@example.com" />
23.<add key="ToName" value="Planet Wrox" />
24.<add key="SendMailOnError" value="true" />
...25.Save all your changes and press Ctrl+F5 to open the homepage in your browser. Go to the Contact page and fill in the contact form. You should receive an e-mail at the address you specified in the previous step.
26.Request a nonexistent page in your browser. For example, change the page name in the address in the browser’s address bar to DefaultTest.aspx. You should receive a “File Not Found” message and an e-mail with the exception details, just as in the preceding chapter.
27.Go back to Visual Studio, open Web.config, and change the setting for SendMailOnError from true to false:
<add key="SendMailOnError" value="false" />28.Save your changes, and again request a page that doesn’t exist. Because you changed the SendMailOnError setting, you shouldn’t get an e-mail with the exception details.
The properties of the AppConfiguration class look in the Web.config file for the requested application settings. When the setting is not defined or does not contain a value, each property throws an exception. This is useful to detect missing application settings at an early stage. Instead of silently returning an empty value, you now get an exception that reminds you to add the required application setting.
At run time, the code accesses these properties like this:
VB.NET
myMessage.From = New MailAddress(AppConfiguration.FromAddress, AppConfiguration.FromName)C#
myMessage.From = new MailAddress(AppConfiguration.FromAddress, AppConfiguration.FromName);Because the properties have been defined as Shared (static in C#), you can access them directly on the AppConfiguration class, without the need to create a new instance of AppConfiguration first.
Although you could access the <appSettings> element in Web.config directly in the code (for example, you could use WebConfigurationManager.AppSettings.Get("FromAddress") to get the e-mail address in ContactForm.ascx directly), it’s better to wrap the<appSettings> elements in shared properties in their own class. This solution gives you IntelliSense on the AppConfiguration class, making it easy to see what configuration properties are available. It also enables you to write centralized code that throws exceptions when the required application settings cannot be found or that supplies sensible defaults. Notice how the properties throw an exception only when a valid value cannot be returned. If you access Web.config directly in your own code, you need to check for valid values every time you access a setting.
The same principle is used for the SendMailOnError setting. When an exception occurs at run time, the code in Application_Error now consults the SendMailOnError property. This property in turn checks the <appSettings> element of Web.config to determine if an error message should be e-mailed. Because the SendMailOnError property is a boolean, the code uses Convert.ToBoolean to convert the string returned from the Web.config file into a boolean.
By storing values in Web.config instead of hard-coding them, your site becomes easier to maintain and deploy. When you go live, all you need to do is create a copy of Web.config for your production environment and change a few settings. This enables you to turn off error logging by e-mail on your development machine easily.
With the hard-coded application settings moved to the central Web.config file, the next step in the deployment process is optimizing your external CSS and JavaScript references.
Bundling and minification are two features that have been added to ASP.NET 4.5. Both are designed to improve the performance of your site by minimizing the number and size of your client CSS and JavaScript files. With bundling, the ASP.NET run time combines one or more CSS or JavaScript files into a single request. This minimizes the network overhead, as the browser needs to make fewer requests. Minification works by removing irrelevant code from these files. Combining these two techniques greatly enhances the performance of your site.
The cool thing about bundling and minification is that they are really simple to do, and require hardly any code. As an example, imagine you have two CSS files in your Styles folder called 1.css and 2.css. Without bundling and minification, you may have something like this in your master page:
<link href="Styles/1.css" rel="stylesheet" type="text/css" /><link href="Styles/2.css" rel="stylesheet" type="text/css" />To enable bundling and minification, you change these two lines into the following single line:
<link href="Styles/css" rel="stylesheet" type="text/css" />Notice that you no longer specify a filename after the folder name. Instead, you just specify a file extension — css in this case. This instructs the ASP.NET run time to take all files with a .css extension from the Styles folder, bundle them into a single response, and minify them by removing unnecessary content like whitespace and comments. This final result is then streamed to the browser, where it’s interpreted in exactly the same way as it was with the two separate files.
You can bundle and minimize JavaScript files the same way by specifying js as the file extension rather than css.
One problem with the previous code example is that the browser caches the result for the URL Styles/css. Even if you change the underlying CSS or JavaScript files, the browser may continue to use the old files. You can overcome this problem by creating aStyleBundle that collects all the CSS files in a particular folder which are then rendered as a single <link> element with a unique key for the files that is appended to the query string. As long as the files are unmodified on disk the same key is used, which tells the browser it’s safe to keep using a cached copy of the file. However, as soon as you change one of the files, the key changes as well, which in turn causes the browser to request a fresh copy of the bundle from the server. You see how this works in the next exercise.
Enabling bundling and minification in your ASP.NET website is a three-step process:
1. Install the Microsoft.AspNet.Web.Optimization.WebForms package using NuGet.
2. Enable bundling by writing some code in Global.asax.
3. Remove existing <link> and <script> elements pointing to CSS and JavaScript files and replace them with a single control per file type pointing at the correct source folder.
The current Planet Wrox website doesn’t benefit a lot from bundling and minification because the number of CSS and JavaScript files is quite low. In addition, the CSS for the site is placed in the Themes folder, which is not supported by the bundling and minification functionality.
However, to show you how to use bundling and minification in your own sites, where it may result in improved performance, in the following exercise you optimize a few style sheets you add to the Styles folder so their content is bundled and minified.
In this exercise, you add two new CSS files to the Styles folder. You then enable bundling and minification for this folder so you can see how this affects the CSS code that gets sent to the client.
1. Create a new folder called Styles in the root of your site. You may already have this folder from earlier exercises in this book, in which case you can skip this step.
2. Install the Microsoft.AspNet.Web.Optimization.WebForms package. To do this, choose Tools ⇒ Library Package Manager ⇒ Package Manager Console and run the following command:
Install-Package Microsoft.AspNet.Web.Optimization.WebForms3. Open up your Global.asax file and at the top of the file, below the Import statement for the System.Net.Mail namespace, add the following Import statement:
<%@ Import Namespace="System.Web.Optimization" %>4. In the Application_Start event handler in the same file, add the following code below the line that creates the ScriptResourceDefinition:
VB.NET
BundleTable.Bundles.Add(New StyleBundle("~/StyleSheets"). IncludeDirectory("~/Styles", "*.css"))C#
BundleTable.Bundles.Add(new StyleBundle("~/StyleSheets"). IncludeDirectory("~/Styles", "*.css"));The path (~/StyleSheets) that is being passed to the StyleBundle’s constructor is the virtual path to which the bundle is going to respond. You can make up your own path as long as it doesn’t map to an existing folder on disk (for example, don’t use~/Styles, as that folder exists).
5. Open the Frontend master page and right before the closing <head> tag add the following code:
6.<webopt:bundlereference runat="server" path="~/StyleSheets" />
</head>7. Add a new CSS file to your Styles folder and call it Test1.css. Remove the existing code and add the following code to underline all headings at level one:
8.h1
9.{
10.text-decoration: underline;
}11.Add another CSS file to your Styles folder and call it Test2.css. Remove the existing code and add the following code to change the color of all headings at level one to green:
12.h1
13.{
14.color: Green;
}15.Open up Web.config, locate the <compilation> element, and set the debug attribute to false.
16.Save all your changes and request the homepage in your browser. Notice how the heading is now underlined and green.
17.Open the HTML source for the page in the browser and locate the <link> element near the opening <body> tag. It should look similar to this:
18.<link href="/StyleSheets?v=pEehzO8qi6qpAx9iydIGYPTpID2z0pdm3I0s0GMzTv41"
rel="stylesheet"/>The v parameter ensures that the browser always gets a fresh copy of the page if you make a change to the underlying CSS files. The exact value for the v parameter will be different on your machine.
19.Request the URL set in the href attribute in your browser directly. Your browser’s address bar should look similar to this (all on one line):
http://localhost:8631/StyleSheets?v=pEehzO8qi6qpAx9iydIGYPTpID2z0pdm3I0s0GMzTv41
The CSS code you see should look similar to this:
h1{text-decoration:underline}h1{color:green}20.Go back to VS and delete Test2.css from the Styles folder.
21.Request the homepage in your browser again. The heading should still be underlined, but the green font has now gone.
22.Repeat steps 10 and 11 and notice how both the query string parameter and the CSS have changed to reflect the deleted style sheet.
23.Go back to Web.config, set the debug attribute back to true, save your changes, and reload the page in the browser. Open the HTML source for the page once more, and notice how Test1.css is now referenced directly, bypassing the bundling mechanism.
When ASP.NET encounters a request for a folder followed by a file extension (for example, /Styles/css or /Scripts/js), it takes all files with the extension in the folder, combines them into a single file, and then optimizes the code by removing unneeded code such as comments and irrelevant whitespace. The result of this operation is streamed back to the browser as a single file. To overcome caching issues, you don’t point to /Styles/css from your server code directly. Instead, you add a new StyleBundleto the Bundles collection in the Global.asax’s Application_Start event handler and specify a virtual path that will render the style sheets. The IncludeDirectory method then scans the requested folder (~/Styles) for the specified files (all files with a .cssextension), which are bundled and minified and streamed back to the browser whenever a request for the virtual path StyleSheets is made. ASP.NET adds a v parameter to the path with a cache key so the browser can cache the resulting CSS file. When the underlying files change (or when you delete or add files to the Styles folder), the cache key changes as well, which causes the browser to fetch a fresh copy from the server.
Notice how in the final CSS from step 9 the underline property comes first. The standard logic for the bundling mechanism is to put files in alphabetical order. Some exceptions to this rule exist. For example, known frameworks such as jQuery that other code may depend on are included first to avoid dependency issues.
The control you added to the Master page is part of the Optimization package and provides an easy way to render the resulting CSS file. When you installed the package, the Web.config was updated as well to register the webopt prefix, similar to how you registered your own Wrox prefix earlier in this chapter:
<add assembly="Microsoft.AspNet.Web.Optimization.WebForms" namespace="Microsoft.AspNet.Web.Optimization.WebForms" tagPrefix="webopt" />Bundling and minification is only active when debugging is turned off in the Web.config file. This makes it easy to debug your CSS files during development, while a single, optimized file is streamed to the browser in your production environment.
Bundling and minification are fully extensible, meaning you can fully customize the way the files are included and minified. For more information, check out this blog post: http://tinyurl.com/c63reut.
Now that you have seen how you optimize your site for the way CSS and script references are handled, the next step is to publish your site.
PREPARING FOR DEPLOYMENTDuring development of your site, you use IIS Express, which ships with Visual Studio. Although this server is great for local development, it’s not designed to be used in a production environment. To put your site in production, you need to deploy it to a machine that runs the full version of Internet Information Services (IIS), Microsoft’s professional web server. If you are using a remote host that supports Microsoft’s Web Deploy for Hosting Servers you can simply deploy your site using the Publish command in Visual Studio. If you’re hosting your site yourself and have not installed Web Deploy, you can publish your site to a local folder that you can deploy to your own IIS server. Later in this chapter, you see how to install and configure IIS in case you’re hosting the site yourself.
Whether you are hosting the site yourself or using an external web host, you’re likely to have different settings in Web.config for your development and production environments. Visual Studio makes it easy to maintain multiple versions of your configuration files — for your development and production environments, for example. However, in order to use that feature you need what is called a publishing profile. The next section therefore looks at publishing first, and a later section digs into maintaining your configuration files.
To deploy your website to a production server, the deployment options shown in the following table are available right from within VS.
|
DEPLOYMENT OPTION |
DESCRIPTION |
|
File System |
Enables you to create a copy of the site on the local filesystem of your development machine or a networked machine. This option is useful if you want to move the files manually to your production server later or if your production server is accessible over the local network. |
|
FTP Site |
Enables you to send the files that make up your web application directly to a remote server using FTP. |
|
Web Deploy |
Enables you to send the files that make up your web application to a remote IIS server using Web Deploy. For this option to work, the remote server needs to have Web Deploy for Hosting Servers installed. Many providers support this option, which makes it convenient to publish your changes. Consult your provider to see if they support this option and for the necessary connection details. |
|
Web Deploy Package |
Enables you to create a package (a .ZIP file) with all the site’s files that an administrator can install on a server with IIS and Web Deploy for Hosting Servers installed. For more information, see http://bit.ly/1ckGqri. |
You can select among these options when you publish your site, as you’ll see in the next exercise.
Before you publish your site, it’s a good idea to check the state of your website. You should do a full recompile where Visual Studio compiles all the code and pages in your website. This helps you detect any problems in your website before you deploy it to a production environment.
Deploying a site is also a good moment to do some housekeeping. To avoid slowing down the deployment process and to keep your site as lean and clean as possible, you should delete the files from your website that you don’t need in production.
In the next exercise you see how to publish your site to another folder on your local disk. You’ll see how to republish the site again when the configuration file management capabilities are discussed.
In this Try It Out, you use the Publish command with the File System option to create a copy of the site. If your host supports it, you can also choose FTP or the Web Deploy option, in which case your changes go live immediately. However, for this exercise, you’ll see how to create a local copy of the site, which you’ll use in a later exercise that show you how to install and configure IIS.
1. Close all open files in Visual Studio and then choose Build ⇒ Rebuild Web Site from the main menu. Doing so forces Visual Studio to recompile the entire site even if it already had compiled some parts of it. Visual Studio lists any problems your site may have in the Error List. To verify that your site is error free, open the Error List (choose View ⇒ Error List from the main menu) and make sure you don’t have any compilation errors. Fix any errors you may have in your site.
2. When the Error List is empty, right-click the site in the Solution Explorer and choose Publish Web Site. Make sure you right-click the site and not its parent solution. The Publish Web dialog appears, as shown in Figure 19-3.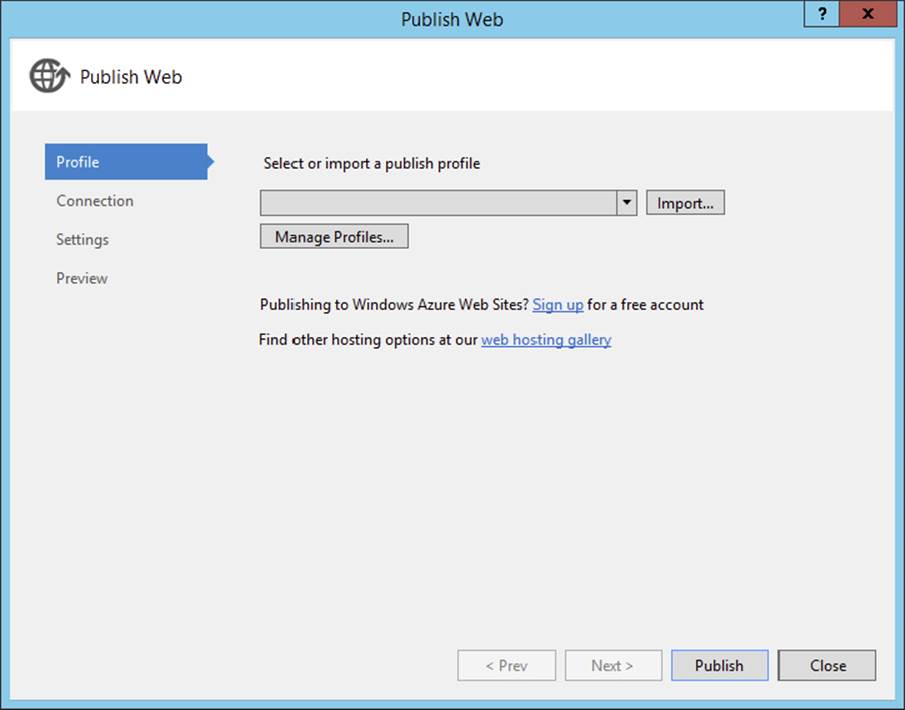
FIGURE 19-3
3.
Open the drop-down at the top of the screen and choose New Profile. Enter a name such as To local disk and click OK.
4. On the Connection tab choose File System. In the text box for Target Location, enter C:\BegASPNET\Release. This folder doesn’t have to exist yet; Visual Studio will create it for you when publishing the site. Click Next.
Note: If your host supports Web Deploy, you can choose that instead and enter the details, such as the server and site name and your user credentials. The remaining steps in this exercise assume you selected File System.
5. In the Settings tab, Debug should be selected, which is what you need for this exercise. Click Next again.
6. On the Preview tab, click Publish to start the publishing process. After a short delay you should see a message in the Output window that the publishing process has completed successfully. If you had selected Web Deploy as the publish option, this dialog would have enabled you to request a preview of the changes by comparing the files on the server with your local files.
7. On the Solution Explorer, click the Refresh icon and then expand the App_Data folder. You should see a file called To local disk.pubxml under the PublishProfiles subfolder.
8. Open the folder C:\BegASPNET\Release in File Explorer. Notice how all files have been copied to the output folder. If you look at the Web.config file in the Release folder you should see it’s identical to the one in Visual Studio. You see later how to generate a Web.config specifically for the deployment server.
The File System option simply creates a copy of all files that make up your website. In this exercise, you saw how to copy the files to the local filesystem. This is a great way to create a copy that is detached from the development environment that can be run on a different machine. You’ll see how to make use of these files later in this chapter. The Web Deploy and FTP options enable you to deploy your changes to a live server directly, while Web Deploy Package lets you create a setup file that can be run by an administrator on a server running IIS and Web Deploy for Hosting Servers.
On the Settings tab of the Publish dialog you can choose the option Precompile During Publishing under the File Publish Options. When you click Configure for that option you can further define the precompilation process. When you enable precompilation, all the code in the Code Behind of your ASPX pages, controls, code files in App_Code, and so on are compiled into .NET assemblies — files with a .dll extension, stored in the bin folder of your site. The main benefits of precompiling are source protection (others with access to the server can’t look into your source) and an increased performance the very first time a page is requested. Pages that are not precompiled are compiled on the fly when they are requested the first time, which takes a little bit of time. Remember that regular visitors to your site will never be able to see the source of your application. All they’ll be able to see is the final HTML that gets sent to the browser. When you select Allow Precompiled Site to Be Updatable in the Advanced Precompile Settings dialog, Visual Studio compiles all your VB.NET and C# code into .NET assemblies and places them in a bin folder at the root of your site. It leaves the markup in ASPX and ASCX files alone. However, with this option turned off, all the markup code is compiled into .dll files as well. The actual files still need to be deployed to the server, but their content has been replaced with placeholder text: “This is a marker file generated by the precompilation tool, and should not be deleted!” When the page is requested by a browser, the ASP.NET run time finds the appropriate content in the assemblies in the bin folder and serves its content as if it were a normal page. This latter option is especially great if you want to prevent other people with access to your server from altering your site after it has been deployed. Because all the source and markup is compiled into .dll files, there is no way to change it on the server anymore, other than uploading a new set of published files.
When you complete the Publish Web wizard, Visual Studio stores the settings in a Publish Profile file (with a .pubxml extension) in the PublishProfiles folder under App_Data. This file is then used whenever you publish to the site, so you don’t have to enter all the details again. Visual Studio uses the publish profile also to maintain multiple versions of your Web.config file, as you’ll see next.
If you take a look at the current Web.config file you’ve been working with so far, you’re likely to have a few settings that will be different on your production server. For example, your connection string will likely be different on the production server, and so are the settings for the mail server and maybe even the individual e-mail addresses you added earlier in this chapter. To avoid overwriting the changes in the production server, developers often skip deploying the Web.config to the production server, and then manually update the settings in that file. However, this is far from ideal because you’re likely to forget to add settings to the production server that you have added in production. To overcome this problem, Microsoft has introduced Web.config Transformations, a mechanism to generate a Web.config file from the main Web.config in your project, but adjusted with settings that are specific for the production server (or other environments, such as a test server).
In order to use Web.config Transformations, you add one or more additional .config files to your project. These files are named after the publish profiles you saw how to create earlier. When you publish the site using the Publish Web wizard you saw earlier, Visual Studio takes this additional configuration file and merges it with the main Web.config file so you get a custom Web.config file for the environment that the Publish Web wizard is targeting. Inside this file you add just the elements that are different for your production server, such as the database and e-mail settings. Then with the special Web.config Transformation syntax you tell the publishing mechanism how you want this data to be merged into the final .config file. To see how this works, take a look at the following example that removes the debug attribute from the <compilation> element:
<compilation xdt:Transform="RemoveAttributes(debug)" />Note the xdt:Transform attribute; this tells the code that carries out the transformation to remove the debug attribute when generating the final .config file, leaving all other attributes in place. So if your original <compilation> element in Web.config looked like this:
<compilation debug="true" targetFramework="4.5.1">it will end up like this in the final file:
<compilation targetFramework="4.5.1">This way, debugging is always turned off on the production server, which improves performance.
The transformation syntax supports other options as well. The following table lists the ones you’ll most frequently use. For a complete list of all options, check out the MSDN documentation for Web.config transformations at http://bit.ly/79XVXE.
|
SYNTAX |
DESCRIPTION |
|
|
Finds an element in a section based on an attribute defined by name. Often used together with |
|
|
Updates only the attributes defined in the element, leaving the attributes from the source |
|
|
Removes the specified attributes from the source element, leaving the other attributes untouched. You can define multiple attributes by separating them with a comma. |
|
|
Replaces the original element with the element that is specified in the transform file. |
|
|
Adds the element that is defined in the transform file as a sibling to the selected element or elements. |
You see how to create the transformation file in the next exercise.
In this exercise, you’ll add the file Web.To local disk.config to contain the data that is specific for your production environment. You then mark it up with various xdt: attributes that define how the file should be transformed when your site is published.
1. Expand the App_Data\PublishProfiles folder and right-click the .pubxml file that VS created in the previous exercise. It should be called To local disk.pubxml if you called your Publish Profile To local disk. Choose Add Config Transform from the menu that appeared. Visual Studio adds a file called Web.To local disk.config to the root of this website.
2. From the root of the Solution Explorer, delete the file Web.Debug.config. Sometimes Visual Studio picks this file for the transformation instead of your custom file. Deleting this file prevents that from happening. You may need to expand the Web.configitem first.
3. Right-click Web.To local disk.config and choose Preview Transform. Visual Studio shows the original file and the generated file side by side and highlights the differences, as shown in Figure 19-4.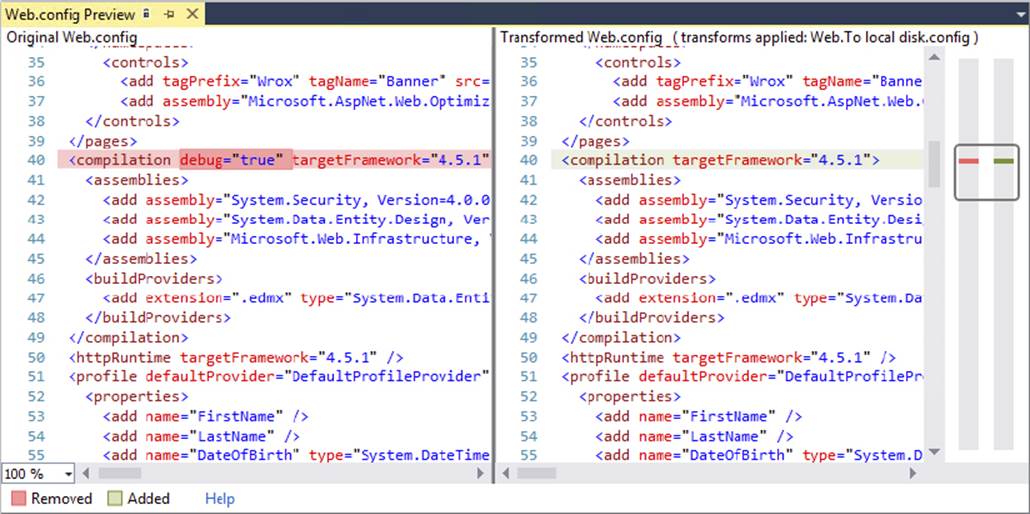
FIGURE 19-4
Notice how the transformed file (on the right) is almost identical to the version on the left, except for the absence of the debug attribute. The transformation engine will take all content from the original file and place it in the target file, except for those elements and attributes that have explicitly been changed with the various xdt: settings.
4. Close the Preview window. Back in Web.To local disk.config add the following bolded lines of code to modify the From and To addresses for outgoing e-mail in the production server:
5.<configuration xmlns:xdt="http://schemas.microsoft.com/XML-Document-Transform">
6.<appSettings>
7.<add key="FromAddress" value=planetwrox-production@example.com
8.xdt:Transform="SetAttributes" xdt:Locator="Match(key)" />
9.<add key="ToAddress" value="planetwrox-production@example.com"
10.xdt:Transform="SetAttributes" xdt:Locator="Match(key)" />
11.</appSettings>
12....
<system.web>The <add /> elements are similar to the source file, except for the inclusion of the xdt: attributes.
13.Right-click Web.To local disk.config again and choose Preview Transformation. Because the e-mail addresses are different, they should be highlighted as well.
14.Next, add the following section above the <appSettings> tag to modify the connection strings. Update the connectionString attributes with a connection string that your host expects. You find more information about connection strings later in this chapter and in Appendix B. Also, your host is likely to provide you with the relevant details that you need to enter here.
15.<connectionStrings>
16.<add name="PlanetWroxConnectionString1" connectionString=" removed to save space "
17.xdt:Transform="SetAttributes" xdt:Locator="Match(name)"/>
18.<add name="PlanetWroxEntities" connectionString=" removed to save space "
19.xdt:Transform="SetAttributes" xdt:Locator="Match(name)"/>
20.</connectionStrings>
<appSettings>Note that the Locator uses name to find the correct connection string by its name, whereas the appSettings you saw in step 4 used key.
21.Below the <compilation> element within the <system.web> element, add the following code to turn custom errors on in the production site:
<customErrors mode="On" xdt:Transform="SetAttributes" />22.Finally, below the <system.web> element, add the following element to configure the mail server:
23.</system.web>
24.<system.net>
25.<mailSettings xdt:Transform="Replace">
26.<smtp deliveryMethod="Network" from="Planet Wrox <planetwrox@example.com>">
27.<network host="your host" />
28.</smtp>
29.</mailSettings>
</system.net>30.Update the code inside the network element to match the requirements for your production server. Refer to Chapter 9 to learn more about the different settings, and consult your server’s administrator for the exact details you must supply here.
31.Request a preview of the transformation once more and verify that the file looks exactly as you want. If your transformation file contains any errors, they’ll be listed in the Output window.
32.When you’re done, close the .config file, as you’re done with it for now.
33.Right-click the site in the Solution Explorer and choose Publish Web Site. Verify that the selected Publish Profile is To local disk and click Publish.
34.When Visual Studio is ready with publishing, open a File Explorer and navigate to C:\BegASPNET\Release. Open the Web.config in Notepad or Visual Studio and verify that the file contains a combination of the original Web.config file and the configuration file associated with the Publish Profile.
When you request the preview, the transformation engine kicks in and generates the target file based on the source file (Web.config) and the changes it finds in the transformation file (Web.To local disk.config). For the connectionStrings and appSettingselements, it finds a Locator attribute that tells it to copy over the element with a matching key (for appSettings) or name (for the connection string) and overwrite only those attributes that are defined in the transformation file. That is why the preview file still contained the providerName attribute, even though it wasn’t specified in the transformation file. This is a convenient way to update attributes selectively without fully redefining the entire element.
The RemoveAttributes Transform option on the <compilation> element simply removes the debug attribute. Without this attribute, .NET turns off debugging, which improves the performance of the site. If you want to remove multiple attributes from an element, simply specify them as a comma-separated list between the parentheses after RemoveAttributes.
The <mailSettings> element takes a different approach. Because the differences between the source and target files are quite large, it’s more convenient to just replace the entire element using xdt:Transform="Replace". Notice that you still need to define the parent elements (<system.net> in this example) so the transformation engine knows where to add the element in the target file.
When you publish the website using the Publish Web wizard, Visual Studio tries to find a configuration file named after the Publish Profile and then uses that file to create a custom configuration file on the fly. This way you can easily manage your mainWeb.config file in Visual Studio along with the differences for the production environment. Then when it comes to deploying your site, you can be assured that the generated Web.config file contains all settings from the main file, with the settings that are specific to the production environment merged into the final file.
Now that you have a clean copy of your website, the next step is to move the files to your production server. If your host supports FTP, you can use FTP to copy the files to the remote server. If you want to host your site on a server you manage yourself, you need to configure IIS, Microsoft’s web server. Installing and configuring IIS is the topic of the next section.
RUNNING YOUR SITE UNDER IISUp until now, you’ve been using IIS Express, which ships with Visual Studio, to debug and test your application. However, because requests to this server are limited to those coming from the local host to minimize security implications, you’ll need to use the full IIS, which comes with most major Windows versions. To have your website run under IIS, you need to perform the following steps:
1. Install and configure IIS.
2. Install and configure the .NET Framework 4.5.1.
3. Configure security settings.
Depending on the current state of your system, some of these actions are optional. In the following sections, you see how to carry out these steps.
Installing and Configuring the Web Server
Although IIS ships with most Windows versions, it’s not installed by default, so you need to do that first. You also need to make sure that your version of Windows supports IIS. Although the Starter and Home Basic versions of Windows 7 and 8 ship with some parts of IIS, you can’t run ASP.NET pages on them, so you need at least the Home Premium Edition. On the server-based versions of Windows, IIS is fully supported. If you’re hosting your site with an external hosting company, you can skip the following sections on installing IIS.
To install and configure IIS on your Windows machine, you need to be logged on as an administrator. If the account you use to log on to your machine does not have administrative privileges, you need to ask your administrator to install and configure IIS for you.
In addition to installing IIS, you also see how to create and configure the website in IIS. Because of the way security works under Windows, your site probably won’t work immediately after you configure IIS unless you change some of the security settings under Windows. You see how to do this in the section “Understanding Security in IIS” and the Try It Out entitled “Configuring the Filesystem.”
You’ll be able to test out your IIS settings more easily if you already have SQL Server 2012 Express installed. This is the case if you followed along with the exercises in Chapter 12. If you haven’t installed SQL Server 2012 Express yet, refer to the section “Installing SQL Server 2012 Express” in Chapter 12 for installation instructions. If you have one of the commercial versions of SQL Server, or have SQL Server on a remote machine, pay special attention to the section “Moving Data to a Remote Server” in this chapter and to Appendix B.
Making Sure IIS Is InstalledThe easiest way to install IIS is through the Web Platform Installer (WPI). WPI is installed with Visual Studio, so if you’re carrying out these steps on your development machine, you already have the WPI. If you’re following these steps on another machine (running Windows Server, for example), you need to download and install WPI first. You can download WPI from www.microsoft.com/web/downloads, where you should see a Download or Download It Now button. If this link ever changes, search the web for “Web Platform Installer download” to find one of the other Microsoft locations that lets you download and install WPI.
Once WPI is installed, it may start automatically. When that happens, close it to clear out any programs that may have been selected to be installed automatically. Start the WPI from the Windows Start menu or Start screen. When it’s done loading, switch to the Products tab, at the top of the screen enter IIS recommended, and press Enter. WPI should list the IIS Recommended Configuration, as shown in Figure 19-5.
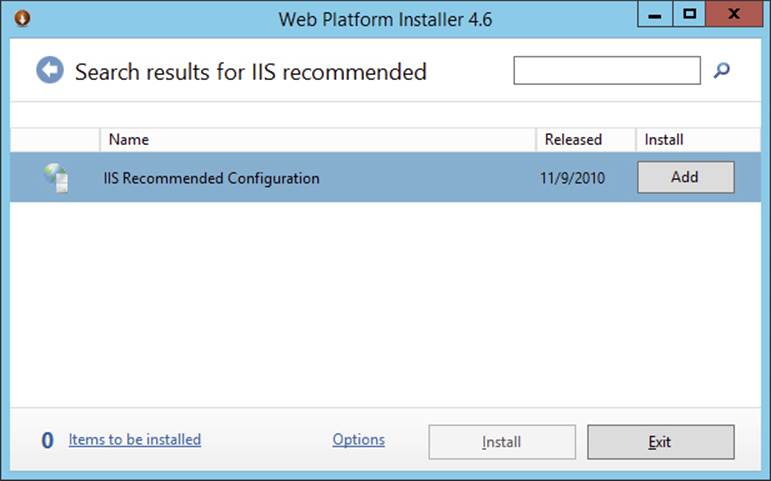
FIGURE 19-5
Next, use the search box again and search for IIS: ASP.NET. Depending on your version of Windows, this should bring up an item called IIS: ASP.NET or IIS: ASP.NET 4.5 (as well as other, unrelated items). The IIS: ASP.NET or IIS: ASP.NET 4.5 item is needed to run ASP.NET under IIS, and is a critical component to run your site successfully. Select this item and click Add. If you see both items choose IIS: ASP.NET 4.5. Finally, click the Install button at the bottom of the screen and then accept the license terms. After a while, you should get a confirmation that IIS and its components were installed successfully.
For detailed instructions on manually setting up IIS, check out these articles on the official IIS website or search www.iis.net:
http://bit.ly/IISOnServer2008
http://bit.ly/IISOnServer2012
When IIS is installed successfully, you need to make sure you have the Microsoft .NET Framework version 4.5.1 installed.
Installing and Configuring ASP.NET
If you installed Visual Studio 2013 (any edition) on your target machine you already have the .NET Framework 4.5.1 installed. Otherwise, you need to download the redistributable package from the Microsoft site at http://msdn.microsoft.com/en-us/netframework. Follow the Download or Install link or use the search option and search for “download .NET Framework 4.5.1.” Make sure you download the full version of the .NET 4.5.1 Framework and not an earlier version or the Client Profile package. After you have downloaded the .NET Framework, run the installer and follow the on-screen instructions. If you get a message stating that the framework has already been installed you can close the installer.
If you already had the .NET Framework 4.5.1 on your machine and installed IIS afterward, you need to tell IIS about the existence of the framework. Normally, this is done during installation of the .NET Framework, but if you installed IIS later, you need to do this manually. You only need to do this on Windows 7 and Server 2008 R2. For Windows 8 and Server 2012, ASP.NET 4.5.1 is registered correctly when you install IIS through the WPI. To register ASP.NET in IIS, follow these steps:
1. Open a command prompt in Administrative mode. To do this, click the Start button, type cmd in the search box, and press Ctrl+Shift+Enter to start the command prompt with elevated permissions.
2. Navigate to the .NET Framework version 4 folder by entering the following command and pressing Enter:
cd \Windows\Microsoft.NET\Framework\v4.0.30319Because .NET 4.5.1 is an in-place replacement for .NET 4, this folder uses the 4.0 version number. Note that the actual version number following v4.0 may be slightly different on your machine if newer versions of the .NET Framework have been released by the time you read this book. Also, if you are using a 64-bit version of Windows, you should use the Framework64 folder. Use Windows Explorer to find out the correct folder before you enter it at the command prompt.
3. Type aspnet_regiis -i and press Enter again.
After a while, you should get a message that ASP.NET was registered with IIS successfully.
Now that IIS and the .NET Framework have been installed and configured correctly, the next step is to configure your website under IIS. You see how to do this in the next Try It Out exercise. After the Try It Out, you learn more about configuring security permissions for your system.
In this exercise, you see how to configure the standard “Default Web Site” that ships with IIS. Although it’s possible to create more than one site under IIS on Windows 7, Windows 8 / 8.1, Windows Server 2008 R2, and Windows Server 2012 / 2012 R2, this option is not discussed here. Contact your system administrator or read the documentation that comes with IIS to learn more about creating multiple websites under IIS. Most of the steps in Windows 8 are identical to those in Windows 7, Windows Server 2008 R2, and Windows Server 2012. However, the screenshots you see in the following exercise were taken in Windows 8.1 and are slightly different on the other operating systems.
If you’re doing this exercise on a machine other than the one you used to build the Planet Wrox site, be sure to copy the BegASPNET folder to the root of the C drive of the target machine. Also make sure this machine has access to SQL Server 2012, installed either locally or on another remote machine.
1. Open the Internet Information Services (IIS) Manager. You find this item in the Administrative Tools section of the Control Panel, which you can access through its System and Security category. Alternatively, click the Start button or Start screen, type inetmgr, and press Enter. If you get a question about learning more about WPI, click No (you could click Yes if you wanted to; if you do, you’re taken to the main WPI section of the Microsoft website).
2. Expand the tree on the left until you see Application Pools and the Default Web Site, as shown in Figure 19-6.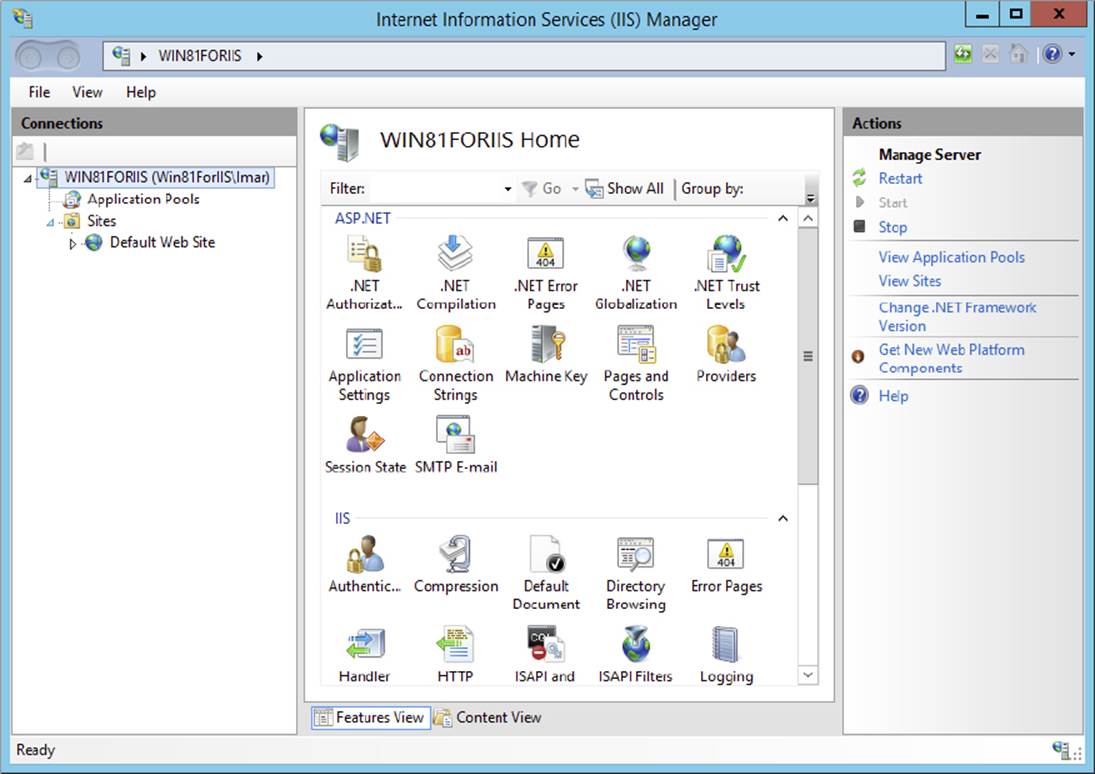
FIGURE 19-6
3.
Select the.NET v4.5 application pool (whether it was already there or not) and click Advanced Settings in the Actions panel on the right. Locate the property called Identity and ensure that it is set to ApplicationPoolIdentity. If it’s not, click the button with the ellipsis, choose the correct item from the Built-in Account drop-down list, and click OK. You use this identity later when configuring security. In the same dialog box, make sure the Load User Profile option is set to True. Your final screen should look like Figure 19-7.
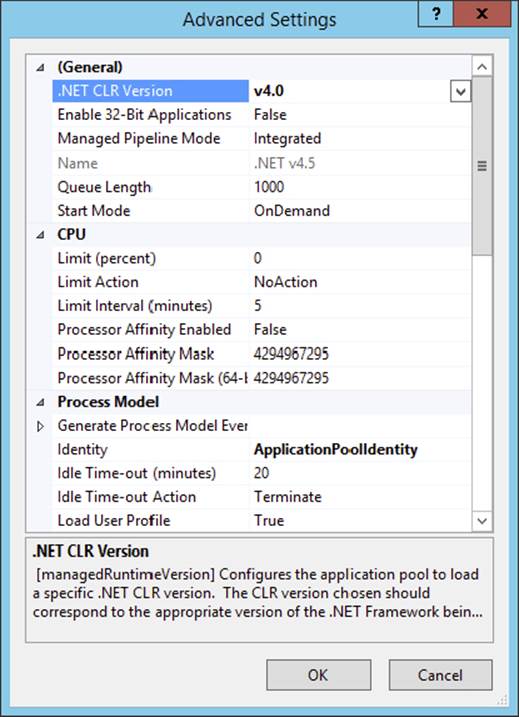
FIGURE 19-7
5. Click the Default Web Site item to select it and click Advanced Settings in the Actions panel on the right.
6. In the Advanced Settings dialog box, click the Physical Path property, click the ellipsis to open up a folder browser, select the folder C:\BegASPNET\Release, and click OK to confirm the path.
7. In the same dialog box, click Application Pool, then click the ellipsis, choose the application pool from step 3 labeled .NET v4.5, and click OK. Your Advanced Settings dialog now looks like Figure 19-8.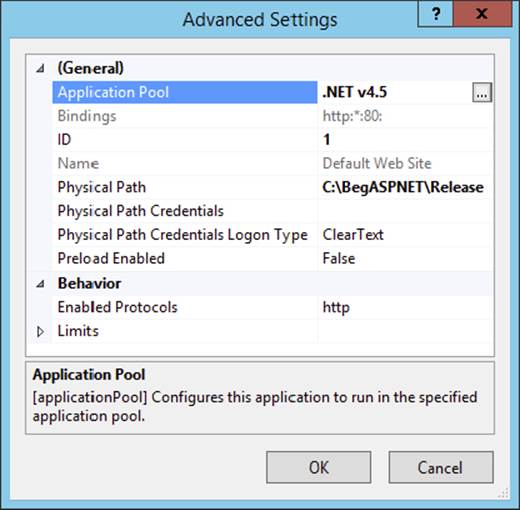
FIGURE 19-8
8. Next you need to make sure that IIS is configured to use a sensible default document, the document that is served when you request a folder name or the root of the site. The Planet Wrox site uses Default.aspx, which is the most common default document name for ASP.NET websites. To configure this, make sure Default Web Site is the selected option in the tree on the left. Then double-click the Default Document option in the IIS Features list (visible in Figure 19-6). Make sure thatDefault.aspx is present and at the beginning of the list. If the item is not there, add it manually. To do this, click the Add link in the Actions panel to add it. Then use the Move Up links to move it to the top of the list. Click Yes when you see the warning about inheriting changes. Your dialog box should look similar to Figure 19-9.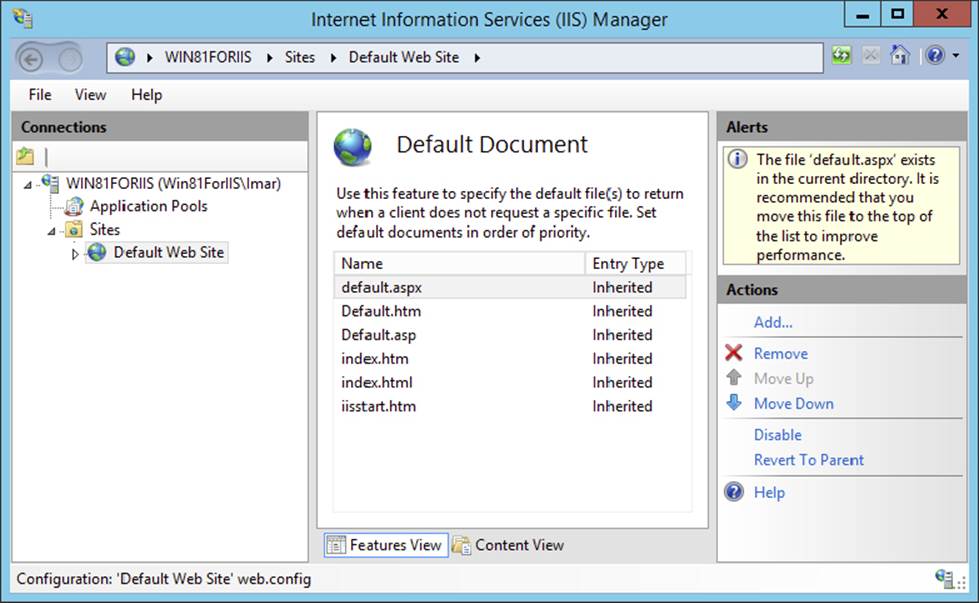
FIGURE 19-9
How It Works
Each new IIS installation has a Default Web Site, the site that listens to http://localhost by default. In this exercise, you configured this default website to run Planet Wrox, but you can also create a whole new site that can run side by side with other websites. You pointed the root of the site to the Release folder that contains your website. With that mapping set up, IIS is able to see what files to serve when you request a URL like http://localhost. It means that a URL like http://localhost/Login.aspxis mapped to the physical file at C:\BegASPNET\Release\Login.aspx. You also assigned the website an application pool — an IIS mechanism to isolate and configure one or more IIS websites in one fell swoop. Two websites running in different application pools do not affect each other in case of a problem such as a crash. In this exercise you selected an application pool that uses the .NET 4.5 Framework and that uses the Integrated Pipeline mode. In this mode, IIS and ASP.NET are tightly integrated, which means you can use ASP.NET features (such as Forms Authentication, which you saw in Chapter 16) in standard IIS functionality such as serving static files. For more information about this mode, check out the official IIS website viahttp://bit.ly/IntegratedPipelineMode.
At the end of the exercise, you configured a default document, the file that is served when you request a URL without an explicit filename, like http://localhost/ or http://localhost/Reviews/. When you configure Default.aspx as the default document, IIS tries to find and serve a file by that name.
The final thing you need to do to make sure your site runs on your local IIS installation is configure the security settings. This is discussed in the following two sections.
Understanding Security in IIS
Because of the seamless integration with IIS Express, you may not realize what happens under the hood, and what security settings are in effect when you browse pages in your site. To use resources in your site, such as ASPX files, Code Behind files, the database in the App_Data folder, and the images in your site, your web server needs permissions from Windows to access those resources. This means that you need to configure Windows and grant access to those resources to the account that the web server uses. But what exactly is that account? The specific account that needs permission depends on a number of factors, including the version of Windows, whether you run your site under IIS or IIS Express, and on a number of settings within IIS.
In most cases, however, you have only two scenarios to consider: using IIS Express or the full version of IIS as your web server.
In the former case, the account that IIS Express uses is the account you use to log on to your Windows machine. This account is usually something like DomainName\UserName or MachineName\UserName. While logged in with this account on Windows, you start up Visual Studio, which in turn starts up IIS Express. This means that the entire web server runs with your credentials. Because it’s likely that you’re an administrator or a power user on your local Windows machine and have permissions to access all files that make up your site, things probably worked fine so far without any changes to the security settings.
In the latter case, where IIS is used, things are quite different. By default, an ASP.NET site under IIS runs with a special account created when you installed IIS. This account is called ApplicationPoolIdentity.
You won’t find the ApplicationPoolIdentity user account on your system directly, because it depends on the name of the configured application pool.
Because the application pool you saw earlier runs in Integrated Pipeline mode, you only need to configure a single user account. If you are running in Classic mode (which isn’t necessary for the Planet Wrox website) you also need to configure another account called IUSR. This account is used by IIS to serve non-ASP.NET content such as HTML files and images. Consult the IIS documentation for more information about Classic mode and the IUSR account.
After you have determined the account that you need to configure, the final step is to configure the filesystem.
NTFS Settings for Planet WroxRegardless of the account you are using, you need to make changes to the Windows filesystem so the web server is allowed to access your resources.
|
FOLDER NAME |
PERMISSIONS |
EXPLANATION |
|
|
List folder contents |
The web server account needs to be able to read all the files and folders that make up the website. Child folders, like |
|
|
Modify |
The web server account needs to be able to read from and write to the Microsoft SQL Server databases in the |
|
|
Modify |
If you’re dropping your e-mails locally, you need to configure the |
If you came here from Chapter 12 to learn how to configure NTFS for the App_Data folder, you can ignore the Release folder that was created earlier in this chapter. Instead, grant Modify permissions for your own account to the App_Data folder of your site atC:\BegASPNET\Site as per the instructions in the next exercise. You may need to do the same for the GigPics folder, which you could create now at the root of your site, or return to this section after you created the folder in Chapter 14.
In the following exercise, you learn how to configure the security settings for these folders.
In this Try It Out, you see how to configure the filesystem for the Planet Wrox website. The exercise shows you screenshots from Windows 8.1, but the other flavors of Windows have similar screens. Search Windows help for “security NTFS” or contact your administrator if you’re having problems carrying out the following steps.
1. Start by opening a File Explorer (called Windows Explorer on versions of Windows before Windows 8 and Server 2012) and then locate your C drive.
2. Browse to C:\BegASPNET, visible in Figure 19-10.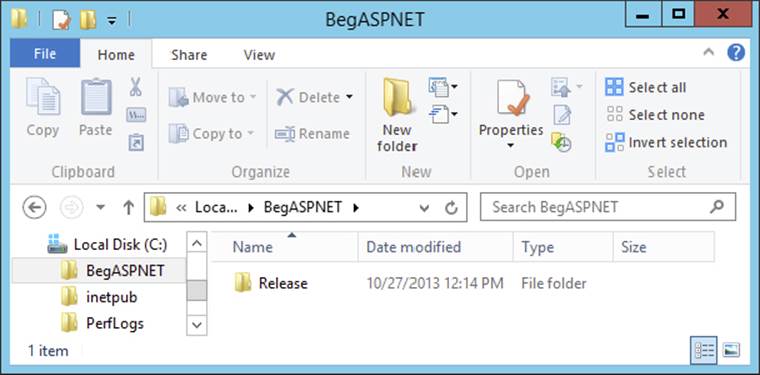
FIGURE 19-10
3.
Right-click the Release folder, choose Properties, and switch to the Security tab (see Figure 19-11).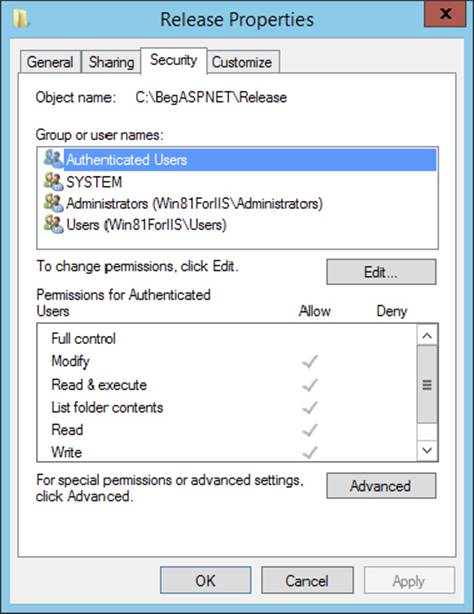
FIGURE 19-11
4.
The next step is to add the web server account. Click the Edit button visible in Figure 19-11, and then click the Add button. Type IIS AppPool\ followed by the name of the application pool. If you followed along with the previous exercises, the application pool is called .NET v4.5, which means the account name is IIS AppPool\.NET v4.5. Click OK to add the account.
With the account selected in the Group or User Names list, ensure that only List Folder Contents and Read are selected. Your dialog box should end up similar to Figure 19-12.
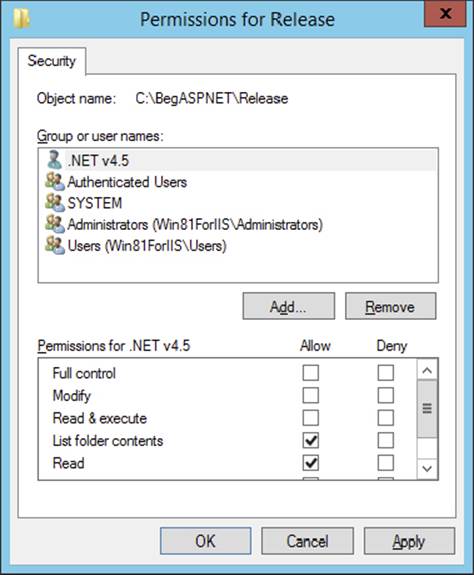
FIGURE 19-12
5.
Close the dialog box so you return to the Release Properties dialog box shown in Figure 19-11.
6. Click the Advanced button to open the Advanced Security Settings dialog box again. For Windows 7 and Server 2008 R2, click the Change Permissions button and check the Replace All Child Object Permissions check box. For Windows 8 and Server 2012, you find this check box on the Advanced Security Settings dialog box directly. This forces Windows to apply the same security settings to all subfiles and subfolders, replacing all existing settings. Click OK and then confirm the changes that will be made. Finally, close all remaining open dialog boxes.
7. Back in File Explorer / Windows Explorer, right-click App_Data from the Release folder, open its Properties dialog box and then its Security tab, and edit the permissions for the web server account you added in step 4 by adding Modify permissions (this in turn causes some of the other permissions to be selected as well). You need to click the Edit button first to bring the Properties dialog box into editable mode. Figure 19-13 shows the completed dialog.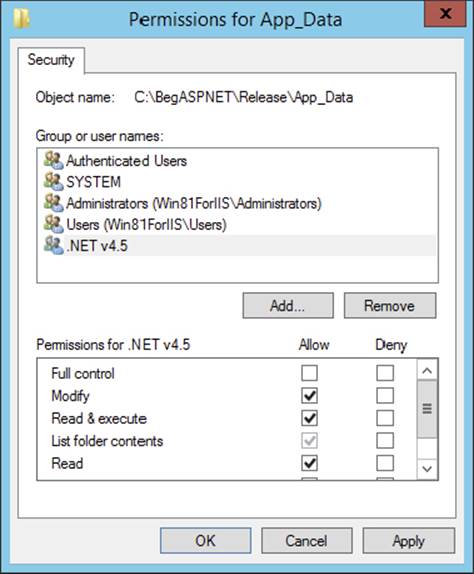
FIGURE 19-13
Click OK to close the dialog box.
8. Repeat this step for the GigPics folder and optionally for the TempMail folder.
9. If you are using IIS on a machine that has SQL Server Express, the final thing you need to do is modify your connection strings. If you don’t have SQL Server Express installed, refer to the start of Chapter 12 that shows you how to install SQL Server Express Edition as well as SQL Server Management Studio Express Edition. If you’re using a different database server, or if you only have SQL Server Local DB Edition installed and don’t want to install SQL Server Express, look at the section “Moving Data to a Remote Server” later in this chapter and look at Appendix B, which explains how to configure a different SQL Server.
To modify the connection string, open up Web.config from the Release folder and replace both occurrences of (LocalDB)\v11.0 in the connection strings with .\SqlExpress. This targets a named instance of SQL Server called SqlExpress on the local machine, identified by the dot (.). In addition, add User Instance=True to both connection strings to run SQL Server under the same user account as the website. Your connection strings should end up like this:
<connectionStrings> <add name="PlanetWroxConnectionString1" connectionString="DataSource=.\SqlExpress;AttachDbFilename=|DataDirectory|\PlanetWrox.mdf;
Integrated Security=True;User Instance=True"
providerName="System.Data.SqlClient" /> <add name="PlanetWroxEntities" connectionString="metadata= res://*/App_Code.PlanetWrox.csdl|res://*/App_Code.PlanetWrox.ssdl |res://*/App_Code.PlanetWrox.msl;provider=System.Data.SqlClient;provider connection string="data source=.\SqlExpress;
attachdbfilename=|DataDirectory|\PlanetWrox.mdf;integrated security=True;User Instance=True;
MultipleActiveResultSets=True;App=EntityFramework"" providerName="System.Data.EntityClient" /> </connectionStrings>You should also add this code to the transformation file in VS so the connection strings will be updated correctly the next time you publish the site.
10.To check if the site works, open a browser and go to http://localhost. You should see the Planet Wrox website appear. To verify that everything is in order, browse through the site by requesting pages from the main menu, filling in the contact form, creating a new album, uploading pictures, and so on. If you get a 404 message for most of the pages in the site, open Web.config from the Release folder and add the following section as a direct child node of <configuration>:
11.<system.webServer>
12.<modules runAllManagedModulesForAllRequests="true"></modules>
</system.webServer>This maps requests without an extension (which includes all pages in the side due to the FriendlyUrls package) to .NET, so they are handled correctly. You should add this code to your transformation file in VS as well so the next time you publish it gets added to your .config file automatically.
If you get other errors, refer to the section “Troubleshooting Web Server Errors.”
How It Works
On a standard Windows system, all files and folders are protected using Windows NTFS. To ensure proper operation of your website, you need to grant the account used by the web server the necessary permissions to the files and folders of your website. For most files and folders, Read permission is enough. However, for a few folders you need to change the permissions. Both App_Data and GigPics are written to at run time so you need to grant Modify permissions to these folders. In addition, you need to configure C:\TempMail if your site drops e-mails there locally.
In order for your site to connect to a database, you changed both connection strings in Web.config to target an instance of SQL Server called SqlExpress. The Local DB Edition you used before is great for local development, but not for running your production sites. Instead, you can use SQL Server Express Edition or one of the commercial versions of SQL Server. Appendix B digs much deeper into configuring your site to work with versions of SQL Server other than Express.
Troubleshooting Web Server Errors
When you try to access your site in a web browser, you may run into a number of problems. The first thing you need to do to get helpful error messages is to change the <customErrors> section in Web.config from On to Off or RemoteOnly. This makes it easier to see what’s going on. Additionally, you may want to check out the Windows Event Viewer (type eventvwr from the Start menu or Start screen) for more details about errors and hints about how to solve them.
This section lists the most common problems and provides a fix for them. You should realize a large number of possible reasons exist for the errors you may get, so it’s impossible to cover them all here. If you run into a problem you can’t solve, turn to this book’s forum at the Wrox community site at http://p2p.wrox.com. You’ll find many helping hands (including mine) that understand your problem and can help you find a solution for it.
- It is an error to use a section registered as allowDefinition=‘MachineToApplication’ beyond application level — You get this error when your website is not at the root of the web server, or you haven’t configured the folder as a separate application. Given the current configuration for the Planet Wrox site, you get this error when, for example, you map your site in IIS to
C:\BegASPNETand then browse to http://localhost/Release. To fix this error, make sure that the root of your IIS website points to the folder that contains your mainWeb.configfile;C:\BegASPNET\Release, in this case. You get the same error when you open an incorrect folder in VS; for example, when you openC:\BegASPNETand then browse to http://localhost:12345/Site. Instead, openC:\BegASPNET\Siteas the website in VS. You may also run into this error if a subfolder in your site contains aWeb.configfile that tries to override settings that are meant to be defined at the root of the site only; for example, if you have a<membership />element in theWeb.configfile of theManagementfolder. - HTTP Error 401.3-Unauthorized — You get this error when the account used by the web server does not have permission to read the files on disk. To fix this problem, refer to the Try It Out entitled “Configuring the Filesystem” earlier in this chapter and configure the correct permissions.
- Failed to update database “C:\BEGASPNET\RELEASE\APP_DATA\ASPNETDB.MDF” because the database is read-only — You get this error when the database files have been marked as read-only, or if the account used by the web server is not allowed to write to the database files. In the former case, open the file’s Properties in File Explorer / Windows Explorer and verify that the Read Only check box is cleared. In the latter case, ensure that the account used by ASP.NET has at least Modify permissions on the
App_Datafolder. - HTTP Error 403.14-Forbidden — Although this error seems to suggest a problem with NTFS permissions at first, it’s often caused by an incorrect or missing default document. If you get this error, ensure that the site or folder you are accessing contains a document called
Default.aspxand that you configured that document name as a default document in IIS. - HTTP Error 404.0-Not Found — You get this error when you try to request a file or folder that doesn’t exist, such as http://localhost/DoesNotExist or http://localhost/DoesNotExist.gif.
- An error has occurred while establishing a connection to the server. When connecting to SQL Server 2008, this failure may be caused by the fact that under the default settings SQL Server does not allow remote connections. (provider: Named Pipes Provider, error: 40-Could not open a connection to SQL Server). Alternatively, you may get the error: A network-related or instance-specific error occurred while establishing a connection to SQL Server. The server was not found or was not accessible. Verify that the instance name is correct and that SQL Server is configured to allow remote connections. (provider: SQL Network Interfaces, error: 26 - Error Locating Server/Instance Specified) — You can get these errors for a number of reasons. Although the error message here mentions SQL Server 2008 explicitly, you can also get this error for other versions of SQL Server. Usually, this error is caused by problems reaching the configured database server. You can get it when you misspell the server’s name in a connection string, the server is down, or the server can only be reached from the local machine and is not accessible over the network. To make sure that SQL Server is running correctly, open the Services section of the Administrative Tools (that you find in the Control Panel). Then look under SQL Server and verify that SQL Server is started. Appendix B explains SQL Server security in more detail and provides solutions to these problems.
- Failed to generate a user instance of SQL Server due to failure in retrieving the user’s local application data path. Please make sure the user has a local user profile on the computer. The connection will be closed — You can get this error when you forget to enable the “Load User Profile” option discussed in the Try It Out titled “Configuring your Site.”
- HTTP Error 500.21 - Internal Server Error Handler “PageHandlerFactory-Integrated” has a bad module “ManagedPipelineHandler” in its module list Detailed Error Information — You get this error when ASP.NET is not registered with IIS. Refer to the section labeled “Installing and Configuring ASP.NET” to learn how to fix this issue.
- Runtime Error Description: An application error occurred on the server. The current custom error settings for this application prevent the details of the application error from being viewed. Details: To enable the details of this specific error message to be viewable on the local server machine, please create a <customErrors> tag within a “web.config” configuration file located in the root directory of the current web application. This <customErrors> tag should then have its “mode” attribute set to “RemoteOnly”. To enable the details to be viewable on remote machines, please set “mode” to “Off” — You may get this error when a runtime error occurs and the
Web.configdoes not contain a<customErrors>element. However, you may also get the same error when theWeb.configfile itself contains an error; for example, if you forget to close an element. To fix this latter category of errors, open the file in Visual Studio and it provides you with more details about the error.
If you are deploying to a machine that also has SQL Server Express Edition installed, you are done with the deployment process now. However, if you’re dealing with a different SQL Server, the only thing that’s left to do is to make sure your new site has the required data. You see how to do this next.
MOVING DATA TO A REMOTE SERVER
Releasing a site to IIS on your local machine is pretty straightforward. You simply copy the data to a new location, configure IIS, change a few security settings, and that’s it. Because the site continues to use your local copy of SQL Server, it will run fine.
However, in the real world when you need to move your site to an external server or host, things are not so easy. Although copying the files that make up your site is usually extremely simple using an FTP program, copying data from your SQL Server database to your host is quite often a bit trickier. This is because most web hosts don’t support the free Express or LocalDB Editions, so you can’t just simply copy the .mdf files to the App_Data folder at your remote host. Instead, these hosts often offer the full versions of SQL Server, which you can access either with a web-based management tool or with tools such as SQL Server Management Studio.
Getting your database data from your local machine to your remote host is typically a two-step process:
1. Create a .sql script from your local SQL Server database.
2. Send this script to your host and execute it there.
In the next section, you see how to export your database to a .sql file. I won’t show you how to run that file at your host to re-create the database because this is different from host to host. Instead, I will give you some general pointers so you know what to look for with your host.
To make it easy to transfer data from your local SQL Server database into a SQL Server database of your web host, SQL Server Management Studio comes with a tool to export your database structure and data to a file. This file contains all the information required to re-create your database and its data at a remote server.
In the following exercise, you see how to use SSMS to export your database to a file.
This exercise assumes you’ve already downloaded and installed SQL Server Management Studio Express Edition. If you haven’t already done this, refer to the start of Chapter 12 for more details.
1. Start SQL Server Management Studio from the Start menu or Start screen. You should see a screen similar to Figure 19-14.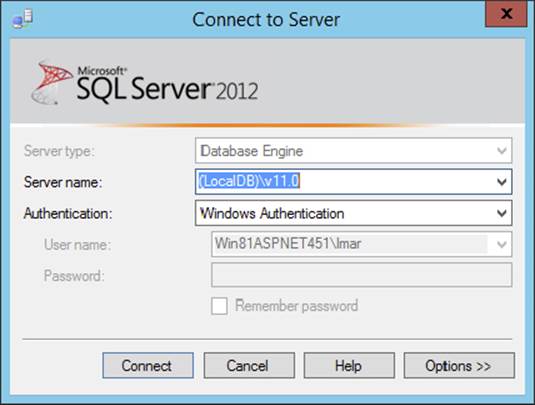
FIGURE 19-14
2.
(localdb)\v11.0 as the server name, and click Connect. Your PlanetWrox database should already be listed under the Databases node, but if it’s not, right-click the Databases node, click Attach, and then browse for the PlanetWrox.mdf file in yourC:\BegASPNET\Site\App_Data folder.
3. Right-click the PlanetWrox database and choose Tasks ⇒ Generate Scripts. If you get a welcome screen, click Next. Ensure that Script Entire Database and All Database Objects is selected, and then click Next. The dialog box shown in Figure 19-15appears.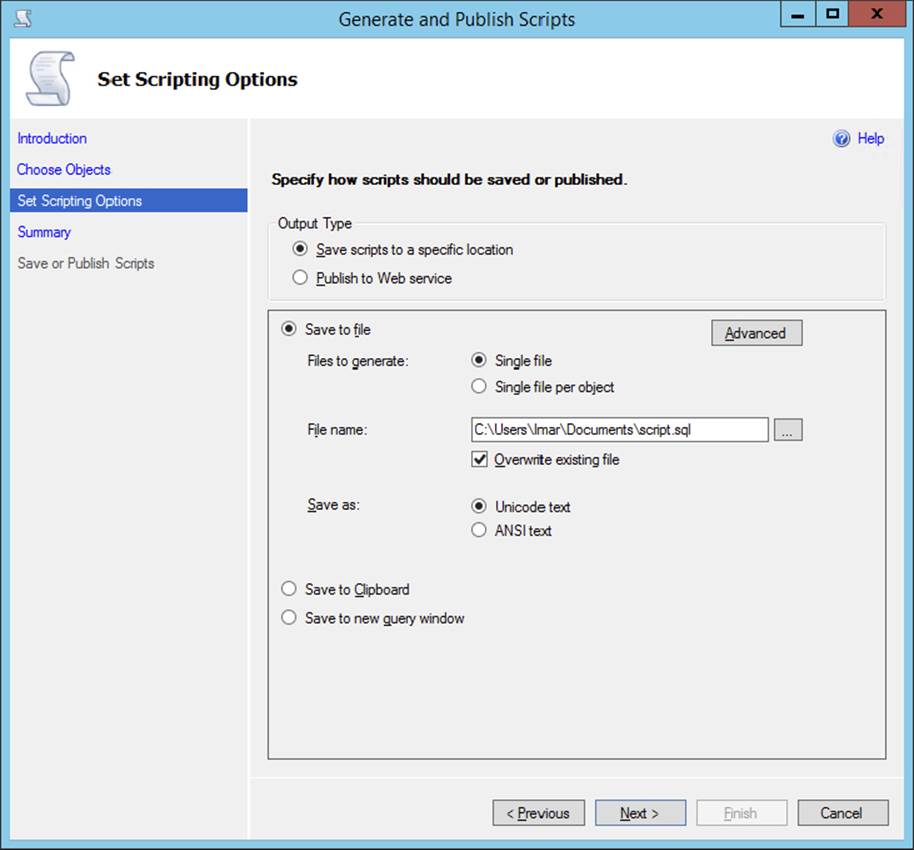
FIGURE 19-15
4.
App_Data folder, which likely won’t work on a machine other than your own. Click OK to close the Advanced Scripting Options dialog box.
5. Click Next twice and the wizard generates the SQL script for you in your Documents folder (as specified in the File Name box shown in Figure 19-15). Open the file in Notepad and look at the SQL statements it contains. Although most of it probably looks like gibberish to you, it can be used as is to re-create the database structure and data on a compatible SQL Server database.
The contents of a database can be separated into two categories: the structure of the database and the actual data. When the scripting tool runs, it investigates the structure of your database first and creates SQL CREATE statements for all the items it finds in your database, such as the tables you created in earlier chapters. It then creates INSERT statements that re-create all records such as Reviews, Genres, and even users in the target database. By clearing the Script All Objects check box at the beginning of the wizard, you can selectively choose parts of your database, enabling you to script only a few tables, for example.
At the end, the scripting tool assembles all the SQL statements and saves them to a single .sql file. This file is now ready to be run at your host to re-create the database.
Recreating the Database
Although every host has its own rules and procedures when it comes to providing access to its SQL Server, they can be grouped in three categories.
First, some hosts don’t give you remote access to their database and require you to submit a
.sql file so they can execute it for you. In this case, you don’t have to do anything other than send the file and wait for the host to create your database.
The second category contains the hosts that allow you to execute SQL statements through a web interface. You typically log in to your online control panel and then execute the SQL statements created by the scripting tool, either by uploading the file or by pasting its contents in a text area in a web page. Regardless of the method, you then end up with a database that you can access from your application. How this works exactly is different with each host, so consult the hosting service’s help or support system for more information. Some known issues exist with web-based database management tools from some providers, resulting in errors when you try to run the generated SQL file. Although the file itself is technically valid, the tool may still run into issues with it. If that’s the case, contact your host for help on resolving the issue. If you run into issues, one of the things you may want to try is to save your SQL file in a different format. The default format is Unicode, which not all providers understand. To change the format, choose ANSI Text for the Save As option when exporting your data, as shown in Figure 19-15.
The final category contains hosts that allow you to connect to their SQL Server over the Internet. This enables you to use tools like SQL Server Management Studio to connect to the database at your host right from your desktop and execute the SQL scripts remotely. Refer to the first exercise in the section “Using SQL to Work with Database Data” of Chapter 12 to learn more about executing SQL files against a database using SSMS.
After your database is re-created at your target server, you need to reconfigure your ASP.NET application to use the new database by changing the connection strings in your website. For this to work, you need to modify two connection strings: thePlanetWroxConnectionString1 and the PlanetWroxEntities you created in an earlier chapter. How your connection string must look depends on the database you are using and its configuration. Your hosting company or database administrator typically provides this information. For many examples of proper connection strings, check out www.connectionstrings.com. The following snippet provides a simple example that reconfigures your application to use a database server called DatabaseServer. This example shows a connection string for a SQL Server that requires you to log in with a username and password (in your configuration file, each connection string should be on a single line):
<connectionStrings> <add name="PlanetWroxConnectionString1" connectionString="Data Source=DatabaseServer;Initial Catalog=PlanetWrox;User Id=YourUserName; Password=YourPassword;" providerName="System.Data.SqlClient"/> <add name="PlanetWroxEntities" connectionString="metadata=res://* /App_Code.PlanetWrox.csdl|res://*/App_Code.PlanetWrox.ssdl|res://* /App_Code.PlanetWrox.msl;provider=System.Data.SqlClient; provider connection string="Data Source=DatabaseServer; Initial Catalog=PlanetWrox;User Id=YourUserName;Password=YourPassword; MultipleActiveResultSets=True"" providerName="System.Data.EntityClient"/></connectionStrings>This points both connection strings for the PlanetWrox database to a different SQL Server. Consult Appendix B for more information about configuring your ASP.NET application and SQL Server to operate with each other. Don’t forget to add the same code to your deployment .config file in Visual Studio so the next time you publish the site the target Web.config has the correct settings.
At this stage, you’re pretty much done configuring your newly created website. Congratulations! However, before you relax and start enjoying your new website, read the following checklist that helps you secure your site and improve its performance.
THE DEPLOYMENT CHECKLIST
Instead of ending this chapter with general tips about deployment, this section gives you a practical list of things to check when you’re ready to put your website in production:
- Make sure you don’t have debugging enabled in the
Web.configfile. This causes unnecessary overhead and decreases performance of your website, because code executes slower and important files cannot be cached by the browser. To ensure debugging is disabled, open theWeb.configfile you are using for your production environment, and verify thatdebugis set tofalse:
<compilation debug="false">If you use the Web.config transformations as described in the book, your target Web.config should have this setting turned off already.
- Make sure you have turned on custom errors by setting the
modeattribute of thecustomErrorselement inWeb.configto eitherOnorRemoteOnly. In the first case, everyone sees your custom error pages, and in the second case, only users local to the web server can see the error details. Never leave themodeset toOff, because doing so can lead to information disclosure. The following snippet shows a safe configuration of thecustomErrorselement:
·<customErrors mode="On" defaultRedirect="~/Errors/OtherErrors.aspx">
·Optional <error /> elements go here
</customErrors>- Disable tracing, or at least limit the trace information to users coming from the local machine. The following
<trace />element fromWeb.configblocks tracing for users coming from machines other than the web server itself. Additionally, it stops the trace information from appearing in the page:
·<trace mostRecent="true" enabled="true" requestLimit="1000"
pageOutput="false" localOnly="true"/>- Consider setting the
retailattribute of the deployment element inmachine.configtotrue:
·<configuration>
·<system.web>
·<deployment retail="true"/>
·</system.web>
</configuration>This section is used to indicate that the server hosts production-ready versions of your sites, and for all sites on the server, changes all three previous items to a secure setting: Debugging and tracing are disabled, and error messages are accessible only to local users.
To make this change, you need to be logged in as an administrator on your system. Also, be sure to make a backup copy of the file first. Because it serves as the root configuration file for all your ASP.NET websites, you don’t want to mess up this file.
- Scan your site for important files that may contain sensitive information (like Word or text documents) and either exclude them from the release version or consider moving them to the
App_Datafolder. Files in that folder cannot be accessed directly. However, your own code can still access the files, as you saw in Chapter 9. - Make sure you turn on error logging. With the error logging code you created in the previous chapter, you are notified whenever an error occurs, enabling you to proactively keep an eye on your server, fixing errors before they get a chance to happen again.
- If you are using themes in your site, make sure you remove the
styleSheetThemeattribute from the<pages>element inWeb.config. The Planet Wrox website uses themes, but you added thestyleSheetThemeattribute to enable design-time support in Visual Studio. On your production server, all you need is this:
·<pages theme="Monochrome">
·...
</pages>This way, the page won’t include the same style sheet twice.
WHAT’S NEXT
Now that you have finished your first ASP.NET website, I am sure you are looking forward to creating your next site. The Planet Wrox site can serve as a basis for new sites you will build. You probably won’t use any of its pages in your site directly, but hopefully this book and the Planet Wrox website inspired you enough to build a new website on your own.
Because this book is aimed at beginners, I haven’t been able to provide you with a lot of in-depth information on some important topics. Most subjects that have their own chapters in this book easily warrant an entire book on their own. For example, topics like CSS, AJAX, and LINQ are so extensive that Wrox has published many books about them. Now that you’ve mastered the basics of these technologies, you can dig deeper into them using the following books in the Wrox Professional series:
- Professional CSS: Cascading Style Sheets for Web Design, 3rd Edition (ISBN: 978-0-470-89152-0)
- Professional ASP.NET 2.0 Design: CSS, Themes, and Master Pages (ISBN: 978-0-470-12448-2)
- Professional ASP.NET 4.5 in C# and VB (ISBN: 978-1-118-31182-0)
- Professional LINQ (ISBN: 978-0-470-04181-9)
- Professional Microsoft IIS 8 (ISBN: 978-1-118-38804-4)
Of course, the web is also a good place for more information. The following URLs may be helpful in your search for more information about ASP.NET and its related technologies:
- http://p2p.wrox.com — The public discussion forum from Wrox where you can go for all your programming-related questions. This book has its own category on that site, enabling you to ask targeted questions. I am a frequent visitor to these forums and I’ll do my best to answer each question you may have about this book.
- http://imar.spaanjaars.com — My own website where I keep you up to date about various web programming-related topics.
- http://www.asp.net — The Microsoft community site for ASP.NET technology. Go here for news on ASP.NET, additional downloads, and tutorials.
- http://msdn.microsoft.com/asp.net — The official home for ASP.NET at the Microsoft developers website that gives you a wealth of information on ASP.NET.
SUMMARY
Obviously, deployment is an important action at the end of the development cycle of your new website. However, it’s unlikely that you will deploy your site only once. As soon as you release the first version of your site, you’ll think of other new and cool features you want to add, making the development of your site a continuous process. To accommodate for this, you need to make your site easy to deploy.
One way to do this is by moving hard-coded configuration settings to the Web.config file, giving you a single location to change parameters for the site in your development and production environments.
When you’re ready to roll out your site, it’s a good idea to create a copy of your site and clean that up before you send the files to your target server. Copying and then publishing a site is a breeze with the Publish Web Site command.
Because you will deploy your site against IIS, you need to understand some important settings of this web server. In this chapter, you saw how to configure the Default Web Site and make some configuration changes. Because of the way security works in Windows and IIS, you also need to configure your hard drive so that the accounts used by the web server can read the files in your site and write to specific folders such as App_Data and GigPics.
This chapter has no exercises, because the Planet Wrox site is now completely finished. However, your biggest challenge starts now: building websites with the knowledge you gained from this book. If you ever build a site with the information from this book and want to share it with me, please contact me through my website at http://imar.spaanjaars.com. Have fun!
WHAT YOU LEARNED IN THIS CHAPTER
|
.NET assembly |
A file with a |
|
Application pool |
A mechanism to isolate (one or more) websites in IIS to give them their own set of resources |
|
Deployment |
The process of releasing a website from your development environment to the production environment |
|
Expression syntax |
A technique that enables you to bind control properties to different resources, such as application settings defined in |
|
IIS |
Internet Information Services — Microsoft’s web server for the Windows platform |
|
Integrated Pipeline mode |
With Integrated Pipeline mode turned on for an application pool in IIS, ASP.NET and IIS are tightly integrated, enabling you to use ASP.NET techniques for non-.NET resources such as static files. |
|
Precompilation |
The process of compiling a web application into a set of |
|
WebConfigurationManager class |
A .NET Framework class that provides access to data that is stored in configuration files |