C# FOR BEGINNERS CRASH COURSE (2014)
Chapter 2 Program Structure in C#
2.1 Introduction to C# Program structure
C# Program consists of various parts. We shall explore all the components needed for a C# program.
Consider the code demonstrating the C# program.
|
|
|
using System; namespace welcome public class WelcomeUser { static void Main( string[] args) { Console.WriteLine("WelcomeUser"); Console.Read(); } } |
The code consists of several parts. They are as mentioned below:
Namespace declaration
The namespace consists of collection of classes used in programming. Theusing keyword is used for adding the System namespace. The System class consists of classes and methods useful for the user.
In the above code, namespace welcome is added.
Class
The class consists of data and method definitions used by the program. The class can have one or many methods. Every class must have a Main method, which is the first method run in the code. In the above code, WelcomeUser class is declared.
Class Methods
Methods in a class specify the behavior of the statement. In the above code, WriteLine method is used for writing the value in the console. It is defined in the Console class inside the System namespace.
The Read method of the Console class is used for waiting till the user hits a key. Thus prevents the screen from closing too quickly.
Comments
Comments are text useful for providing additional information about the code. The compiler ignores any code that is placed inside a comment block. There are two types of comments; one comment is used for single line entries and the other for multi line entries.
For example:
|
|
|
using System; namespace comment /*It is a simple code Used for writing value to the console */ class Demo { static void Main() { //It is added inside Main method Console.WriteLine("Demonstration of code"); } } |
2.2 User Interface elements
There are various user interface elements present in the Visual Studio application that can be used in a project. We shall explore the user interface elements in detail.
Start Page
The Start Page is the initial page that gets displayed when the user opens the Microsoft Visual Studio application.
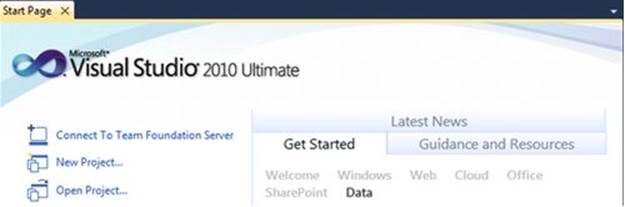
The Visual Studio IDE provides the start page as the default home page. Through the start page user can specify the preferences, developer communication using the .NET platform, exploring new .NET features.
In Visual Studio .NET, the Projects tab displays the recent projects and the latest modification date. User can use any of the existing projects from the list. Click on the New Project button when you need to work for a new project. Click on the Open project button when user wants to open the existing project.
Standard Toolbar
The standard toolbar is used to provide the shortcut menu commands. There are several buttons on the toolbar that help user to perform tasks related to opening, closing, saving, editing, pasting on the file.
There are functions related to the tools present in the standard toolbar. They are as listed below.
· New Project: A new project can be created in the application. The ![]() button is used.
button is used.
· Add New Item: A new item is added to the project. The ![]() button is used
button is used
· Save: All the programs created in a particular solution are saved. The ![]() button is used
button is used
· Save All: It saves all the unsaved items in an application. The ![]() button is used
button is used
· Cut: The selected objects are placed on the clipboard using this option. The ![]() icon is used
icon is used
· Copy: The copy of the selected item is kept on the clipboard. The ![]() icon is used
icon is used
· Paste: It is used to paste the contents in the document. The ![]() icon is used
icon is used
· Debugging: The compilation and execution of the project is done. The ![]() icon is used.
icon is used.
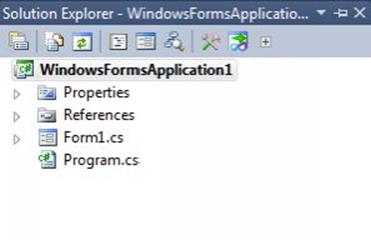
Solution Explorer
In the solution explorer window, classes, project and solution name used in the project gets displayed. Double click the file in the solution explorer for opening the file.
The following figure shows the solution explorer window in application.
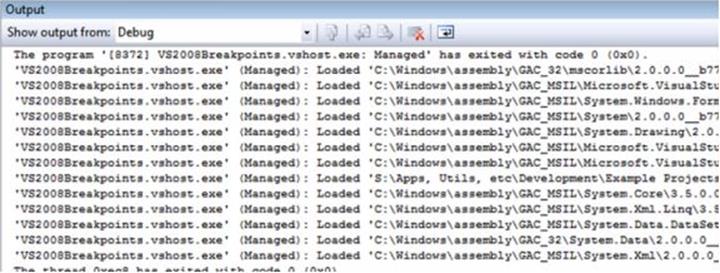
Output window
The messages for the status of the features of Visual Studio .NET IDE are provided by the output window. The current status of the application is displayed when the user compiles it. The number of errors present during compilation is displayed in the window. The View -> Output Windowoption is used to open the window.
The following figure shows the output window in Visual Studio application.
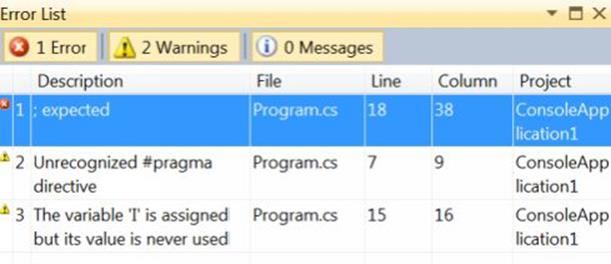
Error List
The list of errors present in the application is displayed in the error list window. The user can locate errors as soon as the code is compiled. Double click the error and the source for it is located. Click View, Error List Window option to open the error list window.
The following figure shows the error list window.
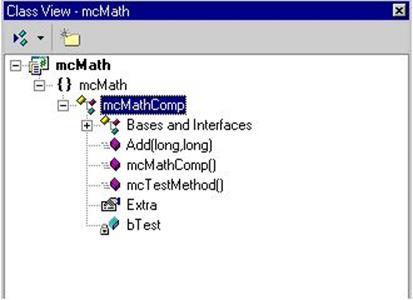
Class View Window
The class view window is useful in displaying classes, properties and methods associated with a file. The tree view structure is used to display the items. The code editor window can be viewed by double clicking the item.
The window contains two buttons, one for sorting the items, other for new folder creation. The View, Class View option is used for opening the class view window.
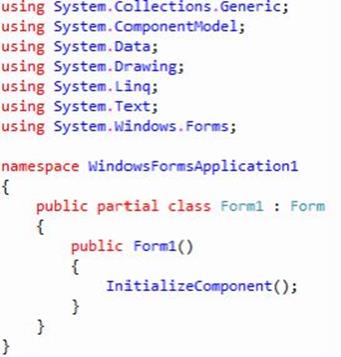
Code Editor
User can enter or edit code in the code editor. User can add code to the editor for the class.
The following window shows the code editor.
2.3 Compiling and executing C# program
There are some steps involved in compiling and executing the program as mentioned below:
1) Open Visual Studio application
2) Click File, New, Project option from the list
3) Select the Visual C# template and select Windows option
4) Select the console application template from the template list
5) Add a project name and click OK button
6) A new project is created in the solution explorer window
7) Add the needed code in the code editor window
8) Press F5 or click the Run button for project execution. User can view the output for the code
The compiling of the code of C# program using the command line of the Visual Studio IDE is possible.
1) Add the code in the text editor and save the file with .cs extension
2) Open the command prompt and navigate to the file
3) The csc filename.cs and compile the code
4) The command prompt moves to the next line and creates an executable file
5) Add the filename and execute the program
All materials on the site are licensed Creative Commons Attribution-Sharealike 3.0 Unported CC BY-SA 3.0 & GNU Free Documentation License (GFDL)
If you are the copyright holder of any material contained on our site and intend to remove it, please contact our site administrator for approval.
© 2016-2026 All site design rights belong to S.Y.A.