C# Programming for Beginners (2015)
Chapter 1: Creating Your First C# Program
C# is Microsoft’s premier programming language and is an integral part of the Microsoft .NET framework. C# is a completely object oriented and type safe language. If you are looking forward to developing applications with Microsoft’s programming technologies, C# is the best place to start. C# is currently being used for developing ASP.NET web applications, Windows forms, and WPF based desktop applications. With the advent of smart phones, C# is also used for Windows phone apps development and Android application development.
This book presents a basic overview of the core features of C# language. After reading this book you will be able to jump in to Microsoft’s advanced programming technologies, such as ASP.NET, WCF, WPF, and Windows phone. The first chapter of this book explains how to install the IDE, integrated development environment, and how to create your first C# application.
Contents
· Installing the IDE
· Creating and Running the First Application
1- Installing the IDE
The best software for developing C# applications is, without any doubt, Microsoft’s Visual Studio integrated environment. It contains everything it takes to build professional C# applications. However, the full edition of Visual Studio is commercial. In this book, we are going to develop C# applications without spending a cent. To do this, we are going to download a trimmed-down version of Visual Studio, which is totally free. This software has more than enough features and functionality for developing basic C# applications. Follow these steps to download the software:
· Go to the following link: http://www.visualstudio.com/en-us/products/visual-studio-express-vs.aspx
· Scroll down the page and find the link for “Express 2013 for Windows Desktop”. Click “Download” to download the installation file. This is shown in the following figure:
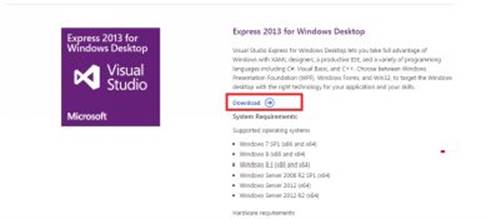
Fig 1.0
· The page that appears will ask you to login with your “Windows Live ID” or a “Microsoft Account.” If you don’t have one, sign up on that page.
· Once you create your ID and provide details such as your full name and country, you will be presented with a couple of versions of VS 2013 Express to download. Choose the latest version for the Windows Desktop. In this example we will be downloading “Express 2013 for Windows Desktop.” This is shown in following figure:
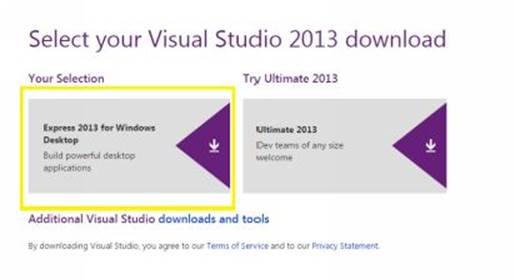
Fig 1.1
· This will download the installation exe for “Visual Studio Express 2013 for Windows Desktop.” The name of the download file will be “wdexpress_full.exe”.
· Open the downloaded file. The installation wizard appears. Agree to license terms and privacy policy and click the "Install” button at the bottom. This is shown in the following figure.
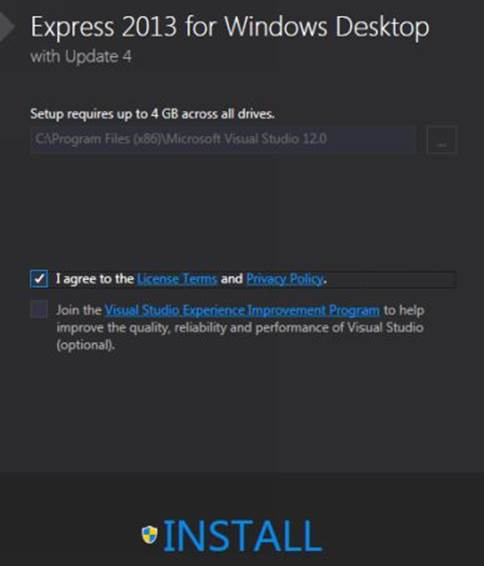
Fig 1.2
And that’s it. The wizard will download the required C# components for developing web applications. You just have to keep clicking the “Next” button in the installer.
2- Creating and Running the First Application
To create your first C# application, open “Visual Studio 2013 Express,” which you downloaded in the last section. Follow these steps:
· Open File => New => Project from the menu bar as shown in the following figure:

Fig 1.3
· From the options that appear, choose “Console Application.” In the “Name” and “Location” text fields at the bottom, enter the name and location of your choice. Keep the “Create directory for solution” option checked and click the “OK” button as shown in the following figure:
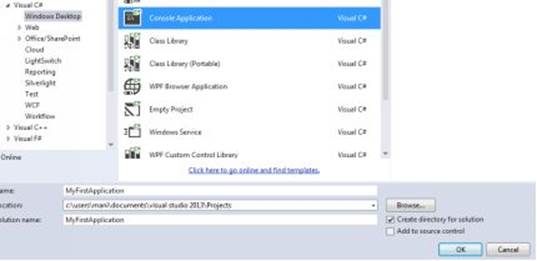
Fig 1.4
Note:
Your options might be different depending on the version of visual studio you have installed. However, remember that you have to select the “Console Application” type in any version you use.
· Once you click the “OK” button in figure 1.4, visual studio will automatically create a basic program for you. Replace the default code snippet with following:
using System;
namespaceMyFirstApplication
{
class Program
{
static void Main(string[] args)
{
Console.WriteLine("Welcome to C#");
Console.Read();
}
}
}
· Click on the “Start” button next to the green triangle in the tool bar. This is highlighted with a yellow rectangle in Fig 1.5. You will see the output of your code on the console. The string “Welcome to C#” which you wrote inside the “Console.WriteLine” method will be displayed on screen.
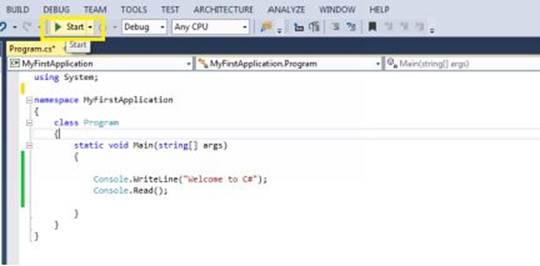
Fig 1.5
In the code in Fig 1.5, just keep in mind that everything in C# happens inside a class. The “Program” class is where code execution starts, since it contains the “Main” method. When you run a program, the “static void Main (string [] args)” method is called. The first statement which executes is the first statement inside the “Main” method. To add a new class to an existing project, simply right click the project name =>Add => Class.
You’ve completed the first chapter. In this chapter, you learned how to download an IDE, which is used for developing C# applications. You also developed your first C# application, which prints a string on the console screen. In the next chapter, we shall see what type of data a C# program can store and what operations can be performed on that data.
All materials on the site are licensed Creative Commons Attribution-Sharealike 3.0 Unported CC BY-SA 3.0 & GNU Free Documentation License (GFDL)
If you are the copyright holder of any material contained on our site and intend to remove it, please contact our site administrator for approval.
© 2016-2025 All site design rights belong to S.Y.A.