MCSD Certification Toolkit (Exam 70-483): Programming in C# (2013)
Chapter 7
Multithreading and Asynchronous Processing
What You Will Learn in This Chapter
· Understanding threads and thread pool
· Using the Task Parallel Library
· Using concurrent collections
· Implementing asynchronous methods
WROX.COM CODE DOWNLOADS FOR THIS CHAPTER
You can find the code downloads for this chapter at www.wrox.com/remtitle.cgi?isbn=1118612094 on the Download Code tab. The code is in the chapter07 download and individually named according to the names throughout the chapter.
In 1967, Gordon Moore observed that the numbers of transistors that can be fit on the same surface on a silicon chip is doubling every other year. Today, this doubling happens every one-and-a-half years. Until 2005, this translated into several improvements such as doubling the frequency and processing speed, doubling the capacity, cutting the size of the chip in half, and so on. In 2005, the frequency a CPU could operate at reached a plateau. Although the hardware manufacturers could still follow Moore’s law, the frequency could not be increased without major implications, mainly because of the huge heat that got generated by the processor, and that heat needed to be taken care of. So to still benefit from technological advancement outlined by Moore’s law, the hardware manufacturer started to deliver more processing units per processor, known as cores, instead of increasing the speed. Developers now face the biggest challenge of their careers because many are used to thinking and developing applications for machines that have only one core. Fortunately, Microsoft realized that already, so it created new libraries and introduced new paradigms into C# so life can be easier.
In this chapter, you will explore different options you have to improve the performance of your application. This chapter starts by discussing threads and the thread pool, then continues with a discussion about the BackgroundWorker class and how you can use it in WPF and Windows Forms applications. Next, you will look at the Task Parallel Library (TPL), as well as some applications of the TPL, like the Parallel class. After that the chapter covers the new asynchronous programming paradigm introduced by C# 5.0. The chapter then continues the discussion by describing synchronizing access to resources to ensure the correctness of your application and working with concurrent collections. Finally, the chapter by describes cancellations in .NET Framework.
Table 7-1 introduces you to the exam objectives covered in this chapter.
Table 7-1: 70-483 Exam Objectives Covered in This Chapter
|
Objective |
Content Covered |
|
Implement multithreading and asynchronous processing |
Task Parallel Library (ParallelFor, Plinq, Tasks). This includes creating new tasks and using them to increase the performance of your application. |
|
Manage multithreading |
Synchronize resources. This includes using ManualResetEvent and AutoResetEvent classes. |
Creating Responsive Applications
The first computers were created following a logical design called “von Newmann architecture,” which was developed by John von Newmann and other mathematicians in 1945. According to that design, a computer should have one processing unit, a control unit, memory, and an input and output system (IO). The processing unit and the control unit form the central processing unit (CPU). Because the design had only one processing unit, the programs needed to be written for that kind of design were sequential, and most of the programming languages were created to be used in a sequential manner, which is a practice still used in today’s programming languages, including C#. The biggest disadvantage of creating such applications is that whenever your application had to wait for something to happen, the whole system would freeze, creating a very unpleasant user experience. Threads were introduced to minimize this kind of problem.
Working with Threads
Less than 20 years ago, most consumer operating systems (OS) could run one single process with one thread of execution. (A thread is the smallest unit of execution that can be independently scheduled by the OS.) In a single-threaded OS, the computer runs only one application at the time. There was normally a command-line interpreter that was interpreting the commands entered by the user. When a command was entered, the interpreter transferred the control to the processor to the application the command was referring to. When the application was done, it transferred the control back to the interpreter. If you think about it, this made a lot of sense, considering the fact that you had only one thread. The biggest problem was that the user could feel that the computer froze when an application did one of the following two things:
· Intensive calculations
· Fetched some data from the I/O
When your application had to do intensive calculations, there wasn’t too much you could do except either using a quicker computer to decrease the time it took to do the calculation or splitting the problem into smaller ones and distributing it across several computers, both of which are expensive operations, and sometimes it might take longer to do the calculations.
When your application fetched data from the I/O, your CPU was waiting for the data to come, doing no processing in the meantime. To improve the responsiveness of your application, the notion of multithreading was introduced. In a multithreaded application, one thread would spawn another thread to do the fetching and waiting while the parent thread continued to do other work. When the data was needed, the parent thread was blocked waiting for the spawned thread to finish its work. This pattern is known as fork-join pattern.
ADVICE FROM THE EXPERTS: Understanding Threads
Although threads are not explicitly required for the exam, it is the authors’ firm belief that a good understanding of how threads work in Windows can help you become a better programmer and understand this chapter. If you are already familiar with this subject, you can skip this section and jump to the next one, “Spawning New Threads by Using ThreadPool,” after going through the code in this section.
Having one processor, it meant that only one thread could be run at any given time. This can be achieved in two different ways:
· Collaboratively: Every thread must give up the control so that another thread can execute.
· Preemptively: The operating system has a component called scheduler that makes sure that no thread monopolizes the CPU. This is how Windows is implemented.
The Windows scheduler works as follows:
1. Every thread gets a priority assigned when it is created. A created thread is not automatically started; you have to do that.
2. When a thread is started, it will be added on a queue with all the threads that can be run.
3. The scheduler takes the thread with the highest priority on the queue, and it starts to run it.
4. If several threads have the same priority, the scheduler schedules them in circular order (round robin).
5. When the time allotted is up, the scheduler suspends the thread, adding it at the end of the queue. After that, it picks up a new thread to run it.
6. If there is no other thread with higher priority than the one just interrupted, that thread executes again.
7. When a thread is blocked because it has to wait for an I/O operation, or for some other reasons such as locking (discussed later in this chapter in the “Synchronizing Resources” section), the thread will be removed from the queue and another thread will be scheduled to run.
8. When the reason for blocking ends, the thread is added back in the queue to get a chance to run.
9. When a thread finishes the work, the scheduler can pick another thread to run it.
There is one thread called System idle process that does nothing, except keeping the processor busy when there is no other thread to run. This process of time slicing creates the impression that your operating system can run several applications at the same time, including answering to the user interface (UI) commands you send, such as moving the mouse or moving windows around.
In .NET all applications have several threads. Following is a list with some of those threads:
· Garbage Collector thread: Responsible for the garbage collection.
· Finalizer thread: Responsible to run the Finalize method of your objects.
· Main thread: Responsible to run your main application’s method.
· UI thread: If your application is a Windows Form application, a WPF application, or a Windows store application, it will have one thread dedicated to update the user interface.
Except for the main thread, all the threads mentioned so far are background threads. When you create a new thread, you have the option to specify if the thread should be a background thread.
When the main thread and all other nonbackground threads of a .NET application finishes, the .NET application finishes as well.
With the coming of the new multicore and many-core processors, the applications that are written in a multithreaded fashion will inherently benefit from those improvements, whereas the applications written sequentially will underuse the resources available while making the user wait unnecessarily.
NOTE Multicore and many-core are both used to describe systems with more than one core, but there is a difference between them. Multicore refers to CPUs that have several cores of the same type on the same silicon chip. Many-core refers to CPUs that have different kinds of specialized cores on the same silicon chip.
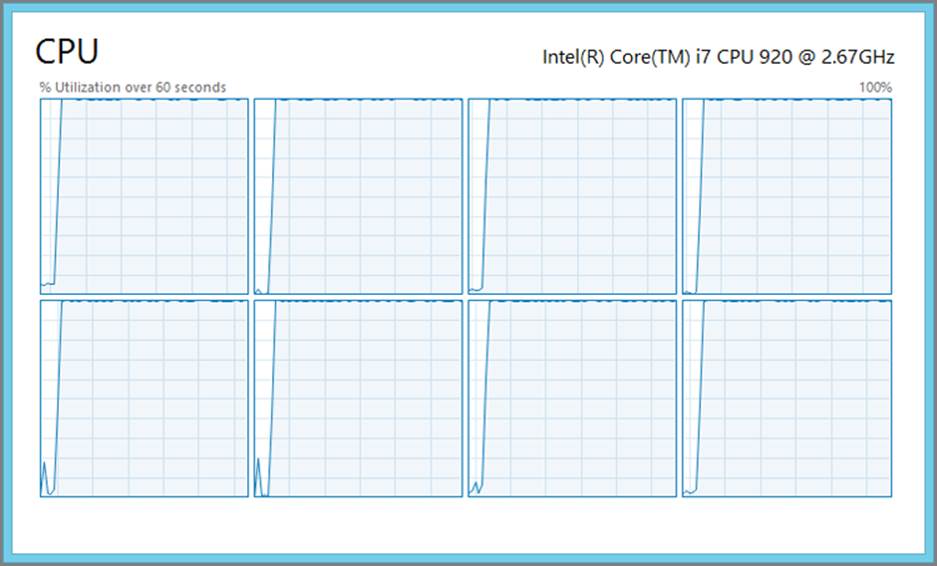
To illustrate what happens when your application is compute-intensive but is written in a sequential manner versus if it were written in a concurrent manner with multiple cores in mind, analyze Figures 7-1 and 7-2.
Figure 7-1: Single-threaded compute-intensive application
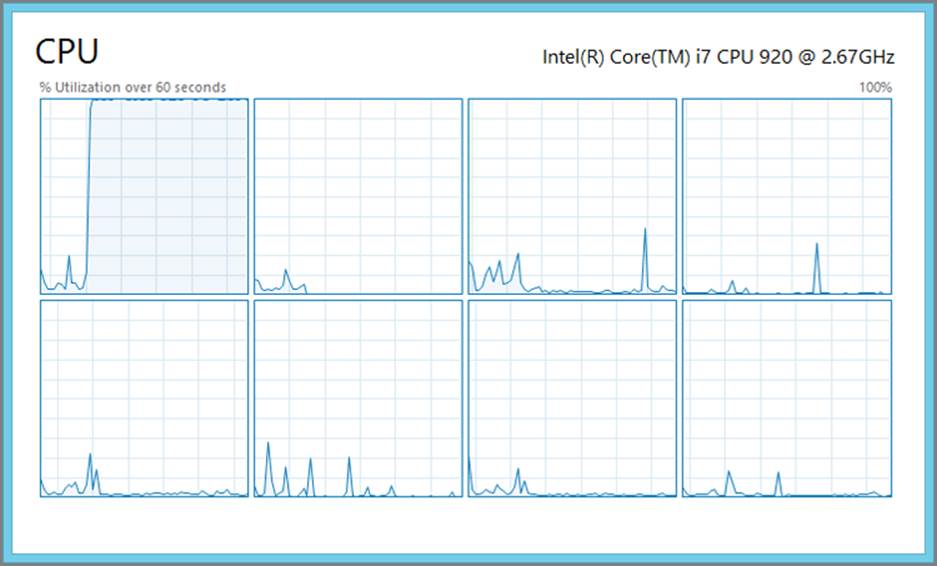
As you can see in Figure 7-1, the CPU on the top left is working at 100 percent load most of the time, whereas the other seven CPUs are idling most of the time. In some situations you might see that the load moves from one CPU to the other, but still there is only one CPU fully loaded by the application at any given time.
The same application in Figure 7-2 is loading all the CPUs to 100 percent. Although this might seem a bad thing in the eye of a system administrator, this is actually a good thing. The reason this might seem a bad thing for the system administrator is because historically a CPU loaded to 100 percent meant that one application entered an endless loop consuming all the resources, impeding other applications on the same machine from doing their job. In this case, you know that the application is compute-intensive and, therefore, is not waiting for any I/O to complete. The scheduler will do its job and ensure that all the threads having the same priority get a chance to run, so 100 percent in this situation just means that the computer is busy working. However, you need to tell your system administrator about your application so she won’t mistake it for an erroneous application.
Figure 7-2: Multithreaded compute-intensive application
Following are some of the disadvantages of multithreaded applications:
· All threads are resource-intensive. They need a lot of memory (1 megabyte is standard), and every time the scheduler has to switch between threads, the processor will be busy saving the context of the suspending thread and restoring the context of the running thread.
· If your application creates too many threads, the context switching consumes a considerable amount of time.
· Because the thread needs so much memory, it usually takes a considerable amount of time for the system to create one tread and takes some time to destroy it as well.
In .NET threads are implemented in the System.Threading.Thread class. Because threads are not required for the exam, you can find more information about the Thread class in the “Additional Readings and Resources” section at the end of this chapter.
It is a straightforward process to work with threads:
1. Create a thread object.
2. Start the thread.
3. Do more work in the calling method.
4. Wait for the thread to finish.
5. Continue the work on the calling method.
Take a look at the following Code Lab.
Code Lab: Using threads [Chapter7\SimpleApp\Program.cs]
class Program {
static void Main(string[] args) {
// We are using Stopwatch to time the code
Stopwatch sw = Stopwatch.StartNew();
// Here we call different methods
// for different ways of running our application.
RunSequencial();
// Print the time it took to run the application.
Console.WriteLine("We're done in {0}ms!", sw.ElapsedMilliseconds);
if (Debugger.IsAttached) {
Console.Write("Press any key to continue . . .");
Console.ReadKey(true);
}
}
static void RunSequencial() {
double result = 0d;
// Call the function to read data from I/O
result += ReadDataFromIO();
// Add the result of the second calculation
result += DoIntensiveCalculations();
// Print the result
Console.WriteLine("The result is {0}", result);
}
static double ReadDataFromIO() {
// We are simulating an I/O by putting the current thread to sleep.
Thread.Sleep(5000);
return 10d;
}
static double DoIntensiveCalculations(){
// We are simulating intensive calculations
// by doing nonsens divisions
double result = 100000000d;
var maxValue = Int32.MaxValue;
for(int i=1; i < maxValue; i++){
result /= i;
}
return result + 10d;
}
}
Code Lab Analysis
This code shows a program that must do two things: read data from I/O and do some intensive calculations. The implementation of the two methods is not important in this context; they simulate the intended behavior. In a real application the assumption is that the ReadFromIO method does real I/O operations, such as reading files or requiring data from the network, whereas DoIntensiveCalculations does calculations needed for the application. Running this application produces the following result:
The result is 20.
We're done in 10437ms.
Because the two methods are independent, you can improve the response time of this code by using threads. To do this, you need to modify the Main method accordingly to call RunWithThreads instead of RunSequencial.
static void RunWithThreads() {
double result = 0d;
// Create the thread to read from I/O
var thread = new Thread(() => result = ReadDataFromIO());
// Start the thread
thread.Start();
// Save the result of the calculation into another variable
double result2 = DoIntensiveCalculations();
// Wait for the thread to finish
thread.Join();
// Calculate the end result
result += result2;
// Print the result
Console.WriteLine("The result is {0}", result);
}
You start by creating a new thread that will run the result = ReadDataFromIO() code. The thread is not started when it is created, so you have to start it by calling the Start() method. This queues this new thread for execution while continuing to run the code in the current method, in this case double result2 = DoIntensiveCalculations(). When the intensive calculation is done, you need to wait for the previously created thread to finish executing. You do that by calling the Join() method. Join blocks the current thread until the other thread is finished executing. When the other thread finishes, Join will return, and the current thread will be unblocked.
Please note that a new variable called result2 has been introduced to hold the result from the second method, instead of using the result variable. (Why this was done is discussed later in this chapter in the “Synchronizing Resources” section.) When you run the application now, you get the following result:
The result is 20
We're done in 5370ms!
As you can see, this cuts the time it took to run the calculation by 5 seconds (the time it took for the I/O operation to complete). This improvement can be achieved for any number of cores. If both methods were doing calculations, you would have reduced the execution time only if you have had two or more cores.
This is a naïve take at the multithreading problem, but it illustrates the problem and the solution quite well.
The number of threads you can end up creating can be big, and because of the resource-intensive nature of the threads, sometimes it is better to have the threads already created.
Spawning New Threads by Using ThreadPool
As discussed in the previous section, threads are expensive resources, and to improve the overall performance of your application, you can choose to pre-create some threads. In .NET there is a class called System.Threading.ThreadPool used when you want to work with threads from the thread pool. This class contains only static methods that are useful when working with the ThreadPool. Table 7-2 lists some of the methods you normally need from that class.
Table 7-2: System.Threading.ThreadPool Methods
|
Method |
Description |
|
GetAvailableThreads |
Returns the number of threads available in the thread pool. This represents the number of threads that can pick up work items from the queue. |
|
GetMaxThreads |
Returns the maximum number of threads that can be created by the thread pool. |
|
GetMinThreads |
Returns the minimum number of threads that will be available in the thread pool. |
|
QueueUserWorkItem |
Adds a request for execution to the thread pool queue. If there are available threads in the thread pool, then the request will execute right away. |
|
RegisterWaitForSingleObject |
Registers a method to be invoked when either the WaitHandle specified as the first parameter gets signaled or when the timeout specified as fourth parameter will elapse. This method has four overloads, one for every mode, that the timeout can be expressed as: int, long, unsigned int, or TimeSpan. |
|
SetMaxThreads |
Sets the maximum number of threads that can be created in the thread pool. |
|
SetMinThreads |
Sets the minimum number of threads that will be available in the thread pool at any given time. |
The preceding list is not complete, and from this list you are more likely to use only one method: QueueUserWorkItem. If you are interested in all the methods that the ThreadPool class has to offer, you can follow the link from the “Additional Reading and Resources” section at the end of this chapter.
The thread pool works in the following way. When you need a long running method to be run in a separate thread, instead of creating a new thread, you call the QueueUserWorkItem method to place a new work item in a queue managed by the thread pool. If there is a thread idle in the pool, it picks up the work item and runs it to completion like any thread will do. If there is no thread available and the total number in the pool is less than MaxThreads, the pool creates a new thread to run the work item; otherwise, the job work item waits in the queue for the first available thread.
SetMinThread is used to prepopulate the pool with threads to improve the performance of your application when you know that you will use the thread pool.
QueueUserWorkItem has two overloads:
· public static bool QueueUserWorkItem(WaitCallback callBack)
· public static bool QueueUserWorkItem(WaitCallback callBack, Object state)
The first parameter is of type System.Threading.WaitCallback, which is a delegate defined as follows:
public delegate void WaitCallback(Object state)
If you recall from Chapter 6, “Working with Delegates, Events, and Exceptions,” this represents a method that takes one parameter of type Object and doesn’t return any value.
Before looking at a code example, you need to know a bit about the differences between threads created manually and threads from the thread pool:
· All the threads from the thread pool are background threads, whereas the manually created threads are foreground threads by default and can be set as background threads as well.
· You can’t abort or interrupt a thread from the thread pool.
· You can’t join a thread from the thread pool. To achieve that, you must use some other mechanisms (discussed later in this chapter in the “Synchronizing Resources” section).
· Threads from the thread pool are reused when they finish their work, whereas the normal threads are destroyed.
· You can’t control the priority of a thread from the thread pool.
More differences exist but are outside the scope of this book.
NOTE The maximum number of threads in the thread pool is different for different versions of .NET and should be treated as an implementation detail. In .NET 2.0 there were 25 threads per core, in .NET 3.5 there were 250, and in .NET 4 there are 1,023 threads for the 32-bit applications and 32,767 threads for the 64-bit applications.
REAL-WORLD CASE SCENARIO: Using the thread pool
Now it’s time to return to the problem. If you skipped the previous section, go back and take a look at the program proposed earlier. This scenario requires for you to create a method named RunInThreadPool that uses the thread pool to run the ReadDataFromIO method and call it from the Main method.
Solution
The RunInThreadPool looks like this:
static void RunInThreadPool() {
double result = 0d;
// Create a work item to read from I/O
ThreadPool.QueueUserWorkItem((x) => result += ReadDataFromIO());
// Save the result of the calculation into another variable
double result2 = DoIntensiveCalculations();
// Wait for the thread to finish
// TODO: We will need a way to indicate
// when the thread pool thread finished the execution
// Calculate the end result
result += result2;
// Print the result
Console.WriteLine("The result is {0}", result);
}
Calling the ThreadPool.QueueUserWorkItem method places the work item on the queue managed by the thread pool. When a thread from the pool is available, it picks up the item and runs it to completion. The only problem is that you don’t know when the thread finishes its work. There is no Join method or something similar. To solve this problem, you need to use some kind of signaling mechanism. (Different signaling mechanisms are discussed later in the “Synchronizing Resources” section.)
If you run the application now, you get the correct result but only because the thread pool thread returns before the other method finishes its work. If you increase the value you send to Sleep to be higher than the total time it takes to run the other method, you will observe that the result will be 10 instead of 20, which is wrong.
Often you won’t use the ThreadPool class directly. Instead you can use other technologies built on top of it, such as Task Parallel Library (TPL), Asynchronous Pattern Model (APM), Event-based Asynchronous Pattern (EAP), Task-based Asynchronous Pattern Model (TAP), or the new async/await keywords.
Unblocking the UI
One of the biggest problems mentioned earlier in this chapter was that your application might become unresponsive, giving the user the impression that the application is hung up. The reason for this is often because heavy work is placed on the thread responsible for updating the UI. To improve the perceived performance of the application, you can move this heavy work into another thread. To achieve that, you have to apply different asynchronous programming patterns. (You can find a detailed explanation of those patterns in the “Additional Reading and Resources” section.)
Windows forms or WPF applications have one thread responsible to update the UI. Any update to the UI should be done through this thread.
If your application targets .NET 4.5, the new async/await programming model (discussed later in this chapter in the “Programming Asynchronous Applications with C# 5.0” section) takes care of this for you. If you target a .NET version prior to 4.5, you must take care of this by yourself.
BackgroundWorker Class
.NET 2.0 introduced a class called System.ComponentModel.BackgroundWorker that abstracts away the thread creation and the usage of the thread pool. Tables 7-3, 7-4, and 7-5 show some of the methods, properties, and events that this class offers.
Table 7-3: System.ComponentModel.BackgroundWorker Methods
|
Method |
Description |
|
RunWorkerAsync |
Registers a start request for the background operation |
|
ReportProgress |
Raises the ProgressChanged event |
|
CancelAsync |
Registers a cancellation request for the background operation |
Table 7-4: System.ComponentModel.BackgroundWorker Properties
|
Property |
Description |
|
CancellationPending |
Set to true if CancelAsync was called for this background operation. |
|
IsBusy |
Returns true after the RunAsync was called and before the background operation completed. |
|
WorkerReportsProgress |
Set this property to true if you want your background operation to report progress updates. |
|
WorkerSupportsCancellation |
Set this property to true if you want your background operation to support cancellation. |
Table 7-5: System.ComponentModel.BackgroundWorker Events
|
Event |
Description |
|
DoWork |
Triggers when RunWorkerAsync is invoked. This is where you call your long-running method. |
|
ProgressChanged |
Triggers when ReportProgress is invoked. |
|
RunWorkerCompleted |
Triggers when the background operation is done. It can be done either because the operation completed successfully, as a response to a cancellation request, or because of an unhandled exception. |
NOTE For a complete list of methods, properties, and events, refer to the “Additional Reading and Resources” section at the end of this chapter.
The workflow of using the BackgroundWorker class is as follows:
1. Create a method that follows the DoWorkEventHandler signature.
2. In this method call the long-running operation. When the operation finishes, assign the result of the operation to the Result property of the DoWorkEventArgs parameter.
3. Create a BackgroundWorker instance.
4. Use the method you created on the first step to subscribe to the DoWork event.
5. Create a method that follows the RunWorkerCompletedEventHandler signature.
6. In this method, get the result of the long-running operation and update the UI.
7. Use this method to subscribe to the RunWorkerCompleted event so that your code knows when the long-running operation is completed. Before reading the result, you must make sure that your long-running operation did not throw an exception by checking the Error property of theRunWorkerCompletedEventArgs parameter. If the property is null, it means that no exception was thrown.
8. Optionally, create a method to be used to report progress, following the ProgressChangedEventHandler signature and subscribing this method to the ProgressChanged event.
9. Call the RunWorkerAsync method to start the background work.
10. If the work supports cancellation and you want to cancel the work, you can call the CancelAsync method.
BEST PRACTICES: Threading with BackgroundWork
The implementation of the BackgroundWork class ensures that in a Windows Forms or WPF application the RunWorkerCompleted event handler is run by a UI thread if the RunWorkerAsync is called by the UI thread. In other words, if you start the background work inside an event handler, the completion event will be run in the UI thread. You can see the implications of this in the next two sections.
Assume that you have a Windows Forms application that has a form with one label called lblResult and one button called btnRun. If you use the long-running method from the previous section together with BackgroundWork, the resulting code might look like this:
public partial class Form1 : Form {
private BackgroundWorker worker;
public Form1() {
InitializeComponent();
worker = new BackgroundWorker();
worker.DoWork += worker_DoWork;
worker.RunWorkerCompleted += worker_RunWorkerCompleted;
}
void worker_DoWork(object sender, DoWorkEventArgs e) {
e.Result = DoIntensiveCalculations();
}
void worker_RunWorkerCompleted(object sender, RunWorkerCompletedEventArgs e) {
lblResult.Text = e.Result.ToString());
}
private void btnRun_Click(object sender, EventArgs e) {
if (!worker.IsBusy) {
worker.RunWorkerAsync();
}
}
static double DoIntensiveCalculations() {
// We are simulating intensive calculations
// by doing nonsens divisions
double result = 100000000d;
var maxValue = Int32.MaxValue;
for (int i = 1; i < maxValue; i++) {
result /= i;
}
return result + 10d;
}
}
Multithreaded Windows Forms Applications
As mentioned earlier, both Windows Forms and WPF applications have dedicated threads that update the UI to avoid a situation that might arise in multithreaded applications, called race conditions. A race condition occurs when two or more threads access shared data, for writing, at the same time. (How to deal with race conditions is covered later in this chapter in the “Synchronizing Resources” section.) If you try to update the UI from another thread, .NET Framework throws an InvalidOperationException containing the following message: "Cross-thread operation not valid: Control 'ctrlName' accessed from a thread other than the thread it was created on." You might not get this exception every time, but this doesn’t make your code correct. The code in the previous section works because you started the background worker from the UI thread. If the background worker would have been started from another thread, you would have gotten the exception mentioned earlier. To solve the problem, change the worker_RunWorkerCompleted method as follows:
void worker_RunWorkerCompleted(object sender, RunWorkerCompletedEventArgs e) {
if (this.InvokeRequired) {
this.Invoke(
new Action<string>(UpdateLabel),
e.Result.ToString());
}
else {
UpdateLabel(e.Result.ToString());
}
}
private void UpdateLabel(string text) {
lblResult.Text = text;
}
This is what you had to do with the preceding code:
1. You moved the UI code in to its own method. In this case you called the method UpdateLabel.
2. In the worker_RunWorkerCompleted method, you now check the InvokeRequired property. This property is defined in the Control class, and as such is present on all the controls on a page. InvokeRequired is set to false if you call it from the UI thread and true otherwise.
3. If you are in the UI thread, you just call the UpdateLabel method. If you are in another thread, you must call the Invoke method, which is defined on the Control class.
4. The Invoke method takes as the first parameter a delegate, meaning any method can be placed there. The new Action<string>() constructor call is used to make sure that you get a delegate. If your method has a different signature, you must change that constructor accordingly. The rest of the parameters of the Invoke method are sent directly to the method you want to run. Invoke places the method call in a queue to be picked up by the UI thread.
Multithreaded WPF Applications
Like with Windows Forms applications, WPF applications have a dedicated UI thread. Unlike Windows Forms, WPF has an extra thread responsible for rendering the UI. This second thread is private to WPF, and you don’t have access to it from your application. For detailed information about the threading model in WPF, consult the “Additional Reading and Resources” section at the end of this chapter.
Now see how the application from the previous section looks in the WPF world. Start by assuming that you have a WPF application that has a main window. On that window you have a button called btnRun and a label called lblResult. A possible implementation of the MainWindow class that calls the DoIntensiveCalculation method can look as follows:
public partial class MainWindow : Window {
private BackgroundWorker worker;
public MainWindow() {
InitializeComponent();
worker = new BackgroundWorker();
worker.DoWork += worker_DoWork;
worker.RunWorkerCompleted += worker_RunWorkerCompleted;
}
void worker_RunWorkerCompleted(object sender, RunWorkerCompletedEventArgs e) {
lblResult.Content = e.Result;
}
void worker_DoWork(object sender, DoWorkEventArgs e) {
e.Result = DoIntensiveCalculations();
}
private void btnRun_Click(object sender, EventArgs e) {
if (!worker.IsBusy) {
worker.RunWorkerAsync();
}
}
static double DoIntensiveCalculations() {
// We are simulating intensive calculations
// by doing nonsens divisions
double result = 100000000d;
var maxValue = Int32.MaxValue;
for (int i = 1; i < maxValue; i++) {
result /= i;
}
return result + 10d;
}
}
As you can see, the code for the WPF application looks almost the same as the one for the Windows Forms application. The only difference is how you update the label—instead of the setting the Text property, you set the Content property. This solution suffers from the same issue that the Windows Forms solution suffered from. If the background worker is triggered from another thread than the UI thread, when you try to update the UI, the .NET Framework throws an InvalidOperationException with the message: The calling thread cannot access this object because a different thread owns it. The solution to this problem resembles the one in the previous section but is much simpler. The new worker_RunWorkerCompleted should look like the following:
void worker_RunWorkerCompleted(object sender, RunWorkerCompletedEventArgs e) {
this.Dispatcher.Invoke(()=> lblResult.Content = e.Result);
}
As you can see it is enough to call the Dispatcher.Invoke method in all the situations. This call ensures that the lambda expression ()=> lblResult.Content = e.Result is run by the UI thread, regardless from which thread the method is called.
BEST PRACTICES: Updating the UI
When you need to update the UI, make sure that you keep the non-UI work to a minimum. You should dispatch only the code that updates the UI (in the previous example, only the code that updates the label). If in your code, after you get the result from the background worker, you need to do some more processing before updating the UI, do that processing before you call the Dispatch.Invoke method for WPF applications or Invoke method for Windows Forms applications.
Working with the Task Parallel Library
One of the shortcomings of using threads is that they are resource-intensive. When you start a thread, that thread competes with other threads for the CPU in order to run. Sometimes a thread it is interrupted in the middle of an operation and must wait for its turn to run again to be able to complete that operation.
Most of the time you need to perform some work unitarily and get back the result. You don’t care about the underlying implementation in the OS. This unit of work is called task and can be run independently. Microsoft introduced a new library, TPL, which is a collection of classes designed to abstract away the threads.
Introducing Task
With .NET 4 Microsoft introduced the Task class, which represents an asynchronous operation. The tasks are as well a way to abstract away the need for threads from the programmer. It uses threads from the thread pool but offers a great deal of flexibility and control over how the task is created. The Task class is defined under the System.Treading.Tasks namespace. There are two task classes: Task and Task<TResult>. The first one is used when you run a method as a task and you don’t have or don’t need the return value, and the second one is used when you run a function as a task and you want to use the return value.
The methods and properties used most often are described in Tables 7-6 and 7-7, respectively.
Table 7-6: System.Threading.Tasks.Task Methods
|
Method |
Description |
|
ContinueWith |
Creates new task that will be started asynchronously when the current task completes. |
|
Delay |
This static method creates a task that is marked as completed after the specified delay. |
|
Run |
This static method adds a request for work on the thread pool and it returns a Task object. |
|
Start |
Starts the task represented by this instance. |
|
Wait |
Waits for the task represented by this instance to complete. |
|
WaitAll |
This static method waits for all tasks sent as parameters to complete. |
|
WaitAny |
This static method waits for any of the tasks sent as parameters to complete. |
|
WhenAll |
This static method creates a task that is marked as completed when all tasks sent as parameters complete. |
|
WhenAny |
This static method creates a task that is marked as completed when any of the tasks sent as parameters complete. |
Table 7-7: System.Threading.Tasks.Task Properties
|
Property |
Description |
|
CurrentId |
This read-only static property retrieves the ID of the currently executing task. |
|
Exception |
This read-only property retrieves the unhandled AggregateException, if any, that caused the task to end its execution. |
|
Factory |
This read-only static property returns a factory object that can be used to create a new task. |
|
ID |
This read-only property gets the ID of a particular task instance. |
|
IsCanceled |
This read-only property is set to true if the task completed because it was canceled. |
|
IsCompleted |
This read-only property is set to true when the task completes. |
|
IsFaulted |
This read-only property is set to true if the task completes because of an unhandled exception. |
|
Status |
This read-only property returns the status of the task. |
|
Result |
This read-only property gets the value returned by the asynchronous operation represented by this task. |
For a complete list of methods and properties, refer to the “Additional Reading and Resources” section at the end of this chapter.
The static property Factory is of type TaskFactory and is used to create new tasks. Table 7-8 describes some of the most common methods.
Table 7-8: System.Threading.Tasks.TaskFactory Methods
|
Method |
Description |
|
ContinueWhenAll |
Creates a task that starts when all the tasks sent as parameters complete. |
|
ContinueWhenAny |
Creates a task that starts when any of the tasks sent as parameters complete. |
|
FromAsync |
Several overloaded methods used to bring old APM code to the new TAP model by wrapping a task around the asynchronous call. |
|
StartNew |
Several overloaded methods used to create a task and start it. |
For a complete list of methods and properties, refer to the “Additional Reading and Resources” section at the end of this chapter.
Creating Tasks
You can create a task in several ways:
· You can create an instance of Task. This method of creating is useful when you want to update code that uses threads to use tasks instead. The task is not started, so you must call the Start method.
· You call one of the overloads of the static method TaskFactory.StartNew. Those methods create and start the tasks.
· You call one of the overloads of the static method Task.Run. Those methods create and start the tasks. This is a simplified wrapper for TaskFactory.StartNew.
· You can call one of the continuation methods. Those are Task.WhenAll, Task.WhenAny, TaskFactory.ContinueWhenAll, TaskFactory.ContinueWhenAny.
TaskFactory.StartNew offers a great deal of flexibility. When you create a new task, you need to specify at least the method or function that you want to run as a task. In addition, you can specify options for creating the task, a cancelation token, and a scheduler that queues tasks into threads. (Schedulers are discussed in the next section, and cancellation will be discussed later in this chapter in the “Working with Cancellations” section.)
TaskCreationOptions enumeration describes the options for creating tasks. Table 7-9 describes the options.
Table 7-9: System.Threading.Tasks.TaskCreationOptions Members
|
Member Name |
Description |
|
None |
Default behavior. |
|
PreferFairness |
Tasks should be scheduled in a fair manner. This is just a hint and the intended result is that tasks scheduled sooner will have a better chance to be run sooner, and tasks scheduled later will be more likely to be run later. |
|
LongRunning |
This is used to specify that the task will take a long time to complete. This is just a hint and the result will be oversubscription. Oversubscription allows the scheduler to create more threads to run the tasks than the available number of hardware threads. |
|
AttachedToParent |
The newly created task is attached to the parent task in the hierarchy. |
|
DenyChildAttach |
Specifies that no child tasks are allowed to be attached to the current task. If you attempt to attach a child task to this newly created task, an InvalidOperationException will be thrown. |
|
HideScheduler |
Specifies that the current scheduler should not be used when creating new tasks from this newly created task. Those new tasks should use Default as the current scheduler when they are created. |
This enumeration is decorated with the FlagsAttribute, meaning that these options can be combined.
Now take a moment to look at some code that deals with tasks. Consider the following code snippet. It is a variation of the code you saw in the first section, but instead of calling one I/O and one computing-intensive method, you call the same computing method 32 times.
class Program {
const int NUMBER_OF_ITERATIONS = 32;
static void Main(string[] args) {
// We are using Stopwatch to time the code
Stopwatch sw = Stopwatch.StartNew();
// Run the method
RunSequential();
// Print the time it took to run the application.
Console.WriteLine("We're done in {0}ms!", sw.ElapsedMilliseconds);
}
static void RunSequential() {
double result = 0d;
// Here we call same method several times.
for (int i = 0; i < NUMBER_OF_ITERATIONS; i++) {
result += DoIntensiveCalculations();
}
// Print the result
Console.WriteLine("The result is {0}", result);
}
static double DoIntensiveCalculations() {
// We are simulating intensive calculations
// by doing nonsens divisions and multiplications
double result = 10000d;
var maxValue = Int32.MaxValue >> 4;
for (int i = 1; i < maxValue; i++) {
if (i % 2 == 0) {
result /= i;
}
else {
result *= i;
}
}
return result;
}
}
Running this code results in the following output:
The result is 22.0386557304958
We're done in 41860ms!
As you can see it takes approximately 42 seconds to run this code sequential. You should improve that time by using tasks. First, you must replace the call to RunSequential with a call to RunTasks. Add the RunTasks method to your code that should look like this:
static void RunTasks() {
double result = 0d;
Task[] tasks = new Task[NUMBER_OF_ITERATIONS];
// We create one task per iteration.
for (int i = 0; i < NUMBER_OF_ITERATIONS; i++) {
tasks[i] = Task.Run(() => result += DoIntensiveCalculations());
}
// Print the result
Console.WriteLine("The result is {0}", result);
}
By running the application on a machine with eight cores, you get the following result:
The result is 2.75483196631197
We're done in 10115ms!
There are two things to notice here. Before telling you what those are, take a minute to see if you can spot them.
Now for the first one: The result is incorrect. Can you guess why?
Secondly, the application is not eight times faster as expected.
COMMON MISTAKES: The Performance Gain Induced by Modern Processors
The reason the application is not eight times faster is because you run the application on an Intel Core I7 processor. This is a quad core with hyper-threading. Quad core means that there are four cores in one silicon chip. Hyperthreading means that every core has two instruction pipelines, but only one execution engine. The operating system sees those as eight different processors. Hyperthreading improves the performance by 30 percent, not 100 percent as expected, whereas every core on the chip improves the performance by 70 percent.
If you didn’t guess why the result is incorrect, it is because it is not obvious for an untrained eye. Earlier in this chapter we hinted something about race conditions. That discussion will be deferred once more, but what is happening here is that instead of adding the return value of the method to the result, you overwrite the result with that return value. To solve that you need to make sure that only one task at the time updates the result, or that you read the results of the calculation one at a time. A corrected version of the method looks something like this:
static void RunTasksCorrected() {
double result = 0d;
Task<double>[] tasks = new Task<double>[NUMBER_OF_ITERATIONS];
// We create one task per iteration.
for (int i = 0; i < NUMBER_OF_ITERATIONS; i++) {
tasks[i] = Task.Run(() => DoIntensiveCalculations());
}
// We wait for the tasks to finish
Task.WaitAll(tasks);
// We collect the results
foreach (var task in tasks) {
result += task.Result;
}
// Print the result
Console.WriteLine("The result is {0}", result);
}
After replacing the call in the main method as well and running the application, you get the following result:
The result is 22.0386557304958
We're done in 10369ms!
Now the result is correct, and the speed up is roughly four times.
ADVICE FROM THE EXPERTS: Getting Results from a Task
It’s not actually necessary to call Task.WaitAll(tasks) in the code because task.Result will block the caller if the task didn’t finish the calculation. So if any of the tasks isn’t done when you enter the foreach loop, the caller will block and wait for the task to finish.
Working with the Scheduler
The work of queuing tasks into threads is done by a component called task scheduler, implemented by the TaskScheduler class. Normally, you don’t work with the scheduler directly. When you start a new task, if you are not specifying any scheduler, it uses a default one.
There is one situation, though, that you need to use the scheduler when you use tasks, and that is when you use tasks in a Windows Forms or WPF application. If you remember from the previous section, the UI can be updated only by the UI thread, so if a task needs to update the UI, it needs to be executed by the UI thread. To achieve that you need to call one of the StartNew or ContinueWith overloads that takes a TaskScheduler parameter and pass TaskScheduler.FromCurrentSynchronizationContext() as the value for that parameter. For instance, if you were to use tasks in the Windows Forms application and you want to call the UpdateLabel method on the UI thread, you would use the following:
Task.Factory.StartNew(UpdateLabel,
CancellationToken.None,
TaskCreationOptions.None,
TaskScheduler.FromCurrentSynchronizationContext());
By creating the task this way, it will be executed by the UI thread as soon as the UI thread can process it.
Using the Parallel Class
As discussed, the tasks are abstractions representing asynchronous operations run by threads. Although they are lighter than threads, sometimes you just need a better abstraction to do this kind of multitasking work. That is why Microsoft created the Parallel class. This class is part of theSystem.Threading.Tasks namespace. This class has three static methods, as outlined in Table 7-10.
Table 7-10: System.Threading.Tasks.Parallel Methods
|
Method |
Description |
|
For |
Similar to a for loop but iterations may run in parallel. There are 12 overloads for this method, some of them accepting a ParallelOptions parameter, others using ParallelLoopState to control the loop. |
|
ForEach |
Similar to a foreach loop but iterations may run in parallel. There are 20 overloads for this method, some of them accepting a ParallelOptions parameter, others using ParallelLoopState to control the loop. |
|
Invoke |
This method will attempt to run the provided actions in parallel. There are two overloads for this method, both accepting an array of Actions delegates to execute. One of the overloads accepts a ParallelOptions parameter. |
As you can see all three methods mention the possibility of running in parallel, but they don’t guarantee it.
ParallelLoopState is used as an input parameter for some of the For and ForEach methods. It has two methods, Stop and Break, which you can use to prematurely stop a loop from running. If you use Break in a For method, you are instructing the loop to stop executing all the iterations with an iterator higher than the one of the current iteration.
Now see how the previous example can be implemented with Parallel.For:
static void RunParallelFor() {
double result = 0d;
// Here we call same method several times in parallel.
Parallel.For(0, NUMBER_OF_ITERATIONS, i => {
result += DoIntensiveCalculations();
});
// Print the result
Console.WriteLine("The result is {0}", result);
}
As you might have guessed, if you run the previous code snippet, you get an erroneous result for the same reason you did before: race conditions. Here is the result:
The result is 2.06612397473398
We're done in 10186ms!
To solve the problem you must take care of this by using interim results. You can use the following overload of the Parallel.For method to solve this problem:
public static ParallelLoopResult For<TLocal>(
int fromInclusive,
int toExclusive,
Func<TLocal> localInit,
Func<int, ParallelLoopState, TLocal, TLocal> body,
Action<TLocal> localFinally
)
Here is a possible solution:
static void RunParallelForCorrected() {
double result = 0d;
// Here we call same method several times.
//for (int i = 0; i < NUMBER_OF_ITERATIONS; i++)
Parallel.For(0, NUMBER_OF_ITERATIONS,
// Func<TLocal> localInit,
() => 0d,
// Func<int, ParallelLoopState, TLocal, TLocal> body,
(i, state, interimResult) => interimResult + DoIntensiveCalculations(),
// Final step after the calculations
// we add the result to the final result
// Action<TLocal> localFinally
(lastInterimResult) => result += lastInterimResult
);
// Print the result
Console.WriteLine("The result is {0}", result);
}
By running the application now, you get this result:
The result is 22.0386557304958
We're done in 10370ms!
Again, you get the correct result and a speedup of four times.
COMMON MISTAKES: When to Use the Parallel Loops
Try to resist the urge to change all your for and foreach loops into their parallel counterparts. If you do that, you risk breaking your application. As you saw in the simple sample, it was easy to do just that. If you know that the iterations are completely independent of each other and you can avoid race conditions, then by all means, go for it. But chances are high that not all your loops are that simple, so a bit of analysis and testing is always recommended.
NOTE TPL has another abstraction in the form of Parallel Linq (PLinq) that is also built using tasks and the TPL. This subject is addressed in Chapter 10, “Working with Language Integrated Query (LINQ).”
Working with Continuations
In some situations you cannot transform everything into tasks without breaking your application. You need to take care of the dependencies imposed by your algorithm. If you have dependencies between tasks such as you can’t start step 3 before step 1 and 2 are done, you can use some of the continuations mechanisms available in the TPL. Assume that you have three methods that you need to call in your application. You call them Step1, Step2, and Step3.
The code should look similar to this:
class Program {
static void Main(string[] args) {
Step1();
Step2();
Step3();
}
static void Step1() {
Console.WriteLine("Step1");
}
static void Step2() {
Console.WriteLine("Step2");
}
static void Step3() {
Console.WriteLine("Step3");
}
}
Following are four main scenarios:
· Step1, Step2 and Step3 are independent of each other.
· Step1 and Step2 are independent of each other, and Step3 can be run only after Step1 finishes.
· Step1 and Step2 are independent of each other, and Step3 can be run only after Step1 and Step2 finish.
· Step1 and Step2 are independent of each other, and Step3 can be run only after Step1 or Step2 finishes.
If you want to use tasks to implement this functionality, you have different solutions.
For the first case the Main method looks something similar to this:
static void Main(string[] args) {
Parallel.Invoke(Step1, Step2, Step3);
}
The result of running the previous code is unpredictable, meaning that the methods can be run in any order, but considering the independent nature of the steps, it shouldn’t matter.
For the second case, you need to change the code to use tasks. The result could be something similar to this:
static void Main(string[] args) {
Task step1Task = Task.Run(() => Step1());
Task step2Task = Task.Run(() => Step2());
Task step3Task = step1Task.ContinueWith( (previousTask) => Step3());
Task.WaitAll(step2Task, step3Task);
}
The only guarantee you have by running this is that Step3 runs after Step1. Nothing can be said about when Step2 will be executed. The last line of code Task.WaitAll(step2Task, step3Task); guarantees that you are waiting to collect the results. Without it the Main method just returns, and the application might not get a chance to run the tasks. You don’t need to wait for Step1 because Step3 starts only after Step1 finishes.
For the third case, the code should look like this:
static void Main(string[] args) {
Task step1Task = Task.Run(() => Step1());
Task step2Task = Task.Run(() => Step2());
Task step3Task = Task.Factory.ContinueWhenAll(
new Task[] { step1Task, step2Task },
(previousTasks) => Step3());
step3Task.Wait();
}
For this call ContinueWhenAll that takes as a first parameter an array of tasks, and as a second parameter a delegate to run when all the tasks finish. It returns a new task, which you can use to wait for all the tasks to complete. The delegate takes as in parameter the array of tasks it was waiting for.
For the last scenario use the following code:
static void Main(string[] args) {
Task step1Task = Task.Run(() => Step1());
Task step2Task = Task.Run(() => Step2());
Task step3Task = Task.Factory.ContinueWhenAny(
new Task[] { step1Task, step2Task },
(previousTask) => Step3());
step3Task.Wait();
}
By calling ContinueWhenAny, you create a task that runs the delegate after any task from the list completes. The delegate takes as a parameter the completed task. If the completed task returns something, you can get that value from the previousTask.Result property. This scenario is quite common when you have some redundant services and you care only about the value retrieved by the quickest one.
Programming Asynchronous Applications with C# 5.0
Prior to C# 5.0 to achieve asynchrony you had to manually implement this kind of functionality using the IAsyncResult and callbacks. The resulting code was hard to follow and error prone. When lambda expressions made their entry in C# 3.0, the code could be made somewhat more compact but still had the same problems as before. It was difficult to both implement and maintain. TPL made possible the birth of another paradigm in .NET: asynchronous programming. In C# 5.0 Microsoft introduced two new language keywords: async and await.
You can use the async modifier to mark a method as asynchronous, and to notify the compiler that the method will have at least an await statement. If your method lacks the await statement, the compiler generates a warning.
The await operator is applied to a task in an asynchronous method to suspend the execution of the method until the awaited task completes. The task represents ongoing work.
Many of the classes in .NET Framework Library that deal with I/O have been modified by adding to them asynchronous methods to support the async/await pattern. If you have classes that deal with I/O, you can do the same. See how you can change an existing synchronous method into an asynchronous one. Here you have the ReadDataFromIO method:
public static double ReadDataFromIO() {
// We are simulating an I/O by putting the current thread to sleep.
Thread.Sleep(2000);
return 10d;
}
The asynchronous variant of the method can be implemented as simple as this:
public static Task<double> ReadDataFromIOAsync() {
return Task.Run(new Func<double>(ReadDataFromIO));
}
To make a method asynchronous, you must return a Task or Task<TResult> and add the Async suffix to the method name. The suffix is there so the programmers using your library know that the method is the asynchronous counterpart of your synchronous method.
Return Type of Asynchronous Methods
When a method is marked with an async modifier, it can have one of the following three return types: void, Task, and Task<TResult>. If your synchronous method were returning void, you have a choice between void and Task. If the method is not an event handler, the recommendation is to return Task. By returning Task you make the method not only asynchronous, but awaitable as well. If your synchronous method were returning something else than void, you must change the return type to Task<TResult>, so a synchronous method returning double returns in the asynchronous variant Task<double>.
ADVICE FROM THE EXPERTS: To Asynchronize or Not to Asynchronize?
What you did in the previous sample is a naïve implementation of an asynchronous method, obtained by wrapping the synchronous method inside a task. Just because it is that easy to do it doesn’t mean you should transform all your synchronous methods into asynchronous methods, and that all the methods should be transformed like that. This chapter has mentioned I/O operations several times, so if your method deals with I/O then you should consider making your methods asynchronous.
Now it’s time to get back to the WPF application from the previous sections and see how you can transform the application from using ReadDataFromIO method to using the asynchronous version of it. Recall that the example is a simple WPF application with a button called btnRun and a label called lblResult.
public partial class MainWindow : Window {
public MainWindow() {
InitializeComponent();
}
private void btnRun_Click(object sender, EventArgs e) {
lblResult.Content = ReadDataFromIO();
}
}
If you run the application and press the button, the UI freezes for two seconds. You cannot move nor do anything with it. The reason is simple: btnRun_Click is run by the UI thread, so the method ReadDataFromIO will be run by the UI thread. Before C# 5.0 you had to make use of aBackgroundWorker to offload the UI thread. To solve the problem with C# 5.0, the solution is simple:
private async void btnRun_Click(object sender, EventArgs e) {
lblResult.Content = await ReadDataFromIOAsync();
}
If you run the application now, you can see that the application does not freeze this time and yields the same result.
Take a moment now to analyze what you just did and to understand why it works:
1. You added the async reserved word to mark the method as asynchronous. The return type of the method wasn’t changed because you need to follow the EventHandler delegate signature.
2. You replaced the call to ReadDataFromIO with the awaitReadDataFromIOAsync. This is approximately equivalent with Task<double> task = ReadDataFromIOAsync(); lblResult.Content = task.Result;.
3. When you call ReadDataFromIOAsync, .NET Framework runs the code until the method will be blocked by an I/O operation. At that point the framework saves the state of the method, wraps it in a task, and returns to the calling method.
4. The calling method continues to run until it needs the result. In this case that’s right away, but it is completely possible to save the task, do some more synchronous work, and then call await task later, blocking the calling method.
5. When the compiler sees the await keyword, it rewrites the method to do what you just described.
If you have an application and a library that makes use of some asynchronous methods, you can change them as well. Take a moment to see how the code can change if you do not call the ReadDataFromIO directly from the event handler, but instead call it several times via another method, updating several labels. So using the previous example, you add an extra label called lblResult2.
The code might look like this:
public partial class MainWindow : Window {
public MainWindow() {
InitializeComponent();
}
private void btnRun_Click(object sender, EventArgs e) {
GetData();
}
private void GetData() {
lblResult.Content = ReadDataFromIO();
lblResult2.Content = ReadDataFromIO();
}
}
To make it asynchronous, you need first to transform GetData. One possible implementation would be this:
private async Task GetDataAsync() {
lblResult.Content = await ReadDataFromIOAsync();
lblResult2.Content = await ReadDataFromIOAsync();
}
As you can see, the async modifier was added to the method, and the name was changed by adding the Async suffix to give an indication to the developers using the method that this is an asynchronous method. The return type was changed from void to Task, and you used the asynchronous variant of the ReadDataFromIO method, ReadDataFromIOAsync, together with the await keyword.
If you run the application now, you can see that the application won’t freeze. After two seconds you get the first result, and after another two seconds you get the second result.
The reason for that is because you block the calling method in the first await and then call the second method and await for it. One way to improve this code will be to rewrite the GetDataAsync as follows:
private async Task GetDataAsync() {
var task1 = ReadDataFromIOAsync();
var task2 = ReadDataFromIOAsync();
// Here we can do more processing
// that doesn't need the data from the previous calls.
// Now we need the data so we have to wait
await Task.WhenAll(task1, task2);
// Now we have data to show.
lblResult.Content = task1.Result;
lblResult2.Content = task2.Result;
}
In this case, you call ReadDataFromIOAsync the first time, and when it blocks, it wraps the call in a Task<double> and returns the control to GetDataAsync. Then GetDataAsync method calls the second ReadDataFromIOAsync, and when that one blocks as well, it will wrap the call in anotherTask<double> and returns the control back to GetDataAsync. Then you might do some more processing that doesn’t require the data you just asked for asynchronously. When you need the data, you can await for it blocking the calling method. After you get the data, the calling method gets unblocked. The method unwraps the result from the tasks by calling task.Result.
BEST PRACTICES: Dealing with Multiple Await Statements
You could have implemented the GetDataAsync as follows:
private async Task GetDataAsync() {
var task1 = ReadDataFromIOAsync();
var task2 = ReadDataFromIOAsync();
lblResult.Content = await task1;
lblResult2.Content = await task2;
}
This implementation and the previous one would have been almost identical. From the end result standpoint, they are equivalent, but calling await two times forces the compiler to rewrite the method twice, when you just need both values for the method to complete.
For more in-depth information about asynchronous programming in C# 5.0, consult the links in the “Additional Reading and Resources” section at the end of this chapter.
NOTE Asynchronous methods are meant to be nonblocking operations, meaning that the calling method will not block the current thread while waiting on the awaited task to finish. Using async and await doesn’t create additional threads, because the asynchronous method doesn’t run on its own thread. More information about threads and asynchronous operations can be found on the “Additional Reading and Resources” section.
Exploring Advanced Multithreading Programming Topics
Multithreaded programing is hard—much harder than single-threaded programing—for several reasons:
· It introduces some “strange” behavior, caused because several threads can update the same piece of data at the same time.
· Is not as easy to follow and understand.
· It is not as predictable; although, you have to guarantee the same result.
· It is not as easy to debug, making it harder to find bugs.
· It is harder to test.
· The list can continue.
As stated before, one of the most common problems is called race condition. This happens when two threads try to update the same data. Here’s a simple example. Assume that you have one variable called sharedData and two threads, and both of them want to run the following instruction:sharedData++, which is executed by the CPU in the following way:
1. Read sharedData in a register.
2. Add 1 to the value in the register.
3. Write the new value from the register back into sharedData variable.
Why is that important to know? Because if it would have been only one instruction, the CPU would have executed that once, and no error can be introduced here. That is called atomic operation. But when you have a multithreaded application, the scheduler can interrupt the current thread at any time, and that might result in an error. Here’s how:
1. sharedData has an initial value of 0.
2. The first thread runs the first instruction, reading the value 0.
3. The second thread runs the first instruction, reading the value 0. On a single-core machine, this can happen when the scheduler interrupts the first thread and schedules the second thread. In a multicore machine this is a common situation because the threads can be scheduled on different cores.
4. The first thread increments the value to 1.
5. The first thread writes back the value 1 into sharedData.
6. The second thread increments the value to 1. Now the value should have been 2, but the value that the second thread has is the “old” value of 0.
7. The second thread writes back the value 1 into sharedData.
As explained, this kind of behavior can happen even if you run your application on a machine with one core, but it is more likely to manifest itself if you run it on a machine with several cores. To avoid this kind of problem, you must ensure that only one thread can access a shared variable at any given time.
The best way to deal with share data is not to share it. If you do need to share data, make it in a read-only kind of way. Sometimes, this might not be feasible because the data is big. If that is the case, try to isolate the data and make sure you access it in a controlled way. If this is not possible either, make sure you synchronize access to the data using different mechanisms. In conclusion, the order to consider sharing data is as follows:
1. Don’t share.
2. Make data read-only.
3. Isolate the data in smaller modules.
4. Use synchronization mechanisms.
Microsoft provides several classes that deal with this. There are classes that deal with signaling, classes that deal with mutual exclusion, classes that deal with cancellations, and classes that deal with concurrent collection. Most of them are discussed in the remainder of this section.
Synchronizing Resources
If you recall, earlier in this chapter the discussion about signaling was deferred, and now is the time to discuss it. Signaling is used as a communication mechanism between threads. In .NET there are two kinds of signaling mechanisms: synchronization events and barriers.
COMMON MISTAKES: Disambiguating Event
Synchronization events should not be confused with the C# events.
Synchronization Events
Synchronization events are objects that can be in one of two states: signaled and nonsignaled. If a thread needs something to be done by another thread, it can use a synchronization event and interrogate the state of the event as a communication mechanism. If it is signaled, it continues the execution; if not, it blocks the execution, waiting for the event to be signaled. When the other thread finishes its work, it signals the event, unblocking the waiting thread or threads. Synchronization events are implemented by two classes: EventWaitHandle and CountdownEvent.
EventWaitHandle Class
This class represents a thread synchronization event. EventWaitHandle is defined in the System.Threading namespace, and Table 7-11 lists the most common methods.
Table 7-11: System.Threading.EventWaitHandle Methods
|
Method |
Description |
|
EventWaitHandle |
Constructor. This method has four different overloads. At minimum you need to specify if the event should be signaled, and if the event should be reset manually or automatically using the EventResetMode enumeration. |
|
Dispose |
This is the method from the IDisposable interface. You need to call this method to ensure that the OS resources are freed when this object is not needed anymore. |
|
Reset |
Sets the state of the event to nonsignaled state, causing threads to block. |
|
Set |
Sets the state of the event to signaled state. One or more waiting threads will be able to proceed. If the event were created as AutoReset, only one thread will be enabled to call WaitOne without being blocked. Or if there are threads already blocked as a result of a call to WaitOne, only one thread will be unblocked, and then the event will be again nonsignaled until the Set method is called again. If the event was created as ManualReset, the event will be signaled until Reset is called on this event. |
|
WaitOne |
Blocks the current thread if the event is nonsignaled. When this event is signaled, if it was created as AutoReset, it unblocks the thread and resets the event back in the nonsignaled state. |
You can find a complete list of methods and properties in the “Additional Reading and Resources” section at the end of this chapter.
Here’s an example of using this class. And to be more precise, you can see how to correct the thread pool solution to be sure that you are not trying to read the result of the calculation before the calculation is actually completed. The original method looked like this:
static void RunInThreadPool() {
double result = 0d;
// Create a work item to read from I/O
ThreadPool.QueueUserWorkItem((x) => result += ReadDataFromIO());
// Save the result of the calculation into another variable
double result2 = DoIntensiveCalculations();
// Wait for the thread to finish
// TODO: We will need a way to indicate
// when the thread pool thread finished the execution
// Calculate the end result
result += result2;
// Print the result
Console.WriteLine("The result is {0}", result);
}
A possible solution using signaling looks like this:
static void RunInThreadPoolWithEvents() {
double result = 0d;
// We use this event to signal when the thread is don executing.
EventWaitHandle calculationDone =
new EventWaitHandle(false, EventResetMode.ManualReset);
// Create a work item to read from I/O
ThreadPool.QueueUserWorkItem((x) => {
result += ReadDataFromIO();
calculationDone.Set();
});
// Save the result of the calculation into another variable
double result2 = DoIntensiveCalculations();
// Wait for the thread to finish
calculationDone.WaitOne();
// Calculate the end result
result += result2;
// Print the result
Console.WriteLine("The result is {0}", result);
}
The previous code does the following:
1. The code first creates an EventWaitHandle object in the nonsignaled state.
2. The code then queues a new work item. After you get the first result, you signal the event to indicate that the calculation is done.
3. In the main thread, you call the second method.
4. After the second method returns, you need to wait for the first calculation to be done, by waiting on the event to get signaled.
5. When you get the signal, you know that you have the result, so you can just calculate the final result and show it.
.NET provides two classes that inherit from EventWaitHandle: AutoResetEvent and ManualResetEvent. Both classes have only one constructor and no methods or properties of their own defined. In both cases the constructor takes one boolean parameter specifying if the event is initially signaled.AutoResetEvent class constructor creates an EventWaitHandle and sets the mode to EventResetMode.AutoReset. The ManualResetEvent class constructor sets the mode parameter to EventResetMode.ManualReset.
CoundownEvent Class
.NET 4 introduced a new class called CoundownEvent, defined in the System.Threading namespace. The usage scenario is straightforward: You need to wait for a predefined number of threads to finish their work. Before .NET this was implemented by using several EventWaitHandle objects and calling the WaitHandle.WaitAll method. As this is a common scenario, Microsoft decided to implement this functionality in .NET. Tables 7-12 and 7-13 list the most common methods and properties of CoundownEvent.
Table 7-12: System.Threading.CountdownEvent Methods
|
Method |
Description |
|
CountdownEvent |
Constructor that accepts as parameter an integer value called count, representing the number of signals it needs to receive before it becomes signaled. |
|
AddCount |
Two overloads. Increments the CountdownEvent’s current count by one, or by a specified value. If the CountdownEvent object is already set, then this method can throw an InvalidOperationException. |
|
Dispose |
This is the method from the IDisposable interface. You must call this method to ensure that the OS resources are freed when this object is not needed anymore. |
|
Reset |
Two overloads. Resets the CurrentCount to the value of InitialCount or to a specified value. |
|
Signal |
Two overloads. Registers a signal with the CountdownEvent, decrementing the value of CurrentCount by one or by a specified value. |
|
TryAddCount |
Two overloads. Attempts to increment CurrentCount by one or by a specified value. This method won’t throw an exception as AddCount does. It returns true or false to indicate the success or failure of the operation. |
|
Wait |
Six overloads. Blocks the current thread until the CountdownEvent is set. The overloads are used to call the method with a cancellation token and/or with a timeout. |
Table 7-13: System.Threading.CountdownEvent Properties
|
Property |
Description |
|
CurrentCount |
Read-only property that returns the number of remaining signals required to set the event. |
|
InitialCount |
Read-only property that returns the numbers of signals initially required to set the event. |
|
IsSet |
Read-only property that returns true if the event is set. |
|
WaitHandle |
Read-only property that returns a WaitHandle used to wait for the event to be set. |
You can find a complete list of methods and properties in the “Additional Reading and Resources” section at the end of this chapter.
The CoundownEvent does not inherit from WaitHandle like almost all other synchronization classes, instead has a property called WaitHandle that will return a WaitHandle instance. That instance can be used wherever a WaitHandle is needed.
Barriers
In a multithreaded scenario, there are situations when you spawn several threads and you want to make sure that they arrive all at a certain point before you can continue the execution of your code. One common example for this scenario is as follows: A group of friends decide to travel by cars from point A to point C, via point B. They want to start traveling together from point A and stop at point B; then they plan to start together again to travel and meet at the final point C. Some of them might even decide that they don’t want to go anymore and return back home.
Before looking at a possible implementation, you need to look at what .NET can offer to solve this kind of problems. One way would be to use the Countdown event, but it is not actually modeling what you need! .NET 4 introduced a new class called System.Threading.Barrier that deals with exactly such situations. Tables 7-14 and 7-15 list some of the methods and properties of the class.
Table 7-14: System.Threading.Barrier Methods
|
Method |
Description |
|
Barrier |
Constructor. Initializes a new instance of the Barrier class. This method has two overloads, both taking as a parameter the number of participants. The second overload takes as an extra parameter an Action that will be run after all the participants have arrived at the barrier on one phase. |
|
AddParticipant |
Send a notification to the Barrier that there will be one more participant. |
|
AddParticipants |
Send a notification to the Barrier that there will be several more participants. |
|
Dispose |
This is the method from the IDisposable interface. You must call this method to ensure that the OS resources are freed when this object is not needed anymore. |
|
RemoveParticipant |
Sends a notification to the Barrier that there will be one less participant. |
|
RemoveParticipants |
Sends a notification to the Barrier that there will be fewer participants. |
|
SignalAndWait |
Six overloads. Signals that a participant has reached the barrier and waits for all other participants to reach the barrier as well. The overloads are used to call the method with a cancellation token and/or with a timeout. |
Table 7-15: System.Threading.Barrier Properties
|
Property |
Description |
|
CurrentPhaseNumber |
Read-only property that returns the number of the barrier's current phase. |
|
ParticipantCount |
Read-only property that returns the total number of participants in the barrier. |
|
ParticipantsRemaining |
Read-only property that returns the number of participants in the barrier that haven’t arrived yet. |
You can find a complete list of methods and properties in the “Additional Reading and Resources” section at the end of this chapter.
Code Lab: Using barriers [Chapter7\BarrierSample\Program.cs]
Consider the following code snippet that uses the Barrier class:
static void Main(string[] args) {
var participants = 5;
Barrier barrier = new Barrier(participants + 1,
// We add one for the main thread.
b => { // This method is only called when all the paricipants arrived.
Console.WriteLine("{0} paricipants are at rendez-vous point {1}.",
b.ParticipantCount -1, // We substract the main thread.
b.CurrentPhaseNumber);
});
for (int i = 0; i < participants; i++) {
var localCopy = i;
Task.Run(() => {
Console.WriteLine("Task {0} left point A!", localCopy);
Thread.Sleep(1000 * localCopy + 1); // Do some "work"
if (localCopy % 2 == 0) {
Console.WriteLine("Task {0} arrived at point B!", localCopy);
barrier.SignalAndWait();
}
else {
Console.WriteLine("Task {0} changed its mind and went back!",
localCopy);
barrier.RemoveParticipant();
return;
}
Thread.Sleep(1000 * (participants - localCopy)); // Do some "more work"
Console.WriteLine("Task {0} arrived at point C!", localCopy);
barrier.SignalAndWait();
});
}
Console.WriteLine("Main thread is waiting for {0} tasks!",
barrier.ParticipantCount - 1);
barrier.SignalAndWait(); // Waiting at the first phase
barrier.SignalAndWait(); // Waiting at the second phase
Console.WriteLine("Main thread is done!");
}
In this sample you create a barrier to keep track of the participants that arrived at the meeting points. You have to initialize the barrier with the number of participants plus one. The extra participant is used by the main thread.
Then you create one task per participant. The statement var localCopy = i captures the value of the iterator, so you avoid problems that might appear. Just to make the scenario more interesting, every other task will “change its mind” and go back, but not before informing the others. The main thread is calling barrier.SignalAndWait twice, once for each phase.
Running the previous sample yields the following result:
Main thread is waiting for 5 tasks!
Task 4 left point A!
Task 2 left point A!
Task 0 left point A!
Task 3 left point A!
Task 1 left point A!
Task 0 arrived at point B!
Task 1 changed its mind and went back!
Task 2 arrived at point B!
Task 3 changed its mind and went back!
Task 4 arrived at point B!
3 paricipants are at rendez-vous point 0.
Task 4 arrived at point C!
Task 2 arrived at point C!
Task 0 arrived at point C!
3 paricipants are at rendez-vous point 1.
Main thread is done!
Using Locking Mechanisms
One way to deal with data sharing is mutual exclusion. Mutual exclusion ensures that only one thread at a time can access a shared resource. If another thread tries to gain access to the same resource, it will be blocked while the first thread works with the shared resource. Instead of trying to control all the code paths that lead to a specific data region, you control the code regions that are trying to access that piece of data. Mutual exclusion is implemented in .NET in several ways: monitors, mutexes, semaphores, reader-writer locks, and some lock-free implementations. This section describes using monitors and some lock-free implementations.
Monitors
Monitors are synchronization primitives used to synchronize access to objects. They are implemented in .NET in the System.Threading.Monitor class. The Monitor class is used in conjunction with reference types, not value types, to ensure that only one thread can access that object at the time. The class exposes only static methods that take as a first parameter the object you want to take the lock on. At any given time at most one thread can place a lock on an object by calling the Monitor.Enter static method. If another thread will call Monitor.Enter before the first thread called Monitor.Exit, that second thread will be blocked until the first thread calls Monitor.Exit. In .NET all objects have a field that holds a reference to the thread that acquired a lock on the object, a ready list with all the threads that want to acquire the lock, and a waiting list with all the threads waiting for the object to get a notification via Pulse or PulseAll methods.
The class exposes several static methods, some of which are listed in Table 7-16.
Table 7-16: System.Threading.Monitor Methods
|
Method |
Description |
|
Enter |
Acquires an exclusive lock on a specified object. If the lock were already acquired by another thread, the current thread will be placed in the ready queue and will block its execution until the thread that owns the object releases the lock. |
|
Exit |
Releases an exclusive lock on the specified object. |
|
IsEntered |
Returns true if the current thread holds the lock on the specified object. This method was introduced in .NET 4.5. |
|
Pulse |
Notifies the thread in the waiting queue that the locked object's state changed, in effect moving the thread from the waiting queue to the ready queue. |
|
PulseAll |
Notifies all waiting threads that the locked object's state changed, in effect moving all the threads from the waiting queue to the ready queue. |
|
TryEnter |
Attempts to acquire an exclusive lock on the specified object. This method has six overloads enabling you to specify a timeout as well. |
|
Wait |
Releases the exclusive lock on the object and blocks the current thread until it reacquires the lock. The current thread will be placed on the waiting queue, and it will wait there for another thread to call Pulse or PulseAll so it can resume its execution. |
Wait, Pulse, and PulseAll can be called only by the thread that owns the lock on the object. Here’s some simple code using a monitor:
object syncObject = new object();
Monitor.Enter(syncObject);
// Code updating some shared data
Monitor.Exit(syncObject);
This code creates a new object to be used specifically for locking. You acquire the lock by calling Monitor.Enter. You execute the code that accesses the shared data. You then release the lock by calling the Monitor.Exit.
Although this is a complete piece of code, it does not account for the fact that the code that updates the shared data might throw an exception. If that happens, the lock won’t be released, leading to a deadlock. To solve this problem you can change the code as follows:
object syncObject = new object();
Monitor.Enter(syncObject);
try {
// Code updating some shared data
}
finally {
Monitor.Exit(syncObject);
}
In this way you make sure that even if the code throws an exception, the lock it is still released. The C# language provides a shortcut instruction for this called lock. The previous snippet can be written with lock as follows:
object syncObject = new object();
lock (syncObject) {
// Code updating some shared data
}
Lock-Free Alternatives
Locking is both dangerous and resource-intensive. Sometimes, you just need to perform simple operations, and you need to make sure that they are atomic. To solve this kind of problem, .NET offers a class called Interlocked, defined in the System.Threading namespace. The class has only static methods, and all the represent atomic operations, meaning they will be performed without being interrupted by the scheduler. Those methods are listed in the Table 7-17.
COMMON MISTAKES: Using References with Monitors
As mentioned, monitors work only with reference objects, not value objects. The reason is simple. Value objects are copied when they are sent as parameters. The result will be that the lock will be acquired on one object, but when you call release you will be on another object. When you call Exit on an object that you never called Enter on, .NET will throw an exception.
The best practice to deal with locks is the one shown earlier. You have to create an object that will be used only for this purpose. If you have to deal with legacy code, or if you look for samples on the Internet, you might find code acquiring a lock on this reference. The code looks like this:
lock (this) {
// Code updating some shared data
}
Although this is a perfectly valid C# code snippet, and indeed acquires and releases a lock on the current object, this code has a latent error that can manifest itself at any time. Where might the error come from? See the following code snippet:
public class LockThisBadSample {
public void OneMethod() {
lock (this) {
// Do Something here
}
}
}
public class UsingTheLockedObject {
public void AnotherMethod(){
LockThisBadSample lockObject = new LockThisBadSample();
lock (lockObject) {
// Do something else
}
}
}
As you can see AnotherMethod acquires a lock on lockObject, which is this reference inside the OneMethod call. Because you don’t have control over all the code that would like to acquire locks on the objects, this can easily lead to deadlocks.
The lesson here is to avoid lock(this) even if you see online samples using this kind of programming, and MSDN is no exception.
Table 7-17: System.Threading.Interlocked Methods
|
Method |
Description |
|
Add |
Adds two 32-bit or 64-bit integers and replaces the first integer with the sum, as an atomic operation. |
|
CompareExchange |
Compares the first and third parameters for equality and, if they are equal, replaces the value of the first parameter with the second parameter. |
|
Decrement |
Decrements a specified variable and stores the result, as an atomic operation. |
|
Exchange |
Sets an object to a specified value and returns a reference to the original object, as an atomic operation. |
|
Increment |
Increments a specified variable and stores the result, as an atomic operation. |
|
Read |
Loads a 64-bit value as an atomic operation and returns it to the caller. This is only necessary on 32-bit Platforms. |
Working with Concurrent Collections
The collections defined in System.Collections and System.Collections.Generic were not implemented to be thread-safe. They were implemented to be fast. Prior to .NET 4 if you needed a thread-safe collection, you had to implement it by yourself. In .NET 4 Microsoft introduced new collections that are thread-safe. They are all defined in the System.Collections.Concurrent namespace. Except ConcurrentDictionary, all concurrent collection classes implanted by Microsoft implement the IProducerConsumerCollection interface. This interface requires a class that implements it to provide the method listed in Table 7-18.
Table 7-18: System.Collections.Concurrent.IProducerConsumerCollection Interface
|
Method |
Description |
|
CopyTo |
Copies the elements of the IProducerConsumerCollection object into an Array, starting at the specified location. |
|
ToArray |
Returns a new array containing all the elements in the IProducerConsumerCollection. |
|
TryAdd |
Tries to add an object to the IProducerConsumerCollection. |
|
TryTake |
Tries to remove and return an object from the IProducerConsumerCollection. |
The concurrent collection classes available in .NET are listed in Table 7-19.
Table 7-19: System.Collections.Concurrent Classes
|
Class |
Description |
|
BlockingCollection<T> |
Implements the IProducerConsumerCollection<T> interface, providing blocking and bounding capabilities. |
|
ConcurrentBag<T> |
Represents a thread-safe collection of objects. |
|
ConcurrentDictionary <TKey, TValue> |
Represents a thread-safe version of the Dictionary<TKey, TValue> class. |
|
ConcurrentQueue<T> |
Represents the thread-safe version of the Queue<T> class. |
|
ConcurrentStack<T> |
Represents the thread-safe version of the Stack<T> class. |
Working with Cancellations
One thing mentioned several times but never talked about in this chapter is how to cancel an ongoing operation. Prior to .NET 4 the ways to cancel an ongoing operation were unsafe. They included aborting threads, interrupting threads, or even abandoning operations you weren’t interested in anymore. Although this worked most of the time, cancellations were the source of many errors. .NET 4 introduced cancellations as first-class citizens of the .NET library. The cancellations provided in .NET are cooperative cancellations, meaning that you can send a cancellation request to another thread, or task, but it is their choice to honor the request. Cancellation capabilities are implemented using one class, CancellationTokenSource, and one struct, CancellationToken, and works as follows:
1. If a thread wants to have the capability to cancel subsequent operations, it creates a CancellationTokenSource object.
2. When a cancellable asynchronous operation starts, the calling thread passes a CancellationToken obtained via the Token property of the CancellationTokenSource object. Cancelable asynchronous operation means either an operation that has support for cancellations or a new thread or that will be created by the current thread. This is normally expressed in the form of one or several overloaded methods accepting a CancellationToken parameter. By sending a CancellationToken you won’t allow the operation to initiate the cancellation. This can be done only via theCancellationTokenSource object.
3. If the parent thread wants to cancel the ongoing cancelable operations, it calls Cancel on the CancellationTokenSource object.
4. All ongoing operations might use the CancelationToken sent as a parameter to check if a cancellation is pending and respond accordingly. Note that ignoring the cancellation request is a perfect valid option.
You can find more information about cancellations in the “Additional Reading and Resources” section at the end of this chapter.
You can find a practical example about how to use cancellations in the following Code Lab.
CODE LAB: Using barriers with cancellations [Chapter7\BarrierWithCancellationSample\Program.cs]
Earlier in this chapter you saw an example in which barriers were used to coordinate the arrival of several threads at the same point. But what happens if you want to cancel the trip? The next code sample does just this.
static void Main(string[] args) {
var participants = 5;
// We create a CancellationTokenSource to be able to initiate the cancellation
var tokenSource = new CancellationTokenSource();
// We create a barrier object to use it for the rendez-vous points
var barrier = new Barrier(participants,
b => {
Console.WriteLine("{0} paricipants are at rendez-vous point {1}.",
b.ParticipantCount,
b.CurrentPhaseNumber);
});
for (int i = 0; i < participants; i++) {
var localCopy = i;
Task.Run(() => {
Console.WriteLine("Task {0} left point A!", localCopy);
Thread.Sleep(1000 * localCopy + 1); // Do some "work"
if (localCopy % 2 == 0) {
Console.WriteLine("Task {0} arrived at point B!", localCopy);
barrier.SignalAndWait(tokenSource.Token);
}
else {
Console.WriteLine("Task {0} changed its mind and went back!",
localCopy);
barrier.RemoveParticipant();
return;
}
Thread.Sleep(1000 * localCopy + 1);
Console.WriteLine("Task {0} arrived at point C!", localCopy);
barrier.SignalAndWait(tokenSource.Token);
});
}
Console.WriteLine("Main thread is waiting for {0} tasks!",
barrier.ParticipantsRemaining - 1);
Console.WriteLine("Press enter to cancel!");
Console.ReadLine();
if(barrier.CurrentPhaseNumber < 2){
tokenSource.Cancel();
Console.WriteLine("We canceled the operation!");
}
else{
Console.WriteLine("Too late to cancel!");
}
Console.WriteLine("Main thread is done!");
}
Code Lab Analysis
The code starts by creating a CancellationTokenSource and a Barrier. The participant count for this barrier will be the same as the number of participants because you want to use the main thread for the cancellation.
Next, the code creates one task per participant. As before, the code makes every other task change its mind and remove itself from the barrier.
The code then calls SignalAndWait, which sends a cancellation token from the CancellationTokenSource.
The main thread now calls Console.ReadLine instead of waiting on the barrier to wait for the user input. When the user presses Enter, the code looks first to see if everyone arrived at the destination. It finds this out by querying the value of the CurrentPhaseNumber property of the barrier object. If this is 2, it means that everyone passed through the first and second phase, so there is no need to cancel the operation.
Finally, the code calls tokenSource.Cancel, which sends cancellation signals to all objects waiting on the barrier object, effectively unblocking them and canceling the remainder of the operation.
Summary
This chapter described how to work with different technologies to improve the performance of applications.
First, the chapter looked at threads and how they are created and started. Unfortunately, threads are resource-consuming, but one way to circumvent this is to use threads from the thread pool. The thread pool has a pool of pre-created threads that can pick up work items placed in a queue by the application.
With .NET 4 Microsoft introduced the Task Parallel Library. Tasks represent an asynchronous unit of work. A task can be created and started in one operations via Task.Run or Task.Factory.StartNew methods. Tasks can be started as well as continuations of other tasks by calling one of theContinueWith, or WhenAnll/WhenAny methods. One more class introduced by .NET 4 is the Parallel class, which abstracts away tasks’ creation and makes it easier to deal with loops or running or parallel invocation of methods.
C# 5.0 took the tasks concepts further, by making asynchronous programming in .NET a first-class citizen, via async/await keywords. The chapter also looked at some of the advanced topics in multithreading applications such as synchronization events, barriers, different locking mechanisms, and the lock-free alternatives offered by the Interlocked class.
Finally, the chapter looked at the concurrent collections that implement a thread-safe version of the most common collections, and it looked at ways to cancel ongoing operations with cancellation tokens.
Chapter Test Questions
Read each question carefully and select the answer or answers that represent the best solution to the problem. You can find the answers in Appendix A, “Answers to Chapter Test Questions.”
1. You are a developer at company xyx. You have been asked to improve the responsiveness of your WPF application. Which solution best fits the requirements?
a. Use the BackgroundWorker class.
b. Use the LongRunningMethod class.
c. Run the method in the UI thread.
d. Use the WorkInBackground class.
e. None of the above.
2. How do you execute a method as a task?
a. Create a new Task object, and then call the Start method on the newly created object.
b. Create the task via the Task.Run method.
c. Create the task via the Task.Factory.StartNew method.
d. All the above.
e. None of the above.
3. Which of the following is not a locking mechanism?
a. Monitor
b. Semaphore
c. Mutex
d. async
4. How can you schedule work to be done by a thread from the thread pool?
a. You create a new object of type ThreadPool, and then you call the Start method.
b. You call the ThreadPool.Run method.
c. You call the ThreadPool.QueueUserWorkItem method.
d. You create a new thread and set its property IsThreadPool to true.
e. You call ContinueWith on a running thread from the thread pool.
5. Which of the following are methods of the Parallel class?
a. Run
b. Invoke
c. For
d. ForEach
e. Parallel
6. Which method can you use to cancel an ongoing operation that uses CancelationToken?
a. Call Cancel method on the CancelationToken
b. Call Cancel method on the CancelationTokenSource object that was used to create the CancelationToken
c. Call Abort method on the CancelationToken
d. Call Abort method on the CancelationTokenSource object that was used to create the CancelationToken
7. Which method would you call when you use a barrier to mark that a participant reached that point?
a. Signal
b. Wait
c. SignalAndWait
d. RemoveParticipant
e. JoinParticipant
8. What code is equivalent with lock(syncObject){…}?
a. Monitor.Lock(syncObject) {…}
b. Monitor.TryEnter(syncObject) {…}
c. Monitor.Enter(syncObject); try{…}finally{ Monitor.Exit(syncObject); }
d. Monitor.Lock(syncObject); try{…} catch{ Monitor.Unlock(syncObject);}
9. In a multithreaded application how would you increment a variable called counter in a lock free manner? Choose all that apply.
a. lock(counter){counter++;}
b. counter++;
c. Interlocked.Add(ref counter, 1);
d. Interlocked.Increment (counter);
e. Interlocked.Increment (ref counter);
10. Which method will you use to signal and EventWaitHandle?
a. Signal
b. Wait
c. Set
d. Reset
e. SignalAndWait
Additional Reading and Resources
Here are some additional useful resources to help you understand the topics presented in this chapter:
Parallel Processing and Concurrency in the .NET Framework http://msdn.microsoft.com/en-us/library/hh156548.aspx
Thread Class http://msdn.microsoft.com/en-us/library/system.threading.thread.aspx
Threading in C# by Joseph Albahari http://www.albahari.com/threading/
Asynchronous Programming Patterns http://msdn.microsoft.com/en-us/library/jj152938.aspx
Consuming the Task-based Asynchronous Pattern http://msdn.microsoft.com/en-us/library/hh873173.aspx
BackgroundWorker Class http://msdn.microsoft.com/en-us/library/4852et58.aspx
Threading Model http://msdn.microsoft.com/en-us/library/ms741870.aspx
Task Class http://msdn.microsoft.com/en-us/library/system.threading.tasks.task.aspx
Asynchronous Programming with Async and Await http://msdn.microsoft.com/en-us/library/hh191443.aspx
Asynchronous Programming with Async and Await and Threads http://msdn.microsoft.com/en-us/library/hh191443.aspx#BKMK_Threads
Parallel Programming team blog http://blogs.msdn.com/b/pfxteam/
EventWaitHandle Class http://msdn.microsoft.com/en-us/library/system.threading.eventwaithandle.aspx
CountdownEvent Class http://msdn.microsoft.com/en-us/library/system.threading.countdownevent.aspx
Barrier Class http://msdn.microsoft.com/en-us/library/system.threading.barrier.aspx
Cancellation in Managed Threads http://msdn.microsoft.com/en-us/library/dd997364.aspx
Cheat Sheet
This cheat sheet is designed as a way for you to quickly study the key points of this chapter.
Threads
· Create a thread object by sending to the constructor a delegate that will be the thread’s main method.
· Start the thread by calling explicitly the start method on the thread object.
· To use the thread pool, call ThreadPool.QueueUserWorkItem or ThreadPool.RegisterWaitForSingleObject.
Tasks
· Create a task object by sending to the constructor a delegate that will be the tasks main method. Start the task by calling explicitly the start method on the task object.
· Call one of the Task.Run static methods and send as parameter a delegate that will be tasks main method. The task is started automatically.
· Call one of the Task.Factory.StartNew static methods and send as parameter a delegate that will be the task’s main method. The task is started automatically.
Locks
· Use Monitor.Enter or Monitor.TryEnter to acquire a lock, and use Monitor.Exit to release the lock.
· Use the lock statement in C#.
Cancellations
· Use CancellationTokenSource objects to control cancelable operations.
· Use the CancellationToken obtained from a CancellationTokenSource object via the Token property to start a cancelable operation
· Call Cancel on the CancellationTokenSource object to initiate the cancellation.
· Inside the cancelable operation stop what you were doing to cancel the operation.
async/await
· These are two new keywords introduced in C# 5.0
· async marks a method as asynchronous, effectively telling the compiler that the method will have an await instruction in the body. If you don’t have any await instruction in the method body, the compiler will issue a warning.
· await blocks the execution of the current method, waiting for the awaited operation to complete.
BackgroundWorker
· Wire the long-running method that you need executed via the DoWork event.
· Start the operation by calling RunWorkerAsync.
· To find out when the long operation is done, subscribe to the RunWorkerCompleted event.
· To get information about the progress of the operation, subscribe to the ProgressChanged event.
Task continuation
· Continue a task by invoking ContinueWith, WhenAll, or WhenAny methods.
Review of Key Terms
asynchrony Operations that are run in a nonblocking fashion. When a method needs to call another method that potentially can block, instead of calling that method directly you can apply different techniques to avoid the blocking of the calling method.
Asynchronous Pattern Model (APM) When using this pattern, a method is split in two parts, a Begin and an End part. The begin part is responsible to prepare the call and to return the caller right away, and the end part is the one called to get back the result. The method was run in a thread from the thread pool. It is not recommended to use this approach for new development; instead use the new TAP.
atomic operation An operation that will be run at once without being interrupted by the scheduler.
deadlock Occurs when two or more threads try to acquire a lock on a resource that one of the other threads has locked already; neither of them can make more progress. There are four conditions that need to be fulfilled and that lead to a deadlock: mutual exclusion, hold and wait, no preemption, and circular wait.
Event-based Asynchronous Pattern (EAP) This pattern requires a method to be suffixed with Async and provide events and delegates to signal when the method finished or failed. It is not recommended for new development to use this approach; instead use the new TAP.
fork-join pattern The process of spawning another thread from the current thread (fork) to do something else while the current threads continue their work and then to wait for the spawned thread to finish its execution (join).
multithreading The capability of an operating system, or a hardware platform to have several threads of execution at the same time.
mutual exclusion Mutual exclusion is the problem, first solved by Edsger W. Dijkstra, of ensuring that two threads can’t be in the same critical section at the same time.
race condition Occurs when two or more threads access shared data, writing at the same time. If the access to data is for read purposes only, there is no problem. But when several threads try to write, one thread might overwrite the data written by another thread, not taking in consideration the change.
scheduler A component of the operating system that ensures that threads are given access to the CPU in a fair manner, avoiding situations when a thread monopolizes the CPU.
task A unit of work. It normally represents an asynchronous operation that is part of a bigger problem.
Task Parallel Library (TPL) A .NET library created by Microsoft that tries to abstract away and simplify the code that deals with threads.
Task-based Asynchronous Pattern (TAP) A pattern based on a single method that returns Task or Task<Result> objects that represent the asynchronous work in progress. This is the recommended pattern for the new development.
thread The smallest unit of execution that can be independently scheduled by the operating system.
thread pool The thread pool represents a pool of precreated threads that can be used by the tasks, or to queue work items, or to run asynchronous I/O operations.
Exam Tips and Tricks
You can print the Review of Key Terms and the Cheat Sheet for this chapter to help you study. You can find these files in the ZIP file for this chapter at www.wrox.com/remtitle.cgi?isbn=1118612094 on the Download Code tab.
All materials on the site are licensed Creative Commons Attribution-Sharealike 3.0 Unported CC BY-SA 3.0 & GNU Free Documentation License (GFDL)
If you are the copyright holder of any material contained on our site and intend to remove it, please contact our site administrator for approval.
© 2016-2026 All site design rights belong to S.Y.A.