C# 6.0 and the .NET 4.6 Framework (2015)
PART IV
Advanced C# Programming
CHAPTER 11
Advanced C# Language Features
In this chapter, you’ll deepen your understanding of the C# programming language by examining a number of more advanced topics. To begin, you’ll learn how to implement and use an indexer method. This C# mechanism enables you to build custom types that provide access to internal subitems using an array-like syntax. After you learn how to build an indexer method, you’ll see how to overload various operators (+, -, <, >, and so forth) and how to create custom explicit and implicit conversion routines for your types (and you’ll learn why you might want to do this).
Next, you’ll examine topics that are particularly useful when working with LINQ-centric APIs (though you can use them outside of the context of LINQ)—specifically extension methods and anonymous types.
To wrap things up, you’ll learn how to create an “unsafe” code context to directly manipulate unmanaged pointers. While it is certainly true that using pointers in C# applications is a fairly infrequent activity, understanding how to do so can be helpful in some circumstances that involve complex interoperability scenarios.
Understanding Indexer Methods
As a programmer, you are certainly familiar with the process of accessing individual items contained within a simple array using the index operator ([]). Here’s an example:
static void Main(string[] args)
{
// Loop over incoming command-line arguments
// using index operator.
for(int i = 0; i < args.Length; i++)
Console.WriteLine("Args: {0}", args[i]);
// Declare an array of local integers.
int[] myInts = { 10, 9, 100, 432, 9874};
// Use the index operator to access each element.
for(int j = 0; j < myInts.Length; j++)
Console.WriteLine("Index {0} = {1} ", j, myInts[j]);
Console.ReadLine();
}
This code is by no means a major news flash. However, the C# language provides the capability to design custom classes and structures that may be indexed just like a standard array, by defining an indexer method. This particular feature is most useful when you are creating custom collection classes (generic or nongeneric).
Before examining how to implement a custom indexer, let’s begin by seeing one in action. Assume you have added support for an indexer method to the custom PersonCollection type developed in Chapter 9 (specifically, the IssuesWithNonGenericCollections project). While you have not yet added the indexer, observe the following usage within a new Console Application project named SimpleIndexer:
// Indexers allow you to access items in an array-like fashion.
class Program
{
static void Main(string[] args)
{
Console.WriteLine("***** Fun with Indexers *****\n");
PersonCollection myPeople = new PersonCollection();
// Add objects with indexer syntax.
myPeople[0] = new Person("Homer", "Simpson", 40);
myPeople[1] = new Person("Marge", "Simpson", 38);
myPeople[2] = new Person("Lisa", "Simpson", 9);
myPeople[3] = new Person("Bart", "Simpson", 7);
myPeople[4] = new Person("Maggie", "Simpson", 2);
// Now obtain and display each item using indexer.
for (int i = 0; i < myPeople.Count; i++)
{
Console.WriteLine("Person number: {0}", i);
Console.WriteLine("Name: {0} {1}",
myPeople[i].FirstName, myPeople[i].LastName);
Console.WriteLine("Age: {0}", myPeople[i].Age);
Console.WriteLine();
}
}
}
As you can see, indexers allow you to manipulate the internal collection of subobjects just like a standard array. Now for the big question: how do you configure the PersonCollection class (or any custom class or structure) to support this functionality? An indexer is represented as a slightly modified C# property definition. In its simplest form, an indexer is created using the this[] syntax. Here is the required update for the PersonCollection class:
// Add the indexer to the existing class definition.
public class PersonCollection : IEnumerable
{
private ArrayList arPeople = new ArrayList();
// Custom indexer for this class.
public Person this[int index]
{
get { return (Person)arPeople[index]; }
set { arPeople.Insert(index, value); }
}
...
}
Apart from using the this keyword, the indexer looks just like any other C# property declaration. For example, the role of the get scope is to return the correct object to the caller. Here, you are doing so by delegating the request to the indexer of the ArrayList object, as this class also supports an indexer. The set scope is in charge of adding new Person objects; this is achieved by calling the Insert() method of the ArrayList.
Indexers are yet another form of syntactic sugar, given that this functionality can also be achieved using “normal” public methods such as AddPerson() or GetPerson(). Nevertheless, when you support indexer methods on your custom collection types, they integrate well into the fabric of the .NET base class libraries.
While creating indexer methods is quite commonplace when you are building custom collections, do remember that generic types give you this functionality out of the box. Consider the following method, which uses a generic List<T> of Person objects. Note that you can simply use the indexer of List<T> directly. Here’s an example:
static void UseGenericListOfPeople()
{
List<Person> myPeople = new List<Person>();
myPeople.Add(new Person("Lisa", "Simpson", 9));
myPeople.Add(new Person("Bart", "Simpson", 7));
// Change first person with indexer.
myPeople[0] = new Person("Maggie", "Simpson", 2);
// Now obtain and display each item using indexer.
for (int i = 0; i < myPeople.Count; i++)
{
Console.WriteLine("Person number: {0}", i);
Console.WriteLine("Name: {0} {1}", myPeople[i].FirstName,
myPeople[i].LastName);
Console.WriteLine("Age: {0}", myPeople[i].Age);
Console.WriteLine();
}
}
![]() Source Code The SimpleIndexer project is located in the Chapter 11 subdirectory.
Source Code The SimpleIndexer project is located in the Chapter 11 subdirectory.
Indexing Data Using String Values
The current PersonCollection class defined an indexer that allowed the caller to identify subitems using a numerical value. Understand, however, that this is not a requirement of an indexer method. Suppose you’d prefer to contain the Person objects using aSystem.Collections.Generic.Dictionary<TKey, TValue> rather than an ArrayList. Given that Dictionary types allow access to the contained types using a key (such as a person’s first name), you could define an indexer as follows:
public class PersonCollection : IEnumerable
{
private Dictionary<string, Person> listPeople =
new Dictionary<string, Person>();
// This indexer returns a person based on a string index.
public Person this[string name]
{
get { return (Person)listPeople[name]; }
set { listPeople[name] = value; }
}
public void ClearPeople()
{ listPeople.Clear(); }
public int Count
{ get { return listPeople.Count; } }
IEnumerator IEnumerable.GetEnumerator()
{ return listPeople.GetEnumerator(); }
}
The caller would now be able to interact with the contained Person objects as shown here:
static void Main(string[] args)
{
Console.WriteLine("***** Fun with Indexers *****\n");
PersonCollection myPeople = new PersonCollection();
myPeople["Homer"] = new Person("Homer", "Simpson", 40);
myPeople["Marge"] = new Person("Marge", "Simpson", 38);
// Get "Homer" and print data.
Person homer = myPeople["Homer"];
Console.WriteLine(homer.ToString());
Console.ReadLine();
}
Again, if you were to use the generic Dictionary<TKey, TValue> type directly, you’d gain the indexer method functionality out of the box, without building a custom, nongeneric class supporting a string indexer. Nevertheless, do understand that the data type of any indexer will be based on how the supporting collection type allows the caller to retrieve subitems.
![]() Source Code The StringIndexer project is located under the Chapter 11 subdirectory.
Source Code The StringIndexer project is located under the Chapter 11 subdirectory.
Overloading Indexer Methods
Understand that indexer methods may be overloaded on a single class or structure. Thus, if it makes sense to allow the caller to access subitems using a numerical index or a string value, you might define multiple indexers for a single type. By way of example, in ADO.NET (.NET’s native database-access API), the DataSet class supports a property named Tables, which returns to you a strongly typed DataTableCollection type. As it turns out, DataTableCollection defines three indexers to get and set DataTable objects—one by ordinal position and the others by a friendly string moniker and optional containing namespace, as shown here:
public sealed class DataTableCollection : InternalDataCollectionBase
{
...
// Overloaded indexers!
public DataTable this[int index] { get; }
public DataTable this[string name] { get; }
public DataTable this[string name, string tableNamespace] { get; }
}
It is common for types in the base class libraries to support indexer methods. So be aware, even if your current project does not require you to build custom indexers for your classes and structures, that many types already support this syntax.
Indexers with Multiple Dimensions
You can also create an indexer method that takes multiple parameters. Assume you have a custom collection that stores subitems in a 2D array. If this is the case, you may define an indexer method as follows:
public class SomeContainer
{
private int[,] my2DintArray = new int[10, 10];
public int this[int row, int column]
{ /* get or set value from 2D array */ }
}
Again, unless you are building a highly stylized custom collection class, you won’t have much need to build a multidimensional indexer. Still, once again ADO.NET showcases how useful this construct can be. The ADO.NET DataTable is essentially a collection of rows and columns, much like a piece of graph paper or the general structure of a Microsoft Excel spreadsheet.
While DataTable objects are typically populated on your behalf using a related “data adapter,” the following code illustrates how to manually create an in-memory DataTable containing three columns (for the first name, last name, and age of each record). Notice how once you have added a single row to the DataTable, you use a multidimensional indexer to drill into each column of the first (and only) row. (If you are following along, you’ll need to import the System.Data namespace into your code file.)
static void MultiIndexerWithDataTable()
{
// Make a simple DataTable with 3 columns.
DataTable myTable = new DataTable();
myTable.Columns.Add(new DataColumn("FirstName"));
myTable.Columns.Add(new DataColumn("LastName"));
myTable.Columns.Add(new DataColumn("Age"));
// Now add a row to the table.
myTable.Rows.Add("Mel", "Appleby", 60);
// Use multidimension indexer to get details of first row.
Console.WriteLine("First Name: {0}", myTable.Rows[0][0]);
Console.WriteLine("Last Name: {0}", myTable.Rows[0][1]);
Console.WriteLine("Age : {0}", myTable.Rows[0][2]);
}
Do be aware that you’ll take a rather deep dive into ADO.NET beginning with Chapter 21, so if some of the previous code seems unfamiliar, fear not. The main point of this example is that indexer methods can support multiple dimensions and, if used correctly, can simplify the way you interact with contained subobjects in custom collections.
Indexer Definitions on Interface Types
Indexers can be defined on a given .NET interface type to allow supporting types to provide a custom implementation. Here is a simple example of an interface that defines a protocol for obtaining string objects using a numerical indexer:
public interface IStringContainer
{
string this[int index] { get; set; }
}
With this interface definition, any class or structure that implements this interface must now support a read-write indexer that manipulates subitems using a numerical value. Here is a partial implementation of such as class:
class SomeClass : IStringContainer
{
private List<string> myStrings = new List<string>();
public string this[int index]
{
get { return myStrings[index]; }
set { myStrings.Insert(index, value); }
}
}
That wraps up the first major topic of this chapter. Now let’s examine a language feature that lets you build custom classes or structures that respond uniquely to the intrinsic operators of C#. Next, allow me to introduce the concept of operator overloading.
Understanding Operator Overloading
C#, like any programming language, has a canned set of tokens that are used to perform basic operations on intrinsic types. For example, you know that the + operator can be applied to two integers to yield a larger integer.
// The + operator with ints.
int a = 100;
int b = 240;
int c = a + b; // c is now 340
Once again, this is no major news flash, but have you ever stopped and noticed how the same + operator can be applied to most intrinsic C# data types? For example, consider this code:
// + operator with strings.
string s1 = "Hello";
string s2 = " world!";
string s3 = s1 + s2; // s3 is now "Hello world!"
In essence, the + operator functions in specific ways based on the supplied data types (strings or integers, in this case). When the + operator is applied to numerical types, the result is the summation of the operands. However, when the + operator is applied to string types, the result is string concatenation.
The C# language gives you the capability to build custom classes and structures that also respond uniquely to the same set of basic tokens (such as the + operator). While not every possible C# operator can be overloaded, many can, as shown in Table 11-1.
Table 11-1. Overloadability of C# Operators
|
C# Operator |
Overloadability |
|
+, -,! , ~, ++, --, true, false |
These unary operators can be overloaded. |
|
+, -, *, /, %, &, |, ^, <<, >> |
These binary operators can be overloaded. |
|
==,!=, <, >, <=, >= |
These comparison operators can be overloaded. C# demands that “like” operators (i.e., < and >, <= and >=, == and !=) are overloaded together. |
|
[] |
The [] operator cannot be overloaded. As you saw earlier in this chapter, however, the indexer construct provides the same functionality. |
|
() |
The () operator cannot be overloaded. As you will see later in this chapter, however, custom conversion methods provide the same functionality. |
|
+=, -=, *=, /=, %=, &=, |=, ^=, <<=, >>= |
Shorthand assignment operators cannot be overloaded; however, you receive them as a freebie when you overload the related binary operator. |
Overloading Binary Operators
To illustrate the process of overloading binary operators, assume the following simple Point class is defined in a new Console Application project named OverloadedOps:
// Just a simple, everyday C# class.
public class Point
{
public int X {get; set;}
public int Y {get; set;}
public Point(int xPos, int yPos)
{
X = xPos;
Y = yPos;
}
public override string ToString()
{
return string.Format("[{0}, {1}]", this.X, this.Y);
}
}
Now, logically speaking, it makes sense to “add” Points together. For example, if you added together two Point variables, you should receive a new Point that is the summation of the X and Y values. Of course, it might also be helpful to subtract one Point from another. Ideally, you would like to be able to author the following code:
// Adding and subtracting two points?
static void Main(string[] args)
{
Console.WriteLine("***** Fun with Overloaded Operators *****\n");
// Make two points.
Point ptOne = new Point(100, 100);
Point ptTwo = new Point(40, 40);
Console.WriteLine("ptOne = {0}", ptOne);
Console.WriteLine("ptTwo = {0}", ptTwo);
// Add the points to make a bigger point?
Console.WriteLine("ptOne + ptTwo: {0} ", ptOne + ptTwo);
// Subtract the points to make a smaller point?
Console.WriteLine("ptOne - ptTwo: {0} ", ptOne - ptTwo);
Console.ReadLine();
}
However, as your Point now stands, you will receive compile-time errors, as the Point type does not know how to respond to the + or - operators. To equip a custom type to respond uniquely to intrinsic operators, C# provides the operator keyword, which you can use only in conjunction with the static keyword. When you overload a binary operator (such as + and -), you will most often pass in two arguments that are the same type as the defining class (a Point in this example), as illustrated in the following code update:
// A more intelligent Point type.
public class Point
{
...
// Overloaded operator +.
public static Point operator + (Point p1, Point p2)
{
return new Point(p1.X + p2.X, p1.Y + p2.Y);
}
// Overloaded operator -.
public static Point operator - (Point p1, Point p2)
{
return new Point(p1.X - p2.X, p1.Y - p2.Y);
}
}
The logic behind operator + is simply to return a new Point object based on the summation of the fields of the incoming Point parameters. Thus, when you write pt1 + pt2, under the hood you can envision the following hidden call to the static operator + method.
// Pseudo-code: Point p3 = Point.operator+ (p1, p2)
Point p3 = p1 + p2;
Likewise, p1 – p2 maps to the following:
// Pseudo-code: Point p4 = Point.operator- (p1, p2)
Point p4 = p1 - p2;
With this update, your program now compiles, and you find you are able to add and subtract Point objects, as shown in the following output:
ptOne = [100, 100]
ptTwo = [40, 40]
ptOne + ptTwo: [140, 140]
ptOne - ptTwo: [60, 60]
When you are overloading a binary operator, you are not required to pass in two parameters of the same type. If it makes sense to do so, one of the arguments can differ. For example, here is an overloaded operator + that allows the caller to obtain a new Point that is based on a numerical adjustment:
public class Point
{
...
public static Point operator + (Point p1, int change)
{
return new Point(p1.X + change, p1.Y + change);
}
public static Point operator + (int change, Point p1)
{
return new Point(p1.X + change, p1.Y + change);
}
}
Notice that you need both versions of the method if you want the arguments to be passed in either order (i.e., you can’t just define one of the methods and expect the compiler to automatically support the other one). You are now able to use these new versions of operator + as follows:
// Prints [110, 110].
Point biggerPoint = ptOne + 10;
Console.WriteLine("ptOne + 10 = {0}", biggerPoint);
// Prints [120, 120].
Console.WriteLine("10 + biggerPoint = {0}", 10 + biggerPoint);
Console.WriteLine();
And What of the += and –+ Operators?
If you are coming to C# from a C++ background, you might lament the loss of overloading the shorthand assignment operators (+=, -=, and so forth). Don’t despair. In terms of C#, the shorthand assignment operators are automatically simulated if a type overloads the related binary operator. Thus, given that the Point structure has already overloaded the + and - operators, you can write the following:
// Overloading binary operators results in a freebie shorthand operator.
static void Main(string[] args)
{
...
// Freebie +=
Point ptThree = new Point(90, 5);
Console.WriteLine("ptThree = {0}", ptThree);
Console.WriteLine("ptThree += ptTwo: {0}", ptThree += ptTwo);
// Freebie -=
Point ptFour = new Point(0, 500);
Console.WriteLine("ptFour = {0}", ptFour);
Console.WriteLine("ptFour -= ptThree: {0}", ptFour -= ptThree);
Console.ReadLine();
}
Overloading Unary Operators
C# also allows you to overload various unary operators, such as ++ and --. When you overload a unary operator, you also must use the static keyword with the operator keyword; however, in this case you simply pass in a single parameter that is the same type as the defining class/structure. For example, if you were to update the Point with the following overloaded operators:
public class Point
{
...
// Add 1 to the X/Y values for the incoming Point.
public static Point operator ++(Point p1)
{
return new Point(p1.X+1, p1.Y+1);
}
// Subtract 1 from the X/Y values for the incoming Point.
public static Point operator --(Point p1)
{
return new Point(p1.X-1, p1.Y-1);
}
}
you could increment and decrement Point’s x and y values like this:
static void Main(string[] args)
{
...
// Applying the ++ and -- unary operators to a Point.
Point ptFive = new Point(1, 1);
Console.WriteLine("++ptFive = {0}", ++ptFive); // [2, 2]
Console.WriteLine("--ptFive = {0}", --ptFive); // [1, 1]
// Apply same operators as postincrement/decrement.
Point ptSix = new Point(20, 20);
Console.WriteLine("ptSix++ = {0}", ptSix++); // [20, 20]
Console.WriteLine("ptSix-- = {0}", ptSix--); // [21, 21]
Console.ReadLine();
}
Notice in the preceding code example you are applying the custom ++ and -- operators in two different manners. In C++, it is possible to overload pre- and postincrement/decrement operators separately. This is not possible in C#. However, the return value of the increment/decrement is automatically handled “correctly” free of charge (i.e., for an overloaded ++ operator, pt++ has the value of the unmodified object as its value within an expression, while ++pt has the new value applied before use in the expression).
Overloading Equality Operators
As you might recall from Chapter 6, System.Object.Equals() can be overridden to perform value-based (rather than referenced-based) comparisons between reference types. If you choose to override Equals() (and the often related System.Object.GetHashCode() method), it is trivial to overload the equality operators (== and !=). To illustrate, here is the updated Point type:
// This incarnation of Point also overloads the == and != operators.
public class Point
{
...
public override bool Equals(object o)
{
return o.ToString() == this.ToString();
}
public override int GetHashCode()
{
return this.ToString().GetHashCode();
}
// Now let’s overload the == and != operators.
public static bool operator ==(Point p1, Point p2)
{
return p1.Equals(p2);
}
public static bool operator !=(Point p1, Point p2)
{
return !p1.Equals(p2);
}
}
Notice how the implementation of operator == and operator != simply makes a call to the overridden Equals() method to get the bulk of the work done. Given this, you can now exercise your Point class as follows:
// Make use of the overloaded equality operators.
static void Main(string[] args)
{
...
Console.WriteLine("ptOne == ptTwo : {0}", ptOne == ptTwo);
Console.WriteLine("ptOne != ptTwo : {0}", ptOne != ptTwo);
Console.ReadLine();
}
As you can see, it is quite intuitive to compare two objects using the well-known == and != operators, rather than making a call to Object. Equals(). If you do overload the equality operators for a given class, keep in mind that C# demands that if you override the == operator, youmust also override the != operator (if you forget, the compiler will let you know).
Overloading Comparison Operators
In Chapter 8, you learned how to implement the IComparable interface to compare the relationship between two like objects. You can, in fact, also overload the comparison operators (<, >, <=, and >=) for the same class. As with the equality operators, C# demands that if you overload <, you must also overload >. The same holds true for the <= and >= operators. If the Point type overloaded these comparison operators, the object user could now compare Points, as follows:
// Using the overloaded < and > operators.
static void Main(string[] args)
{
...
Console.WriteLine("ptOne < ptTwo : {0}", ptOne < ptTwo);
Console.WriteLine("ptOne > ptTwo : {0}", ptOne > ptTwo);
Console.ReadLine();
}
Assuming you have implemented the IComparable interface (or better yet, the generic equivalent), overloading the comparison operators is trivial. Here is the updated class definition:
// Point is also comparable using the comparison operators.
public class Point : IComparable<Point>
{
...
public int CompareTo(Point other)
{
if (this.X > other.X && this.Y > other.Y)
return 1;
if (this.X < other.X && this.Y < other.Y)
return -1;
else
return 0;
}
public static bool operator <(Point p1, Point p2)
{ return (p1.CompareTo(p2) < 0); }
public static bool operator >(Point p1, Point p2)
{ return (p1.CompareTo(p2) > 0); }
public static bool operator <=(Point p1, Point p2)
{ return (p1.CompareTo(p2) <= 0); }
public static bool operator >=(Point p1, Point p2)
{ return (p1.CompareTo(p2) >= 0); }
}
Final Thoughts Regarding Operator Overloading
As you have seen, C# provides the capability to build types that can respond uniquely to various intrinsic, well-known operators. Now, before you go and retrofit all your classes to support such behavior, you must be sure that the operators you are about to overload make some sort of logical sense in the world at large.
For example, let’s say you overloaded the multiplication operator for the MiniVan class. What exactly would it mean to multiply two MiniVan objects? Not much. In fact, it would be confusing for teammates to see the following use of MiniVan objects:
// Huh?! This is far from intuitive...
MiniVan newVan = myVan * yourVan;
Overloading operators is generally useful only when you’re building atomic data types. Text, points, rectangles, fractions, and hexagons make good candidates for operator overloading. People, managers, cars, database connections, and web pages do not. As a rule of thumb, if an overloaded operator makes it harder for the user to understand a type’s functionality, don’t do it. Use this feature wisely.
![]() Source Code The OverloadedOps project is located in the Chapter 11 subdirectory.
Source Code The OverloadedOps project is located in the Chapter 11 subdirectory.
Understanding Custom Type Conversions
Let’s now examine a topic closely related to operator overloading: custom type conversions. To set the stage for the discussion, let’s quickly review the notion of explicit and implicit conversions between numerical data and related class types.
Recall: Numerical Conversions
In terms of the intrinsic numerical types (sbyte, int, float, etc.), an explicit conversion is required when you attempt to store a larger value in a smaller container, as this could result in a loss of data. Basically, this is your way to tell the compiler, “Leave me alone, I know what I am trying to do.” Conversely, an implicit conversion happens automatically when you attempt to place a smaller type in a destination type that will not result in a loss of data.
static void Main()
{
int a = 123;
long b = a; // Implicit conversion from int to long.
int c = (int) b; // Explicit conversion from long to int.
}
Recall: Conversions Among Related Class Types
As shown in Chapter 6, class types may be related by classical inheritance (the “is-a” relationship). In this case, the C# conversion process allows you to cast up and down the class hierarchy. For example, a derived class can always be implicitly cast to a base type. However, if you want to store a base class type in a derived variable, you must perform an explicit cast, like so:
// Two related class types.
class Base{}
class Derived : Base{}
class Program
{
static void Main(string[] args)
{
// Implicit cast between derived to base.
Base myBaseType;
myBaseType = new Derived();
// Must explicitly cast to store base reference
// in derived type.
Derived myDerivedType = (Derived)myBaseType;
}
}
This explicit cast works because the Base and Derived classes are related by classical inheritance. However, what if you have two class types in different hierarchies with no common parent (other than System.Object) that require conversions? Given that they are not related by classical inheritance, typical casting operations offer no help (and you would get a compiler error to boot!).
On a related note, consider value types (structures). Assume you have two .NET structures named Square and Rectangle. Given that structures cannot leverage classic inheritance (as they are always sealed), you have no natural way to cast between these seemingly related types.
While you could create helper methods in the structures (such as Rectangle.ToSquare()), C# lets you build custom conversion routines that allow your types to respond to the () casting operator. Therefore, if you configured the structures correctly, you would be able to use the following syntax to explicitly convert between them as follows:
// Convert a Rectangle to a Square!
Rectangle rect;
rect.Width = 3;
rect.Height = 10;
Square sq = (Square)rect;
Creating Custom Conversion Routines
Begin by creating a new Console Application project named CustomConversions. C# provides two keywords, explicit and implicit, that you can use to control how your types respond during an attempted conversion. Assume you have the following structure definitions:
public struct Rectangle
{
public int Width {get; set;}
public int Height {get; set;}
public Rectangle(int w, int h) : this()
{
Width = w; Height = h;
}
public void Draw()
{
for (int i = 0; i < Height; i++)
{
for (int j = 0; j < Width; j++)
{
Console.Write("*");
}
Console.WriteLine();
}
}
public override string ToString()
{
return string.Format("[Width = {0}; Height = {1}]",
Width, Height);
}
}
public struct Square
{
public int Length {get; set;}
public Square(int l) : this()
{
Length = l;
}
public void Draw()
{
for (int i = 0; i < Length; i++)
{
for (int j = 0; j < Length; j++)
{
Console.Write("*");
}
Console.WriteLine();
}
}
public override string ToString()
{ return string.Format("[Length = {0}]", Length); }
// Rectangles can be explicitly converted
// into Squares.
public static explicit operator Square(Rectangle r)
{
Square s = new Square();
s.Length = r.Height;
return s;
}
}
![]() Note You’ll notice in the Square and Rectangle constructors, I am explicitly chaining to the default constructor. The reason is that if you have a structure, which makes use of automatic property syntax (as you do here), the default constructor must be explicitly called (from all custom constructors) to initialize the private backing fields (for example, if the structures had any additional fields/properties, this default constructor would initialize these fields to default values). Yes, this is a quirky rule of C#, but after all, this is an advanced topics chapter.
Note You’ll notice in the Square and Rectangle constructors, I am explicitly chaining to the default constructor. The reason is that if you have a structure, which makes use of automatic property syntax (as you do here), the default constructor must be explicitly called (from all custom constructors) to initialize the private backing fields (for example, if the structures had any additional fields/properties, this default constructor would initialize these fields to default values). Yes, this is a quirky rule of C#, but after all, this is an advanced topics chapter.
Notice that this iteration of the Square type defines an explicit conversion operator. Like the process of overloading an operator, conversion routines make use of the C# operator keyword, in conjunction with the explicit or implicit keyword, and must be defined as static. The incoming parameter is the entity you are converting from, while the operator type is the entity you are converting to.
In this case, the assumption is that a square (being a geometric pattern in which all sides are of equal length) can be obtained from the height of a rectangle. Thus, you are free to convert a Rectangle into a Square, as follows:
static void Main(string[] args)
{
Console.WriteLine("***** Fun with Conversions *****\n");
// Make a Rectangle.
Rectangle r = new Rectangle(15, 4);
Console.WriteLine(r.ToString());
r.Draw();
Console.WriteLine();
// Convert r into a Square,
// based on the height of the Rectangle.
Square s = (Square)r;
Console.WriteLine(s.ToString());
s.Draw();
Console.ReadLine();
}
You can see the output here:
***** Fun with Conversions *****
[Width = 15; Height = 4]
***************
***************
***************
***************
[Length = 4]
****
****
****
****
While it may not be all that helpful to convert a Rectangle into a Square within the same scope, assume you have a function that has been designed to take Square parameters.
// This method requires a Square type.
static void DrawSquare(Square sq)
{
Console.WriteLine(sq.ToString());
sq.Draw();
}
Using your explicit conversion operation on the Square type, you can now pass in Rectangle types for processing using an explicit cast, like so:
static void Main(string[] args)
{
...
// Convert Rectangle to Square to invoke method.
Rectangle rect = new Rectangle(10, 5);
DrawSquare((Square)rect);
Console.ReadLine();
}
Additional Explicit Conversions for the Square Type
Now that you can explicitly convert Rectangles into Squares, let’s examine a few additional explicit conversions. Given that a square is symmetrical on all sides, it might be helpful to provide an explicit conversion routine that allows the caller to cast from an integer type into a Square(which, of course, will have a side length equal to the incoming integer). Likewise, what if you were to update Square such that the caller can cast from a Square into an int? Here is the calling logic:
static void Main(string[] args)
{
...
// Converting an int to a Square.
Square sq2 = (Square)90;
Console.WriteLine("sq2 = {0}", sq2);
// Converting a Square to an int.
int side = (int)sq2;
Console.WriteLine("Side length of sq2 = {0}", side);
Console.ReadLine();
}
and here is the update to the Square class:
public struct Square
{
...
public static explicit operator Square(int sideLength)
{
Square newSq = new Square();
newSq.Length = sideLength;
return newSq;
}
public static explicit operator int (Square s)
{return s.Length;}
}
To be honest, converting from a Square into an integer may not be the most intuitive (or useful) operation (after all, chances are you could just pass such values to a constructor). However, it does point out an important fact regarding custom conversion routines: the compiler does not care what you convert to or from, as long as you have written syntactically correct code.
Thus, as with overloading operators, just because you can create an explicit cast operation for a given type does not mean you should. Typically, this technique will be most helpful when you’re creating .NET structure types, given that they are unable to participate in classical inheritance (where casting comes for free).
Defining Implicit Conversion Routines
So far, you have created various custom explicit conversion operations. However, what about the following implicit conversion?
static void Main(string[] args)
{
...
Square s3 = new Square();
s3.Length = 83;
// Attempt to make an implicit cast?
Rectangle rect2 = s3;
Console.ReadLine();
}
This code will not compile, given that you have not provided an implicit conversion routine for the Rectangle type. Now here is the catch: it is illegal to define explicit and implicit conversion functions on the same type if they do not differ by their return type or parameter set. This might seem like a limitation; however, the second catch is that when a type defines an implicit conversion routine, it is legal for the caller to make use of the explicit cast syntax!
Confused? To clear things up, let’s add an implicit conversion routine to the Rectangle structure using the C# implicit keyword (note that the following code assumes the width of the resulting Rectangle is computed by multiplying the side of the Square by 2):
public struct Rectangle
{
...
public static implicit operator Rectangle(Square s)
{
Rectangle r = new Rectangle();
r.Height = s.Length;
// Assume the length of the new Rectangle with
// (Length x 2).
r.Width = s.Length * 2;
return r;
}
}
With this update, you are now able to convert between types, as follows:
static void Main(string[] args)
{
...
// Implicit cast OK!
Square s3 = new Square();
s3.Length= 7;
Rectangle rect2 = s3;
Console.WriteLine("rect2 = {0}", rect2);
// Explicit cast syntax still OK!
Square s4 = new Square();
s4.Length = 3;
Rectangle rect3 = (Rectangle)s4;
Console.WriteLine("rect3 = {0}", rect3);
Console.ReadLine();
}
That wraps up your look at defining custom conversion routines. As with overloaded operators, remember that this bit of syntax is simply a shorthand notation for “normal” member functions, and in this light it is always optional. When used correctly, however, custom structures can be used more naturally, as they can be treated as true class types related by inheritance.
![]() Source Code The CustomConversions project is located in the Chapter 11 subdirectory.
Source Code The CustomConversions project is located in the Chapter 11 subdirectory.
Understanding Extension Methods
.NET 3.5 introduced the concept of extension methods, which allow you to add new methods or properties to a class or structure, without modifying the original type in any direct manner. So, where might this be helpful? Consider the following possibilities.
First, say you have a given class that is in production. It becomes clear over time that this class should support a handful of new members. If you modify the current class definition directly, you risk the possibility of breaking backward compatibility with older code bases making use of it, as they might not have been compiled with the latest and greatest class definition. One way to ensure backward compatibility is to create a new derived class from the existing parent; however, now you have two classes to maintain. As we all know, code maintenance is the least glamorous part of a software engineer’s job description.
Now consider this situation. Let’s say you have a structure (or maybe a sealed class) and want to add new members so that it behaves polymorphically in your system. Since structures and sealed classes cannot be extended, your only choice is to add the members to the type, once again risking backward compatibility!
Using extension methods, you are able to modify types without subclassing and without modifying the type directly. To be sure, this technique is essentially a smoke-and-mirror show. The new functionality is offered to a type only if the extension methods have been referenced for use in your current project.
Defining Extension Methods
When you define extension methods, the first restriction is that they must be defined within a static class (see Chapter 5) and, therefore, each extension method must be declared with the static keyword. The second point is that all extension methods are marked as such by using the thiskeyword as a modifier on the first (and only the first) parameter of the method in question. The “this qualified” parameter represents the item being extended.
To illustrate, create a new Console Application project named ExtensionMethods. Now, assume you are authoring a class named MyExtensions that defines two extension methods. The first method allows any object to use a new method named DisplayDefiningAssembly()that makes use of types in the System.Reflection namespace to display the name of the assembly containing the type in question.
![]() Note You will formally examine the reflection API in Chapter 15. If you are new to the topic, simply understand that reflection allows you to discover the structure of assemblies, types, and type members at runtime.
Note You will formally examine the reflection API in Chapter 15. If you are new to the topic, simply understand that reflection allows you to discover the structure of assemblies, types, and type members at runtime.
The second extension method, named ReverseDigits(), allows any int to obtain a new version of itself where the value is reversed digit by digit. For example, if an integer with the value 1234 called ReverseDigits(), the integer returned is set to the value 4321. Consider the following class implementation (be sure to import the System.Reflection namespace if you are following along):
static class MyExtensions
{
// This method allows any object to display the assembly
// it is defined in.
public static void DisplayDefiningAssembly(this object obj)
{
Console.WriteLine("{0} lives here: => {1}\n", obj.GetType().Name,
Assembly.GetAssembly(obj.GetType()).GetName().Name);
}
// This method allows any integer to reverse its digits.
// For example, 56 would return 65.
public static int ReverseDigits(this int i)
{
// Translate int into a string, and then
// get all the characters.
char[] digits = i.ToString().ToCharArray();
// Now reverse items in the array.
Array.Reverse(digits);
// Put back into string.
string newDigits = new string(digits);
// Finally, return the modified string back as an int.
return int.Parse(newDigits);
}
}
Again, note how the first parameter of each extension method has been qualified with the this keyword, before defining the parameter type. It is always the case that the first parameter of an extension method represents the type being extended. Given thatDisplayDefiningAssembly() has been prototyped to extend System.Object, every type now has this new member, as Object is the parent to all types in the .NET platform. However, ReverseDigits() has been prototyped to extend only integer types; therefore, if anything other than an integer attempts to invoke this method, you will receive a compile-time error.
![]() Note Understand that a given extension method can have multiple parameters, but only the first parameter can be qualified with this. The additional parameters would be treated as normal incoming parameters for use by the method.
Note Understand that a given extension method can have multiple parameters, but only the first parameter can be qualified with this. The additional parameters would be treated as normal incoming parameters for use by the method.
Invoking Extension Methods
Now that you have these extension methods in place, consider the following Main() method that applies the extension method to various types in the base class libraries:
static void Main(string[] args)
{
Console.WriteLine("***** Fun with Extension Methods *****\n");
// The int has assumed a new identity!
int myInt = 12345678;
myInt.DisplayDefiningAssembly();
// So has the DataSet!
System.Data.DataSet d = new System.Data.DataSet();
d.DisplayDefiningAssembly();
// And the SoundPlayer!
System.Media.SoundPlayer sp = new System.Media.SoundPlayer();
sp.DisplayDefiningAssembly();
// Use new integer functionality.
Console.WriteLine("Value of myInt: {0}", myInt);
Console.WriteLine("Reversed digits of myInt: {0}", myInt.ReverseDigits());
Console.ReadLine();
}
Here is the output:
***** Fun with Extension Methods *****
Int32 lives here: => mscorlib
DataSet lives here: => System.Data
SoundPlayer lives here: => System
Value of myInt: 12345678
Reversed digits of myInt: 87654321
Importing Extension Methods
When you define a class containing extension methods, it will no doubt be defined within a .NET namespace. If this namespace is different from the namespace using the extension methods, you will need to make use of the expected C# using keyword. When you do, your code file has access to all extension methods for the type being extended. This is important to remember, because if you do not explicitly import the correct namespace, the extension methods are not available for that C# code file.
In effect, although it can appear on the surface that extension methods are global in nature, they are in fact limited to the namespaces that define them or the namespaces that import them. Thus, if you wrap the MyExtensions class into a namespace named MyExtensionMethods, as follows:
namespace MyExtensionMethods
{
static class MyExtensions
{
...
}
}
other namespaces in the project would need to explicitly import the MyExtensionMethods namespace to gain the extension methods defined by your class.
![]() Note It is common practice to not only isolate extension methods into a dedicated .NET namespace but into a dedicated class library. In this way, new applications can “opt in” to extensions by explicitly referencing the correct library and importing the namespace. Chapter 14 will examine the details of building and using custom .NET class libraries.
Note It is common practice to not only isolate extension methods into a dedicated .NET namespace but into a dedicated class library. In this way, new applications can “opt in” to extensions by explicitly referencing the correct library and importing the namespace. Chapter 14 will examine the details of building and using custom .NET class libraries.
The IntelliSense of Extension Methods
Given that extension methods are not literally defined on the type being extended, it is certainly possible to become confused when examining an existing code base. For example, assume you have imported a namespace that defined some number of extension methods authored by a teammate. As you are authoring your code, you might create a variable of the extended type, apply the dot operator, and find dozens of new methods that are not members of the original class definition!
Thankfully, Visual Studio’s IntelliSense mechanism marks all extension methods as shown in Figure 11-1.
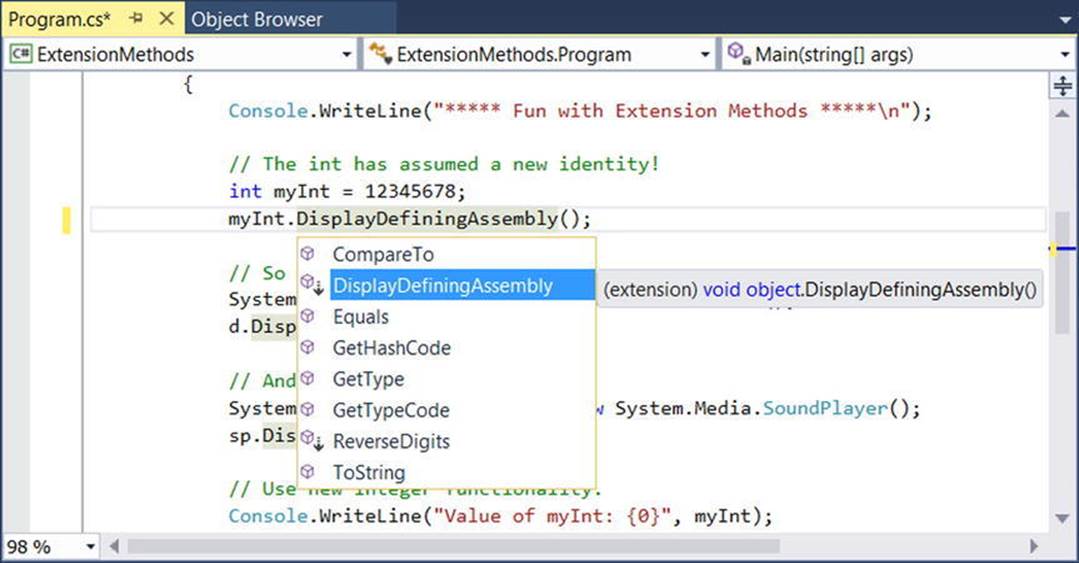
Figure 11-1. The IntelliSense of extension methods
Any method marked as such is a friendly reminder that the method is defined outside of the original class definition via an extension method.
![]() Source Code The ExtensionMethods project can be found in the Chapter 11 subdirectory.
Source Code The ExtensionMethods project can be found in the Chapter 11 subdirectory.
Extending Types Implementing Specific Interfaces
At this point, you have seen how to extend classes (and, indirectly, structures that follow the same syntax) with new functionality via extension methods. It is also possible to define an extension method that can only extend a class or structure that implements the correct interface. For example, you could say something to the effect of “If a class or structure implements IEnumerable<T>, then that type gets the following new members.” Of course, it is possible to demand that a type support any interface at all, including your own custom interfaces.
To illustrate, create a new Console Application project named InterfaceExtensions. The goal here is to add a new method to any type that implements IEnumerable, which would include any array and many nongeneric collection classes (recall from Chapter 8 that the genericIEnumerable<T> interface extends the nongeneric IEnumerable interface). Add the following extension class to your new project:
static class AnnoyingExtensions
{
public static void PrintDataAndBeep(this System.Collections.IEnumerable iterator)
{
foreach (var item in iterator)
{
Console.WriteLine(item);
Console.Beep();
}
}
}
Given that the PrintDataAndBeep() method can be used by any class or structure that implements IEnumerable, you could test via the following Main() method:
static void Main( string[] args )
{
Console.WriteLine("***** Extending Interface Compatible Types *****\n");
// System.Array implements IEnumerable!
string[] data = { "Wow", "this", "is", "sort", "of", "annoying",
"but", "in", "a", "weird", "way", "fun!"};
data.PrintDataAndBeep();
Console.WriteLine();
// List<T> implements IEnumerable!
List<int> myInts = new List<int>() {10, 15, 20};
myInts.PrintDataAndBeep();
Console.ReadLine();
}
That wraps up your examination of C# extension methods. Remember that this particular language feature can be useful whenever you want to extend the functionality of a type but do not want to subclass (or cannot subclass if the type is sealed), for the purposes of polymorphism. As you will see later in the text, extension methods play a key role for LINQ APIs. In fact, you will see that under the LINQ APIs, one of the most common items being extended is a class or structure implementing (surprise!) the generic version of IEnumerable.
![]() Source Code The InterfaceExtension project can be found in the Chapter 11 subdirectory.
Source Code The InterfaceExtension project can be found in the Chapter 11 subdirectory.
Understanding Anonymous Types
As an object-oriented programmer, you know the benefits of defining classes to represent the state and functionality of a given item you are attempting to model. To be sure, whenever you need to define a class that is intended to be reused across projects and that provides numerous bits of functionality through a set of methods, events, properties, and custom constructors, creating a new C# class is common practice.
However, there are other times when you would like to define a class simply to model a set of encapsulated (and somehow related) data points without any associated methods, events, or other specialized functionality. Furthermore, what if this type is to be used only by a handful of methods in your program? It would be rather a bother to define a full class definition as shown next when you know full well this class will be used in only a handful of places. To accentuate this point, here is the rough outline of what you might need to do when you need to create a “simple” data type that follows typical value-based semantics:
class SomeClass
{
// Define a set of private member variables...
// Make a property for each member variable...
// Override ToString() to account for key member variables...
// Override GetHashCode() and Equals() to work with value-based equality...
}
As you can see, it is not necessarily so simple. Not only do you need to author a fair amount of code, but you have another class to maintain in your system. For temporary data such as this, it would be useful to whip up a custom data type on the fly. For example, let’s say you need to build a custom method that receives a set of incoming parameters. You would like to take these parameters and use them to create a new data type for use in this method scope. Further, you would like to quickly print out this data using the typical ToString() method and perhaps use other members of System.Object. You can do this very thing using anonymous type syntax.
Defining an Anonymous Type
When you define an anonymous type, you do so by using the var keyword (see Chapter 3) in conjunction with object initialization syntax (see Chapter 5). You must use the var keyword because the compiler will automatically generate a new class definition at compile time (and you never see the name of this class in your C# code). The initialization syntax is used to tell the compiler to create private backing fields and (read-only) properties for the newly created type.
To illustrate, create a new Console Application project named AnonymousTypes. Now, add the following method to your Program class, which composes a new type, on the fly, using the incoming parameter data:
static void BuildAnonType( string make, string color, int currSp )
{
// Build anon type using incoming args.
var car = new { Make = make, Color = color, Speed = currSp };
// Note you can now use this type to get the property data!
Console.WriteLine("You have a {0} {1} going {2} MPH",
car.Color, car.Make, car.Speed);
// Anon types have custom implementations of each virtual
// method of System.Object. For example:
Console.WriteLine("ToString() == {0}", car.ToString());
}
You can call this method from Main(), as expected. However, do note that an anonymous type can also be created using hard-coded values, as shown here:
static void Main(string[] args)
{
Console.WriteLine("***** Fun with Anonymous Types *****\n");
// Make an anonymous type representing a car.
var myCar = new { Color = "Bright Pink", Make = "Saab", CurrentSpeed = 55 };
// Now show the color and make.
Console.WriteLine("My car is a {0} {1}.", myCar.Color, myCar.Make);
// Now call our helper method to build anonymous type via args.
BuildAnonType("BMW", "Black", 90);
Console.ReadLine();
}
So, at this point, simply understand that anonymous types allow you to quickly model the “shape” of data with very little overhead. This technique is little more than a way to whip up a new data type on the fly, which supports bare-bones encapsulation via properties and acts according to value-based semantics. To understand that last point, let’s see how the C# compiler builds out anonymous types at compile time and, specifically, how it overrides the members of System.Object.
The Internal Representation of Anonymous Types
All anonymous types are automatically derived from System.Object and, therefore, support each of the members provided by this base class. Given this, you could invoke ToString(), GetHashCode(), Equals(), or GetType() on the implicitly typed myCar object. Assume your Program class defines the following static helper function:
static void ReflectOverAnonymousType(object obj)
{
Console.WriteLine("obj is an instance of: {0}", obj.GetType().Name);
Console.WriteLine("Base class of {0} is {1}",
obj.GetType().Name,
obj.GetType().BaseType);
Console.WriteLine("obj.ToString() == {0}", obj.ToString());
Console.WriteLine("obj.GetHashCode() == {0}", obj.GetHashCode());
Console.WriteLine();
}
Now assume you invoke this method from Main(), passing in the myCar object as the parameter, like so:
static void Main(string[] args)
{
Console.WriteLine("***** Fun with Anonymous Types *****\n");
// Make an anonymous type representing a car.
var myCar = new {Color = "Bright Pink", Make = "Saab", CurrentSpeed = 55};
// Reflect over what the compiler generated.
ReflectOverAnonymousType(myCar);
...
Console.ReadLine();
}
The output will look similar to the following:
***** Fun with Anonymous Types *****
obj is an instance of: <>f__AnonymousType0`3
Base class of <>f__AnonymousType0`3 is System.Object
obj.ToString() = { Color = Bright Pink, Make = Saab, CurrentSpeed = 55 }
obj.GetHashCode() = -439083487
First, notice that, in this example, the myCar object is of type <>f AnonymousType0`3 (your name may differ). Remember that the assigned type name is completely determined by the compiler and is not directly accessible in your C# code base.
Perhaps most important, notice that each name-value pair defined using the object initialization syntax is mapped to an identically named read-only property and a corresponding private read-only backing field. The following C# code approximates the compiler-generated class used to represent the myCar object (which again can be verified using ildasm.exe):
internal sealed class <>f__AnonymousType0<<Color>j__TPar,
<Make>j__TPar, <CurrentSpeed>j__TPar>
{
// Read-only fields.
private readonly <Color>j__TPar <Color>i__Field;
private readonly <CurrentSpeed>j__TPar <CurrentSpeed>i__Field;
private readonly <Make>j__TPar <Make>i__Field;
// Default constructor.
public <>f__AnonymousType0(<Color>j__TPar Color,
<Make>j__TPar Make, <CurrentSpeed>j__TPar CurrentSpeed);
// Overridden methods.
public override bool Equals(object value);
public override int GetHashCode();
public override string ToString();
// Read-only properties.
public <Color>j__TPar Color { get; }
public <CurrentSpeed>j__TPar CurrentSpeed { get; }
public <Make>j__TPar Make { get; }
}
The Implementation of ToString() and GetHashCode()
All anonymous types automatically derive from System.Object and are provided with an overridden version of Equals(), GetHashCode(), and ToString(). The ToString() implementation simply builds a string from each name-value pair. Here’s an example:
public override string ToString()
{
StringBuilder builder = new StringBuilder();
builder.Append("{ Color = ");
builder.Append(this.<Color>i__Field);
builder.Append(", Make = ");
builder.Append(this.<Make>i__Field);
builder.Append(", CurrentSpeed = ");
builder.Append(this.<CurrentSpeed>i__Field);
builder.Append(" }");
return builder.ToString();
}
The GetHashCode() implementation computes a hash value using each anonymous type’s member variables as input to the System.Collections.Generic.EqualityComparer<T> type. Using this implementation of GetHashCode(), two anonymous types will yield the same hash value if (and only if) they have the same set of properties that have been assigned the same values. Given this implementation, anonymous types are well-suited to be contained within a Hashtable container.
The Semantics of Equality for Anonymous Types
While the implementation of the overridden ToString() and GetHashCode() methods is fairly straightforward, you might be wondering how the Equals() method has been implemented. For example, if you were to define two “anonymous cars” variables that specify the same name-value pairs, would these two variables be considered equal? To see the results firsthand, update your Program type with the following new method:
static void EqualityTest()
{
// Make 2 anonymous classes with identical name/value pairs.
var firstCar = new { Color = "Bright Pink", Make = "Saab", CurrentSpeed = 55 };
var secondCar = new { Color = "Bright Pink", Make = "Saab", CurrentSpeed = 55 };
// Are they considered equal when using Equals()?
if (firstCar.Equals(secondCar))
Console.WriteLine("Same anonymous object!");
else
Console.WriteLine("Not the same anonymous object!");
// Are they considered equal when using ==?
if (firstCar == secondCar)
Console.WriteLine("Same anonymous object!");
else
Console.WriteLine("Not the same anonymous object!");
// Are these objects the same underlying type?
if (firstCar.GetType().Name == secondCar.GetType().Name)
Console.WriteLine("We are both the same type!");
else
Console.WriteLine("We are different types!");
// Show all the details.
Console.WriteLine();
ReflectOverAnonymousType(firstCar);
ReflectOverAnonymousType(secondCar);
}
Assuming you have called this method from within Main(), here is the (somewhat surprising) output:
My car is a Bright Pink Saab.
You have a Black BMW going 90 MPH
ToString() == { Make = BMW, Color = Black, Speed = 90 }
Same anonymous object!
Not the same anonymous object!
We are both the same type!
obj is an instance of: <>f__AnonymousType0`3
Base class of <>f__AnonymousType0`3 is System.Object
obj.ToString() == { Color = Bright Pink, Make = Saab, CurrentSpeed = 55 }
obj.GetHashCode() == -439083487
obj is an instance of: <>f__AnonymousType0`3
Base class of <>f__AnonymousType0`3 is System.Object
obj.ToString() == { Color = Bright Pink, Make = Saab, CurrentSpeed = 55 }
obj.GetHashCode() == -439083487
When you run this test code, you will see that the first conditional test where you call Equals() returns true and, therefore, the message “Same anonymous object!” prints out to the screen. This is because the compiler-generated Equals() method uses value-based semantics when testing for equality (e.g., checking the value of each field of the objects being compared).
However, the second conditional test, which makes use of the C# equality operator (==), prints out “Not the same anonymous object!” This might seem at first glance to be a bit counterintuitive. This result is because anonymous types do not receive overloaded versions of the C# equality operators (== and !=). Given this, when you test for equality of anonymous types using the C# equality operators (rather than the Equals() method), the references, not the values maintained by the objects, are being tested for equality.
Last but not least, in the final conditional test (where you examine the underlying type name), you find that the anonymous types are instances of the same compiler-generated class type (in this example, <>f AnonymousType0`3) because firstCar and secondCar have the same properties (Color, Make, and CurrentSpeed).
This illustrates an important but subtle point: the compiler will generate a new class definition only when an anonymous type contains unique names of the anonymous type. Thus, if you declare identical anonymous types (again, meaning the same names) within the same assembly, the compiler generates only a single anonymous type definition.
Anonymous Types Containing Anonymous Types
It is possible to create an anonymous type that is composed of other anonymous types. For example, assume you want to model a purchase order that consists of a timestamp, a price point, and the automobile purchased. Here is a new (slightly more sophisticated) anonymous type representing such an entity:
// Make an anonymous type that is composed of another.
var purchaseItem = new {
TimeBought = DateTime.Now,
ItemBought = new {Color = "Red", Make = "Saab", CurrentSpeed = 55},
Price = 34.000};
ReflectOverAnonymousType(purchaseItem);
At this point, you should understand the syntax used to define anonymous types, but you might still be wondering exactly where (and when) to use this new language feature. To be blunt, anonymous type declarations should be used sparingly, typically only when making use of the LINQ technology set (see Chapter 12). You would never want to abandon the use of strongly typed classes/structures simply for the sake of doing so, given anonymous types’ numerous limitations, which include the following:
· You don’t control the name of the anonymous type.
· Anonymous types always extend System.Object.
· The fields and properties of an anonymous type are always read-only.
· Anonymous types cannot support events, custom methods, custom operators, or custom overrides.
· Anonymous types are always implicitly sealed.
· Anonymous types are always created using the default constructor.
However, when programming with the LINQ technology set, you will find that in many cases this syntax can be helpful when you want to quickly model the overall shape of an entity rather than its functionality.
![]() Source Code The AnonymousTypes project can be found in the Chapter 11 subdirectory.
Source Code The AnonymousTypes project can be found in the Chapter 11 subdirectory.
Working with Pointer Types
And now for the final topic of the chapter, which most likely will be the least used of all C# features for the vast majority of your .NET projects.
![]() Note In the examples that follow, I’m assuming you have some background in C++ pointer manipulation. If this is not true, feel free to skip this topic entirely. Using pointers will not be a common task for the vast majority of C# applications.
Note In the examples that follow, I’m assuming you have some background in C++ pointer manipulation. If this is not true, feel free to skip this topic entirely. Using pointers will not be a common task for the vast majority of C# applications.
In Chapter 4, you learned that the .NET platform defines two major categories of data: value types and reference types. Truth be told, however, there is a third category: pointer types. To work with pointer types, you get specific operators and keywords that allow you to bypass the CLR’s memory-management scheme and take matters into your own hands (see Table 11-2).
Table 11-2. Pointer-Centric C# Operators and Keywords
|
Operator/Keyword |
Meaning in Life |
|
* |
This operator is used to create a pointer variable (i.e., a variable that represents a direct location in memory). As in C++, this same operator is used for pointer indirection. |
|
& |
This operator is used to obtain the address of a variable in memory. |
|
-> |
This operator is used to access fields of a type that is represented by a pointer (the unsafe version of the C# dot operator). |
|
[] |
This operator (in an unsafe context) allows you to index the slot pointed to by a pointer variable (if you’re a C++ programmer, you will recall the interplay between a pointer variable and the [] operator). |
|
++, -- |
In an unsafe context, the increment and decrement operators can be applied to pointer types. |
|
+, - |
In an unsafe context, the addition and subtraction operators can be applied to pointer types. |
|
==,!=, <, >, <=, => |
In an unsafe context, the comparison and equality operators can be applied to pointer types. |
|
stackalloc |
In an unsafe context, the stackalloc keyword can be used to allocate C# arrays directly on the stack. |
|
fixed |
In an unsafe context, the fixed keyword can be used to temporarily fix a variable so that its address can be found. |
Now, before digging into the details, let me again point out that you will seldom if ever need to make use of pointer types. Although C# does allow you to drop down to the level of pointer manipulations, understand that the .NET runtime has absolutely no clue of your intentions. Thus, if you mismanage a pointer, you are the one in charge of dealing with the consequences. Given these warnings, when exactly would you need to work with pointer types? There are two common situations:
· You are looking to optimize select parts of your application by directly manipulating memory outside the management of the CLR.
· You are calling methods of a C-based .dll or COM server that demand pointer types as parameters. Even in this case, you can often bypass pointer types in favor of the System.IntPtr type and members of theSystem.Runtime.InteropServices.Marshal type.
In the event that you do decide to make use of this C# language feature, you are required to inform the C# compiler (csc.exe) of your intentions by enabling your project to support “unsafe code.” To do so at the command line, simply supply the following /unsafe flag as an argument:
csc /unsafe *.cs
From Visual Studio, you will need to access your project’s Properties page and check the Allow Unsafe Code box on the Build tab (see Figure 11-2). To experiment with pointer types, create a new Console Application project named UnsafeCode and enable unsafe code, and make sure you enable this setting.
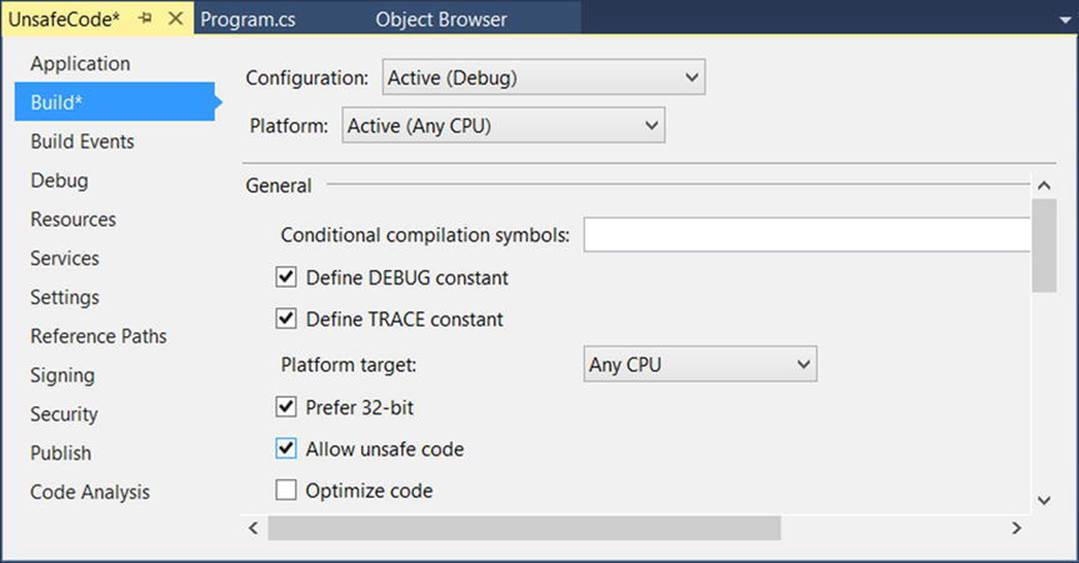
Figure 11-2. Enabling unsafe code using Visual Studio
The unsafe Keyword
When you want to work with pointers in C#, you must specifically declare a block of “unsafe code” using the unsafe keyword (any code that is not marked with the unsafe keyword is considered “safe” automatically). For example, the following Program class declares a scope of unsafe code within the safe Main() method:
class Program
{
static void Main(string[] args)
{
unsafe
{
// Work with pointer types here!
}
// Can’t work with pointers here!
}
}
In addition to declaring a scope of unsafe code within a method, you can build structures, classes, type members, and parameters that are “unsafe.” Here are a few examples to gnaw on (no need to define the Node or Node2 types in your current project):
// This entire structure is "unsafe" and can
// be used only in an unsafe context.
unsafe struct Node
{
public int Value;
public Node* Left;
public Node* Right;
}
// This struct is safe, but the Node2* members
// are not. Technically, you may access "Value" from
// outside an unsafe context, but not "Left" and "Right".
public struct Node2
{
public int Value;
// These can be accessed only in an unsafe context!
public unsafe Node2* Left;
public unsafe Node2* Right;
}
Methods (static or instance level) may be marked as unsafe as well. For example, assume you know that a particular static method will make use of pointer logic. To ensure that this method can be called only from an unsafe context, you could define the method as follows:
unsafe static void SquareIntPointer(int* myIntPointer)
{
// Square the value just for a test.
*myIntPointer *= *myIntPointer;
}
The configuration of your method demands that the caller invoke SquareIntPointer() as follows:
static void Main(string[] args)
{
unsafe
{
int myInt = 10;
// OK, because we are in an unsafe context.
SquareIntPointer(&myInt);
Console.WriteLine("myInt: {0}", myInt);
}
int myInt2 = 5;
// Compiler error! Must be in unsafe context!
SquareIntPointer(&myInt2);
Console.WriteLine("myInt: {0}", myInt2);
}
If you would rather not force the caller to wrap the invocation within an unsafe context, you could update Main() with the unsafe keyword. In this case, the following code would compile:
unsafe static void Main(string[] args)
{
int myInt2 = 5;
SquareIntPointer(&myInt2);
Console.WriteLine("myInt: {0}", myInt2);
}
If you run this Main() method, you will see the following output:
myInt: 25
Working with the * and & Operators
After you have established an unsafe context, you are then free to build pointers to data types using the * operator and obtain the address of what is being pointed to using the & operator. Unlike in C or C++, in C# the * operator is applied to the underlying type only, not as a prefix to each pointer variable name. For example, consider the following code, which illustrates both the correct and incorrect ways to declare pointers to integer variables:
// No! This is incorrect under C#!
int *pi, *pj;
// Yes! This is the way of C#.
int* pi, pj;
Consider the following unsafe method:
unsafe static void PrintValueAndAddress()
{
int myInt;
// Define an int pointer, and
// assign it the address of myInt.
int* ptrToMyInt = &myInt;
// Assign value of myInt using pointer indirection.
*ptrToMyInt = 123;
// Print some stats.
Console.WriteLine("Value of myInt {0}", myInt);
Console.WriteLine("Address of myInt {0:X}", (int)&ptrToMyInt);
}
An Unsafe (and Safe) Swap Function
Of course, declaring pointers to local variables simply to assign their value (as in the previous example) is never required and not altogether useful. To illustrate a more practical example of unsafe code, assume you want to build a swap function using pointer arithmetic.
unsafe public static void UnsafeSwap(int* i, int* j)
{
int temp = *i;
*i = *j;
*j = temp;
}
Very C-like, don’t you think? However, given your work previously, you should be aware that you could write the following safe version of your swap algorithm using the C# ref keyword:
public static void SafeSwap(ref int i, ref int j)
{
int temp = i;
i = j;
j = temp;
}
The functionality of each method is identical, thus reinforcing the point that direct pointer manipulation is not a mandatory task under C#. Here is the calling logic using a safe Main(), with an unsafe context:
static void Main(string[] args)
{
Console.WriteLine("***** Calling method with unsafe code *****");
// Values for swap.
int i = 10, j = 20;
// Swap values "safely."
Console.WriteLine("\n***** Safe swap *****");
Console.WriteLine("Values before safe swap: i = {0}, j = {1}", i, j);
SafeSwap(ref i, ref j);
Console.WriteLine("Values after safe swap: i = {0}, j = {1}", i, j);
// Swap values "unsafely."
Console.WriteLine("\n***** Unsafe swap *****");
Console.WriteLine("Values before unsafe swap: i = {0}, j = {1}", i, j);
unsafe { UnsafeSwap(&i, &j); }
Console.WriteLine("Values after unsafe swap: i = {0}, j = {1}", i, j);
Console.ReadLine();
}
Field Access via Pointers (the -> Operator)
Now assume you have defined a simple, safe Point structure, as follows:
struct Point
{
public int x;
public int y;
public override string ToString()
{
return string.Format("({0}, {1})", x, y);
}
}
If you declare a pointer to a Point type, you will need to make use of the pointer field-access operator (represented by ->) to access its public members. As shown in Table 11-2, this is the unsafe version of the standard (safe) dot operator (.). In fact, using the pointer indirection operator (*), it is possible to dereference a pointer to (once again) apply the dot operator notation. Check out the unsafe method:
unsafe static void UsePointerToPoint()
{
// Access members via pointer.
Point point;
Point* p = &point;
p->x = 100;
p->y = 200;
Console.WriteLine(p->ToString());
// Access members via pointer indirection.
Point point2;
Point* p2 = &point2;
(*p2).x = 100;
(*p2).y = 200;
Console.WriteLine((*p2).ToString());
}
The stackalloc Keyword
In an unsafe context, you may need to declare a local variable that allocates memory directly from the call stack (and is, therefore, not subject to .NET garbage collection). To do so, C# provides the stackalloc keyword, which is the C# equivalent to the _alloca function of the C runtime library. Here is a simple example:
unsafe static void UnsafeStackAlloc()
{
char* p = stackalloc char[256];
for (int k = 0; k < 256; k++)
p[k] = (char)k;
}
Pinning a Type via the fixed Keyword
As you saw in the previous example, allocating a chunk of memory within an unsafe context may be facilitated via the stackalloc keyword. By the very nature of this operation, the allocated memory is cleaned up as soon as the allocating method has returned (as the memory is acquired from the stack). However, assume a more complex example. During our examination of the -> operator, you created a value type named Point. Like all value types, the allocated memory is popped off the stack once the executing scope has terminated. For the sake of argument, assumePoint was instead defined as a reference type, like so:
class PointRef // <= Renamed and retyped.
{
public int x;
public int y;
public override string ToString()
{
return string.Format("({0}, {1})", x, y);
}
}
As you are aware, if the caller declares a variable of type Point, the memory is allocated on the garbage-collected heap. The burning question then becomes, “What if an unsafe context wants to interact with this object (or any object on the heap)?” Given that garbage collection can occur at any moment, imagine the problems encountered when accessing the members of Point at the very point in time such a sweep of the heap is underway. Theoretically, it is possible that the unsafe context is attempting to interact with a member that is no longer accessible or has been repositioned on the heap after surviving a generational sweep (which is an obvious problem).
To lock a reference type variable in memory from an unsafe context, C# provides the fixed keyword. The fixed statement sets a pointer to a managed type and “pins” that variable during the execution of the code. Without fixed, pointers to managed variables would be of little use, since garbage collection could relocate the variables unpredictably. (In fact, the C# compiler will not allow you to set a pointer to a managed variable except in a fixed statement.)
Thus, if you create a PointRef object and want to interact with its members, you must write the following code (or receive a compiler error):
unsafe public static void UseAndPinPoint()
{
PointRef pt = new PointRef ();
pt.x = 5;
pt.y = 6;
// Pin pt in place so it will not
// be moved or GC-ed.
fixed (int* p = &pt.x)
{
// Use int* variable here!
}
// pt is now unpinned, and ready to be GC-ed once
// the method completes.
Console.WriteLine ("Point is: {0}", pt);
}
In a nutshell, the fixed keyword allows you to build a statement that locks a reference variable in memory, such that its address remains constant for the duration of the statement (or scope block). Any time you interact with a reference type from within the context of unsafe code, pinning the reference is a must.
The sizeof Keyword
The final unsafe-centric C# keyword to consider is sizeof. As in C++, the C# sizeof keyword is used to obtain the size in bytes of an intrinsic data type, but not a custom type, unless within an unsafe context. For example, the following method does not need to be declared “unsafe” as all arguments to the sizeof keyword are intrinsic types:
static void UseSizeOfOperator()
{
Console.WriteLine("The size of short is {0}.", sizeof(short));
Console.WriteLine("The size of int is {0}.", sizeof(int));
Console.WriteLine("The size of long is {0}.", sizeof(long));
}
However, if you want to get the size of your custom Point structure, you need to update this method as so (note the unsafe keyword has been added):
unsafe static void UseSizeOfOperator()
{
...
Console.WriteLine("The size of Point is {0}.", sizeof(Point));
}
![]() Source Code The UnsafeCode project can be found in the Chapter 11 subdirectory.
Source Code The UnsafeCode project can be found in the Chapter 11 subdirectory.
That wraps up the look at some of the more advanced features of the C# programming language. To make sure we are all on the same page here, I again must say that a majority of your .NET projects might never need to directly use these features (especially pointers). Nevertheless, as you will see in later chapters, some topics are quite useful, if not required, when working with the LINQ APIs, most notably extension methods and anonymous types.
Summary
The purpose of this chapter was to deepen your understanding of the C# programming language. First, you investigated various advanced type construction techniques (indexer methods, overloaded operators, and custom conversion routines).
Next, you examined the role of extension methods and anonymous types. As you’ll see in some detail in the next chapter, these features are useful when working with LINQ-centric APIs (though you can use them anywhere in your code, should they be useful). Recall that anonymous methods allow you to quickly model the “shape” of a type, while extension methods allow you to tack on new functionality to types, without the need to subclass.
You spent the remainder of this chapter examining a small set of lesser-known keywords (sizeof, unsafe, and so forth) and during the process learned how to work with raw pointer types. As stated throughout the examination of pointer types, the vast majority of your C# applications will never need to use them.
All materials on the site are licensed Creative Commons Attribution-Sharealike 3.0 Unported CC BY-SA 3.0 & GNU Free Documentation License (GFDL)
If you are the copyright holder of any material contained on our site and intend to remove it, please contact our site administrator for approval.
© 2016-2026 All site design rights belong to S.Y.A.