C# 6.0 and the .NET 4.6 Framework (2015)
PART III
Object-Oriented Programming with C#
CHAPTER 6
Understanding Inheritance and Polymorphism
Chapter 5 examined the first pillar of OOP: encapsulation. At that time, you learned how to build a single well-defined class type with constructors and various members (fields, properties, methods, constants, and read-only fields). This chapter will focus on the remaining two pillars of OOP: inheritance and polymorphism.
First, you will learn how to build families of related classes using inheritance. As you will see, this form of code reuse allows you to define common functionality in a parent class that can be leveraged, and possibly altered, by child classes. Along the way, you will learn how to establish apolymorphic interface into class hierarchies using virtual and abstract members, as well as the role of explicit casting.
The chapter will wrap up by examining the role of the ultimate parent class in the .NET base class libraries: System.Object.
The Basic Mechanics of Inheritance
Recall from Chapter 5 that inheritance is an aspect of OOP that facilitates code reuse. Specifically speaking, code reuse comes in two flavors: inheritance (the “is-a” relationship) and the containment/delegation model (the “has-a” relationship). Let’s begin this chapter by examining the classical inheritance model of the “is-a” relationship.
When you establish “is-a” relationships between classes, you are building a dependency between two or more class types. The basic idea behind classical inheritance is that new classes can be created using existing classes as a starting point. To begin with a simple example, create a new Console Application project named Basic Inheritance. Now assume you have designed a class named Car that models some basic details of an automobile.
// A simple base class.
class Car
{
public readonly int maxSpeed;
private int currSpeed;
public Car(int max)
{
maxSpeed = max;
}
public Car()
{
maxSpeed = 55;
}
public int Speed
{
get { return currSpeed; }
set
{
currSpeed = value;
if (currSpeed > maxSpeed)
{
currSpeed = maxSpeed;
}
}
}
}
Notice that the Car class is using encapsulation services to control access to the private currSpeed field using a public property named Speed. At this point, you can exercise your Car type as follows:
static void Main(string[] args)
{
Console.WriteLine("***** Basic Inheritance *****\n");
// Make a Car object and set max speed.
Car myCar = new Car(80);
// Set the current speed, and print it.
myCar.Speed = 50;
Console.WriteLine("My car is going {0} MPH", myCar.Speed);
Console.ReadLine();
}
Specifying the Parent Class of an Existing Class
Now assume you want to build a new class named MiniVan. Like a basic Car, you want to define the MiniVan class to support data for a maximum speed, a current speed, and a property named Speed to allow the object user to modify the object’s state. Clearly, the Car and MiniVanclasses are related; in fact, it can be said that a MiniVan “is-a” type of Car. The “is-a” relationship (formally termed classical inheritance) allows you to build new class definitions that extend the functionality of an existing class.
The existing class that will serve as the basis for the new class is termed a base class, superclass, or parent class. The role of a base class is to define all the common data and members for the classes that extend it. The extending classes are formally termed derived or child classes. In C#, you make use of the colon operator on the class definition to establish an “is-a” relationship between classes. Assume you have authored the following new MiniVan class:
// MiniVan "is-a" Car.
class MiniVan : Car
{
}
Currently, this new class has not defined any members whatsoever. So, what have you gained by extending your MiniVan from the Car base class? Simply put, MiniVan objects now have access to each public member defined within the parent class.
![]() Note Although constructors are typically defined as public, a derived class never inherits the constructors of a parent class. Constructors are used to construct only the class that they are defined within.
Note Although constructors are typically defined as public, a derived class never inherits the constructors of a parent class. Constructors are used to construct only the class that they are defined within.
Given the relation between these two class types, you could now make use of the MiniVan class like so:
static void Main(string[] args)
{
Console.WriteLine("***** Basic Inheritance *****\n");
...
// Now make a MiniVan object.
MiniVan myVan = new MiniVan();
myVan.Speed = 10;
Console.WriteLine("My van is going {0} MPH",
myVan.Speed);
Console.ReadLine();
}
Again, notice that although you have not added any members to the MiniVan class, you have direct access to the public Speed property of your parent class and have thus reused code. This is a far better approach than creating a MiniVan class that has the same members as Car, such as a Speed property. If you did duplicate code between these two classes, you would need to now maintain two bodies of code, which is certainly a poor use of your time.
Always remember that inheritance preserves encapsulation; therefore, the following code results in a compiler error, as private members can never be accessed from an object reference:
static void Main(string[] args)
{
Console.WriteLine("***** Basic Inheritance *****\n");
...
// Make a MiniVan object.
MiniVan myVan = new MiniVan();
myVan.Speed = 10;
Console.WriteLine("My van is going {0} MPH",
myVan.Speed);
// Error! Can’t access private members!
myVan.currSpeed = 55;
Console.ReadLine();
}
On a related note, if the MiniVan defined its own set of members, it would still not be able to access any private member of the Car base class. Remember, private members can be accessed only by the class that defines it. For example, the following method in MiniVan would result in a compiler error:
// MiniVan derives from Car.
class MiniVan : Car
{
public void TestMethod()
{
// OK! Can access public members
// of a parent within a derived type.
Speed = 10;
// Error! Cannot access private
// members of parent within a derived type.
currSpeed = 10;
}
}
Regarding Multiple Base Classes
Speaking of base classes, it is important to keep in mind that C# demands that a given class have exactly one direct base class. It is not possible to create a class type that directly derives from two or more base classes (this technique, which is supported in unmanaged C++, is known asmultiple inheritance, or simply MI). If you attempted to create a class that specifies two direct parent classes, as shown in the following code, you would receive compiler errors:
// Illegal! C# does not allow
// multiple inheritance for classes!
class WontWork
: BaseClassOne, BaseClassTwo
{}
As you will see in Chapter 8, the .NET platform does allow a given class, or structure, to implement any number of discrete interfaces. In this way, a C# type can exhibit a number of behaviors while avoiding the complexities associated with MI. On a related note, while a class can have only one direct base class, it is permissible for an interface to directly derive from multiple interfaces. Using this technique, you can build sophisticated interface hierarchies that model complex behaviors (again, see Chapter 8).
The sealed Keyword
C# supplies another keyword, sealed, that prevents inheritance from occurring. When you mark a class as sealed, the compiler will not allow you to derive from this type. For example, assume you have decided that it makes no sense to further extend the MiniVan class.
// The MiniVan class cannot be extended!
sealed class MiniVan : Car
{
}
If you (or a teammate) were to attempt to derive from this class, you would receive a compile-time error.
// Error! Cannot extend
// a class marked with the sealed keyword!
class DeluxeMiniVan
: MiniVan
{}
Most often, sealing a class makes the best sense when you are designing a utility class. For example, the System namespace defines numerous sealed classes. You can verify this for yourself by opening the Visual Studio Object Browser (via the View menu) and selecting the Stringclass within the System namespace of the mscorlib.dll assembly. Notice in Figure 6-1 the icon used to denote a sealed class.
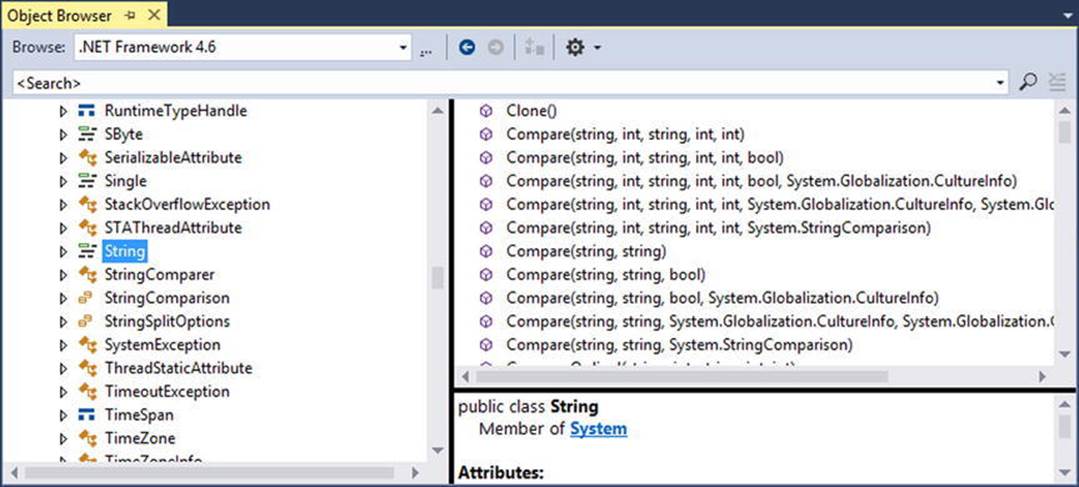
Figure 6-1. The base class libraries define numerous sealed types, such as System.String
Thus, just like the MiniVan, if you attempt to build a new class that extends System.String, you will receive a compile-time error.
// Another error! Cannot extend
// a class marked as sealed!
class MyString
: String
{}
![]() Note In Chapter 4, you learned that C# structures are always implicitly sealed (see Table 4-3). Therefore, you can never derive one structure from another structure, a class from a structure, or a structure from a class. Structures can be used to model only stand-alone, atomic, user-defined data types. If you want to leverage the is-a relationship, you must use classes.
Note In Chapter 4, you learned that C# structures are always implicitly sealed (see Table 4-3). Therefore, you can never derive one structure from another structure, a class from a structure, or a structure from a class. Structures can be used to model only stand-alone, atomic, user-defined data types. If you want to leverage the is-a relationship, you must use classes.
As you would guess, there are many more details to inheritance that you will come to know during the remainder of this chapter. For now, simply keep in mind that the colon operator allows you to establish base/derived class relationships, while the sealed keyword prevents subsequent inheritance from occurring.
Revising Visual Studio Class Diagrams
In Chapter 2, I briefly mentioned that Visual Studio allows you to establish base/derived class relationships visually at design time. To leverage this aspect of the IDE, your first step is to include a new class diagram file into your current project. To do so, access the Project ![]() Add New Item menu option and click the Class Diagram icon (in Figure 6-2, I renamed the file from ClassDiagram1.cd to Cars.cd).
Add New Item menu option and click the Class Diagram icon (in Figure 6-2, I renamed the file from ClassDiagram1.cd to Cars.cd).
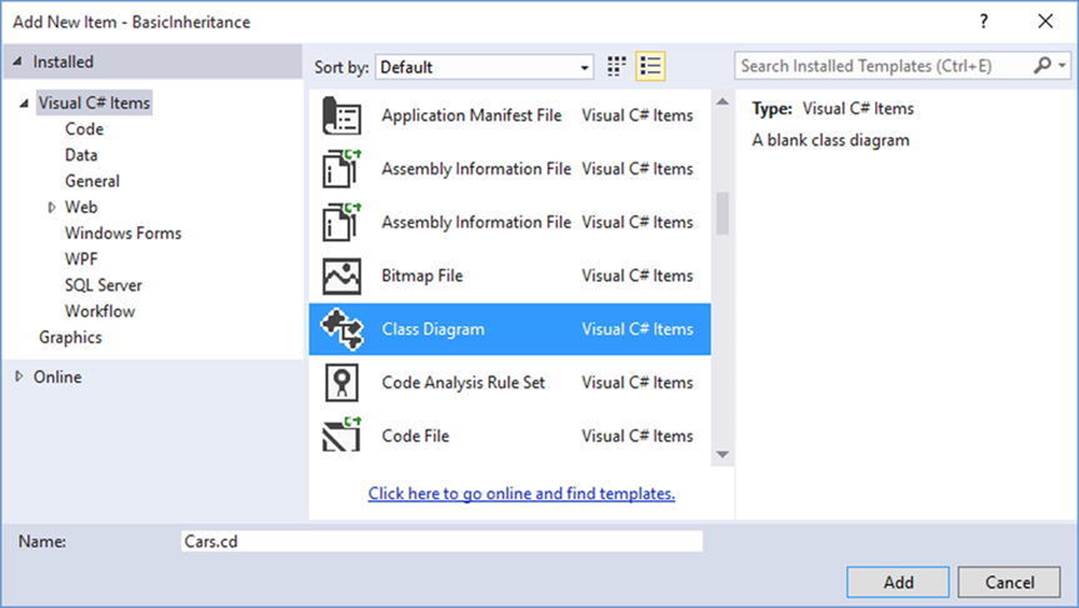
Figure 6-2. Inserting a new class diagram
After you click the Add button, you will be presented with a blank designer surface. To add types to a class designer, simply drag each file from the Solution Explorer window onto the surface. Also recall that if you delete an item from the visual designer (simply by selecting it and pressing the Delete key), this will not destroy the associated source code but simply remove the item off the designer surface. Figure 6-3 shows the current class hierarchy.
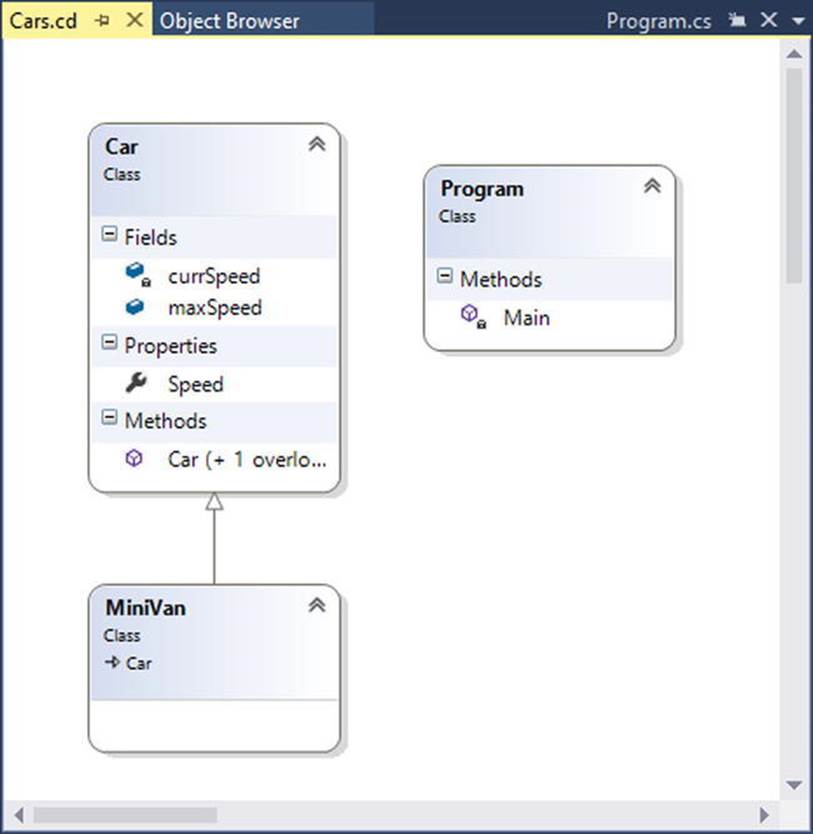
Figure 6-3. The visual designer of Visual Studio
Beyond simply displaying the relationships of the types within your current application, recall from Chapter 2 that you can also create new types and populate their members using the Class Designer toolbox and Class Details window.
If you want to make use of these visual tools during the remainder of the book, feel free. However, always make sure you analyze the generated code so you have a solid understanding of what these tools have done on your behalf.
![]() Source Code The Basic Inheritance project is located in the Chapter 6 subdirectory.
Source Code The Basic Inheritance project is located in the Chapter 6 subdirectory.
The Second Pillar of OOP: The Details of Inheritance
Now that you have seen the basic syntax of inheritance, let’s create a more complex example and get to know the numerous details of building class hierarchies. To do so, you will be reusing the Employee class you designed in Chapter 5. To begin, create a new C# Console Application project named Employees.
Next, activate the Project ![]() Add Existing Item menu option and navigate to the location of your Employee.cs and Employee.Core.cs files you created in the EmployeeApp example of Chapter 5. Select each of them (via a Ctrl+click) and click the Add button. Visual Studio responds by copying each file into the current project (because these are full copies, you will not need to worry about changing the original work you did in the Chapter 5 project).
Add Existing Item menu option and navigate to the location of your Employee.cs and Employee.Core.cs files you created in the EmployeeApp example of Chapter 5. Select each of them (via a Ctrl+click) and click the Add button. Visual Studio responds by copying each file into the current project (because these are full copies, you will not need to worry about changing the original work you did in the Chapter 5 project).
Before you start to build some derived classes, you have one detail to attend to. Because the original Employee class was created in a project named EmployeeApp, the class has been wrapped within an identically named .NET namespace. Chapter 14 will examine namespaces in detail; however, for simplicity, rename the current namespace (in both file locations) to Employees to match your new project name.
// Be sure to change the namespace name in both C# files!
namespace Employees
{
partial class Employee
{...}
}
![]() Note As a sanity check, compile and run your new project by pressing Ctrl+F5. The program will not do anything at this point; however, this will ensure you do not have any compiler errors.
Note As a sanity check, compile and run your new project by pressing Ctrl+F5. The program will not do anything at this point; however, this will ensure you do not have any compiler errors.
Your goal is to create a family of classes that model various types of employees in a company. Assume you want to leverage the functionality of the Employee class to create two new classes (SalesPerson and Manager). The new SalesPerson class “is-an” Employee (as is aManager). Remember that under the classical inheritance model, base classes (such as Employee) are used to define general characteristics that are common to all descendants. Subclasses (such as SalesPerson and Manager) extend this general functionality while adding more specific functionality.
For your example, you will assume that the Manager class extends Employee by recording the number of stock options, while the SalesPerson class maintains the number of sales made. Insert a new class file (Manager.cs) that defines the Manager class with the following automatic property:
// Managers need to know their number of stock options.
class Manager : Employee
{
public int StockOptions { get; set; }
}
Next, add another new class file (SalesPerson.cs) that defines the SalesPerson class with a fitting automatic property.
// Salespeople need to know their number of sales.
class SalesPerson : Employee
{
public int SalesNumber { get; set; }
}
Now that you have established an “is-a” relationship, SalesPerson and Manager have automatically inherited all public members of the Employee base class. To illustrate, update your Main() method as follows:
// Create a subclass object and access base class functionality.
static void Main(string[] args)
{
Console.WriteLine("***** The Employee Class Hierarchy *****\n");
SalesPerson fred = new SalesPerson();
fred.Age = 31;
fred.Name = "Fred";
fred.SalesNumber = 50;
Console.ReadLine();
}
Controlling Base Class Creation with the base Keyword
Currently, SalesPerson and Manager can be created only using the “freebie” default constructor (see Chapter 5). With this in mind, assume you have added a new six-argument constructor to the Manager type, which is invoked as follows:
static void Main(string[] args)
{
...
// Assume Manager has a constructor matching this signature:
// (string fullName, int age, int empID,
// float currPay, string ssn, int numbOfOpts)
Manager chucky = new Manager("Chucky", 50, 92, 100000, "333-23-2322", 9000);
Console.ReadLine();
}
If you look at the parameter list, you can clearly see that most of these arguments should be stored in the member variables defined by the Employee base class. To do so, you might implement this custom constructor on the Manager class as follows:
public Manager(string fullName, int age, int empID,
float currPay, string ssn, int numbOfOpts)
{
// This property is defined by the Manager class.
StockOptions = numbOfOpts;
// Assign incoming parameters using the
// inherited properties of the parent class.
ID = empID;
Age = age;
Name = fullName;
Pay = currPay;
// OOPS! This would be a compiler error,
// if the SSN property were read-only!
SocialSecurityNumber = ssn;
}
The first issue with this approach is that if you defined any property as read-only (for example, the SocialSecurityNumber property), you are unable to assign the incoming string parameter to this field, as shown in the final code statement of this custom constructor.
The second issue is that you have indirectly created a rather inefficient constructor, given that under C#, unless you say otherwise, the default constructor of a base class is called automatically before the logic of the derived constructor is executed. After this point, the current implementation accesses numerous public properties of the Employee base class to establish its state. Thus, you have really made seven hits (five inherited properties and two constructor calls) during the creation of a Manager object!
To help optimize the creation of a derived class, you will do well to implement your subclass constructors to explicitly call an appropriate custom base class constructor, rather than the default. In this way, you are able to reduce the number of calls to inherited initialization members (which saves processing time). First, ensure your Employee parent class has the following five-argument constructor:
// Add to the Employee base class.
public Employee(string name, int age, int id, float pay, string ssn) :this(name, age, id, pay)
{
empSSN = ssn;
}
Now, let’s retrofit the custom constructor of the Manager type to do this very thing using the base keyword.
public Manager(string fullName, int age, int empID,
float currPay, string ssn, int numbOfOpts)
: base(fullName, age, empID, currPay, ssn)
{
// This property is defined by the Manager class.
StockOptions = numbOfOpts;
}
Here, the base keyword is hanging off the constructor signature (much like the syntax used to chain constructors on a single class using the this keyword, as was discussed in Chapter 5), which always indicates a derived constructor is passing data to the immediate parent constructor. In this situation, you are explicitly calling the five-parameter constructor defined by Employee and saving yourself unnecessary calls during the creation of the child class. The custom SalesPerson constructor looks almost identical.
// As a general rule, all subclasses should explicitly call an appropriate
// base class constructor.
public SalesPerson(string fullName, int age, int empID,
float currPay, string ssn, int numbOfSales)
: base(fullName, age, empID, currPay, ssn)
{
// This belongs with us!
SalesNumber = numbOfSales;
}
![]() Note You may use the base keyword whenever a subclass wants to access a public or protected member defined by a parent class. Use of this keyword is not limited to constructor logic. You will see examples using base in this manner during the examination of polymorphism, later in this chapter.
Note You may use the base keyword whenever a subclass wants to access a public or protected member defined by a parent class. Use of this keyword is not limited to constructor logic. You will see examples using base in this manner during the examination of polymorphism, later in this chapter.
Finally, recall that once you add a custom constructor to a class definition, the default constructor is silently removed. Therefore, be sure to redefine the default constructor for the SalesPerson and Manager types. Here’s an example:
// Add back the default ctor
// in the Manager class as well.
public SalesPerson() {}
Keeping Family Secrets: The protected Keyword
As you already know, public items are directly accessible from anywhere, while private items can be accessed only by the class that has defined them. Recall from Chapter 5 that C# takes the lead of many other modern object languages and provides an additional keyword to define member accessibility: protected.
When a base class defines protected data or protected members, it establishes a set of items that can be accessed directly by any descendant. If you want to allow the SalesPerson and Manager child classes to directly access the data sector defined by Employee, you can update the original Employee class definition as follows:
// Protected state data.
partial class Employee
{
// Derived classes can now directly access this information.
protected string empName;
protected int empID;
protected float currPay;
protected int empAge;
protected string empSSN;
...
}
The benefit of defining protected members in a base class is that derived types no longer have to access the data indirectly using public methods or properties. The possible downfall, of course, is that when a derived type has direct access to its parent’s internal data, it is possible to accidentally bypass existing business rules found within public properties. When you define protected members, you are creating a level of trust between the parent class and the child class, as the compiler will not catch any violation of your type’s business rules.
Finally, understand that as far as the object user is concerned, protected data is regarded as private (as the user is “outside” the family). Therefore, the following is illegal:
static void Main(string[] args)
{
// Error! Can’t access protected data from client code.
Employee emp = new Employee();
emp.empName = "Fred";
}
![]() Note Although protected field data can break encapsulation, it is quite safe (and useful) to define protected methods. When building class hierarchies, it is common to define a set of methods that are only for use by derived types and are not intended for use by the outside world.
Note Although protected field data can break encapsulation, it is quite safe (and useful) to define protected methods. When building class hierarchies, it is common to define a set of methods that are only for use by derived types and are not intended for use by the outside world.
Adding a Sealed Class
Recall that a sealed class cannot be extended by other classes. As mentioned, this technique is most often used when you are designing a utility class. However, when building class hierarchies, you might find that a certain branch in the inheritance chain should be “capped off,” as it makes no sense to further extend the linage. For example, assume you have added yet another class to your program (PTSalesPerson) that extends the existing SalesPerson type. Figure 6-4 shows the current update.
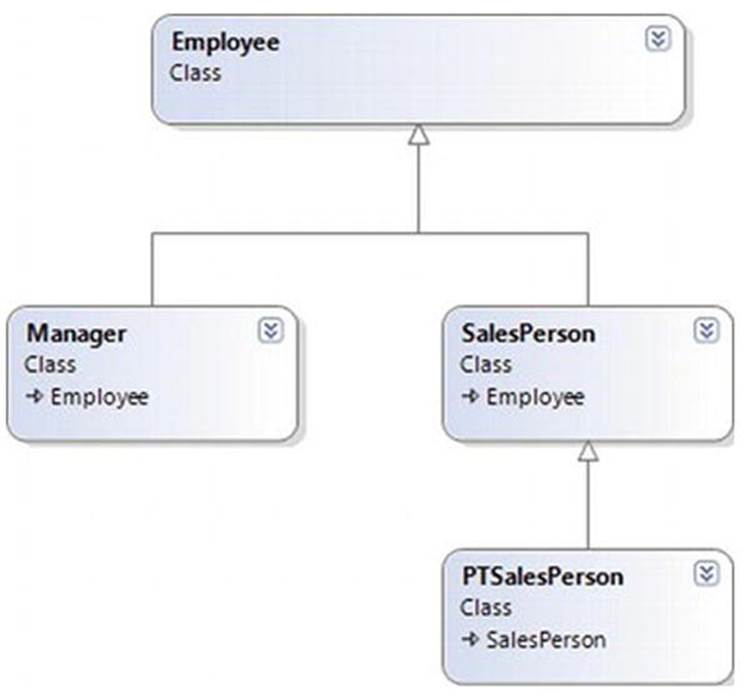
Figure 6-4. The PTSalesPerson class
PTSalesPerson is a class representing, of course, a part-time salesperson. For the sake of argument, let’s say you want to ensure that no other developer is able to subclass from PTSalesPerson. (After all, how much more part-time can you get than “part-time”?) Again, to prevent others from extending a class, use the sealed keyword.
sealed class PTSalesPerson : SalesPerson
{
public PTSalesPerson(string fullName, int age, int empID,
float currPay, string ssn, int numbOfSales)
:base (fullName, age, empID, currPay, ssn, numbOfSales)
{
}
// Assume other members here...
}
Programming for Containment/Delegation
Recall that code reuse comes in two flavors. You have just explored the classical “is-a” relationship. Before you examine the third pillar of OOP (polymorphism), let’s examine the “has-a” relationship (also known as the containment/delegation model or aggregation). Assume you have created a new class that models an employee benefits package, as follows:
// This new type will function as a contained class.
class BenefitPackage
{
// Assume we have other members that represent
// dental/health benefits, and so on.
public double ComputePayDeduction()
{
return 125.0;
}
}
Obviously, it would be rather odd to establish an “is-a” relationship between the BenefitPackage class and the employee types. (Employee “is-a” BenefitPackage? I don’t think so.) However, it should be clear that some sort of relationship between the two could be established. In short, you would like to express the idea that each employee “has-a” BenefitPackage. To do so, you can update the Employee class definition as follows:
// Employees now have benefits.
partial class Employee
{
// Contain a BenefitPackage object.
protected BenefitPackage empBenefits = new BenefitPackage();
...
}
At this point, you have successfully contained another object. However, exposing the functionality of the contained object to the outside world requires delegation. Delegation is simply the act of adding public members to the containing class that use the contained object’s functionality.
For example, you could update the Employee class to expose the contained empBenefits object using a custom property, as well as make use of its functionality internally using a new method named GetBenefitCost().
partial class Employee
{
// Contain a BenefitPackage object.
protected BenefitPackage empBenefits = new BenefitPackage();
// Expose certain benefit behaviors of object.
public double GetBenefitCost()
{ return empBenefits.ComputePayDeduction(); }
// Expose object through a custom property.
public BenefitPackage Benefits
{
get { return empBenefits; }
set { empBenefits = value; }
}
...
}
In the following updated Main() method, notice how you can interact with the internal BenefitsPackage type defined by the Employee type.
static void Main(string[] args)
{
Console.WriteLine("***** The Employee Class Hierarchy *****\n");
...
Manager chucky = new Manager("Chucky", 50, 92, 100000, "333-23-2322", 9000);
double cost = chucky.GetBenefitCost();
Console.ReadLine();
}
Understanding Nested Type Definitions
Chapter 5 briefly mentioned the concept of nested types, which is a spin on the “has-a” relationship you have just examined. In C# (as well as other .NET languages), it is possible to define a type (enum, class, interface, struct, or delegate) directly within the scope of a class or structure. When you have done so, the nested (or “inner”) type is considered a member of the nesting (or “outer”) class and in the eyes of the runtime can be manipulated like any other member (fields, properties, methods, and events). The syntax used to nest a type is quite straightforward.
public class OuterClass
{
// A public nested type can be used by anybody.
public class PublicInnerClass {}
// A private nested type can only be used by members
// of the containing class.
private class PrivateInnerClass {}
}
Although the syntax is fairly clear, understanding why you would want to do this might not be readily apparent. To understand this technique, ponder the following traits of nesting a type:
· Nested types allow you to gain complete control over the access level of the inner type because they may be declared privately (recall that non-nested classes cannot be declared using the private keyword).
· Because a nested type is a member of the containing class, it can access private members of the containing class.
· Often, a nested type is useful only as a helper for the outer class and is not intended for use by the outside world.
When a type nests another class type, it can create member variables of the type, just as it would for any point of data. However, if you want to use a nested type from outside the containing type, you must qualify it by the scope of the nesting type. Consider the following code:
static void Main(string[] args)
{
// Create and use the public inner class. OK!
OuterClass.PublicInnerClass inner;
inner = new OuterClass.PublicInnerClass();
// Compiler Error! Cannot access the private class.
OuterClass.PrivateInnerClass inner2;
inner2 = new OuterClass.PrivateInnerClass();
}
To use this concept within the employees example, assume you have now nested the BenefitPackage directly within the Employee class type.
partial class Employee
{
public class BenefitPackage
{
// Assume we have other members that represent
// dental/health benefits, and so on.
public double ComputePayDeduction()
{
return 125.0;
}
}
...
}
The nesting process can be as “deep” as you require. For example, assume you want to create an enumeration named BenefitPackageLevel, which documents the various benefit levels an employee may choose. To programmatically enforce the tight connection betweenEmployee, BenefitPackage, and BenefitPackageLevel, you could nest the enumeration as follows:
// Employee nests BenefitPackage.
public partial class Employee
{
// BenefitPackage nests BenefitPackageLevel.
public class BenefitPackage
{
public enum BenefitPackageLevel
{
Standard, Gold, Platinum
}
public double ComputePayDeduction()
{
return 125.0;
}
}
...
}
Because of the nesting relationships, note how you are required to make use of this enumeration:
static void Main(string[] args)
{
...
// Define my benefit level.
Employee.BenefitPackage.BenefitPackageLevel myBenefitLevel =
Employee.BenefitPackage.BenefitPackageLevel.Platinum;
Console.ReadLine();
}
Excellent! At this point, you have been exposed to a number of keywords (and concepts) that allow you to build hierarchies of related types via classical inheritance, containment, and nested types. If the details aren’t crystal clear right now, don’t sweat it. You will be building a number of additional hierarchies over the remainder of this book. Next up, let’s examine the final pillar of OOP: polymorphism.
The Third Pillar of OOP: C#’s Polymorphic Support
Recall that the Employee base class defined a method named GiveBonus() , which was originally implemented as follows:
public partial class Employee
{
public void GiveBonus(float amount)
{
Pay += amount;
}
...
}
Because this method has been defined with the public keyword, you can now give bonuses to salespeople and managers (as well as part-time salespeople).
static void Main(string[] args)
{
Console.WriteLine("***** The Employee Class Hierarchy *****\n");
// Give each employee a bonus?
Manager chucky = new Manager("Chucky", 50, 92, 100000, "333-23-2322", 9000);
chucky.GiveBonus(300);
chucky.DisplayStats();
Console.WriteLine();
SalesPerson fran = new SalesPerson("Fran", 43, 93, 3000, "932-32-3232", 31);
fran.GiveBonus(200);
fran.DisplayStats();
Console.ReadLine();
}
The problem with the current design is that the publicly inherited GiveBonus() method operates identically for all subclasses. Ideally, the bonus of a salesperson or part-time salesperson should take into account the number of sales. Perhaps managers should gain additional stock options in conjunction with a monetary bump in salary. Given this, you are suddenly faced with an interesting question: “How can related types respond differently to the same request?” Again, glad you asked!
The virtual and override Keywords
Polymorphism provides a way for a subclass to define its own version of a method defined by its base class, using the process termed method overriding. To retrofit your current design, you need to understand the meaning of the virtual and override keywords. If a base class wants to define a method that may be (but does not have to be) overridden by a subclass, it must mark the method with the virtual keyword.
partial class Employee
{
// This method can now be "overridden" by a derived class.
public virtual void GiveBonus(float amount)
{
Pay += amount;
}
...
}
![]() Note Methods that have been marked with the virtual keyword are (not surprisingly) termed virtual methods.
Note Methods that have been marked with the virtual keyword are (not surprisingly) termed virtual methods.
When a subclass wants to change the implementation details of a virtual method, it does so using the override keyword. For example, the SalesPerson and Manager could override GiveBonus() as follows (assume that PTSalesPerson will not override GiveBonus() and, therefore, simply inherits the version defined by SalesPerson):
class SalesPerson : Employee
{
...
// A salesperson’s bonus is influenced by the number of sales.
public override void GiveBonus(float amount)
{
int salesBonus = 0;
if (SalesNumber >= 0 && SalesNumber <= 100)
salesBonus = 10;
else
{
if (SalesNumber >= 101 && SalesNumber <= 200)
salesBonus = 15;
else
salesBonus = 20;
}
base.GiveBonus(amount * salesBonus);
}
}
class Manager : Employee
{
...
public override void GiveBonus(float amount)
{
base.GiveBonus(amount);
Random r = new Random();
StockOptions += r.Next(500);
}
}
Notice how each overridden method is free to leverage the default behavior using the base keyword.
In this way, you have no need to completely reimplement the logic behind GiveBonus() but can reuse (and possibly extend) the default behavior of the parent class.
Also assume that the current DisplayStats() method of the Employee class has been declared virtually.
public virtual void DisplayStats()
{
Console.WriteLine("Name: {0}", Name);
Console.WriteLine("ID: {0}", ID);
Console.WriteLine("Age: {0}", Age);
Console.WriteLine("Pay: {0}", Pay);
Console.WriteLine("SSN: {0}", SocialSecurityNumber);
}
By doing so, each subclass can override this method to account for displaying the number of sales (for salespeople) and current stock options (for managers). For example, consider the Manager’s version of the DisplayStats() method (the SalesPerson class would implementDisplayStats() in a similar manner to show the number of sales).
public override void DisplayStats()
{
base.DisplayStats();
Console.WriteLine("Number of Stock Options: {0}", StockOptions);
}
Now that each subclass can interpret what these virtual methods mean for itself, each object instance behaves as a more independent entity.
static void Main(string[] args)
{
Console.WriteLine("***** The Employee Class Hierarchy *****\n");
// A better bonus system!
Manager chucky = new Manager("Chucky", 50, 92, 100000, "333-23-2322", 9000);
chucky.GiveBonus(300);
chucky.DisplayStats();
Console.WriteLine();
SalesPerson fran = new SalesPerson("Fran", 43, 93, 3000, "932-32-3232", 31);
fran.GiveBonus(200);
fran.DisplayStats();
Console.ReadLine();
}
The following output shows a possible test run of your application thus far:
***** The Employee Class Hierarchy *****
Name: Chucky
ID: 92
Age: 50
Pay: 100300
SSN: 333-23-2322
Number of Stock Options: 9337
Name: Fran
ID: 93
Age: 43
Pay: 5000
SSN: 932-32-3232
Number of Sales: 31
Overriding Virtual Members Using the Visual Studio IDE
As you might have already noticed, when you are overriding a member, you must recall the type of every parameter—not to mention the method name and parameter passing conventions (ref, out, and params). Visual Studio has a helpful feature that you can make use of when overriding a virtual member. If you type the word override within the scope of a class type (then hit the spacebar), IntelliSense will automatically display a list of all the overridable members defined in your parent classes, as you see in Figure 6-5.
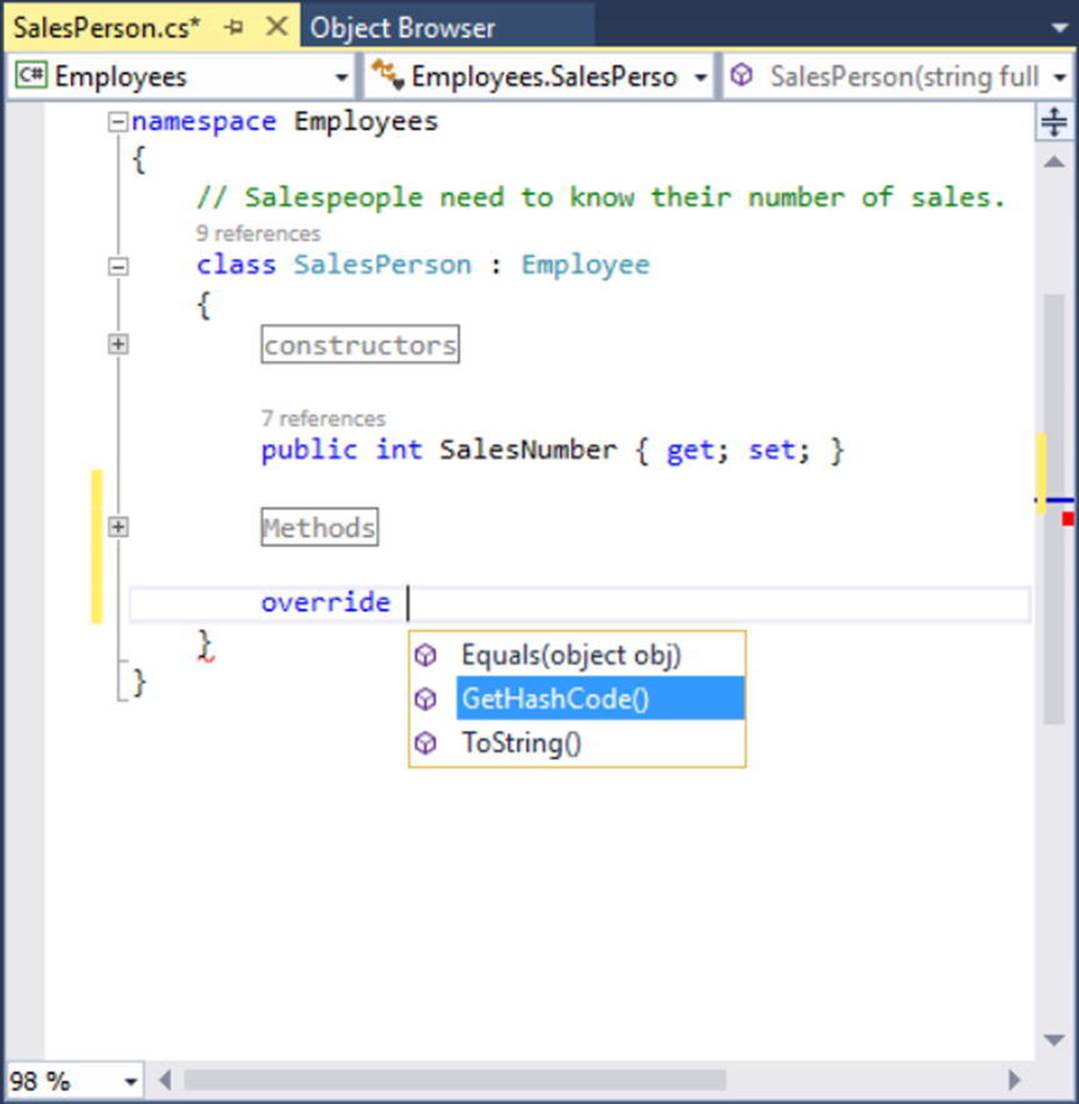
Figure 6-5. Quickly viewing overridable methods à la Visual Studio
When you select a member and hit the Enter key, the IDE responds by automatically filling in the method stub on your behalf. Note that you also receive a code statement that calls your parent’s version of the virtual member (you are free to delete this line if it is not required). For example, if you used this technique when overriding the DisplayStats() method, you might find the following autogenerated code:
public override void DisplayStats()
{
base.DisplayStats();
}
Sealing Virtual Members
Recall that the sealed keyword can be applied to a class type to prevent other types from extending its behavior via inheritance. As you might remember, you sealed PTSalesPerson because you assumed it made no sense for other developers to extend this line of inheritance any further.
On a related note, sometimes you might not want to seal an entire class but simply want to prevent derived types from overriding particular virtual methods. For example, assume you do not want part-time salespeople to obtain customized bonuses. To prevent the PTSalesPerson class from overriding the virtual GiveBonus() method, you could effectively seal this method in the SalesPerson class as follows:
// SalesPerson has sealed the GiveBonus() method!
class SalesPerson : Employee
{
...
public override sealed void GiveBonus(float amount)
{
...
}
}
Here, SalesPerson has indeed overridden the virtual GiveBonus() method defined in the Employee class; however, it has explicitly marked it as sealed. Thus, if you attempted to override this method in the PTSalesPerson class, you would receive compile-time errors, as shown in the following code:
sealed class PTSalesPerson : SalesPerson
{
public PTSalesPerson(string fullName, int age, int empID,
float currPay, string ssn, int numbOfSales)
:base (fullName, age, empID, currPay, ssn, numbOfSales)
{
}
// Compiler error! Can’t override this method
// in the PTSalesPerson class, as it was sealed.
public override void GiveBonus(float amount)
{
}
}
Understanding Abstract Classes
Currently, the Employee base class has been designed to supply various data members for its descendants, as well as supply two virtual methods (GiveBonus() and DisplayStats()) that may be overridden by a given descendant. While this is all well and good, there is a rather odd byproduct of the current design; you can directly create instances of the Employee base class.
// What exactly does this mean?
Employee X = new Employee();
In this example, the only real purpose of the Employee base class is to define common members for all subclasses. In all likelihood, you did not intend anyone to create a direct instance of this class, reason being that the Employee type itself is too general of a concept. For example, if I were to walk up to you and say, “I’m an employee!” I would bet your first question to me would be, “What kind of employee are you?” Are you a consultant, trainer, admin assistant, copyeditor, or White House aide?
Given that many base classes tend to be rather nebulous entities, a far better design for this example is to prevent the ability to directly create a new Employee object in code. In C#, you can enforce this programmatically by using the abstract keyword in the class definition, thus creating an abstract base class.
// Update the Employee class as abstract
// to prevent direct instantiation.
abstract partial class Employee
{
...
}
With this, if you now attempt to create an instance of the Employee class, you are issued a compile-time error.
// Error! Cannot create an instance of an abstract class!
Employee X = new Employee();
At first glance, it might seem strange to define a class that you cannot directly create an instance of. Recall, however, that base classes (abstract or not) are useful, in that they contain all the common data and functionality of derived types. Using this form of abstraction, you are able to model that the “idea” of an employee is completely valid; it is just not a concrete entity. Also understand that although you cannot directly create an instance of an abstract class, it is still assembled in memory when derived classes are created. Thus, it is perfectly fine (and common) for abstract classes to define any number of constructors that are called indirectly when derived classes are allocated.
At this point, you have constructed a fairly interesting employee hierarchy. You will add a bit more functionality to this application later in this chapter when examining C# casting rules. Until then, Figure 6-6 illustrates the crux of your current design.
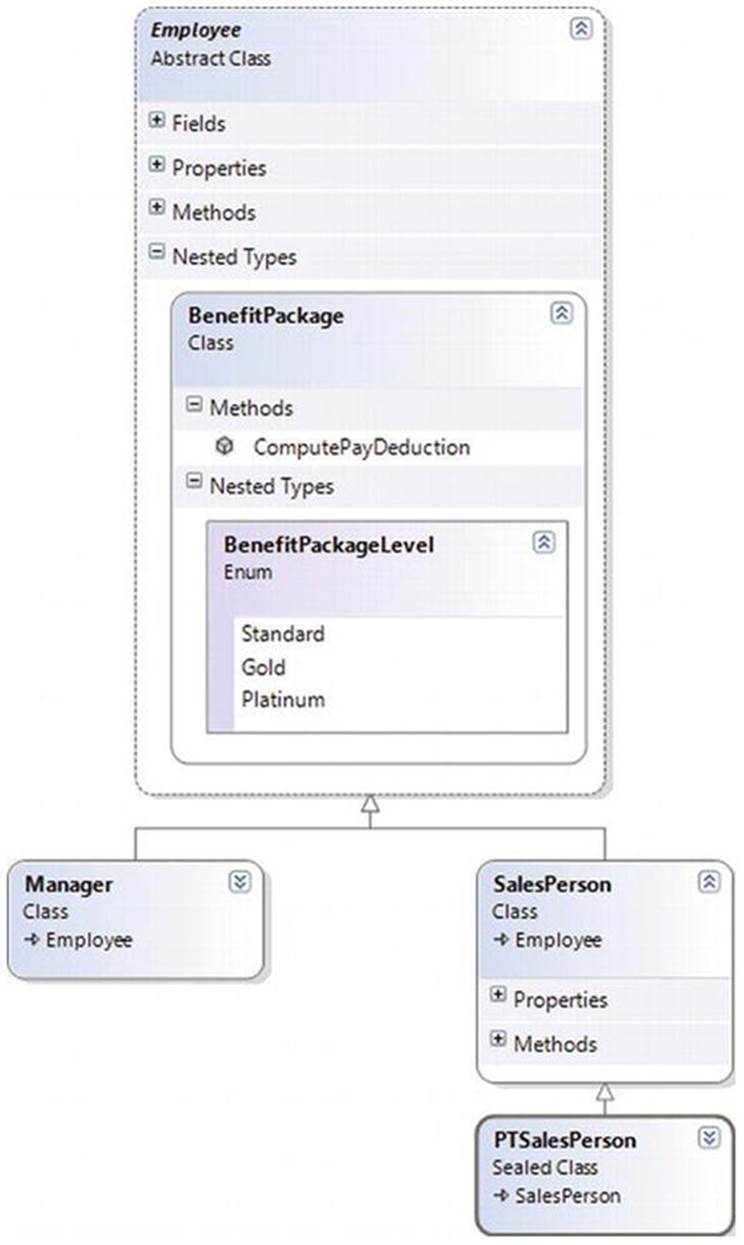
Figure 6-6. The Employee hierarchy
![]() Source Code The Employees project is included in the Chapter 6 subdirectory.
Source Code The Employees project is included in the Chapter 6 subdirectory.
Understanding the Polymorphic Interface
When a class has been defined as an abstract base class (via the abstract keyword), it may define any number of abstract members. Abstract members can be used whenever you want to define a member that does not supply a default implementation but must be accounted for by each derived class. By doing so, you enforce a polymorphic interface on each descendant, leaving them to contend with the task of providing the details behind your abstract methods.
Simply put, an abstract base class’s polymorphic interface simply refers to its set of virtual and abstract methods . This is much more interesting than first meets the eye because this trait of OOP allows you to build easily extendable and flexible software applications. To illustrate, you will be implementing (and slightly modifying) the hierarchy of shapes briefly examined in Chapter 5 during the overview of the pillars of OOP. To begin, create a new C# Console Application project named Shapes.
In Figure 6-7, notice that the Hexagon and Circle types each extend the Shape base class. Like any base class, Shape defines a number of members (a PetName property and Draw() method, in this case) that are common to all descendants.
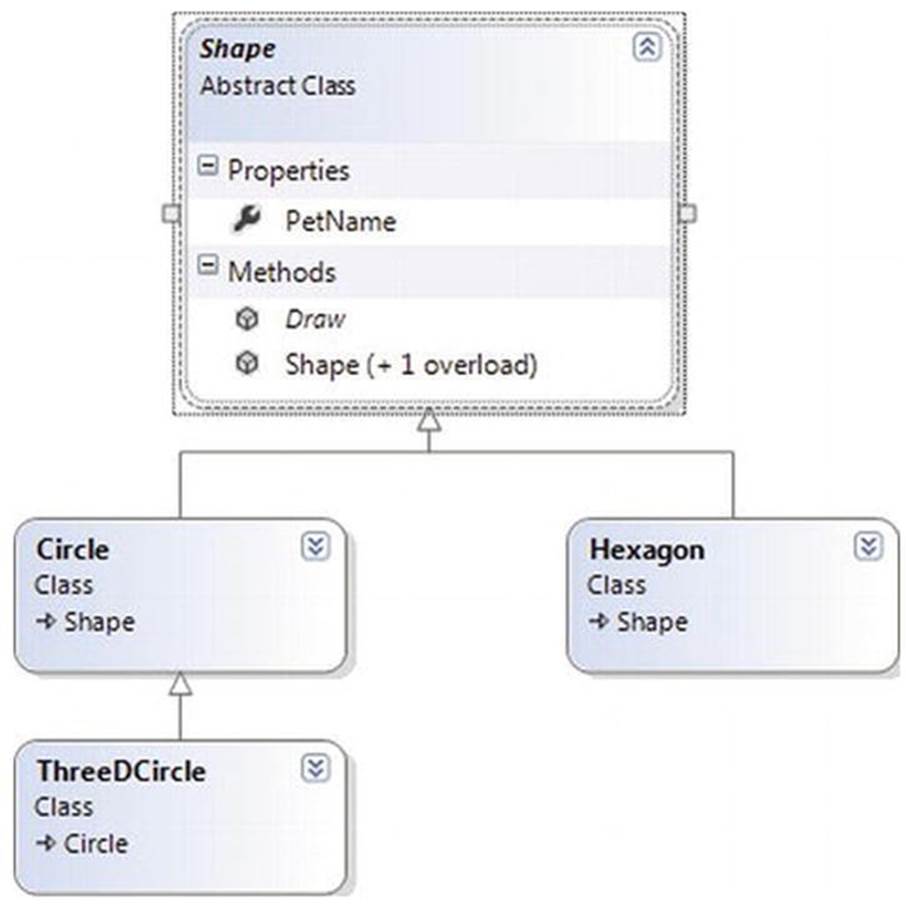
Figure 6-7. The shapes hierarchy
Much like the employee hierarchy, you should be able to tell that you don’t want to allow the object user to create an instance of Shape directly, as it is too abstract of a concept. Again, to prevent the direct creation of the Shape type, you could define it as an abstract class. As well, given that you want the derived types to respond uniquely to the Draw() method, let’s mark it as virtual and define a default implementation.
// The abstract base class of the hierarchy.
abstract class Shape
{
public Shape(string name = "NoName")
{ PetName = name; }
public string PetName { get; set; }
// A single virtual method.
public virtual void Draw()
{
Console.WriteLine("Inside Shape.Draw()");
}
}
Notice that the virtual Draw() method provides a default implementation that simply prints out a message that informs you that you are calling the Draw() method within the Shape base class. Now recall that when a method is marked with the virtual keyword, the method provides a default implementation that all derived types automatically inherit. If a child class so chooses, it may override the method but does not have to. Given this, consider the following implementation of the Circle and Hexagon types:
// Circle DOES NOT override Draw().
class Circle : Shape
{
public Circle() {}
public Circle(string name) : base(name){}
}
// Hexagon DOES override Draw().
class Hexagon : Shape
{
public Hexagon() {}
public Hexagon(string name) : base(name){}
public override void Draw()
{
Console.WriteLine("Drawing {0} the Hexagon", PetName);
}
}
The usefulness of abstract methods becomes crystal clear when you once again remember that subclasses are never required to override virtual methods (as in the case of Circle). Therefore, if you create an instance of the Hexagon and Circle types, you’d find that the Hexagonunderstands how to “draw” itself correctly or at least print out an appropriate message to the console. The Circle, however, is more than a bit confused.
static void Main(string[] args)
{
Console.WriteLine("***** Fun with Polymorphism *****\n");
Hexagon hex = new Hexagon("Beth");
hex.Draw();
Circle cir = new Circle("Cindy");
// Calls base class implementation!
cir.Draw();
Console.ReadLine();
}
Now consider the following output of the previous Main() method:
***** Fun with Polymorphism *****
Drawing Beth the Hexagon
Inside Shape.Draw()
Clearly, this is not an intelligent design for the current hierarchy. To force each child class to override the Draw() method, you can define Draw() as an abstract method of the Shape class, which by definition means you provide no default implementation whatsoever. To mark a method as abstract in C#, you use the abstract keyword. Notice that abstract members do not provide any implementation whatsoever.
abstract class Shape
{
// Force all child classes to define how to be rendered.
public abstract void Draw();
...
}
![]() Note Abstract methods can be defined only in abstract classes. If you attempt to do otherwise, you will be issued a compiler error.
Note Abstract methods can be defined only in abstract classes. If you attempt to do otherwise, you will be issued a compiler error.
Methods marked with abstract are pure protocol. They simply define the name, return type (if any), and parameter set (if required). Here, the abstract Shape class informs the derived types that “I have a method named Draw() that takes no arguments and returns nothing. If you derive from me, you figure out the details.”
Given this, you are now obligated to override the Draw() method in the Circle class. If you do not, Circle is also assumed to be a noncreatable abstract type that must be adorned with the abstract keyword (which is obviously not useful in this example). Here is the code update:
// If we did not implement the abstract Draw() method, Circle would also be
// considered abstract, and would have to be marked abstract!
class Circle : Shape
{
public Circle() {}
public Circle(string name) : base(name) {}
public override void Draw()
{
Console.WriteLine("Drawing {0} the Circle", PetName);
}
}
The short answer is that you can now assume that anything deriving from Shape does indeed have a unique version of the Draw() method. To illustrate the full story of polymorphism, consider the following code:
static void Main(string[] args)
{
Console.WriteLine("***** Fun with Polymorphism *****\n");
// Make an array of Shape-compatible objects.
Shape[] myShapes = {new Hexagon(), new Circle(), new Hexagon("Mick"),
new Circle("Beth"), new Hexagon("Linda")};
// Loop over each item and interact with the
// polymorphic interface.
foreach (Shape s in myShapes)
{
s.Draw();
}
Console.ReadLine();
}
Here is the output from the modified Main() method:
***** Fun with Polymorphism *****
Drawing NoName the Hexagon
Drawing NoName the Circle
Drawing Mick the Hexagon
Drawing Beth the Circle
Drawing Linda the Hexagon
This Main() method illustrates polymorphism at its finest. Although it is not possible to directly create an instance of an abstract base class (the Shape), you are able to freely store references to any subclass with an abstract base variable. Therefore, when you are creating an array ofShapes, the array can hold any object deriving from the Shape base class (if you attempt to place Shape-incompatible objects into the array, you receive a compiler error).
Given that all items in the myShapes array do indeed derive from Shape, you know they all support the same “polymorphic interface” (or said more plainly, they all have a Draw() method). As you iterate over the array of Shape references, it is at runtime that the underlying type is determined. At this point, the correct version of the Draw() method is invoked in memory.
This technique also makes it simple to safely extend the current hierarchy. For example, assume you derived more classes from the abstract Shape base class (Triangle, Square, etc.). Because of the polymorphic interface, the code within your foreach loop would not have to change in the slightest, as the compiler enforces that only Shape-compatible types are placed within the myShapes array.
Understanding Member Shadowing
C# provides a facility that is the logical opposite of method overriding, termed shadowing . Formally speaking, if a derived class defines a member that is identical to a member defined in a base class, the derived class has shadowed the parent’s version. In the real world, the possibility of this occurring is the greatest when you are subclassing from a class you (or your team) did not create yourself (such as when you purchase a third-party .NET software package).
For the sake of illustration, assume you receive a class named ThreeDCircle from a co-worker (or classmate) that defines a subroutine named Draw() taking no arguments.
class ThreeDCircle
{
public void Draw()
{
Console.WriteLine("Drawing a 3D Circle");
}
}
You figure that a ThreeDCircle “is-a” Circle, so you derive from your existing Circle type.
class ThreeDCircle : Circle
{
public void Draw()
{
Console.WriteLine("Drawing a 3D Circle");
}
}
After you recompile, you find the following warning:
’ThreeDCircle.Draw()’ hides inherited member ’Circle.Draw()’. To make the
current member override that implementation, add the override keyword. Otherwise add the new keyword.
The problem is that you have a derived class (ThreeDCircle) that contains a method that is identical to an inherited method. To address this issue, you have a few options. You could simply update the parent’s version of Draw() using the override keyword (as suggested by the compiler). With this approach, the ThreeDCircle type is able to extend the parent’s default behavior as required. However, if you don’t have access to the code defining the base class (again, as would be the case in many third- party libraries), you would be unable to modify the Draw()method as a virtual member, as you don’t have access to the code file!
As an alternative, you can include the new keyword to the offending Draw() member of the derived type (ThreeDCircle, in this example). Doing so explicitly states that the derived type’s implementation is intentionally designed to effectively ignore the parent’s version (again, in the real world, this can be helpful if external .NET software somehow conflicts with your current software).
// This class extends Circle and hides the inherited Draw() method.
class ThreeDCircle : Circle
{
// Hide any Draw() implementation above me.
public new void Draw()
{
Console.WriteLine("Drawing a 3D Circle");
}
}
You can also apply the new keyword to any member type inherited from a base class (field, constant, static member, or property). As a further example, assume that ThreeDCircle wants to hide the inherited PetName property.
class ThreeDCircle : Circle
{
// Hide the PetName property above me.
public new string PetName { get; set; }
// Hide any Draw() implementation above me.
public new void Draw()
{
Console.WriteLine("Drawing a 3D Circle");
}
}
Finally, be aware that it is still possible to trigger the base class implementation of a shadowed member using an explicit cast, as described in the next section. For example, the following code shows:
static void Main(string[] args)
{
...
// This calls the Draw() method of the ThreeDCircle.
ThreeDCircle o = new ThreeDCircle();
o.Draw();
// This calls the Draw() method of the parent!
((Circle)o).Draw();
Console.ReadLine();
}
![]() Source Code The Shapes project can be found in the Chapter 6 subdirectory.
Source Code The Shapes project can be found in the Chapter 6 subdirectory.
Understanding Base Class/Derived Class Casting Rules
Now that you can build a family of related class types, you need to learn the rules of class casting operations. To do so, let’s return to the Employees hierarchy created earlier in this chapter and add some new methods to the Program class (if you are following alone, open the Employee project in Visual Studio). As described in the final section of this chapter, the ultimate base class in the system is System.Object. Therefore, everything “is-an” Object and can be treated as such. Given this fact, it is legal to store an instance of any type within an object variable.
static void CastingExamples()
{
// A Manager "is-a" System.Object, so we can
// store a Manager reference in an object variable just fine.
object frank = new Manager("Frank Zappa", 9, 3000, 40000, "111-11-1111", 5);
}
In the Employees example, Managers, SalesPerson, and PTSalesPerson types all extend Employee, so you can store any of these objects in a valid base class reference. Therefore, the following statements are also legal:
static void CastingExamples()
{
// A Manager "is-a" System.Object, so we can
// store a Manager reference in an object variable just fine.
object frank = new Manager("Frank Zappa", 9, 3000, 40000, "111-11-1111", 5);
// A Manager "is-an" Employee too.
Employee moonUnit = new Manager("MoonUnit Zappa", 2, 3001, 20000, "101-11-1321", 1);
// A PTSalesPerson "is-a" SalesPerson.
SalesPerson jill = new PTSalesPerson("Jill", 834, 3002, 100000, "111-12-1119", 90);
}
The first law of casting between class types is that when two classes are related by an “is-a” relationship, it is always safe to store a derived object within a base class reference. Formally, this is called an implicit cast, as “it just works” given the laws of inheritance. This leads to some powerful programming constructs. For example, assume you have defined a new method within your current Program class.
static void GivePromotion(Employee emp)
{
// Increase pay...
// Give new parking space in company garage...
Console.WriteLine("{0} was promoted!", emp.Name);
}
Because this method takes a single parameter of type Employee, you can effectively pass any descendant from the Employee class into this method directly, given the “is-a” relationship.
static void CastingExamples()
{
// A Manager "is-a" System.Object, so we can
// store a Manager reference in an object variable just fine.
object frank = new Manager("Frank Zappa", 9, 3000, 40000, "111-11-1111", 5);
// A Manager "is-an" Employee too.
Employee moonUnit = new Manager("MoonUnit Zappa", 2, 3001, 20000, "101-11-1321", 1);
GivePromotion(moonUnit);
// A PTSalesPerson "is-a" SalesPerson.
SalesPerson jill = new PTSalesPerson("Jill", 834, 3002, 100000, "111-12-1119", 90);
GivePromotion(jill);
}
The previous code compiles given the implicit cast from the base class type (Employee) to the derived type. However, what if you also wanted to fire Frank Zappa (currently stored in a general System.Object reference)? If you pass the frank object directly into this method, you will find a compiler error as follows:
object frank = new Manager("Frank Zappa", 9, 3000, 40000, "111-11-1111", 5);
// Error!
GivePromotion(frank);
The problem is that you are attempting to pass in a variable that is not declared as an Employee but a more general System.Object. Given that object is higher up the inheritance chain than Employee, the compiler will not allow for an implicit cast, in an effort to keep your code as type-safe as possible.
Even though you can figure out that the object reference is pointing to an Employee-compatible class in memory, the compiler cannot, as that will not be known until runtime. You can satisfy the compiler by performing an explicit cast. This is the second law of casting: you can, in such cases, explicitly downcast using the C# casting operator. The basic template to follow when performing an explicit cast looks something like the following:
(ClassIWantToCastTo)referenceIHave
Thus, to pass the object variable into the GivePromotion() method, you could author the following code:
// OK!
GivePromotion((Manager)frank);
The C# as Keyword
Be aware that explicit casting is evaluated at runtime, not compile time. For the sake of argument, assume your Employees project had a copy of the Hexagon class created earlier in this chapter. For simplicity, you could add the following class to the current project:
class Hexagon
{
public void Draw() { Console.WriteLine("Drawing a hexagon!"); }
}
Although casting the employee object to a shape object makes absolutely no sense, code such as the following could compile without error:
// Ack! You can’t cast frank to a Hexagon, but this compiles fine!
object frank = new Manager();
Hexagon hex = (Hexagon)frank;
However, you would receive a runtime error, or, more formally, a runtime exception. Chapter 7 will examine the full details of structured exception handling; however, it is worth pointing out, for the time being, that when you are performing an explicit cast, you can trap the possibility of an invalid cast using the try and catch keywords (again, see Chapter 7 for full details).
// Catch a possible invalid cast.
object frank = new Manager();
Hexagon hex;
try
{
hex = (Hexagon)frank;
}
catch (InvalidCastException ex)
{
Console.WriteLine(ex.Message);
}
Obviously this is a contrived example; you would never bother casting between these types in this situation. However, assume you have an array of System.Object types, only a few of which contain Employee-compatible objects. In this case, you would like to determine whether an item in an array is compatible to begin with and, if so, perform the cast.
C# provides the as keyword to quickly determine at runtime whether a given type is compatible with another. When you use the as keyword, you are able to determine compatibility by checking against a null return value. Consider the following:
// Use "as" to test compatability.
object[] things = new object[4];
things[0] = new Hexagon();
things[1] = false;
things[2] = new Manager();
things[3] = "Last thing";
foreach (object item in things)
{
Hexagon h = item as Hexagon;
if (h == null)
Console.WriteLine("Item is not a hexagon");
else
{
h.Draw();
}
}
Here you loop over each item in the array of objects, checking each one for compatibility with the Hexagon class. If (and only if!) you find a Hexagon-compatible object, you invoke the Draw() method. Otherwise, you simply report the items are not compatible.
The C# is Keyword
In addition to the as keyword, the C# language provides the is keyword to determine whether two items are compatible. Unlike the as keyword, however, the is keyword returns false, rather than a null reference if the types are incompatible. In other words, the is keyword does not perform any sort of cast; it just checks compatibility. If things are compatible, you can then perform a safe cast.
Currently, the GivePromotion() method has been designed to take any possible type derived from Employee. Consider the following update, which now checks to see exactly which “type of employee” you have been passed:
static void GivePromotion(Employee emp)
{
Console.WriteLine("{0} was promoted!", emp.Name);
if (emp is SalesPerson)
{
Console.WriteLine("{0} made {1} sale(s)!", emp.Name,
((SalesPerson)emp).SalesNumber);
Console.WriteLine();
}
if (emp is Manager)
{
Console.WriteLine("{0} had {1} stock options...", emp.Name,
((Manager)emp).StockOptions);
Console.WriteLine();
}
}
Here, you are performing a runtime check to determine what the incoming base class reference is actually pointing to in memory. After you determine whether you received a SalesPerson or Manager type, you are able to perform an explicit cast to gain access to the specialized members of the class. Also notice that you are not required to wrap your casting operations within a try/catch construct, as you know that the cast is safe if you enter either if scope, given your conditional check.
The Master Parent Class: System.Object
To wrap up this chapter, I’d like to examine the details of the master parent class in the .NET platform: Object. As you were reading the previous section, you might have noticed that the base classes in your hierarchies (Car, Shape, Employee) never explicitly specify their parent classes.
// Who is the parent of Car?
class Car
{...}
In the .NET universe, every type ultimately derives from a base class named System.Object, which can be represented by the C# object keyword (lowercase o). The Object class defines a set of common members for every type in the framework. In fact, when you do build a class that does not explicitly define its parent, the compiler automatically derives your type from Object. If you want to be clear in your intentions, you are free to define classes that derive from Object as follows (however again, there is no need to do so):
// Here we are explicitly deriving from System.Object.
class Car : object
{...}
Like any class, System.Object defines a set of members. In the following formal C# definition, note that some of these items are declared virtual, which specifies that a given member may be overridden by a subclass, while others are marked with static (and are therefore called at the class level):
public class Object
{
// Virtual members.
public virtual bool Equals(object obj);
protected virtual void Finalize();
public virtual int GetHashCode();
public virtual string ToString();
// Instance-level, nonvirtual members.
public Type GetType();
protected object MemberwiseClone();
// Static members.
public static bool Equals(object objA, object objB);
public static bool ReferenceEquals(object objA, object objB);
}
Table 6-1 offers a rundown of the functionality provided by some of the methods you’re most likely to use.
Table 6-1. Core Members of System.Object
|
Instance Method of Object Class |
Meaning in Life |
|
Equals() |
By default, this method returns true only if the items being compared refer to the same item in memory. Thus, Equals() is used to compare object references, not the state of the object. Typically, this method is overridden to return true only if the objects being compared have the same internal state values (that is, value-based semantics). |
|
Be aware that if you override Equals(), you should also override GetHashCode(), as these methods are used internally by Hashtable types to retrieve subobjects from the container. |
|
|
Also recall from Chapter 4, that the ValueType class overrides this method for all structures, so they work with value-based comparisons. |
|
|
Finalize() |
For the time being, you can understand this method (when overridden) is called to free any allocated resources before the object is destroyed. I talk more about the CLR garbage collection services in Chapter 9. |
|
GetHashCode() |
This method returns an int that identifies a specific object instance. |
|
ToString() |
This method returns a string representation of this object, using the <namespace>.<type name> format (termed the fully qualified name). This method will often be overridden by a subclass to return a tokenized string of name/value pairs that represent the object’s internal state, rather than its fully qualified name. |
|
GetType() |
This method returns a Type object that fully describes the object you are currently referencing. In short, this is a Runtime Type Identification (RTTI) method available to all objects (discussed in greater detail in Chapter 15). |
|
MemberwiseClone() |
This method exists to return a member-by-member copy of the current object, which is often used when cloning an object (see Chapter 8). |
To illustrate some of the default behavior provided by the Object base class, create a final C# Console Application project named ObjectOverrides. Insert a new C# class type that contains the following empty class definition for a type named Person:
// Remember! Person extends Object.
class Person {}
Now, update your Main() method to interact with the inherited members of System.Object as follows:
class Program
{
static void Main(string[] args)
{
Console.WriteLine("***** Fun with System.Object *****\n");
Person p1 = new Person();
// Use inherited members of System.Object.
Console.WriteLine("ToString: {0}", p1.ToString());
Console.WriteLine("Hash code: {0}", p1.GetHashCode());
Console.WriteLine("Type: {0}", p1.GetType());
// Make some other references to p1.
Person p2 = p1;
object o = p2;
// Are the references pointing to the same object in memory?
if (o.Equals(p1) && p2.Equals(o))
{
Console.WriteLine("Same instance!");
}
Console.ReadLine();
}
}
Here is the output of the current Main() method:
***** Fun with System.Object *****
ToString: ObjectOverrides.Person
Hash code: 46104728
Type: ObjectOverrides.Person
Same instance!
First, notice how the default implementation of ToString() returns the fully qualified name of the current type (ObjectOverrides.Person). As you will see later during the examination of building custom namespaces in Chapter 14, every C# project defines a “root namespace,” which has the same name of the project itself. Here, you created a project named ObjectOverrides; thus, the Person type and the Program class have both been placed within the ObjectOverrides namespace.
The default behavior of Equals() is to test whether two variables are pointing to the same object in memory. Here, you create a new Person variable named p1. At this point, a new Person object is placed on the managed heap. p2 is also of type Person. However, you are not creating a new instance but rather assigning this variable to reference p1. Therefore, p1 and p2 are both pointing to the same object in memory, as is the variable o (of type object, which was thrown in for good measure). Given that p1, p2, and o all point to the same memory location, the equality test succeeds.
Although the canned behavior of System.Object can fit the bill in a number of cases, it is quite common for your custom types to override some of these inherited methods. To illustrate, update the Person class to support some properties representing an individual’s first name, last name, and age, each of which can be set by a custom constructor.
// Remember! Person extends Object.
class Person
{
public string FirstName { get; set; } = "";
public string LastName { get; set; } = "";
public int Age { get; set; }
public Person(string fName, string lName, int personAge)
{
FirstName = fName;
LastName = lName;
Age = personAge;
}
public Person(){}
}
Overriding System.Object.ToString()
Many classes (and structures) that you create can benefit from overriding ToString() in order to return a string textual representation of the type’s current state. This can be quite helpful for purposes of debugging (among other reasons). How you choose to construct this string is a matter of personal choice; however, a recommended approach is to separate each name-value pair with semicolons and wrap the entire string within square brackets (many types in the .NET base class libraries follow this approach). Consider the following overridden ToString() for yourPerson class:
public override string ToString()
{
string myState;
myState = string.Format("[First Name: {0}; Last Name: {1}; Age: {2}]",
FirstName, LastName, Age);
return myState;
}
This implementation of ToString() is quite straightforward, given that the Person class has only three pieces of state data. However, always remember that a proper ToString() override should also account for any data defined up the chain of inheritance.
When you override ToString() for a class extending a custom base class, the first order of business is to obtain the ToString() value from your parent using the base keyword. After you have obtained your parent’s string data, you can append the derived class’s custom information.
Overriding System.Object.Equals()
Let’s also override the behavior of Object.Equals() to work with value-based semantics. Recall that by default, Equals() returns true only if the two objects being compared reference the same object instance in memory. For the Person class, it may be helpful to implementEquals() to return true if the two variables being compared contain the same state values (e.g., first name, last name, and age).
First, notice that the incoming argument of the Equals() method is a general System. Object. Given this, your first order of business is to ensure the caller has indeed passed in a Person object and, as an extra safeguard, to make sure the incoming parameter is not a nullreference.
After you have established the caller has passed you an allocated Person, one approach to implement Equals() is to perform a field-by-field comparison against the data of the incoming object to the data of the current object.
public override bool Equals(object obj)
{
if (obj is Person && obj != null)
{
Person temp;
temp = (Person)obj;
if (temp.FirstName == this.FirstName
&& temp.LastName == this.LastName
&& temp.Age == this.Age)
{
return true;
}
else
{
return false;
}
}
return false;
}
Here, you are examining the values of the incoming object against the values of your internal values (note the use of the this keyword). If the name and age of each are identical, you have two objects with the same state data and, therefore, return true. Any other possibility results in returning false.
While this approach does indeed work, you can certainly imagine how labor intensive it would be to implement a custom Equals() method for nontrivial types that may contain dozens of data fields. One common shortcut is to leverage your own implementation of ToString(). If a class has a prim-and- proper implementation of ToString() that accounts for all field data up the chain of inheritance, you can simply perform a comparison of the object’s string data.
public override bool Equals(object obj)
{
// No need to cast "obj" to a Person anymore,
// as everything has a ToString() method.
return obj.ToString() == this.ToString();
}
Notice in this case that you no longer need to check whether the incoming argument is of the correct type (a Person, in this example), as everything in .NET supports a ToString() method. Even better, you no longer need to perform a property-by-property equality check, as you are not simply testing the value returned from ToString().
Overriding System.Object.GetHashCode()
When a class overrides the Equals() method, you should also override the default implementation of GetHashCode(). Simply put, a hash code is a numerical value that represents an object as a particular state. For example, if you create two string variables that hold the valueHello, you would obtain the same hash code. However, if one of the string objects were in all lowercase (hello), you would obtain different hash codes.
By default, System.Object.GetHashCode() uses your object’s current location in memory to yield the hash value. However, if you are building a custom type that you intend to store in a Hashtable type (within the System.Collections namespace), you should always override this member, as the Hashtable will be internally invoking Equals() and GetHashCode() to retrieve the correct object.
![]() Note To be more specific, the System.Collections.Hashtable class calls GetHashCode() internally to gain a general idea where the object is located, but a subsequent (internal) call to Equals() determines the exact match.
Note To be more specific, the System.Collections.Hashtable class calls GetHashCode() internally to gain a general idea where the object is located, but a subsequent (internal) call to Equals() determines the exact match.
Although you are not going to place your Person into a System.Collections.Hashtable, for completion let’s override GetHashCode(). There are many algorithms that can be used to create a hash code—some fancy, others not so fancy. Most of the time, you are able to generate a hash code value by leveraging the System.String’s GetHashCode() implementation.
Given that the String class already has a solid hash code algorithm that is using the character data of the String to compute a hash value, if you can identify a piece of field data on your class that should be unique for all instances (such as a Social Security number), simply callGetHashCode() on that point of field data. Thus, if the Person class defined an SSN property, you could author the following code:
// Assume we have an SSN property as so.
class Person
{
public string SSN {get; set;} = "";
// Return a hash code based on a point of unique string data.
public override int GetHashCode()
{
return SSN.GetHashCode();
}
}
If you cannot find a single point of unique string data but you have overridden ToString(), call GetHashCode() on your own string representation:
// Return a hash code based on the person’s ToString() value.
public override int GetHashCode()
{
return this.ToString().GetHashCode();
}
Testing Your Modified Person Class
Now that you have overridden the virtual members of Object, update Main() to test your updates.
static void Main(string[] args)
{
Console.WriteLine("***** Fun with System.Object *****\n");
// NOTE: We want these to be identical to test
// the Equals() and GetHashCode() methods.
Person p1 = new Person("Homer", "Simpson", 50);
Person p2 = new Person("Homer", "Simpson", 50);
// Get stringified version of objects.
Console.WriteLine("p1.ToString() = {0}", p1.ToString());
Console.WriteLine("p2.ToString() = {0}", p2.ToString());
// Test overridden Equals().
Console.WriteLine("p1 = p2?: {0}", p1.Equals(p2));
// Test hash codes.
Console.WriteLine("Same hash codes?: {0}", p1.GetHashCode() == p2.GetHashCode());
Console.WriteLine();
// Change age of p2 and test again.
p2.Age = 45;
Console.WriteLine("p1.ToString() = {0}", p1.ToString());
Console.WriteLine("p2.ToString() = {0}", p2.ToString());
Console.WriteLine("p1 = p2?: {0}", p1.Equals(p2));
Console.WriteLine("Same hash codes?: {0}", p1.GetHashCode() == p2.GetHashCode());
Console.ReadLine();
}
The output is shown here:
***** Fun with System.Object *****
p1.ToString() = [First Name: Homer; Last Name: Simpson; Age: 50]
p2.ToString() = [First Name: Homer; Last Name: Simpson; Age: 50]
p1 = p2?: True
Same hash codes?: True
p1.ToString() = [First Name: Homer; Last Name: Simpson; Age: 50]
p2.ToString() = [First Name: Homer; Last Name: Simpson; Age: 45]
p1 = p2?: False
Same hash codes?: False
The Static Members of System.Object
In addition to the instance-level members you have just examined, System.Object does define two (very helpful) static members that also test for value-based or reference-based equality. Consider the following code:
static void StaticMembersOfObject()
{
// Static members of System.Object.
Person p3 = new Person("Sally", "Jones", 4);
Person p4 = new Person("Sally", "Jones", 4);
Console.WriteLine("P3 and P4 have same state: {0}", object.Equals(p3, p4));
Console.WriteLine("P3 and P4 are pointing to same object: {0}",
object.ReferenceEquals(p3, p4));
}
Here, you are able to simply send in two objects (of any type) and allow the System.Object class to determine the details automatically.
![]() Source Code The ObjectOverrides project is located in the Chapter 6 subdirectory.
Source Code The ObjectOverrides project is located in the Chapter 6 subdirectory.
Summary
This chapter explored the role and details of inheritance and polymorphism. Over these pages you were introduced to numerous new keywords and tokens to support each of these techniques. For example, recall that the colon token is used to establish the parent class of a given type. Parent types are able to define any number of virtual and/or abstract members to establish a polymorphic interface. Derived types override such members using the override keyword.
In addition to building numerous class hierarchies, this chapter also examined how to explicitly cast between base and derived types and wrapped up by diving into the details of the cosmic parent class in the .NET base class libraries: System.Object.
All materials on the site are licensed Creative Commons Attribution-Sharealike 3.0 Unported CC BY-SA 3.0 & GNU Free Documentation License (GFDL)
If you are the copyright holder of any material contained on our site and intend to remove it, please contact our site administrator for approval.
© 2016-2026 All site design rights belong to S.Y.A.