C# 6.0 and the .NET 4.6 Framework (2015)
PART III
Object-Oriented Programming with C#
CHAPTER 8
Working with Interfaces
This chapter builds upon your current understanding of object-oriented development by examining the topic of interface-based programming. Here you’ll learn how to define and implement interfaces and come to understand the benefits of building types that support multiple behaviors. Along the way, you will also examine a number of related topics, such as obtaining interface references, explicit interface implementation, and the construction of interface hierarchies. You’ll also examine a number of standard interfaces defined within the .NET base class libraries. As you will see, your custom classes and structures are free to implement these predefined interfaces to support a number of useful behaviors, such as object cloning, object enumeration, and object sorting.
Understanding Interface Types
To begin this chapter, allow me to provide a formal definition of the interface type. An interface is nothing more than a named set of abstract members. Recall from Chapter 6 that abstract methods are pure protocol in that they do not provide a default implementation. The specific members defined by an interface depend on the exact behavior it is modeling. Said another way, an interface expresses a behavior that a given class or structure may choose to support. Furthermore, as you will see in this chapter, a class or structure can support as many interfaces as necessary, thereby supporting (in essence) multiple behaviors.
As you might guess, the .NET base class libraries ship with numerous predefined interface types that are implemented by various classes and structures. For example, as you will see in Chapter 21, ADO.NET ships with multiple data providers that allow you to communicate with a particular database management system. Thus, under ADO.NET, you have numerous connection objects to choose from (SqlConnection, OleDbConnection, OdbcConnection, etc.). In addition, third-party database vendors (as well as numerous open source projects) provide .NET libraries to communicate with a wide number of other databases (MySQL, Oracle, etc.), all of which contain objects implementing these interfaces.
Regardless of the fact that each connection class has a unique name, is defined within a different namespace, and (in some cases) is bundled within a different assembly, all connection classes implement a common interface named IDbConnection.
// The IDbConnection interface defines a common
// set of members supported by all connection objects.
public interface IDbConnection : IDisposable
{
// Methods
IDbTransaction BeginTransaction();
IDbTransaction BeginTransaction(IsolationLevel il);
void ChangeDatabase(string databaseName);
void Close();
IDbCommand CreateCommand();
void Open();
// Properties
string ConnectionString { get; set;}
int ConnectionTimeout { get; }
string Database { get; }
ConnectionState State { get; }
}
![]() Note By convention, .NET interfaces are prefixed with a capital letter I. When you are creating your own custom interfaces, it is considered a best practice to do the same.
Note By convention, .NET interfaces are prefixed with a capital letter I. When you are creating your own custom interfaces, it is considered a best practice to do the same.
Don’t concern yourself with the details of what these members actually do at this point. Simply understand that the IDbConnection interface defines a set of members that are common to all ADO.NET connection classes. Given this, you are guaranteed that every connection object supports members such as Open(), Close(), CreateCommand(), and so forth. Furthermore, given that interface members are always abstract, each connection object is free to implement these methods in its own unique manner.
As you work through the remainder of this book, you’ll be exposed to dozens of interfaces that ship with the .NET base class libraries. As you will see, these interfaces can be implemented on your own custom classes and structures to define types that integrate tightly within the framework. As well, once you understand the usefulness of the interface type, you will certainly find reasons to build your own.
Interface Types vs. Abstract Base Classes
Given your work in Chapter 6, the interface type might seem somewhat similar to an abstract base class. Recall that when a class is marked as abstract, it may define any number of abstract members to provide a polymorphic interface to all derived types. However, even when a class does define a set of abstract members, it is also free to define any number of constructors, field data, nonabstract members (with implementation), and so on. Interfaces, on the other hand, contain only member definitions.
The polymorphic interface established by an abstract parent class suffers from one major limitation in that only derived types support the members defined by the abstract parent. However, in larger software systems, it is common to develop multiple class hierarchies that have no common parent beyond System.Object. Given that abstract members in an abstract base class apply only to derived types, you have no way to configure types in different hierarchies to support the same polymorphic interface. By way of example, assume you have defined the following abstract class:
public abstract class CloneableType
{
// Only derived types can support this
// "polymorphic interface." Classes in other
// hierarchies have no access to this abstract
// member.
public abstract object Clone();
}
Given this definition, only members that extend CloneableType are able to support the Clone() method. If you create a new set of classes that do not extend this base class, you can’t gain this polymorphic interface. Also, you might recall that C# does not support multiple inheritance for classes. Therefore, if you wanted to create a MiniVan that is-a Car and is-a CloneableType, you are unable to do so.
// Nope! Multiple inheritance is not possible in C#
// for classes.
public class MiniVan : Car, CloneableType
{
}
As you might guess, interface types come to the rescue. After an interface has been defined, it can be implemented by any class or structure, in any hierarchy, and within any namespace or any assembly (written in any .NET programming language). As you can see, interfaces are highlypolymorphic. Consider the standard .NET interface named ICloneable, defined in the System namespace. This interface defines a single method named Clone():
public interface ICloneable
{
object Clone();
}
If you examine the .NET Framework 4.6 SDK documentation, you’ll find that a large number of seemingly unrelated types (System.Array, System.Data.SqlClient.SqlConnection, System.OperatingSystem, System.String, etc.) all implement this interface. Although these types have no common parent (other than System.Object), you can treat them polymorphically via the ICloneable interface type.
For example, if you had a method named CloneMe() that took an ICloneable interface parameter, you could pass this method any object that implements said interface. Consider the following simple Program class defined within a Console Application project named ICloneableExample:
class Program
{
static void Main(string[] args)
{
Console.WriteLine("***** A First Look at Interfaces *****\n");
// All of these classes support the ICloneable interface.
string myStr = "Hello";
OperatingSystem unixOS = new OperatingSystem(PlatformID.Unix, new Version());
System.Data.SqlClient.SqlConnection sqlCnn =
new System.Data.SqlClient.SqlConnection();
// Therefore, they can all be passed into a method taking ICloneable.
CloneMe(myStr);
CloneMe(unixOS);
CloneMe(sqlCnn);
Console.ReadLine();
}
private static void CloneMe(ICloneable c)
{
// Clone whatever we get and print out the name.
object theClone = c.Clone();
Console.WriteLine("Your clone is a: {0}",
theClone.GetType().Name);
}
}
When you run this application, the class name of each class prints to the console via the GetType() method you inherit from System.Object. As explained in Chapter 15, this method (and .NET reflection services) allow you to understand the composition of any type at runtime. In any case, the output of the previous program is shown next:
***** A First Look at Interfaces *****
Your clone is a: String
Your clone is a: OperatingSystem
Your clone is a: SqlConnection
![]() Source Code The ICloneableExample project is located in the Chapter 8 subdirectory.
Source Code The ICloneableExample project is located in the Chapter 8 subdirectory.
Another limitation of abstract base classes is that each derived type must contend with the set of abstract members and provide an implementation. To see this problem, recall the shapes hierarchy you defined in Chapter 6. Assume you defined a new abstract method in the Shape base class named GetNumberOfPoints(), which allows derived types to return the number of points required to render the shape.
abstract class Shape
{
...
// Every derived class must now support this method!
public abstract byte GetNumberOfPoints();
}
Clearly, the only class that has any points in the first place is Hexagon. However, with this update, every derived class (Circle, Hexagon, and ThreeDCircle) must now provide a concrete implementation of this function, even if it makes no sense to do so. Again, the interface type provides a solution. If you define an interface that represents the behavior of “having points,” you can simply plug it into the Hexagon type, leaving Circle and ThreeDCircle untouched.
Defining Custom Interfaces
Now that you better understand the overall role of interface types, let’s see an example of defining and implementing custom interfaces. To begin, create a new Console Application project named CustomInterface. Using the Project ![]() Add Existing Item menu option, insert the file (or files) containing your shape type definitions (Shapes.cs in the book’s solution code) created in Chapter 6 during the Shapes example. After you have done so, rename the namespace that defines your shape-centric types to CustomInterface (simply to avoid having to import namespace definitions in your new project).
Add Existing Item menu option, insert the file (or files) containing your shape type definitions (Shapes.cs in the book’s solution code) created in Chapter 6 during the Shapes example. After you have done so, rename the namespace that defines your shape-centric types to CustomInterface (simply to avoid having to import namespace definitions in your new project).
namespace CustomInterface
{
// Your shape types defined here...
}
Now, insert a new interface into your project named IPointy using the Project ![]() Add New Item menu option, as shown in Figure 8-1.
Add New Item menu option, as shown in Figure 8-1.
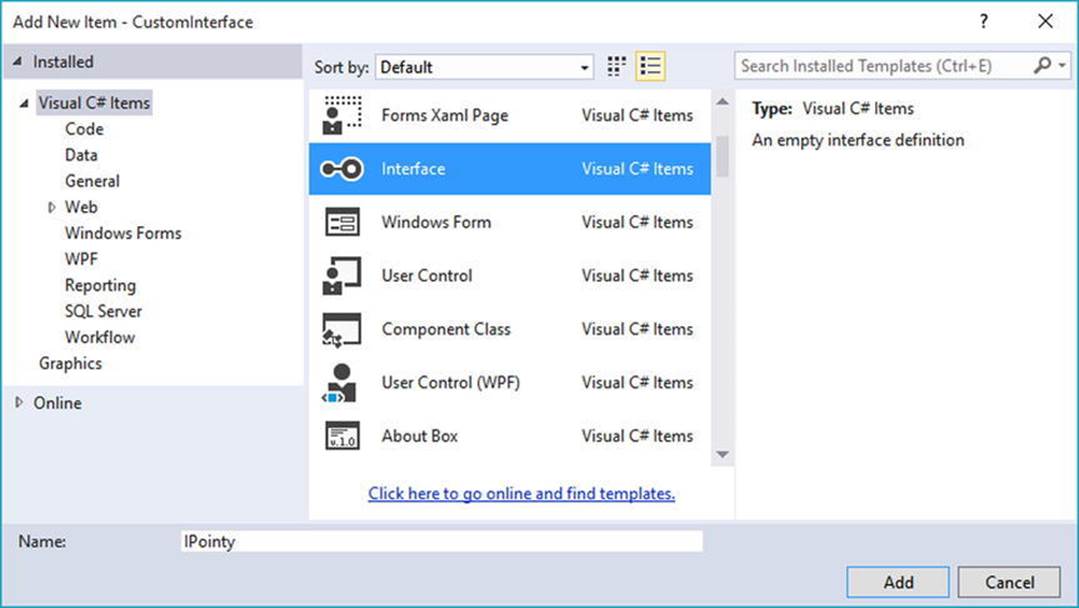
Figure 8-1. Interfaces, like classes, can be defined in any *.cs file
At a syntactic level, an interface is defined using the C# interface keyword. Unlike a class, interfaces never specify a base class (not even System.Object; however, as you will see later in this chapter, an interface can specify base interfaces). Moreover, the members of an interface never specify an access modifier (as all interface members are implicitly public and abstract). To get the ball rolling, here is a custom interface defined in C#:
// This interface defines the behavior of "having points."
public interface IPointy
{
// Implicitly public and abstract.
byte GetNumberOfPoints();
}
Remember that when you define interface members, you do not define an implementation scope for the members in question. Interfaces are pure protocol and, therefore, never define an implementation (that is up to the supporting class or structure). Hence, the following version ofIPointy would result in various compiler errors:
// Ack! Errors abound!
public interface IPointy
{
// Error! Interfaces cannot have data fields!
public int numbOfPoints;
// Error! Interfaces do not have constructors!
public IPointy() { numbOfPoints = 0;}
// Error! Interfaces don’t provide an implementation of members!
byte GetNumberOfPoints() { return numbOfPoints; }
}
In any case, this initial IPointy interface defines a single method. However, .NET interface types are also able to define any number of property prototypes. For example, let’s update the IPointy interface to use a read-only property rather than a traditional accessor method.
// The pointy behavior as a read-only property.
public interface IPointy
{
// A read-write property in an interface would look like:
// retType PropName { get; set; }
//
// while a write-only property in an interface would be:
// retType PropName { set; }
byte Points { get; }
}
![]() Note Interface types can also contain event (see Chapter 10) and indexer (see Chapter 11) definitions.
Note Interface types can also contain event (see Chapter 10) and indexer (see Chapter 11) definitions.
Interface types are quite useless on their own, as they are nothing more than a named collection of abstract members. For example, you can’t allocate interface types as you would a class or structure.
// Ack! Illegal to allocate interface types.
static void Main(string[] args)
{
IPointy p = new IPointy(); // Compiler error!
}
Interfaces do not bring much to the table until they are implemented by a class or structure. Here, IPointy is an interface that expresses the behavior of “having points.” The idea is simple: some classes in the shapes hierarchy have points (such as the Hexagon), while others (such as the Circle) do not.
Implementing an Interface
When a class (or structure) chooses to extend its functionality by supporting interfaces, it does so using a comma-delimited list in the type definition. Be aware that the direct base class must be the first item listed after the colon operator. When your class type derives directly fromSystem.Object, you are free to simply list the interface (or interfaces) supported by the class, as the C# compiler will extend your types from System.Object if you do not say otherwise. On a related note, given that structures always derive from System.ValueType (see Chapter 4), simply list each interface directly after the structure definition. Ponder the following examples:
// This class derives from System.Object and
// implements a single interface.
public class Pencil : IPointy
{...}
// This class also derives from System.Object
// and implements a single interface.
public class SwitchBlade : object, IPointy
{...}
// This class derives from a custom base class
// and implements a single interface.
public class Fork : Utensil, IPointy
{...}
// This struct implicitly derives from System.ValueType and
// implements two interfaces.
public struct PitchFork : ICloneable, IPointy
{...}
Understand that implementing an interface is an all-or-nothing proposition. The supporting type is not able to selectively choose which members it will implement. Given that the IPointy interface defines a single read-only property, this is not too much of a burden. However, if you are implementing an interface that defines ten members (such as the IDbConnection interface shown earlier), the type is now responsible for fleshing out the details of all ten abstract members.
For this example, insert a new class type named Triangle that is-a Shape and supports IPointy. Note that the implementation of the read-only Points property simply returns the correct number of points (3).
// New Shape derived class named Triangle.
class Triangle : Shape, IPointy
{
public Triangle() { }
public Triangle(string name) : base(name) { }
public override void Draw()
{ Console.WriteLine("Drawing {0} the Triangle", PetName); }
// IPointy implementation.
public byte Points
{
get { return 3; }
}
}
Now, update your existing Hexagon type to also support the IPointy interface type.
// Hexagon now implements IPointy.
class Hexagon : Shape, IPointy
{
public Hexagon(){ }
public Hexagon(string name) : base(name){ }
public override void Draw()
{ Console.WriteLine("Drawing {0} the Hexagon", PetName); }
// IPointy implementation.
public byte Points
{
get { return 6; }
}
}
To sum up the story so far, the Visual Studio class diagram shown in Figure 8-2 illustrates IPointy-compatible classes using the popular “lollipop” notation. Notice again that Circle and ThreeDCircle do not implement IPointy, as this behavior makes no sense for these particular classes.
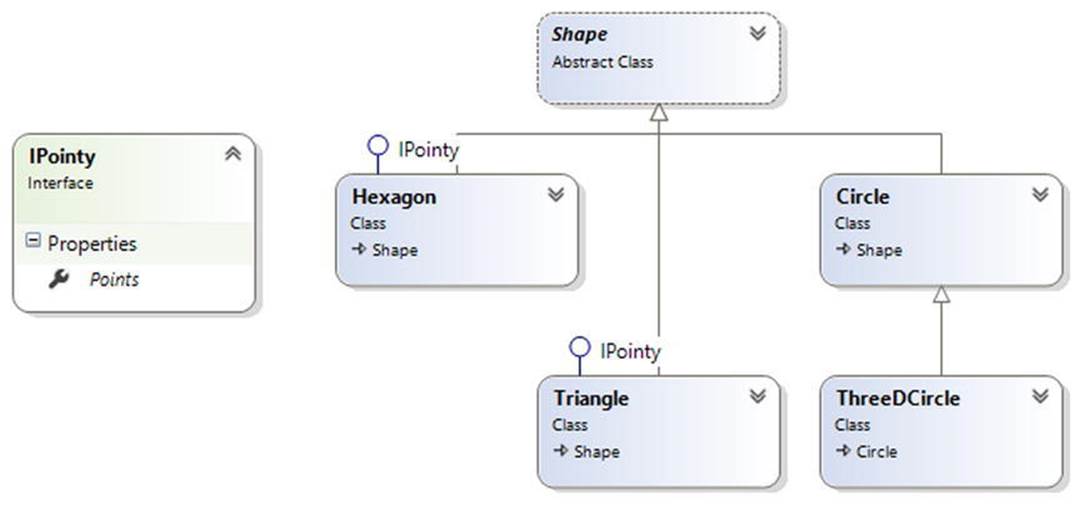
Figure 8-2. The shapes hierarchy, now with interfaces
![]() Note To display or hide interface names in the class designer, right-click the interface icon and select the Collapse or Expand option.
Note To display or hide interface names in the class designer, right-click the interface icon and select the Collapse or Expand option.
Invoking Interface Members at the Object Level
Now that you have some classes that support the IPointy interface, the next question is how you interact with the new functionality. The most straightforward way to interact with functionality supplied by a given interface is to invoke the members directly from the object level (provided the interface members are not implemented explicitly; you can find more details later in the section “Explicit Interface Implementation”). For example, consider the following Main() method:
static void Main(string[] args)
{
Console.WriteLine("***** Fun with Interfaces *****\n");
// Call Points property defined by IPointy.
Hexagon hex = new Hexagon();
Console.WriteLine("Points: {0}", hex.Points);
Console.ReadLine();
}
This approach works fine in this particular case, given that you are well aware that the Hexagon type has implemented the interface in question and, therefore, has a Points property. Other times, however, you might not be able to determine which interfaces are supported by a given type. For example, suppose you have an array containing 50 Shape-compatible types, only some of which support IPointy. Obviously, if you attempt to invoke the Points property on a type that has not implemented IPointy, you would receive an error. So, how can you dynamically determine whether a class or structure supports the correct interface?
One way to determine at runtime whether a type supports a specific interface is to use an explicit cast. If the type does not support the requested interface, you receive an InvalidCastException. To handle this possibility gracefully, use structured exception handling as in the following example:
static void Main(string[] args)
{
...
// Catch a possible InvalidCastException.
Circle c = new Circle("Lisa");
IPointy itfPt = null;
try
{
itfPt = (IPointy)c;
Console.WriteLine(itfPt.Points);
}
catch (InvalidCastException e)
{
Console.WriteLine(e.Message);
}
Console.ReadLine();
}
While you could use try/catch logic and hope for the best, it would be ideal to determine which interfaces are supported before invoking the interface members in the first place. Let’s see two ways of doing so.
Obtaining Interface References: The as Keyword
You can determine whether a given type supports an interface by using the as keyword, introduced in Chapter 6. If the object can be treated as the specified interface, you are returned a reference to the interface in question. If not, you receive a null reference. Therefore, be sure to check against a null value before proceeding.
static void Main(string[] args)
{
...
// Can we treat hex2 as IPointy?
Hexagon hex2 = new Hexagon("Peter");
IPointy itfPt2 = hex2 as IPointy;
if(itfPt2 != null)
Console.WriteLine("Points: {0}", itfPt2.Points);
else
Console.WriteLine("OOPS! Not pointy...");
Console.ReadLine();
}
Notice that when you use the as keyword, you have no need to use try/catch logic, given that if the reference is not null, you know you are calling on a valid interface reference.
Obtaining Interface References: The is Keyword
You may also check for an implemented interface using the is keyword (also first discussed in Chapter 6). If the object in question is not compatible with the specified interface, you are returned the value false. On the other hand, if the type is compatible with the interface in question, you can safely call the members without needing to use try/catch logic.
To illustrate, assume you have an array of Shape types containing some members that implement IPointy. Notice how you are able to determine which items in the array support this interface using the is keyword, as shown in this retrofitted Main() method:
static void Main(string[] args)
{
Console.WriteLine("***** Fun with Interfaces *****\n");
// Make an array of Shapes.
Shape[] myShapes = { new Hexagon(), new Circle(),
new Triangle("Joe"), new Circle("JoJo")} ;
for(int i = 0; i < myShapes.Length; i++)
{
// Recall the Shape base class defines an abstract Draw()
// member, so all shapes know how to draw themselves.
myShapes[i].Draw();
// Who’s pointy?
if(myShapes[i] is IPointy)
Console.WriteLine("-> Points: {0}", ((IPointy) myShapes[i]).Points);
else
Console.WriteLine("-> {0}\’s not pointy!", myShapes[i].PetName);
Console.WriteLine();
}
Console.ReadLine();
}
The output is as follows:
***** Fun with Interfaces *****
Drawing NoName the Hexagon
-> Points: 6
Drawing NoName the Circle
-> NoName’s not pointy!
Drawing Joe the Triangle
-> Points: 3
Drawing JoJo the Circle
-> JoJo’s not pointy!
Interfaces As Parameters
Given that interfaces are valid .NET types, you may construct methods that take interfaces as parameters, as illustrated by the CloneMe() method earlier in this chapter. For the current example, assume you have defined another interface named IDraw3D.
// Models the ability to render a type in stunning 3D.
public interface IDraw3D
{
void Draw3D();
}
Next, assume that two of your three shapes (ThreeDCircle and Hexagon) have been configured to support this new behavior.
// Circle supports IDraw3D.
class ThreeDCircle : Circle, IDraw3D
{
...
public void Draw3D()
{ Console.WriteLine("Drawing Circle in 3D!"); }
}
// Hexagon supports IPointy and IDraw3D.
class Hexagon : Shape, IPointy, IDraw3D
{
...
public void Draw3D()
{ Console.WriteLine("Drawing Hexagon in 3D!"); }
}
Figure 8-3 presents the updated Visual Studio class diagram.
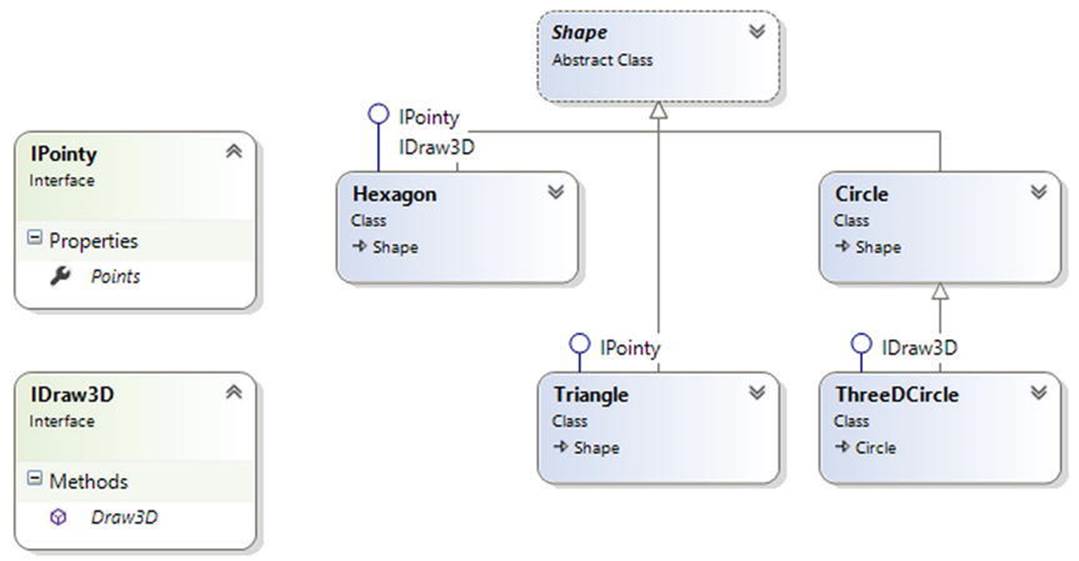
Figure 8-3. The updated shapes hierarchy
If you now define a method taking an IDraw3D interface as a parameter, you can effectively send in any object implementing IDraw3D. (If you attempt to pass in a type not supporting the necessary interface, you receive a compile-time error.) Consider the following method defined within your Program class:
// I’ll draw anyone supporting IDraw3D.
static void DrawIn3D(IDraw3D itf3d)
{
Console.WriteLine("-> Drawing IDraw3D compatible type");
itf3d.Draw3D();
}
You could now test whether an item in the Shape array supports this new interface and, if so, pass it into the DrawIn3D() method for processing.
static void Main(string[] args)
{
Console.WriteLine("***** Fun with Interfaces *****\n");
Shape[] myShapes = { new Hexagon(), new Circle(),
new Triangle("Joe"), new Circle("JoJo") } ;
for(int i = 0; i < myShapes.Length; i++)
{
...
// Can I draw you in 3D?
if(myShapes[i] is IDraw3D)
DrawIn3D((IDraw3D)myShapes[i]);
}
}
Here is the output of the updated application. Notice that only the Hexagon object prints out in 3D, as the other members of the Shape array do not implement the IDraw3D interface.
***** Fun with Interfaces *****
Drawing NoName the Hexagon
-> Points: 6
-> Drawing IDraw3D compatible type
Drawing Hexagon in 3D!
Drawing NoName the Circle
-> NoName’s not pointy!
Drawing Joe the Triangle
-> Points: 3
Drawing JoJo the Circle
-> JoJo’s not pointy!
Interfaces As Return Values
Interfaces can also be used as method return values. For example, you could write a method that takes an array of Shape objects and returns a reference to the first item that supports IPointy.
// This method returns the first object in the
// array that implements IPointy.
static IPointy FindFirstPointyShape(Shape[] shapes)
{
foreach (Shape s in shapes)
{
if (s is IPointy)
return s as IPointy;
}
return null;
}
You could interact with this method as follows:
static void Main(string[] args)
{
Console.WriteLine("***** Fun with Interfaces *****\n");
// Make an array of Shapes.
Shape[] myShapes = { new Hexagon(), new Circle(),
new Triangle("Joe"), new Circle("JoJo")};
// Get first pointy item.
// To be safe, you’d want to check firstPointyItem for null before proceeding.
IPointy firstPointyItem = FindFirstPointyShape(myShapes);
Console.WriteLine("The item has {0} points", firstPointyItem.Points);
...
}
Arrays of Interface Types
Recall that the same interface can be implemented by numerous types, even if they are not within the same class hierarchy and do not have a common parent class beyond System.Object. This can yield some powerful programming constructs. For example, assume you have developed three new class types within your current project that model kitchen utensils (via Knife and Fork classes) and another modeling gardening equipment (à la PitchFork). Consider Figure 8-4.
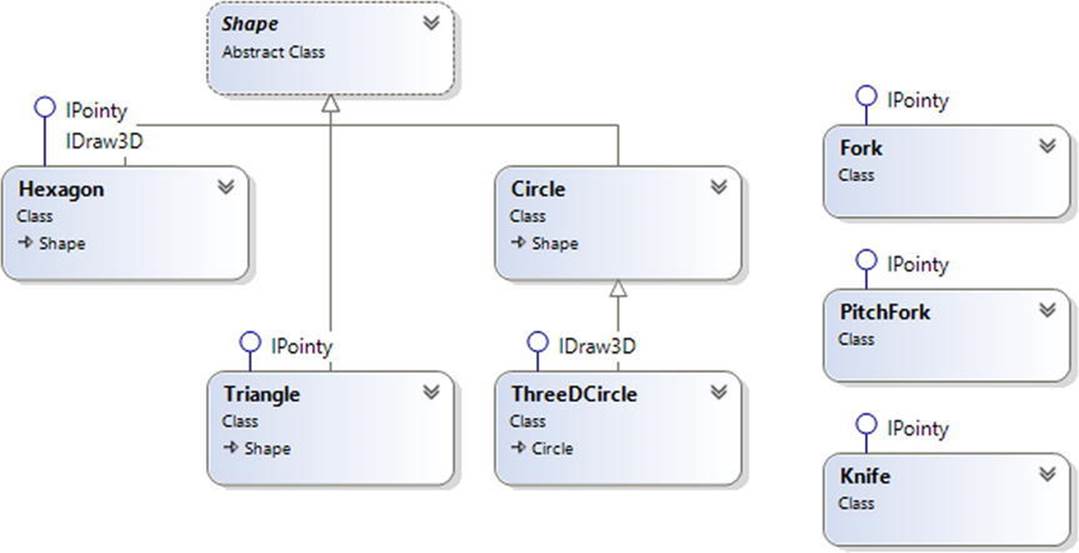
Figure 8-4. Recall that interfaces can be “plugged into” any type in any part of a class hierarchy
If you defined the PitchFork, Fork, and Knife types, you could now define an array of IPointy-compatible objects. Given that these members all support the same interface, you can iterate through the array and treat each item as an IPointy-compatible object, regardless of the overall diversity of the class hierarchies.
static void Main(string[] args)
{
...
// This array can only contain types that
// implement the IPointy interface.
IPointy[] myPointyObjects = {new Hexagon(), new Knife(),
new Triangle(), new Fork(), new PitchFork()};
foreach(IPointy i in myPointyObjects)
Console.WriteLine("Object has {0} points.", i.Points);
Console.ReadLine();
}
Just to highlight the importance of this example, remember this: when you have an array of a given interface, the array can contain any class or structure that implements that interface.
![]() Source Code The CustomInterface project is located in the Chapter 8 subdirectory.
Source Code The CustomInterface project is located in the Chapter 8 subdirectory.
Implementing Interfaces Using Visual Studio
Although interface-based programming is a powerful technique, implementing interfaces may entail a healthy amount of typing. Given that interfaces are a named set of abstract members, you are required to type in the definition and implementation for each interface method on each type that supports the behavior. Therefore, if you want to support an interface that defines a total of five methods and three properties, you need to account for all eight members (or else you will receive compiler errors).
As you would hope, Visual Studio supports various tools that make the task of implementing interfaces less burdensome. By way of a simple test, insert a final class into your current project named PointyTestClass. When you add an interface such as IPointy (or any interface for that matter) to a class type, you might have noticed that when you complete typing the interface’s name (or when you position the mouse cursor on the interface name in the code window), the first letter is underlined (formally termed a smart tag). When you click the smart tag, you will be presented with a drop-down list that allows you to implement the interface (see Figure 8-5).

Figure 8-5. Implementing interfaces using Visual Studio
Notice you are presented with two options, the second of which (explicit interface implementation) will be examined in the next section. For the time being, select the first option and you’ll see that Visual Studio has generated stub code for you to update (note that the default implementation throws a System.NotImplementedException, which can obviously be deleted).
namespace CustomInterface
{
class PointyTestClass : IPointy
{
public byte Points
{
get { throw new NotImplementedException(); }
}
}
}
![]() Note Visual Studio also supports extract interface refactoring, available from the Extract Interface option of the Quick Actions menu. This allows you to pull out a new interface definition from an existing class definition. For example, you might be halfway through writing a class when it dawns on you that you can generalize the behavior into an interface (and thereby open up the possibility of alternative implementations).
Note Visual Studio also supports extract interface refactoring, available from the Extract Interface option of the Quick Actions menu. This allows you to pull out a new interface definition from an existing class definition. For example, you might be halfway through writing a class when it dawns on you that you can generalize the behavior into an interface (and thereby open up the possibility of alternative implementations).
Explicit Interface Implementation
As shown earlier in this chapter, a class or structure can implement any number of interfaces. Given this, there is always the possibility you might implement interfaces that contain identical members and, therefore, have a name clash to contend with. To illustrate various manners in which you can resolve this issue, create a new Console Application project named InterfaceNameClash. Now design three interfaces that represent various locations to which an implementing type could render its output.
// Draw image to a form.
public interface IDrawToForm
{
void Draw();
}
// Draw to buffer in memory.
public interface IDrawToMemory
{
void Draw();
}
// Render to the printer.
public interface IDrawToPrinter
{
void Draw();
}
Notice that each interface defines a method named Draw(), with the identical signature (which happen to be no arguments). If you now want to support each of these interfaces on a single class type named Octagon, the compiler would allow the following definition:
class Octagon : IDrawToForm, IDrawToMemory, IDrawToPrinter
{
public void Draw()
{
// Shared drawing logic.
Console.WriteLine("Drawing the Octagon...");
}
}
Although the code compiles cleanly, you do have a possible problem. Simply put, providing a single implementation of the Draw() method does not allow you to take unique courses of action based on which interface is obtained from an Octagon object. For example, the following code will invoke the same Draw() method, regardless of which interface you obtain:
static void Main(string[] args)
{
Console.WriteLine("***** Fun with Interface Name Clashes *****\n");
// All of these invocations call the
// same Draw() method!
Octagon oct = new Octagon();
IDrawToForm itfForm = (IDrawToForm)oct;
itfForm.Draw();
IDrawToPrinter itfPriner = (IDrawToPrinter)oct;
itfPriner.Draw();
IDrawToMemory itfMemory = (IDrawToMemory)oct;
itfMemory.Draw();
Console.ReadLine();
}
Clearly, the sort of code required to render the image to a window is quite different from the code needed to render the image to a networked printer or a region of memory. When you implement several interfaces that have identical members, you can resolve this sort of name clash usingexplicit interface implementation syntax. Consider the following update to the Octagon type:
class Octagon : IDrawToForm, IDrawToMemory, IDrawToPrinter
{
// Explicitly bind Draw() implementations
// to a given interface.
void IDrawToForm.Draw()
{
Console.WriteLine("Drawing to form...");
}
void IDrawToMemory.Draw()
{
Console.WriteLine("Drawing to memory...");
}
void IDrawToPrinter.Draw()
{
Console.WriteLine("Drawing to a printer...");
}
}
As you can see, when explicitly implementing an interface member, the general pattern breaks down to this:
returnType InterfaceName.MethodName(params){}
Note that when using this syntax, you do not supply an access modifier; explicitly implemented members are automatically private. For example, the following is illegal syntax:
// Error! No access modifier!
public void IDrawToForm.Draw()
{
Console.WriteLine("Drawing to form...");
}
Because explicitly implemented members are always implicitly private, these members are no longer available from the object level. In fact, if you were to apply the dot operator to an Octagon type, you would find that IntelliSense does not show you any of the Draw() members. As expected, you must use explicit casting to access the required functionality. Here’s an example:
static void Main(string[] args)
{
Console.WriteLine("***** Fun with Interface Name Clashes *****\n");
Octagon oct = new Octagon();
// We now must use casting to access the Draw()
// members.
IDrawToForm itfForm = (IDrawToForm)oct;
itfForm.Draw();
// Shorthand notation if you don’t need
// the interface variable for later use.
((IDrawToPrinter)oct).Draw();
// Could also use the "is" keyword.
if(oct is IDrawToMemory)
((IDrawToMemory)oct).Draw();
Console.ReadLine();
}
While this syntax is quite helpful when you need to resolve name clashes, you can use explicit interface implementation simply to hide more “advanced” members from the object level. In this way, when the object user applies the dot operator, the user will see only a subset of the type’s overall functionality. However, those who require the more advanced behaviors can extract the desired interface via an explicit cast.
![]() Source Code The InterfaceNameClash project is located in the Chapter 8 subdirectory.
Source Code The InterfaceNameClash project is located in the Chapter 8 subdirectory.
Designing Interface Hierarchies
Interfaces can be arranged in an interface hierarchy. Like a class hierarchy, when an interface extends an existing interface, it inherits the abstract members defined by the parent (or parents). Of course, unlike class-based inheritance, derived interfaces never inherit true implementation. Rather, a derived interface simply extends its own definition with additional abstract members.
Interface hierarchies can be useful when you want to extend the functionality of an existing interface without breaking existing code bases. To illustrate, create a new Console Application project named InterfaceHierarchy. Now, let’s design a new set of rendering-centric interfaces such that IDrawable is the root of the family tree.
public interface IDrawable
{
void Draw();
}
Given that IDrawable defines a basic drawing behavior, you could now create a derived interface that extends this interface with the ability to render in modified formats. Here’s an example:
public interface IAdvancedDraw : IDrawable
{
void DrawInBoundingBox(int top, int left, int bottom, int right);
void DrawUpsideDown();
}
Given this design, if a class were to implement IAdvancedDraw, it would now be required to implement every member defined up the chain of inheritance (specifically, the Draw(), DrawInBoundingBox(), and DrawUpsideDown() methods).
public class BitmapImage : IAdvancedDraw
{
public void Draw()
{
Console.WriteLine("Drawing...");
}
public void DrawInBoundingBox(int top, int left, int bottom, int right)
{
Console.WriteLine("Drawing in a box...");
}
public void DrawUpsideDown()
{
Console.WriteLine("Drawing upside down!");
}
}
Now, when you use the BitmapImage, you are able to invoke each method at the object level (as they are all public), as well as extract a reference to each supported interface explicitly via casting.
static void Main(string[] args)
{
Console.WriteLine("***** Simple Interface Hierarchy *****");
// Call from object level.
BitmapImage myBitmap = new BitmapImage();
myBitmap.Draw();
myBitmap.DrawInBoundingBox(10, 10, 100, 150);
myBitmap.DrawUpsideDown();
// Get IAdvancedDraw explicitly.
IAdvancedDraw iAdvDraw = myBitmap as IAdvancedDraw;
if(iAdvDraw != null)
iAdvDraw.DrawUpsideDown();
Console.ReadLine();
}
![]() Source Code The InterfaceHierarchy project is located in the Chapter 8 subdirectory.
Source Code The InterfaceHierarchy project is located in the Chapter 8 subdirectory.
Multiple Inheritance with Interface Types
Unlike class types, an interface can extend multiple base interfaces, allowing you to design some powerful and flexible abstractions. Create a new Console Application project named MIInterfaceHierarchy. Here is another collection of interfaces that model various rendering and shape abstractions. Notice that the IShape interface is extending both IDrawable and IPrintable.
// Multiple inheritance for interface types is a-okay.
interface IDrawable
{
void Draw();
}
interface IPrintable
{
void Print();
void Draw(); // <-- Note possible name clash here!
}
// Multiple interface inheritance. OK!
interface IShape : IDrawable, IPrintable
{
int GetNumberOfSides();
}
Figure 8-6 illustrates the current interface hierarchy.
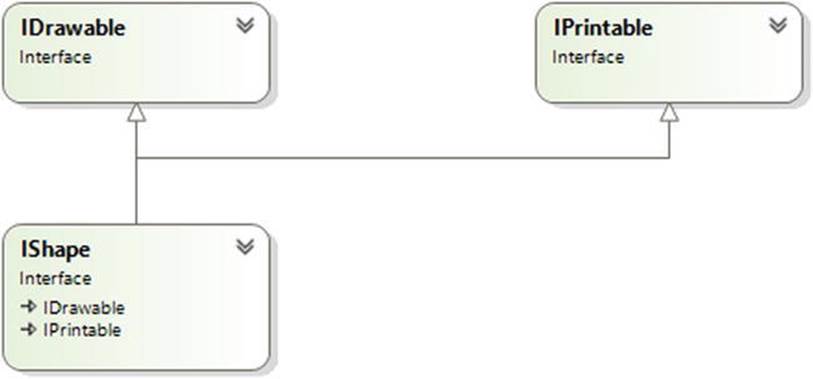
Figure 8-6. Unlike classes, interfaces can extend multiple interface types
At this point, the million dollar question is, if you have a class supporting IShape, how many methods will it be required to implement? The answer: it depends. If you want to provide a simple implementation of the Draw() method, you need provide only three members, as shown in the following Rectangle type:
class Rectangle : IShape
{
public int GetNumberOfSides()
{ return 4; }
public void Draw()
{ Console.WriteLine("Drawing..."); }
public void Print()
{ Console.WriteLine("Printing..."); }
}
If you’d rather have specific implementations for each Draw() method (which in this case would make the most sense), you can resolve the name clash using explicit interface implementation, as shown in the following Square type:
class Square : IShape
{
// Using explicit implementation to handle member name clash.
void IPrintable.Draw()
{
// Draw to printer ...
}
void IDrawable.Draw()
{
// Draw to screen ...
}
public void Print()
{
// Print ...
}
public int GetNumberOfSides()
{ return 4; }
}
Ideally, at this point you feel more comfortable with the process of defining and implementing custom interfaces using the C# syntax. To be honest, interface-based programming can take a while to get comfortable with, so if you are in fact still scratching your head just a bit, this is a perfectly normal reaction.
Do be aware, however, that interfaces are a fundamental aspect of the .NET Framework. Regardless of the type of application you are developing (web-based, desktop GUIs, data-access libraries, etc.), working with interfaces will be part of the process. To summarize the story thus far, remember that interfaces can be extremely useful when
· You have a single hierarchy where only a subset of the derived types supports a common behavior.
· You need to model a common behavior that is found across multiple hierarchies with no common parent class beyond System.Object.
Now that you have drilled into the specifics of building and implementing custom interfaces, the remainder of this chapter examines a number of predefined interfaces contained within the .NET base class libraries. As you will see, you can implement standard .NET interfaces on your custom types to ensure they integrate into the framework seamlessly.
![]() Source Code The MIInterfaceHierarchy project is located in the Chapter 8 subdirectory.
Source Code The MIInterfaceHierarchy project is located in the Chapter 8 subdirectory.
The IEnumerable and IEnumerator Interfaces
To begin examining the process of implementing existing .NET interfaces, let’s first look at the role of IEnumerable and IEnumerator. Recall that C# supports a keyword named foreach that allows you to iterate over the contents of any array type.
// Iterate over an array of items.
int[] myArrayOfInts = {10, 20, 30, 40};
foreach(int i in myArrayOfInts)
{
Console.WriteLine(i);
}
While it might seem that only array types can use this construct, the truth of the matter is any type supporting a method named GetEnumerator() can be evaluated by the foreach construct. To illustrate, begin by creating a new Console Application project named CustomEnumerator. Next, add the Car.cs and Radio.cs files defined in the SimpleException example of Chapter 7 (via the Project ![]() Add Existing Item menu option).
Add Existing Item menu option).
![]() Note You might want to rename the namespace containing the Car and Radio types to CustomEnumerator to avoid having to import the CustomException namespace within this new project.
Note You might want to rename the namespace containing the Car and Radio types to CustomEnumerator to avoid having to import the CustomException namespace within this new project.
Now, insert a new class named Garage that stores a set of Car objects within a System.Array.
// Garage contains a set of Car objects.
public class Garage
{
private Car[] carArray = new Car[4];
// Fill with some Car objects upon startup.
public Garage()
{
carArray[0] = new Car("Rusty", 30);
carArray[1] = new Car("Clunker", 55);
carArray[2] = new Car("Zippy", 30);
carArray[3] = new Car("Fred", 30);
}
}
Ideally, it would be convenient to iterate over the Garage object’s subitems using the foreach construct, just like an array of data values.
// This seems reasonable ...
public class Program
{
static void Main(string[] args)
{
Console.WriteLine("***** Fun with IEnumerable / IEnumerator *****\n");
Garage carLot = new Garage();
// Hand over each car in the collection?
foreach (Car c in carLot)
{
Console.WriteLine("{0} is going {1} MPH",
c.PetName, c.CurrentSpeed);
}
Console.ReadLine();
}
}
Sadly, the compiler informs you that the Garage class does not implement a method named GetEnumerator(). This method is formalized by the IEnumerable interface, which is found lurking within the System.Collections namespace.
![]() Note In Chapter 9, you will learn about the role of generics and the System.Collections.Generic namespace. As you will see, this namespace contains generic versions of IEnumerable/IEnumerator that provide a more type-safe way to iterate over items.
Note In Chapter 9, you will learn about the role of generics and the System.Collections.Generic namespace. As you will see, this namespace contains generic versions of IEnumerable/IEnumerator that provide a more type-safe way to iterate over items.
Classes or structures that support this behavior advertise that they are able to expose contained items to the caller (in this example, the foreach keyword itself). Here is the definition of this standard .NET interface:
// This interface informs the caller
// that the object’s items can be enumerated.
public interface IEnumerable
{
IEnumerator GetEnumerator();
}
As you can see, the GetEnumerator() method returns a reference to yet another interface named System.Collections.IEnumerator. This interface provides the infrastructure to allow the caller to traverse the internal objects contained by the IEnumerable-compatible container.
// This interface allows the caller to
// obtain a container’s items.
public interface IEnumerator
{
bool MoveNext (); // Advance the internal position of the cursor.
object Current { get;} // Get the current item (read-only property).
void Reset (); // Reset the cursor before the first member.
}
If you want to update the Garage type to support these interfaces, you could take the long road and implement each method manually. While you are certainly free to provide customized versions of GetEnumerator(), MoveNext(), Current, and Reset(), there is a simpler way. As the System.Array type (as well as many other collection classes) already implements IEnumerable and IEnumerator, you can simply delegate the request to the System.Array as follows (note you will need to import the System.Collections namespace into your code file):
using System.Collections;
...
public class Garage : IEnumerable
{
// System.Array already implements IEnumerator!
private Car[] carArray = new Car[4];
public Garage()
{
carArray[0] = new Car("FeeFee", 200);
carArray[1] = new Car("Clunker", 90);
carArray[2] = new Car("Zippy", 30);
carArray[3] = new Car("Fred", 30);
}
public IEnumerator GetEnumerator()
{
// Return the array object’s IEnumerator.
return carArray.GetEnumerator();
}
}
After you have updated your Garage type, you can safely use the type within the C# foreach construct. Furthermore, given that the GetEnumerator() method has been defined publicly, the object user could also interact with the IEnumerator type.
// Manually work with IEnumerator.
IEnumerator i = carLot.GetEnumerator();
i.MoveNext();
Car myCar = (Car)i.Current;
Console.WriteLine("{0} is going {1} MPH", myCar.PetName, myCar.CurrentSpeed);
However, if you prefer to hide the functionality of IEnumerable from the object level, simply make use of explicit interface implementation.
IEnumerator IEnumerable.GetEnumerator()
{
// Return the array object’s IEnumerator.
return carArray.GetEnumerator();
}
By doing so, the casual object user will not find the Garage’s GetEnumerator() method, while the foreach construct will obtain the interface in the background when necessary.
![]() Source Code The CustomEnumerator project is located in the Chapter 8 subdirectory.
Source Code The CustomEnumerator project is located in the Chapter 8 subdirectory.
Building Iterator Methods with the yield Keyword
There’s an alternative way to build types that work with the foreach loop via iterators. Simply put, an iterator is a member that specifies how a container’s internal items should be returned when processed by foreach. To illustrate, create a new Console Application project named CustomEnumeratorWithYield and insert the Car, Radio, and Garage types from the previous example (again, renaming your namespace definitions to the current project if you like). Now, retrofit the current Garage type as follows:
public class Garage : IEnumerable
{
private Car[] carArray = new Car[4];
...
// Iterator method.
public IEnumerator GetEnumerator()
{
foreach (Car c in carArray)
{
yield return c;
}
}
}
Notice that this implementation of GetEnumerator() iterates over the subitems using internal foreach logic and returns each Car to the caller using the yield return syntax. The yield keyword is used to specify the value (or values) to be returned to the caller’s foreachconstruct. When the yield return statement is reached, the current location in the container is stored, and execution is restarted from this location the next time the iterator is called.
Iterator methods are not required to use the foreach keyword to return its contents. It is also permissible to define this iterator method as follows:
public IEnumerator GetEnumerator()
{
yield return carArray[0];
yield return carArray[1];
yield return carArray[2];
yield return carArray[3];
}
In this implementation, notice that the GetEnumerator() method is explicitly returning a new value to the caller with each pass through. Doing so for this example makes little sense, given that if you were to add more objects to the carArray member variable, yourGetEnumerator() method would now be out of sync. Nevertheless, this syntax can be useful when you want to return local data from a method for processing by the foreach syntax.
Building a Named Iterator
It is also interesting to note that the yield keyword can technically be used within any method, regardless of its name. These methods (which are technically called named iterators) are also unique in that they can take any number of arguments. When building a named iterator, be aware that the method will return the IEnumerable interface, rather than the expected IEnumerator-compatible type. To illustrate, you could add the following method to the Garage type:
public IEnumerable GetTheCars(bool ReturnRevesed)
{
// Return the items in reverse.
if (ReturnRevesed)
{
for (int i = carArray.Length; i != 0; i--)
{
yield return carArray[i-1];
}
}
else
{
// Return the items as placed in the array.
foreach (Car c in carArray)
{
yield return c;
}
}
}
Notice that the new method allows the caller to obtain the subitems in sequential order, as well as in reverse order, if the incoming parameter has the value true. You could now interact with your new method as follows:
static void Main(string[] args)
{
Console.WriteLine("***** Fun with the Yield Keyword *****\n");
Garage carLot = new Garage();
// Get items using GetEnumerator().
foreach (Car c in carLot)
{
Console.WriteLine("{0} is going {1} MPH",
c.PetName, c.CurrentSpeed);
}
Console.WriteLine();
// Get items (in reverse!) using named iterator.
foreach (Car c in carLot.GetTheCars(true))
{
Console.WriteLine("{0} is going {1} MPH",
c.PetName, c.CurrentSpeed);
}
Console.ReadLine();
}
As you might agree, named iterators are helpful constructs, in that a single custom container can define multiple ways to request the returned set.
So, to wrap up your look at building enumerable objects, remember that for your custom types to work with the C# foreach keyword, the container must define a method named GetEnumerator(), which has been formalized by the IEnumerable interface type. The implementation of this method is typically achieved by simply delegating it to the internal member that is holding onto the subobjects; however, it is also possible to use the yield return syntax to provide multiple “named iterator” methods.
![]() Source Code The CustomEnumeratorWithYield project is located in the Chapter 8 subdirectory.
Source Code The CustomEnumeratorWithYield project is located in the Chapter 8 subdirectory.
The ICloneable Interface
As you might recall from Chapter 6, System.Object defines a method named MemberwiseClone(). This method is used to obtain a shallow copy of the current object. Object users do not call this method directly, as it is protected. However, a given object may call this method itself during the cloning process. To illustrate, create a new Console Application project named CloneablePoint that defines a class named Point.
// A class named Point.
public class Point
{
public int X {get; set;}
public int Y {get; set;}
public Point(int xPos, int yPos) { X = xPos; Y = yPos;}
public Point(){}
// Override Object.ToString().
public override string ToString()
{ return string.Format("X = {0}; Y = {1}", X, Y ); }
}
Given what you already know about reference types and value types (see Chapter 4), you are aware that if you assign one reference variable to another, you have two references pointing to the same object in memory. Thus, the following assignment operation results in two references to the same Point object on the heap; modifications using either reference affect the same object on the heap:
static void Main(string[] args)
{
Console.WriteLine("***** Fun with Object Cloning *****\n");
// Two references to same object!
Point p1 = new Point(50, 50);
Point p2 = p1;
p2.X = 0;
Console.WriteLine(p1);
Console.WriteLine(p2);
Console.ReadLine();
}
When you want to give your custom type the ability to return an identical copy of itself to the caller, you may implement the standard ICloneable interface. As shown at the start of this chapter, this type defines a single method named Clone().
public interface ICloneable
{
object Clone();
}
Obviously, the implementation of the Clone() method varies among your classes. However, the basic functionality tends to be the same: copy the values of your member variables into a new object instance of the same type and return it to the user. To illustrate, ponder the following update to the Point class:
// The Point now supports "clone-ability."
public class Point : ICloneable
{
public int X { get; set; }
public int Y { get; set; }
public Point(int xPos, int yPos) { X = xPos; Y = yPos; }
public Point() { }
// Override Object.ToString().
public override string ToString()
{ return string.Format("X = {0}; Y = {1}", X, Y); }
// Return a copy of the current object.
public object Clone()
{ return new Point(this.X, this.Y); }
}
In this way, you can create exact stand-alone copies of the Point type, as illustrated by the following code:
static void Main(string[] args)
{
Console.WriteLine("***** Fun with Object Cloning *****\n");
// Notice Clone() returns a plain object type.
// You must perform an explicit cast to obtain the derived type.
Point p3 = new Point(100, 100);
Point p4 = (Point)p3.Clone();
// Change p4.X (which will not change p3.X).
p4.X = 0;
// Print each object.
Console.WriteLine(p3);
Console.WriteLine(p4);
Console.ReadLine();
}
While the current implementation of Point fits the bill, you can streamline things just a bit. Because the Point type does not contain any internal reference type variables, you could simplify the implementation of the Clone() method as follows:
public object Clone()
{
// Copy each field of the Point member by member.
return this.MemberwiseClone();
}
Be aware, however, that if the Point did contain any reference type member variables, MemberwiseClone() would copy the references to those objects (i.e., a shallow copy). If you want to support a true deep copy, you will need to create a new instance of any reference type variables during the cloning process. Let’s see an example next.
A More Elaborate Cloning Example
Now assume the Point class contains a reference type member variable of type PointDescription. This class maintains a point’s friendly name as well as an identification number expressed as a System.Guid (a globally unique identifier [GUID] is a statistically unique 128-bit number). Here is the implementation:
// This class describes a point.
public class PointDescription
{
public string PetName {get; set;}
public Guid PointID {get; set;}
public PointDescription()
{
PetName = "No-name";
PointID = Guid.NewGuid();
}
}
The initial updates to the Point class itself included modifying ToString() to account for these new bits of state data, as well as defining and creating the PointDescription reference type. To allow the outside world to establish a pet name for the Point, you also update the arguments passed into the overloaded constructor.
public class Point : ICloneable
{
public int X { get; set; }
public int Y { get; set; }
public PointDescription desc = new PointDescription();
public Point(int xPos, int yPos, string petName)
{
X = xPos; Y = yPos;
desc.PetName = petName;
}
public Point(int xPos, int yPos)
{
X = xPos; Y = yPos;
}
public Point() { }
// Override Object.ToString().
public override string ToString()
{
return string.Format("X = {0}; Y = {1}; Name = {2};\nID = {3}\n",
X, Y, desc.PetName, desc.PointID);
}
// Return a copy of the current object.
public object Clone()
{ return this.MemberwiseClone(); }
}
Notice that you did not yet update your Clone() method. Therefore, when the object user asks for a clone using the current implementation, a shallow (member-by-member) copy is achieved. To illustrate, assume you have updated Main() as follows:
static void Main(string[] args)
{
Console.WriteLine("***** Fun with Object Cloning *****\n");
Console.WriteLine("Cloned p3 and stored new Point in p4");
Point p3 = new Point(100, 100, "Jane");
Point p4 = (Point)p3.Clone();
Console.WriteLine("Before modification:");
Console.WriteLine("p3: {0}", p3);
Console.WriteLine("p4: {0}", p4);
p4.desc.PetName = "My new Point";
p4.X = 9;
Console.WriteLine("\nChanged p4.desc.petName and p4.X");
Console.WriteLine("After modification:");
Console.WriteLine("p3: {0}", p3);
Console.WriteLine("p4: {0}", p4);
Console.ReadLine();
}
Notice in the following output that while the value types have indeed been changed, the internal reference types maintain the same values, as they are “pointing” to the same objects in memory (specifically, note that the pet name for both objects is now “My new Point”).
***** Fun with Object Cloning *****
Cloned p3 and stored new Point in p4
Before modification:
p3: X = 100; Y = 100; Name = Jane;
ID = 133d66a7-0837-4bd7-95c6-b22ab0434509
p4: X = 100; Y = 100; Name = Jane;
ID = 133d66a7-0837-4bd7-95c6-b22ab0434509
Changed p4.desc.petName and p4.X
After modification:
p3: X = 100; Y = 100; Name = My new Point;
ID = 133d66a7-0837-4bd7-95c6-b22ab0434509
p4: X = 9; Y = 100; Name = My new Point;
ID = 133d66a7-0837-4bd7-95c6-b22ab0434509
To have your Clone() method make a complete deep copy of the internal reference types, you need to configure the object returned by MemberwiseClone() to account for the current point’s name (the System.Guid type is in fact a structure, so the numerical data is indeed copied). Here is one possible implementation:
// Now we need to adjust for the PointDescription member.
public object Clone()
{
// First get a shallow copy.
Point newPoint = (Point)this.MemberwiseClone();
// Then fill in the gaps.
PointDescription currentDesc = new PointDescription();
currentDesc.PetName = this.desc.PetName;
newPoint.desc = currentDesc;
return newPoint;
}
If you rerun the application once again and view the output (shown next), you see that the Point returned from Clone() does copy its internal reference type member variables (note the pet name is now unique for both p3 and p4).
***** Fun with Object Cloning *****
Cloned p3 and stored new Point in p4
Before modification:
p3: X = 100; Y = 100; Name = Jane;
ID = 51f64f25-4b0e-47ac-ba35-37d263496406
p4: X = 100; Y = 100; Name = Jane;
ID = 0d3776b3-b159-490d-b022-7f3f60788e8a
Changed p4.desc.petName and p4.X
After modification:
p3: X = 100; Y = 100; Name = Jane;
ID = 51f64f25-4b0e-47ac-ba35-37d263496406
p4: X = 9; Y = 100; Name = My new Point;
ID = 0d3776b3-b159-490d-b022-7f3f60788e8a
To summarize the cloning process, if you have a class or structure that contains nothing but value types, implement your Clone() method using MemberwiseClone(). However, if you have a custom type that maintains other reference types, you might want to create a new object that takes into account each reference type member variable in order to get a “deep copy.”
![]() Source Code The CloneablePoint project is located in the Chapter 8 subdirectory.
Source Code The CloneablePoint project is located in the Chapter 8 subdirectory.
The IComparable Interface
The System.IComparable interface specifies a behavior that allows an object to be sorted based on some specified key. Here is the formal definition:
// This interface allows an object to specify its
// relationship between other like objects.
public interface IComparable
{
int CompareTo(object o);
}
![]() Note The generic version of this interface (IComparable<T>) provides a more type-safe manner to handle comparisons between objects. You’ll examine generics in Chapter 9.
Note The generic version of this interface (IComparable<T>) provides a more type-safe manner to handle comparisons between objects. You’ll examine generics in Chapter 9.
Let’s assume you have a new Console Application project named ComparableCar that updates the Car class from Chapter 7 as so (notice that you have basically just added a new property to represent a unique ID for each car and a modified constructor):
public class Car
{
...
public int CarID {get; set;}
public Car(string name, int currSp, int id)
{
CurrentSpeed = currSp;
PetName = name;
CarID = id;
}
...
}
Now assume you have an array of Car objects as follows:
static void Main(string[] args)
{
Console.WriteLine("***** Fun with Object Sorting *****\n");
// Make an array of Car objects.
Car[] myAutos = new Car[5];
myAutos[0] = new Car("Rusty", 80, 1);
myAutos[1] = new Car("Mary", 40, 234);
myAutos[2] = new Car("Viper", 40, 34);
myAutos[3] = new Car("Mel", 40, 4);
myAutos[4] = new Car("Chucky", 40, 5);
Console.ReadLine();
}
The System.Array class defines a static method named Sort(). When you invoke this method on an array of intrinsic types (int, short, string, etc.), you are able to sort the items in the array in numeric/alphabetic order, as these intrinsic data types implement IComparable. However, what if you were to send an array of Car types into the Sort() method as follows?
// Sort my cars? Not yet!
Array.Sort(myAutos);
If you run this test, you would get a runtime exception, as the Car class does not support the necessary interface. When you build custom types, you can implement IComparable to allow arrays of your types to be sorted. When you flesh out the details of CompareTo(), it will be up to you to decide what the baseline of the ordering operation will be. For the Car type, the internal CarID seems to be the logical candidate.
// The iteration of the Car can be ordered
// based on the CarID.
public class Car : IComparable
{
...
// IComparable implementation.
int IComparable.CompareTo(object obj)
{
Car temp = obj as Car;
if (temp != null)
{
if (this.CarID > temp.CarID)
return 1;
if (this.CarID < temp.CarID)
return -1;
else
return 0;
}
else
throw new ArgumentException("Parameter is not a Car!");
}
}
As you can see, the logic behind CompareTo() is to test the incoming object against the current instance based on a specific point of data. The return value of CompareTo() is used to discover whether this type is less than, greater than, or equal to the object it is being compared with (see Table 8-1).
Table 8-1. CompareTo() Return Values
|
CompareTo( ) Return Value |
Description |
|
Any number less than zero |
This instance comes before the specified object in the sort order. |
|
Zero |
This instance is equal to the specified object. |
|
Any number greater than zero |
This instance comes after the specified object in the sort order. |
You can streamline the previous implementation of CompareTo() given that the C# int data type (which is just a shorthand notation for the CLR System.Int32) implements IComparable. You could implement the Car’s CompareTo() as follows:
int IComparable.CompareTo(object obj)
{
Car temp = obj as Car;
if (temp != null)
return this.CarID.CompareTo(temp.CarID);
else
throw new ArgumentException("Parameter is not a Car!");
}
In either case, so that your Car type understands how to compare itself to like objects, you can write the following user code:
// Exercise the IComparable interface.
static void Main(string[] args)
{
// Make an array of Car objects.
...
// Display current array.
Console.WriteLine("Here is the unordered set of cars:");
foreach(Car c in myAutos)
Console.WriteLine("{0} {1}", c.CarID, c.PetName);
// Now, sort them using IComparable!
Array.Sort(myAutos);
Console.WriteLine();
// Display sorted array.
Console.WriteLine("Here is the ordered set of cars:");
foreach(Car c in myAutos)
Console.WriteLine("{0} {1}", c.CarID, c.PetName);
Console.ReadLine();
}
Here is the output from the previous Main() method:
***** Fun with Object Sorting *****
Here is the unordered set of cars:
1 Rusty
234 Mary
34 Viper
4 Mel
5 Chucky
Here is the ordered set of cars:
1 Rusty
4 Mel
5 Chucky
34 Viper
234 Mary
Specifying Multiple Sort Orders with IComparer
In this version of the Car type, you used the car’s ID as the base for the sort order. Another design might have used the pet name of the car as the basis for the sorting algorithm (to list cars alphabetically). Now, what if you wanted to build a Car that could be sorted by ID as well as by pet name? If this is the type of behavior you are interested in, you need to make friends with another standard interface named IComparer, defined within the System.Collections namespace as follows:
// A general way to compare two objects.
interface IComparer
{
int Compare(object o1, object o2);
}
![]() Note The generic version of this interface (IComparer<T>) provides a more type-safe manner to handle comparisons between objects. You’ll examine generics in Chapter 9.
Note The generic version of this interface (IComparer<T>) provides a more type-safe manner to handle comparisons between objects. You’ll examine generics in Chapter 9.
Unlike the IComparable interface, IComparer is typically not implemented on the type you are trying to sort (i.e., the Car). Rather, you implement this interface on any number of helper classes, one for each sort order (pet name, car ID, etc.). Currently, the Car type already knows how to compare itself against other cars based on the internal car ID. Therefore, allowing the object user to sort an array of Car objects by pet name will require an additional helper class that implements IComparer. Here’s the code (be sure to import the System.Collectionsnamespace in the code file):
// This helper class is used to sort an array of Cars by pet name.
public class PetNameComparer : IComparer
{
// Test the pet name of each object.
int IComparer.Compare(object o1, object o2)
{
Car t1 = o1 as Car;
Car t2 = o2 as Car;
if(t1 != null && t2 != null)
return String.Compare(t1.PetName, t2.PetName);
else
throw new ArgumentException("Parameter is not a Car!");
}
}
The object user code is able to use this helper class. System.Array has a number of overloaded Sort() methods, one that just happens to take an object implementing IComparer.
static void Main(string[] args)
{
...
// Now sort by pet name.
Array.Sort(myAutos, new PetNameComparer());
// Dump sorted array.
Console.WriteLine("Ordering by pet name:");
foreach(Car c in myAutos)
Console.WriteLine("{0} {1}", c.CarID, c.PetName);
...
}
Custom Properties and Custom Sort Types
It is worth pointing out that you can use a custom static property to help the object user along when sorting your Car types by a specific data point. Assume the Car class has added a static read-only property named SortByPetName that returns an instance of an object implementing theIComparer interface (PetNameComparer, in this case; be sure to import System.Collections).
// We now support a custom property to return
// the correct IComparer interface.
public class Car : IComparable
{
...
// Property to return the PetNameComparer.
public static IComparer SortByPetName
{ get { return (IComparer)new PetNameComparer(); } }
}
The object user code can now sort by pet name using a strongly associated property, rather than just “having to know” to use the stand-alone PetNameComparer class type.
// Sorting by pet name made a bit cleaner.
Array.Sort(myAutos, Car.SortByPetName);
![]() Source Code The ComparableCar project is located in the Chapter 8 subdirectory.
Source Code The ComparableCar project is located in the Chapter 8 subdirectory.
Ideally, at this point you not only understand how to define and implement your own interfaces but also understand their usefulness. To be sure, interfaces are found within every major .NET namespace, and you will continue working with various standard interfaces in the remainder of this book.
Summary
An interface can be defined as a named collection of abstract members. Because an interface does not provide any implementation details, it is common to regard an interface as a behavior that may be supported by a given type. When two or more classes implement the same interface, you can treat each type the same way (interface-based polymorphism) even if the types are defined within unique class hierarchies.
C# provides the interface keyword to allow you to define a new interface. As you have seen, a type can support as many interfaces as necessary using a comma-delimited list. Furthermore, it is permissible to build interfaces that derive from multiple base interfaces.
In addition to building your custom interfaces, the .NET libraries define a number of standard (i.e., framework-supplied) interfaces. As you have seen, you are free to build custom types that implement these predefined interfaces to gain a number of desirable traits such as cloning, sorting, and enumerating.
All materials on the site are licensed Creative Commons Attribution-Sharealike 3.0 Unported CC BY-SA 3.0 & GNU Free Documentation License (GFDL)
If you are the copyright holder of any material contained on our site and intend to remove it, please contact our site administrator for approval.
© 2016-2026 All site design rights belong to S.Y.A.