C# 5.0 in a Nutshell (2012)
Chapter 10. LINQ to XML
The .NET Framework provides a number of APIs for working with XML data. From Framework 3.5, the primary choice for general-purpose XML document processing is LINQ to XML. LINQ to XML comprises a lightweight LINQ-friendly XML document object model, plus a set of supplementary query operators. LINQ to XML is supported fully in the Metro profile.
In this chapter, we concentrate entirely on LINQ to XML. In Chapter 11, we cover the more specialized XML types and APIs, including the forward-only reader/writer, the types for working with schemas, stylesheets and XPaths, and the legacy XmlDocument-based DOM.
NOTE
The LINQ to XML DOM is extremely well designed and highly performant. Even without LINQ, the LINQ to XML DOM is valuable as a lightweight façade over the low-level XmlReader and XmlWriter classes.
All LINQ to XML types are defined in the System.Xml.Linq namespace.
Architectural Overview
This section starts with a very brief introduction to the concept of a DOM, and then explains the rationale behind LINQ to XML’s DOM.
What Is a DOM?
Consider the following XML file:
<?xml version="1.0" encoding="utf-8" standalone="yes"?>
<customer id="123" status="archived">
<firstname>Joe</firstname>
<lastname>Bloggs</lastname>
</customer>
As with all XML files, we start with a declaration, and then a root element, whose name is customer. The customer element has two attributes, each with a name (id and status) and value ("123" and "archived"). Within customer, there are two child elements, firstname andlastname, each having simple text content ("Joe" and "Bloggs").
Each of these constructs—declaration, element, attribute, value, and text content—can be represented with a class. And if such classes have collection properties for storing child content, we can assemble a tree of objects to fully describe a document. This is called a document object model, or DOM.
The LINQ to XML DOM
LINQ to XML comprises two things:
§ An XML DOM, which we call the X-DOM
§ A set of about 10 supplementary query operators
As you might expect, the X-DOM consists of types such as XDocument, XElement, and XAttribute. Interestingly, the X-DOM types are not tied to LINQ—you can load, instantiate, update, and save an X-DOM without ever writing a LINQ query.
Conversely, you could use LINQ to query a DOM created of the older W3C-compliant types. However, this would be frustrating and limiting. The distinguishing feature of the X-DOM is that it’s LINQ-friendly. This means:
§ It has methods that emit useful IEnumerable sequences, upon which you can query.
§ Its constructors are designed such that you can build an X-DOM tree through a LINQ projection.
X-DOM Overview
Figure 10-1 shows the core X-DOM types. The most frequently used of these types is XElement. XObject is the root of the inheritance hierarchy; XElement and XDocument are roots of the containership hierarchy.
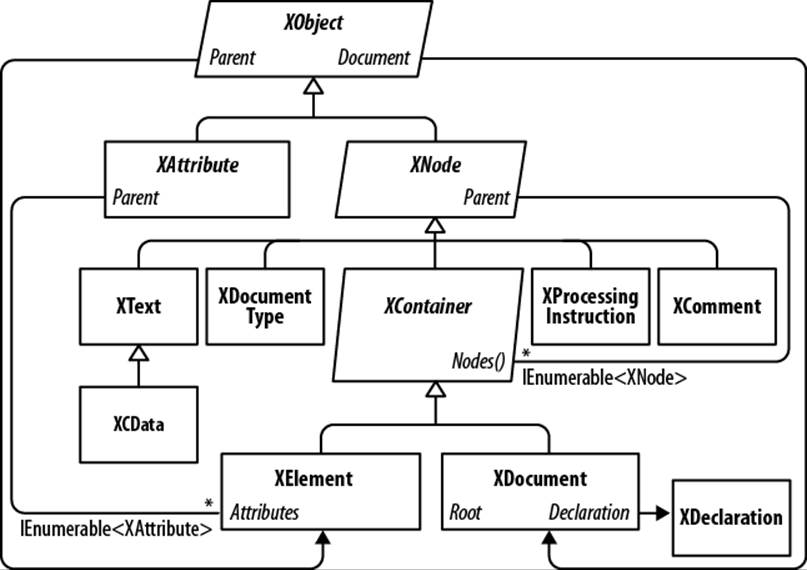
Figure 10-1. Core X-DOM types
Figure 10-2 shows the X-DOM tree created from the following code:
string xml = @"<customer id='123' status='archived'>
<firstname>Joe</firstname>
<lastname>Bloggs<!--nice name--></lastname>
</customer>";
XElement customer = XElement.Parse (xml);

Figure 10-2. A simple X-DOM tree
XObject is the abstract base class for all XML content. It defines a link to the Parent element in the containership tree as well as an optional XDocument.
XNode is the base class for most XML content excluding attributes. The distinguishing feature of XNode is that it can sit in an ordered collection of mixed-type XNodes. For instance, consider the following XML:
<data>
Hello world
<subelement1/>
<!--comment-->
<subelement2/>
</data>
Within the parent element <data>, there’s first an XText node (Hello world), then an XElement node, then an XComment node, and then a second XElement node. In contrast, an XAttribute will tolerate only other XAttributes as peers.
Although an XNode can access its parent XElement, it has no concept of child nodes: this is the job of its subclass XContainer. XContainer defines members for dealing with children and is the abstract base class for XElement and XDocument.
XElement introduces members for managing attributes—as well as a Name and Value. In the (fairly common) case of an element having a single XText child node, the Value property on XElement encapsulates this child’s content for both get and set operations, cutting unnecessary navigation. Thanks to Value, you can mostly avoid working directly with XText nodes.
XDocument represents the root of an XML tree. More precisely, it wraps the root XElement, adding an XDeclaration, processing instructions, and other root-level “fluff.” Unlike with the W3C DOM, its use is optional: you can load, manipulate, and save an X-DOM without ever creating an XDocument! The nonreliance on XDocument also means you can efficiently and easily move a node subtree to another X-DOM hierarchy.
Loading and Parsing
Both XElement and XDocument provide static Load and Parse methods to build an X-DOM tree from an existing source:
§ Load builds an X-DOM from a file, URI, Stream, TextReader, or XmlReader.
§ Parse builds an X-DOM from a string.
For example:
XDocument fromWeb = XDocument.Load ("http://albahari.com/sample.xml");
XElement fromFile = XElement.Load (@"e:\media\somefile.xml");
XElement config = XElement.Parse (
@"<configuration>
<client enabled='true'>
<timeout>30</timeout>
</client>
</configuration>");
In later sections, we describe how to traverse and update an X-DOM. As a quick preview, here’s how to manipulate the config element we just populated:
foreach (XElement child in config.Elements())
Console.WriteLine (child.Name); // client
XElement client = config.Element ("client");
bool enabled = (bool) client.Attribute ("enabled"); // Read attribute
Console.WriteLine (enabled); // True
client.Attribute ("enabled").SetValue (!enabled); // Update attribute
int timeout = (int) client.Element ("timeout"); // Read element
Console.WriteLine (timeout); // 30
client.Element ("timeout").SetValue (timeout * 2); // Update element
client.Add (new XElement ("retries", 3)); // Add new elememt
Console.WriteLine (config); // Implicitly call config.ToString()
Here’s the result of that last Console.WriteLine:
<configuration>
<client enabled="false">
<timeout>60</timeout>
<retries>3</retries>
</client>
</configuration
NOTE
XNode also provides a static ReadFrom method that instantiates and populates any type of node from an XmlReader. Unlike Load, it stops after reading one (complete) node, so you can continue to read manually from the XmlReader afterward.
You can also do the reverse and use an XmlReader or XmlWriter to read or write an XNode, via its CreateReader and CreateWriter methods.
We describe XML readers and writers and how to use them with the X-DOM in Chapter 11.
Saving and Serializing
Calling ToString on any node converts its content to an XML string—formatted with line breaks and indentation as we just saw. (You can disable the line breaks and indentation by specifying SaveOptions.DisableFormatting when calling ToString.)
XElement and XDocument also provide a Save method that writes an X-DOM to a file, Stream, TextWriter, or XmlWriter. If you specify a file, an XML declaration is automatically written. There is also a WriteTo method defined in the XNode class, which accepts just anXmlWriter.
We describe the handling of XML declarations when saving in more detail in the section Documents and Declarations later in this chapter.
Instantiating an X-DOM
Rather than using the Load or Parse methods, you can build an X-DOM tree by manually instantiating objects and adding them to a parent via XContainer’s Add method.
To construct an XElement and XAttribute, simply provide a name and value:
XElement lastName = new XElement ("lastname", "Bloggs");
lastName.Add (new XComment ("nice name"));
XElement customer = new XElement ("customer");
customer.Add (new XAttribute ("id", 123));
customer.Add (new XElement ("firstname", "Joe"));
customer.Add (lastName);
Console.WriteLine (customer.ToString());
The result:
<customer id="123">
<firstname>Joe</firstname>
<lastname>Bloggs<!--nice name--></lastname>
</customer>
A value is optional when constructing an XElement—you can provide just the element name and add content later. Notice that when we did provide a value, a simple string sufficed—we didn’t need to explicitly create and add an XText child node. The X-DOM does this work automatically, so you can deal simply with “values.”
Functional Construction
In our preceding example, it’s hard to glean the XML structure from the code. X-DOM supports another mode of instantiation, called functional construction (from functional programming). With functional construction, you build an entire tree in a single expression:
XElement customer =
new XElement ("customer", new XAttribute ("id", 123),
new XElement ("firstname", "joe"),
new XElement ("lastname", "bloggs",
new XComment ("nice name")
)
);
This has two benefits. First, the code resembles the shape of the XML. Second, it can be incorporated into the select clause of a LINQ query. For example, the following LINQ to SQL query projects directly into an X-DOM:
XElement query =
new XElement ("customers",
from c in dataContext.Customers
select
new XElement ("customer", new XAttribute ("id", c.ID),
new XElement ("firstname", c.FirstName),
new XElement ("lastname", c.LastName,
new XComment ("nice name")
)
)
);
More on this later in this chapter, in the section Projecting into an X-DOM.
Specifying Content
Functional construction is possible because the constructors for XElement (and XDocument) are overloaded to accept a params object array:
public XElement (XName name, params object[] content)
The same holds true for the Add method in XContainer:
public void Add (params object[] content)
Hence, you can specify any number of child objects of any type when building or appending an X-DOM. This works because anything counts as legal content. To see how, we need to examine how each content object is processed internally. Here are the decisions made by XContainer, in order:
1. If the object is null, it’s ignored.
2. If the object is based on XNode or XStreamingElement, it’s added as is to the Nodes collection.
3. If the object is an XAttribute, it’s added to the Attributes collection.
4. If the object is a string, it gets wrapped in an XText node and added to Nodes.[8]
5. If the object implements IEnumerable, it’s enumerated, and the same rules are applied to each element.
6. Otherwise, the object is converted to a string, wrapped in an XText node, and then added to Nodes.[9]
Everything ends up in one of two buckets: Nodes or Attributes. Furthermore, any object is valid content because it can always ultimately call ToString on it and treat it as an XText node.
NOTE
Before calling ToString on an arbitrary type, XContainer first tests whether it is one of the following types:
float, double, decimal, bool,
DateTime, DateTimeOffset, TimeSpan
If so, it calls an appropriate typed ToString method on the XmlConvert helper class instead of calling ToString on the object itself. This ensures that the data is round-trippable and compliant with standard XML formatting rules.
Automatic Deep Cloning
When a node or attribute is added to an element (whether via functional construction or an Add method) the node or attribute’s Parent property is set to that element. A node can have only one parent element: if you add an already parented node to a second parent, the node is automaticallydeep-cloned. In the following example, each customer has a separate copy of address:
var address = new XElement ("address",
new XElement ("street", "Lawley St"),
new XElement ("town", "North Beach")
);
var customer1 = new XElement ("customer1", address);
var customer2 = new XElement ("customer2", address);
customer1.Element ("address").Element ("street").Value = "Another St";
Console.WriteLine (
customer2.Element ("address").Element ("street").Value); // Lawley St
This automatic duplication keeps X-DOM object instantiation free of side effects—another hallmark of functional programming.
Navigating and Querying
As you might expect, the XNode and XContainer classes define methods and properties for traversing the X-DOM tree. Unlike a conventional DOM, however, these functions don’t return a collection that implements IList<T>. Instead, they return either a single value or a sequence that implements IEnumerable<T>—upon which you are then expected to execute a LINQ query (or enumerate with a foreach). This allows for advanced queries as well as simple navigation tasks—using familiar LINQ query syntax.
NOTE
Element and attribute names are case-sensitive in the X-DOM—just as they are in XML.
Child Node Navigation
|
Return type |
Members |
Works on |
|
XNode |
FirstNode { get; } |
XContainer |
|
LastNode { get; } |
XContainer |
|
|
IEnumerable<XNode> |
Nodes() |
XContainer* |
|
DescendantNodes() |
XContainer* |
|
|
DescendantNodesAndSelf() |
XElement* |
|
|
XElement |
Element (XName) |
XContainer |
|
IEnumerable<XElement> |
Elements() |
XContainer* |
|
Elements (XName) |
XContainer* |
|
|
Descendants() |
XContainer* |
|
|
Descendants (XName) |
XContainer* |
|
|
DescendantsAndSelf() |
XElement* |
|
|
DescendantsAndSelf (XName) |
XElement* |
|
|
bool |
HasElements { get; } |
XElement |
NOTE
Functions marked with an asterisk in the third column of this and other tables also operate on sequences of the same type. For instance, you can call Nodes on either an XContainer or a sequence of XContainer objects. This is possible because of extension methods defined in System.Xml.Linq—the supplementary query operators we talked about in the overview.
FirstNode, LastNode, and Nodes
FirstNode and LastNode give you direct access to the first or last child node; Nodes returns all children as a sequence. All three functions consider only direct descendants. For example:
var bench = new XElement ("bench",
new XElement ("toolbox",
new XElement ("handtool", "Hammer"),
new XElement ("handtool", "Rasp")
),
new XElement ("toolbox",
new XElement ("handtool", "Saw"),
new XElement ("powertool", "Nailgun")
),
new XComment ("Be careful with the nailgun")
);
foreach (XNode node in bench.Nodes())
Console.WriteLine (node.ToString (SaveOptions.DisableFormatting) + ".");
This is the output:
<toolbox><handtool>Hammer</handtool><handtool>Rasp</handtool></toolbox>.
<toolbox><handtool>Saw</handtool><powertool>Nailgun</powertool></toolbox>.
<!--Be careful with the nailgun-->.
Retrieving elements
The Elements method returns just the child nodes of type XElement:
foreach (XElement e in bench.Elements())
Console.WriteLine (e.Name + "=" + e.Value); // toolbox=HammerRasp
// toolbox=SawNailgun
The following LINQ query finds the toolbox with the nail gun:
IEnumerable<string> query =
from toolbox in bench.Elements()
where toolbox.Elements().Any (tool => tool.Value == "Nailgun")
select toolbox.Value;
RESULT: { "SawNailgun" }
The next example uses a SelectMany query to retrieve the hand tools in all toolboxes:
IEnumerable<string> query =
from toolbox in bench.Elements()
from tool in toolbox.Elements()
where tool.Name == "handtool"
select tool.Value;
RESULT: { "Hammer", "Rasp", "Saw" }
NOTE
Elements itself is equivalent to a LINQ query on Nodes. Our preceding query could be started as follows:
from toolbox in bench.Nodes().OfType<XElement>()
where ...
Elements can also return just the elements of a given name. For example:
int x = bench.Elements ("toolbox").Count(); // 2
This is equivalent to:
int x = bench.Elements().Where (e => e.Name == "toolbox").Count(); // 2
Elements is also defined as an extension method accepting IEnumerable<XContainer> or, more precisely, it accepts an argument of this type:
IEnumerable<T> where T : XContainer
This allows it to work with sequences of elements, too. Using this method, we can rewrite the query that finds the hand tools in all toolboxes as follows:
from tool in bench.Elements ("toolbox").Elements ("handtool")
select tool.Value.ToUpper();
The first call to Elements binds to XContainer’s instance method; the second call to Elements binds to the extension method.
Retrieving a single element
The method Element (singular) returns the first matching element of the given name. Element is useful for simple navigation, as follows:
XElement settings = XElement.Load ("databaseSettings.xml");
string cx = settings.Element ("database").Element ("connectString").Value;
Element is equivalent to calling Elements() and then applying LINQ’s FirstOrDefault query operator with a name-matching predicate. Element returns null if the requested element doesn’t exist.
NOTE
Element("xyz").Value will throw a NullReferenceException if element xyz does not exist. If you’d prefer a null rather than an exception, cast the XElement to a string instead of querying its Value property. In other words:
string xyz = (string) settings.Element ("xyz");
This works because XElement defines an explicit string conversion—just for this purpose!
Retrieving descendants
XContainer also provides Descendants and DescendantNodes methods that return child elements or nodes plus all of their children, and so on (the entire tree). Descendants accepts an optional element name. Returning to our earlier example, we can use Descendants to find all the hand tools as follows:
Console.WriteLine (bench.Descendants ("handtool").Count()); // 3
Both parent and leaf nodes are included, as the following example demonstrates:
foreach (XNode node in bench.DescendantNodes())
Console.WriteLine (node.ToString (SaveOptions.DisableFormatting));
<toolbox><handtool>Hammer</handtool><handtool>Rasp</handtool></toolbox>
<handtool>Hammer</handtool>
Hammer
<handtool>Rasp</handtool>
Rasp
<toolbox><handtool>Saw</handtool><powertool>Nailgun</powertool></toolbox>
<handtool>Saw</handtool>
Saw
<powertool>Nailgun</powertool>
Nailgun
<!--Be careful with the nailgun-->
The next query extracts all comments anywhere within the X-DOM that contain the word “careful”:
IEnumerable<string> query =
from c in bench.DescendantNodes().OfType<XComment>()
where c.Value.Contains ("careful")
orderby c.Value
select c.Value;
Parent Navigation
All XNodes have a Parent property and AncestorXXX methods for parent navigation. A parent is always an XElement:
|
Return type |
Members |
Works on |
|
XElement |
Parent { get; } |
XNode* |
|
Enumerable<XElement> |
Ancestors() |
XNode* |
|
Ancestors (XName) |
XNode* |
|
|
AncestorsAndSelf() |
XElement* |
|
|
AncestorsAndSelf (XName) |
XElement* |
If x is an XElement, the following always prints true:
foreach (XNode child in x.Nodes())
Console.WriteLine (child.Parent == x);
The same is not the case, however, if x is an XDocument. XDocument is peculiar: it can have children, but can never be anyone’s parent! To access the XDocument, you instead use the Document property—this works on any object in the X-DOM tree.
Ancestors returns a sequence whose first element is Parent, and whose next element is Parent.Parent, and so on, until the root element.
NOTE
You can navigate to the root element with the LINQ query AncestorsAndSelf().Last().
Another way to achieve the same thing is to call Document.Root—although this works only if an XDocument is present.
Peer Node Navigation
|
Return type |
Members |
Defined in |
|
bool |
IsBefore (XNode node) |
XNode |
|
IsAfter (XNode node) |
XNode |
|
|
XNode |
PreviousNode { get; } |
XNode |
|
NextNode { get; } |
XNode |
|
|
IEnumerable<XNode> |
NodesBeforeSelf() |
XNode |
|
NodesAfterSelf() |
XNode |
|
|
IEnumerable<XElement> |
ElementsBeforeSelf() |
XNode |
|
ElementsBeforeSelf (XName name) |
XNode |
|
|
ElementsAfterSelf() |
XNode |
|
|
ElementsAfterSelf (XName name) |
XNode |
With PreviousNode and NextNode (and FirstNode/LastNode), you can traverse nodes with the feel of a linked list. This is noncoincidental: internally, nodes are stored in a linked list.
WARNING
XNode internally uses a singly linked list, so PreviousNode is not performant.
Attribute Navigation
|
Return type |
Members |
Defined in |
|
bool |
HasAttributes { get; } |
XElement |
|
XAttribute |
Attribute (XName name) |
XElement |
|
FirstAttribute { get; } |
XElement |
|
|
LastAttribute { get; } |
XElement |
|
|
IEnumerable<XAttribute> |
Attributes() |
XElement |
|
Attributes (XName name) |
XElement |
In addition, XAttribute defines PreviousAttribute and NextAttribute properties, as well as Parent.
The Attributes method that accepts a name returns a sequence with either zero or one element; an element cannot have duplicate attribute names in XML.
Updating an X-DOM
You can update elements and attributes in the following ways:
§ Call SetValue or reassign the Value property.
§ Call SetElementValue or SetAttributeValue.
§ Call one of the RemoveXXX methods.
§ Call one of the AddXXX or ReplaceXXX methods, specifying fresh content.
You can also reassign the Name property on XElement objects.
Simple Value Updates
|
Members |
Works on |
|
SetValue (object value) |
XElement, XAttribute |
|
Value { get; set } |
XElement, XAttribute |
The SetValue method replaces an element or attribute’s content with a simple value. Setting the Value property does the same, but accepts string data only. We describe both of these functions in detail later in this chapter (see the section Working with Values).
An effect of calling SetValue (or reassigning Value) is that it replaces all child nodes:
XElement settings = new XElement ("settings",
new XElement ("timeout", 30)
);
settings.SetValue ("blah");
Console.WriteLine (settings.ToString()); // <settings>blah</settings>
Updating Child Nodes and Attributes
|
Category |
Members |
Works on |
|
Add |
Add (params object[] content) |
XContainer |
|
AddFirst (params object[] content) |
XContainer |
|
|
Remove |
RemoveNodes() |
XContainer |
|
RemoveAttributes() |
XElement |
|
|
RemoveAll() |
XElement |
|
|
Update |
ReplaceNodes (params object[] content) |
XContainer |
|
ReplaceAttributes (params object[] content) |
XElement |
|
|
ReplaceAll (params object[] content |
XElement |
|
|
SetElementValue (XName name, object value) |
XElement |
|
|
SetAttributeValue (XName name, object value) |
XElement |
The most convenient methods in this group are the last two: SetElementValue and SetAttributeValue. They serve as shortcuts for instantiating an XElement or XAttribute and then Adding it to a parent, replacing any existing element or attribute of that name:
XElement settings = new XElement ("settings");
settings.SetElementValue ("timeout", 30); // Adds child node
settings.SetElementValue ("timeout", 60); // Update it to 60
Add appends a child node to an element or document. AddFirst does the same thing, but inserts at the beginning of the collection rather than the end.
You can remove all child nodes or attributes in one hit with RemoveNodes or RemoveAttributes. RemoveAll is equivalent to calling both of these methods.
The ReplaceXXX methods are equivalent to Removing and then Adding. They take a snapshot of the input, so e.ReplaceNodes(e.Nodes()) works as expected.
Updating through the Parent
|
Members |
Works on |
|
AddBeforeSelf (params object[] content) |
XNode |
|
AddAfterSelf (params object[] content) |
XNode |
|
Remove() |
XNode*, XAttribute* |
|
ReplaceWith (params object[] content) |
XNode |
The methods AddBeforeSelf, AddAfterSelf, Remove, and ReplaceWith don’t operate on the node’s children. Instead, they operate on the collection in which the node itself is in. This requires that the node have a parent element—otherwise, an exception is thrown. AddBeforeSelfand AddAfterSelf are useful for inserting a node into an arbitrary position:
XElement items = new XElement ("items",
new XElement ("one"),
new XElement ("three")
);
items.FirstNode.AddAfterSelf (new XElement ("two"));
Here’s the result:
<items><one /><two /><three /></items>
Inserting into an arbitrary position within a long sequence of elements is actually quite efficient, because nodes are stored internally in a linked list.
The Remove method removes the current node from its parent. ReplaceWith does the same—and then inserts some other content at the same position. For instance:
XElement items = XElement.Parse ("<items><one/><two/><three/></items>");
items.FirstNode.ReplaceWith (new XComment ("One was here"));
Here’s the result:
<items><!--one was here--><two /><three /></items>
Removing a sequence of nodes or attributes
Thanks to extension methods in System.Xml.Linq, you can also call Remove on a sequence of nodes or attributes. Consider this X-DOM:
XElement contacts = XElement.Parse (
@"<contacts>
<customer name='Mary'/>
<customer name='Chris' archived='true'/>
<supplier name='Susan'>
<phone archived='true'>012345678<!--confidential--></phone>
</supplier>
</contacts>");
The following removes all customers:
contacts.Elements ("customer").Remove();
The next statement removes all archived contacts (so Chris disappears):
contacts.Elements().Where (e => (bool?) e.Attribute ("archived") == true)
.Remove();
If we replaced Elements() with Descendants(), all archived elements throughout the DOM would disappear, with this result:
<contacts>
<customer name="Mary" />
<supplier name="Susan" />
</contacts>
The next example removes all contacts that feature the comment “confidential” anywhere in their tree:
contacts.Elements().Where (e => e.DescendantNodes()
.OfType<XComment>()
.Any (c => c.Value == "confidential")
).Remove();
This is the result:
<contacts>
<customer name="Mary" />
<customer name="Chris" archived="true" />
</contacts>
Contrast this with the following simpler query, which strips all comment nodes from the tree:
contacts.DescendantNodes().OfType<XComment>().Remove();
NOTE
Internally, the Remove methods first read all matching elements into a temporary list, and then enumerate over the temporary list to perform the deletions. This avoids errors that could otherwise result from deleting and querying at the same time.
Working with Values
XElement and XAttribute both have a Value property of type string. If an element has a single XText child node, XElement’s Value property acts as a convenient shortcut to the content of that node. With XAttribute, the Value property is simply the attribute’s value.
Despite the storage differences, the X-DOM provides a consistent set of operations for working with element and attribute values.
Setting Values
There are two ways to assign a value: call SetValue or assign the Value property. SetValue is more flexible because it accepts not just strings, but other simple data types too:
var e = new XElement ("date", DateTime.Now);
e.SetValue (DateTime.Now.AddDays(1));
Console.Write (e.Value); // 2007-03-02T16:39:10.734375+09:00
We could have instead just set the element’s Value property, but this would mean manually converting the DateTime to a string. This is more complicated than calling ToString—it requires the use of XmlConvert for an XML-compliant result.
When you pass a value into XElement or XAttribute’s constructor, the same automatic conversion takes place for nonstring types. This ensures that DateTimes are correctly formatted; true is written in lowercase, and double.NegativeInfinity is written as “-INF”.
Getting Values
To go the other way around and parse a Value back to a base type, you simply cast the XElement or XAttribute to the desired type. It sounds like it shouldn’t work—but it does! For instance:
XElement e = new XElement ("now", DateTime.Now);
DateTime dt = (DateTime) e;
XAttribute a = new XAttribute ("resolution", 1.234);
double res = (double) a;
An element or attribute doesn’t store DateTimes or numbers natively—they’re always stored as text, and then parsed as needed. It also doesn’t “remember” the original type, so you must cast it correctly to avoid a runtime error. To make your code robust, you can put the cast in atry/catch block, catching a FormatException.
Explicit casts on XElement and XAttribute can parse to the following types:
§ All standard numeric types
§ string, bool, DateTime, DateTimeOffset, TimeSpan, and Guid
§ Nullable<> versions of the aforementioned value types
Casting to a nullable type is useful in conjunction with the Element and Attribute methods, because if the requested name doesn’t exist, the cast still works. For instance, if x has no timeout element, the first line generates a runtime error and the second line does not:
int timeout = (int) x.Element ("timeout"); // Error
int? timeout = (int?) x.Element ("timeout"); // OK; timeout is null.
You can factor away the nullable type in the final result with the ?? operator. The following evaluates to 1.0 if the resolution attribute doesn’t exist:
double resolution = (double?) x.Attribute ("resolution") ?? 1.0;
Casting to a nullable type won’t get you out of trouble, though, if the element or attribute exists and has an empty (or improperly formatted) value. For this, you must catch a FormatException.
You can also use casts in LINQ queries. The following returns “John”:
var data = XElement.Parse (
@"<data>
<customer id='1' name='Mary' credit='100' />
<customer id='2' name='John' credit='150' />
<customer id='3' name='Anne' />
</data>");
IEnumerable<string> query = from cust in data.Elements()
where (int?) cust.Attribute ("credit") > 100
select cust.Attribute ("name").Value;
Casting to a nullable int avoids a NullReferenceException in the case of Anne, who has no credit attribute. Another solution would be to add a predicate to the where clause:
where cust.Attributes ("credit").Any() && (int) cust.Attribute...
The same principles apply in querying element values.
Values and Mixed Content Nodes
Given the value of Value, you might wonder when you’d ever need to deal directly with XText nodes. The answer is when you have mixed content. For example:
<summary>An XAttribute is <bold>not</bold> an XNode</summary>
A simple Value property is not enough to capture summary’s content. The summary element contains three children: an XText node followed by an XElement, followed by another XText node. Here’s how to construct it:
XElement summary = new XElement ("summary",
new XText ("An XAttribute is "),
new XElement ("bold", "not"),
new XText (" an XNode")
);
Interestingly, we can still query summary’s Value—without getting an exception. Instead, we get a concatenation of each child’s value:
An XAttribute is not an XNode
It’s also legal to reassign summary’s Value, at the cost of replacing all previous children with a single new XText node.
Automatic XText Concatenation
When you add simple content to an XElement, the X-DOM appends to the existing XText child rather than creating a new one. In the following examples, e1 and e2 end up with just one child XText element whose value is HelloWorld:
var e1 = new XElement ("test", "Hello"); e1.Add ("World");
var e2 = new XElement ("test", "Hello", "World");
If you specifically create XText nodes, however, you end up with multiple children:
var e = new XElement ("test", new XText ("Hello"), new XText ("World"));
Console.WriteLine (e.Value); // HelloWorld
Console.WriteLine (e.Nodes().Count()); // 2
XElement doesn’t concatenate the two XText nodes, so the nodes’ object identities are preserved.
Documents and Declarations
XDocument
As we said previously, an XDocument wraps a root XElement and allows you to add an XDeclaration, processing instructions, a document type, and root-level comments. An XDocument is optional and can be ignored or omitted: unlike with the W3C DOM, it does not serve as glue to keep everything together.
An XDocument provides the same functional constructors as XElement. And because it’s based on XContainer, it also supports the AddXXX, RemoveXXX, and ReplaceXXX methods. Unlike XElement, however, an XDocument can accept only limited content:
§ A single XElement object (the “root”)
§ A single XDeclaration object
§ A single XDocumentType object (to reference a DTD)
§ Any number of XProcessingInstruction objects
§ Any number of XComment objects
NOTE
Of these, only the root XElement is mandatory in order to have a valid XDocument. The XDeclaration is optional—if omitted, default settings are applied during serialization.
The simplest valid XDocument has just a root element:
var doc = new XDocument (
new XElement ("test", "data")
);
Notice that we didn’t include an XDeclaration object. The file generated by calling doc.Save would still contain an XML declaration, however, because one is generated by default.
The next example produces a simple but correct XHTML file, illustrating all the constructs that an XDocument can accept:
var styleInstruction = new XProcessingInstruction (
"xml-stylesheet", "href='styles.css' type='text/css'");
var docType = new XDocumentType ("html",
"-//W3C//DTD XHTML 1.0 Strict//EN",
"http://www.w3.org/TR/xhtml1/DTD/xhtml1-strict.dtd", null);
XNamespace ns = "http://www.w3.org/1999/xhtml";
var root =
new XElement (ns + "html",
new XElement (ns + "head",
new XElement (ns + "title", "An XHTML page")),
new XElement (ns + "body",
new XElement (ns + "p", "This is the content"))
);
var doc =
new XDocument (
new XDeclaration ("1.0", "utf-8", "no"),
new XComment ("Reference a stylesheet"),
styleInstruction,
docType,
root);
doc.Save ("test.html");
The resultant test.html reads as follows:
<?xml version="1.0" encoding="utf-8" standalone="no"?>
<!--Reference a stylesheet-->
<?xml-stylesheet href='styles.css' type='text/css'?>
<!DOCTYPE html PUBLIC "-//W3C//DTD XHTML 1.0 Strict//EN"
"http://www.w3.org/TR/xhtml1/DTD/xhtml1-strict.dtd">
<html xmlns="http://www.w3.org/1999/xhtml">
<head>
<title>An XHTML page</title>
</head>
<body>
<p>This is the content</p>
</body>
</html>
XDocument has a Root property that serves as a shortcut for accessing a document’s single XElement. The reverse link is provided by XObject’s Document property, which works for all objects in the tree:
Console.WriteLine (doc.Root.Name.LocalName); // html
XElement bodyNode = doc.Root.Element (ns + "body");
Console.WriteLine (bodyNode.Document == doc); // True
Recall that a document’s children have no Parent:
Console.WriteLine (doc.Root.Parent == null); // True
foreach (XNode node in doc.Nodes())
Console.Write (node.Parent == null); // TrueTrueTrueTrue
NOTE
An XDeclaration is not an XNode and does not appear in the document’s Nodes collection—unlike comments, processing instructions, and the root element. Instead, it gets assigned to a dedicated property called Declaration. This is why “True” is repeated four and not five times in the last example.
XML Declarations
A standard XML file starts with a declaration such as the following:
<?xml version="1.0" encoding="utf-8" standalone="yes"?>
An XML declaration ensures that the file will be correctly parsed and understood by a reader. XElement and XDocument follow these rules in emitting XML declarations:
§ Calling Save with a filename always writes a declaration.
§ Calling Save with an XmlWriter writes a declaration unless the XmlWriter is instructed otherwise.
§ The ToString method never emits an XML declaration.
NOTE
You can instruct an XmlWriter not to produce a declaration by setting the OmitXmlDeclaration and ConformanceLevel properties of an XmlWriterSettings object when constructing the XmlWriter. We describe this in Chapter 11.
The presence or absence of an XDeclaration object has no effect on whether an XML declaration gets written. The purpose of an XDeclaration is instead to hint the XML serialization—in two ways:
§ What text encoding to use
§ What to put in the XML declaration’s encoding and standalone attributes (should a declaration be written)
XDeclaration’s constructor accepts three arguments, which correspond to the attributes version, encoding, and standalone. In the following example, test.xml is encoded in UTF-16:
var doc = new XDocument (
new XDeclaration ("1.0", "utf-16", "yes"),
new XElement ("test", "data")
);
doc.Save ("test.xml");
NOTE
Whatever you specify for the XML version is ignored by the XML writer: it always writes "1.0".
The encoding must use an IETF code such as "utf-16"—just as it would appear in the XML declaration.
Writing a declaration to a string
Suppose we want to serialize an XDocument to a string—including the XML declaration. Because ToString doesn’t write a declaration, we’d have to use an XmlWriter instead:
var doc = new XDocument (
new XDeclaration ("1.0", "utf-8", "yes"),
new XElement ("test", "data")
);
var output = new StringBuilder();
var settings = new XmlWriterSettings { Indent = true };
using (XmlWriter xw = XmlWriter.Create (output, settings))
doc.Save (xw);
Console.WriteLine (output.ToString());
This is the result:
<?xml version="1.0" encoding="utf-16" standalone="yes"?>
<test>data</test>
Notice that we got UTF-16 in the output—even though we explicitly requested UTF-8 in an XDeclaration! This might look like a bug, but in fact, XmlWriter is being remarkably smart. Because we’re writing to a string and not a file or stream, it’s impossible to apply any encoding other than UTF-16—the format in which strings are internally stored. Hence, XmlWriter writes "utf-16"—so as not to lie.
This also explains why the ToString method doesn’t emit an XML declaration. Imagine that instead of calling Save, you did the following to write an XDocument to a file:
File.WriteAllText ("data.xml", doc.ToString());
As it stands, data.xml would lack an XML declaration, making it incomplete but still parsable (you can infer the text encoding). But if ToString() emitted an XML declaration, data.xml would actually contain an incorrect declaration (encoding="utf-16"), which might prevent it from being read at all, because WriteAllText encodes using UTF-8.
Names and Namespaces
Just as .NET types can have namespaces, so too can XML elements and attributes.
XML namespaces achieve two things. First, rather like namespaces in C#, they help avoid naming collisions. This can become an issue when you merge data from one XML file into another. Second, namespaces assign absolute meaning to a name. The name “nil,” for instance, could mean anything. Within the http://www.w3.org/2001/xmlschema-instance namespace, however, “nil” means something equivalent to null in C# and comes with specific rules on how it can be applied.
Because XML namespaces are a significant source of confusion, we’ll cover the topic first in general, and then move on to how they’re used in LINQ to XML.
Namespaces in XML
Suppose we want to define a customer element in the namespace OReilly.Nutshell.CSharp. There are two ways to proceed. The first is to use the xmlns attribute as follows:
<customer xmlns="OReilly.Nutshell.CSharp"/>
xmlns is a special reserved attribute. When used in this manner, it performs two functions:
§ It specifies a namespace for the element in question.
§ It specifies a default namespace for all descendant elements.
This means that in the following example, address and postcode implicitly live in the OReilly.Nutshell.CSharp namespace:
<customer xmlns="OReilly.Nutshell.CSharp">
<address>
<postcode>02138</postcode>
</address>
</customer>
If we want address and postcode to have no namespace, we’d have to do this:
<customer xmlns="OReilly.Nutshell.CSharp"s>
<address xmlns="">
<postcode>02138</postcode> <!-- postcode now inherits empty ns -->
</address>
</customer>
Prefixes
The other way to specify a namespace is with a prefix. A prefix is an alias that you assign to a namespace to save typing. There are two steps in using a prefix—defining the prefix and using it. You can do both together as follows:
<nut:customer xmlns:nut="OReilly.Nutshell.CSharp"/>
Two distinct things are happening here. On the right, xmlns:nut="..." defines a prefix called nut and makes it available to this element and all its descendants. On the left, nut:customer assigns the newly allocated prefix to the customer element.
A prefixed element does not define a default namespace for descendants. In the following XML, firstname has an empty namespace:
<nut:customer nut:xmlns="OReilly.Nutshell.CSharp">
<firstname>Joe</firstname>
</customer>
To give firstname the OReilly.Nutshell.CSharp prefix, we must do this:
<nut:customer xmlns:nut="OReilly.Nutshell.CSharp">
<nut:firstname>Joe</firstname>
</customer>
You can also define a prefix—or prefixes—for the convenience of your descendants, without assigning any of them to the parent element itself. The following defines two prefixes, i and z, while leaving the customer element itself with an empty namespace:
<customer xmlns:i="http://www.w3.org/2001/XMLSchema-instance"
xmlns:z="http://schemas.microsoft.com/2003/10/Serialization/">
...
</customer>
If this was the root node, the whole document would have i and z at its fingertips. Prefixes are convenient when elements need to draw from a number of namespaces.
Notice that both namespaces in this example are URIs. Using URIs (that you own) is standard practice: it ensures namespace uniqueness. So, in real life, our customer element would more likely be:
<customer xmlns="http://oreilly.com/schemas/nutshell/csharp"/>
or:
<nut:customer xmlns:nut="http://oreilly.com/schemas/nutshell/csharp"/>
Attributes
You can assign namespaces to attributes too. The main difference is that it always requires a prefix. For instance:
<customer xmlns:nut="OReilly.Nutshell.CSharp" nut:id="123" />
Another difference is that an unqualified attribute always has an empty namespace: it never inherits a default namespace from a parent element.
Attributes tend not to need namespaces because their meaning is usually local to the element. An exception is with general-purpose or metadata attributes, such as the nil attribute defined by W3C:
<customer xmlns:xsi="http://www.w3.org/2001/XMLSchema-instance">
<firstname>Joe</firstname>
<lastname xsi:nil="true"/>
</customer>
This indicates unambiguously that lastname is nil (null in C#) and not an empty string. Because we’ve used the standard namespace, a general-purpose parsing utility could know with certainty our intention.
Specifying Namespaces in the X-DOM
So far in this chapter, we’ve used just simple strings for XElement and XAttribute names. A simple string corresponds to an XML name with an empty namespace—rather like a .NET type defined in the global namespace.
There are a couple of ways to specify an XML namespace. The first is to enclose it in braces, before the local name. For example:
var e = new XElement ("{http://domain.com/xmlspace}customer", "Bloggs");
Console.WriteLine (e.ToString());
Here’s the resulting XML:
<customer xmlns="http://domain.com/xmlspace">Bloggs</customer>
The second (and more performant) approach is to use the XNamespace and XName types. Here are their definitions:
public sealed class XNamespace
{
public string NamespaceName { get; }
}
public sealed class XName // A local name with optional namespace
{
public string LocalName { get; }
public XNamespace Namespace { get; } // Optional
}
Both types define implicit casts from string, so the following is legal:
XNamespace ns = "http://domain.com/xmlspace";
XName localName = "customer";
XName fullName = "{http://domain.com/xmlspace}customer";
XNamespace also overloads the + operator, allowing you to combine a namespace and name into an XName without using braces:
XNamespace ns = "http://domain.com/xmlspace";
XName fullName = ns + "customer";
Console.WriteLine (fullName); // {http://domain.com/xmlspace}customer
All constructors and methods in the X-DOM that accept an element or attribute name actually accept an XName object rather than a string. The reason you can substitute a string—as in all our examples to date—is because of the implicit cast.
Specifying a namespace is the same whether for an element or an attribute:
XNamespace ns = "http://domain.com/xmlspace";
var data = new XElement (ns + "data",
new XAttribute (ns + "id", 123)
);
The X-DOM and Default Namespaces
The X-DOM ignores the concept of default namespaces until it comes time to actually output XML. This means that when you construct a child XElement, you must give it a namespace explicitly if needed: it will not inherit from the parent:
XNamespace ns = "http://domain.com/xmlspace";
var data = new XElement (ns + "data",
new XElement (ns + "customer", "Bloggs"),
new XElement (ns + "purchase", "Bicycle")
);
The X-DOM does, however, apply default namespaces when reading and outputting XML:
Console.WriteLine (data.ToString());
OUTPUT:
<data xmlns="http://domain.com/xmlspace">
<customer>Bloggs</customer>
<purchase>Bicycle</purchase>
</data>
Console.WriteLine (data.Element (ns + "customer").ToString());
OUTPUT:
<customer xmlns="http://domain.com/xmlspace">Bloggs</customer>
If you construct XElement children without specifying namespaces—in other words:
XNamespace ns = "http://domain.com/xmlspace";
var data = new XElement (ns + "data",
new XElement ("customer", "Bloggs"),
new XElement ("purchase", "Bicycle")
);
Console.WriteLine (data.ToString());
you get this result instead:
<data xmlns="http://domain.com/xmlspace">
<customer xmlns="">Bloggs</customer>
<purchase xmlns="">Bicycle</purchase>
</data>
Another trap is failing to include a namespace when navigating an X-DOM:
XNamespace ns = "http://domain.com/xmlspace";
var data = new XElement (ns + "data",
new XElement (ns + "customer", "Bloggs"),
new XElement (ns + "purchase", "Bicycle")
);
XElement x = data.Element (ns + "customer"); // ok
XElement y = data.Element ("customer"); // null
If you build an X-DOM tree without specifying namespaces, you can subsequently assign every element to a single namespace as follows:
foreach (XElement e in data.DescendantsAndSelf())
if (e.Name.Namespace == "")
e.Name = ns + e.Name.LocalName;
Prefixes
The X-DOM treats prefixes just as it treats namespaces: purely as a serialization function. This means you can choose to completely ignore the issue of prefixes—and get by! The only reason you might want to do otherwise is for efficiency when outputting to an XML file. For example, consider this:
XNamespace ns1 = "http://domain.com/space1";
XNamespace ns2 = "http://domain.com/space2";
var mix = new XElement (ns1 + "data",
new XElement (ns2 + "element", "value"),
new XElement (ns2 + "element", "value"),
new XElement (ns2 + "element", "value")
);
By default, XElement will serialize this as follows:
<data xmlns="http://domain.com/space1">
<element xmlns="http://domain.com/space2">value</element>
<element xmlns="http://domain.com/space2">value</element>
<element xmlns="http://domain.com/space2">value</element>
</data>
As you can see, there’s a bit of unnecessary duplication. The solution is not to change the way you construct the X-DOM, but instead to hint the serializer prior to writing the XML. Do this by adding attributes defining prefixes that you want to see applied. This is typically done on the root element:
mix.SetAttributeValue (XNamespace.Xmlns + "ns1", ns1);
mix.SetAttributeValue (XNamespace.Xmlns + "ns2", ns2);
This assigns the prefix “ns1” to our XNamespace variable ns1, and “ns2” to ns2. The X-DOM automatically picks up these attributes when serializing and uses them to condense the resulting XML. Here’s the result now of calling ToString on mix:
<ns1:data xmlns:ns1="http://domain.com/space1"
xmlns:ns2="http://domain.com/space2">
<ns2:element>value</ns2:element>
<ns2:element>value</ns2:element>
<ns2:element>value</ns2:element>
</ns1:data>
Prefixes don’t change the way you construct, query, or update the X-DOM—for these activities, you ignore the presence of prefixes and continue to use full names. Prefixes come into play only when converting to and from XML files or streams.
Prefixes are also honored in serializing attributes. In the following example, we record a customer’s date of birth and credit as "nil" using the W3C-standard attribute. The highlighted line ensures that the prefix is serialized without unnecessary namespace repetition:
XNamespace xsi = "http://www.w3.org/2001/XMLSchema-instance";
var nil = new XAttribute (xsi + "nil", true);
var cust = new XElement ("customers",
new XAttribute (XNamespace.Xmlns + "xsi", xsi),
new XElement ("customer",
new XElement ("lastname", "Bloggs"),
new XElement ("dob", nil),
new XElement ("credit", nil)
)
);
This is its XML:
<customers xmlns:xsi="http://www.w3.org/2001/XMLSchema-instance">
<customer>
<lastname>Bloggs</lastname>
<dob xsi:nil="true" />
<credit xsi:nil="true" />
</customer>
</customers>
For brevity, we predeclared the nil XAttribute so that we could use it twice in building the DOM. You’re allowed to reference the same attribute twice because it’s automatically duplicated as required.
Annotations
You can attach custom data to any XObject with an annotation. Annotations are intended for your own private use and are treated as black boxes by X-DOM. If you’ve ever used the Tag property on a Windows Forms or WPF control, you’ll be familiar with the concept—the difference is that you have multiple annotations, and your annotations can be privately scoped. You can create an annotation that other types cannot even see—let alone overwrite.
The following methods on XObject add and remove annotations:
public void AddAnnotation (object annotation)
public void RemoveAnnotations<T>() where T : class
The following methods retrieve annotations:
public T Annotation<T>() where T : class
public IEnumerable<T> Annotations<T>() where T : class
Each annotation is keyed by its type, which must be a reference type. The following adds and then retrieves a string annotation:
XElement e = new XElement ("test");
e.AddAnnotation ("Hello");
Console.WriteLine (e.Annotation<string>()); // Hello
You can add multiple annotations of the same type, and then use the Annotations method to retrieve a sequence of matches.
A public type such as string doesn’t make a great key, however, because code in other types can interfere with your annotations. A better approach is to use an internal or (nested) private class:
class X
{
class CustomData { internal string Message; } // Private nested type
static void Test()
{
XElement e = new XElement ("test");
e.AddAnnotation (new CustomData { Message = "Hello" } );
Console.Write (e.Annotations<CustomData>().First().Message); // Hello
}
}
To remove annotations, you must also have access to the key’s type:
e.RemoveAnnotations<CustomData>();
Projecting into an X-DOM
So far, we’ve shown how to use LINQ to get data out of an X-DOM. You can also use LINQ queries to project into an X-DOM. The source can be anything over which LINQ can query, such as:
§ LINQ to SQL or Entity Framework queries
§ A local collection
§ Another X-DOM
Regardless of the source, the strategy is the same in using LINQ to emit an X-DOM: first write a functional construction expression that produces the desired X-DOM shape, and then build a LINQ query around the expression.
For instance, suppose we want to retrieve customers from a database into the following XML:
<customers>
<customer id="1">
<name>Sue</name>
<buys>3</buys>
</customer>
...
</customers>
We start by writing a functional construction expression for the X-DOM using simple literals:
var customers =
new XElement ("customers",
new XElement ("customer", new XAttribute ("id", 1),
new XElement ("name", "Sue"),
new XElement ("buys", 3)
)
);
We then turn this into a projection and build a LINQ query around it:
var customers =
new XElement ("customers",
from c in dataContext.Customers
select
new XElement ("customer", new XAttribute ("id", c.ID),
new XElement ("name", c.Name),
new XElement ("buys", c.Purchases.Count)
)
);
NOTE
In Entity Framework, you must call .ToList() after retrieving customers, so that the third line reads:
from c in objectContext.Customers.ToList()
Here’s the result:
<customers>
<customer id="1">
<name>Tom</name>
<buys>3</buys>
</customer>
<customer id="2">
<name>Harry</name>
<buys>2</buys>
</customer>
...
</customers>
We can see how this works more clearly by constructing the same query in two steps. First:
IEnumerable<XElement> sqlQuery =
from c in dataContext.Customers
select
new XElement ("customer", new XAttribute ("id", c.ID),
new XElement ("name", c.Name),
new XElement ("buys", c.Purchases.Count)
);
This inner portion is a normal LINQ to SQL query that projects into custom types (from LINQ to SQL’s perspective). Here’s the second step:
var customers = new XElement ("customers", sqlQuery);
This constructs the root XElement. The only thing unusual is that the content, sqlQuery, is not a single XElement but an IQueryable<XElement>—which implements IEnumerable<XElement>. Remember that in the processing of XML content, collections are automatically enumerated. So, each XElement gets added as a child node.
This outer query also defines the line at which the query transitions from being a database query to a local LINQ to enumerable query. XElement’s constructor doesn’t know about IQueryable<>, so it forces enumeration of the database query—and execution of the SQL statement.
Eliminating Empty Elements
Suppose in the preceding example that we also wanted to include details of the customer’s most recent high-value purchase. We could do this as follows:
var customers =
new XElement ("customers",
from c in dataContext.Customers
let lastBigBuy = (from p in c.Purchases
where p.Price > 1000
orderby p.Date descending
select p).FirstOrDefault()
select
new XElement ("customer", new XAttribute ("id", c.ID),
new XElement ("name", c.Name),
new XElement ("buys", c.Purchases.Count),
new XElement ("lastBigBuy",
new XElement ("description",
lastBigBuy == null ? null : lastBigBuy.Description),
new XElement ("price",
lastBigBuy == null ? 0m : lastBigBuy.Price)
)
)
);
This emits empty elements, though, for customers with no high-value purchases. (If it was a local query rather than a database query, it would throw a NullReferenceException.) In such cases, it would be better to omit the lastBigBuy node entirely. We can achieve this by wrapping the constructor for the lastBigBuy element in a conditional operator:
select
new XElement ("customer", new XAttribute ("id", c.ID),
new XElement ("name", c.Name),
new XElement ("buys", c.Purchases.Count),
lastBigBuy == null ? null :
new XElement ("lastBigBuy",
new XElement ("description", lastBigBuy.Description),
new XElement ("price", lastBigBuy.Price)
For customers with no lastBigBuy, a null is emitted instead of an empty XElement. This is what we want, because null content is simply ignored.
Streaming a Projection
If you’re projecting into an X-DOM only to Save it (or call ToString on it), you can improve memory efficiency through an XStreamingElement. An XStreamingElement is a cut-down version of XElement that applies deferred loading semantics to its child content. To use it, you simply replace the outer XElements with XStreamingElements:
var customers =
new XStreamingElement ("customers",
from c in dataContext.Customers
select
new XStreamingElement ("customer", new XAttribute ("id", c.ID),
new XElement ("name", c.Name),
new XElement ("buys", c.Purchases.Count)
)
);
customers.Save ("data.xml");
The queries passed into an XStreamingElement’s constructor are not enumerated until you call Save, ToString, or WriteTo on the element; this avoids loading the whole X-DOM into memory at once. The flipside is that the queries are reevaluated, should you re-Save. Also, you cannot traverse an XStreamingElement’s child content—it does not expose methods such as Elements or Attributes.
XStreamingElement is not based on XObject—or any other class—because it has such a limited set of members. The only members it has, besides Save, ToString, and WriteTo, are:
§ An Add method, which accepts content like the constructor
§ A Name property
XStreamingElement does not allow you to read content in a streamed fashion—for this, you must use an XmlReader in conjunction with the X-DOM. We describe how to do this in the section Patterns for Using XmlReader/XmlWriter in Chapter 11.
Transforming an X-DOM
You can transform an X-DOM by reprojecting it. For instance, suppose we want to transform an msbuild XML file, used by the C# compiler and Visual Studio to describe a project, into a simple format suitable for generating a report. An msbuild file looks like this:
<Project DefaultTargets="Build" xmlns="http://schemas.microsoft.com/dev...>
<PropertyGroup>
<Platform Condition=" '$(Platform)' == '' ">AnyCPU</Platform>
<ProductVersion>9.0.11209</ProductVersion>
...
</PropertyGroup>
<ItemGroup>
<Compile Include="ObjectGraph.cs" />
<Compile Include="Program.cs" />
<Compile Include="Properties\AssemblyInfo.cs" />
<Compile Include="Tests\Aggregation.cs" />
<Compile Include="Tests\Advanced\RecursiveXml.cs" />
</ItemGroup>
<ItemGroup>
...
</ItemGroup>
...
</Project>
Let’s say we want to include only files, as follows:
<ProjectReport>
<File>ObjectGraph.cs</File>
<File>Program.cs</File>
<File>Properties\AssemblyInfo.cs</File>
<File>Tests\Aggregation.cs</File>
<File>Tests\Advanced\RecursiveXml.cs</File>
</ProjectReport>
The following query performs this transformation:
XElement project = XElement.Load ("myProjectFile.csproj");
XNamespace ns = project.Name.Namespace;
var query =
new XElement ("ProjectReport",
from compileItem in
project.Elements (ns + "ItemGroup").Elements (ns + "Compile")
let include = compileItem.Attribute ("Include")
where include != null
select new XElement ("File", include.Value)
);
The query first extracts all ItemGroup elements, and then uses the Elements extension method to obtain a flat sequence of all their Compile subelements. Notice that we had to specify an XML namespace—everything in the original file inherits the namespace defined by the Projectelement—so a local element name such as ItemGroup won’t work on its own. Then, we extracted the Include attribute value and projected its value as an element.
Advanced transformations
When querying a local collection such as an X-DOM, you’re free to write custom query operators to assist with more complex queries.
Suppose in the preceding example that we instead wanted a hierarchical output, based on folders:
<Project>
<File>ObjectGraph.cs</File>
<File>Program.cs</File>
<Folder name="Properties">
<File>AssemblyInfo.cs</File>
</Folder>
<Folder name="Tests">
<File>Aggregation.cs</File>
<Folder name="Advanced">
<File>RecursiveXml.cs</File>
</Folder>
</Folder>
</Project>
To produce this, we need to process path strings such as Tests\Advanced\RecursiveXml.cs recursively. The following method does just this: it accepts a sequence of path strings and emits an X-DOM hierarchy consistent with our desired output:
static IEnumerable<XElement> ExpandPaths (IEnumerable<string> paths)
{
var brokenUp = from path in paths
let split = path.Split (new char[] { '\\' }, 2)
orderby split[0]
select new
{
name = split[0],
remainder = split.ElementAtOrDefault (1)
};
IEnumerable<XElement> files = from b in brokenUp
where b.remainder == null
select new XElement ("file", b.name);
IEnumerable<XElement> folders = from b in brokenUp
where b.remainder != null
group b.remainder by b.name into grp
select new XElement ("folder",
new XAttribute ("name", grp.Key),
ExpandPaths (grp)
);
return files.Concat (folders);
}
The first query splits each path string at the first backslash, into a name + remainder:
Tests\Advanced\RecursiveXml.cs -> Tests + Advanced\RecursiveXml.cs
If remainder is null, we’re dealing with a straight filename. The files query extracts these cases.
If remainder is not null, we’ve got a folder. The folders query handles these cases. Because other files can be in the same folder, it must group by folder name to bring them all together. For each group, it then executes the same function for the subelements.
The final result is a concatenation of files and folders. The Concat operator preserves order, so all the files come first, alphabetically, then all the folders, alphabetically.
With this method in place, we can complete the query in two steps. First, we extract a simple sequence of path strings:
IEnumerable<string> paths =
from compileItem in
project.Elements (ns + "ItemGroup").Elements (ns + "Compile")
let include = compileItem.Attribute ("Include")
where include != null
select include.Value;
Then, we feed this into our ExpandPaths method for the final result:
var query = new XElement ("Project", ExpandPaths (paths));
[8] The X-DOM actually optimizes this step internally by storing simple text content in a string. The XTEXT node is not actually created until you call Nodes( ) on the XContainer.
[9] See footnote 1.
All materials on the site are licensed Creative Commons Attribution-Sharealike 3.0 Unported CC BY-SA 3.0 & GNU Free Documentation License (GFDL)
If you are the copyright holder of any material contained on our site and intend to remove it, please contact our site administrator for approval.
© 2016-2025 All site design rights belong to S.Y.A.