Exam Ref 70-483: Programming in C# (2013)
Chapter 3. Debug applications and implement security
When you are building your applications, you will always run into unforeseen problems. Maybe you see the error and you start looking for the problem, or a user reports the error while the application is being tested or is already in production.
Debugging is the process of finding errors in your software and removing them. The C# compiler and the .NET Framework help you identify these bugs, whether on your development machine or in a production environment. In this chapter, you learn how to use the compiler to output extra information that can help you find bugs. You also look at implementing diagnostics in your application that output critical information about its health.
When building real-world applications, it’s also important to make sure that your applications are secure. You look at validating application input to ensure that the data is correct, but also to avoid malicious actions. Another area of security has to do with the code itself. If a user can change your assemblies and deploy them in a production environment, he can change the way your application behaves without you even knowing it. In this chapter, you look at the options you have to protect yourself against these attacks.
Objectives in this chapter:
§ Objective 3.1: Validate application input
§ Objective 3.2 Perform symmetric and asymmetric encryption
§ Objective 3.3 Manage assemblies
§ Objective 3.4 Debug an application
§ Objective 3.5 Implement diagnostics in an application
Objective 3.1: Validate application input
If your application runs in total isolation and processes only its own data, you can be sure that your application behaves the way it should behave.
But in the real world, you have to deal with external input. This input can come from another system, but most of the time it comes from your users. Validating all input to your application is an area that’s sometimes overlooked but that is of critical importance.
THIS OBJECTIVE COVERS HOW TO:
§ Explain why validating application input is important.
§ Manage data integrity.
§ Use Parse, TryParse, and Convert.
§ Use regular expressions for input validation.
§ Validating JSON and XML.
Why validating application input is important
When your application is in production, it has to deal with various types of input. Some of this input comes from other systems that it integrates with, and most input is generated by users. Those users fall into two categories:
§ Innocent users
§ Malicious users
Innocent users are the ones who try to use your application to get some work done. They have no bad intentions when working with your application, but they can still make mistakes. Maybe they forget to input some required data, or they make a typo and insert invalid data.
Malicious users are a different species. They actively seek weaknesses in your application and try to exploit them. Maybe they want access to some privileged information, or they try to add or remove information. These are the users who try to insert invalid data, decompile your code to see how it works, or just start looking for hidden areas of your system.
Even when your application integrates with other applications that have no bad intentions, you still have to validate the data you’re consuming. Maybe you have developed your application, tested it, and made sure everything was working, but suddenly the other system is upgraded to a new version. The fields you were expecting are gone or moved to another location, and new data is suddenly added. If you don’t protect yourself against these kinds of situations, they can crash your application or corrupt the data in your system.
When building real world applications, you will probably use frameworks such as Windows Presentation Foundation (WPF), ASP.NET, or the Entity Framework. Those frameworks have built-in functionality to validate data, but it’s still important to make sure that you know how to perform your own validation.
Managing data integrity
When invalid data enters your application, it can be that your application crashes. Maybe you expect a valid date, but a user makes a typo. When you try to perform some calculations on the date, an exception is thrown, and your application crashes.
Of course, this is inconvenient for the user and definitely something you should avoid. But crashing isn’t the worst that can happen. What if the invalid data isn’t recognized and is saved to your database? That can lead to corrupt data and jeopardize the integrity of your data.
Let’s say, for example, that you have built an online shopping application. One of the administrators decides to do some cleaning and removes a couple of user accounts that he presumes are no longer in use. But he forgets that those accounts have a purchase history. Suddenly your data is in an inconsistent state. You have orphaned orders in your database that can’t be linked to a specific user any more.
Another situation can arise when you have a power outage or a hardware failure. Maybe you have developed an application for a bank. You receive a message that a certain amount of money should be removed from one account and added to another one. After removing the money, your application is abruptly terminated, and suddenly the money is gone.
Avoiding these types of problems is the area of managing data integrity. There are four different types of data integrity:
§ Entity integrity. States that each entity (a record in a database) should be uniquely identifiable. In a database, this is achieved by using a primary key column. A primary key uniquely identifies each row of data. It can be generated by the database or by your application.
§ Domain integrity. Refers to the validity of the data that an entity contains. This can be about the type of data and the possible values that are allowed (a valid postal code, a number within a certain range, or a default value, for example).
§ Referential integrity. The relationship that entities have with each other, such as the relationship between an order and a customer.
§ User-defined integrity. Comprises specific business rules that you need to enforce. A business rule for a web shop might involve a new customer who is not allowed to place an order above a certain dollar amount.
Most of these integrity checks are integrated into modern database systems. You can use primary keys and foreign keys to let the database perform certain basic checks on your data. A primary key uniquely identifies each row of data. Defining them makes sure that no rows have the same ID. A foreign key is used to point to another record (for example, the manager of a person or the order for an order line). You can configure the database to disallow the removal of an order without also removing the order lines.
When working with a database, you will probably use an object-relational mapper such as the Entity Framework, which enables a couple of different ways to work with your database. One approach is to define your object model in code and then let the Entity Framework generate a database that can store your model. You can annotate your classes with attributes that specify certain validation rules, or you can use a special mapping syntax to configure the way your database schema is generated.
MORE INFO: ENTITY FRAMEWORK
For more information on the Entity Framework and the different ways you can use it, see Chapter 4.
For example, when working with a web shop, you have classes for at least an order, a customer, an order line, and a product.
You need entity integrity to ensure that each entity can be uniquely identified. You do this by adding an ID property to each entity. The database helps you generate unique values for your IDs when you add entities to the database.
Referential integrity is necessary to ensure a relationship is maintained between orders, order lines, customers, and products. Foreign key constraints show which relationships are required and which are optional.
Domain integrity also comes into play. You have specific data types, such as a DateTime for your order date and shipping date. Some fields are required, such as the name of the customer and the quantity of products you want to order.
User-defined integrity is another issue. It can’t be handled automatically by the Entity Framework. You can define these checks in code or write custom code that will be executed by your database. Another way is to use a trigger. Triggers are special methods that run when data in your database is updated, inserted, or removed. Such an action triggers your method to execute. You can also use stored procedures, which are subroutines that are stored in your database and can be executed to validate date or control access to data.
Example 3-1 is a code sample that describes the Customer and Address classes. As you can see, some of the properties are annotated with special attributes. These attributes can be found in the System.ComponentModel.DataAnnotations.dll, which is included in the Entity Framework. You can add the Entity Framework to your application by installing the Entity Framework NuGet package.
MORE INFO: NUGET
NuGet is a free and open-source package manager. It’s installed as a Visual Studio extension that can be used to easily download software packages and add them to your applications. You can find more information about NuGet at http://nuget.org/.
Example 3-1. Customer and Address classes
public class Customer
{
public int Id { get; set; }
[Required, MaxLength(20)]
public string FirstName { get; set; }
[Required, MaxLength(20)]
public string LastName { get; set; }
[Required]
public Address ShippingAddress { get; set; }
[Required]
public Address BillingAddress { get; set; }
}
public class Address
{
public int Id { get; set; }
[Required, MaxLength(20)]
public string AddressLine1 { get; set; }
[Required, MaxLength(20)]
public string AddressLine2 { get; set; }
[Required, MaxLength(20)]
public string City { get; set; }
[RegularExpression(@"^[1-9][0-9]{3}\s?[a-zA-Z]{2}$")]
public string ZipCode { get; set; }
}
You can use the following predefined attributes:
§ DataTypeAttribute
§ RangeAttribute
§ RegularExpressionAttribute
§ RequiredAttribute
§ StringLengthAttribute
§ CustomValidationAttribute
§ MaxLengthAttribute
§ MinLengthAttribute
You can apply these attributes to your class members, and when you save your changes to the database, the validation code runs.
Example 3-2 shows an example of using an Entity Framework context to save a new customer to the database.
Example 3-2. Saving a new customer to the database
public class ShopContext : DbContext
{
public IDbSet<Customer> Customers { get; set; }
protected override void OnModelCreating(DbModelBuilder modelBuilder)
{
// Make sure the database knows how to handle the duplicate address property
modelBuilder.Entity<Customer>().HasRequired(bm => bm.BillingAddress)
.WithMany().WillCascadeOnDelete(false);
}
}
using (ShopContext ctx = new ShopContext())
{
Address a = new Address
{
AddressLine1 = "Somewhere 1",
AddressLine2 = "At some floor",
City = "SomeCity",
ZipCode = "1111AA"
};
Customer c = new Customer()
{
FirstName = "John",
LastName = "Doe",
BillingAddress = a,
ShippingAddress = a,
};
ctx.Customers.Add(c);
ctx.SaveChanges();
}
If you forget to set the FirstName property, the Entity Framework throws the following exception:
System.Data.Entity.Validation.DbEntityValidationException : Validation failed for one or
more entities. See 'EntityValidationErrors' property for more details.
Looking at the EntityValidationErrors property tells you that the FirstName field is required. You can run this validation code manually outside of the context of the Entity Framework. Example 3-3 shows a class that can run validation on an entity and report the errors.
Example 3-3. Running manual validation
public static class GenericValidator<T>
{
public static IList<ValidationResult> Validate(T entity)
{
var results = new List<ValidationResult>();
var context = new ValidationContext(entity, null, null);
Validator.TryValidateObject(entity, context, results);
return results;
}
}
The Entity Framework also creates foreign keys and primary keys in the database for your entities. They ensure that you don’t have entities with the same ID and that the relationships between your entities, such as from Customer to Address, are correct.
MORE INFO: ENTITY FRAMEWORK
For more information about the Entity Framework, see the Microsoft documentation at http://msdn.microsoft.com/en-us/data/ef.aspx. You can also read Programming Entity Framework: DbContext by Julia Lerman and Rowan Miller (O’Reilly Media, 2012).
Another important topic when managing data integrity with a database is using transactions. A transaction helps you group a set of related operations on a database. It ensures that those operations are seen as one distinct action. If one fails, they all fail and can easily be rolled back.
You can also run into problems when your users work concurrently with the same set of data. By using transactions, you can configure your database to throw an exception when there is a conflicting update. In your application, you can catch those exceptions and write code that handles the conflict. You could, for example, allow the user to choose which update should win, or you can let the last update win. This helps you maintain your data integrity.
MORE INFO: TRANSACTIONS
For more information on using transactions, see Chapter 4.
Using Parse, TryParse, and Convert
Most input to your application comes in as a simple string. Maybe you know that it actually represents a number or a valid date, but you have to check this to ensure that the data is valid.
The .NET Framework has some built-in types that help you convert data from one type to another.
The Parse and TryParse methods can be used when you have a string that you want to convert to a specific data type. For example, if you have a string that you know is a Boolean value, you can use the bool.Parse method, as Example 3-4 shows.
Example 3-4. Using Parse
string value = "true";
bool b = bool.Parse(value);
Console.WriteLine(b); // displays True
The bool.Parse method uses the static readonly fields TrueString and FalseString to see whether your string is true or false. If your string contains an invalid value, Parse throws a FormatException. If you pass a null value for the string, you will get an ArgumentNullException. Parse should be used if you are certain the parsing will succeed. If an exception is thrown, this denotes a real error in your application.
TryParse does things differently. You use TryParse if you are not sure that the parsing will succeed. You don’t want an exception to be thrown and you want to handle invalid conversion gracefully. Look at Example 3-5 for an example of using the int.TryParse method that tries to parse a string to a valid number.
Example 3-5. Using TryParse
string value = "1";
int result;
bool success = int.TryParse(value, out result);
if (success)
{
// value is a valid integer, result contains the value
}
else
{
// value is not a valid integer
}
As Example 3-5 shows, TryParse returns a Boolean value that indicates whether the value could be parsed. The out parameter contains the resulting value when the operation is successful. If the parsing succeeds, the variable holds the converted value; otherwise, it contains the initial value.
TryParse can be used when you are parsing some user input. If the user provides invalid data, you can show a friendly error message and let him try again.
When using the bool.Parse or bool.TryParse methods, you don’t have any extra parsing options. When parsing numbers, you can supply extra options for the style of the number and the specific culture that you want to use. Example 3-6 shows how you can parse a string that contains a currency symbol and a decimal separator. The CultureInfo class can be found in the System.Globalization namespace.
Example 3-6. Using configuration options when parsing a number
CultureInfo english = new CultureInfo("En");
CultureInfo dutch = new CultureInfo("Nl");
string value = "€19,95";
decimal d = decimal.Parse(value, NumberStyles.Currency, dutch);
Console.WriteLine(d.ToString(english)); // Displays 19.95
A complex subject is parsing a date and time. You can use the DateTime.Parse method for this, which offers several overloads (methods with the same name but different arguments):
§ Parse(string) uses the current thread culture and the DateTimeStyles.AllowWhiteSpaces.
§ Parse(string, IFormatProvider) uses the specified culture and the DateTimeStyles.AllowWhiteSpaces.
§ Parse(string, IFormatProvider, DateTimeStyles).
When parsing a DateTime, you must take into account things such as time zone differences and cultural differences, especially when working on an application that uses globalization. It’s important to parse user input with the correct culture.
MORE INFO: PARSING DATETIME
For more information on parsing dates and times, see the MSDN documentation at http://msdn.microsoft.com/en-us/library/system.datetime.parse.aspx.
The .NET Framework also offers the Convert class to convert between base types. The supported base types are Boolean, Char, SByte, Byte, Int16, Int32, Int64, UInt16, Uint32, Uint64, Single, Double, Decimal, DateTime, and String. The difference between Parse/TryParse and Convert is that Convert enables null values. It doesn’t throw an ArgumentNullException; instead, it returns the default value for the supplied type, as Example 3-7 shows.
Example 3-7. Using Convert with a null value
int i = Convert.ToInt32(null);
Console.WriteLine(i); // Displays 0
A difference between Convert and the Parse methods is that Parse takes a string only as input, while Convert can also take other base types as input. Example 3-8 shows an example of converting a double to an int. The double value is rounded.
Example 3-8. Using Convert to convert from double to int
double d = 23.15;
int i = Convert.ToInt32(d);
Console.WriteLine(i); // Displays 23
Methods such as these throw an OverflowException when the parsed or converted value is too large for the target type.
EXAM TIP
It’s important to know that when you are parsing user input, the best choice is the TryParse method. Throwing exceptions for “normal” errors is not a best practice. TryParse just returns false when the value can’t be parsed.
Using regular expressions
A regular expression is a specific pattern used to parse and find matches in strings. A regular expression is sometimes called regex or regexp.
Regular expressions are flexible. For example, the regex ^(\(\d{3}\)|^\d{3}[.-]?)?\d{3}[.-]?\d{4}$ matches North American telephone numbers with or without parentheses around the area code, and with or without hyphens or dots between the numbers.
Regular expressions have a history of being hard to write and use. Luckily, a lot of patterns are already written by someone else. Websites such as http://regexlib.com/ contain a lot of examples that you can use or adapt to your own needs. Regular expressions can be useful when validating application input, reducing to a few lines of code what can take dozens or more with manual parsing. Maybe you allow a user to use both slashes and dashes to input a valid date. Or you allow white space when entering a ZIP Code. Example 3-9 shows how cumbersome it is to validate a Dutch ZIP Code manually.
Example 3-9. Manually validating a ZIP Code
static bool ValidateZipCode(string zipCode)
{
// Valid zipcodes: 1234AB | 1234 AB | 1001 AB
if (zipCode.Length < 6) return false;
string numberPart = zipCode.Substring(0, 4);
int number;
if (!int.TryParse(numberPart, out number)) return false;
string characterPart = zipCode.Substring(4);
if (numberPart.StartsWith("0")) return false;
if (characterPart.Trim().Length < 2) return false;
if (characterPart.Length == 3 && characterPart.Trim().Length != 2)
return false;
return true;
}
If you use a regular expression, the code is much shorter. A regular expression that matches Dutch ZIP Codes is ^[1-9][0-9]{3}\s?[a-zA-Z]{2}$.
You can use this pattern with the RegEx class that can be found in the System.Text.Regular-Expressions namespace. Example 3-10 shows how you can use the RegEx class to validate a zip code.
Example 3-10. Validate a ZIP Code with a regular expression
static bool ValidateZipCodeRegEx(string zipCode)
{
Match match = Regex.Match(zipCode, @"^[1-9][0-9]{3}\s?[a-zA-Z]{2}$",
RegexOptions.IgnoreCase);
return match.Success;
}
Next to matching application input to a specific pattern, you can also use regular expressions to ensure that input doesn’t contain certain restricted characters. You can use regex to replace those characters with another value to remove them from the input.
Especially when working in the context of a web application, it is important to filter the user input. Imagine that a user inputs some HTML inside an input field that is meant for information such as a name or address. The application doesn’t validate the input and saves it straight to the database. The next time the user visits the application, the HTML is directly rendered as a part of the page. A user can do a lot of harm by using this technique, so it’s important to ensure that input doesn’t contain potentially harmful characters.
Example 3-11 shows an example of using a RegEx expression to remove all excessive use of white space. Every single space is allowed but multiple spaces are replaced with a single space.
Example 3-11. Validate a ZIP Code with a regular expression
RegexOptions options = RegexOptions.None;
Regex regex = new Regex(@"[ ]{2,}", options);
string input = "1 2 3 4 5";
string result = regex.Replace(input, " ");
Console.WriteLine(result); // Displays 1 2 3 4 5
Although regex looks more difficult than writing the validation code in plain C#, it’s definitely worth learning how it works. A regular expression can dramatically simplify your code, and it’s worth examining if you are in a situation requiring validation.
Validating JSON and XML
When exchanging data with other applications, you will often receive JavaScript Object Notation (JSON) or Extensible Markup Language (XML) data. JSON is a popular format that has its roots in the JavaScript world. It’s a compact way to represent some data. XML has a stricter schema and is considered more verbose, but certainly has its uses. It’s important to make sure that this data is valid before you start using it.
Valid JSON starts with { or [, and ends with } or ]. You can easily see whether a string starts with these characters by using the code in Example 3-12.
Example 3-12. Seeing whether a string contains potential JSON data
public static bool IsJson(string input)
{
input = input.Trim();
return input.StartsWith("{") && input.EndsWith("}")
|| input.StartsWith("[") && input.EndsWith("]");
}
Checking only the start and end characters is, of course, not enough to know whether the whole object can be parsed as JSON. The .NET Framework offers the JavaScriptSerializer that you can use to deserialize a JSON string into an object. You can find the JavaScriptSerializer in theSystem.Web.Extensions dynamic-link library (DLL) in the System.Web.Script.Serialization namespace.
Example 3-13 shows how you can use the JavaScriptSerializer. In this case, you are deserializing the data to a Dictionary<string,object>. You can then loop through the dictionary to see the property names and their values.
Example 3-13. Deserializing an object with the JavaScriptSerializer
var serializer = new JavaScriptSerializer();
var result = serializer.Deserialize<Dictionary<string, object>>(json);
If you pass some invalid JSON to this function, an ArgumentException is thrown with a message that starts with “Invalid object passed in”.
An XML file can be described by using an XML Schema Definition (XSD). This XSD can be used to validate an XML file.
Take, for example, the XML file that is described in Example 3-14.
Example 3-14. A sample XML with person data
<?xml version="1.0" encoding="utf-16" ?>
<Person xmlns:xsi="http://www.w3.org/2001/XMLSchema-
instance" xmlns:xsd="http://www.w3.org/2001/XMLSchema">
<FirstName>John</FirstName>
<LastName>Doe</LastName>
<Age>42</Age>
</Person>
You can create an XSD file for this schema by using the XML Schema Definition Tool (Xsd.exe) that is a part of Visual Studio. This tool can generate XML Schema files or C# classes.
The following line will generate an XSD file for the person.xml file:
Xsd.exe person.xml
The tool creates a file called person.xsd. You can see the content of this XSD file in Example 3-15.
Example 3-15. A sample XSD file
<?xml version="1.0" encoding="utf-8"?>
<xs:schema id="NewDataSet" xmlns="" xmlns:xs="http://www.w3.org/2001/XMLSchema"
xmlns:msdata="urn:schemas-microsoft-com:xml-msdata">
<xs:element name="Person">
<xs:complexType>
<xs:sequence>
<xs:element name="FirstName" type="xs:string" minOccurs="0" />
<xs:element name="LastName" type="xs:string" minOccurs="0" />
<xs:element name="Age" type="xs:string" minOccurs="0" />
</xs:sequence>
</xs:complexType>
</xs:element>
<xs:element name="NewDataSet" msdata:IsDataSet="true" msdata:UseCurrentLocale="true">
<xs:complexType>
<xs:choice minOccurs="0" maxOccurs="unbounded">
<xs:element ref="Person" />
</xs:choice>
</xs:complexType>
</xs:element>
</xs:schema>
By default, none of the items in the file is required. It does, however, record which elements are possible and what the structure of the file should look like.
You can now use this XSD file to validate an XML file. Example 3-16 shows a way to do this.
Example 3-16. Validating an XML file with a schema
public void ValidateXML()
{
string xsdPath = "person.xsd";
string xmlPath = "person.xml";
XmlReader reader = XmlReader.Create(xmlPath);
XmlDocument document = new XmlDocument();
document.Schemas.Add("", xsdPath);
document.Load(reader);
ValidationEventHandler eventHandler =
new ValidationEventHandler(ValidationEventHandler);
document.Validate(eventHandler);
}
static void ValidationEventHandler(object sender,
ValidationEventArgs e)
{
switch (e.Severity)
{
case XmlSeverityType.Error:
Console.WriteLine("Error: {0}", e.Message);
break;
case XmlSeverityType.Warning:
Console.WriteLine("Warning {0}", e.Message);
break;
}
}
If there is something wrong with the XML file, such as a non-existing element, the ValidationEventHandler is called. Depending on the type of validation error, you can decide which action to take.
THOUGHT EXPERIMENT
Strange errors
In this thought experiment, apply what you’ve learned about this objective. You can find answers to these questions in the Answers section at the end of this chapter.
You have developed a complex web application and deployed it to production. The application is a new hybrid of wiki and a forum. Users can use it to brainstorm on ideas and write a document together.
Suddenly users start contacting your support desk. They are all reporting “that your application looks strange.” It suddenly contains extra URLs that link to external websites that are mixed with the original website’s layout.
1. What could be the problem?
2. How will you solve it?
Objective summary
§ Validating application input is important to protect your application against both mistakes and attacks.
§ Data integrity should be managed both by your application and your data store.
§ The Parse, TryParse, and Convert functions can be used to convert between types.
§ Regular expressions, or regex, can be used to match input against a specified pattern or replace specified characters with other values.
§ When receiving JSON and XML files, it’s important to validate them using the built-in types, such as with JavaScriptSerializer and XML Schemas.
Objective review
Answer the following questions to test your knowledge of the information in this objective. You can find the answers to these questions and explanations of why each answer choice is correct or incorrect in the Answers section at the end of this chapter.
1. A user needs to enter a DateTime in a text field. You need to parse the value in code. Which method do you use?
a. DateTime.Parse
b. DateTime.TryParse
c. Convert.ToDateTime
d. Regex.Match.
2. You are working on a globalized web application. You need to parse a text field where the user enters an amount of money. Which method do you use?
a. int.TryParse(value, NumberStyles.Currency, UICulture);
b. decimal.TryParse(value, NumberStyles.Currency, UICulture);
c. decimal.TryParse(value, ServerCulture);
d. decimal.TryParse(value)
3. You need to validate an XML file. What do you use?
a. JavaScriptSerializer
b. RegEx
c. StringBuilder
d. XSD
Objective 3.2 Perform symmetric and asymmetric encryption
Security and cryptography are closely related to each other. Some important steps in building a secure application are the authentication of users, making sure your data stays confidential, and ensuring that no one can tamper with your data. The .NET Framework offers several implementations of popular algorithms that you can use to protect your applications.
THIS OBJECTIVE COVERS HOW TO:
§ Use symmetric and asymmetric encryption algorithms.
§ Work with encryption in the .NET Framework.
§ Use hashing.
§ Manage and create certificates.
§ Use the code access permissions from the System.Security namespace.
§ Secure string data.
Using symmetric and asymmetric encryption
Security is about keeping secrets. You can use complex algorithms to encrypt your data, but if you can’t keep your passwords and codes secret, everyone will be able to read your private data.
Cryptography is about encrypting and decrypting data. With encryption, you take a piece of plain text (regular text that’s human readable) and then run an algorithm over it. The resulting data looks like a random byte sequence, often called ciphertext. Decryption is the opposite process: The byte sequence is transformed into the original plain text data.
In cryptography, you can keep your algorithm secret, or you can use a public algorithm and keep your key secret.
Keeping your algorithm secret is often impractical because you would need to switch algorithms each time someone leaked the algorithm. Instead a key is kept secret. A key is used by an algorithm to control the encryption process. An encryption key is the same as a regular password: It shouldn’t be easy to guess the key you have chosen.
Another advantage of making the algorithm public is that it’s extensively tested. When a successor for the widespread Data Encryption Standard (DES) algorithm became necessary, the American National Institute of Standards and Technology (NIST) invited anyone to submit new algorithms. After the submission period was closed, NIST made the source code for these algorithms public and invited everyone to break them. Some algorithms were broken in a matter of days, and only a small number made it to the final round. Making those algorithms public improved security.
Because the algorithm is public, the key is the thing that should be kept private. The difference in symmetric and asymmetric encryption strategies lies in the way this key is used. A symmetric algorithm uses one single key to encrypt and decrypt the data. You need to pass your original key to the receiver so he can decrypt your data. And this automatically leads to the problem of securely exchanging keys.
This is where an asymmetric algorithm can be used. An asymmetric algorithm uses two different keys that are mathematically related to each other. Although they are related, it’s infeasible to determine one when you know the other. One key is completely public and can be read and used by everyone. The other part is private and should never be shared with someone else. When you encrypt something with the public key, it can be decrypted by using the private key, and vice versa.
Another difference between symmetric and asymmetric encryption has to do with performance and message size. Symmetric encryption is faster than asymmetric encryption and is well-suited for larger data sets. Asymmetric encryption is not optimized for encrypting long messages, but it can be very useful for decrypting a small key. Combining these two techniques can help you transmit large amounts of data in an encrypted way.
Let’s say that Bob and Alice want to send each other a message. They take the following steps:
1. Alice and Bob both generate their own asymmetric key pair.
2. They send each other their public key and keep their private key secret.
3. They both generate a symmetric key and encrypt it only with the other parties’ public key (so that it can be encrypted by the private key of the other person).
4. They send their own encrypted symmetric key to one another and decrypt the others symmetric key with their own private key.
5. To send a confidential message, they use the symmetric key of the other person and use it to encrypt their message.
6. The receiving person decrypts the message with their own symmetric key.
As you can see, the asymmetric encryption is used to encrypt a symmetric key. After the key is safely transmitted, Bob and Alice can use it to send larger messages to one another.
Next to using a key, another important concept in cryptography is the initialization vector (IV). An IV is used to add some randomness to encrypting data. If encrypting the same text would always give the same results, this could be used by a potential attacker to break the encryption. The IV makes sure that the same data results in a different encrypted message each time.
EXAM TIP
Try to remember the differences between symmetric and asymmetric algorithms. A symmetric algorithm uses one key; an asymmetric algorithm uses two: a key pair that consists of both a public and a private key.
MORE INFO: SYMMETRIC AND ASYMMETRIC ENCRYPTION
If you want to know more about encryption a good place to start is http://msdn.microsoft.com/en-us/library/0ss79b2x.aspx.
Working with encryption in the .NET Framework
The .NET Framework offers an extensive set of algorithms for both symmetric and asymmetric encryption.
One symmetric algorithm is the Advanced Encryption Standard (AES). AES is adopted by the U.S. government and is becoming the standard worldwide for both governmental and business use. The .NET Framework has a managed implementation of the AES algorithm in the AesManagedclass. All cryptography classes can be found in the System.Security.Cryptography class.
Example 3-17 shows an example of using this algorithm to encrypt and decrypt a piece of text. As you can see, AES is a symmetric algorithm that uses a key and IV for encryption. By using the same key and IV, you can decrypt a piece of text. The cryptography classes all work on byte sequences.
Example 3-17. Use a symmetric encryption algorithm
public static void EncryptSomeText()
{
string original = "My secret data!";
using (SymmetricAlgorithm symmetricAlgorithm =
new AesManaged())
{
byte[] encrypted = Encrypt(symmetricAlgorithm, original);
string roundtrip = Decrypt(symmetricAlgorithm, encrypted);
// Displays: My secret data!
Console.WriteLine("Original: {0}", original);
Console.WriteLine("Round Trip: {0}", roundtrip);
}
}
static byte[] Encrypt(SymmetricAlgorithm aesAlg, string plainText)
{
ICryptoTransform encryptor = aesAlg.CreateEncryptor(aesAlg.Key, aesAlg.IV);
using (MemoryStream msEncrypt = new MemoryStream())
{
using (CryptoStream csEncrypt =
new CryptoStream(msEncrypt, encryptor, CryptoStreamMode.Write))
{
using (StreamWriter swEncrypt = new StreamWriter(csEncrypt))
{
swEncrypt.Write(plainText);
}
return msEncrypt.ToArray();
}
}
}
static string Decrypt(SymmetricAlgorithm aesAlg, byte[] cipherText)
{
ICryptoTransform decryptor = aesAlg.CreateDecryptor(aesAlg.Key, aesAlg.IV);
using (MemoryStream msDecrypt = new MemoryStream(cipherText))
{
using (CryptoStream csDecrypt =
new CryptoStream(msDecrypt, decryptor, CryptoStreamMode.Read))
{
using (StreamReader srDecrypt = new StreamReader(csDecrypt))
{
return srDecrypt.ReadToEnd();
}
}
}
}
The SymmetricAlgorithm class has both a method for creating an encryptor and a decryptor. By using the CryptoStream class, you can encrypt or decrypt a byte sequence.
The .NET Framework also has support for asymmetric encryption. You can use the RSACryptoServiceProvider and DSACryptoServiceProvider classes. When working with asymmetric encryption, you typically use the public key from another party. You encrypt the data using the public key so only the other party can decrypt the data with their private key.
Example 3-18 shows how you can create a new instance of the RSACryptoServiceProvider and export the public key to XML. By passing true to the ToXmlString method, you also export the private part of your key.
Example 3-18. Exporting a public key
RSACryptoServiceProvider rsa = new RSACryptoServiceProvider();
string publicKeyXML = rsa.ToXmlString(false);
string privateKeyXML = rsa.ToXmlString(true);
Console.WriteLine(publicKeyXML);
Console.WriteLine(privateKeyXML);
// Displays:
//<RSAKeyValue>
// <Modulus>
// tYo35ywT0Q0KCNhFPu207bS8rrTk91YaxNcD2ElQ1eoWpdYnoCsdj1KaW/
as9zFLYW5slg5Qq8ltdkxZuU//
fh0j2t+7ZFH8RRAD808GkZTrUi1zv3yqMjQDphHOcNfWh+dQrPmp1ShFxEGuA9Y4Ij9RINU5jcfviPa
// B1ClLXaGbc=
// </Modulus>
// <Exponent>AQAB</Exponent>
//</RSAKeyValue>
//<RSAKeyValue>
// <Modulus>
// tYo35ywT0Q0KCNhFPu207bS8rrTk91YaxNcD2ElQ1eoWpdYnoCsdj1KaW/as9zFLYW5slg5Qq8ltdkxZuU
// fh0j2t+7ZFH8RRAD808GkZTrUi1zv3yqMjQDphHOcNfWh+dQrPmp1ShFxEGuA9Y4Ij9RINU5jcfviPa
// B1ClLXaGbc=
// </Modulus>
// <Exponent>AQAB</Exponent>
// <P>
// 4uhNaN3cPSUzr+KxHmpKyeaD39RT+kWjjDcn/9sTAV/HmDzFzjsiov3KyJ+3XCXucx5TU0lhDOLc/
// cO+Xrquqw==
// </P>
// <Q>
// zNDVw6oL7YNglrFAeqmgIL3Oj2PkUxrWvoYHCbuFwJKpkWvFBRwZfKXHzzU0zaU5bGdX7M24hW8z5s0
// eF9CRJQ==
// </Q>
// <DP>
// jkS+/GhWxZPEw5vsF7jnaY3502ZqvPna4HhYwQgX832dRKueDn9vaSidc4sIyWMTDeTOs+LHUfAQRZ/
// shbKg/w==
// </DP>
// <DQ>
// HV4QWJboUO0Wi2Ts/umViTxOAudq1LOzeOwU1ENsITmmULCoNlxaFzJaHQ7e/GGlgzKqO80fmRph0c
// U1fGqudQ==
// </DQ>
// <InverseQ>
// BW1VUOgXpkRnn2twvb72uxcbK6+o9ns3xa4Ypm+++7vzlg6t/Iyvk94xNJWjjgR+XsSpN6JEtztWol8
// bv8HEyA==
// </InverseQ>
// <D>
// IOZUrUNyr+8iA2pWWkowAOhBTZQg7qYfIc8ptjfLO4k544IFGmTV7ZR1vvbcb8vyMk0Vxrf/bLKLcOX
// zWL2rMeWYGuoTbZEeUbr0SlmesHARL7X/feCm9MIyPjhlhJieRVG3h4f+TyAVo70jmYVcSou+xAaad3
// 7o3Pa8Vny6qIk=
// </D>
//</RSAKeyValue>
The public key is the part you want to publish so others can use it to encrypt data. You can send it to someone directly or publish it on a website that belongs to you. Example 3-19 shows an example of using a public key to encrypt data and decrypt it with the private key.
Example 3-19. Using a public and private key to encrypt and decrypt data
UnicodeEncoding ByteConverter = new UnicodeEncoding();
byte[] dataToEncrypt = ByteConverter.GetBytes("My Secret Data!");
byte[] encryptedData;
using (RSACryptoServiceProvider RSA = new RSACryptoServiceProvider())
{
RSA.FromXmlString(publicKeyXML);
encryptedData = RSA.Encrypt(dataToEncrypt, false);
}
byte[] decryptedData;
using (RSACryptoServiceProvider RSA = new RSACryptoServiceProvider())
{
RSA.FromXmlString(privateKeyXML);
decryptedData = RSA.Decrypt(encryptedData, false);
}
string decryptedString = ByteConverter.GetString(decryptedData);
Console.WriteLine(decryptedString); // Displays: My Secret Data!
As you can see, you first need to convert the data you want to encrypt to a byte sequence. To encrypt the data, you need only the public key. You then use the private key to decrypt the data.
Because of this, it’s important to store the private key in a secure location. If you would store it in plain text on disk or even in a nonsecure memory location, your private key could be extracted and your security would be compromised.
The .NET Framework offers a secure location for storing asymmetric keys in a key container. A key container can be specific to a user or to the whole machine. Example 3-20 shows how to configure an RSACryptoServiceProvider to use a key container for saving and loading the asymmetric key.
Example 3-20. Using a key container for storing an asymmetric key
string containerName = "SecretContainer";
CspParameters csp = new CspParameters() { KeyContainerName = containerName };
byte[] encryptedData;
using (RSACryptoServiceProvider RSA = new RSACryptoServiceProvider(csp))
{
encryptedData = RSA.Encrypt(dataToEncrypt, false);
}
Loading the key from the key container is the exact same process. You can securely store your asymmetric key without malicious users being able to read it.
Using hashing
To understand what hashing is and see some of the ideas behind a hash code, take a look at Example 3-21. Example 3-21 shows an example of how you can implement a set class. A set stores only unique items, so it sees whether an item already exists before adding it.
Example 3-21. A naïve set implementation
class Set<T>
{
private List<T> list = new List<T>();
public void Insert(T item)
{
if (!Contains(item))
list.Add(item);
}
public bool Contains(T item)
{
foreach (T member in list)
if (member.Equals(item))
return true;
return false;
}
}
For each item that you add, you have to loop through all existing items. This doesn’t scale well and leads to performance problems when you have a large amount of items. It would be nice if you somehow needed to check only a small subgroup instead of all the items.
This is where a hash code can be used. Hashing is the process of taking a large set of data and mapping it to a smaller data set of fixed length. For example, mapping all names to a specific integer. Instead of checking the complete name, you would have to use only an integer value.
By using hashing, you can improve the design of the set class. You split the data in a set of buckets. Each bucket contains a subgroup of all the items in the set. Example 3-22 shows how you can do this.
Example 3-22. A set implementation that uses hashing
class Set<T>
{
private List<T>[] buckets = new List<T>[100];
public void Insert(T item)
{
int bucket = GetBucket(item.GetHashCode());
if (Contains(item, bucket))
return;
if (buckets[bucket] == null)
buckets[bucket] = new List<T>();
buckets[bucket].Add(item);
}
public bool Contains(T item)
{
return Contains(item, GetBucket(item.GetHashCode()));
}
private int GetBucket(int hashcode)
{
// A Hash code can be negative. To make sure that you end up with a positive
// value cast the value to an unsigned int. The unchecked block makes sure that
// you can cast a value larger then int to an int safely.
unchecked
{
return (int)((uint)hashcode % (uint)buckets.Length);
}
}
private bool Contains(T item, int bucket)
{
if (buckets[bucket] != null)
foreach (T member in buckets[bucket])
if (member.Equals(item))
return true;
return false;
}
}
If you look at the Contains method, you can see that it uses the GetHashCode method of each item. This method is defined on the base class Object. In each type, you can override this method and provide a specific implementation for your type. This method should output an integer code that describes your particular object. As a general guideline, the distribution of hash codes must be as random as possible. This is why the set implementation uses the GetHashCode method on each object to calculate in which bucket it should go.
Now your items are distributed over a hundred buckets instead of one single bucket. When you see whether an item exists, you first calculate the hash code, go to the corresponding bucket, and look for the item.
This technique is used by the Hashtable and Dictionary classes in the .NET Framework. Both use the hash code to store and access items. Hashtable is nongeneric collection; Dictionary is a generic collection.
A couple of important principles can be deduced from this. First of all, equal items should have equal hash codes. This means that you can check to determine whether two items are equal by checking their hash codes. It also means that your implementation of GetHashCode should return the same value during time. It shouldn’t depend on changing values such as the current date or time.
MORE INFO: IMPLEMENTING GETHASHCODE
For more information on how to implement GetHashCode correctly, see http://msdn.microsoft.com/en-us/library/system.object.gethashcode(v=vs.110).aspx.
These properties are important when looking at hashing in a security context. If you hash a paragraph of text and change only one letter, the hash code will change, so hashing is used to check the integrity of a message.
For example, let’s say that Alice and Bob want to send a message to each other. Alice creates a hash of the message and sends both the hash and the message to Bob. Bob creates a hash of the message he has received from Alice and compares the two hash codes with each other. If they match, Bob knows he has received the correct message.
Of course, without any additional encryption, a third party can still tamper with the message by changing both the message and the hash code. Combined with the encryption technologies that the .NET Framework offers, hashing is an important technique to validate the authenticity of a message.
The .NET Framework offers a couple of classes to generate hash values. The algorithms that the .NET Framework offers are optimized hashing algorithms that output a significantly different hash code for a small change in the data.
Example 3-23 shows an example of using the SHA256Managed algorithm to calculate the hash code for a piece of text.
Example 3-23. Using SHA256Managed to calculate a hash code
UnicodeEncoding byteConverter = new UnicodeEncoding();
SHA256 sha256 = SHA256.Create();
string data = "A paragraph of text";
byte[] hashA = sha256.ComputeHash(byteConverter.GetBytes(data));
data = "A paragraph of changed text";
byte[] hashB = sha256.ComputeHash(byteConverter.GetBytes(data));
data = "A paragraph of text";
byte[] hashC = sha256.ComputeHash(byteConverter.GetBytes(data));
Console.WriteLine(hashA.SequenceEqual(hashB)); // Displays: false
Console.WriteLine(hashA.SequenceEqual(hashC)); // Displays: true
As you can see, different strings give a different hash code and the same string gives the exact same hash code. This enables you to see whether a string has been altered by comparing the hash codes.
Managing and creating certificates
Digital certificates are the area where both hashing and asymmetric encryption come together. A digital certificate authenticates the identity of any object signed by the certificate. It also helps with protecting the integrity of data.
If Alice sends a message to Bob, she first hashes her message to generate a hash code. Alice then encrypts the hash code with her private key to create a personal signature. Bob receives Alice’s message and signature. He decrypts the signature using Alice’s public key and now he has both the message and the hash code. He can then hash the message and see whether his hash code and the hash code from Alice match.
A digital certificate is part of a Public Key Infrastructure (PKI). A PKI is a system of digital certificates, certificate authorities, and other registration authorities that authenticate and verify the validity of each involved party.
A Certificate Authority (CA) is a third-party issuer of certificates that is considered trustworthy by all parties. The CA issues certificates, or certs, that contain a public key, a subject to which the certificate is issued, and the details of the CA.
When working on your development or testing environment, you can create certificates by using the Makecert.exe tool. This tool generates X.509 certificates for testing purposes. The X.509 certificate is a widely used standard for defining digital certificates.
If you open a developer command prompt as administrator, you can run the following command to generate a testing certificate:
makecert testCert.cer
This command generates a file called testCert.cer that you can use as a certificate. You first need to install this certificate on your computer to be able to use it. After installation, it’s stored in a certificate store. The following line creates a certificate and installs it in a custom certificate store named testCertStore:
makecert -n "CN=WouterDeKort" -sr currentuser -ss testCertStore
Example 3-24 shows how to use this generated certificate to sign and verify some text. The data is hashed and then signed. When verifying, the same hash algorithm is used to make sure the data has not changed.
Example 3-24. Signing and verifying data with a certificate
public static void SignAndVerify()
{
string textToSign = "Test paragraph";
byte[] signature = Sign(textToSign, "cn=WouterDeKort");
// Uncomment this line to make the verification step fail
// signature[0] = 0;
Console.WriteLine(Verify(textToSign, signature));
}
static byte[] Sign(string text, string certSubject)
{
X509Certificate2 cert = GetCertificate();
var csp = (RSACryptoServiceProvider)cert.PrivateKey;
byte[] hash = HashData(text);
return csp.SignHash(hash, CryptoConfig.MapNameToOID("SHA1"));
}
static bool Verify(string text, byte[] signature)
{
X509Certificate2 cert = GetCertificate();
var csp = (RSACryptoServiceProvider)cert.PublicKey.Key;
byte[] hash = HashData(text);
return csp.VerifyHash(hash,
CryptoConfig.MapNameToOID("SHA1"),
signature);
}
private static byte[] HashData(string text)
{
HashAlgorithm hashAlgorithm = new SHA1Managed();
UnicodeEncoding encoding = new UnicodeEncoding();
byte[] data = encoding.GetBytes(text);
byte[] hash = hashAlgorithm .ComputeHash(data);
return hash;
}
private static X509Certificate2 GetCertificate()
{
X509Store my = new X509Store("testCertStore",
StoreLocation.CurrentUser);
my.Open(OpenFlags.ReadOnly);
var certificate = my.Certificates[0];
return certificate;
}
The SignHash method uses the private key of the certificate to create a signature for the data. VerifyHash uses the public key of the certificate to see whether the data has changed.
MORE INFO: USING MAKECERT.EXE
For more information on how to use makecert.exe, see http://msdn.microsoft.com/en-us/library/bfsktky3(v=vs.110).aspx.
One use of digital certificates is to secure Internet communication. The popular HTTPS communication protocol is used to secure communication between a web server and a client. Digital certificates are used to make sure that the client is talking to the correct web server, not to an imposter.
Using code access permissions
The days when the only way to get a program on your computer was by using a floppy disk to install it to your hard drive are long gone. Today, you can install programs from a variety of sources, which can lead to several security issues. Your computer is probably running a virus scanner, and you’re in the habit of making sure that you know the sender of an e-mail message before you open an attachment.
The .NET Framework helps you protect your computers from malicious code via a mechanism called code access security (CAS). Instead of giving every application full trust, applications can be restricted on the types of resources they can access and the operations they can execute.
When using CAS, your code is the untrusted party. You need to ask for permission to execute certain operations or access protected resources. The common language runtime (CLR) enforces security restrictions on managed code and makes sure that your code has the correct permissions to access privileged resources.
Applications that are installed on your computer or on your local intranet have full trust. They can access resources and execute all kinds of operations. When running in a sandboxed environment such as Internet Explorer or SQL Server, CAS restricts the operations that an application can execute.
Each code access permission represents one of the following rights:
§ The right to access a protected resource, such as a file
§ The right to perform a protected operation, such as accessing unmanaged code
It can also be that you are creating a plug-in system and you want to make sure that third-party plug-ins can’t compromise your security. CAS can then be used to restrict the things a plug-in is allowed to do.
CAS performs the following functions in the .NET Framework:
§ Defines permissions for accessing system resources.
§ Enables code to demand that its callers have specific permissions. For example, a library that exposes methods that create files should enforce that its callers have the right for file input/output.
§ Enables code to demand that its callers possess a digital signature. This way, code can make sure that it’s only called by callers from a particular organization or location.
§ Enforces all those restrictions at runtime.
One important concept of CAS is that each and every element on the current call stack is checked. The call stack is a data structure that stores information about all the active methods at a specific moment. So if your application starts in the Main method and then calls method A which calls method B, all three methods will be on the call stack. When method B returns, only Main and A are on the call stack.
CAS walks the call stack and sees whether every element on the stack has the required permissions. This way, you can be sure that a less-trusted method cannot call some restricted code through a highly trusted method.
The base class for all things related to CAS is System.Security.CodeAccessPermission. Permissions that inherit from CodeAccessPermission are permissions such as FileIOPermission, ReflectionPermission, or SecurityPermission. When applying one of those permissions, you ask the CLR for the permission to execute a protected operation or access a resource.
You can specify CAS in two ways: declarative or imperative.
Declarative means that you use attributes to apply security information to your code. Example 3-25 shows an example of asking for the permission to read all local files by using the FileIOPermissionAttribute.
Example 3-25. Declarative CAS
[FileIOPermission(SecurityAction.Demand,
AllLocalFiles = FileIOPermissionAccess.Read)]
public void DeclarativeCAS()
{
// Method body
}
You can also do this in an imperative way, which means that you explicitly ask for the permission in the code. Example 3-26 shows how you can create a new instance of FileIOPermission and demand certain rights.
Example 3-26. Imperative CAS
FileIOPermission f = new FileIOPermission(PermissionState.None);
f.AllLocalFiles = FileIOPermissionAccess.Read;
try
{
f.Demand();
}
catch (SecurityException s)
{
Console.WriteLine(s.Message);
}
MORE INFO: CODE ACCESS SECURITY
For more information about CAS, see http://msdn.microsoft.com/en-us/library/c5tk9z76.aspx.
Securing string data
A lot of data in your application consists of simple strings. For example, passwords and credit card numbers are both strings. But the default System.String implementation is not optimized for security. Using a string for storing sensitive data has a couple of problems:
§ The string value can be moved around in memory by the garbage collector leaving multiple copies around.
§ The string value is not encrypted. If you run low on memory, it could be that your string is written as plain text to a page file on disk. The same could happen when your application crashes and a memory dump is made.
§ System.String is immutable. Each change will make a copy of the data, leaving multiple copies around in memory.
§ It’s impossible to force the garbage collector to remove all copies of your string from memory.
The .NET Framework offers a special class that can help you minimize the surface area an attacker has: System.Security.SecureString.
A SecureString automatically encrypts its value so the possibility of an attacker finding a plain text version of your string is decreased. A SecureString is also pinned to a specific memory location. The garbage collector doesn’t move the string around, so you avoid the problem of having multiple copies. SecureString is a mutable string that can be made read-only when necessary. Finally, SecureString implements IDisposable so you can make sure that its content is removed from memory whenever you’re done with it.
MORE INFO: IDISPOSABLE AND GARBAGE COLLECTION
For more info on what IDisposable is and how to use it, see Chapter 2. Chapter 2 also discusses how the garbage collector works.
A SecureString doesn’t completely solve all security problems. Because it needs to be initialized at some point, the data that is used to initialize the SecureString is still in memory. To minimize this risk and force you to think about it, SecureString can deal with only individual characters at a time. It’s not possible to pass a string directly to a SecureString. Example 3-27 shows an example of using a SecureString. The application reads one character at a time from the user and appends these characters to the SecureString.
Example 3-27. Initializing a SecureString
using (SecureString ss = new SecureString())
{
Console.Write("Please enter password: ");
while (true)
{
ConsoleKeyInfo cki = Console.ReadKey(true);
if (cki.Key == ConsoleKey.Enter) break;
ss.AppendChar(cki.KeyChar);
Console.Write("*");
}
ss.MakeReadOnly();
}
As you can see, the SecureString is used with a using statement, so the Dispose method is called when you are done with the string so that it doesn’t stay in memory any longer then strictly necessary.
At some point, you probably want to convert the SecureString back to a normal string so you can use it. The .NET Framework offers some special functionality for this. It’s important to make sure that the regular string is cleared from memory as soon as possible. This is why there is atry/finally statement around the code. The finally statement makes sure that the string is removed from memory even if there is an exception thrown in the code. Example 3-28 shows an example of how to do this.
Example 3-28. Getting the value of a SecureString
public static void ConvertToUnsecureString(SecureString securePassword)
{
IntPtr unmanagedString = IntPtr.Zero;
try
{
unmanagedString = Marshal.SecureStringToGlobalAllocUnicode(securePassword);
Console.WriteLine(Marshal.PtrToStringUni(unmanagedString));
}
finally
{
Marshal.ZeroFreeGlobalAllocUnicode(unmanagedString);
}
}
The Marshal class is located in the System.Runtime.InteropServices namespace. It offers five methods that can be used when you are decrypting a SecureString. Those methods accept a SecureString and return an IntPtr. Each method has a corresponding method that you need to call to zero out the internal buffer. Table 3-1 shows these methods.
Table 3-1. Methods for working with SecureString
|
Decrypt method |
Clear memory method |
|
SecureStringToBSTR |
ZeroFreeBSTR |
|
SecureStringToCoTaskMemAnsi |
ZeroFreeCoTaskMemAnsi |
|
SecureStringToCoTaskMemUnicode |
ZeroFreeCoTaskMemUnicode |
|
SecureStringToGlobalAllocAnsi |
ZeroFreeGlobalAllocAnsi |
|
SecureStringToGlobalAllocUnicode |
ZeroFreeGlobalAllocUnicode |
It’s important to realize that a SecureString is not completely secure. You can create an application, running in full thrust, which will be able to read the SecureString content. However, it does add to the complexity of hacking your application. All the small steps you can take to make your application more secure will create a bigger hindrance for an attacker.
THOUGHT EXPERIMENT
Choosing your technologies
In this thought experiment, apply what you’ve learned about this objective. You can find answers to these questions in the Answers section at the end of this chapter.
You are working on an application that helps users track their time and shows them when they are most productive. The application runs on a server with a web, desktop, and mobile front end being developed with the .NET Framework.
You are assigned the task of determining which security features should be used in the application.
Make a list of the possible technologies that can be used to secure the application.
Objective summary
§ A symmetric algorithm uses the same key to encrypt and decrypt data.
§ An asymmetric algorithm uses a public and private key that are mathematically linked.
§ Hashing is the process of converting a large amount of data to a smaller hash code.
§ Digital certificates can be used to verify the authenticity of an author.
§ CAS are used to restrict the resources and operations an application can access and execute.
§ System.Security.SecureString can be used to keep sensitive string data in memory.
Objective review
Answer the following questions to test your knowledge of the information in this objective. You can find the answers to these questions and explanations of why each answer choice is correct or incorrect in the Answers section at the end of this chapter.
1. Bob and Alice are using an asymmetric algorithm to exchange data. Which key should they send to the other party to make this possible?
a. Bob sends Alice his private key, and Alice sends Bob her public key.
b. Bob sends Alice his private key, and Alice sends Bob her private key.
c. Bob sends Alice his public key, and Alice sends Bob her public key.
d. Bob sends Alice his public key, and Alice sends Bob her private key.
2. You need to encrypt a large amount of data. Which algorithm do you use?
a. SHA256
b. RSACryptoServiceProvider
c. MD5CryptoServiceProvider
d. AesManaged
3. You need to send sensitive data to another party and you want to make sure that no one tampers with the data. Which method do you use?
a. X509Certificate2.SignHash
b. RSACryptoServiceProvider.Encrypt
c. UnicodeEncoding.GetBytes
d. Marshal.ZeroFreeBSTR
Objective 3.3 Manage assemblies
When building your applications, you work with source code files and projects, but this is not the way your application is deployed. The C# compiler takes your source code and produces assemblies. Managing those assemblies is important when you are deploying applications to production environments or distributing them to other parties.
THIS OBJECTIVE COVERS HOW TO:
§ Explain what an assembly is.
§ Sign assemblies using strong names.
§ Put an assembly in the GAC.
§ Version assemblies and implement side-by-side hosting.
§ Create a WinMD assembly.
What is an assembly?
Before Microsoft released the .NET Framework, the Component Object Model (COM) was dominant, but there were several problems.
One of those problems was known as “DLL hell.” Microsoft and other software companies distributed DLLs that can be used as building blocks by other applications. Problems start to arise when a company distributes a new version of a DLL without fully testing it against all applications that depend on it (which can be numerous applications which makes thorough testing almost impossible). Updating one application can lead to problems in another, seemingly unrelated applications.
Another problem had to do with the way applications were installed. Often an application would have to make changes to several parts of your system. Of course, there would be application directories copied to your system, but also changes were made to the registry and shortcuts were deployed. This made the installation process more difficult because uninstalling an application is hard and sometimes leaves traces of an application behind.
A third issue is security. Because applications made so many changes during installation, it was hard for a user to determine what was actually installed. It could be that one application in turn installs other components that form a security risk.
The .NET Framework addresses these issues and tries to solve them by making some radical changes. One important component of those changes is the concept of an assembly. An assembly still has the .dll (or .exe) extension like previous Windows components. Internally, however, they are completely different.
Assemblies are completely self-contained; they don’t need to write any information to the registry or some other location. Assemblies contain all the information they need to run. This is called the assembly’s manifest.
Another important aspect is that an assembly is language-neutral. You can write some C# code, compile it to an assembly, and then use the assembly directly from other .NET languages such as F# or Visual Basic.
In contrast to an old DLL, an assembly can be versioned, which enables you to have different versions of a specific assembly on one system without causing conflicts.
One other important change is the way assemblies are deployed. If you want, you can deploy an application by simply copying it to a new machine. All the assemblies that are required are deployed locally in the new application folder. An assembly can even contain resource files, such as images, that are directly embedded in the assembly. You can also choose to deploy an assembly in a shared way so it can be used by multiple applications.
Signing assemblies using a strong name
The CLR supports two different types of assemblies: strong-named assemblies and regular assemblies.
A regular assembly is what Visual Studio generates for you by default. It’s structurally identical to a strong-named assembly. They both contain metadata, header, manifest, and all the types that are in your assembly.
A strong-named assembly is signed with a public/private key pair that uniquely identifies the publisher of the assembly and the content of the assembly. A strong name consists of the simple text name of the assembly, its version number, and culture information. It also contains a public key and a digital signature.
Strongly naming an assembly has several benefits:
§ Strong names guarantee uniqueness. Your unique private key is used to generate the name for your assembly. No other assembly can have the exact same strong name.
§ Strong names protect your versioning lineage. Because you control the private key, you are the only one who can distribute updates to your assemblies. Users can be sure that the new version originates from the same publisher.
§ Strong names provide a strong integrity check. The .NET Framework sees whether a strong-named assembly has changed since the moment it was signed.
Overall, you can see that a strong-named assembly ensures a user that they can trust the origin and content of an assembly.
You generate a strong-named assembly by using your own private key to sign the assembly. Other users can verify the assembly by using the public key that is distributed with the assembly.
MORE INFO: PUBLIC AND PRIVATE KEY USAGE
For more information on using private and public keys to generate a digital signature see the section “Objective 3.2: Perform symmetric and asymmetric encryption” earlier in this chapter.
Signing an assembly can be done both at the command line and by using Visual Studio. The first step you have to take is to generate a key pair. A key pair is usually a file with an .snk extension that contains your public/private key information.
When using the developer command prompt, you can run the following command to generate a new key pair file:
sn -k myKey.snk
An easier way is to use Visual Studio to generate the key pair file for you. You can open the property page of the project you want to sign and then navigate to the Signing tab, as shown in Figure 3-1.
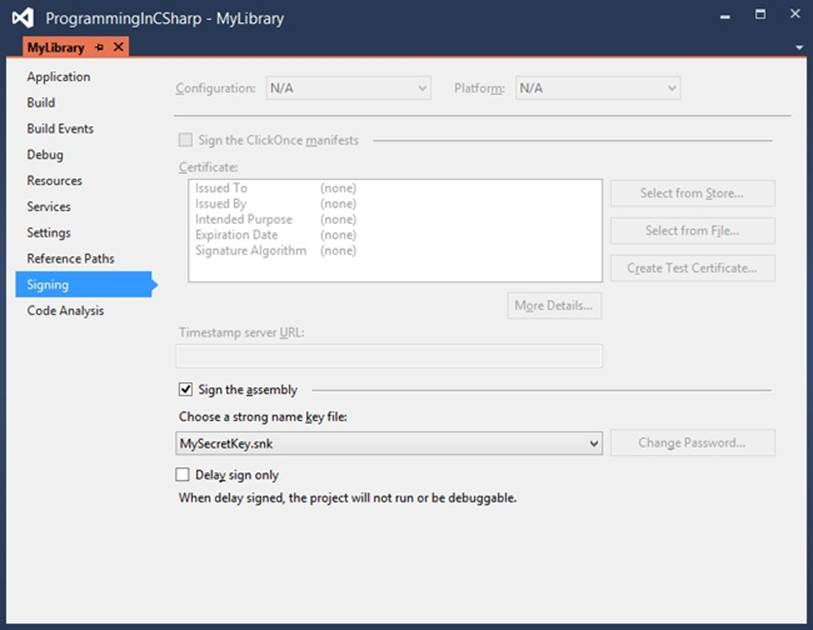
Figure 3-1. The Signing page in Visual Studio
By enabling the signing of the assembly, you can let Visual Studio generate a new key file, which is then added to your project and is used in the compilation step to strongly sign your assembly.
A strong-named assembly can reference only other assemblies that are also strongly named. This is to avoid security flaws where a depending assembly could be changed to influence the behavior of a strong-named assembly. When you add a reference to a regular assembly and try to invoke code from that assembly, the compiler issues an error:
Assembly generation failed -- Referenced assembly 'MyLib' does not have a strong name
After signing an assembly, you can view the public key by using the Strong Name tool (Sn.exe) that’s installed with Visual Studio. One of the strongly named assemblies that’s installed with the .NET Framework is System.Data. Example 3-29 shows how you can get the public key of this assembly.
Example 3-29. Inspecting the public key of a signed assembly
C:\>sn -Tp C:\Windows\Microsoft.NET\Framework\v4.0.30319\System.D
ata.dll
Microsoft (R) .NET Framework Strong Name Utility Version 4.0.30319.17929
Copyright (c) Microsoft Corporation. All rights reserved.
Identity public key (hash algorithm: Unknown):
00000000000000000400000000000000
Signature public key (hash algorithm: sha256):
002400000c800000140100000602000000240000525341310008000001000100613399aff18ef1
a2c2514a273a42d9042b72321f1757102df9ebada69923e2738406c21e5b801552ab8d200a65a2
35e001ac9adc25f2d811eb09496a4c6a59d4619589c69f5baf0c4179a47311d92555cd006acc8b
5959f2bd6e10e360c34537a1d266da8085856583c85d81da7f3ec01ed9564c58d93d713cd0172c
8e23a10f0239b80c96b07736f5d8b022542a4e74251a5f432824318b3539a5a087f8e53d2f135f
9ca47f3bb2e10aff0af0849504fb7cea3ff192dc8de0edad64c68efde34c56d302ad55fd6e80f3
02d5efcdeae953658d3452561b5f36c542efdbdd9f888538d374cef106acf7d93a4445c3c73cd9
11f0571aaf3d54da12b11ddec375b3
Public key token is b77a5c561934e089
The public key token is a small string that represents the public key. It is generated by hashing the public key and taking the last eight bytes. If you reference another assembly, you store only the public key token, which preserves space in the assembly manifest. The CLR does not use the public key token when making security decisions because it could happen that several public keys have the same public key token.
Within an organization, it’s important to secure the private key. If all employees have access to the private key, someone might leak or steal the key. They are then able to distribute assemblies that look legitimate. But without access to the private key, developers can’t sign the assembly and use it while building the application.
To avoid this problem, you can use a feature called delayed or partial signing. When using delayed signing, you use only the public key to sign an assembly and you delay using the private key until the project is ready for deployment. If you look at Figure 3-1, you can see that there is an option to activate delayed signing in Visual Studio.
IMPORTANT: ORIGIN OF A STRONG-NAMED ASSEMBLY
One thing that’s important to understand is that a strongly named assembly does not prove that the assembly comes from the original publisher. It only shows that the person who created the assembly has access to the private key.
If you want to make sure that users can verify you as the publisher, you have to use something called Authenticode. Authenticode is a technology that uses digital certificates to identify the publisher of an application. You need to buy a certificate online and then use that certificate to sign your application.
For more information on Authenticode, see http://technet.microsoft.com/en-us/library/cc750035.aspx.
Putting an assembly in the GAC
Assemblies that are local to an application are called private assemblies. You can easily deploy an application that depends on private assemblies by copying it to a new location.
Another way to deploy an assembly is to deploy it to the global assembly cache (GAC). The GAC is a specialized library for storing assemblies. It is machine-wide and it is one of the locations the CLR checks when looking for an assembly.
Normally, you want to avoid installing assemblies in the GAC. One reason to deploy to the GAC is when an assembly is shared by multiple applications. Other reasons for installing an assembly into the GAC can be the enhanced security (normally only users with administrator rights can alter the GAC) or the situation where you want to deploy multiple versions of the same assembly.
Deploying an assembly in the GAC can be done in two ways:
§ For production scenarios, use a specific installation program that has access to the GAC such as the Windows Installer 2.0.
§ In development scenarios, use a tool called the Global Assembly Cache tool (Gacutil.exe).
You can view the content of your GAC by running the following command from a developer command prompt:
gacutil -l
This returns a list of all the assemblies that are installed in the GAC.
Installing an assembly in the GAC can be done with the following command:
gacutil –i [assembly name]
You can also remove an assembly from the GAC:
gacutil –u [assembly name]
When referencing a shared assembly from your project, you can add a reference to the file located in the GAC or to a local copy of it. When Visual Studio detects that there is a GAC version of the DLL you are referencing, it will add a reference to the GAC, not to the local version.
Versioning assemblies
In stark contrast with how DLLs worked before the .NET Framework, an assembly has a version number. Inside the assembly manifest, the assembly records its own version number and the version numbers of all the assemblies that it references.
Each assembly has a version number that has the following format:
{Major Version}.{Minor Version}.{Build Number}.{Revision}
§ The Major Version is manually incremented for each major release. A major release should contain many new features or breaking changes.
§ The Minor Version is incremented for minor releases that introduce only some small changes to existing features.
§ The Build Number is automatically incremented for each build by the build server. This way, each build has a unique identification number that can be used to track it.
§ The Revision is used for patches to the production environment.
When building an assembly, there are two version numbers that you need to take into account: the file version number and the .NET assembly version number.
If you create a new project in Visual Studio, it automatically adds an AssemblyInfo.cs file to the properties of your project.
This file contains the following two lines:
[assembly: AssemblyVersion("1.0.0.0")]
[assembly: AssemblyFileVersion("1.0.0.0")]
AssemblyFileVersionAttribute is the one that should be incremented with each build. This is not something you want to do on the client, where it would get incremented with every developer build. Instead, you should integrate this into your build process on your build server.
AssemblyVersionAttribute should be incremented manually. This should be done when you plan to deploy a specific version to production.
Because the version of an assembly is important when the runtime tries to locate an assembly, you can deploy multiple versions of the same assembly to the GAC and avoid the DLL problem that happened with regular DLL files. This is called side-by-side hosting, in which multiple versions of an assembly are hosted together on one computer.
The process of finding the correct assembly starts with the version number that is mentioned in the manifest file of the original assembly to determine which assembly to load. These bindings can be influenced with specific configuration files, however.
Three configuration files are used:
§ Application configuration files
§ Publisher policy files
§ Machine configuration files
Those configuration files can be used to influence the binding of referenced assemblies. Suppose, for example, that you have deployed an assembly to the GAC and a couple of applications depend on it. Suddenly a bug is discovered and you create a fix for it. The new assembly has a new version number and you want to make sure that all applications use the new assembly.
You can do this by using a publisher policy file. In such a configuration file, you specify that if the CLR looks for a specific assembly, it should bind to the new version. Example 3-30 shows an example of how such a file would look.
Example 3-30. Redirecting assembly bindings to a newer version
<configuration>
<runtime>
<assemblyBinding xmlns="urn:schemas-microsoft-com:asm.v1">
<dependentAssembly>
<assemblyIdentity name="myAssembly"
publicKeyToken="32ab4ba45e0a69a1"
culture="en-us" />
<!-- Redirecting to version 2.0.0.0 of the assembly. -->
<bindingRedirect oldVersion="1.0.0.0"
newVersion="2.0.0.0"/>
</dependentAssembly>
</assemblyBinding>
</runtime>
</configuration>
This file instructs the CLR to bind to version 2 of the assembly instead of version 1. You need to deploy such a publisher policy to the GAC so that the CLR can use it when binding assemblies.
MORE INFO: PUBLISHER POLICY FILES
For more information on how to create and deploy a publisher profile file see http://msdn.microsoft.com/en-us/library/8f6988ab.aspx.
If you have an assembly deployed privately with your application, the CLR starts looking for it in the current application directory. If it can’t find the assembly, it throws a FileNotFoundException.
You can specify extra locations where the CLR should look in the configuration file of the application. You use the probing section for this as Example 3-31 shows.
Example 3-31. Specifying additional locations for assemblies
<?xml version="1.0" encoding="utf-8" ?>
<configuration>
<runtime>
<assemblyBinding xmlns="urn:schemas-microsoft-com:asm.v1">
<probing privatePath="MyLibraries"/>
</assemblyBinding>
</runtime>
</configuration>
Another option is using the codebase element. A codebase element can specify a location for an assembly that is outside of the application’s directory. This way you can locate an assembly that’s on another computer on the network or somewhere on the Internet. These assemblies have to be strongly named if they are not in the current application’s folder. When the assembly is located on another computer, it’s downloaded to a special folder in the GAC. Example 3-32 shows an example of using the codebase element to specify the location of an assembly somewhere on the web.
Example 3-32. Specifying additional locations for assemblies
<?xml version="1.0" encoding="utf-8" ?>
<configuration>
<runtime>
<assemblyBinding xmlns="urn:schemas-microsoft-com:asm.v1">
<dependentAssembly>
<codeBase version="1.0.0.0"
href= "http://www.mydomain.com/ReferencedAssembly.dll"/>
</dependentAssembly>
</assemblyBinding>
</runtime>
</configuration>
EXAM TIP
The probing option can be used only to point to locations that are relative to the application path. If you want to locate assemblies somewhere else, you have to use the codebase element.
Creating a WinMD assembly
With the introduction of Windows 8, Microsoft introduced the new WinRT runtime. WinRT is completely written in native C++. There is no managed environment, no CLR, and no Just-In-Time (JIT) compiler.
NOTE: WINRT VS. WINDOWS RT
Although WinRT and Windows RT look similar, they are two completely different things. WinRT is Windows Runtime. Windows RT is a special version of Windows 8 for devices using ARM-based processors. This version of Windows is deployed on tablet devices such as the Microsoft Surface. It can run only Windows Store applications.
Developing apps for Windows 8, however, can be done in languages such as JavaScript and C#. A regular C++ native component does not include metadata. But metadata is necessary to create the correct mapping between the native components and the other languages. To make this work, Microsoft created a new file type named Windows Metadata (WinMD) files.
If you are running Windows 8, you can find these files located in C:\Windows\System32\WinMetadata. The format of these files is the same as used by the .NET Framework for the Common Language Infrastructure (CLI).
WinMD files can contain both code and metadata. The ones that you find in your System32 directory contain only metadata, however. This metadata is used by Visual Studio to provide IntelliSense. At runtime, the metadata tells the CLI that the implementation of all the methods found in them is supplied by the runtime. This is why the files don’t have to contain actual code; they make sure that the methods are mapped to the correct methods in WinRT.
One thing to note is that WinRT does not offer access to all the functionality of the .NET Framework 4.5. Instead, a lot of duplicate, legacy, or badly designed application programming interfaces (APIs) were removed. This all helps to make sure that WinRT apps can be ported to other platforms and use only the best APIs available.
If you want to create your own WinMD assembly, you do so by creating a Windows Runtime component in Visual Studio. You should do this only when you are creating a component that should be used from different programming languages such as JavaScript and C#. If you are working only with C#, you should create a new “Class Library (Windows Store apps)” project.
The Windows Runtime component compiles down to a .winmd file that you can then use.
There are a couple of restrictions on your Windows Runtime component that you need to be aware of:
§ The fields, parameters, and return values of all the public types and members in your component must be Windows Runtime types.
§ Public classes and interfaces can contain methods, properties and events. A public class or interface cannot do the following, however:
§ Be generic
§ Implement an interface that is not a Windows Runtime interface
§ Derive from types that are not inside the Windows Runtime
§ Public classes must be sealed.
§ Public structures can have only public fields as members, which must be value types or strings.
§ All public types must have a root namespace that matches the assembly name and does not start with Windows.
If you create a valid Windows Runtime Component, you can then use this library when building a Windows 8 app. This way you can, for example, build some complex code in C# and then call it from your JavaScript Windows Store app.
THOUGHT EXPERIMENT
Choosing your technologies
In this thought experiment, apply what you’ve learned about this objective. You can find answers to these questions in the Answers section at the end of this chapter.
You are discussing the reasons why you want to sign an assembly that you have built. The assembly will be distributed with a desktop application you are building. The assembly won’t be shared by other applications.
1. Should you sign the assembly?
2. What are the advantages and disadvantages of signing?
Objective summary
§ An assembly is a compiled unit of code that contains metadata.
§ An assembly can be strongly signed to make sure that no one can tamper with the content.
§ Signed assemblies can be put in the GAC.
§ An assembly can be versioned, and applications will use the assembly version they were developed with. It’s possible to use configuration files to change these bindings.
§ A WinMD assembly is a special type of assembly that is used by WinRT to map nonnative languages to the native WinRT components.
Objective review
Answer the following questions to test your knowledge of the information in this objective. You can find the answers to these questions and explanations of why each answer choice is correct or incorrect in the Answers section at the end of this chapter.
1. You are building a strong-named assembly and you want to reference a regular assembly to reuse some code you built. What do you have to do?
a. You first need to put the assembly in the GAC.
b. Nothing. Referencing another assembly to use some code is always possible.
c. You need to sign the other assembly before using it.
d. You need to use the public key token of the other assembly to reference it.
2. You are building an assembly that will be used by a couple of server applications. You want to make the update process of this assembly as smooth as possible. Which steps should you take? (Choose all that apply.)
a. Create a WinMD Metadata file.
b. Deploy the assembly to the GAC.
c. Add an assemblyBinding section to each client application that points to the location of the assembly.
d. Strongly name the assembly.
3. You want to deploy an assembly to a shared location on the intranet. Which steps should you take? (Choose all that apply.)
a. Strongly name the assembly.
b. Use the codebase configuration element in the applications that use the assembly.
c. Deploy the assembly to the GAC.
d. Use the assemblyBinding configuration element with the probing option.
Objective 3.4 Debug an application
No matter how good your development process is, from time to time you will have a bug in your application. Debugging is the process of removing those errors from your application. The C# compiler and Visual Studio help you a lot with finding and fixing the bugs in your application.
THIS OBJECTIVE COVERS HOW TO:
§ Choose an appropriate build type.
§ Create and manage compiler directives.
§ Manage program database files and symbols.
Build configurations
If you create a new project in Visual Studio, it creates two default build configurations for you:
§ Release mode
§ Debug mode
If you compile your project, the settings from these configurations are used to configure what the compiler does. In release mode, the compiled code is fully optimized, and no extra information for debugging purposes is created.
In debug mode, there is no optimization applied, and additional information is outputted. The difference between these two configurations is clear when you execute the program in Example 3-33.
Example 3-33. A simple console application
using System;
using System.Threading;
public static class Program
{
public static void Main()
{
Timer t = new Timer(TimerCallback, null, 0, 2000);
Console.ReadLine();
}
private static void TimerCallback(Object o)
{
Console.WriteLine("In TimerCallback: " + DateTime.Now);
GC.Collect();
}
}
This console application creates an instance of a Timer object and then sets the timer to fire every 2 seconds. When it does, it outputs the current data and time. It also calls GC.Collect to force the garbage collector to run. Normally, you would never do this, but in this example it shows some interesting behavior.
When you run this application in debug mode, it does a nice job of outputting the time every 2 seconds and keeps on doing this until you terminate the application.
But when you execute this application in release mode, it outputs the current date and time only once. This demonstrates the difference between a debug and a release build. When executing a release build, the compiler optimizes the code. In this scenario, it sees that the Timer object is not used anymore, so it’s no longer considered a root object and the garbage collector removes it from memory.
MORE INFO: GARBAGE COLLECTOR
For more information on the garbage collector, see Chapter 2.
In debug configuration, the compiler inserts extra no-operation (NOP) instructions and branch instructions. NOP instructions are instructions that effectively don’t do anything (for example, an assignment to a variable that’s never used). A branch instruction is a piece of code that is executed conditionally (for example, when some variable is true or false). When the compiler sees that a certain branch is never executed, it can remove it from the compiled output. When optimizing the code, the compiler can also choose to inline short methods, effectively removing a method from the output.
In the real world, you don’t suddenly have to start worrying about your objects being garbage collected and your code going wrong in release mode. The Timer object is a special case and normally you wouldn’t have any problems with this. But it does illustrate the difference between a release and a debug build. The extra information that the compiler outputs in a debug build can be used to debug your application in Visual Studio.
One thing you can do is set a breakpoint. Figure 3-2 shows an example of setting a breakpoint in the application shown in Example 3-31.
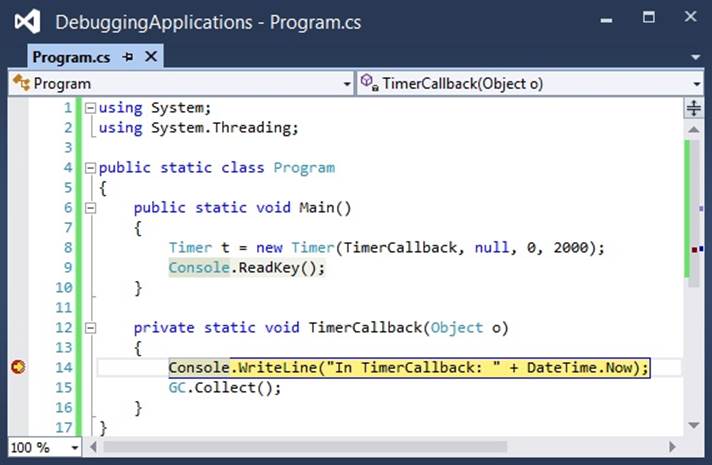
Figure 3-2. Setting a breakpoint in Visual Studio
As you can see, the breakpoint on line 14 is currently active. This means that the debugger has paused the application, and you can now use Visual Studio to inspect and edit values and influence the flow of your program.
MORE INFO: DEBUGGING USING VISUAL STUDIO
For more information on how to use the debugger in Visual Studio, see http://msdn.microsoft.com/en-us/library/k0k771bt.aspx.
While you are working on your application, the debug configuration is the most useful. But when you are ready to deploy your application to a production environment, it’s important to make sure that you use the release configuration to get the best performance.
Creating and managing compiler directives
Some programming languages have the concept of a preprocessor, which is a program that goes through your code and applies some changes to your code before handing it off to the compiler.
C# does not have a specialized preprocessor, but it does support preprocessor compiler directives, which are special instructions to the compiler to help in the compilation process.
One example of a preprocessor directive is #if. Example 3-34 shows an example.
Example 3-34. Checking for the debug symbol
public void DebugDirective()
{
#if DEBUG
Console.WriteLine("Debug mode");
#else
Console.WriteLine("Not debug");
#endif
}
The output of this method depends on the build configuration you use. If you have set your build configuration to Debug, it outputs “Debug mode”; otherwise, it shows “Not debug”.
When using the #if directive, you can use the operators you are used to from C#: == (equality), != (inequality), && (and), || (or) and ! (not) to test for true or false.
The debug symbol is defined by Visual Studio when you use the default configuration for debug. It does so by passing the /debug command to the compiler. You can define your own symbols by using the #define directive. Example 3-35 shows how to define your own symbol and use it later on to see whether it exists. It’s important that the definition comes before any other code in the file.
Example 3-35. Defining a custom symbol
#define MySymbol
// ...
public void UseCustomSymbol()
{
#if MySymbol
Console.WriteLine("Custom symbol is defined");
#endif
}
Using directives this way can make your code harder to understand, and you should try to avoid them if possible. A scenario in which using preprocessor directives can be necessary is when you are building a library that targets multiple platforms. When building a .NET library that targets platforms such as Silverlight, WinRT, and different versions of the .NET Framework, you can use the preprocessor directives to smooth out the differences between the platforms.
Example 3-36 shows an example of the differences between WinRT and .NET 4.5. In .NET 4.5, you can get the assembly of a type directly from the Assembly property. In WinRT, however, this API has changed, and you need to call GetTypeInfo. By using a preprocessor directive, you can reuse a lot of your code and adjust your code only for the differences.
Example 3-36. Using preprocessor directives to target multiple platforms
public Assembly LoadAssembly<T>()
{
#if !WINRT
Assembly assembly = typeof(T).Assembly;
#else
Assembly assembly = typeof(T).GetTypeInfo().Assembly;
#endif
return assembly;
}
Another preprocessor directive is #undef, which can be used to remove the definition of a symbol. This can be used in a situation where you want to debug a piece of code that’s normally included only in a release build. You can then use the #undef directive to remove the debug symbol.
Two other directives are #warning and #error. You can include them in your code to report an error or warning to the compiler. Example 3-37 shows an example.
Example 3-37. The warning and error directives
#warning This code is obsolete
#if DEBUG
#error Debug build is not allowed
#endif
If you paste this code into a Visual Studio project and build the Debug configuration, you will see a warning and an error (see Figure 3-3).
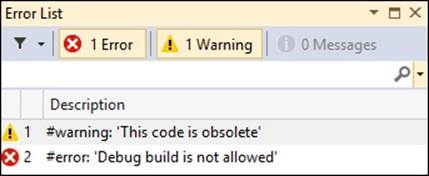
Figure 3-3. A warning and an error
When working with code generation features, you sometimes remove or add lines to a source file before it is compiled. If an error occurs in your code, the compiler will report a line number in your file that is out of sync with how you see the code. The #line directive can be used to modify the compiler’s line number and even the name of the file. You can also hide a line of code from the debugger. If you debug code using the #line hide directive, the debugger skips the hidden parts. Example 3-38 shows an example of using the #line directive.
Example 3-38. The line directive
#line 200 "OtherFileName"
int a; // line 200
#line default
int b; // line 4
#line hidden
int c; // hidden
int d; // line 7
When building an application, you sometimes willingly write some code that triggers a warning. You don’t want to change the code, but you do want to hide the warning. You can do this by using the #pragma warning directive. Example 3-39 shows an example of disabling and enabling all warnings.
Example 3-39. The pragma warning directive
#pragma warning disable
while (false)
{
Console.WriteLine("Unreachable code");
}
#pragma warning restore
You can also choose to disable or restore specific warnings, as shown in Example 3-40. The compiler won’t report a warning for the int i statement, but it will report a warning for the unreachable code. You can find the specific error codes in your Output Window in Visual Studio.
Example 3-40. Disabling and enabling specific warnings
#pragma warning disable 0162, 0168
int i;
#pragma warning restore 0162
while (false)
{
Console.WriteLine("Unreachable code");
}
#pragma warning restore
Often, preprocessor directives are used to include or exclude a certain piece of code depending on the build configuration. The .NET Framework has the ConditionalAttribute that you can use as an alternative. Maybe you want a certain function called only when you are building a debug configuration. Example 3-41 shows how this can be done using preprocessor directives.
Example 3-41. Call a method only in a debug build
public void SomeMethod()
{
#if DEBUG
Log("Step1");
#endif
}
private static void Log(string message)
{
Console.WriteLine("message");
}
It’s inconvenient to have to wrap each call to the method in preprocessor directives. Instead, you can use the ConditionalAttribute, which signals to the compiler that calls to the method should be included only in the compiled program when the condition is true. Example 3-42 shows an example.
Example 3-42. Applying the ConditionalAttribute
[Conditional("DEBUG")]
private static void Log(string message)
{
Console.WriteLine("message");
}
Another attribute that can be useful when debugging is DebuggerDisplayAttribute. By default, the debugger in Visual Studio calls ToString on each object that you want to inspect for a value. For simple objects, such as ints or strings, this is no problem because they have an overload forToString that displays their value. But for types that don’t override ToString, the default implementation shows the name of the type, which is not useful when debugging. Of course, you can start overriding all ToString methods and give them an implementation that’s useful for debugging purposes, but that implementation will also show up in your release build.
As an alternative, you can use the DebuggerDisplayAttribute found in the System.Diagnostics namespace. This attribute is used by the Visual Studio debugger to display an object. Example 3-43 shows an example.
Example 3-43. Applying the DebuggerDisplayAttribute
[DebuggerDisplay("Name = {FirstName} {LastName")]
public class Person
{
public string FirstName { get; set; }
public string LastName { get; set; }
}
Managing program database files and symbols
When compiling your programs, you have the option of creating an extra file with the extension .pdb. This file is called a program database (PDB) file, which is an extra data source that annotates your application’s code with additional information that can be useful during debugging.
You can construct the compiler to create a PDB file by specifying the /debug:full or /debug:pdbonly switches. When you specify the full flag, a PDB file is created, and the specific assembly has debug information. With the pdbonly flag, the generated assembly is not modified, and only the PDB file is generated. The latter option is recommended when you are doing a release build.
A .NET PDB file contains two pieces of information:
§ Source file names and their lines
§ Local variable names
This data is not contained in the .NET assemblies, but you can imagine how it helps with debugging.
When you load a module, the debugger starts looking for the corresponding PDB file. It does this by looking for a PDB file with the same name that sits in the same directory as the application or library. So when you have a MyApp.dll, the debugger looks for MyApp.pdb. When it finds a file with a matching name, it compares an internal ID that is created by the compiler. The ID, which is a globally unique identifier (GUID), should match exactly. This way, the debugger knows that you are using the correct PDB file and it can show the correct source code for your application while you are debugging.
The important thing is that this GUID is created at compile time, so if you recompile your application, you get a new PDB file that matches your recompiled build exactly. Thus, you can’t debug a build from yesterday by using the PDB file that you created today; the GUIDs won’t match up, and the debugger won’t accept the PDB file.
When you execute a debug session in Visual Studio, there are no problems most of the time. Your code and the running application match exactly, and Visual Studio lets you debug the application. But when you want to debug an application that’s currently in production, you need the matching PDB file to debug the application.
You can see the effects of missing PDB files when you run the console application from Example 3-44 and put a breakpoint somewhere in the Main function.
Example 3-44. Examining PDB files
using System;
namespace PdbFiles
{
class Program
{
static void Main(string[] args)
{
Console.WriteLine("Hello World");
Console.ReadKey();
}
}
}
After hitting the breakpoint, you can open two interesting windows. The first one is the Modules window that you can find in the Debug menu (see Figure 3-4).
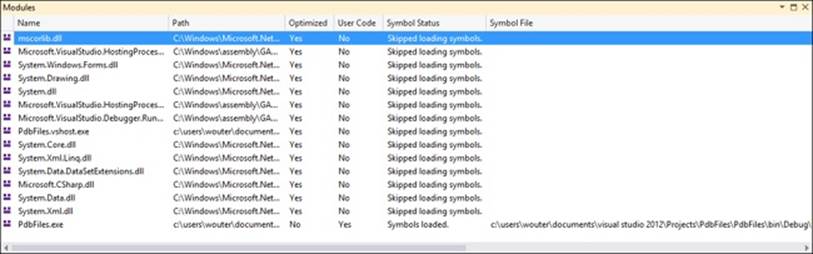
Figure 3-4. The Modules window
The Modules window shows a couple of interesting things. It shows a list of all the DLLs required to run your program. As you can see, only the last file, PdbFiles.exe, has a corresponding symbol file loaded. All the others have User Code set to No and have the message Skipped Loading Symbols because the debugger can’t find the corresponding PDB file for those modules.
Another area where you miss the PDB files is when you look in the Call Stack window from the Debug menu. Figure 3-5 shows what the Call Stack window looks like.

Figure 3-5. The Call Stack window
As you can see, the debugger knows that you are currently in the Main method of your application. All other code, however, is seen as External Code.
Microsoft has helpfully published its PDB files to its Symbol Server, which is a way to expose the PDB files of applications to the debugger so it can easily find the files. The Symbol Server also helps the debugger handle the different versions of PDB files so that it knows how to find the matching version for each build.
If you want to use the Microsoft Symbol Server, you first need to turn off the Enable Just My Code option (you can find this option in Tools → Options → Debugging → General). Tell the debugger where to find the Microsoft symbol files. You can do this in the same Options section by selecting Symbols and then selecting the Microsoft Symbol Servers option.
When you now start debugging, the debugger will download the PDB files from the Microsoft Symbol Server. If you look at the Modules window, you will see that all the modules have their symbols loaded. You will also see that the Call Stack window shows a lot more information than it did previously (see Figure 3-6).
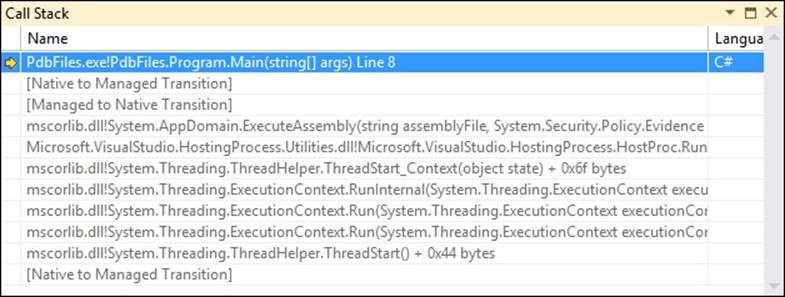
Figure 3-6. The Call Stack window with all modules loaded
When building your own projects, it’s important to set up a Symbol Server for your internal use. The easiest way to do this is to use Team Foundation Server (TFS) to manage your source code and builds. TFS has an option to publish all the PDB files from your builds to a shared location, which can then act as a Symbol Server for Visual Studio, enabling you to debug all previous versions of an application without having the source code around.
MORE INFO: SYMBOL SERVER
For more information on setting up your own Symbol Server, see http://msdn.microsoft.com/en-us/library/ms680693(VS.85).aspx.
EXAM TIP
Remember how important it is to save your PDB files somewhere. If you throw them away, you immediately lose the opportunity to debug that specific build of your application.
When a full-sized PDB file is built by the compiler, it contains two distinct collections of information: private and public symbol data. A public symbol file contains less data. It exposes only the items that are accessible from one source file to another. Items visible in only one object file, such as local variables, are not in the public symbol part.
When publishing symbol files to the outside world, as Microsoft did, you can choose to remove the private information. When you are dealing with intellectual property that you don’t want to be exposed, this is an important step.
You can do this by using the PDBCopy tool. PDBCopy is a part of the Debugging Tools for Windows that you install as a part of the Windows Software Development Kit (SDK). The following line shows an example of stripping the private data from a PDB file:
pdbcopy mysymbols.pdb publicsymbols.pdb –p
This code takes a mysymbols.pdb file and creates a file publicsymbols.pdb file without the private symbol data.
MORE INFO: PDBCOPY
For more information on using PDBCopy, see http://msdn.microsoft.com/en-us/library/windows/hardware/ff560131(v=vs.85).aspx.
THOUGHT EXPERIMENT
Debugging an application
In this thought experiment, apply what you’ve learned about this objective. You can find answers to these questions in the Answers section at the end of this chapter.
You are working in the support department of your organization. A customer phones you to report an error in a web application that you are hosting on your own servers.
1. You want to start debugging this application remotely.
2. Do you need to deploy a debug version to the server?
3. What do you need to make this possible?
4. How can a Symbol Server help you?
Objective summary
§ Visual Studio build configurations can be used to configure the compiler.
§ A debug build outputs a nonoptimized version of the code that contains extra instructions to help debugging.
§ A release build outputs optimized code that can be deployed to a production environment.
§ Compiler directives can be used to give extra instructions to the compiler. You can use them, for example, to include code only in certain build configurations or to suppress certain warnings.
§ A program database (PDB) file contains extra information that is required when debugging an application.
Objective review
Answer the following questions to test your knowledge of the information in this objective. You can find the answers to these questions and explanations of why each answer choice is correct or incorrect in the Answers section at the end of this chapter.
1. You are ready to deploy your code to a production server. Which configuration do you deploy?
a. Debug configuration
b. Release configuration
c. Custom configuration with PDB files
d. Release configuration built with the /debug:full compiler flag
2. You are debugging an application for a web shop and are inspecting a lot of Order classes. What can you do to make your debugging easier?
a. Use the DebuggerDisplayAttribute on the Order class.
b. Override ToString on the Order class.
c. Use the ConditionalAttribute on the Order class.
d. Use the #line compiler directive to make sure you can find the correct location when an exception occurs.
3. You are using custom code generation to insert security checks into your classes. When an exception happens, you’re having troubling finding the correct line in your source code. What should you do?
a. Use #error to signal the error from your code so that it’s easier to find.
b. Use #line hidden to hide unnecessary lines from the debugger.
c. Use the ConditionalAttribute to remove the security checks from your debug build.
d. Use the #line directive with the correct line numbers in your generated code to restore the original line numbers.
Objective 3.5 Implement diagnostics in an application
When your application is in production, you still want to make sure that everything is working the way it should. Maybe customers are reporting errors in a certain area of the application, and you can’t find their cause. It might be that your application is performing worse then you anticipated and you are getting complaints from users. The .NET Framework offers features that can help you to fix these issues.
THIS OBJECTIVE COVERS HOW TO:
§ Implement logging and tracing.
§ Profile your applications.
§ Create and monitor performance counters.
Logging and tracing
When your application is running on a production server, it’s sometimes impossible to attach a debugger because of security restrictions or the nature of the application. If the application runs on multiple servers in a distributed environment, such as Windows Azure, a regular debugger won’t always help you find the error.
Because of this, it’s important that you implement a logging and tracing strategy right from the start. Tracing is a way for you to monitor the execution of your application while it’s running. Tracing information can be detailed; it can show which methods are entered, decisions are made, and errors or warnings happen while the application is running.
Tracing can generate a huge amount of information and it’s something that you enable when you need to investigate an issue in a production application.
Logging is always enabled and is used for error reporting. You can configure your logging to collect the data in some centralized way. Maybe you want an e-mail or text message when there is a serious issue. Other errors can be logged to a file or a database.
The .NET Framework offers classes that can help you with logging and tracing in the System.Diagnostics namespace. One such class is the Debug class, which can, as its name suggests, be used only in a debug build. This is because the ConditionalAttribute with a value of DEBUG is applied to the Debug class. You can use it for basic logging and executing assertions on your code. Example 3-45 shows an example of using the Debug class.
Example 3-45. Using the Debug class
Debug.WriteLine("Starting application");
Debug.Indent();
int i = 1 + 2;
Debug.Assert(i == 3);
Debug.WriteLineIf(i > 0, "i is greater than 0");
By default, the Debug class writes its output to the Output window in Visual Studio. If the Debug.Assert statement fails, you get a message box showing the current stack trace of the application. This message box asks you to retry, abort, or ignore the assertion failure. You can useDebug.Assert to indicate a bug in your code that you want pointed out to you while developing your application.
Another class that you can use is the TraceSource class, which was added in .NET 2.0 and should be used instead of the static Trace class.
Example 3-46 shows how to use the TraceSource class.
Example 3-46. Using the TraceSource class
TraceSource traceSource = new TraceSource("myTraceSource",
SourceLevels.All);
traceSource.TraceInformation("Tracing application..");
traceSource.TraceEvent(TraceEventType.Critical, 0, "Critical trace");
traceSource.TraceData(TraceEventType.Information, 1,
new object[] { "a", "b", "c" });
traceSource.Flush();
traceSource.Close();
// Outputs:
// myTraceSource Information: 0 : Tracing application..
// myTraceSource Critical: 0 : Critical trace
// myTraceSource Information: 1 : a, b, c
As you can see, you can pass a parameter of type TraceEventType to the trace methods. You use this to specify the severity of the event that is happening. This information is later used by the TraceSource to determine which information should be output.
You can use several different options for the TraceEventType enum:
§ Critical. This is the most severe option. It should be used sparingly and only for very serious and irrecoverable errors.
§ Error. This enum member has a slightly lower priority than Critical, but it still indicates that something is wrong in the application. It should typically be used to flag a problem that has been handled or recovered from.
§ Warning. This value indicates something unusual has occurred that may be worth investigating further. For example, you notice that a certain operation suddenly takes longer to process than normal or you flag a warning that the server is getting low on memory.
§ Information. This value indicates that the process is executing correctly, but there is some interesting information to include in the tracing output file. It may be information that a user has logged onto a system or that something has been added to the database.
§ Verbose. This is the loosest of all the severity related values in the enum. It should be used for information that is not indicating anything wrong with the application and is likely to appear in vast quantities. For example, when instrumenting all methods in a type to trace their beginning and ending, it is typical to use the verbose event type.
§ Stop, Start, Suspend, Resume, Transfer. These event types are not indications of severity, but mark the trace event as relating to the logical flow of the application. They are known as activity event types and mark a logical operation’s starting or stopping, or transferring control to another logical operation.
The second argument to the trace methods is the event ID number. This number does not have any predefined meaning; it’s just another way to group your events together. You could, for example, group your database calls as numbers 10000–10999 and your web service calls as 11000–11999 to more easily tell what area of your application a trace entry is related.
The third parameter is a string that contains the message that should be traced. When you are using the TraceData method, you can pass extra arguments that should be output to the trace.
Writing all information to the Output window can be useful during debug sessions, but not in a production environment. To change this behavior, both the Debug and TraceSource classes have a Listeners property. This property holds a collection of TraceListeners, which process the information from the Write, Fail, and Trace methods.
Out of the box, both the Debug and the TraceSource class use an instance of the DefaultTraceListener class. The DefaultTraceListener writes to the Output window and shows the message box when assertion fails.
You can use several other TraceListeners that are a part of the .NET Framework. Table 3-2 shows a list of the available listeners.
Table 3-2. TraceListeners in the .NET Framework
|
Name |
Output |
|
ConsoleTraceListener |
Standard output or error stream |
|
DelimitedListTraceListener |
TextWriter |
|
EventLogTraceListener |
EventLog |
|
EventSchemaTraceListener |
XML-encoded, schema-compliant log file |
|
TextWriterTraceListener |
TextWriter |
|
XmlWriterTraceListener |
XML-encoded data to a TextWriter or stream. |
If you don’t want the DefaultTraceListener to be active, you need to clear the current listeners collection. You can add as many listeners as you want. In the example in Example 3-47, the DefaultTraceListener is removed, and a TextWriteTraceListener is configured. After running this code, an output file is created named Tracefile.txt that contains the output of the trace.
Example 3-47. Configuring TraceListener.
Stream outputFile = File.Create("tracefile.txt");
TextWriterTraceListener textListener =
new TextWriterTraceListener(outputFile);
TraceSource traceSource = new TraceSource("myTraceSource",
SourceLevels.All);
traceSource.Listeners.Clear();
traceSource.Listeners.Add(textListener);
traceSource.TraceInformation("Trace output");
traceSource.Flush();
traceSource.Close();
You can define your own trace listeners by inheriting from the TraceListener base class and specifying your own implementation for the trace methods.
Specifying the listeners through code can be useful, but it’s not something you can easily change after the application is deployed. Instead of configuring the listeners through code, you can also use a configuration file.
Example 3-48 shows an example of configuring your trace source from a configuration file.
Example 3-48. Using a configuration file for tracing
<?xml version="1.0" encoding="utf-8" ?>
<configuration>
<system.diagnostics>
<sources>
<source name="myTraceSource" switchName="defaultSwitch">
<listeners>
<add initializeData="output.txt"
type="System.Diagnostics.TextWriterTraceListeer"
name="myLocalListener">
<filter type="System.Diagnostics.EventTypeFilter"
initializeData="Warning"/>
</add>
<add name="consoleListener" />
<remove name="Default"/>
</listeners>
</source>
</sources>
<sharedListeners>
<add initializeData="output.xml" type="System.Diagnostics.XmlWriterTraceListener"
name="xmlListener" traceOutputOptions="None" />
<add type="System.Diagnostics.ConsoleTraceListener" name="consoleListener"
traceOutputOptions="None" />
</sharedListeners>
<switches>
<add name="defaultSwitch" value="All" />
</switches>
</system.diagnostics>
</configuration>
Through the configuration file, you have a lot of flexibility. In this case, you configure a trace source named myTraceSource to use two listeners: one to a file and the other to the console. The console listener is defined as a shared listener so that you can use it for multiple trace sources.
The configuration file also defines a switch, which is used by a trace source to determine whether it should do something with a trace message it receives. This way, you can determine which trace messages you want to see. Lowering the number of messages enhances performance and will result in a smaller output file. After you have found the particular area that you want to focus on, you can set your switch to a more detailed level.
While switches work for a whole trace source, a filter is applied to an individual listener. When you have multiple listeners for one single trace source, you can use filters to determine which trace events are actually processed by the listener. You could have a listener that sends text messages only for the critical events in a trace source, for example.
Next to writing trace information to a file or database, you can also write events to the Windows Event Log. You do this by using the EventLog class in the System.Diagnostics namespace. To use the EventLog class, you need to run with an account that has the appropriate permissions to create event logs. When running it from Visual Studio, you have to run Visual Studio as an administrator.
Example 3-49 shows an example of how to create a new log and write some data to it.
Example 3-49. Writing data to the event log
using System;
using System.Diagnostics;
class MySample
{
public static void Main()
{
if (!EventLog.SourceExists("MySource"))
{
EventLog.CreateEventSource("MySource", "MyNewLog");
Console.WriteLine("CreatedEventSource");
Console.WriteLine("Please restart application");
Console.ReadKey();
return;
}
EventLog myLog = new EventLog();
myLog.Source = "MySource";
myLog.WriteEntry("Log event!");
}
}
These messages can then be viewed by the Windows Event Viewer. Figure 3-7 shows the Event Viewer with the newly logged message.
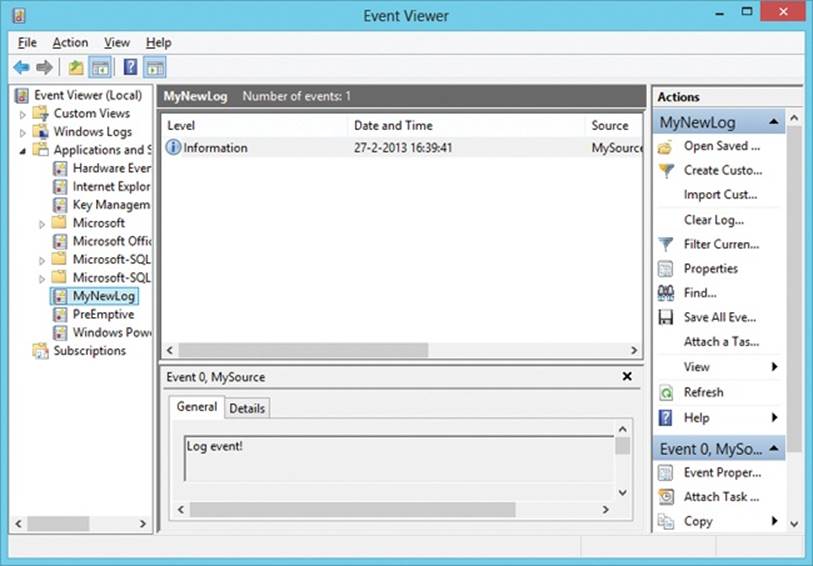
Figure 3-7. The Windows Event Viewer with a new custom event
You can also read programmatically from the event log. You do this by getting an Event-LogEntry from the Entries property of the EventLog. Example 3-50 shows how you can read the latest entry in the event log “MyNewLog”.
Example 3-50. Reading data from the event log.
EventLog log = new EventLog("MyNewLog");
Console.WriteLine("Total entries: " + log.Entries.Count);
EventLogEntry last = log.Entries[log.Entries.Count - 1];
Console.WriteLine("Index: " + last.Index);
Console.WriteLine("Source: " + last.Source);
Console.WriteLine("Type: " + last.EntryType);
Console.WriteLine("Time: " + last.TimeWritten);
Console.WriteLine("Message: " + last.Message);
The EventLog also gives you the option to subscribe to changes in the event log. It exposes a special EntryWritten event that you can subscribe to for changes. You could use this, for example, to alert your system administrators of critical situations so they don’t have to monitor the event log manually. Example 3-51 shows how to subscribe to changes in the event log.
Example 3-51. Writing data to the event log
using System;
using System.Diagnostics;
class EventLogSample
{
public static void Main()
{
EventLog applicationLog = new EventLog("Application", ".", "testEventLogEvent");
applicationLog.EntryWritten += (sender, e) =>
{
Console.WriteLine(e.Entry.Message);
};
applicationLog.EnableRaisingEvents = true;
applicationLog.WriteEntry("Test message", EventLogEntryType.Information);
Console.ReadKey();
}
}
Profiling your application
When looking for a performance problem, the only real way to find it is measure, not guess. Maybe you have a feeling where the problem is but just making some random changes and then verifying that your applications performance has improved is really hard.
Most of the time, performance is seen as the amount of time something takes. That’s not the only performance criterion, however. Maybe you are working on an application that processes lots of data, and constraints are not so much in time as perhaps in memory usage.
Profiling is the process of determining how your application uses certain resources. You can check, for example, how much memory your program uses, which methods are being called, and how long each method takes to execute. This information is required when you have a performance bottleneck and you want to find the cause.
With performance, one thing is always true: Don’t get into premature optimizations. Worrying whether some algorithm will be faster than another algorithm could be important, but if you haven’t profiled your application, you won’t even know if that algorithm is the bottleneck of your application. Because of this, a guideline is to write your code as easy and maintainable as possible. When you run into performance problems, you can use a profiler to actually measure which part of your application is causing problems.
A simple way of measuring the execution time of some code is by using the Stopwatch class that can be found in the System.Diagnostics namespace. Example 3-52 shows how you can initialize and use a StopWatch.
Example 3-52. Using the StopWatch class
using System;
using System.Diagnostics;
using System.Text;
namespace Profiling
{
class Program
{
const int numberOfIterations = 100000;
static void Main(string[] args)
{
Stopwatch sw = new Stopwatch();
sw.Start();
Algorithm1();
sw.Stop();
Console.WriteLine(sw.Elapsed);
sw.Reset();
sw.Start();
Algorithm2();
sw.Stop();
Console.WriteLine(sw.Elapsed);
Console.WriteLine("Ready...");
Console.ReadLine(); }
private static void Algorithm2()
{
string result = "";
for (int x = 0; x < numberOfIterations; x++)
{
result += 'a';
}
}
private static void Algorithm1()
{
StringBuilder sb = new StringBuilder();
for (int x = 0; x < numberOfIterations; x++)
{
sb.Append('a');
}
string result = sb.ToString();
}
}
}
// Displays
// 00:00:00.0007635
// 00:00:01.4071420
As you can see, the StopWatch class has a Start, Stop, and Reset method. You can get the elapsed time in milliseconds, in ticks, or formatted as in the example.
Visual Studio 2012 also includes an extensive set of profiling tools. To use them, you need Visual Studio Ultimate, Premium, or Professional edition.
When using the profiler, the easiest way is to use the Performance Wizard. You can find this wizard in the Analyze menu in Visual Studio. Figure 3-8 shows the first page of the wizard.
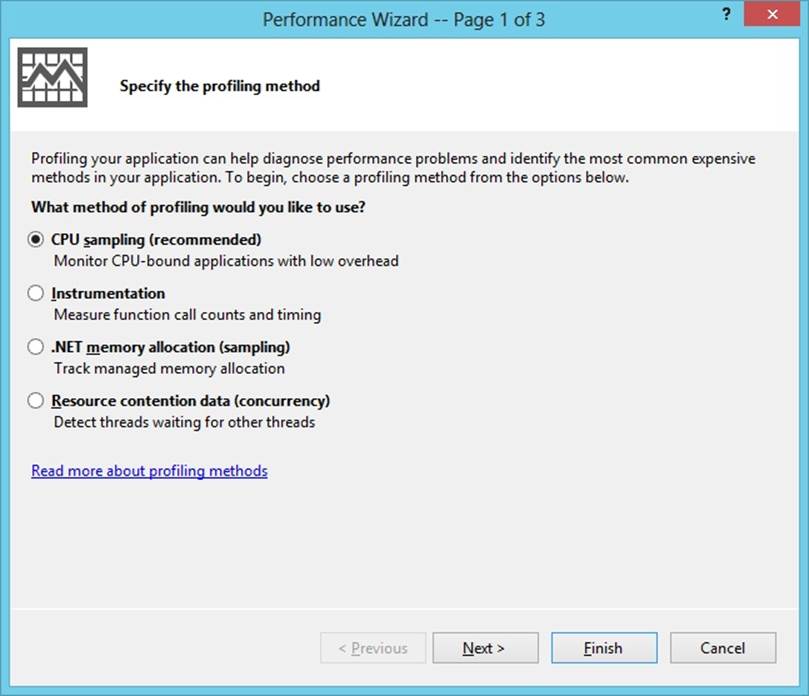
Figure 3-8. Performance Wizard
When profiling your applications, you have four options:
§ CPU sampling. This is the most lightweight option. It has little effect on the application. You use it for an initial search for your performance problems.
§ Instrumentation. This method injects code into your compiled file that captures timing information for each function that is called. With instrumentation, you can find problems that have to do with input/output (I/O) or you can closely examine a particular method.
§ .NET memory allocation. This method interrupts your program each time the application allocates a new object or when the object is collected by the garbage collector to give you a good idea of how memory is being used in your program.
§ Resource contention data. This method can be used in multithreaded applications to find out why methods have to wait for each other before they can access a shared resource.
If you run the application from Example 3-49 without the Stopwatch code and profile it with the CPU Sampling option, you see a report that looks like the one in Figure 3-9.
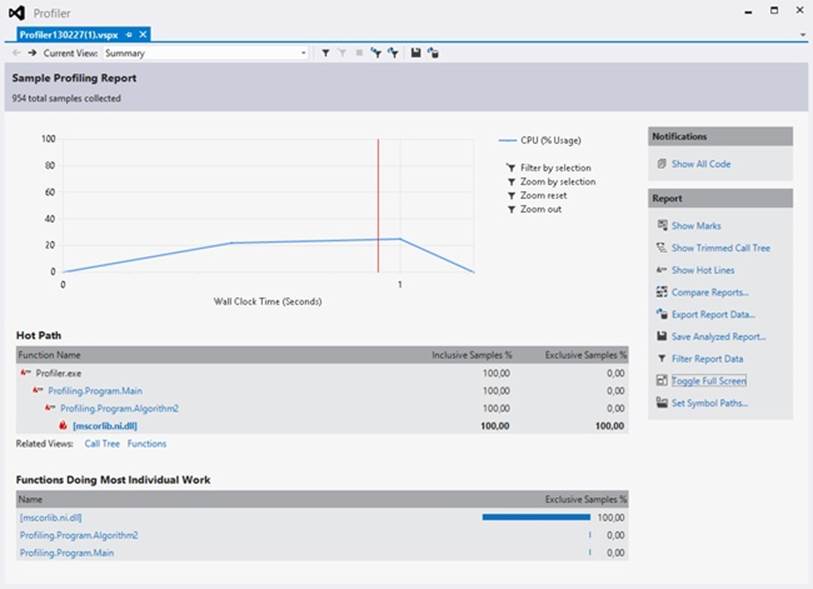
Figure 3-9. Profiler report
In this case, a lot of time is spent inside the Mscorlib.dll, in which the implementation of the string and StringBuilder classes resides. But you can also see that the function on the second place is Algorithm2. You can use this report to drill into individual methods and check which methods should be optimized.
MORE INFO: VISUAL STUDIO PROFILER
For more information on how to use the Visual Studio profiler, see http://msdn.microsoft.com/en-us/library/z9z62c29.aspx.
Creating and monitoring performance counters
Windows provides a large number of categorized performance counters that you can use to monitor your hardware, services, applications, and drivers. Examples of performance counters are those that display your CPU usage and memory usage, but also application-specific counters such as the length of a query in SQL Server.
The performance counters that Windows offers can be viewed with a special program called Perfmon.exe. Figure 3-10 shows what the Performance Monitor looks like when examining some data about the CPU.
Figure 3-10. Windows Performance Monitor
You can read the values of the performance counters from code by using the PerformanceCounter class found in the System.Diagnostics namespace. Example 3-50 shows an example of accessing a performance counter to read the amount of available memory and display it on-screen.
Example 3-53. Reading data from a performance counter
using System;
using System.Diagnostics;
namespace PerformanceCounters
{
class Program
{
static void Main(string[] args)
{
Console.WriteLine("Press escape key to stop");
using (PerformanceCounter pc =
new PerformanceCounter("Memory", "Available Bytes"))
{
string text = "Available memory: ";
Console.Write(text);
do
{
while (!Console.KeyAvailable)
{
Console.Write(pc.RawValue);
Console.SetCursorPosition(text.Length, Console.CursorTop);
}
} while (Console.ReadKey(true).Key != ConsoleKey.Escape);
}
}
}
}
All performance counters are part of a category, and within that category they have a unique name. To access the performance counters, your application has to run under full trust, or the account that it’s running under should be an administrator or be a part of the Performance Monitor Users group.
All performance counters implement IDisposable because they access unmanaged resources. After you’re done with the performance counter, it’s best to immediately dispose of it.
MORE INFO: IDISPOSABLE
For more information on implementing and using IDisposable, see Chapter 2.
Performance counters come in several different types. The type definition determines how the counter interacts with the monitoring applications. Some types that can be useful are the following:
§ NumberOfItems32/NumberOfItems64. These types can be used for counting the number of operations or items. NumberOfItems64 is the same as NumberOfItems32, except that it uses a larger field to accommodate for larger values.
§ RateOfCountsPerSecond32/RateOfCountsPerSecond64. These types can be used to calculate the amount per second of an item or operation. RateOfCountsPerSecond64 is the same as RateOfCountsPerSecond32, except that it uses larger fields to accommodate for larger values.
§ AvergateTimer32. Calculates the average time to perform a process or process an item.
Example 3-54 shows an example of creating and using your own performance counters. The first time, the application will create two new performance counters. The second time, it will increment both counters by one. If you run this program (as administrator) and keep an eye on the Windows Performance Monitoring tool, you will see the two counters update.
Example 3-54. Reading data from a performance counter
using System;
using System.Diagnostics;
namespace PerformanceCounters
{
class Program
{
static void Main(string[] args)
{
if (CreatePerformanceCounters())
{
Console.WriteLine("Created performance counters");
Console.WriteLine("Please restart application");
Console.ReadKey();
return;
}
var totalOperationsCounter = new PerformanceCounter(
"MyCategory",
"# operations executed",
"",
false);
var operationsPerSecondCounter = new PerformanceCounter(
"MyCategory",
"# operations / sec",
"",
false);
totalOperationsCounter.Increment();
operationsPerSecondCounter.Increment();
}
private static bool CreatePerformanceCounters()
{
if (!PerformanceCounterCategory.Exists("MyCategory"))
{
CounterCreationDataCollection counters =
new CounterCreationDataCollection
{
new CounterCreationData(
"# operations executed",
"Total number of operations executed",
PerformanceCounterType.NumberOfItems32),
new CounterCreationData(
"# operations / sec",
"Number of operations executed per second",
PerformanceCounterType.RateOfCountsPerSecond32)
};
PerformanceCounterCategory.Create("MyCategory",
"Sample category for Codeproject", counters);
return true;
}
return false;
}
}
}
Creating your own performance counters can be a huge help when checking on the health of your application. You can create another application to read them (some kind of dashboard application), or you can use the Performance Counter Monitor tool that Windows provides.
THOUGHT EXPERIMENT
Building a logging and tracing strategy
In this thought experiment, apply what you’ve learned about this objective. You can find answers to these questions in the Answers section at the end of this chapter.
You are building an online web shop that will be hosted in a distributed environment. Your web shop needs to scale well, so performance is an important concept.
1. Which events would you write to a trace source in a web shop?
2. How can you use performance counters to keep an eye on your performance?
Objective summary
§ Logging and tracing are important to monitor an application that is in production and should be implemented right from the start.
§ You can use the Debug and TraceSource classes to log and trace messages. By configuring different listeners, you can configure your application to know which data to send where.
§ When you are experiencing performance problems, you can profile your application to find the root cause and fix it.
§ Performance counters can be used to constantly monitor the health of your applications.
Objective review
Answer the following questions to test your knowledge of the information in this objective. You can find the answers to these questions and explanations of why each answer choice is correct or incorrect in the Answers section at the end of this chapter.
1. You are using the TraceSource class to trace data for your application. You want to trace data when an order cannot be submitted to the database and you are going to perform a retry. Which TraceEventType should you use?
a. Information
b. Verbose
c. Critical
d. Error
2. Users are reporting errors in your application, and you want to configure your application to output more trace data. Which configuration setting should you change?
a. NumberOfItems32
b. Listener
c. Filter
d. Switch
3. You are working on a global application with lots of users. The operation staff requests information on how many user logons per second are occurring. What should you do?
a. Add a TraceSource and write each logon to a text file.
b. Implement a performance counter using the RateOfCountsPerSecond64 type.
c. Instrument your application with the profiler so you can see exactly how many times the logon method is called.
d. Use the EventLog class to write an event to the event log for each logon.
Chapter summary
§ Validating application input is important to ensure the stability and security of your application. You can use the Parse, TryParse, and Convert functions to parse user input. Regular Expressions can be used for matching patterns.
§ Cryptography uses symmetric and asymmetric algorithms together with hashing to secure data.
§ Code access permissions can be used to restrict the types of operations a program may execute.
§ An assembly is a self-contained unit that contains application code and metadata. An assembly can be signed, versioned, and shared by putting it in the GAC.
§ By selecting the correct build configurations, you can output additional information to create program database files that can be used to debug an application.
§ By using logging, tracing, and performance counters, you can monitor an application while it’s in production.
Answers
This section contains the solutions to the thought experiments and answers to the lesson review questions in this chapter.
Objective 3.1: Thought experiment
1. It looks like malicious users are entering HTML in the text fields. This data gets submitted to the server and rendered the next time the page is viewed.
2. You need to use regular expressions to restrict the user input. By making clear which characters you allow, you can strip the input of the HTML characters and make sure they are not showing up in the page layout.
Objective 3.1: Review
1. Correct answer: B
a. Incorrect: Parse will throw an exception when the user enters an invalid date,, which is not uncommon.
b. Correct: TryParse will see whether the entered value is a valid date. If not, it will return gracefully instead of throwing an exception.
c. Incorrect: Convert.ToDateTime uses Parse internally. This will throw an exception when entered data is in the wrong format.
d. Incorrect: RegEx.Match can be used to see whether the input is a valid date. It can’t convert the input string to a DateTime object.
2. Correct answer: B
a. Incorrect: Money should not be stored in an integer because it can’t store decimal numbers.
b. Correct: You need to specify the NumberStyles.Currency and the culture that the user is using to parse the DateTime correctly.
c. Incorrect: Using the server culture doesn’t account for the differences in user culture. You also need the NumberStyles.Currency parameter to make sure the user can enter a currency symbol.
d. Incorrect: Leaving off the culture defaults to the culture of the operating system. You also need the NumberStyles.Currency parameter to make sure the user can enter a currency symbol.
Objective 3.2: Thought experiment
You can use numerous security features, including these:
§ Digital certificates to make sure the application can be safely installed on desktop machines.
§ Asymmetric encryption to send data to the server by using the public key to encrypt the data.
§ Asymmetric encryption to send data from the server to the client. The server encrypts with the private key; the client decrypts with the public key.
§ Code access permissions to make sure that your application can run in sandboxed environments.
Objective 3.2: Review
1. Correct answer: C
a. Incorrect: The private key should always be kept confidential.
b. Incorrect: The private key should always be kept confidential.
c. Correct: By sending each other their public key, they can then encrypt data with the other party’s public key to send them data.
d. Incorrect: The private key should always be kept confidential.
2. Correct answer: D
a. Incorrect: SHA256 is a hashing algorithm. It can’t be used to encrypt data.
b. Incorrect: RSACryptoServiceProvider is an asymmetric encryption algorithm. Asymmetric algorithms are not suited for encrypting large amounts of data.
c. Incorrect: MD5CryptoServiceProvider is a hashing algorithm. It can’t be used to encrypt data.
d. Correct: AesManaged is a symmetric algorithm that can be used to encrypt large amounts of data.
3. Correct answers: A, C
a. Correct: Using the digital certificate X509 can be used to sign hashed data. If the other party uses the Verify method, it can check that the hash hasn’t changed.
b. Incorrect: This method encrypts the data with an asymmetric algorithm. It doesn’t ensure that the data hasn’t been tampered with.
c. Correct: UnicodeEncoding.GetBytes converts a string to a byte sequence. It doesn’t protect the data in any way.
d. Incorrect: The Marshal class should be used when working with System.SecureString. The ZeroFreeBSTR method can be used to zero out an area of memory that contained an insecure string.
Objective 3.3: Thought experiment
1. Yes, you should sign the assembly.
2. Signing the assembly protects the assembly against tampering. The .NET Framework will check that the assembly hasn’t been altered between signing and running.
3. Signing is also a requirement to be able to use a digital certificate so users of your application will know that you are the publisher of the application.
4. A disadvantage could be that you can no longer reference other nonsigned assemblies. If you own these assemblies, you can sign them yourself. If not, you would have to ask their publisher to sign them.
Objective 3.3: Review
1. Correct answer: C
a. Incorrect: An assembly in the GAC needs to be strongly named. Your assembly still won’t be able to reference the nonsigned assembly.
b. Incorrect: A strong-named assembly cannot reference a non-strong-named assembly.
c. Correct: You need to strongly name the other assembly before you can reference it.
d. Incorrect: The public key token is a part of the manifest of a strong-named assembly. The non-strong-named assembly doesn’t have this key information. It needs to be strongly named first.
2. Correct answer: B
a. Incorrect: A WinMD file is used by the WinRT in Windows 8. It shouldn’t be used outside of this context.
b. Correct: A shared assembly can be deployed in the GAC. Other applications can reference it there. When you want to update it, you can do so by deploying the new version to the GAC. By using configuration files, you can then let other applications reference your new assembly.
c. Incorrect: You can use the assemblyBinding configuration element to add extra search locations for an assembly. This would ask for changes to each client application, however. The GAC is the location where a shared assembly needs to be deployed.
d. Incorrect: Strongly naming an assembly doesn’t make it a shared assembly. Each application would still require its own copy.
3. Correct answers: A, B
a. Correct: Strongly naming the assembly is required to be able to reference it on the intranet.
b. Correct: The codebase configuration element can be used to have local client applications know they can find an assembly on another location such as the intranet.
c. Incorrect: Deploying it to the GAC won’t put the assembly on the intranet.
d. Incorrect: The probing option can be used only to give additional locations relative to the application path. It can’t be used to point to the intranet.
Objective 3.4: Thought experiment
1. No, you don’t have to do this. Although a debug version will contain more information, you can debug the release version if you have the correct PDB file.
2. You need to make sure that you have the correct PDB file that matches the build that’s running on your server. You need this file to launch a debugging session.
3. A Symbol Server stores your PDB files and helps your debugger find the correct version. If you have a Symbol Server in place, you can easily start a debugging session to your server, and your debugger will find the correct PDB files automatically.
Objective 3.4: Review
1. Correct answer: B
a. Incorrect: A debug configuration is not fully optimized and is not suitable for a production environment.
b. Correct: A release configuration is fully optimized and will give the best results in a production environment.
c. Incorrect: PDB files are necessary only when debugging an application.
d. Incorrect: The /debug:full flag adds extra information to your application for debugging purposes.
2. Correct answer: A
a. Correct: The DebuggerDisplayAttribute helps you in supplying a more helpful description when inspecting an item through the debugger.
b. Incorrect: Overriding ToString does help, but a better solution is to use the DebuggerDisplayAttribute because this won’t influence your code in production.
c. Incorrect: The ConditionalAttribute can be used to remove code from your compiled application. Most of the time, it’s used to remove certain calls when doing a release build.
d. Incorrect: The #line directive is used to change the line numbers of your code. Normally, this won’t be necessary.
3. Correct answer: D
a. Incorrect: #error will signal an error at compile time.
b. Incorrect: #line hidden will remove the extra generated lines from the debugger, but it won’t restore your line numbers.
c. Incorrect: This is a dangerous solution because it creates different behavior between debug and release builds. You won’t be able to test your security checks while working with a debug build.
d. Correct: The #line directive can be used to tell the compiler to change the line number of a line of code. This way, you can remove the line numbers for the generated code so that exceptions will match the original code.
Objective 3.5: Thought experiment
1. Examples could be the following:
o Critical. An irrecoverable error occurs, such as the database which is down so users can’t place any orders.
o Error. While submitting an order, the system notices that the database can’t be reached and tries to resubmit the order.
o Warning. The time it takes to submit an order is suddenly taking longer than expected.
o Information. A new order is submitted successfully.
o Verbose. Here you can trace all application events such as the beginning of the order process, how the user navigates through your web shop, and which decisions he makes.
2. You can use performance counters to keep track of how many orders are submitted and how long it takes to save them to the database. In the same way, you can see whether loading the product catalog is taking too long.
Objective 3.5: Review
1. Correct answer: D
a. Incorrect: A failing order is not something that should be seen as only an informative event. It should be treated as something critical.
b. Incorrect: Verbose should be used only for very detailed tracing messages.
c. Incorrect: You can still recover from the error, which makes it a severity of Error, not Critical.
d. Correct: You should let the operators know that something is wrong and that you are trying to recover. If recovery fails, you should log a Critical event.
2. Correct answer: D
a. Incorrect: NumberOfItems32 is an option for creating a performance counter.
b. Incorrect: A listener determines what is done with the tracing events. It doesn’t influence which events are traced.
c. Incorrect: A filter is used to filter the message that a listener processes. It doesn’t influence which events are traced.
d. Correct: The switch value determines which trace events should be handled. By lowering the severity for the switch, you will see more trace events in your output.
3. Correct answer: B
a. Incorrect: Writing the events to a text file will still require a tool to parse the text file and give results to the operation staff.
b. Correct: This performance counter will help the operation staff to see exactly what happens every second.
c. Incorrect: Profiler instrumentation will really slow down the performance of your application. It’s also something that’s not easy readable by your operations staff.
d. Incorrect: Although the event log can be read by the operation staff, they will have to manually count all events to calculate the logons per second.