Blender Cycles: Materials and Textures Cookbook, Third Edition (2015)
Preface
Since the Blender interface and code were rewritten from scratch, starting with the 2.5 series and throughout the production of the open movie Sintel, a lot of good things have happened to the famous open source 3D modeling and animation suite.
One of them has been the announcement (in April 2011) of Cycles, a new rendering engine developed by Brecht Van Lommel with the goal of modernizing Blender's shading and rendering systems. It could be used as alternative to the Blender Internal rendering engine.
Cycles has finally been integrated with Blender with the 2.61 release, as an add-on that is a Python script, enabled in the Preferences panel by default. It suffices to set this as the active render engine in the User Interface main header.
While Blender Internal is a scan-line rendering engine, Cycles is a physically based path tracer. This approach allows simplification of material creation, support for Global Illumination, and much more realism in the results.
But the best feature of Cycles is probably the rendering you get in the 3D viewport. When you set the Draw mode of any 3D viewport to Rendered, an interactive rendering starts in the viewport. From then onwards, the pre-visualization rendering of the scene is continuously updated almost in real time (depending on the power of your graphics card) as a material, a light, or object. Even the entire scene can be modified.
Using Cycles, a lot of astonishing images and a few animations have been produced, both for testing and for real productions. You can find most of them at the Blender Artists forum (http://blenderartists.org/forum/), but it's enough to mention Tears of Steel, the fifth open movie produced by the Blender Foundation with the codename Mango—a short science-fiction movie entirely rendered in Cycles to accomplish the visual effects; well, not entirely, but actually 95 percent. The team used Blender Internal for the then unsupported features. In fact, being included in the same software also provided an integrated compositor. Both the Blender Internal and the Cycles render engines can actually be paired to make full use of all the needed features.
If you are not a beginner in Blender, you are probably already using your customized version of the User Interface, with your personal preferences as add-ons, modified screens, and all that is already set in the User Preferences panel.
In this book, we'll start our workflow with the Factory Settings, which is the basic interface and preferences situation we have the very first time we start Blender, just after downloading the ZIP file and uncompressing it into some location on our hard drive.
Instructions about any required add-on to be enabled or particular settings are provided in the Getting ready section of the recipes.
Note
In the making of this Cookbook, I've used versions of Blender from 2.71 to 2.73. Therefore, you could sometimes find a screenshot showing buttons or features not appearing in other pictures; for example, there are differences in the Node Editor toolbar between versions 2.71 and 2.72, as shown in the following screenshot (actually, this is only relevant to Cycles):
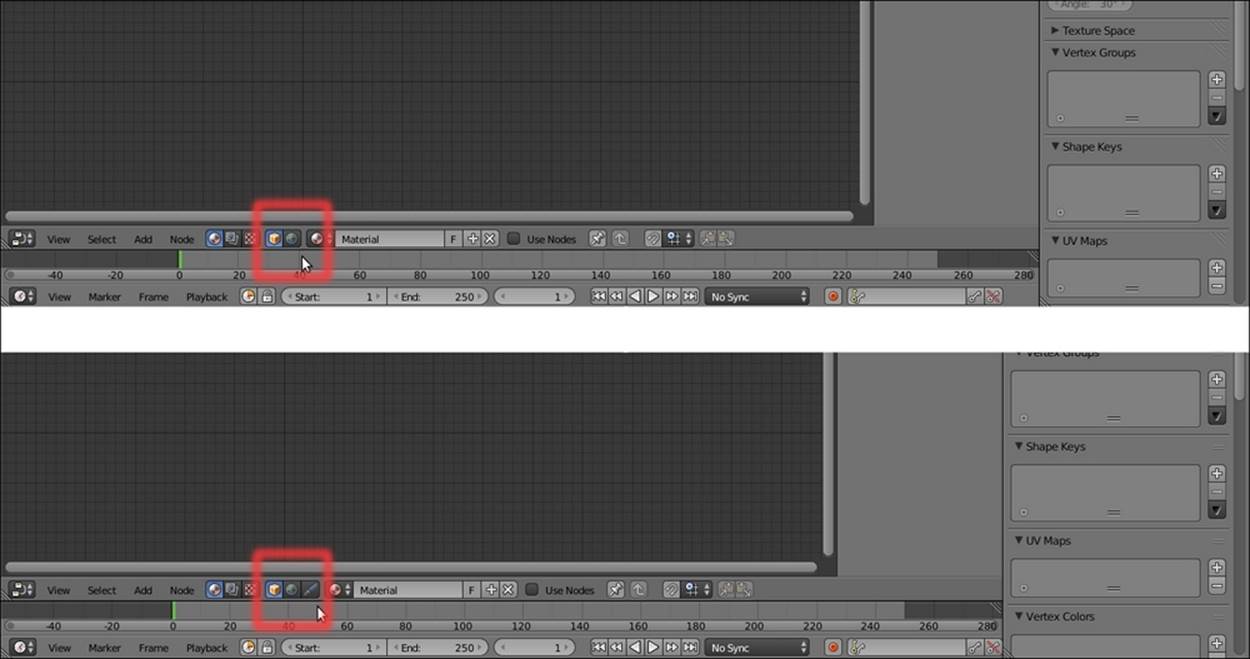
Things like this shouldn't be an issue, however, because there are no big differences in these three versions; only improvements. Moreover, the files provided have been tested under the three versions. Obviously, new features introduced in version 2.73 are not available in the previous versions, so always use the last official Blender release.
You can see a list of the new features available in version 2.73, at http://wiki.blender.org/index.php/Dev:Ref/Release_Notes/2.73.
What this book covers
Chapter 1, Overview of Materials in Cycles, explains how Cycles materials work and their main characteristics. You will learn how to build a basic Cycles material, add textures, use lamps or light-emitting objects, use volume materials, set displacement, and set the World.
Chapter 2, Managing Cycles Materials, shows you how to manage and organize the Cycles textures and materials, create node groups, and build libraries to link or append the materials from.
Chapter 3, Creating Natural Materials in Cycles, covers the process of creating several types of basic natural materials using mainly procedurals but also some image textures.
Chapter 4, Creating Man-made Materials in Cycles, explains the creation process of several types of man-made materials using procedurals and textures.
Chapter 5, Creating Complex Natural Materials in Cycles, teaches you the creation of more complex natural materials using mainly procedurals.
Chapter 6, Creating More Complex Man-made Materials, covers the creation of some more elaborate man-made materials using procedurals and textures.
Chapter 7, Subsurface Scattering in Cycles, explains the use of the Subsurface Scattering node, some ways to simulate the Subsurface Scattering effect in Cycles, and how to build a fake Subsurface Scattering node group.
Chapter 8, Creating Organic Materials, demonstrates the creation of several types of organic shaders that try to use only procedural textures where possible. You will learn how to create hair, fur, and a layered human skin shader in Cycles.
Chapter 9, Special Materials, explains the use of volume materials. You will then be able to create clouds, smoke, fire, and many other special effects.
What you need for this book
The only piece of software necessary for the recipes of this book is the last official 2.73 Blender release (version 2.73a, with several bug fixes, is already out). You need to download it from www.blender.org/download/get-blender. Any particular texture needed for the exercises in the book is provided as a free download on the Packt Publishing website itself.
An image editor is not essential, but it can be handy if you want to adapt your own textures to replace the provided textures. I advise you to try the GIMP, an open source image editor that you can download from www.gimp.org. Any other editor that you prefer is also fine.
Who this book is for
This book is mainly for the intermediate Blender user, who already knows Blender but still hasn't dealt with the new Cycles rendering engine. It's assumed that you already know how to navigate through the Blender interface, and that you have at least basic knowledge of the standard Blender material creation interface. However, this knowledge is not strictly necessary.
Sections
In this book, you will find several headings that appear frequently (Getting ready, How to do it, How it works, There's more, and See also).
To give clear instructions on how to complete a recipe, we use these sections as follows:
Getting ready
This section tells you what to expect in the recipe, and describes how to set up any software or any preliminary settings required for the recipe.
How to do it…
This section contains the steps required to follow the recipe.
How it works…
This section usually consists of a detailed explanation of what happened in the previous section.
There's more…
This section consists of additional information about the recipe in order to make the reader more knowledgeable about the recipe.
See also
This section provides helpful links to other useful information for the recipe.
Conventions
In this book, you will find a number of styles of text that distinguish between different kinds of information. Here are some examples of these styles, and explanations of their meanings.
Sequences of operations, for example, adding nodes to the Node Editor or objects to the 3D view, are written as follows:
Open the Blender User Preferences panel (Ctrl + Alt + U) and go to the System tab, which is the last tab to the right of the panel.
This means that you need to press the keys at the same time, then place the mouse arrow on the Texture item in a pop-up menu, and click on the item.
New terms and important words are shown in bold. Words that you see on the screen, in menus or dialog boxes for example, appear in the text like this: "clicking on the Next button takes you to the next screen."
Note
Warnings or important notes appear in a box like this.
Tip
Tips and tricks appear like this.
All materials on the site are licensed Creative Commons Attribution-Sharealike 3.0 Unported CC BY-SA 3.0 & GNU Free Documentation License (GFDL)
If you are the copyright holder of any material contained on our site and intend to remove it, please contact our site administrator for approval.
© 2016-2026 All site design rights belong to S.Y.A.