eXist: A NoSQL Document Database and Application Platform (2015)
Chapter 8. Security
eXist integrates a comprehensive and flexible security subsystem within the core of the database that cascades up through each API and web server. It is impossible to access any resource or collection within eXist without authorization or access rights being granted to the resource.
eXist at its simplest uses classic username and password credentials for authentication. The essence of its security model was very much inspired by the Unix permissions model. Permissions are applied at a resource level, and each resource and collection in the database must have Unix-style permissions assigned to it; these are validated when the resource or collection is accessed.
The Unix-style security model in eXist is adequate for many applications, but it does not scale well when you have hundreds of users with different roles. While you can solve this by creating many groups containing many permutations of user accounts, this quickly becomes unmanageable, and if you cannot understand your own security model you have little chance of asserting its integrity. For larger uses, eXist supports ACLs (access control lists), which allow you to place many modes for different users and groups onto the same document or collection (see “Access Control Lists”). eXist does not yet natively implement RBAC (role-based access control), but it’s not too hard to add this at your application layer as an organization of ACLs.
eXist’s Security Manager also permits pluggable modules that provide an authentication realm, and through this mechanism eXist can authenticate against external providers to better integrate with your existing infrastructure. eXist provides a default internal realm in which user and group credentials are stored in a set of XML documents within a special collection in the database, /db/system/security/exist.
Security Basics
The basic authentication model in eXist follows the Unix model of having users and groups of users. eXist does not support groups of groups. Each resource and collection in the database is assigned an owner user, group, and mode. The mode describes the access permissions that the owner, user group, and other users have to that resource or collection.
WARNING
User and group names in eXist are case-sensitive, so, for example, the username James is not the same as james.
Out of the box, eXist’s internal authentication realm provides you with some default users and groups to get you started.
Users
Table 8-1 outlines the default users provided with eXist out of the box.
|
Username |
Description |
|
guest |
The guest user represents unauthenticated users. Until a user authenticates with eXist, she is a guest. It is possible to allow users access to some resources as guest without authentication; this is particularly useful for serving content to web users without them having to log in to your website. The guest user has a default auto-set password ofguest, although you should never need it. |
|
admin |
The admin user is the default dba (database administrator) user for eXist, and will be the first user that you log in as after installing eXist. By default, the admin user’s password is empty. |
|
SYSTEM |
The SYSTEM account is used internally by eXist processes to modify resources in the database and manage the database. Even eXist has to authenticate itself! You cannot authenticate as the SYSTEM user, and eXist cannot function without that account. |
|
Table 8-1. Default users |
|
WARNING
You really should consider setting a strong password for the admin user to secure the system, either during or immediately after installing eXist. What constitutes a strong password? Well, that’s hard to explain simply, and advice tends to change over time, but this website can help you generate strong passwords: http://strongpasswordgenerator.com. If you’re more security conscious, check out https://www.grc.com/passwords.htm.
Each user in eXist must belong to at least one group, and may belong to many groups. If a user is a member of many groups, then the default group for ownership of resources or collections created by a user is that user’s primary group. The primary group, by default, is the first group that a user is added to, but this can be reconfigured later as the user is added to further groups.
NOTE
For those wishing to operate a secure environment, it is recommended that you create your own admin user with a different username and place it in the dba group. You can then log out and log in as your new admin user and disable the default admin user account through the Java Admin Client’s User Manager.
Groups
Table 8-2 outlines the default groups that eXist provides out of the box.
|
Group name |
Description |
|
guest |
The guest group can be thought of as a group representing unauthenticated users. It is really present to support the guest user. |
|
dba |
The database administrator (dba) group is all-powerful: if you are in this group, then there is nothing that you cannot do with eXist. This is akin to the root/toor/wheel group in a lot of Unix systems, or the Administrators group in Windows systems. |
|
Table 8-2. Default groups |
|
WARNING
You should give great consideration to adding a user to the dba group. Often, you need only a single user in the dba group. It is better to create your own admin groups that have more limited permissions on resources in the database.
In addition, you should never attempt to delete the guest or dba groups from eXist, as they are required for the proper functioning of the system. If you wish to prevent anonymous access to eXist, you can disable the guest account, using the same method described in the hint for the admin user in the previous section.
Permissions
As well as an owner user and group, each resource and collection in eXist has a permissions mode, which is expressed in the same way in eXist as in Unix systems. The mode is made up of three user classes:
§ Owner user
§ Owner group
§ Other users
Each class consists of three mode bits (or flags, if you like) that describe whether read (r), write (w), and/or execute (x) access is permitted for that class.
In Figure 8-1, we can see that the owner user class of the /db collection has read, write, and execute access; the owner group class has just read and execute access; and the other users class also has just read and execute access.
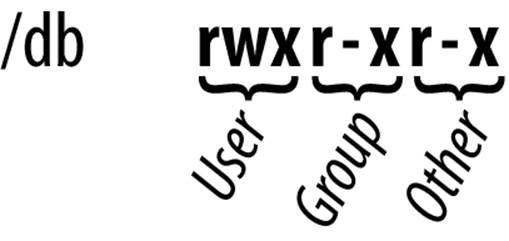
Figure 8-1. Example permission classes on the /db collection
So what do these read, write, and execute bits mean? Well, they are interpreted differently for resources and collections, as outlined in Table 8-3.
|
Bit |
Meaning |
|
Resources |
|
|
Read |
The user class has read access to the content and metadata of the resource. |
|
Write |
The user class has write access to the content and metadata of the resource. |
|
Execute |
If the resource is an XQuery module, then it can be executed by the user class.a If it is not an XQuery module, then this bit is ignored. |
|
Collections |
|
|
Read |
The user class may list the contents of the collection. |
|
Write |
The user class may write to the collection; this includes adding and deleting resources or subcollections to and from this collection. |
|
Execute |
The user class may open this collection. |
|
Table 8-3. Mode bits in eXist |
|
aCurrently in eXist 2.0 and 2.1, both execute and read access are required (not just execute access) in order for a user to execute a stored XQuery module. This limitation persists because the XQuery interpreter in eXist operates entirely within the permissions of the user invoking the XQuery; in future versions of eXist it is likely that this limitation will be lifted.
WARNING
If a user class does not have execute permission on a collection, then the collection is closed to it, and the user(s) in question may neither list the collection’s contents, nor read or write documents in that collection.
If you unset the read bit on a collection and set the execute bit, this allows a user or group to read resources in the collection, but not to list the contents of the collection. In effect, users can only access a resource in that collection if they know the resource’s name in advance and have appropriate permissions on it. If the collection is accessed from the REST Server, it effectively disables collection listings.
Internally in eXist, the mode is held as a series of binary bits, but they are typically represented in one of two ways: either as an octal number or as a mode string (as you have just seen). eXist supports both approaches and provides assistance for converting from one to the other (seeTable 8-4).
|
Character representation |
Octal number representation |
Binary representation |
|
Read (r) |
04 |
100 |
|
Write (w) |
02 |
010 |
|
Execute (x) |
01 |
001 |
|
Table 8-4. Mode bits |
||
When octal numbers are used, the sum of each user class is placed side by side. For example, rwxrwxrwx would equate to:
§ 04 + 02 + 01 = 07
for each user class (i.e., 0777). As another example, 0744 would equate to rwxr--r--.
eXist provides XQuery functions for converting between integer and octal values in the Util module (see util), while several of the security functions in eXist can use either octal or character representations as arguments.
NOTE
If you are browsing the database contents through either the Java Admin Client or the dashboard Collections app, then you may notice that some permissions strings are prefixed with either a c or - character. The c prefix stands for collection and the - prefix stands for resource (i.e., not a collection). This is similar to performing an ls -la command on a Unix-like system, except that whereas there d denotes a directory, eXist has collections instead of directories and therefore uses c, not d. Likewise, if you see a + character on the end of a permission string when browsing the database, this implies that the permission incorporates an access control list (see “Access Control Lists”).
Default Permissions
eXist will apply a default set of permissions to the database when it is first created, and then also to new resources and collections as they are created by users in the database (see Table 8-5).
|
Thing |
Owner user |
Owner group |
Mode |
|
/db |
SYSTEM |
dba |
rwxr-xr-x (0755) |
|
/db/system |
SYSTEM |
dba |
rwxr-xr-x (0755) |
|
/db/system/config |
SYSTEM |
dba |
rwxr-xr-x (0755) |
|
/db/system/plugins |
SYSTEM |
dba |
rwxrwx--- (0770) |
|
/db/system/security |
SYSTEM |
dba |
rwxrwx--- (0770) |
|
New resource |
Logged-in user |
Logged-in user’s primary group |
0666 - umaska |
|
New collection |
Logged-in user |
Logged-in user’s primary group |
0777 - umask |
|
User mask |
- |
- |
022 |
|
Table 8-5. Default permissions |
|||
aThe concept of the umask, or user mask, will be explained in the following section.
NOTE
You might be asking yourself, if the /db collection is only writable by the SYSTEM user by default, how is it that the admin user, which eXist creates by default, can write to the database?
The answer is that the admin user is a member of the dba group, which is all-powerful. The permissions mode is not checked for dba users.
You may be wondering why some of eXist’s collections have a default permissions mode of 0775 and others have a permissions mode of 0770. Put simply, the collections with mode 0770 have higher security concerns—for example, the configuration of security realms, user accounts, and groups is kept under the /db/system/security collection, and it is undesirable to allow non-dba users access to this collection.
User masks
In eXist-db, user accounts can be assigned a mask, just like in Unix; this is known as a umask. The umask adjusts the permissions applied to new resources and collections created by that user. The effective permissions applied at creation time are calculated by taking the default permissions and subtracting the umask of the user creating the resource or collection.
The default umask in eXist is 022, but this is configurable for each user account. Table 8-6 shows some examples of how the effective permissions are calculated when a new resource or collection is created.
|
For |
Permissions |
umask |
Applied permissions |
|
New resource |
0666 (default) |
022 (default) |
0666 - 022 = 0644 (rw-r--r--) |
|
New collection |
0777 (default) |
022 (default) |
0777 - 022 = 0755 (rwxr-xr-x) |
|
Table 8-6. Effective default permissions |
|||
So what does this all mean? Quite simply, that by default:
§ For new resources, the owner can only read and write (this prevents accidentally granting execution permission on XQuery resources to unintended users). The group and other users can only read the resource.
§ For new collections, the owner can open the collection, list the contents, and add or remove resources and subcollections. The group can open the collection and list the contents, but cannot add or delete. Other users, similar to group users, can open the collection and list the contents, and also cannot add to or delete from it.
NOTE
As the default resource permissions are 0666, and with the default umask applied they are 0644, XQueries that you store into the database are not executable by default. This is an intentional decision by the eXist developers, made for two reasons: 1) it follows the Unix security model; and 2) database administrators should be aware of which XQueries are executable and by whom, thus forcing them to enable execution of an XQuery encourages such a mindset.
Many users ask, How can I set all XQueries to be executable? This is achieved relatively easily by creating an XQuery (which you can run once) that uses the functions in the xmldb XQuery module to enumerate the XQueries stored in the database, and the Security Manager XQuery module to set the permissions of those XQueries (see xmldb and sm inAppendix A).
Managing Users and Groups
In eXist the creation of users and groups is also restricted by permissions, and there are differences between the required permissions for each. Table 8-7 shows who is able to make modifications to users and groups.
|
Action |
User modification requirement |
Group modification requirement |
|
Creation |
§ Member of the dba group |
§ Member of the dba group |
|
Modification |
Either: § Target user § Member of the dba group |
Either: § Group manager § Member of the dba group |
|
Deletion |
Either: § Target user § Member of the dba group |
Either: § Group manager § Member of the dba group |
|
Table 8-7. Permissions to modify principals |
||
Group Managers
When a group is created in eXist it has a single member, which is the user who created it. A group is typically used to model collaboration between users on resources in the database. As you build up more and more users and groups, it becomes necessary to share the administration of these groups of users.
eXist extends the Unix model for user groups, and introduces the concept of group managers. Members of a group in eXist may be promoted to managers of that group; in fact, the first member of any group (i.e., the creating user) is automatically set up as the first group manager.
Group managers share control of the group, and may perform several actions upon the group:
§ Adding or removing members to or from the group, including other group managers
§ Promoting or demoting members of the group to or from group managers
§ Modifying the metadata of the group
§ Deleting the group, and therefore removing all members from the group
WARNING
As group managers maintain complete control of the group and its membership, it is important that they all share the same trust relationship. If you were a group manager, it would be inadvisable to promote someone else to a group manager if you did not trust her, as she could effectively remove you and take control of the group.
Tools for User and Group Management
So now that you have a good grounding in the basic security concepts involved in eXist, how do you actually apply these by creating and managing users and groups?
In eXist there are often several ways to achieve the same goal, depending on how you want to approach the problem. Security configuration is no exception: there are at least five possible ways to manage users and groups in eXist.
Using the Java Admin Client
eXist ships with an admin client application written in Java (see “The Java Admin Client”) that provides an excellent user management facility to make working with users and groups simple. This is the tool we will focus on in “User and Group Management with the Java Admin Client”. The User Manager is available via the Tools menu in the Java Admin Client, as you can see in Figure 8-2.
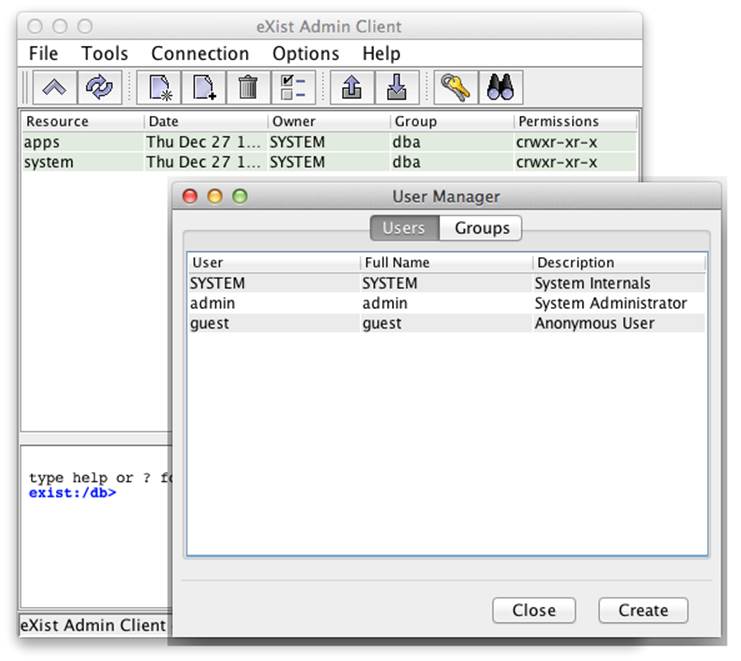
Figure 8-2. The Java Admin Client User Manager
Using the User Manager web app
eXist provides a User Manager app out of the box as part of its dashboard (see Figure 8-3). This app provides identical functionality to the User Manager in the Java Admin Client and looks almost identical. We have chosen not to focus on this, as having such web apps installed may be undesirable in a production server environment (see “Removing preinstalled EXPath packages”).
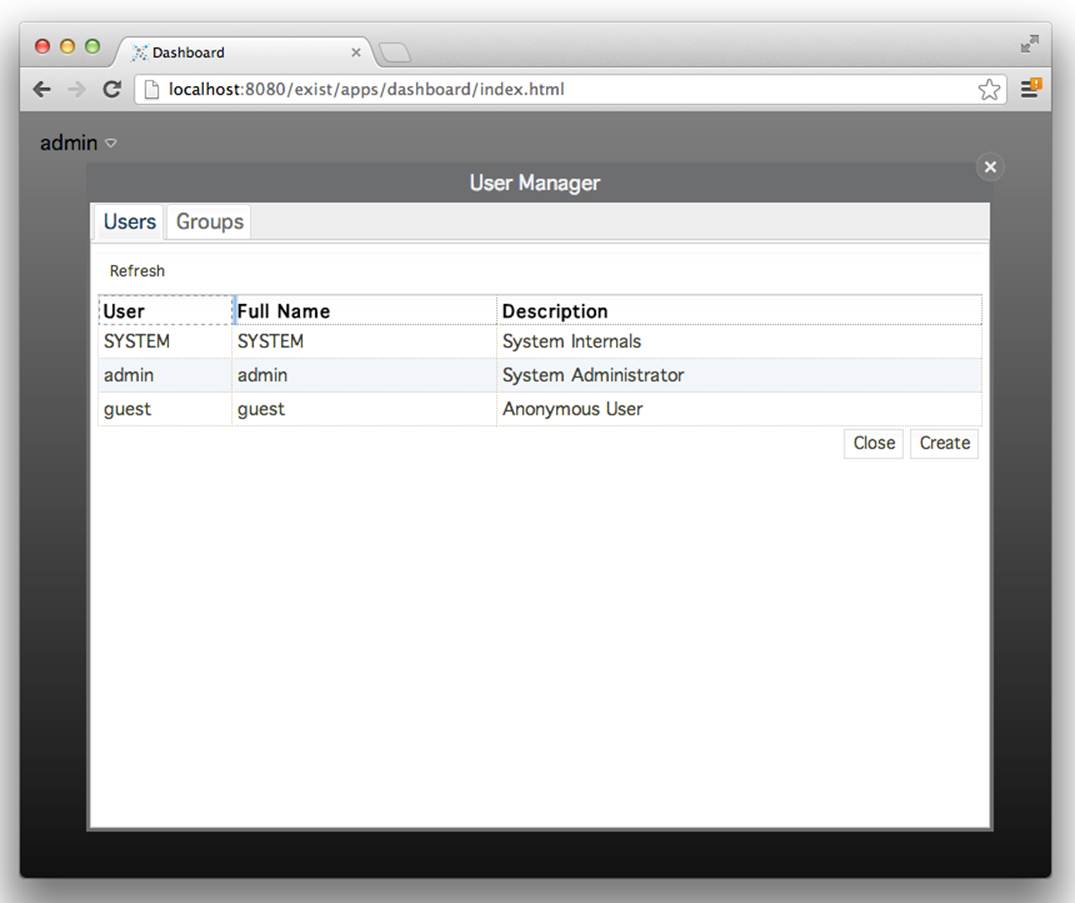
Figure 8-3. The dashboard User Manager app
Executing XQuery functions
eXist provides an XQuery module called the Security Manager. This module has many functions that can be called from your own XQuery modules for programmatically managing security within the database; see sm.
Modifying the security collection
All user and group information in eXist is kept in a series of XML documents within the database (see Figure 8-4). The system collection /db/system/security contains all user and group configuration for all authentication realms known to eXist. The eXist internal authentication realm stores its data in /db/system/security/exist, which has two subcollections: accounts and groups. Unsurprisingly, each XML document in these collections represents a single user or group within the system.
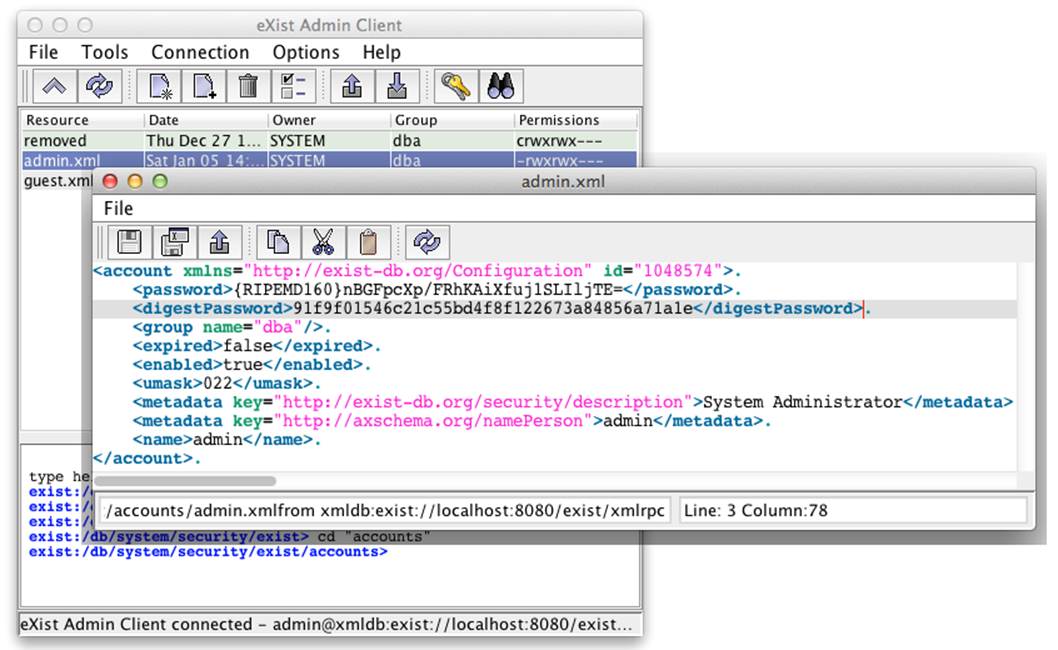
Figure 8-4. Example of the XML document for the eXist admin user
eXist has a dynamic configuration system, which means that when you modify user or group information, the XML documents in the relevant collection are updated, and vice versa; that is, if you were to modify these XML documents, the system would load the changes to the users and groups immediately. Modifying these documents directly is generally discouraged, as their syntax is subject to change at any time, and any mistakes made in the syntax could upset the stability of the system or your ability to access it. However, while this approach is not generally recommended, when used carefully, it does provide a convenient mechanism for those accessing eXist via WebDAV (see “WebDAV”) to create, modify, and delete users and groups simply by adding, updating, or removing XML documents in these collections. Should you opt for this approach, you must ensure that you do not change the id attribute of an account or group, as these are internal pointers within eXist. In addition, if you create a new account or group, you must be certain that you assign it the next free account or group ID.
Using the APIs: XML-RPC, XML:DB, and SOAP
eXist has several APIs for programmatically connecting to the database remotely (or even within an embedded JVM, if you’re using XML:DB) and managing users and groups. The use of these APIs is discussed more thoroughly in Chapter 13.
User and Group Management with the Java Admin Client
In this section we provide a practical walkthrough and explanation of creating a group and subsequently a user. We also deal with group membership and group managers.
Scenario
In our fictitious organization, Ficto Ltd., a new team has been formed to manage content about animal welfare, which Ficto wishes to store, transform, and publish as part of its veterinary journal. The team is expected to grow in the near future. We need to add new accounts for the four team members, James Smith, Joe Brown, Helen Finkle, and Laura Laurence. Laura and James are in charge of the new team.
We will create a security group for the team, create accounts for each member of the team, and set up James and Laura as group managers, so that they can add any future team members to the group.
Creating a Group
First, we need to create our group for the Animal Welfare Content Team.
Launch the Java Admin Client, log in to the database, open the Tools menu, and select Edit Users (Figure 8-5).
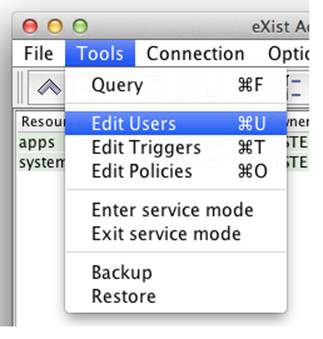
Figure 8-5. Launching the User Manager
Once in the User Manager, click the Groups tab. Then you can either right-click on an existing group in the list to get a pop-up menu and click the New Group menu item, or simply click the Create button at the bottom of the User Manager (Figure 8-6).
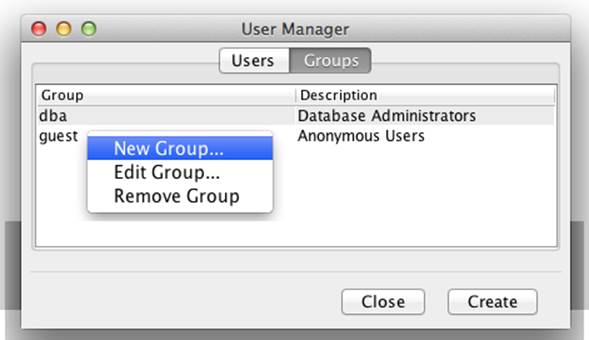
Figure 8-6. Accessing the New Group dialog
When the New Group dialog appears, you need to complete the form and click the Create button. Keep the name of the group simple and remember that group names are case-sensitive in eXist. We recommend that you use short group names in lowercase. Regardless of the scheme you decide on, you cannot use punctuation or whitespace when naming a group.
As with the User Manager dialog, you can right-click on the Group Members list to add and remove group members and also to promote or demote them to or from group managers (Figure 8-7). By default, the creator of the group will be a member and manager of the group he creates.
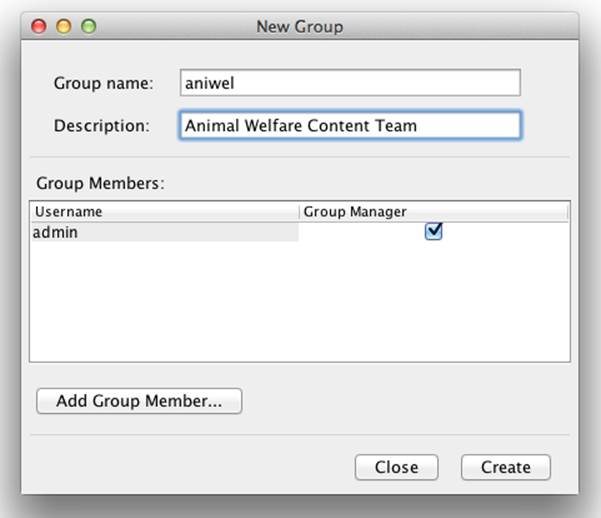
Figure 8-7. Creating a group
Once you have completed the form, click the Create button. The group will be created and you will be returned to the User Manager Groups list.
NOTE
You can associate simple descriptive metadata (such as a description or email address) with groups and accounts in eXist, which can be useful for searching or managing them. The User Manager in the Java Admin Client and the dashboard both limit the metadata to just a description (and a name for accounts), but you can set and retrieve additional metadata properties using the XQuery functions in the Security Manager module, as discussed in sm.
Creating Users
Now we need to create user accounts for each member of the Animal Welfare Content Team and add them to the group we created for the team.
From the User Manager, click the Users tab; and then either right-click on an existing user in the list to get a pop-up menu and click the New User menu item, or simply click the Create button at the bottom of the User Manager (Figure 8-8).
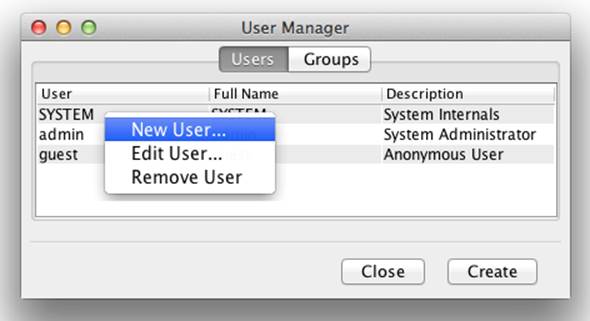
Figure 8-8. Accessing the New User dialog
When the New User dialog appears, you need to complete the form and click the Create button. Keep the name of the user simple and remember that user account names are case-sensitive in eXist. We recommend that you use short usernames in lowercase. Regardless of the scheme you decide on, you cannot use punctuation or whitespace when naming a user.
From the New User dialog you can see a list of available groups of which the user can become a member (providing you have permission to add her to the group). For the purposes of this scenario, we need to add the new user to our newly created group called aniwel (Figure 8-9).
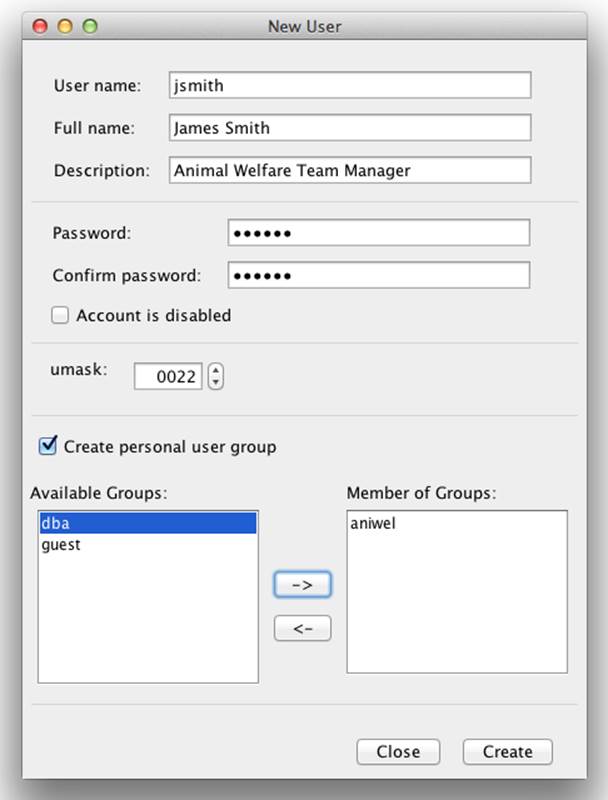
Figure 8-9. Creating a user
Once you have completed the form, click the Create button. The user will be created and you will be returned to the User Manager Users list.
You should now repeat this process to create the other three users described in “Scenario”. The complete list is shown in Figure 8-10.
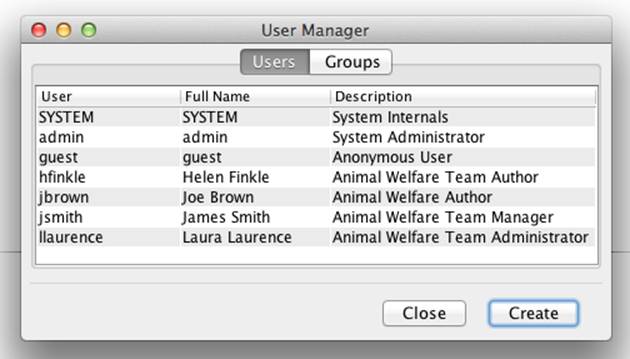
Figure 8-10. List of created users
NOTE
When you’re creating a new user, the default option is to create a personal group for that user. This creates a group with the same name as the user, and sets the user as both a member and group manager of that group. This personal group is then also the default group for that user, which means that should the new user add a resource or collection to the database, the owner group of that resource or collection will be the user’s personal group. Such an approach helps users avoid adding resources to the database and accidentally granting unintended access to other users of a different group.
When you are creating a new user, it is always recommended to also create the personal group.
Setting Group Managers
Finally, we need to set up the managers of the Animal Welfare Content Team as managers of the group that we created for the team.
From the User Manager, click the Groups tab, and then select the aniwel group in the list. Next, right-click on the aniwel group to get a pop-up menu and click the Edit Group menu item (Figure 8-11).
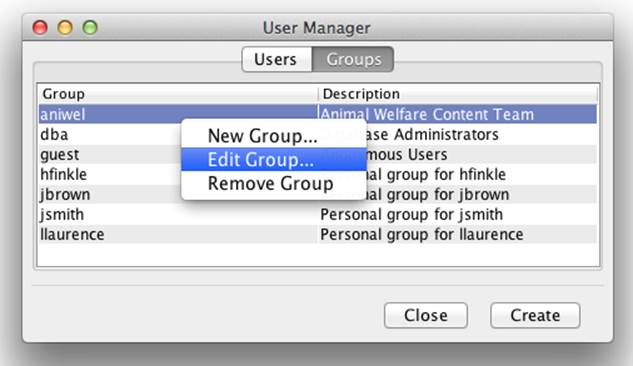
Figure 8-11. Accessing the Edit Group dialog
When the Edit Group dialog appears, you need to promote jsmith and llaurence to group managers of the aniwel group. Select the target group member in the list, and then right-click on the group member. Then click the Group Manager menu item (Figure 8-12).
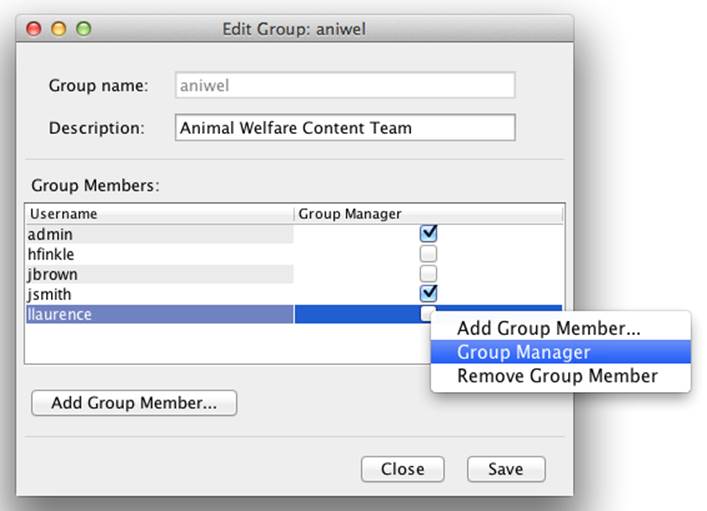
Figure 8-12. Promoting group members to group managers
Once you have completed the changes to the group members, click the Save button. The group will be updated and you will be returned to the User Manager Groups list. You have now successfully created the users and groups and set up the group managers required in “Scenario”.
Managing Permissions
When resources are added to the database, the owner of those resources is the user adding the resources, the group of those resources is the primary group of the user adding the resources, and the mode is calculated from default permission modes subject to the user’s umask, as described in “User masks”.
You may modify the permissions of a resource in the database at any time provided you have the appropriate rights to modify the permissions of that resource. Table 8-8 shows the ownership and group membership requirements for modifying the permissions of a collection or resource.
|
Action |
Collection modification requirement |
Resource modification requirement |
|
Change owner |
§ Member of the dba group |
§ Member of the dba group |
|
Change group |
Either: § Owner and member of the destination group § Member of the dba group |
Either: § Owner and member of the destination group § Member of the dba group |
|
Change mode |
Either: § Owner § Member of the dba group |
Either: § Owner § Member of the dba group |
|
Table 8-8. Requirements to modify permissions |
||
Tools for Permission Management
As with managing users and groups, there are a number of approaches to managing permissions in eXist.
Using the Java Admin Client
The Java Admin Client (see “The Java Admin Client”) provides an excellent facility for modifying the permissions of collections and resources in the database. This is the tool we will focus on in “Permission Management with the Java Admin Client”. The “Resource properties” option on the File menu in the Java Admin Client opens the permissions management screen shown in Figure 8-13.
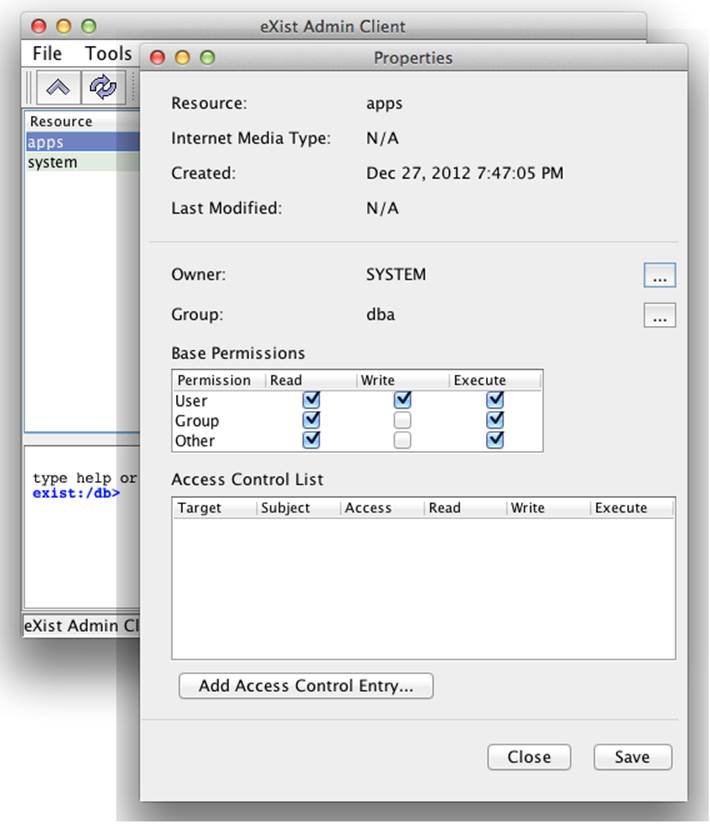
Figure 8-13. The Java Admin Client’s Resource Properties dialog
Using the collection browser web app
eXist provides a collection browser app out of the box as part of its dashboard. This app has a Resource Properties dialog that provides identical functionality to the Resource Properties dialog in the Java Admin Client and looks almost identical (see Figure 8-14).

Figure 8-14. The Resource Properties dialog of the dashboard’s collection browser app
Executing XQuery functions
eXist provides an XQuery module called xmldb (see xmldb). This module provides functions that allow you to retrieve the created and last-modified timestamps of resources, and allows you to retrieve or set the Internet media type of a resource.
Likewise, the previously mentioned Security Manager XQuery module provides functions for retrieving the permissions and changing the owner user, group, and mode of a resource (see sm).
Using the XML-RPC or XML:DB API
eXist’s XML-RPC (see “XML-RPC API”) and XML:DB (see “XML:DB Remote API”) APIs allow you to programmatically connect to the database remotely (or even within an embedded JVM, if you’re using XML:DB) and retrieve and modify the permissions of a resource. The use of these APIs is discussed more thoroughly in Chapter 13.
Using the eXist Ant tasks
eXist provides a series of tasks that can be used with Apache Ant, the basics of which are covered in “Using Ant with eXist”. These tasks allow you to change permissions (chmod), change ownership (chown), and add, edit, and remove users and groups.
The Ant tasks can be an excellent choice in a security-constrained environment, as they may be executed directly on the server console and thus do not require any external XML:DB network access to the host. You may, of course, also choose to execute these against a remote eXist server; however, that will have an impact on your security model, as you will also need to allow the XML:DB protocol across the network between your client and server.
Permission Management with the Java Admin Client
Modifying permissions in eXist is relatively simple with the Java Admin Client. First, you must select a resource or collection in the resource list by clicking on it; then you simply open the File menu and click the “Resource properties” menu item to display the Resource Properties dialog (see Figure 8-15).
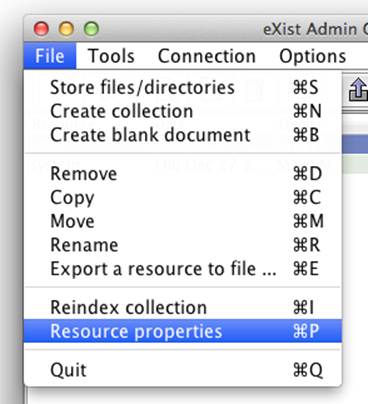
Figure 8-15. Accessing the “Resource properties” menu item
The Resource Properties dialog (Figure 8-16) allows you to change the permission mode applied to the resource using a convenient grid of checkboxes so that you need not remember how to describe the mode in octal format.
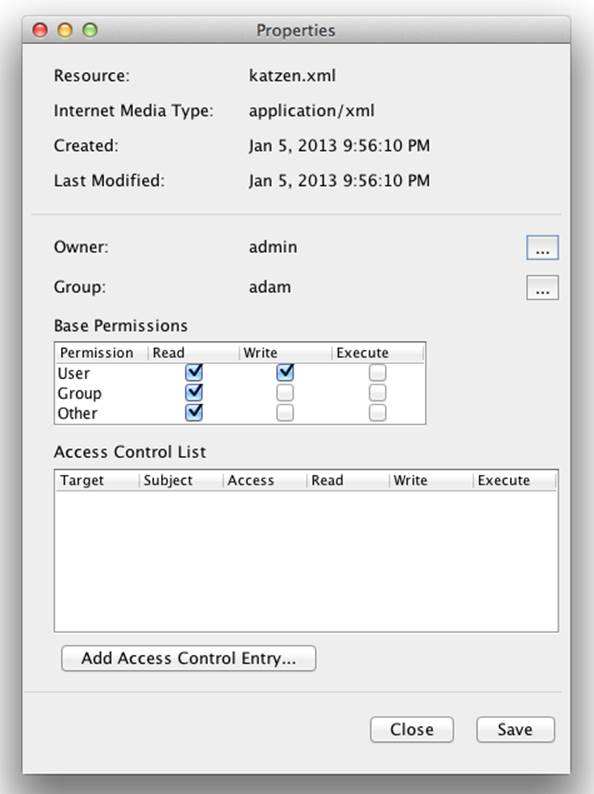
Figure 8-16. Resource Properties dialog
NOTE
The Access Control List and Add Access Control Entry sections of the Resource Properties dialog are covered in “Access Control Lists” and can be safely ignored for the moment.
You may also modify the owner or group of the resource by clicking the button labeled with an ellipsis (...) next to the name of the current owner or group. When modifying the owner or group of a resource, you will be presented with an autocompleted entry field that will only permit you to choose an existing user or group, respectively (see Figure 8-17).
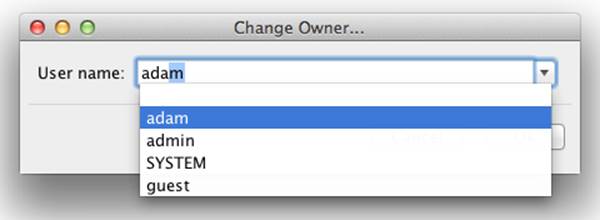
Figure 8-17. Change Owner dialog
Access Control Lists
Access control lists (ACLs) are an advanced permissions model that builds upon the basic Unix-style user and group permissions model that eXist uses. Each resource or collection in eXist may have an ACL in addition to its standard Unix-style permissions of owner, group, and mode.
ACLs are a very new feature in eXist, and familiarity with ACLs is certainly not a prerequisite to being able to understand and make use of eXist. ACLs are available to complement the basic permissions model when it does not provide quite enough for you. The main advantage ofACLs, when used correctly, is greater flexibility in controlling access to resources. The ACLs in eXist were inspired by those in the Network File System v4 (NFSv4) and Zettabyte File System (ZFS), and while they are much simpler than those in their progenitors, should you choose to use them you must clearly understand the evaluation order of ACLs when combined with eXist’s Unix-style permissions.
Consider the following scenario: you have a group of 100 users who need to have access to two different collections: CollectionA and CollectionB. Using the Unix-style permissions, you would simply create a new security group, GroupA, add all 100 users to the group, and give that group access to (using an appropriate mode) both CollectionA and CollectionB and their subresources.
Now suppose that later you are asked to restrict CollectionA so that all but 10 members of the group can access it. This means that you now have to create a second group, GroupB, containing only 90 of the 100 users and change the permissions on CollectionA and its subresources. You now have two groups, GroupA and GroupB, where GroupB is applied to CollectionA and GroupA is applied to CollectionB. Ninety users are in both GroupA and GroupB, and GroupA also has an extra 10 users in it. This quickly becomes a bit of a mess to manage, and so far you have only been asked to make a single change to the security of the system!
Rather than duplicating 90 of the 100 users from GroupA into GroupB, you could simply have used ACLs. Creating a group of the 10 users for whom you want to remove access to CollectionA would allow you to add an access control entry (ACE; discussed in the next section) to the ACL for CollectionA, which would prevent that group from accessing it. This is much easier to manage.
Of course, most things that can be done with ACLs can also be done by subdividing permissions—that is, by creating new groups, adding users to them, and applying them with specific modes to individual resources and collections. However, the problem with that approach is that, with even a fairly simple system, you can quickly end up with a vast proliferation of small groups that are not only hard to name, but also hard to manage because you will need to remember why you applied these subdivided groups of users to various resources and collections.
WARNING
When eXist evaluates the permissions of a resource or collection to determine whether to allow or deny access, the ACL is evaluated before its Unix-style permissions. If the ACL is empty, or does not explicitly allow or deny access, then the Unix-style permissions are evaluated.
Simply put, the ACL can override the Unix-style permissions, which is where its power is derived from.
Access Control Entries
Access control lists are composed of access control entries. The ACL of a resource or collection is considered empty if it has no ACEs; otherwise, it may have up to 255 ACEs. When you consider that each ACE may reference a group of users, this gives you a lot of scope for assigning permissions to resources.
An ACE is made up of several fields that describe the access rights to the resource to which the ACL belongs, as shown in Table 8-9.
|
ACE field |
Description |
|
Target type |
Indicates to the ACE whether the ID is that of a USER or GROUP. |
|
ID |
The identifier of the target; that is, the ID of the user or group. |
|
Access type |
The type of access applied to the target, either ALLOWED or DENIED. |
|
Mode |
The access mode of the target to the resource or collection. Three octets (e.g., rwx). |
|
Table 8-9. ACE fields |
|
So, as we can see from the table, the nice thing about ACEs in ACLs is that they not only allow (ALLOWED) us to grant access to a resource or collection, but they also allow us to explicitly deny (DENIED) access.
The ordering of ACEs in an ACL is critically important.
The ACEs in an ACL are evaluated in order from the start of the list to the bottom of the list. The first ACE in an ACL that both matches a user directly (or indirectly, as a member of a group) and matches the requested access mode will be applied, and the evaluation of permissions will halt.
Consider an ACL with two ACEs in the following order:
1. Prevents a group of users (GroupA) from accessing a resource
2. Allows a user (UserA) from that group (GroupA) access to the resource
Once the ACL is applied, the user UserA will not be allowed access to the resource. If you want that user to have access to the resource, you should swap the order of the ACEs in the ACL.
ACLs by Example
It is perhaps easiest to explain ACLs by giving some concrete examples of how they might be used, and explaining the results of various configurations.
Allowing additional access
With the Unix-style permissions in eXist, you can only control access to a resource by the owner, a group of users, and all other users who are not the owner or within that group of users.
Imagine that you work for a small organization in the publishing industry. You have a security group of users who are content editors already configured in eXist, and that group has write access to many collections in the database, where each collection represents a different journal. However, one day, one of the editors is in an accident and will be away from the office for several weeks. During this time Bob Smith has to pick up that editor’s work on the Medical Neuroscience Journal.
Currently, the Medical Neuroscience Journal collection is configured as follows:
|
Collection |
Owner |
Group |
Mode |
|
/db/journals/review/medical-neuroscience |
admin |
editors |
rwxrwx--- |
So how do we allow Bob Smith to do his temporary editing work on the medical-neuroscience collection? There are several possible approaches:
§ We could add Bob Smith to the editors group.
Unfortunately, we may then have unintentionally given him access to other journal collections in the database, causing a security risk!
§ We could create a new group called editorsAndBobSmith, add all the existing members of editors to the new group, add Bob Smith to the group, and then change the group applied to the medical-neuroscience collection from editors to editorsAndBobSmith.
We have not caused any security issues here, but this seems like quite a lot of work and is quite messy! Not to mention, we would have to undo these changes when the original content editor returned.
§ As Bob Smith is an exception to the rule encoded in the permissions of the collection, we could add an ACE to the ACL for the medical-neuroscience collection that allows Bob Smith access to that collection.
This is most likely the simplest approach, and arguably the easiest to manage over time.
Let’s see how the configuration for the Medical Neuroscience Journal might look if we solved this problem using an ACL:
|
Collection |
|
/db/journals/review/medical-neuroscience |
|
ACL |
Target type |
ID |
Access type |
Mode |
|
ACE:0 |
USER |
bobsmith |
ALLOWED |
rwx |
|
Unix-style permissions |
|||
|
Owner |
Group |
Mode |
|
|
admin |
editors |
rwxrwx--- |
When Bob Smith tries to access the medical-neuroscience collection, eXist checks the collection’s ACL, iterating through each ACE in turn until it finds one that matches Bob Smith. In this case the first ACE matches the user bobsmith and allows Bob Smith access to the collection with the mode rwx, allowing Bob to go about his temporary job.
When one of the other existing editors tries to access the medical-neuroscience collection, eXist still has to check the collection’s ACL. If, after iterating through each ACE in turn it has not found one that matches the editor by user account or group, and so it falls through to the Unix-style permissions and find the editor in the editors group, allowing her access with the mode rwx.
Restricting access
This example is in some ways the inverse of the previous, but in addition it applies a different mode in the ACL than in the Unix-style permissions to solve a more complex problem.
This time at our small publishing organization, one of our editors has been misbehaving and not rigorously checking articles from an academic institution that he used to be involved with before accepting them to be published. The editor in question, Jason Green, has thus been placed on review and is no longer allowed to make edits to the Nanotechnology Journal; he is expected to just review the journal manually and propose changes by email to another editor for review first.
Currently, the Nanotechnology Journal collection is configured like so:
|
Collection |
Owner |
Group |
Mode |
|
/db/journals/review/nanotechnology |
admin |
editors |
rwxrwx--- |
We could reconfigure this collection with an ACL to prevent Jason Green from changing the collection, while still allowing him the ability to view the collection. Such a configuration for the nanotechnology collection could look like this:
|
Collection |
|
/db/journals/review/nanotechnology |
|
ACL |
Target type |
ID |
Access type |
Mode |
|
ACE:0 |
USER |
jasongreen |
DENIED |
-w- |
|
Unix-style permissions |
|||
|
Owner |
Group |
Mode |
|
|
admin |
editors |
rwxrwx--- |
When Jason Green tries to access the nanotechnology collection, eXist checks the collection’s ACL, iterating through each ACE in turn until it finds one that matches Jason Green. In this case the first ACE matches the user jasongreen, so from here one of two things happens:
§ If Jason Green is trying to write to the collection (add or remove a document), then the ACE forbids him from doing that, and he will not be allowed access.
§ If Jason Green is trying to execute (open) and/or read (the contents of) the collection, then the ACE does not forbid him from doing that, as it only denies write access to the collection. This ACE does not match the access request, so we fall through to the Unix-style permissions, which allow those in the editors group read and execute access to the collection. As Jason is still an editor, he is allowed access.
When one of the other existing editors tries to access the nanotechnology collection, eXist still has to check the collection’s ACL. If, after iterating through each ACE in turn it has not found one that matches the editor by user account or group (which it won’t, unless he is Jason Green), so it falls through to the Unix-style permissions and find the editor in the editors group, allowing him access with the mode rwx.
Allowing and restricting access
This example tries to combine aspects of the two previous examples to show a more complex and comprehensive ACL configuration.
This time at our small publishing organization, there are several new developments:
§ There has been a recruitment drive, and a number of trainees have been recruited, some of whom will become editors. Management has decided that these trainees should only have read access to the system while they learn the ropes of the job. However, all trainees should have read access to any part of the system, so that they can easily learn more about the organization’s business.
§ The organization wishes to give read-only access to the printers of the journals so that they can pull the updated content directly from the system.
§ Bob Ling at the printing organization will be allowed to modify the journal content to make stylistic changes for a better printed result.
This configuration is illustrated in Figure 8-18.
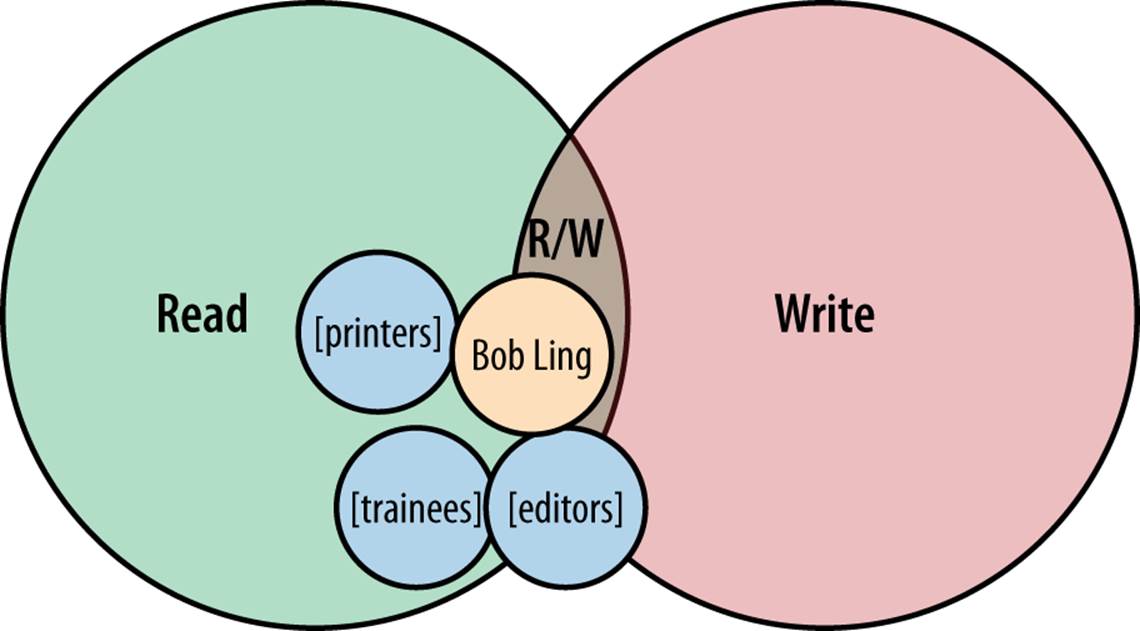
Figure 8-18. Venn diagram of required permissions for the nanotechnology collection
We’ll use the nanotechnology collection configured in the previous section as a starting point:
|
Collection |
|
/db/journals/review/nanotechnology |
|
ACL |
Target type |
ID |
Access type |
Mode |
|
ACE:0 |
USER |
jasongreen |
DENIED |
-w- |
|
Unix-style permissions |
|||
|
Owner |
Group |
Mode |
|
|
admin |
editors |
rwxrwx--- |
We can modify this configuration to suit our evolving needs. First we create a group called trainees, which will contain all of our newly recruited trainees. We also add our trainees to the groups for the roles that they will eventually fulfill (e.g., editors). We then add an ACL to prevent members of the trainees group from changing the collection, while still allowing them the ability to view the collection. Such a configuration for the nanotechnology collection could look like this:
|
Collection |
|
/db/journals/review/nanotechnology |
|
ACL |
Target type |
ID |
Access type |
Mode |
|
ACE:0 |
USER |
jasongreen |
DENIED |
-w- |
|
ACE:1 |
GROUP |
trainees |
ALLOWED |
r-x |
|
ACE:2 |
GROUP |
trainees |
DENIED |
-w- |
|
Unix-style permissions |
|||
|
Owner |
Group |
Mode |
|
|
admin |
editors |
rwxrwx--- |
The new ACE at index 1 that we have added allows all trainees read access to the collection. The new ACE at index 2 prohibits any trainee from writing to the collection. While without this trainees who are not editors would not be able to write to the collection, this ensures that all trainees, including any user who is in both the trainees group and the editors group, cannot write to the collection (otherwise they would be able to, due to eventual fall through to the Unix-style permissions). This works because the ACL is evaluated before the Unix-style permission, so any user in both groups will be denied write access due to his membership in the trainees group. Neat, right?
NOTE
The mode in an ACE is explicit rather than implicit. This means that an unset bit in the ACE mode (indicated by the - character) is not considered as either ALLOWED or DENIED, so processing moves to the next ACE in the ACL or finally falls through to the Unix-style permissions. When an ACE is checked, for it to be applied, it must match both the target and the requested access mode.
Finally, we need to create a group for all of the users at the printer that will need read access to the system; let’s call it printers. We then add all our printer users to that group. Next, we add two more ACEs to the ACL on the nanotechnology collection. The first will permit Bob Ling, who is in the printers group, his extra write access, and the second will allow anyone in the printers group (including Bob Ling) read access. The updated configuration for the nanotechnology collection now looks like:
|
Collection |
|
/db/journals/review/nanotechnology |
|
ACL |
Target type |
ID |
Access type |
Mode |
|
ACE:0 |
USER |
jasongreen |
DENIED |
-w- |
|
ACE:1 |
GROUP |
trainees |
ALLOWED |
r-x |
|
ACE:2 |
GROUP |
trainees |
DENIED |
-w- |
|
ACE:3 |
USER |
bobling |
ALLOWED |
-w- |
|
ACE:4 |
USER |
printers |
ALLOWED |
r-x |
|
Unix-style permissions |
|||
|
Owner |
Group |
Mode |
|
|
admin |
editors |
rwxrwx--- |
When Bob Ling tries to write to the nanotechnology collection, he will be allowed access by the ACE at index 3; when he tries to read the collection, he will be allowed access by the ACE at index 4 because he is also a member of the printers group.
When another member of the printing staff (who is not Bob Ling) tries to read the collection, she will be allowed access by the ACE at index 4; if she tries to write the collection, she will fall through to the Unix-style permission, which prohibits anyone apart from the admin or a member of the editors group from writing to the collection. As this member satisfies neither of these requirements, she will be denied access.
Managing ACLs
When resources or collections are added to the database, they start with an empty ACL. Accordingly, only the Unix-style permissions are in effect. However, you may add and remove ACEs to an ACL of a resource or collection at any time, providing you have the appropriate permissions to do so. Table 8-10 shows which users are permitted to modify the ACL of a collection or resource.
|
Action |
Collection modification requirement |
Resource modification requirement |
|
Add, Update, Remove ACE |
Either: § Member of the dba group § Owner of the collection with write access on the collection |
Either: § Member of the dba group § Owner of the resource with write access on the resource |
|
Table 8-10. Permissions to modify ACL |
||
NOTE
The same tools described in “Tools for Permission Management” for managing permissions also provide the facilities for managing ACLs.
ACL management with the Java Admin Client
Once you’ve opened the Resource Properties dialog of the Java Admin Client, as described in “Permission Management with the Java Admin Client”, you can access the ACL for the resource. As order of ACEs in an ACL is significant, right-clicking on an existing ACE allows you not only to modify that ACE or remove it, but also to move it up or down in the ACL and to insert a new ACE before or after the selection (Figure 8-19).
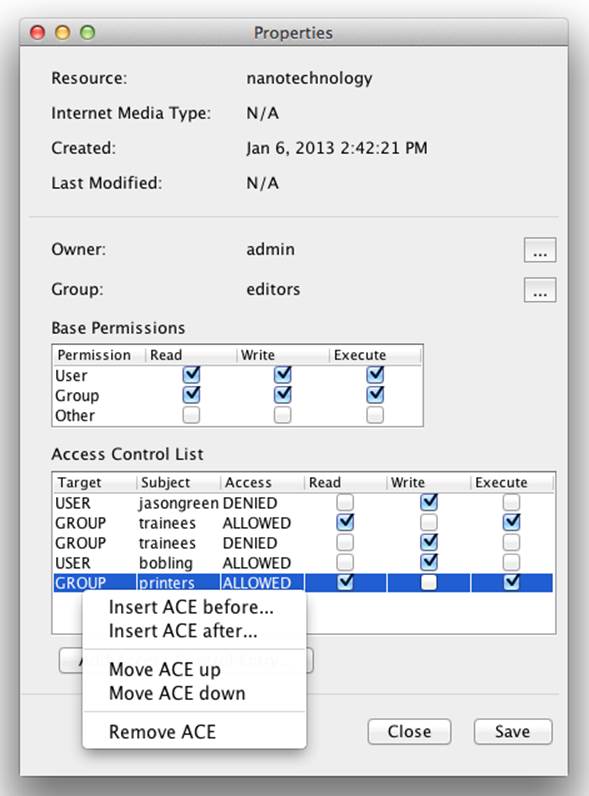
Figure 8-19. ACL management in the Java Admin Client
Clicking either the Add Access Control Entry button, the “Insert ACE before” menu item, or the “Insert ACE after” menu item will display a new dialog that allows you to configure the fields of a new ACE (see Figure 8-20).
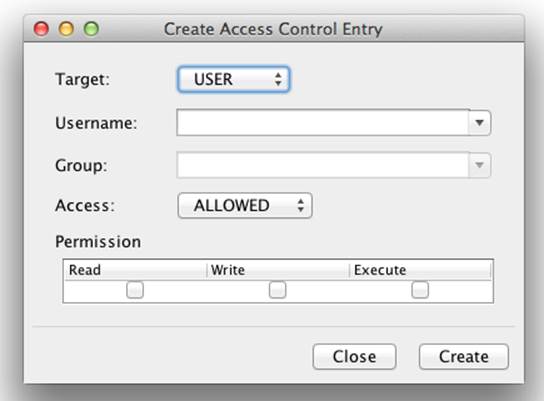
Figure 8-20. Creating an ACE in the Java Admin Client
Realms
As previously mentioned, the Security Manager in eXist permits pluggable modules that provide an authentication realm to the system. eXist comes with a default built-in internal realm that authenticates users and groups whose details are stored in a set of protected XML documents in the database.
In addition to the built-in internal realm, some more complex realm modules are available; these allow integration with authentication systems external to eXist. Each module is expected to provide a single authentication realm. You enable the configuration of these modules by modifying the following document in the database: /db/system/security/config.xml. When multiple realms are configured, eXist will always consult its internal realm first, and then each additional realm in the order in which they are configured in the config.xml document. eXist’s internal realm cannot be disabled, as it is required for the correct functioning of the system; however, you need not keep any user accounts in it apart from the built-in accounts of SYSTEM, admin, and guest that ship with eXist.
LDAP Realm Module
The Lightweight Directory Access Protocol (LDAP) realm module allows you to authenticate users of eXist against an LDAP directory. While traditionally LDAP was used in larger organizations for centralized user management, Microsoft’s Active Directory (AD) technology (among other technologies) is built upon it.
The LDAP module in eXist is very flexible and can be configured to authenticate against almost any LDAP directory server, including domain controllers within a Microsoft Active Directory domain configuration. The LDAP module is shipped with eXist by default, so if you wish to use it simply add its realm configuration to the security configuration in /db/system/security/conf.xml.
LDAP itself does not impose a structure on any particular directory system; rather, it allows you to create a directory structure of your own devising. Products like Red Hat IPA (Identity, Policy, and Audit) and Microsoft Active Directory typically impose a common proprietary structure on an LDAP directory implementation. The LDAP module is flexible enough to cope with any directory structure, but this flexibility comes at a price—namely, that the configuration of the LDAP module is more complicated than that of other such modules in eXist. However, it should not be too difficult for those familiar with LDAP.
The configuration options available for the LDAP module are comprehensive, so we will examine each and provide some explanation. We will also provide an example configuration for integrating with Microsoft Active Directory.
WARNING
The current design of the LDAP module causes eXist to cache LDAP account credentials in the /db/system/security/ldap collection.
This has a few implications that you should be aware of:
§ A copy of your LDAP password will be kept securely (RIPEMD-160 hashed), which may or may not meet the security requirements of your organization.
§ If a user is deleted or disabled in the LDAP directory, he will still have access to eXist until his cached credentials are manually removed from eXist.
LDAP configuration options
The configuration is specified in an LDAP realm configuration inside the security XML configuration file. An XML Schema 1.1 schema is provided with eXist for checking your LDAP configuration structure; you can find it in $EXIST_HOME/extensions/security/ldap/ldap-realm.xsd. An example for Microsoft Active Directory is provided in “LDAP configuration for Microsoft Active Directory”.
All configuration options in Table 8-11 are mandatory unless otherwise stated.
|
Configuration option name |
Description |
|
context (LDAP context configuration) |
|
|
principals-are-case-insensitive |
This can be either true or false. eXist itself is case-sensitive for security principals (i.e., usernames and group names), but your LDAP directory may not be case-sensitive (e.g., Active Directory is not). If your LDAP directory is not case-sensitive, then you should set this to true to ease interoperability. |
|
authentication |
This can be either none, simple, or strong: none No authentication is required before making queries of the LDAP server. simple Basic username and password authentication, sent in plain text across the network. This can be improved by using SSL. strong This is unsupported at this time in eXist. |
|
use-ssl |
This can be either true or false. It’s optional, and defaults to false. |
|
url |
The URL of your LDAP server (e.g., ldap://dir.mydomain.com:389, or for SSL ldaps://dir.mydomain.com:636). For Active Directory, use the address of one of the domain controllers or the AD itself. |
|
domain |
The domain name that your LDAP directory describes (e.g., mydomain.com). |
|
Table 8-11. Explanation of LDAP configuration options by category |
|
|
search (LDAP search configuration) |
|
|
base |
The base of the LDAP context to search. Allows you to restrict the scope of searches within your LDAP directory to a specific distinguished name (e.g., dc=dir,dc=mydomain-ever,dc=com). Otherwise, if you wanted to, say, limit the search scope to just the office of engineers within your directory for your organization, you’d do so with ou=engineers,ou=offices,dc=dir,dc=mydomain,dc=com. In LDAP parlance, dc stands for domain component and ou for organization unit. |
|
default-username |
The default username, used if eXist needs to attach to the directory to perform a query for a system task it is carrying out. Typically the username of the user authenticating with eXist will be used instead of this. This account need only have minimal read access to the directory server. |
|
default-password |
The default password, used with the default username. |
|
account (LDAP account search and property mapping configuration) |
|||||||||||||||||||||
|
search-filter-prefix |
The prefix to use when searching the LDAP directory. This should indicate the class of a user within the LDAP directory. For example, with Active Directory you would use the value objectClass=user. eXist would then construct an LDAP search string like (&(objectClass=user)(name=value)), where name will be substituted by the actual LDAP attribute indicated by a search-attribute and value will be substituted by the criteria of the thing you are trying to find. Trying to retrieve the user account for Bob Smith (bsmith) from Active Directory would, for example, cause eXist to produce the LDAP search string (&(objectClass=user)(sAMAccountName=bsmith)). |
||||||||||||||||||||
|
search-attribute |
As an LDAP directory can come in any shape, eXist needs to know how to address certain properties of the user account in the directory. The search-attribute maps an account property that eXist can understand to an LDAP directory property. eXist requires search-attribute for the following account properties: |
||||||||||||||||||||
|
|||||||||||||||||||||
|
metadata-search-attribute |
eXist supports the notion of storing and retrieving metadata about a user account, and provides some support for searching for accounts using these metadata properties. For the purposes of LDAP, this metadata is read-only. However, if you want seamless integration with such functionality in eXist, then there are a number of properties that you must map to properties of the accounts in your LDAP directory. eXist currently supports the following metadata properties, all of which may be retrieved, but only some of which are used for search. We would recommend you configure at least the properties that are used for searching: |
||||||||||||||||||||
|
|||||||||||||||||||||
|
whitelist |
An optional whitelist of LDAP user accounts that are permitted access to eXist. The blacklist is always evaluated before the whitelist. If a whitelist is provided, a user must appear in the list to get access to eXist; otherwise, she will be denied access via LDAP. |
||||||||||||||||||||
|
blacklist |
An optional blacklist of LDAP user accounts that are forbidden access to eXist. If a user is not in the blacklist and a whitelist is not provided, then he is given access via LDAP; otherwise, he is further checked against the whitelist. |
|
group (LDAP group search and property mapping configuration) |
|||||||||||
|
search-filter-prefix |
The prefix to use when searching the LDAP directory. This should indicate the class of a group within the LDAP directory. For example, with Active Directory you would use the value objectClass=group. eXist would then construct an LDAP search string like (&(objectClass=group)(name=value)), where name will be substituted by the actual LDAP attribute indicated by a search-attribute and valuewill be substituted by the criteria of the thing you are trying to find. Trying to retrieve the user group editors from Active Directory would, for example, cause eXist to produce the LDAP search string (&(objectClass=group)(sAMAccountName=editors)). |
||||||||||
|
search-attribute |
As an LDAP directory can come in any shape, eXist needs to know how to address certain properties of the user group in the directory. The search-attribute maps a group property that eXist can understand to an LDAP directory property. eXist requires search-attribute for the following group properties: |
||||||||||
|
|||||||||||
|
metadata-search-attribute |
eXist supports the notion of storing and retrieving metadata about a group. For the purposes of LDAP, group metadata is currently unsupported. However, it is likely that this may be implemented in future versions of eXist if demand arises. |
||||||||||
|
whitelist |
An optional whitelist of LDAP groups that are permitted access to eXist. The blacklist is always evaluated before the whitelist. If a whitelist is provided, a group must appear in the list to get access to eXist; otherwise, its members will be denied access via LDAP. |
||||||||||
|
blacklist |
An optional blacklist of LDAP groups that are forbidden access to eXist. If a group is not in the blacklist and a whitelist is not provided, then its members are given access via LDAP; otherwise, they are further checked against the whitelist. |
|
transformation (transformations applied to LDAP to aid integration) |
|
|
add-group |
This optional transformation allows you to automatically add each LDAP user to a group known to eXist from another realm (e.g., its internal realm). For example, you could create a group in eXist called businessUsers and have all LDAP users automatically added to this group, and they would be granted access to any collections or resources that you have permitted the businessUsers group access to. |
LDAP configuration for Microsoft Active Directory
Before attempting to configure eXist to authenticate with your Active Directory, it is highly recommended that you discuss this with your network administrators. In any case, they will need to provide you with the username and password for a low-privileged account to use in thedefault-username and default-password parts of the realm configuration.
It is also recommended that you first use a tool like Apache Directory Studio to ensure that you can connect to your Active Directory using LDAP with the username and password provided for the low-privileged account by your network administrator. Apache Directory Studio is a particularly good choice, as not only is it very easy to use and functional, but it is written in Java and uses the same underlying LDAP libraries that eXist will use to connect to your LDAP directory.
NOTE
Remember that if you are using SSL, the LDAP port for your Active Directory connection will most likely be 636 and the scheme is ldaps://; if you are not using SSL, then it is most likely 389 with the scheme ldap:// (as shown in Example 8-1).
Example 8-1 shows an example configuration.
Example 8-1. Security Manager configuration with an LDAP realm for Microsoft Active Directory
<security-manager xmlns="http://exist-db.org/Configuration"
xmlns:xsi="http://www.w3.org/ 2001/XMLSchema-instance">
<authentication-entry-point>/authentication/login</authentication-entry-point>
<realm id="LDAP" version="1.0" principals-are-case-insensitive="true">
<context>
<authentication>simple</authentication>
<use-ssl>false</use-ssl> ![]()
<url>ldap://ad.mydomain.com:389</url> ![]()
<domain>ad.mydomain.com</domain> ![]()
<search>
<base>ou=mygroup,dc=ad,dc=mydomain,dc=com</base> ![]()
<default-username>account@ad.mydomain.com</default-username> ![]()
<default-password>XXXXXXX</default-password> ![]()
<account>
<search-filter-prefix>objectClass=user</search-filter-prefix>
<search-attribute key="objectSid">objectSid</search-attribute>
<search-attribute key="primaryGroupID">primaryGroupID
</search-attribute>
<search-attribute key="name">sAMAccountName</search-attribute>
<search-attribute key="dn">distinguishedName</search-attribute>
<search-attribute key="memberOf">memberOf</search-attribute>
<metadata-search-attribute
key="http://axschema.org/namePerson">name
</metadata-search-attribute>
<metadata-search-attribute
key="http://axschema.org/namePerson/last">sn
</metadata-search-attribute>
<metadata-search-attribute
key="http://axschema.org/namePerson/first">givenName
</metadata-search-attribute>
<metadata-search-attribute
key="http://axschema.org/contact/email">mail
</metadata-search-attribute>
</account>
<group>
<search-filter-prefix>objectClass=group</search-filter-prefix>
<search-attribute key="member">member</search-attribute>
<search-attribute key="objectSid">objectSid</search-attribute>
<search-attribute key="name">sAMAccountName</search-attribute>
<search-attribute key="dn">distinguishedName</search-attribute>
</group>
</search>
</context>
</realm>
</security-manager>
![]()
true if you are using SSL, or false otherwise.
![]()
The network host name of either the Active Directory domain or a domain controller within the domain, and the TCP port to talk to the Active Directory LDAP server on; TCP port 389 is usual, or 636 if you are using SSL.
![]()
The fully qualified Active Directory domain name.
![]()
The LDAP search base for your Active Directory, typically an organization unit followed by the Active Directory domain name components.
![]()
The username of an Active Directory account, which may connect to the LDAP server and interrogate the LDAP store.
![]()
The password of the Active Directory account being used.
Other Realm Modules
eXist also has authentication modules for OpenID and OAuth, but these are relatively new and not yet completely integrated into the eXist Security Manager. They are almost certainly not ready for production use; however, if you do need OpenID or OAuth support, they could serve as a starting point for further development or discussion with the eXist community.
The source code for these modules can be found in $EXIST_HOME/extensions/security. It is expected that these modules will be further developed in the near future and added to a subsequent release of eXist.
Hardening
The topic of hardening focuses on taking a standard eXist installation and modifying its defaults to make it more resilient to would-be intrusion. As eXist ships, it is in pretty good shape from a security perspective, but it also needs to be usable by a wide array of people for a variety of tasks, so some flexibility is afforded; there are several additional things that can be done to increase the security of your installation. This information is most pertinent if you are running an eXist server and providing access to others, for example as a website or web services.
Now, we certainly do not want our wonderful eXist server to be compromised by “the bad guys,” and the eXist developers have gone to a lot of effort to try to ensure that eXist maintains the integrity and security of your data. However, you should never consider any computer system completely secure from intruders. As computer security expert Gene Spafford once said:
The only truly secure system is one that is powered off, cast in a block of concrete, and sealed in a lead-lined room with armed guards.
With that in mind, we take a somewhat pessimistic view in this chapter and concede that your system could indeed be compromised. However, we explain how you can reduce the chances of this happening, and, should it happen, how you can limit the damage caused. The advice herein should be seen as a guide, and should not be substituted for the latest professional security advice. Certainly, there is always more that can be done.
Reducing Collateral Damage
Should your eXist-db installation be compromised, you want to limit the amount of damage that can be done by the intruder to the underlying server on which eXist is installed. One of the most effective ways to do this is to run eXist under an unprivileged service account that is created for this sole purpose.
The unprivileged account should have absolutely no login rights to your server or network. Further, the account should not be a member of any security groups on your server, apart from a personal group of which it is the only member.
The $EXIST_HOME folder and all directories and files therein should be owned by a secure system user, and the personal group of the unprivileged account should have only the access permissions to the files in $EXIST_HOME that it needs.
Typically, the personal group will need read access to all files in $EXIST_HOME and only write access to the following folders:
§ $EXIST_HOME/webapp/WEB-INF/data (configured in $EXIST_HOME/conf.xml)
§ $EXIST_HOME/webapp/WEB-INF/logs (configured in $EXIST_HOME/conf.xml)
§ $EXIST_HOME/tools/wrapper/bin (for just .pid and .status files)
§ $EXIST_HOME/tools/wrapper/logs (configured in $EXIST_HOME/tools/wrapper/conf/wrapper.conf)
§ $EXIST_HOME/tools/jetty/logs (configured in $EXIST_HOME/tools/jetty/etc/jetty.xml)
§ $EXIST_HOME/tools/jetty/tmp (configured in $EXIST_HOME/tools/jetty/etc/jetty.xml)
§ $EXIST_HOME/tools/jetty/work (configured in $EXIST_HOME/tools/jetty/etc/webdefault.xml)
In addition, the personal group will need read and write access to the folder containing the .pid file if you are using the service wrapper (see $EXIST_HOME/tools/wrapper/bin/exist.sh) and the temporary folder used by your system’s JVM (this varies depending on the JVM vendor, the version, and the operating system).
Depending on which operating system you installed eXist on, there are slightly different approaches to configuring eXist to run under an unprivileged account. We will assume that you have created the unprivileged account and set the permissions on the $EXIST_HOME folder and its contents correctly.
Linux platforms
The recommended way to run eXist as a service (system daemon) on Linux is using the Java Service Wrapper shipped in $EXIST_HOME/tools/wrapper and discussed in “Windows Linux and Other Unix”. If you are not taking that approach, we will assume that you know enough about Linux to complete the configuration yourself. If you are using the Java Service Wrapper, then you simply need to change the file $EXIST_HOME/tools/wrapper/bin/exist.sh by uncommenting the following line in that file and setting it to your unprivileged account (replaceexistsrv with the correct user):
RUN_AS_USER=existsrv
You will also need to ensure that this user has execute access on $EXIST_HOME/tools/wrapper/bin/exist.sh, as this will be called when the system service is started. It is also worth remembering that when installing the Java Service Wrapper, you must perform this as a user who hasroot access, either through sudo or directly, as the wrapper will install files into /etc.
Solaris platforms
eXist ships with support for the Solaris SMF (Service Management Framework); see “Solaris”. The documentation provided in the $EXIST_HOME/tools/Solaris/README.txt file explains in detail how you can trivially configure the user account and group that eXist runs under.
Windows platforms
Providing that you opted to install eXist as a service during installation, you are already running eXist using the Java Service Wrapper integrated with Windows Services. If you did not install eXist as a service, you can do this by either using the appropriate icon in the eXist group on the Start menu, or following the instructions in “Windows Linux and Other Unix”.
By default the eXist service will run under the user account that you used to install eXist. Once you have set up your unprivileged account and the necessary permissions, you can reconfigure the service to run under your unprivileged account by opening the Services Manager, locatingeXist-db in the Windows Services list, and editing its properties (double-click on the service). Go to the Log-On tab, change the setting from Local System Account to This Account, and specify the details of the unprivileged account that you created.
Reducing the Attack Surface
eXist comes as a very full-featured product with many things enabled by default, and several of these features are delivered as network services. In its default configuration eXist presents a rather large surface that an outside intruder could attempt to exploit. Fortunately, eXist is very configurable, and we can reduce the chance of an attack vector being found by disabling various features and services that eXist provides.
Disabling extension modules
eXist ships with extension modules, and many of these are enabled by default. These modules provide additional functionality to eXist in one of three areas:
§ XQuery functions
§ Security realms
§ Indexing
Whatever the functionality, these extension modules have to be enabled in a two-step process. First, they have to be compiled into the eXist release, and second, they have to be enabled in eXist’s configuration file ($EXIST_HOME/conf.xml) or in the Security Manager configuration (/db/system/security/config.xml).
While these extension modules provide a wealth of features, they are useful for different reasons and for different projects. It is unlikely that you will need to make use of many of these extension modules, and thus it is recommended that you only enable the extension modules that you absolutely require for your project. If you do not know if you are using an extension module, then most likely you are not.
To disable an extension module that was previously enabled, you can optionally remove its compiled code from your eXist installation (if you opted to install the source code); then you must disable it in eXist’s configuration file.
WARNING
Before changing eXist’s configuration, you should always make sure that you have a recent and valid backup of your eXist database and its current configuration. “Backup and shutdown” explains how to create backups.
To remove the code of a compiled extension module, you need to edit the $EXIST_HOME/extensions/local.build.properties file (if you do not have this file, you should create it from a copy of $EXIST_HOME/extensions/build.properties), find the appropriate include entry, and change it from true to false. Next, make sure that eXist is not running, and then run the following commands from the $EXIST_HOME directory:
$ ./build.sh clean
$ ./build.sh
This will recompile eXist in place, without the extension module(s) that you disabled in the build.properties file.
NOTE
The preceding examples are for Unix-like platforms. If you are on a Windows platform, you should replace .sh with .bat, and you need not worry about the ./ part of the command.
To disable an XQuery or indexing extension module, you can simply modify $EXIST_HOME/conf.xml and comment out the extension module that you wish to disable. This file itself is well documented within, and the process should be self-explanatory. The configuration only takes effect at startup, so you should do this when eXist is not running, or you will need to restart eXist for the changes to take effect. To disable a Security Realm extension module, you need to remove its realm configuration from the /db/system/security/config.xml XML document in the database; it is then recommended that you immediately restart eXist.
Performing an audit of both $EXIST_HOME/extensions/build.properties and $EXIST_HOME/conf.xml and disabling unused modules is always recommended before deploying a public or production instance of eXist.
There are several extension modules, listed in Table 8-12, that are of higher risk than others, and you should fully understand the implications of using them. With suitable precaution and understanding, it is perfectly fine to use these modules, but you should be aware of what an attacker could attempt with them.
|
XQuery extension module |
Security implications of use |
|
Cache module |
A user could potentially store a large quantity of information into the cache. This would exhaust the memory available to the JVM used by eXist and could cause the database to crash. |
|
Counter module |
A user could create many counters on disk, filling the available disk space of the server and thereby potentially crashing eXist or the underlying server. |
|
File module |
You have to be a user in the dba group in eXist to use the functions in the File module. However, should a user be able to obtain dba privileges, he will be able to read/write anywhere in the filesystem that the account under which the eXist server is running can read/write. Potentially, he could delete the .dbx files that make up your database, download data or sensitive files, or fill up your server’s disk space. |
|
FTP module(s) |
The EXPath FTP module could allow a user to retrieve documents from remote sources by URI; you can reduce or alleviate this risk by using sensible firewall and network settings. This module could also potentially be used to launch a Denial of Service (DoS) attack against a remote service. |
|
HTTP module(s) |
eXist and EXPath HTTP module could allow a user to retrieve documents from remote sources by URI; you can reduce or alleviate this risk by using sensible firewall and network settings (e.g., forced transparent proxy). These modules could also potentially be used to launch a DoS attack against a remote service. |
|
JNDI module |
A user could potentially gain access to external JNDI sources, depending on how the authentication of the JNDI sources is configured by the container (e.g., Jetty, Tomcat, etc.). |
|
Mail module |
The Mail module could allow a user to send email either via a local sendmail or via a remote SMTP host. This could be used to send SPAM or launch a DoS attack against a remote SMTP server. Consequently, a local sendmail should not be used and remote SMTP servers should be secured appropriately to avoid such attacks. |
|
Memcached module |
A user could potentially store a large quantity of information into a Memcached instance, which could affect the stability of that instance and the server on which it resides. |
|
Session module |
A user could potentially store a large quantity of information into her session. This would exhaust the memory available to the JVM used by eXist and could cause the database to crash. |
|
SQL module |
A user could potentially open many connections against a remote SQL database, which could affect its ability to respond and, in effect, cause a DoS attack. |
|
Util module |
A user could use the util:serialize function to create many files on disk, filling the available disk space of the server and therefore potentially crashing eXist or the underlying server. A user could use the util:wait function to pause the current database broker for a long period. If this was done across many connections, the available brokers could rapidly be exhausted, effectively causing a DoS attack on eXist. |
|
XPath and XQuery Functions and Operators module |
A user could use the fn:doc function to retrieve documents from the filesystem to which the user under which the eXist server is running has read access. There is also the potential to download documents from remote sources by URI. You can reduce or alleviate this risk by using sensible firewall and network settings. This module could also potentially be used to launch a DoS attack against a remote service. |
|
Table 8-12. Security-sensitive XQuery extension modules |
|
Disabling the Java binding from XQuery
eXist provides a feature called Java binding (see “Java binding” for further details) that allows Java code to be written inside XQuery code and executed by eXist’s XQuery processor. This is undoubtedly a very powerful feature that could prove useful where an XQuery developer wishes to perform some task that is not possible in XQuery and for which no extension functions are provided. However, in the wrong hands, it gives an attacker access to a programming language that has a rich standard library.
By default, eXist is shipped with the Java binding disabled. You can configure this in $EXIST_HOME/conf.xml by changing the value of the enable-java-binding attribute on the xquery configuration element to either yes or no. It is highly recommended that the Java binding remain disabled. If you require additional functionality that XQuery does not provide, you should consider writing an extension module for XQuery in Java that encapsulates just the functionality that you require (see “Internal XQuery Library Modules”).
Disabling direct access to the REST Server
While it is recommended that you disable various XQuery modules and Java binding if you’re not using their functionality, what can you do to limit what anonymous web users can exploit when you do require such functionality?
One possibility is to limit the ability for eXist’s REST Server to directly receive web requests, including XQuery submissions that would otherwise be processed dynamically. Disabling this capability still allows you to place main modules and associated library modules written in XQuery into the database as binary documents and have them executed via URI calls, but access to database resources is instead controlled by XQuery URL Rewrite (see “URL Mapping Using URL Rewriting”). Such a restriction prevents anonymous and authenticated users from directly accessing database resources or sending in XQueries via eXist’s REST Server, unless you permit it within your own XQuery controller.
To remove the REST Server’s ability to directly receive web requests, you can modify the parameter hidden in $EXIST_HOME/webapp/WEB-INF/web.xml:
<init-param>
<param-name>hidden</param-name>
<param-value>true</param-value>
</init-param>
Changing this parameter means that the REST Server will not directly receive requests; rather, it will only receive requests forwarded from an XQuery controller (see “URL Mapping Using URL Rewriting”). You can then choose to filter such requests in your own XQuery controller.
Disabling network services and APIs
eXist provides several network services and APIs that are enabled by default; however, it is quite likely that you will not require all of those services in a production environment. Which services you require will depend on your application, but you should disable any that are not required by your application and/or users. You do so by commenting out the servlet, filter, filter-mapping, and listener declarations in $EXIST_HOME/webapp/WEB-INF/web.xml, as well as any servlet mappings to them in $EXIST_HOME/webapp/WEB-INF/controller-config.xml. See Table 8-13.
|
Servlet |
Provides |
Impact of disabling |
|
org.exist.http.servlets. Log4jInit |
Initializes all logging services for eXist |
eXist will not be able to log any messages.a |
|
org.exist.xmlrpc. RpcServlet |
XML-RPC and XML:DB Remote APIs; removes RPC and XML:DB Remote access |
Will remove the ability to connect with the Java Admin Client, as this uses the XML:DB Remote API. May remove the ability to shut down or back up eXist if you use shutdown.sh or backup.sh, as these use the Java Admin Client library. It may be appropriate to disable this, depending on your environment and deployment of eXist. |
|
org.exist.http.servlets. EXistServlet |
REST Server and SOAP Server |
Removes the REST Server and the ability to navigate the database automatically by URI and execute XQueries stored in the database by URI. Removes the ability to create SOAP web services of XQuery modules. |
|
org.exist.management.client. JMXServlet |
JMX information over HTTP as XML |
Removes the ability to retrieve JMX information over HTTP as XML (see “JMX”). It is typically recommended to disable this API in production, or restrict access at a reverse proxy or firewall. |
|
org.exist.webdav. MiltonWebDAVServlet |
WebDAV access to the eXist database |
Disables WebDAV access to eXist. It is common to disable this API in a production web environment, or restrict access at a reverse proxy or firewall. |
|
org.exist.http.servlets. XQueryServlet |
Ability to execute XQuery main modules stored in files in eXist’s$EXIST_HOME/webapp folder |
Disables execution of XQuery from the filesystem. This should be disabled, as it is now deprecated and has been superseded by the REST Server. |
|
org.exist.http.urlrewrite. XQueryURLRewrite |
Disables XQuery-based URL rewriting |
If you are not using XQuery URL rewriting with the REST Server or the eXist dashboard app, or you are using RESTXQ, then this can be disabled. If you disable this, you will need to translate the servlet mappings from $EXIST_HOME/webapp/WEB-INF/controller-config.xml to $EXIST_HOME/webapp/WEB-INF/web.xml as the URL rewriting controller is then no longer responsible for mapping URIs. |
|
org.exist.http.servlets. XSLTServlet |
XSLT transformations for XQuery URL rewriting |
Disables XSLT transformations from XQuery URL rewriting. If you are not using XSLT transformations through forwarding in your XQuery URL Rewrite controller.xql, then this can be disabled. If you have disabled XQuery URL rewriting, then this should also be disabled. |
|
org.apache.axis.transport.http. AxisServlet AdminServlet |
SOAP API access to the eXist database |
Disables eXist’s SOAP API. If you are not making use of eXist’s SOAP API, then both of these servlets should be disabled. |
|
org.exist.atom.http. AtomServlet |
Atom API access to the eXist database |
Disables eXist’s Atom API. If you are not making use of eXist’s Atom API, then this should be disabled. |
|
org.exist.extensions.exquery.restxq.impl. RestXqServlet |
EXQuery RESTXQ framework |
Disables the RESTXQ framework. If you are not using the RESTXQ framework in your XQuery modules, then this should be disabled. |
|
org.exist.webstart. JnlpServlet |
Java WebStart of Java Admin Client |
Disables the ability to download the Java Admin Client from eXist as a Java WebStart application. If you are not allowing remote users to download the Java Admin Client for eXist from your eXist server via Java WebStart, then this should be disabled. |
|
org.directwebremoting.servlet. DwrServlet de.betterform.agent.web.servlet. XFormsPostServlet FormsServlet XFormsInspectorServlet ResourceServlet ErrorServlet BfServletContextListener de.betterform.agent.web.filter. XFormsFilter |
XForms support through the betterForm engine |
Disables server-side XForms support through betterForm. If you are not using XForms or are using XSLTForms or another XForms rendering engine, then you should disable these servlets, the filter, and the listener. |
|
Table 8-13. eXist’s network service components |
||
aDisabling the logging service is not recommended.
Disabling autodeployment of EXPath packages
eXist provides a mechanism to autodeploy applications, extension libraries, and data provided as EXPath packages to the database at startup time. Any EXPath package placed in the $EXIST_HOME/autodeploy folder will be loaded into the database at startup time.
While this is not a threat from within eXist, should someone compromise the user account under which you run the eXist server, he could potentially place a malicious package into the autodeploy folder that would be loaded the next time the database was restarted. Such a package might contain XQuery scripts that perform further nefarious actions, and these could potentially be invoked remotely.
You can disable the autodeploy folder by commenting out the AutoDeploymentTrigger line in $EXIST_HOME/conf.xml. For example:
<!-- trigger class="org.exist.repo.AutoDeploymentTrigger"/ -->
Subsequent to disabling the AutoDeploymentTrigger, you can also delete the $EXIST_HOME/autodeploy folder.
Removing preinstalled EXPath packages
By default, eXist ships with a number of EXPath packages providing libraries and applications that are installed by the autodeployment mechanism the first time eXist is started. These packages are excellent in a development environment, but less desirable in a production environment. Of particular concern are the dashboard and eXide applications, which provide facilities for remotely administering eXist through web pages.
If you have started eXist before disabling the autodeployment mechanism, as described in the previous section, you may remove these applications from a running eXist instance by executing the following XQuery (for example, from the Java Admin Client):
xquery version "1.0";
import module namespace repo = "http://exist-db.org/xquery/repo";
(:~
: This XQuery removes the preinstalled EXPath packages
: that ship with eXist 2.1
:)
declare variable $local:preinstalled-pkgs := (
"http://exist-db.org/apps/shared",
"http://exist-db.org/apps/dashboard",
"http://exist-db.org/apps/eXide"
);
for $pkg in$local:preinstalled-pkgs return (
repo:undeploy($pkg),
repo:remove($pkg)
)
Securing eXist’s network services
All of the network services and APIs discussed in “Disabling network services and APIs” rely on an underlying Java application server to actually connect them to incoming network requests. eXist uses the Jetty application server by default, but can be deployed into any Java application server of your choosing.
eXist ships with Jetty, servicing incoming HTTP and XML-RPC requests on TCP port 8080 and HTTPS and XML-RPC over SSL requests on TCP port 8443. This configuration is held in the Jetty configuration file $EXIST_HOME/tools/jetty/etc/jetty.xml.
In a production environment, it is recommend that you disable the non-SSL interface and just use the SSL interface. By default eXist is configured with a temporary SSL certificate that serves to provide the encryption of a connection, but not verification of the server. If your users will connect directly to eXist by HTTPS or XML-RPC over SSL, then it is recommended that you generate or purchase your own genuine SSL certificate. The mechanics of SSL, SSL certificates, and configuring Jetty for custom certificates are considered beyond the scope of this book, and good online resources on these topics already exist, including Jetty’s own documentation.
While we do not believe that “security through obscurity” adds any real security to a system, layering of protective mechanisms is always sensible. So, should you wish, you can also modify the TCP port numbers that eXist uses in the aforementioned Jetty configuration file.
NOTE
Should you change the TCP port numbers (or disable the non-SSL protocols) that eXist uses, it is recommended that you also update the $EXIST_HOME/client.properties file. This is used by both the Java Admin Client and backup and restore scripts to connect to eXist when they are executed on the same server.
Reverse proxying
Reverse proxying is the process of placing a reverse proxy server between eXist and the client. The reverse proxy server receives a request from the client, creates a new request to eXist, and then returns the result it receives to the client (see Figure 8-21). The reverse proxy server may also add some optimization services such as caching, response compression, and load balancing.
Figure 8-21. A reverse proxy network
While there are many good arguments for using reverse proxying in production environments, we will focus on the security aspect here. Many firewalls are capable of restricting access to a server for specific ports and protocols, but few firewalls operate at the application layer. A reverse proxy operates at the HTTP application layer (in this case), which means that it can filter based on characteristics of the HTTP requests.
The main security concerns for the reverse proxy server are:
Hiding the existence and characteristics of eXist from the client
The client should only see the reverse proxy server. Should this be a malicious client and try to exploit the server directly, it will be exploiting the reverse proxy server and not eXist. Another concern, perhaps, is to allow the reverse proxy server to map an application or documents you have in eXist into your website’s URI space, so that it is not obvious to attackers that part of your website is running in an application server (eXist)—for example, proxying the public URI http://www.mywebsite.com/widgets/ to the private URI http://my-exist-server:8080/exist/apps/widgets/.
Controlling (and limiting) access to eXist by the client
This allows you to limit which HTTP requests will reach eXist based on various criteria such as URI, headers, and cookies. A useful example is to limit access to the URIs /exist/xmlrpc and /exist/webdav, while allowing access to /exist/apps from your web users.
There are many options for reverse proxy servers, but two of the most popular ones are the Apache HTTP Server Project (Apache httpd) and Nginx. Apache httpd is a large, feature-rich, and very popular web server, an example of whose use is described in “Proxying eXist Behind a Web Server”. Nginx (shown in Example 8-2) is a modern, very lightweight, and incredibly fast web server. It is perfect if you are looking for a reverse proxy for eXist because it is much simpler to install and configure than Apache httpd, lending it a smaller attack surface.
Example 8-2. Nginx configuration for reverse proxying eXist
proxy_set_header Host $host; ![]()
proxy_set_header X-Real-IP $remote_addr; ![]()
proxy_set_header X-Forwarded-For $proxy_add_x_forwarded_for; ![]()
proxy_set_header nginx-request-uri $request_uri; ![]()
server {
listen 80; ![]()
server_name .mywebsite.com; ![]()
charset utf-8;
access_log /srv/www/vhosts/mywebsite.com/logs/access.log;
location / {
proxy_pass http://localhost:8080/exist/rest/db/mywebsite.com/; ![]()
}
}
![]()
The first line, the proxy_set_header directive, takes the host header from the HTTP request sent from the client and sets it in the new HTTP request that Nginx sends to eXist. This can be useful for informing eXist which virtual host it is servicing.
![]()
![]()
These proxy_set_header directives set new headers in the HTTP request that Nginx sends to eXist. eXist automatically uses these when behind a reverse proxy to understand the request from the client correctly.
![]()
This proxy_set_header directive sets a new header in the HTTP request that Nginx sends to eXist, which allows a user in an XQuery to find the original URI requested by the client using request:get-header("nginx-request-uri").
![]()
![]()
Requests to any URI that starts *.mywebsite.com on TCP port 80 (standard HTTP) will be proxied.
![]()
Matched URIs are forwarded to the collection /db/mywebsite.com in eXist via the REST Server, so http://www.mywebsite.com/documents/2012 would be forwarded to http://localhost:8080/exist/rest/db/mywebsite.com/documents/2012.
User Authentication in XQuery
eXist provides an extension module of XQuery functions, called the Security Manager module, for handling security concerns programmatically. This module, discussed in the entry for sm in Appendix A, allows you to manipulate users, groups, and group managers, and also to manage both resource and collection permissions. However, the Security Manager module has a major intentional omission: if you wish to authenticate users in your own XQuery modules (perhaps in response to a login form), you can’t do so through this module; rather, you have to use the xmldb module (see the entry for xmldb in Appendix A).
It may seem strange that authentication and login in XQuery are provided by the xmldb module and not the Security Manager module. The reason for this is that the Security Manager module is a relatively new addition to eXist. The developers felt that the login and authentication mechanisms from XQuery could be improved, and unfortunately it was not possible to accomplish this work before eXist 2.1 was released. It is likely that new and improved authentication and login mechanisms will be added to the Security Manager module in the future, deprecating those in the xmldb module.
xmldb:authenticate
The xmldb:authenticate function allows you to validate that a user has access to a collection in the database. The function takes three arguments: a collection URI, the username of a user, and the corresponding password of that user. It then performs two distinct steps:
1. It attempts to authenticate the user, using her username and password, with the Security Manager.
2. It attempts to open the collection given in the collection URI argument; that is to say, it verifies whether the authenticated user has execute access to the collection.
If either of the two steps fails, the function returns false; if both steps succeed in succession, then the function returns true.
This function is basic, but can be useful when you want to authenticate a user but do not wish to perform actions on that user’s behalf.
xmldb:login
The xmldb:login function takes the same arguments as the xmldb:authenticate function and performs exactly the same steps. Assuming those steps succeed, it then performs two additional steps:
1. It changes the user account of the XQuery that called the function to be that described by the username passed to the function. Subsequently, the calling XQuery has the same access rights to resources and collections in the database as the newly logged-in user.
2. If the XQuery is operating in an HTTP context (i.e., executed via the REST Server, SOAP Server, or XQuery Servlet), then the logged-in user is cached in the HTTP session, if one exists (you can control creation of the session by calling the four-argument version ofxmldb:login or using the session:create function explicitly). Subsequent XQuery invocations from within the same HTTP session will reuse the cached user from this login until the session is invalidated or the user logs out.
The login function is very useful when you want to present a user with a login form, authenticate him, and subsequently allow him to access and manipulate database resources and collections with the permissions he has previously been allocated.
NOTE
You may be wondering how to control user logout after a user has logged into eXist. You have three options for this, each of which involves manipulating the user’s HTTP session:
1. Remove the cached user credentials attribute from the HTTP session by calling session:remove-attribute("_eXist_xmldb_user").
2. Clear all attributes of the user’s HTTP session by calling session:clear().
3. Invalidate the user’s HTTP session by calling session:invalidate(). Invalidating the user’s session means that you will have to create a new session if you wish to store further attributes in the session.
For further details on how HTTP sessions are managed, see the entry for session in Appendix A.
Backups
While the reasons for performing backups are not solely related to security but also to disaster recovery, the importance of backups cannot be stressed enough. First, ensure that you have backups, and secondly, ensure that you can restore your system from them! Whatever approach you take, backups should be something that you perform frequently, test regularly, and have confidence in as your last line of defense. For further information, see “Backup and Restore”.