Magento Search Engine Optimization (2014)
Chapter 4. Template/Design Adjustments for SEO and CRO
Magento allows us to edit any part of a theme using template files, layout XML files, and, of course, CSS (cascading style sheet) files. There are hundreds of free and premium themes available on the Internet and they each have their own take on template page optimization. For the basis of this chapter, we will be concentrating on the Magento base theme, and how we can improve the template markup to better structure our content for SEO and CRO (conversion rate optimization).
Most third-party themes tend to structure their templates on the base theme, so we may see similarities between the code shown here and the code within any custom/downloaded theme that we may have installed.
Magento has evolved rapidly since Version 1.3 back in 2009-2010, especially through changes to the default theme. Where possible, I will try to describe a few major SEO-related problems that exist within these earlier versions and how to fix them.
In this chapter, we will be looking at the following points:
· How to organize our heading structure (h1, h2, h3) and where to change these in our template files
· How to integrate other types of schema such as the breadcrumb schema into our templates
· How to optimize our category pagination and how to add reviews directly onto our product pages
· The main points to consider when streamlining our customer journey through our Magento website
Organizing our heading structure
A good heading structure is important for any website; not only does it clearly define the page structure for search engines, but it also plays a vital role in user accessibility.
Tip
Screen readers use our page's heading tags to allow a visually impaired user quick access to certain sections of our page. See the following post about how accessibility features can benefit SEO (webaim.org): goo.gl/YaI5nl.
It is recommended to have only one instance of an <h1> tag on each page; this is to describe the overall purpose of the page. Other heading types such as <h2>, <h3>, and so on can occur multiple times on the same page as they describe the different levels or subsections within that page.
It is also a best practice to ensure <h1> tags are unique across the website as a whole. As mentioned previously, these are used to define the subject matter of the page. If multiple pages have the same <h1> tag, we are essentially telling search engines that these two pages serve the same purpose. A well-structured website should contain pages that are unique in both purpose and content.
Changing our heading structure on the home, category, and product pages
In my opinion, Magento CE 1.3 was a definitive release and really sparked the rising interest in the Magento platform. There is however a major issue with regards to the heading structure within Magento CE 1.3, and that is the fact that our <h1> tag is always preset for us within the header of our website and is not editable within the CMS.
The adverse effect of this is that each of our web pages will contain the same primary heading tag. Search engines and screen readers alike may get confused when browsing our website, and this will almost certainly result in a negative impact on our rankings.
As mentioned in previous chapters, we should always try our best to make sure that our headings (especially <h1> and ideally <h2>) are unique on every single page of our Magento store.
In order to remedy this issue in Magento 1.3, within app/design/frontend/[package]/[theme]/template/page/html/header.phtml:
· Change <h1 id="logo"> to <span id="logo"> and adjust our CSS accordingly
· Alternatively, take the approach that was introduced with Magento CE 1.4 and conditionally implement <h1> within our header.phtml file for the home page only (shown as follows).
From Magento CE 1.4 to Magento CE 1.8, we will see that our header.phtml file has been adjusted to only show <h1> with our logo (and all important alternative text) on our home page using the following conditional code:
<?php if ($this->getIsHomePage()):?>
<h1 class="logo"><!-- our image code here --></h1>
<?php else:?>
<!—image without the <h1> tag -->
<?php endif?>
Unfortunately, Magento CE 1.3 doesn't come equipped with the $this->getIsHomePage() method; however, we can use other alternative methods on our page to get the desired result (goo.gl/EmZVFx).
From the preceding code, we can see that Magento already attempts to optimize the heading on our home page to match our brand (website logo and alternative text). As mentioned in Chapter 1, Preparing and Configuring Your Magento Website, it is best practice to optimize each page for the keywords that are most relevant.
Once this has been set up successfully, we can now use our <h1> tag within our other templates without worrying about there being multiple <h1> tags on each page (although this is acceptable within HTML5 markup), and we can now implement best practice for headings on our category and product pages.
For categories:
· Our main category heading (by default the name of our category) should be within an <h1> tag (in Version 1.3, we should swap this from <h2> within .../[theme]/template/catalog/category/view.phtml)
· If we are listing products on our category pages, our product names should be relegated to the <h3> or <h4> tags (found within .../[theme]/template/catalog/product/list.phtml); this will free up our <h2> tag so that if we were writing a category description, we could insert another prominent heading into the page
For products:
· Our product name should be within an <h1> tag (again, Magento 1.3, due to already setting an <h1> tag, will have made our product name <h3>; we can change this within .../[theme]/template/catalog/product/view.phtml)
· Additional information or a product description heading should be set to <h2>
· Any related product names should be set to <h3>
It is important to stress that when deciding on a heading structure, we must try to maintain relevance wherever possible. We should be thinking about the page as a whole; what sections within that page require headings, and what their hierarchy should be in terms of importance for search engines and most importantly our users.
Some versions of Magento (mainly versions before Magento CE 1.4) also tend to overuse heading tags, so we should try wherever possible to trim down our headings (by replacing them with <span> tags) in our templates. Here are a few places to check:
· Left/right column block headings (such as the My Cart block, typically found within .../[theme]/template/checkout/cart/sidebar.phtml in Magento CE 1.3)
· Product page <h4> elements, such as More Views (typically found within .../[theme]/template/catalog/product/view/media.phtml)
Tip
A useful tip for figuring out your heading structure is to use a browser plugin like Web Developer Tools for Chrome (goo.gl/ihPJnP), where you can simply click on a button within the Information tab called View Document Outline. This will display your heading structure like this:

Integrating the breadcrumb and organization schema
Along with the Productand Review schemas, which we looked at in Chapter 2, Product and Category Page Optimization, there are many other schema types that we can implement within our template files. In this section, we will look at implementing the following:
· The breadcrumb rich snippet
· The organization (aka logo) schema
Adding structured data to our breadcrumbs
The breadcrumb rich snippet is highly recommended for any e-commerce website as it helps to improve the legibility of our URL within the SERPs. Along with this, it provides the user with multiple links under the result to give that user the option to visit our category pages directly from the search engine.
Search engines such as Google can recognize the breadcrumb structure on our pages and will use these to create rich snippets within the SERPs. For example, if we were to take a look at three results from our wooden dining chairs search term, we would see some interesting results:
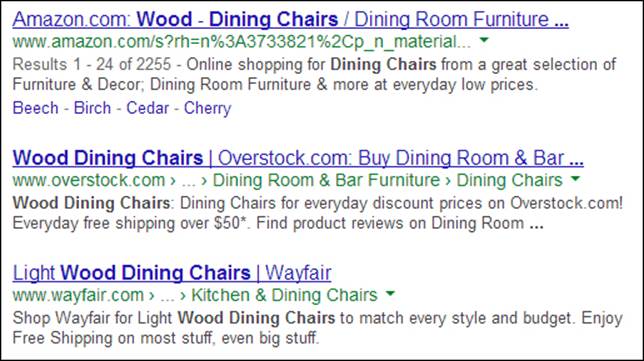
A few interesting points to consider here are:
· The Amazon listing does not display breadcrumbs
· The Overstock listing uses the breadcrumb rich snippet, and these are displayed in the SERPs
· The Wayfair listing does not use the breadcrumb rich snippet but breadcrumbs are displayed nonetheless
Although breadcrumb structured data is a great way to explicitly state how our breadcrumbs should appear, smart search engines such as Google will pick up on other factors (such as a set of delimited links that accurately reflect the site hierarchy) to dynamically insert breadcrumbs into the SERPs.
In order to implement breadcrumbs using RDF (rich data format) into our template files, we would need to open up app/design/frontend/[package]/[theme]/template/page/html/breadcrumbs.phtml and edit the following code (highlighted):
<?php if($crumbs && is_array($crumbs)): ?>
<div class="breadcrumbs" xmlns:v="http://rdf.data-vocabulary.org/#">
<ul>
<?php foreach($crumbs as $_crumbName=>$_crumbInfo): ?>
<li class="<?php echo $_crumbName ?>" typeof="v:Breadcrumb">
<?php if($_crumbInfo['link']): ?>
<a href="<?php echo $_crumbInfo['link'] ?>" rel="v:url" property="v:title" title="<?php echo $this- >htmlEscape($_crumbInfo['title']) ?>"><?php echo $this->htmlEscape($_crumbInfo['label']) ?></a>
<!-- other conditional statements -->
</li>
<?php endforeach; ?>
</ul>
</div>
<?php endif; ?>
In order to add our organization schema around our logo, we should open up app/design/frontend/[package]/[theme]/template/page/header.phtml and edit the following code (highlighted):
<div itemscope itemtype="http://schema.org/Organization">
<?php if ($this->getIsHomePage()):?>
<h1 class="logo"><strong><?php echo $this->getLogoAlt() ?></strong><a itemprop="url" href="<?php echo $this->getUrl('') ?>" title="<?php echo $this->getLogoAlt() ?>" class="logo"><img itemprop="logo"src="<?php echo $this- >getLogoSrc() ?>" alt="<?php echo $this->getLogoAlt() ?>"/></a></h1>
<?php else:?>
<a itemprop="url" href="<?php echo $this->getUrl('') ?>" title="<?php echo $this->getLogoAlt() ?>" class="logo"><strong><?php echo $this->getLogoAlt() ?></strong><img itemprop="logo" src="<?php echo $this-
>getLogoSrc() ?>" alt="<?php echo $this->getLogoAlt() ?>" /></a>
<?php endif?>
</div>
The organization schema will let search engines such as Google know which logo we want to be shown when our website information is used in the SERPs.
There are many types of schema available, and a few others that may be appropriate for our Magento website are:
· LocalBusiness schema: This schema would be useful if we were running an online store but will also provide services within a local area
· PostalAddress schema: This schema type is used to mark up company address details and is useful for Contact Us/About Us pages
Note
As mentioned within Chapter 2, Product and Category Page Optimization, search engines such as Google will serve the most appropriate rich snippets for our different page types.
Therefore, we can assume that the schema we introduced to our product page (Review, Offer, and Product schema) will either be implemented alongside our breadcrumb and organization schema or (more likely) our product-based schema will take precedence.
Adding rel=next/prev to our category pagination
Although we should set our category pages to display a canonical tag, we can also implement another feature to declare to search engines our next and previous pages when search spiders are crawling our paginated product listings.
Much like the canonical tag, this markup is aimed at letting search engines know that the pages being displayed are not meant to be interpreted as duplicate content but are instead intended to help customers navigate between lists of items.
There are a few ways to implement this code into our templates, but the most common is to add our next and previous elements only on our category pages and within the <head> tag.
A good tutorial on how to implement these next and previous elements can be found at the following link (inchoo): goo.gl/PbOFhc.
Tip
I would recommend adapting this technique and incorporating it into layout XML and its own template file rather than pasting it directly into head.phtml.
Once implemented, the code should activate when viewing a category with multiple pages and should appear within the page source similar to the following:
<link rel="prev" href="http://www.mydomain.com/electronics/computers.html?p=2" />
<link rel="next" href="http://www.mydomain.com/electronics/computers.html?p=4" />
These elements will change depending on which page within the pagination we are currently viewing.
Note
For more information on the <link rel="next/prev"> element and how it can work alongside our canonical tag, please see the following post (google.com): goo.gl/cZrssv.
Adding reviews directly onto our product pages
As mentioned in previous chapters, it's important that we make the most out of user-generated content. The best way to do this on our product pages is to display our reviews directly on the page (much like amazon.com).
By doing this, we will be adding fresh content to our product pages as well as providing useful information to our customers and increasing their likelihood to purchase our product (as long as the review is not too terrible).
To do this, we must edit our local.xml file once again (.../[theme]/layout/local.xml) and insert the following code:
<catalog_product_view>
<reference name="product.info">
<block type="review/product_view_list" name="product.info.product_additional_data" as="reviews" template="review/product/view/list.phtml">
<action method="addToParentGroup">
<group>detailed_info</group></action>
<block type="review/form" name="product.review.form" as="review_form"/>
</block>
</reference>
</catalog_product_view>
This should add our reviews to our product page as well as bring out the form for other users to submit reviews. In the default or base theme, it should look like the following screenshot:

Depending on your own theme, you may wish to remove the line <action method="addToParentGroup"><group>detailed_info</group></action>, which groups the reviews into the additional information section.
In order to avoid duplicate content issues, we'd generally want to disable the dedicated review pages from being indexed by search engines. We can do this via robots.txt, which will be covered in Chapter 7, Technical Rewrites for Search Engines.
Note
Interestingly, within Magento 2 (currently under development), there is a theme called Plushe.
Within this theme, the reviews that are added against a product are automatically displayed on the product page within a Reviews tab underneath the review entry form, just like we've performed for Magento CE 1.x.
Removing unwanted blocks from the checkout
Although not necessarily an SEO factor, we should look at a few simple techniques to optimize the Magento checkout process so that the increased traffic we are receiving has the best chance of converting into sales.
As mentioned previously, the primary goal for optimizing our Magento store should be to increase sales; once we have a steady flow of visitors to our website, we should practice CRO (conversion rate optimization) in order to maximize the chances of a customer purchasing a product.
Note
For an excellent breakdown of common e-commerce CRO factors, please take a look at the following Holy Grail on moz.com: goo.gl/NeuFq3.
When we are talking about distractions on the checkout, we are talking about any feature that may take our customer away from the payment page. The last thing we want is for all of our hard work in getting a customer to the checkout to be wasted when they decide to browse another category and then never return to pay for their shopping cart.
By default, Magento will contain various blocks in the header and footer that can be removed on the checkout page. Elements such as the menu navigation, search box, and even top links could be removed to simplify the page and remove distractions from the main checkout process. To remove these items, we would use our local.xml file and enter the following code:
<checkout_cart_index>
<reference name="header">
<remove name="top.search" />
<remove name="top.links" />
<remove name="top.menu" />
</reference>
</checkout_cart_index>
<checkout_onepage_index>
<reference name="header">
<remove name="top.search" />
<remove name="top.links" />
<remove name="top.menu" />
</reference>
</checkout_onepage_index>
The following image shows the effect this code can have on the look and feel of the checkout:
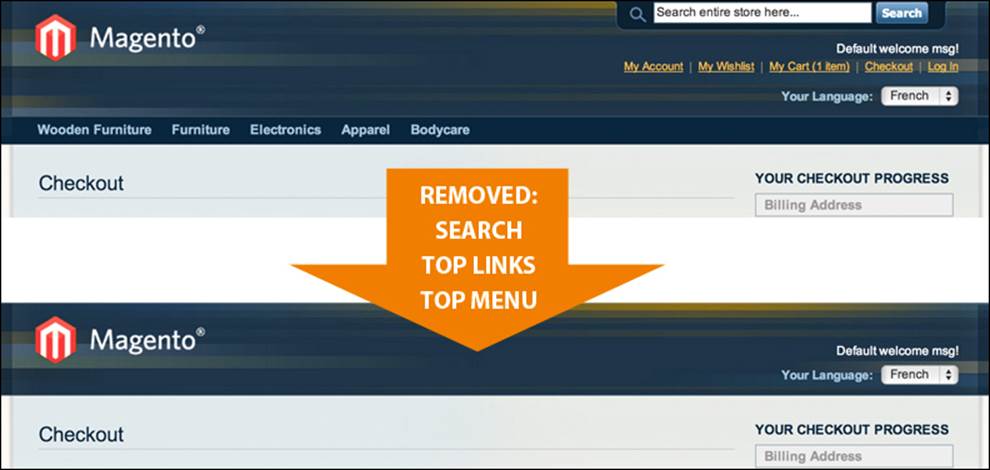
The effect is even more pronounced when there are custom blocks taking up a lot of space within the header/footer area. Removing these items keeps the focus of the page on the checkout form itself and not on the other elements of the page.
Tip
We'll be looking at other checkout optimization methods in Chapter 8, Purpose-built Magento Extensions for SEO/CRO.
Summary
In this section, we have looked at headings, how they should be prioritized on each of the different page types, and how to fix some glaring SEO mistakes in earlier versions of Magento. We've also looked at how to implement different types of schema into different sections of our template files such as the breadcrumb schema and the organization schema (logo).
We've seen how easy it is to display product reviews on our product pages (rather than on a separate page) in order to continuously generate relevant, unique content on our pages to help with SEO, and we've also seen how we can remove elements from our layout in order to simplify the sales process for our customers.
In the next chapter, we will be looking at ways in which we can improve the load speed of our Magento website for the benefit of our users and also search engines, which take loading times into consideration within their ranking algorithms.