Learning OpenShift (2014)
Chapter 13. Using the Do-It-Yourself Cartridge
By default, OpenShift supports many of the most popular languages out of the box. This includes runtimes for PHP, Python, Perl, Node.js, Java, and Ruby. However, there might be times when you want to try out a new programming language or server that is not yet supported by the OpenShift platform with an official cartridge. In this chapter, we are going to learn how to use the DIY cartridge to create and deploy Version 8 of the popular Tomcat servlet container. OpenShift currently supports both Tomcat 6 and 7. However, at the time of writing this book, support for Version 8 of Tomcat as an official cartridge is not provided.
Understanding the DIY cartridge
The DIY cartridge creates an empty gear where users can run just about any program that can speak HTTP. OpenShift Online is essentially a secured Red Hat Enterprise Linux (RHEL) system. This means that any binary that will run on RHEL will run on the DIY cartridge.
The way that the OpenShift Online DIY runtime exposes your application to the outside world is by creating an HTTP proxy that is specified by the following environment variables:
· OPENSHIFT_DIY_IP
· OPENSHIFT_DIY_PORT
The application that you deploy only needs to listen for HTTP connections on the IP address and port that are specified in the preceding environment variables. The OpenShift proxy will then marshal requests from the outside world to your application.
In Chapter 11, Using the Marker and Action Hook System, we learned about the action hook and marker systems. The DIY application type takes advantage of these systems by using the .openshift/action_hooks/start script to control how the custom server is started. Likewise, the.openshift/action_hooks/stop script is used to control how the server is stopped.
Note
DIY applications are unsupported but are a great way for developers to try out unsupported languages, frameworks, or middleware that don't ship as official OpenShift Online cartridges. Furthermore, DIY-based applications are not able to scale using the default scaling algorithm.
Creating an application with the DIY cartridge
For the example in this chapter, we are going to create a DIY-based application that will house the Tomcat 8 servlet container. The first thing we need to do is create an application gear using the DIY cartridge. To perform this action, enter the following command:
$ rhc app create tomcat8 diy
After entering the preceding command, you will see the following information displayed on the screen:
Using diy-0.1 (Do-It-Yourself 0.1) for 'diy'
Application Options
-------------------
Domain: packt
Cartridges: diy-0.1
Gear Size: default
Scaling: no
Creating application 'tomcat8' ... done
Disclaimer: This is an experimental cartridge that provides a way to try unsupported languages, frameworks, and middleware on OpenShift.
Waiting for your DNS name to be available ... done
Your application 'tomcat8' is now available.
URL: http://tomcat8-packt.rhcloud.com/
SSH to: 53841746500446265e00075f@tomcat8-packt.rhcloud.com
Git remote: ssh://53841746500446265e00075f@tomcat8-packt.rhcloud.com/~/git/tomcat8.git/
Cloned to: /Users/gshipley/code/packt/tomcat8
Run 'rhc show-app tomcat8' for more details about your app.
As part of the output, you will notice that we created this application without scaling enabled. This is because the DIY cartridge does not support scaling. The reason for this is that scaling can be extremely complicated and is highly dependent on the runtime to handle operations such as session replication across a cluster of gears. Since the DIY cartridge allows you to execute any binary, the platform cannot determine how to handle the runtime in a scaled environment.
You can also create an application with the DIY cartridge using the web console, as shown in the following screenshot:

In the preceding screenshot, you will notice that the user is not given a choice to scale the application.
Now that we have our application created, visit http://appname-domain.rhcloud.com in your favorite web browser. For example, if our application was called tomcat8 and our domain was called packt, the URL for the DIY-based application will be http://tomcat8-packt.rhcloud.com.
Once you have loaded the URL in your web browser, you will be presented with the following screenshot:

Stopping the default web server
Given the preceding screenshot, you are probably asking yourself how this is happening when we stated that the DIY application type allows you to run any binary. Knowing this information, you probably thought that you would be starting with a blank slate on the application gear. This is not actually the case as the platform ships a template for the DIY cartridge that includes a simple server written in the Ruby programming language.
Since we are going to be installing and using the Tomcat 8 servlet container, we want to stop the existing Ruby server that is running on our application gear. The Ruby service in question is started and stopped via the action hook system that we learned about in Chapter 11, Using the Marker and Action Hook System.
To view the start and stop script associated with the Ruby server, open your terminal window and go to the root directory of the tomcat8 application. Once you are in this directory, execute the following command:
$ cat .openshift/action_hooks/start
This will display the source code that starts the server and should look like the following output:
#!/bin/bash
# The logic to start up your application should be put in this
# script. The application will work only if it binds to
# $OPENSHIFT_DIY_IP:8080
nohup $OPENSHIFT_REPO_DIR/diy/testrubyserver.rb $OPENSHIFT_DIY_IP $OPENSHIFT_REPO_DIR/diy |& /usr/bin/logshifter -tag diy &
In order to delete and clean up the unused Ruby server, we will need to delete several files, including the start and stop scripts. For this, perform the following commands:
$ git rm .openshift/action_hooks/start
$ git rm .openshift/action_hooks/stop
$ git rm diy/testrubyserver.rb
$ git commit -am "removing ruby server"
$ git push
Once the push command is executed, you will see the following output on the screen:
Counting objects: 9, done.
Delta compression using up to 8 threads.
Compressing objects: 100% (3/3), done.
Writing objects: 100% (5/5), 508 bytes | 0 bytes/s, done.
Total 5 (delta 0), reused 0 (delta 0)
remote: Stopping DIY cartridge
remote: Building git ref 'master', commit 5f8e295
remote: Preparing build for deployment
remote: Deployment id is e8469a7d
remote: Activating deployment
remote: Starting DIY cartridge
remote: -------------------------
remote: Git Post-Receive Result: success
remote: Activation status: success
remote: Deployment completed with status: success
To ssh://53841746500446265e00075f@tomcat8-packt.rhcloud.com/~/git/tomcat8.git/
67e52aa..5f8e295 master -> master
Verify that the Ruby server has been stopped and deleted by visiting the URL for your application in a web browser. If the server was removed correctly, you should see the following error message, indicating that a server is not running on your gear:

Creating a Tomcat 8 server
At this point, we have an empty gear that does not have a server listening for HTTP connections. We now want to download the Tomcat application code on our remote gear. For this, we first need to SSH to our application gear with the following command:
$ rhc app ssh tomcat8
Once you have been authenticated to the gear, we want to change to the persistent data directory where we will place the Tomcat source code:
$ cd $OPENSHIFT_DATA_DIR
Note
The preceding command might look a bit odd if you are not familiar with the Linux operating system. What the command does is switch to the directory that is specified in the OPENSHIFT_DATA_DIR environment variable.
We now need to download the Tomcat 8 source code. For this, open a browser and go to the official project page for Tomcat, which is located at https://tomcat.apache.org/.
Once the project page loads, there is a link to download specific versions of the servlet container on the left-hand side. We are interested in Version 8 of the server, so click on that link as shown in the following screenshot:

You will then be presented with a list of downloads that are available for the requested version. Since we are on a Linux-based operating system, we want to download the .tar.gz binary distribution. Right-click on the link for the .tar.gz version and select to copy the link location, as shown in the following screenshot:
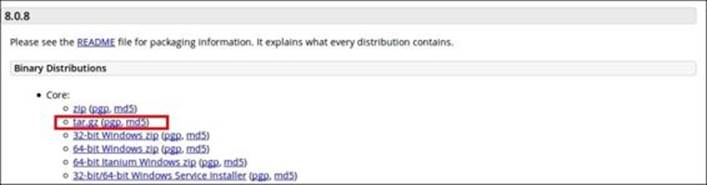
Now that we have a link that points to the binary distribution of the Tomcat 8 servlet container, we want to download it to our OpenShift gear. Open your terminal window again and ensure that you are connected to your remote gear and you are in the $OPENSHIFT_DATA_DIR directory. Once you have verified this, enter the following command, replacing the link in the example with the URL for the distribution that you have chosen to download:
$ wget http://mirrors.gigenet.com/apache/tomcat/tomcat-8/v8.0.8/bin/apache-tomcat-8.0.8.tar.gz
Once the download is complete, extract the contents using the tar command:
$ tar zxvf apache-tomcat-8.0.8.tar.gz
Tip
If you no longer need the .tar.gz package, it is okay to remove it after you have extracted the contents.
This will create a new directory named apache-tomcat-8.0.8 in the $OPENSHIFT_DATA_DIR directory.
At this point, we need to modify the configuration file for the Tomcat server to specify the port and IP address that we will be using for our gear. To find out the IP of your DIY gear, enter the following command on the remote gear:
$ env |grep DIY_IP
The output provided will contain the IP address for your gear.
Note
Make a note of this information, as we will need it when we begin to modify the configuration file for Tomcat.
For example, the output returned for my gear is as follows:
OPENSHIFT_DIY_IP=127.11.60.1
The next thing that we need to do is modify the configuration that defines what IP address and ports the server uses. This configuration file is named server.xml and is in the conf directory of the server. To edit this file, enter the following command:
$ vi $OPENSHIFT_DATA_DIR/apache-tomcat-8.0.8/conf/server.xml
Once the file is opened, we will need to modify the <Server port="8005" shutdown="SHUTDOWN"> line to <Server port="18005" address="127.11.60.1" shutdown="SHUTDOWN">.
Note
Ensure that in all the examples in this chapter, you replace the supplied IP address of 127.11.60.1 with the correct address for your gear.
Now, you need to make some changes to the following lines of code:
<Connector port="8080" protocol="HTTP/1.1"
connectionTimeout="20000"
redirectPort="8443" />
Change the preceding lines of code to the following lines of code:
<Connector port="8080" protocol="HTTP/1.1"
connectionTimeout="20000"
address="127.11.60.1"
redirectPort="8443" />
We then need to change the ports and address for AJP from <Connector port="18009" protocol="AJP/1.3" redirectPort="8443" /> to <Connector port="18009" protocol="AJP/1.3" address="127.11.60.1 redirectPort="8443" />.
We also need to change the hostname section to include the address of our gear:
<Host name="localhost" appBase="webapps"
unpackWARs="true" autoDeploy="true">
Change the preceding lines of code to the following lines of code:
<Host name="tomcat8-packt.rhcloud.com" appBase="webapps"
unpackWARs="true" autoDeploy="true">
Ensure that you provide the correct hostname for your gear and not the one provided.
Once you have made the changes to the configuration file, we can now start the server using the following command:
$ $OPENSHIFT_DATA_DIR/apache-tomcat-8.0.8/bin/startup.sh && tail -f $OPENSHIFT_DATA_DIR /apache-tomcat-8.0.8/logs/*
The preceding command will start the Tomcat 8 server and then tail the logfiles so that you can view any error messages that might be displayed during startup.
If you made the correct modifications to the server.xml configuration file, you should see the following indication in the logs:
27-May-2014 01:34:01.140 INFO [main] org.apache.catalina.startup.Catalina.start Server startup in 5422 ms
To verify that the server was started correctly, open your web browser and point to the URL of your application gear. You will be greeted with the following page that lets you know that the server is up and running:
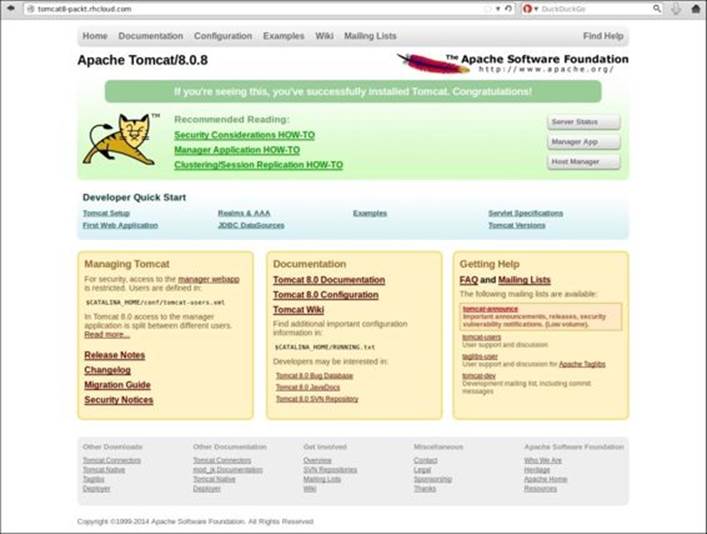
Pretty awesome, huh? We just created a new server using the Tomcat 8 binary distribution and got it up and running on OpenShift Online in a matter of minutes. I decided to use Tomcat for the example in this book because it is one of the most popular servers that people try to get running. With just a few modifications to the configuration, we were able to stand it up and have it start serving requests very quickly.
One last bit of information before we end this chapter. You might have wondered why we changed the port numbers, other than 8080, to something in the 18000 range. This is because OpenShift does not allow the binding of ports below 15000 for custom binaries except for a few exceptions, including 8080.
Summary
In this chapter, we learned how to use the DIY cartridge to create custom servers by utilizing any binary that is executable on the RHEL operating system. We started by creating an application, and then we removed the template Ruby server that ships with the cartridge. After we removed the Ruby server, we downloaded and configured the Tomcat 8 servlet container. Finally, we started the Tomcat 8 server using the startup.sh script and verified that it was working by loading the servlet container in our web browser.
Thank you for reading along through all the chapters in this book. Having progressed through the content, you now have the knowledge and skills to be successful with the OpenShift platform. You have learned the essential concepts that will enable you to create and deploy applications to the public cloud while also learning a few tricks that are not commonly known, such as changing the scaling algorithm, that will empower you to take your applications to the next level.
All materials on the site are licensed Creative Commons Attribution-Sharealike 3.0 Unported CC BY-SA 3.0 & GNU Free Documentation License (GFDL)
If you are the copyright holder of any material contained on our site and intend to remove it, please contact our site administrator for approval.
© 2016-2026 All site design rights belong to S.Y.A.