Learning Informatica PowerCenter 9.x (2014)
Chapter 1. Starting the Development Phase – Using the Designer Screen Basics
With the installation phase over, we are all set to have our first try on the PowerCenter Client tools. We have the following four client tools available in Informatica PowerCenter:
· PowerCenter Designer
· PowerCenter Workflow Manager
· PowerCenter Workflow Monitor
· PowerCenter Repository Manager
Informatica PowerCenter Designer
In this chapter, we are going to discuss the basics of the Informatica PowerCenter Designer screen. The designer screen lets you build and manage PowerCenter objects, such as sources, targets, transformations, and mappings.
To open the PowerCenter Designer screen, navigate to Start | All Programs | Informatica 9.5.1 | Client | Power Center Client | Designer.
This will open the designer screen.
The Designer screen's components
The designer screen, as can be seen in the following screenshot, is divided into five sections. Each section has its own purpose. You need to understand each component properly as we will be referring to these components regularly in the next chapters. They are as follows:
· Navigator: This is used to connect to repositories and open folders. You can copy objects and create shortcuts within the navigator. Navigator allows you to reuse the existing components.
· Workspace: This is the space where you actually do the coding. Open different tools in this window to create and edit the repository objects, such as sources, targets, mapplets, transformations, and mappings. In the designer workspace, you can see different tabs, such as Source Analyzer, Target Designer, Transformation Developer, Mapplet Designer, and Mapping Designer.
· Toolbar: This shows the various components to be used in the designer screen and other shortcuts.
· Output/control panel: This lets you view details about tasks you perform, such as saving your work or validating a mapping. You can view whether your code is valid or invalid. If invalid, the output panel shows you the reason for the error.
· Status bar: This displays the status of the current operation. The status bar shows you the status of the operation that you are trying to perform.
The preceding screen components are shown in the following screenshot:
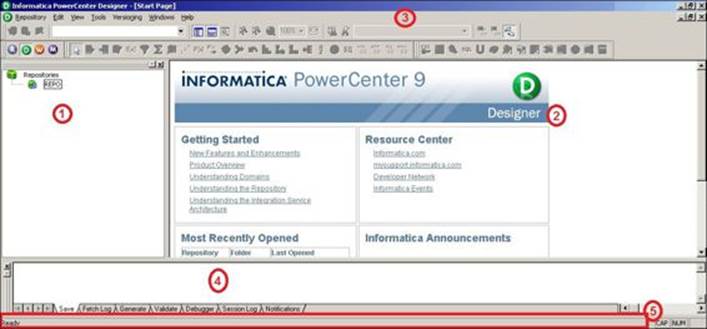
The components shown are as follows:
· Navigator (1)
· Workspace (2)
· Toolbar (3)
· Control panel (4)
· Status bar (5)
PowerCenter Designer has the following tools that allow us to work on different types of sources, different types of targets, and build mappings using different types of transformations:
· Source Analyzer: This allows you to import or create source definitions. You can work on various types of files (flat files, XML, .xls, and so on) and database tables. Source Analyzer lets you modify the existing source definitions.
· Target Designer: This allows you to import or create target definitions. You can work on various types of files (flat files, XML, .xls, and so on) and database tables. Target Designer lets you modify the existing target definitions.
· Transformation Developer: This allows you to create reusable transformations to use in mappings. Reusable components are important because they allow you to use the existing transformations.
· Mapplet Designer: This allows you to create a group of transformations to use in mappings. Mapplets are groups of reusable transformations that can be used in multiple mappings as reusable components.
· Mapping Designer: This allows you to create mappings that the Integration Service uses to extract, transform, and load data. Mappings contain sources, targets, and transformations linked to each other through links. You can add multiple sources, multiple targets, and multiple transformations in a mapping.
The following screenshot shows the Source Analyzer screen components:
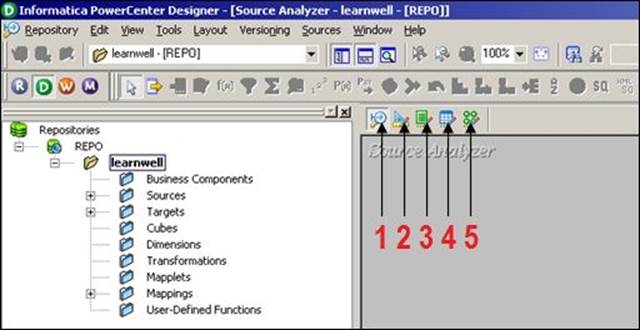
The components shown are as follows:
· Source Analyzer
· Target Designer
· Transformation Developer
· Mapplet Designer
· Mapping Designer
As a general rule, we should work first on the sources, then the targets, and at last the transformations, which completes the mappings.
Working with sources
Any file or table from where we can extract the data in PowerCenter is referred to as a source. You can import or create the source definition.
Note
When you import the source definition in designer, we import only the metadata, that is, column names, data type, size, indexes, constraints, dependencies, and so on. Actual data never comes with the source structure in designer. The data flows through the mapping in a row-wise manner when we execute the workflow in Workflow Manager.
PowerCenter allows you to work on various types of sources, as listed below:
· Relational database: PowerCenter supports relational databases such as Oracle, Sybase, DB2, Microsoft SQL Server, SAP HANA, and Teradata
· File: Flat files (fixed width and delimited files), COBOL files, XML files, and Excel files
· High-end applications: PowerCenter also supports applications such as Hyperion, PeopleSoft, TIBCO, WebSphere MQ, and so on
· Mainframe: Additional features of Mainframe such as IBM DB2 OS/390, IBM DB2 OS/400, IDMS, IDMS-X, IMS, and VSAM can be purchased
· Other: PowerCenter also supports Microsoft Access and external web services
We have seen the components that PowerCenter supports. In the next section, we will learn to import the relational database tables. Before that, a database connection needs to be added to the designer screen as mentioned in the next section.
Adding a new ODBC data source
To add a new database data source connection to import tables, follow this procedure:
1. In the designer screen, navigate to Tools | Source Analyzer to open the Source Analyzer tool, as indicated earlier.
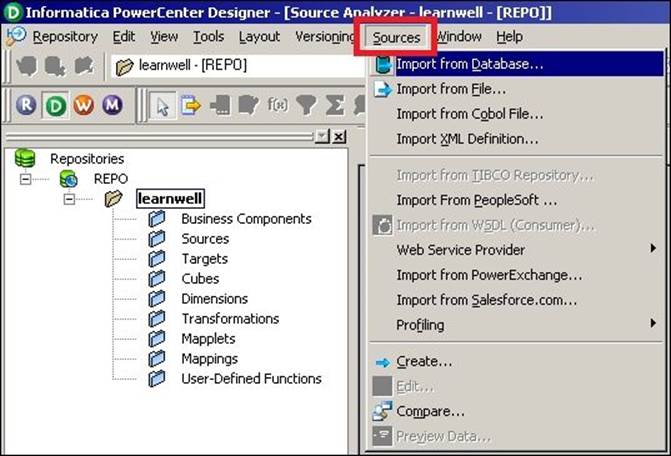
2. Navigate to Sources | Import from Database.
3. To add a new database connection, click on the tab shown in the following screenshot:
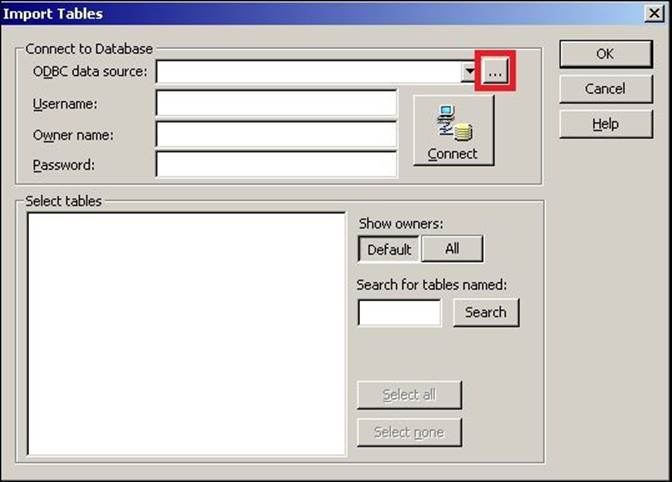
4. A pop up window to add a new connection will appear on the screen, as shown in the following screenshot:
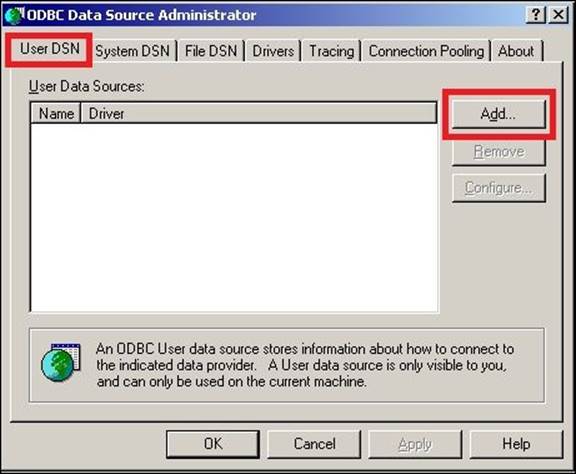
We need to add a new User DSN.
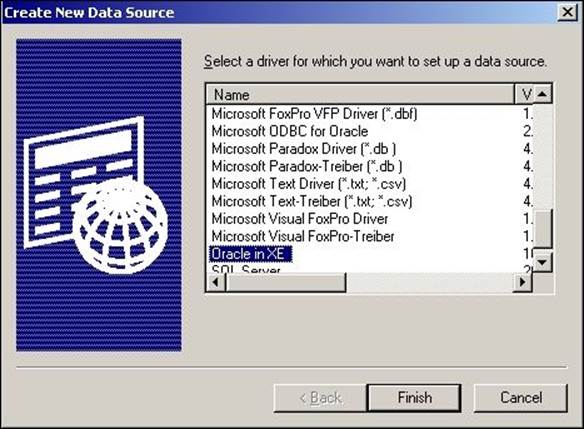
5. The next screen will allow you to select the desired database from the list of databases. For our reference, we are using Oracle Database in this book. If you are using another database, select the appropriate option from the list.
Select the type of database driver you wish to add and click on Finish.
6. A new window will pop up on your screen. Mention the following details to add a new connection, as shown in the following screenshot.
o Data Source Name: Enter the name of the data source. This can be any name for your reference.
o Description: Please specify some description for the connection.
o TNS Service Name: Mention the service name for your connection. We are taking service name as XE; this is the default service name for Oracle 10g Database.
o User ID: Mention the user ID. We are using HR as our user to make the connection.
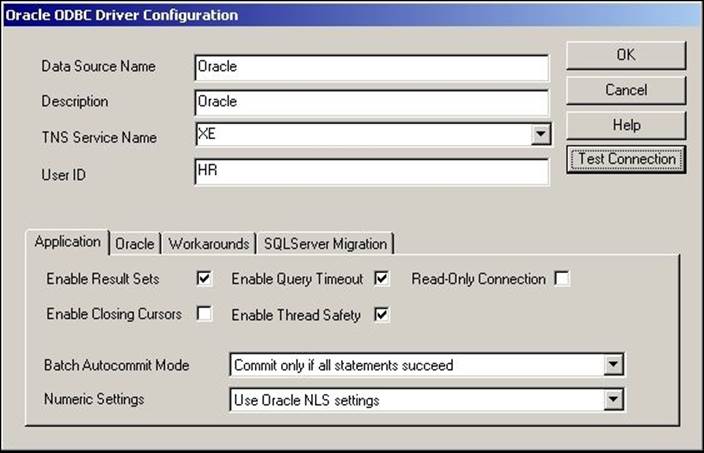
7. After providing all the details, click on Test Connection.
8. A new window will pop up as shown in the following screenshot:
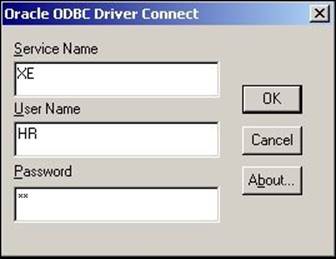
Specify the password for Oracle Database and click on OK.
9. If all the values mentioned by you are correct, the test connection will be successful.
With this, we have added a new database connection to our repository, and we can import the tables using the new connection.
You can add different type of databases to your repository. This is just a one-time process that you need to perform before you can start using the tables.
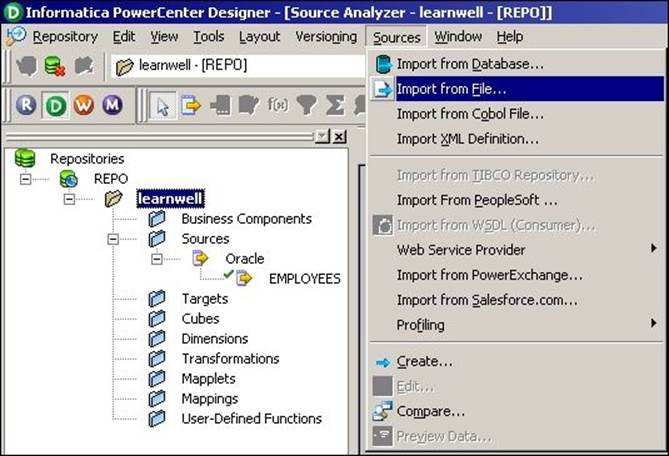
Working with relational database tables – the Import option
We will first start working on the relational tables. You can import or create the table structure in Source Analyzer. After you add these source definitions to the repository, you use them in a mapping.
Perform the following steps to import the table source definition:
1. In the Designer screen, navigate to Tools | Source Analyzer to open the Source Analyzer tool.
2. Navigate to Sources | Import from Database:
3. From the ODBC data source field, select the ODBC data source that you created to access source tables in the previous section.
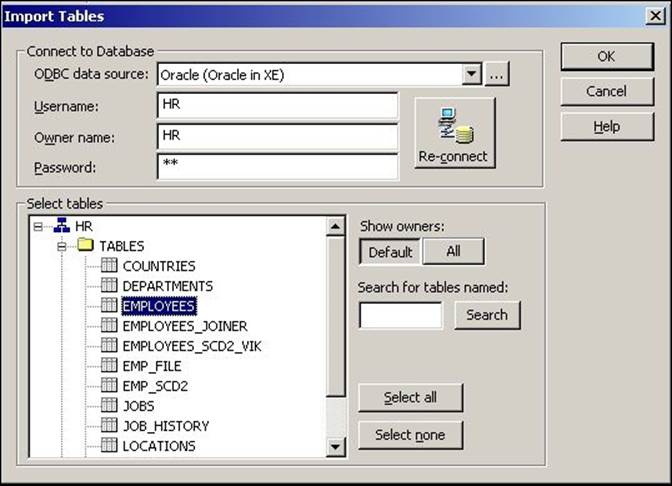
4. Enter the username and password to connect to the database. Also, enter the name of the source table owner if necessary.
5. Click on Connect.
6. In the Select tables list, expand the database owner and the TABLES heading.
7. Select the tables you wish to import and click on OK.
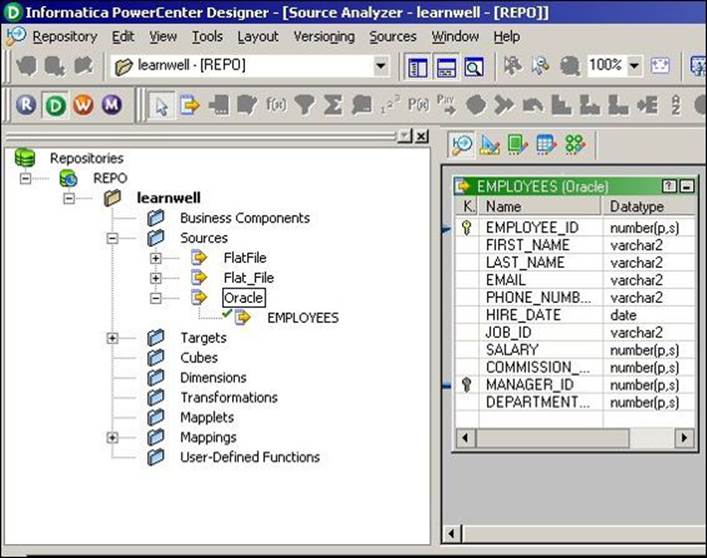
The structure of the selected tables will appear in the workspace as shown in the following screenshot:
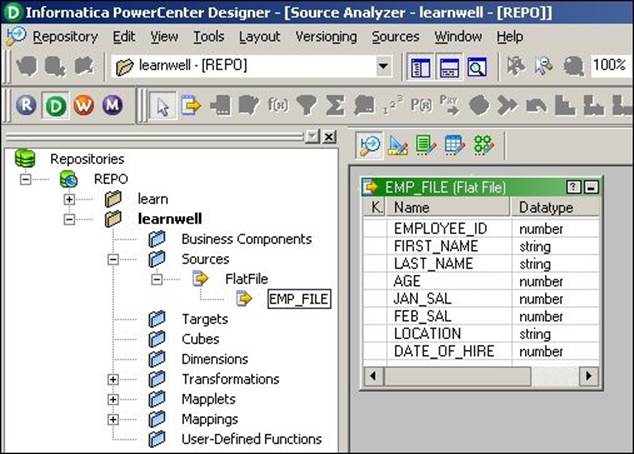
Working with flat files – the Import option
In the previous section, we discussed about importing the relational tables. Before we start working on importing the flat files, we will discuss some important aspects about flat files.
Flat files are of two types: delimited and fixed width. They are explained as follows:
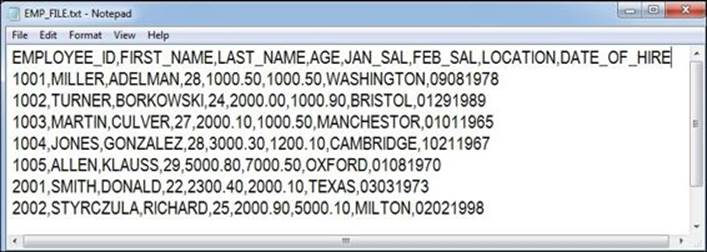
· In delimited files, the values are separated from each other by a delimiter. Any character or number can be used as delimiter, but usually for better interpretation we use special characters as delimiters. In delimited files, the width of each field is not a mandatory option as each value gets separated from the other using a delimiter. Please see the following screenshot to understand a delimited file. The delimiter used in the file is a comma (,).
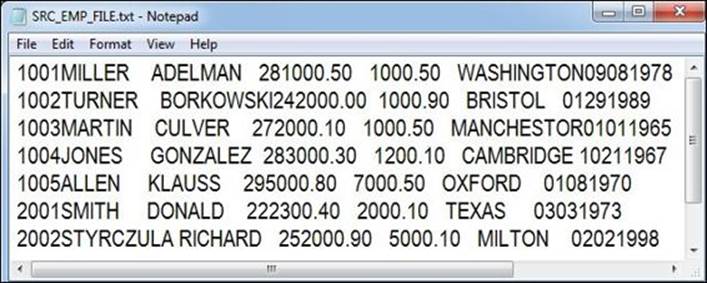
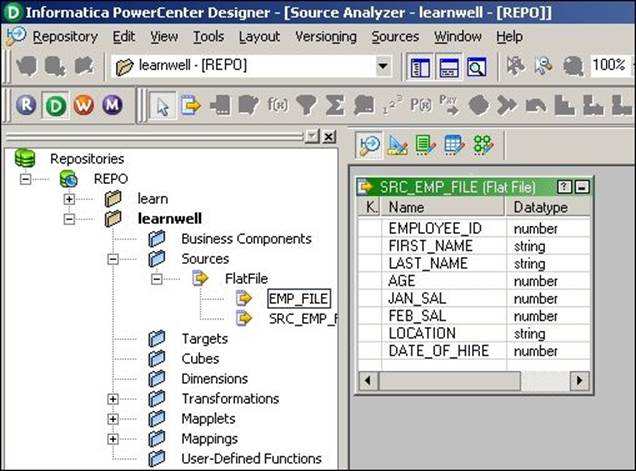
· In fixed-width files, the width of each field is fixed. The values are separated from each other by the fixed size of the column defined. There can be issues in reading the data if the size of each column is not maintained properly. Please see the following screenshot to understand a fixed-width file.
The width of each field in the file is fixed. See the description of each field:
o EMPLOYEE_ID: 4 bytes
o FIRST_NAME: 10 bytes
o LAST__NAME: 10 bytes
o AGE: 2 bytes
o JAN_SAL: 10 bytes
o FEB_SAL: 10 bytes
o LOCATION: 10 bytes
o DATE_OF_HIRE: 8 bytes
If the size of a particular value is not equal to the size mentioned, we need to pad the value with spaces:
Working with delimited files
Perform the following steps to import the delimited files:
1. In the designer screen, navigate to Tools | Source Analyzer to open the Source Analyzer.
2. Navigate to Sources | Import from File.

3. Browse the files you wish to import as source files.
4. The Flat File Import Wizard screen will pop up. The Flat File Import Wizard screen will help you specify the properties for importing the file in a proper format. Please complete the following steps in the wizard.
5. Select the file type as Delimited as shown in the following screenshot:
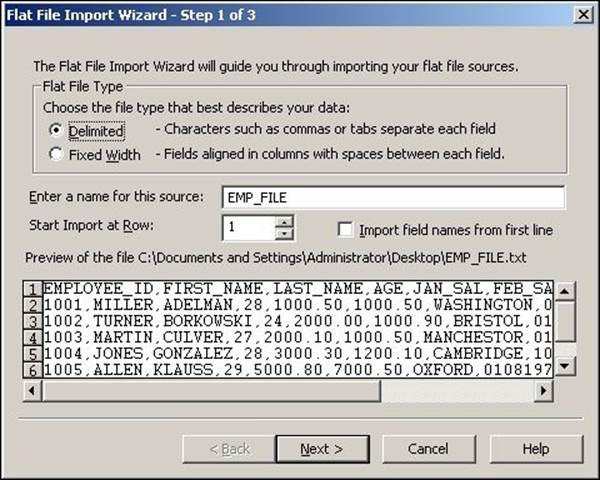
If the file contains headers as column names in the first line, then we will need to start the import at row 2, as this option indicates from which row the actual data has to be imported. If the file doesn't contain the headers in first line, we will import the data from the first line only.
Files may contain the column names in the first line as headers. You need to verify the file properly before you start working on the file. The Import field names from first line option enables us to import the header names into the source definition. If you do not select this option, the header names will not be imported.
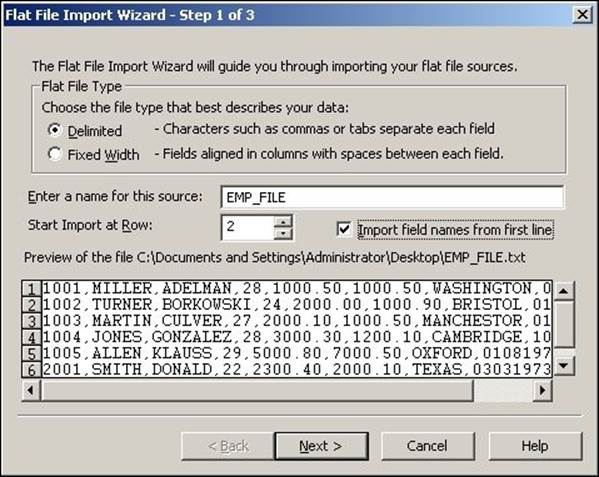
Click on Next.
6. Select the type Delimiter to be used in the file. In our case, we are using comma as a delimiter. You can select the delimiter as per the file you are using.
7. Also, check the quotes option: No quotes, Single quotes, and Double quotes—to work with the quotes in the text values. This option enables us to import the data with single or double quotes in text values. We are using No quotes as our option since the sample file we are using does not have any data with quotes.
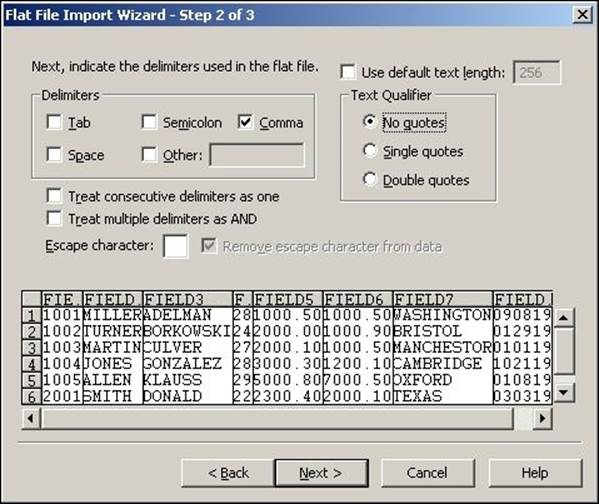
8. Click on Next.
9. Verify the column name, data type, and precision in the data view option. You can edit the column names and other details in this view. Generally, you do not need to do so. This is shown in the following screenshot:
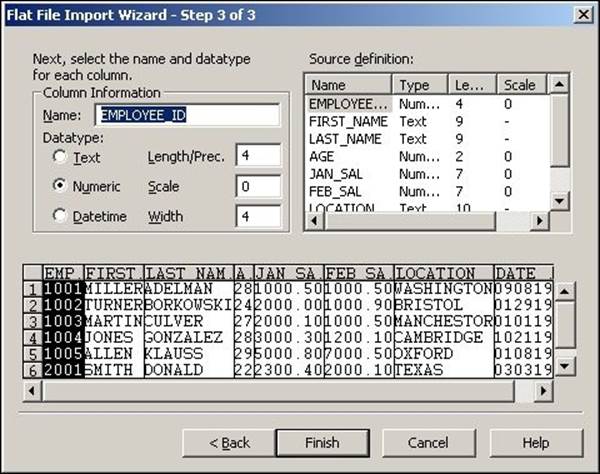
10.Click on Finish to get the source imported in the Source Analyzer, as shown in the following screenshot:
Working with fixed-width files
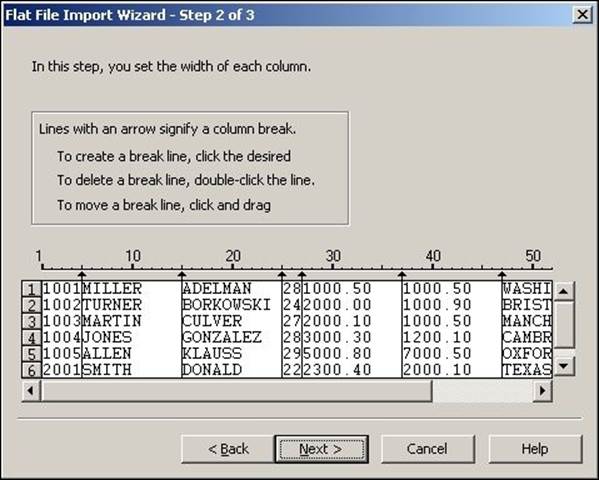
Perform the following steps to import the fixed-width files:
1. In the designer screen, navigate to Tools | Source Analyzer to open the Source Analyzer.
2. Navigate to Sources | Import from File.
3. Browse the files you wish to use as source files. We are using EMP_SRC_FILE as a reference to import the fixed-width file.
4. The Flat File Import Wizard screen will pop up.
5. Select the file type Fixed Width.

6. Click on Next.
7. As against the delimited files, we will now need to set the width of each column as per the requirement. This will help us divide the file in a proper column-wise manner, as shown in the following screenshot:
8. Click on Next.
9. Specify the column name, data type, and precision in the data view option. You can edit the column names and other details in this view:
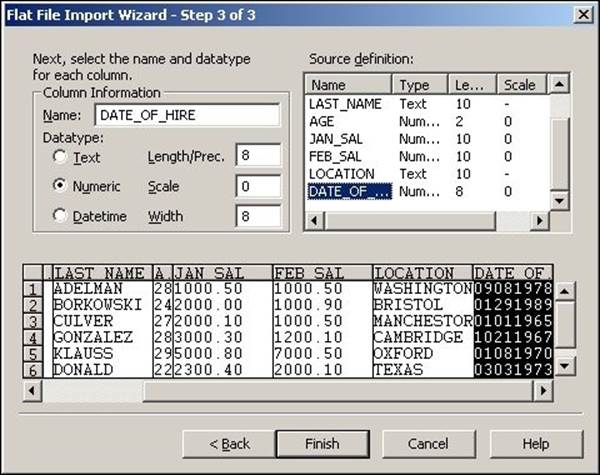
10.Click on Finish to get the source imported in the Source Analyzer, as shown in the following screenshot:
Working with sources – the Create option
Apart from importing the file or table structure, we can manually create the source definition. When the sample source file or the table structure is not available, we need to manually create the source structure. When we select the Create option, we need to define every detail related to the file or table manually, such as the name of the source, the type of the source, the column names, the column data type, the column data size, indexes, constraints, and so on. When you import the structure, the import wizard automatically imports all these details. We perform the following steps:
1. In the designer screen, navigate to Tools | Source Analyzer to open the Source Analyzer.
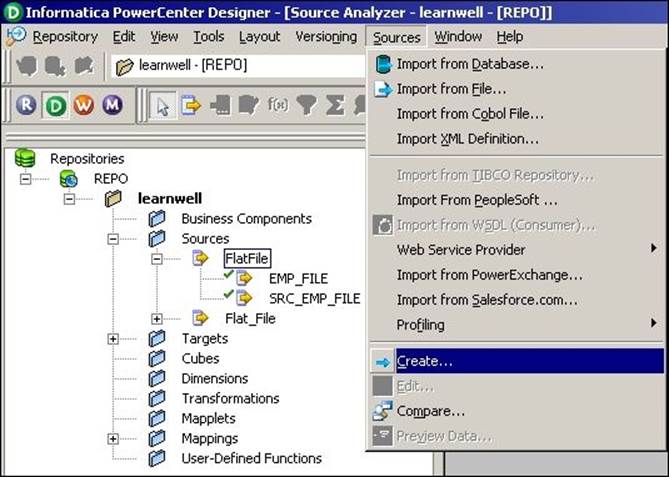
2. Navigate to Sources | Create.
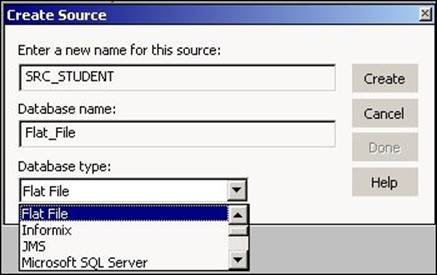
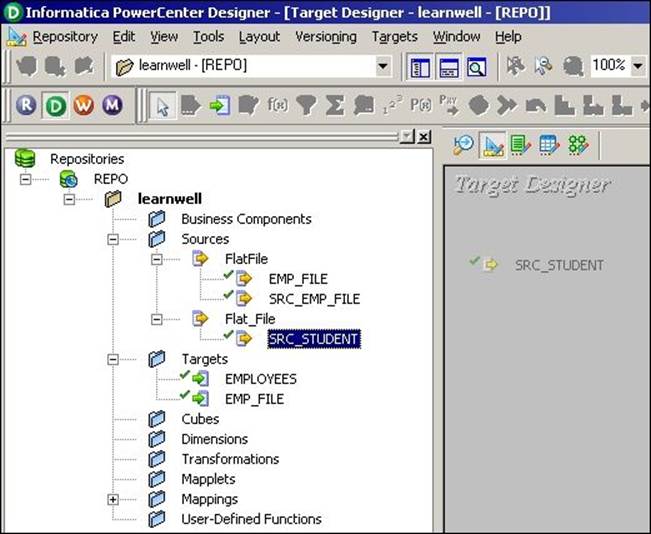
3. Mention the name of the source as per your requirements and select the type of source you wish to create from the drop-down list. For your reference, we are choosing Flat File as our source type and using SRC_STUDENT as the source filename. Also, select the database type for the new source to be created. This is shown in the following screenshot:
4. Click on Create and then click on Done.
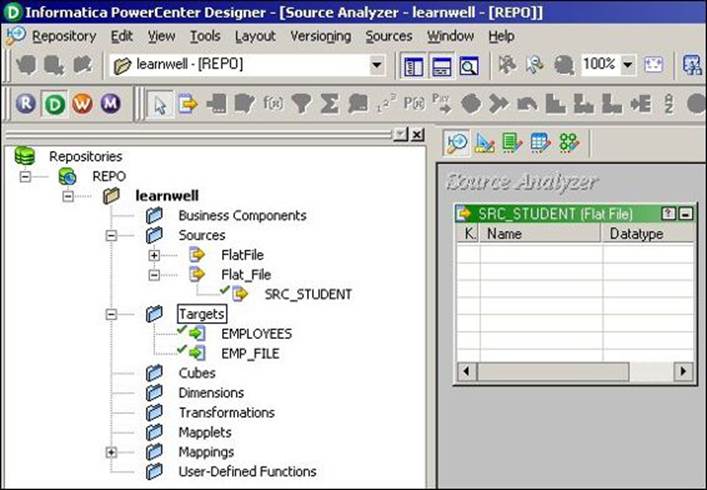
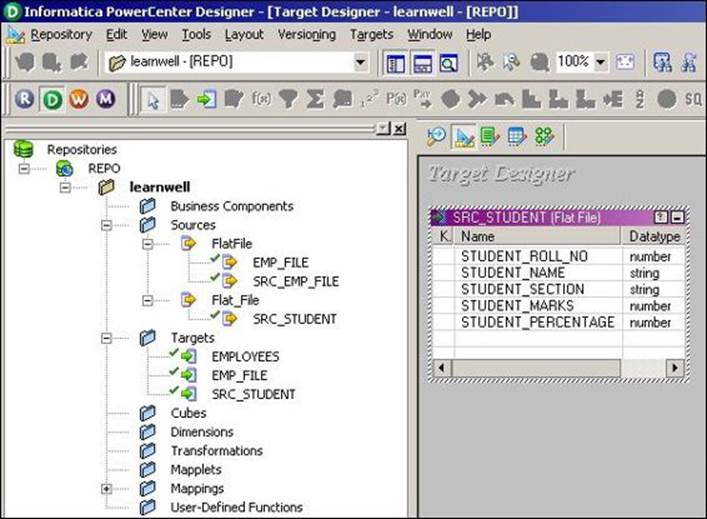
5. An empty source structure with the name SRC_STUDENT will appear in the Source Analyzer as shown in the following screenshot:
6. Since we are using the Create option, we need to manually specify all the details, such as the column names, data type, precision, and so on.
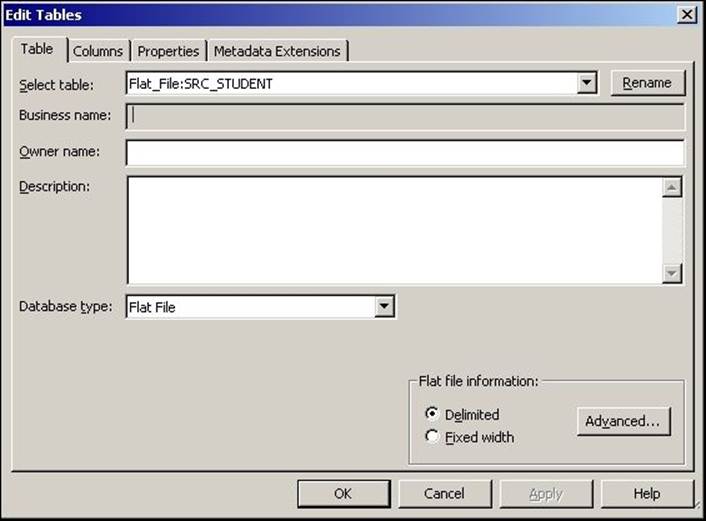
7. Double-click on the title bar of the SRC_STUDENT source structure to open the source definition. The Edit Tables dialog box appears and displays all the properties of this source definition. The Table tab shows the name of the table, the owner name, and the database type. You can add a comment in the Description section. The Business name field is empty.
8. Click on the Columns tab. The Columns tab displays the column descriptions for the source. In the Columns tab, we have options to add a new column, delete an existing column, and so on.
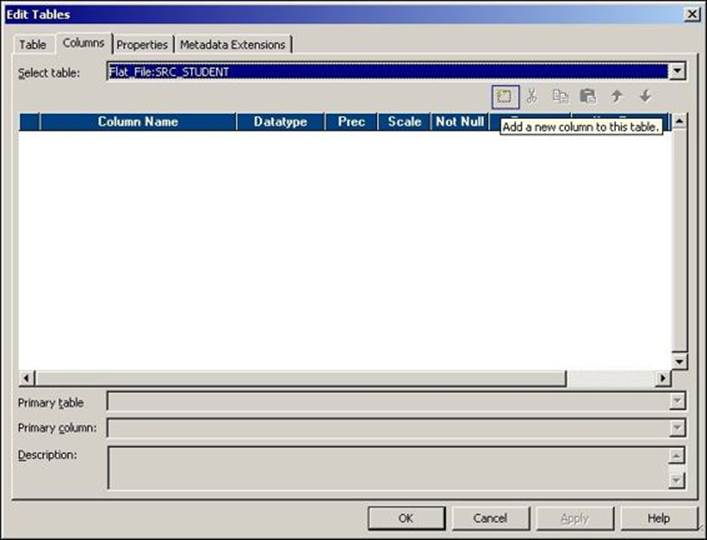
The options available in the Columns tab are explained as follows:
o Add a new column: You can click on this option to add a new column. You can add multiple columns as per your requirement. Once you add a new column, you need to specify other details such as data type, precision, and so on for the column you added.
o Delete a column: To delete a column, click on the column you wish to delete and press the Delete button.
o Copy an existing column: You can copy an existing column if you wish to make a column similar to that column.
o Paste the copied column: You can paste the copied column as per your requirement.
o Move up or down the column: You can move up or down the column to rearrange the columns inside the source definition.
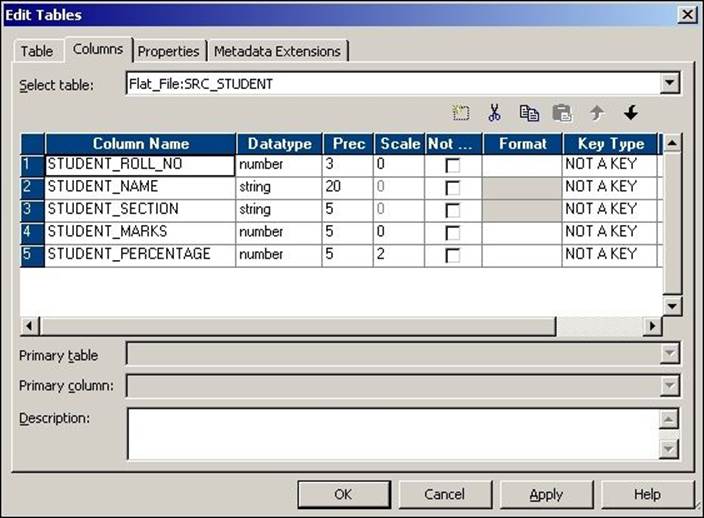
We have added a few columns to the source, as shown in the following screenshot:
9. Click on the Metadata Extensions tab. Metadata extensions allow you to extend the metadata stored in the repository by associating information with individual repository objects. For example, you can store contact information, such as name or e-mail address with the sources you create. This is optional and is usually left empty.
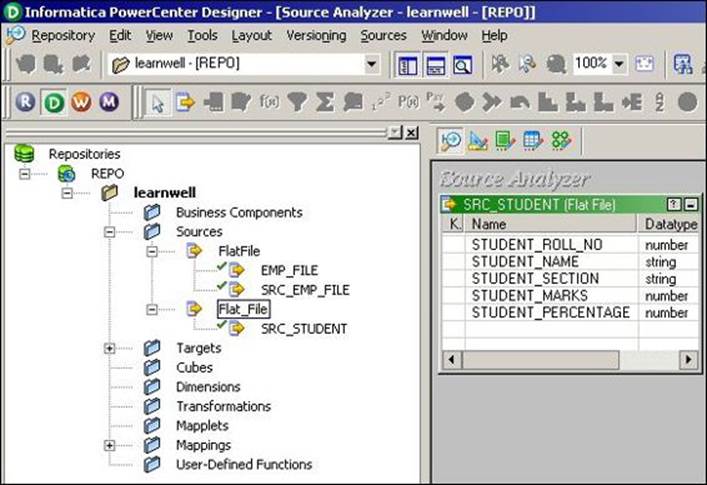
10.Click on Apply and then click on OK to close the dialog box and get the source definition in the Source Analyzer as shown in the following screenshot:
11.Navigate to Repository | Save or press Ctrl + S to save the changes to the repository.
Working with targets
We have seen in the earlier section that PowerCenter can use different types of sources. Similarly, PowerCenter is capable of working with different types of targets to load data. The targets are explained as follows:
· Relational database: PowerCenter supports all the relational databases such as Oracle, Sybase, DB2, Microsoft SQL Server, SAP HANA, and Teradata
· Files: PowerCenter supports flat files (fixed-width and delimited files), COBOL files, XML files, and Excel files
· High-end applications: PowerCenter also supports applications such as Hyperion, PeopleSoft, TIBCO, WebSphere MQ, and so on
· Mainframe: Additional features of Mainframe such as IBM DB2 OS/390, IBM DB2 OS/400, IDMS, IDMS-X, IMS, and VSAM can be purchased
· Other: PowerCenter also supports Microsoft Access and external web services
Working with target relational database tables – the Import option
As we discussed about importing and creating source files and source tables, the same way, we need to work on target definitions.
The process of importing the target table is exactly the same as importing the source table; the only difference is that you need to work in Target Designer.
You can import or create the table structure in Target Designer. After you add these target definitions to the repository, you can use them in a mapping.
Perform the following steps to import the table target definition:
1. In the designer screen, navigate to Tools | Target Designer to open the Target Designer screen.
2. Navigate to Targets | Import from Database.
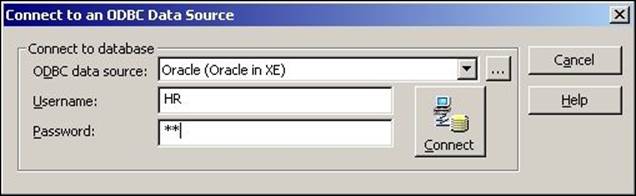
3. From the ODBC data source button, select the ODBC data source that you created to access the source tables. We have already added the data source while working on the sources.
4. Enter the username and password to connect to the database.
5. Click on Connect.
6. In the Select tables list, expand the database owner and the TABLE heading.
7. Select the tables you wish to import and click on OK.
The structure of the selected tables will appear in the Target Designer screen in the workspace.
As mentioned, the process is exactly similar to importing the source in Source Analyzer. Please follow the preceding steps if you have any issues.
Working with target flat files – the Import option
The process of importing the target file is exactly the same as importing the source file; the only difference is that you need to work in Target Designer.
Working with delimited files
Perform the following steps to import the delimited files:
1. In the Designer screen, navigate to Tools | Target Designer to open the Target Designer.
2. Navigate to Targets | Import from file.
3. Browse the files you wish to import as source files.
4. The Flat File Import Wizard screen will pop up.
5. Select the file type: Delimited. Also select the appropriate option to import the data from the row and import file names from the first line, as we did in case of importing the source. Click on Next.
6. Select the type of delimiter used in the file. Also check the quotes option: No quotes, Single quotes, and Double quotes—to work with the quotes in the text values. Click on Next.
7. Verify the column name, data type, and precision in the data view option.
8. Click on Finish to get the target file imported in the Target Designer.
Working with fixed-width files
Perform the following steps to import the fixed width files:
1. In the Designer screen, navigate to Tools | Target Designer to open the Target Designer.
2. Navigate to Targets | Import from file.
3. Browse the files you wish to use as source files.
4. The Flat File Import Wizard screen will pop up.
5. Select the file type: Fixed Width. Click on Next.
6. Set the width of each column as required by adding a line break. Click on Next.
7. Specify the column name, data type, and precision in the data view option.
8. Click on Finish to get the target file imported in the Target Designer.
Working with the target – the Create option
Apart from importing the file or table structure, we can manually create the target definition. When the sample target file or the table structure is not available, we need to manually create the target structure. When we select the Create option, we need to define every detail related to the file or table manually, such as the name of the target, type of target, column names, column data type, column data size, indexes, constraints, and so on. When you import the structure, the import wizard automatically imports all these details. We perform the following steps:
1. In the designer screen, navigate to Tools | Target Designer to open the Target Designer.
2. Navigate to Target | Create.
3. Select the type of target you wish to create from the drop-down list.
4. An empty target structure will appear in the Target Designer.
5. Double-click on the title bar of the target definition for the T_EMPLOYEES table. This will open the T_EMPLOYEES target definition.
6. A pop-up window will display all the properties of this target definition. The Table tab will show the name of the table, the owner name, and the database type. You can add a comment in the Description section. Usually, we keep the Business name section empty.
7. Click on the Columns tab. This will display the column descriptions for the target. You can add, delete, or edit the columns.
8. Click on the Metadata Extensions tab; usually, you keep this tab blank. You can store some metadata related to the target you created. Some personal details and reference details can be saved. Click on Apply and then click on OK.
9. Navigate to Repository | Save to save the changes to the repository.
Working with the target – the Copy option
PowerCenter provides a very convenient way of reusing the existing components in the repository. It provides the Drag-Drop feature, which helps when reusing the existing components.
Using the Drag-Drop feature, you can copy the existing source definition, created earlier, into the Target Designer to create the target definition with the same structure.
Perform the following steps:
1. In the Designer screen, navigate to Tools | Target Designer to open the Target Designer.
2. Drag the SRC_STUDENT source definition from the navigator to the Target Designer workspace as shown in the following screenshot:
3. The designer screen creates a target definition, SRC_STUDENT, with the same column definitions as the SRC_STUDENT source definition, and the same database type.
4. Double-click on the title bar of the SRC_STUDENT target definition to open it and edit its properties if you wish to change them.
5. Click on Rename.

6. A new pop-up window will allow you to mention a new name. Change the target definition name to TGT_STUDENT as shown in the following screenshot:
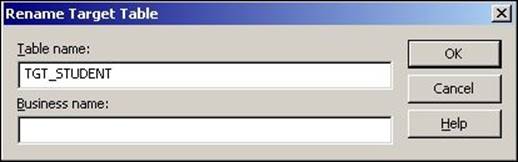
7. Click on OK.
8. Click on the Columns tab. The target column definitions are the same as the SRC_STUDENT source definition. You can add a new column, delete an existing column, or edit the columns as per your requirements.
9. Click on OK to save the changes and close the dialog box.
10.Navigate to Repository | Save.
A feel of the data inside the repository – a preview
Now that you have learned to use sources and targets in PowerCenter, we will start using these sources and targets in mappings. As mentioned earlier, in the PowerCenter Designer we only deal with the metadata of sources and targets; we do have an option to preview the data of the source and target, which we imported by providing the path/connection for files or tables. This gives us an option to understand the data clearly before we move ahead with the next step.
Previewing the source data – flat files
Perform the following steps to preview the data in the source:
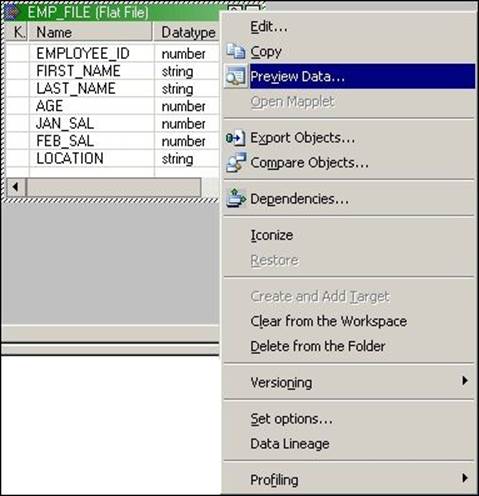
1. Drag-and-drop the source from the navigator section to Source Analyzer. We are using EMP_FILE as our reference to preview data.
2. Right-click on the source definition and click on Preview Data.
3. A new window will pop up that will ask you to provide the path where your file is stored. The following screenshot shows the pop-up window:

4. Click on Open to view the preview data.
5. Once you are done, click on Close.
Previewing the source data – a relational table
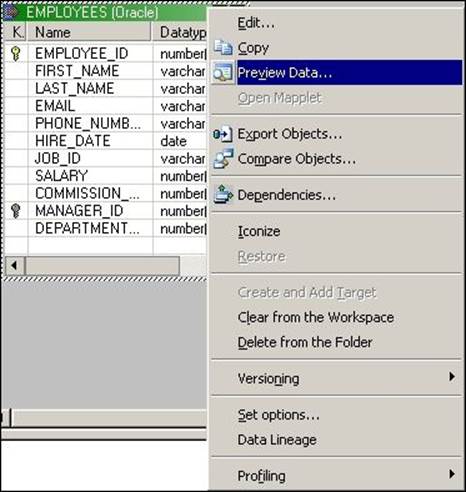
Perform the following steps to preview the data in the relational data source:
1. Drag-and-drop the source table from the navigator section to Source Analyzer. We are using the EMPLOYEES Oracle table as our reference to preview data.
2. Right-click on the EMPLOYEES source definition and click on Preview Data.
3. A new window will pop up, which will ask you to provide the database connection details. The following screenshot shows the database connection details:
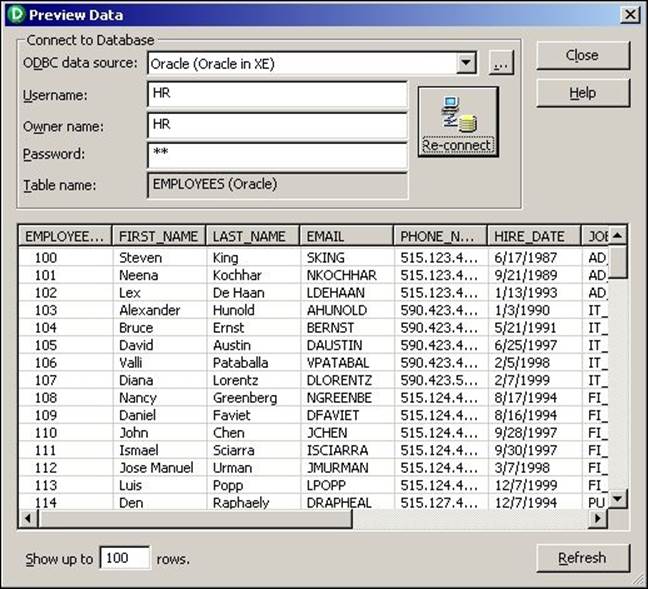
4. Click on Connect to view the preview data.
5. Once you are done, click on Close.
Creating a database table
In the earlier section, you saw the steps to import the database table into Informatica.
Informatica PowerCenter tools allow you to create a database table from Informatica. If you have a table structure available in PowerCenter but the corresponding table is not available in the database, you will not be able to use the table for your mapping purpose as you will not be able to provide the required connections to load the data. PowerCenter provides a very efficient and faster way to generate a database table directly, so you need not write a CREATE SQL statement to generate a table in your database.
For your reference, we will create a table named TGT_EMPLOYEES in Oracle Database. We will perform the following steps:
1. In the designer screen, navigate to Tools | Target Designer to open the Target Designer.
2. In the workspace, select the TGT_EMPLOYEES target definition.
3. Navigate to Targets | Generate/Execute SQL.
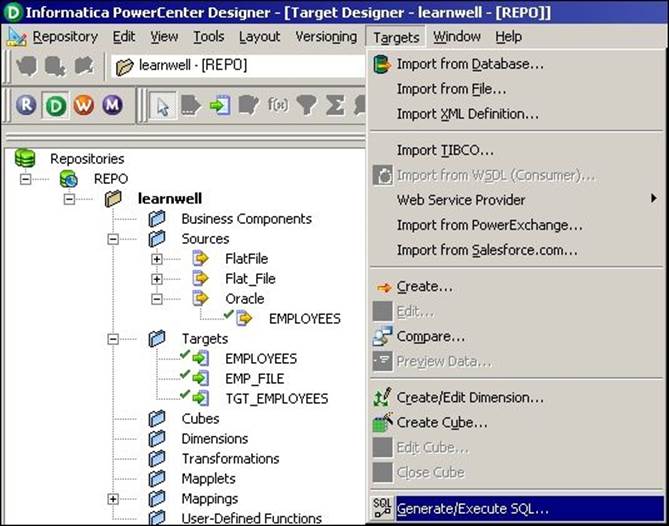
4. The Database Object Generation dialog box appears.
5. In the Filename field, enter the following text to generate a SQL script called MKTABLES.SQL: C:\MKTABLES.SQL. You can provide any path. Informatica PowerCenter will generate a SQL file at the specified location.
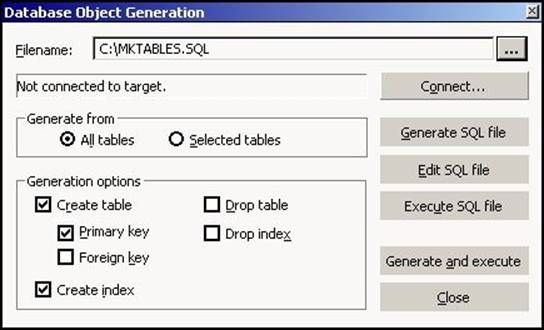
6. Select the ODBC data source to connect to the target database.
7. Enter the necessary username and password, and then click on Connect:
8. Select the appropriate option to generate the table.
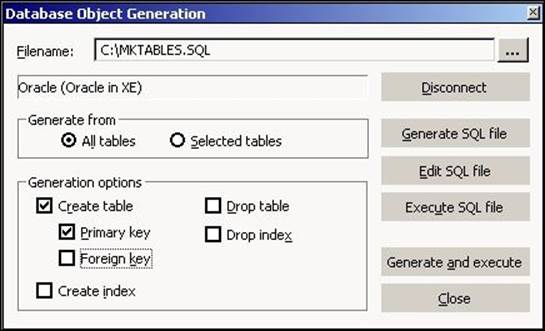
9. Click on Generate and execute.
10.Click on Close to exit the Database Object Generation dialog box.
With this, the TGT_EMPLOYEES table will be generated in the Oracle database.
The skeleton – a mapping
In the earlier section, you learned about all the prerequisites to create a mapping. Mapping is a structural flow of data from the source to target through transformations.
To understand the basic steps of creating a mapping, let's start by creating a pass-through mapping. A pass-through mapping inserts all the source rows into the target without any modifications.
We will use the EMPLOYEE Oracle table as source and the TGT_EMPLOYEE table as target to create a pass-through mapping.
By performing the following steps, you will create a mapping and link columns in the source EMPLOYEES table to a source qualifier transformation:
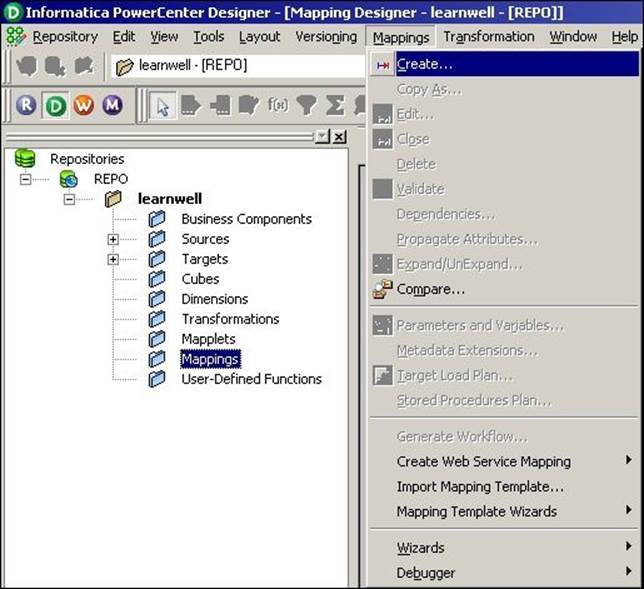
1. Navigate to Tools | Mapping Designer and then to Mappings | Create to create a new mapping.
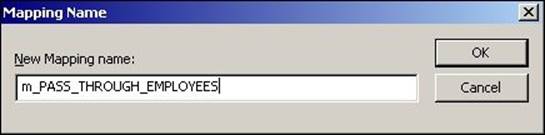
2. In the Mapping Name dialog box, enter m_PASS_THROUGH_EMPLOYEES and click on OK.
3. Drag the EMPLOYEES source definition into the Mapping Designer workspace.
4. The source definition appears in the workspace. The Designer tool creates a source qualifier transformation and connects it to the source definition. Source qualifier is a default transformation, which comes automatically with a source. We will see the use of source qualifier transformation in the next section.
5. Expand the Targets node in the navigator section to open the list of all target definitions. Drag the TGT_EMPLOYEES target definition into the workspace. The target definition appears in the Mapping Designer section.
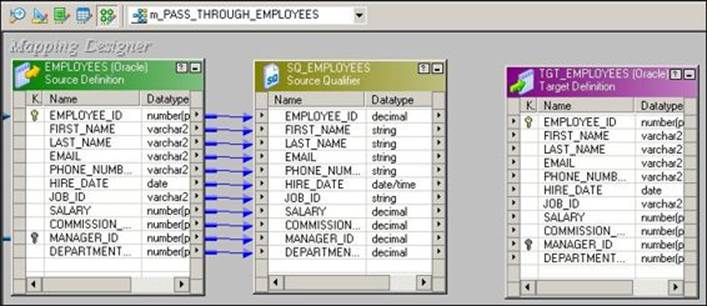
6. The final step is to connect the source qualifier transformation to the target definition.
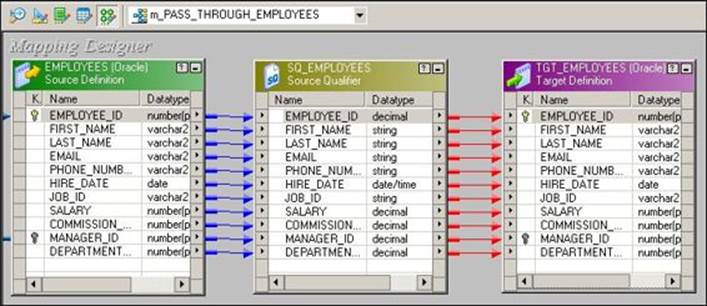
7. Drag the columns from the source qualifier transformation to the target. Make sure you are linking the ports properly as any mismatch in linking the ports will make the data movement incorrect. This is shown in the following screenshot:
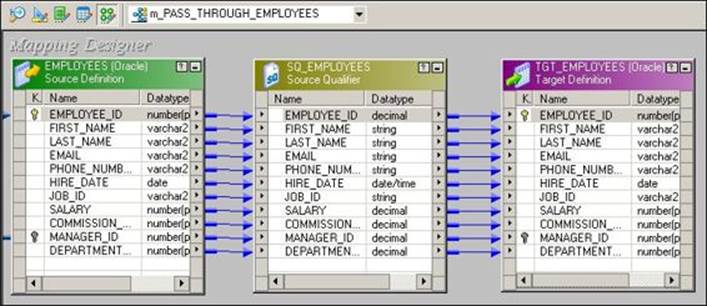
8. If you connect the links incorrectly by mistake, you can delete the links by clicking on the link and pressing the Delete button on your keyboard.
9. Navigate to Repository | Save.
With this, the mapping is completed and saved in the repository. You can check the details in the Output panel.
Summary
We started the chapter with the basic components of the PowerCenter Designer screen, that is, Source Analyzer, Target Designer, Transformation Developer, Mapplet Designer, and Mapping Designer. You then learned to work on different types of sources, which included flat files (delimited files and fixed-width files) and relational databases. Similarly, we worked on different types of targets. We also worked on the import and create functionalities of sources and targets. Later in the chapter, you saw how to preview the data. The last and most important aspect that you learned in this chapter was how to create mappings using sources and targets.
The Informatica PowerCenter Designer screen, of course, cannot be that simple. Moving ahead, in the next chapter, we will see the advanced concepts of the designer screen. There are a lot of high-level functionalities that are added in the designer window to help better and faster processing.
In the next chapter, you will see how to process the data by managing the constraints in the database. You will also see the utility to debug the mapping, which will help in finding any errors, and will study the concept of the reusable functionality of transformations and mapping.
All materials on the site are licensed Creative Commons Attribution-Sharealike 3.0 Unported CC BY-SA 3.0 & GNU Free Documentation License (GFDL)
If you are the copyright holder of any material contained on our site and intend to remove it, please contact our site administrator for approval.
© 2016-2026 All site design rights belong to S.Y.A.