RESTful Web Services with Dropwizard (2014)
Chapter 2. Creating a Dropwizard Application
Let's go through the processes required to create a new RESTful Web Services application based on Dropwizard. Firstly, we will need to create the application's structure, files, and folders, and also obtain the necessary libraries. Luckily, Maven will handle these tasks for us.
As soon as our application's structure is ready, we will modify the appropriate files, defining the application's dependencies on Dropwizard's modules and also configuring how the runnable package of our application should be produced. After that, we may proceed to coding our application.
Generating a Maven-based project
Before we start with coding, we need to perform some tasks in order to properly create our project's structure. We are going to use Maven in order to generate a default, empty project, which we will then turn into a Dropwizard application.
Getting ready
Our project will be based on the maven-archetype-quickstart archetype. Archetypes are Maven project templates, and by using the quick-start archetype, we will have our project's structure (folders and files) prepared in no time.
How to do it…
1. Open the terminal (the command line in Windows) and navigate to the directory where you want your application to be created.
2. Create a new Maven project by executing the following command (without the line breaks):
$ mvn archetype:generate-DgroupId=com.dwbook.phonebook-DartifactId=dwbook-phonebook-DarchetypeArtifactId=maven-archetype-quickstart-DinteractiveMode=false
This will create an empty Maven project in the dwbook-phonebook directory.
Tip
Downloading the example code
You can download the example code files for all Packt books you have purchased from your account at http://www.packtpub.com. If you purchased this book elsewhere, you can visit http://www.packtpub.com/support and register to have the files e-mailed directly to you.
How it works…
Dropwizard is based on Maven, so we created a new Maven project in which we included Dropwizard's core dependency.
The structure of the dwbook-phonebook directory at this point is illustrated in the following screenshot:
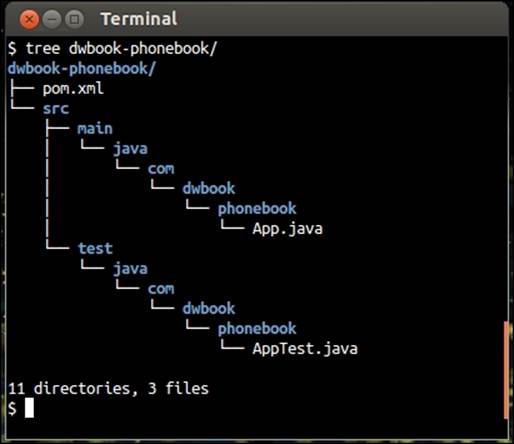
The src/ folder will hold our application's main classes, whereas all the test classes will be placed under the test/ directory.
Notice that Maven has placed pom.xml on the application's root folder. The Project Object Model (POM) is an XML file that holds important information regarding our project's configuration and dependencies. This is the file we need to edit in order to add Dropwizard support for our project.
Configuring Dropwizard dependencies and building the configuration
We just created a sample application outline. The next thing we need to do is edit the project's configuration file, pom.xml, and define the Maven modules on which our application will depend on. We are building a Dropwizard application, and Dropwizard is based on Maven, so everything we need is available in the Maven Central Repository. This means that we just need to provide the modules' IDs, and Maven will take care of the download and inclusion of these modules in our project.
Next, we need to add build and package support to our project. We will use the maven-shade plugin, which will allow us to package our project completely, along with its dependencies, into a single standalone JAR file (Fat JAR) that can be distributed and executed as is.
How to do it…
Perform the following steps to configure Dropwizard dependencies and build the configuration:
1. We need to configure our POM by adding the Maven Repository where snapshots of all Dropwizard modules can be found. Maven will then be able to automatically fetch the required modules during the building of our project. Locate the <dependencies> section in pom.xml and add the following entries just before it:
2. <repositories>
3. <repository>
4. <id>sonatype-nexus-snapshots</id>
5. <name>Sonatype Nexus Snapshots</name>
6. <url>http://oss.sonatype.org/content/repositories/snapshots</url>
7. </repository>
</repositories>
8. To define the dependencies, add the following code within the <dependencies> section:
<dependency><groupId>io.dropwizard</groupId><artifactId>dropwizard-core</artifactId><version>0.7.0-SNAPSHOT</version></dependency>
9. To configure the build and package procedures, locate the <project> section in pom.xml and insert the following entries within it:
10. <build>
11. <plugins>
12. <plugin>
13. <groupId>org.apache.maven.plugins</groupId>
14. <artifactId>maven-compiler-plugin</artifactId>
15. <version>3.1</version>
16. <configuration>
17. <source>1.7</source>
18. <target>1.7</target>
19. <encoding>UTF-8</encoding>
20. </configuration>
21. </plugin>
22. <plugin>
23. <groupId>org.apache.maven.plugins</groupId>
24. <artifactId>maven-shade-plugin</artifactId>
25. <version>1.6</version>
26. <configuration>
27. <filters>
28. <filter>
29. <artifact>*:*</artifact>
30. <excludes>
31. <exclude>META-INF/*.SF</exclude>
32. <exclude>META-INF/*.DSA</exclude>
33. <exclude>META-INF/*.RSA</exclude>
34. </excludes>
35. </filter>
36. </filters>
37. </configuration>
38. <executions>
39. <execution>
40. <phase>package</phase>
41. <goals>
42. <goal>shade</goal>
43. </goals>
44. <configuration>
45. <transformers>
46. <transformerimplementation="org.apache.maven.plugins.shade.resource.ManifestResourceTransformer">
47. <mainClass>com.dwbook.phonebook.App</mainClass>
48. </transformer>
49. </transformers>
50. </configuration>
51. </execution>
52. </executions>
53. </plugin>
54. </plugins>
</build>
How it works…
We just told Maven everything it needs to know in order to build our application. Maven will fetch the Dropwizard core module from the Maven Central Repository and include it in the build path while packaging (as a result of the mvn package command) the application.
Moreover, we added build and package support with the maven-shade plugin and also specified our application's main class (the <mainClass> section in pom.xml), which facilitates the packaging of the Dropwizard application with its dependencies into a single JAR file. We also instructed the maven-compiler-plugin to build the application for Java Version 1.7 (check the target and source elements of the configuration section of maven-compiler plugin).
The exclusion of digital signatures
The <excludes> section in the maven-shade configuration instructs Maven to exclude the digital signatures of all the referenced signed JAR files. This is because Java would otherwise treat them as invalid during runtime, preventing the execution of our application.
Hello World using Dropwizard
Our project's dependencies are now set in the pom.xml file and we may start building our application. Maven has already created our application's entry point class, the App class, in the App.java file. However, its default contents are more suitable to a plain Java application and not a Dropwizard-based one.
How to do it…
Let's have a look at the steps we need to follow to print a Hello World message using Dropwizard:
1. In the App.java file, add the following import clauses:
2. import org.slf4j.Logger;
3. import org.slf4j.LoggerFactory;
4. import io.dropwizard.Application;
5. import io.dropwizard.Configuration;
6. import io.dropwizard.setup.Bootstrap;
import io.dropwizard.setup.Environment;
7. Modify the definition of the App class as shown in the next step. This class needs to extend Application <Configuration>.
8. Add a logger to our application by declaring it as a static final member of the App class after its definition:
9. public class App extends Application<Configuration> {
private static final Logger LOGGER =LoggerFactory.getLogger(App.class);
10. Implement the abstract methods of the Service class, initialize() and run(), by adding the following code:
11. @Override
12. public void initialize(Bootstrap<Configuration> b) {}
13. @Override
14. public void run(Configuration c, Environment e) throwsException {
15. LOGGER.info("Method App#run() called");
16. System.out.println( "Hello world, by Dropwizard!" );
}
17. Finally, modify the main() method, adding the necessary code to instantiate our Dropwizard service:
18. public static void main( String[] args ) throws Exception{
19. new App().run(args);
}
20. Build the application by executing the following command in your terminal inside the dwbook-phonebook directory:
21.$ mvn package
The output of this command will contain the [INFO] BUILD SUCCESS line, indicating that the project was successfully built, as shown in the following screenshot:

Maven has produced (built) the executable Fat JAR using the shade plugin, and this can be located in the target/directory named dwbook-phonebook-1.0-SNAPSHOT.jar. Run it as you would with any executable JAR file using the java -jar command as follows:
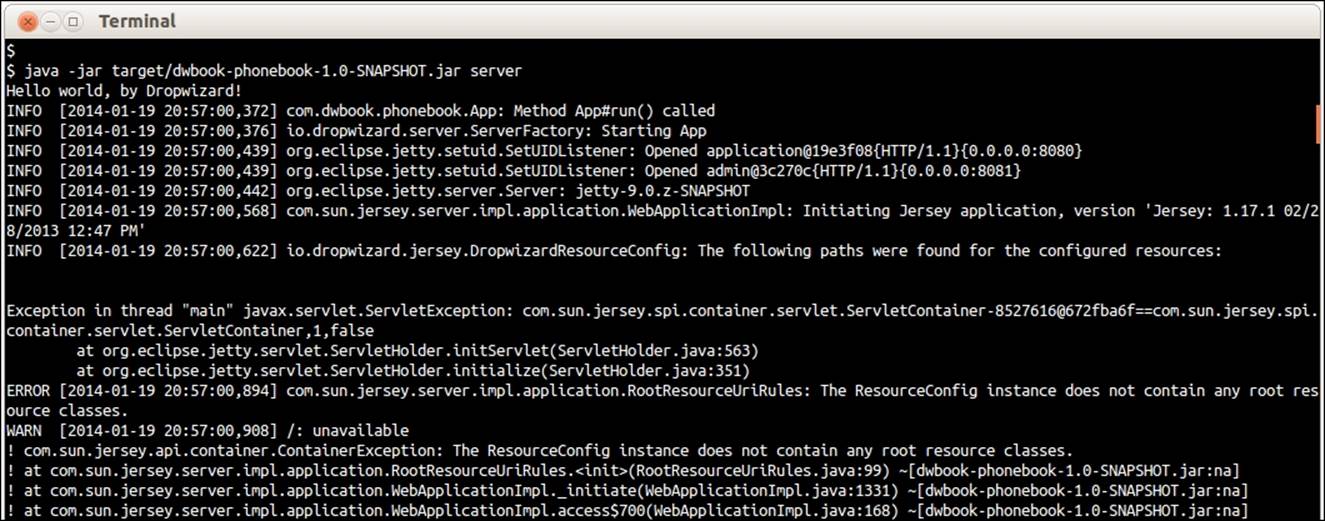
$ java -jar target/dwbook-phonebook-1.0-SNAPSHOT.jar server
Normally, you should see a lot of entries in your terminal, including an error. The first line is the message in which we included the #run() method. This is followed by a warning message indicating that our application has no health checks configured, but this is something we will handle later on in this book.
The next logged entries indicate that the Jetty server embedded in our Dropwizard application is starting and listening for incoming requests on port 8080. Port 8081 is also used for administration purposes. You will also see an error stating that no resource classes could be located (the ResourceConfig instance does not contain any root resource classes), which is reasonable and absolutely normal, as we haven't created and configured any REST resources yet.
How it works…
What we just did was we added the minimum amount of code required in a Dropwizard application. As you saw, our application's entry point class needs to extend the io.dropwizard.Application class and implement the initialize(Bootstrap<Configuration>) andrun(Configuration, Environment) methods. The initialize method is tasked with bootstrapping, possibly loading additional components and generally preparing the runtime environment of the application.
We were going to just print a Hello message in this phase, so we included only a println() statement in the run() method.
The execution of the JAR file produced by the mvn package command resulted in the printing of the Hello World! greeting by Dropwizard, as public static void main triggered the execution of the relevant code in the public void run method.
There's more…
For executing the JAR file, we add the server argument to the command. In public static void main, we called the public void run method, passing command-line arguments to it. Dropwizard has only one command preconfigured (although we're able to configure additional commands), the server command, which starts the embedded HTTP Server (Jetty) to run our service. In our case, following the execution of the code in the run() method, an error with an exception was displayed as Jetty couldn't locate any REST resources to serve.
Logging
Dropwizard is backed by Logback and provides an SLF4J implementation for our logging means. In the App.java file, we imported the necessary Logger and LoggerFactory classes in order to construct a Logger instance we could use for our logging needs.
Default HTTP Ports
Dropwizard's embedded Jetty server will try to bind to ports 8080 and 8081 by default. Port 8080 is used by the server in order to serve incoming HTTP requests to the application, while 8081 is used by Dropwizard's administration interface. In case there is another service running on your system that uses any of these ports, you will see a java.net.BindException when trying to run this example.
Later on, we will see how you can configure your application to use another port for incoming requests, but for now, just make sure this port is available to use.
All materials on the site are licensed Creative Commons Attribution-Sharealike 3.0 Unported CC BY-SA 3.0 & GNU Free Documentation License (GFDL)
If you are the copyright holder of any material contained on our site and intend to remove it, please contact our site administrator for approval.
© 2016-2026 All site design rights belong to S.Y.A.