RESTful Web Services with Dropwizard (2014)
Chapter 4. Creating and Adding REST Resources
Up until this point, our application doesn't really do much. This is because it lacks configured REST resources. A REST resource is something that one can refer to as an entity, and in our case, a set of URI templates with a common base URL that one can interact with using common HTTP methods.
Creating a resource class
We are building a phonebook application, and thus we need to implement the necessary functionalities for storing and managing contacts. We will create the resource class for the phonebook service. This class will be responsible for handling HTTP requests and generating JSON responses. The resource class will initially provide the endpoints for retrieving, creating, updating, and deleting contacts.
Please note that we are not yet dealing with structured data or interacting with a database, and thus contact-related information transmitted to and from our application does not follow a specific format.
How to do it...
Perform the following steps for creating a resource class:
1. Create a new package, com.dwbook.phonebook.resources, and add a ContactResource class in it.
2. Import the required packages, javax.ws.rs.* and javax.ws.rs.core.*.wdasdasd:
3. import javax.ws.rs.*;
import javax.ws.rs.core.*;
4. Specify the URI template of the resource by annotating the class with the @Path annotation and also specify the response Content-Type header using the @Produces annotation:
5. @Path("/contact")
6. @Produces(MediaType.APPLICATION_JSON)
7. public class ContactResource {
8. // code...
}
9. In order to add a method that will return the information regarding a stored contact, create the #getContact()method. This method will return a javax.ws.rs.core.Response object, which is a simple but efficient way of manipulating the actual HTTP response sent to the client that performs the request. Add the @GET and @PATH annotations as shown in the following code snippet. This will bind the method to HTTP GET requests to /contact/{id}. The {id} part of the URI represents a variable, and is bound to the int idparameter of the same method via the @PathParam annotation:
10. @GET
11. @Path("/{id}")
12. public Response getContact(@PathParam("id") int id) {
13. // retrieve information about the contact with theprovided id
14. // ...
15. return Response
16. .ok("{contact_id: " + id + ", name: \"Dummy Name\",phone: \"+0123456789\" }")
17. .build();
}
18. Similarly, we need to implement appropriate methods for creating, deleting, and updating contacts. The #createContact() method for creating contacts will be bound to HTTP POST requests to the /contact URI. Since nothing is appended to our base URI, this method does not need to be annotated with @Path. This method will return a Response object as well, like all of our resource's methods will, indicating that a new contact has been created:
19.@POST
20.public Response createContact(
21. @FormParam("name") String name,
22. @FormParam("phone") String phone) {
23. // store the new contact
24. // ...
25. return Response
26. .created(null)
27. .build();
}
28. For deleting existing contacts, the HTTP client needs to send an HTTP DELETE request to a particular contact's URI. Due to this, the respective method's URI will be exactly the same as the one for retrieving a single contact. Add the #deleteContact() method to our resource class, as shown in the following code snippet. We will also need to indicate that the requested URI does not have content anymore:
29.@DELETE
30.@Path("/{id}")
31.public Response deleteContact(@PathParam("id") int id) {
32. // delete the contact with the provided id
33. // ...
34. return Response
35. .noContent()
36. .build();
}
37. The updates to existing contacts are generally performed by HTTP PUT requests to a contact's endpoint. The #updateContact() method is going to handle such requests and indicate that the update was successful, returning the appropriate Response object:
38.@PUT
39.@Path("/{id}")
40.public Response updateContact(
41. @PathParam("id") int id,
42. @FormParam("name") String name,
43. @FormParam("phone") String phone) {
44. // update the contact with the provided ID
45. // ...
46. return Response
47. .ok("{contact_id: "+ id +", name: \""+ name +"\",phone: \""+ phone +"\" }")
48. .build();
}
49. Add the implemented resource to our Dropwizard application's environment by modifying the run method in the App class via the JerseyEnvironment#register() method, as shown in the following code. You also need to add an import clause on top of the App.javafile for the ContactResource class (import com.dwbook.phonebook.resources.ContactResource). You should also see that in order to access our application's Jersey environment, you may use the Environment#jersey() method:
50.public void run(PhonebookConfiguration c, Environment e)
51. throws Exception {
52. // ...
53. // Add the resource to the environment
54. e.jersey().register(new ContactResource());
}
55. Rebuild (with mvn package ) and run the application java -jar target/dwbook-phonebook-1.0-SNAPSHOT.jar server config.yaml. You will see a message indicating that our (Jersey based) Dropwizard application is starting along with a list of configured resources, in this case, the resources defined in our com.dwbook.phonebook.resources.ContactResource class.
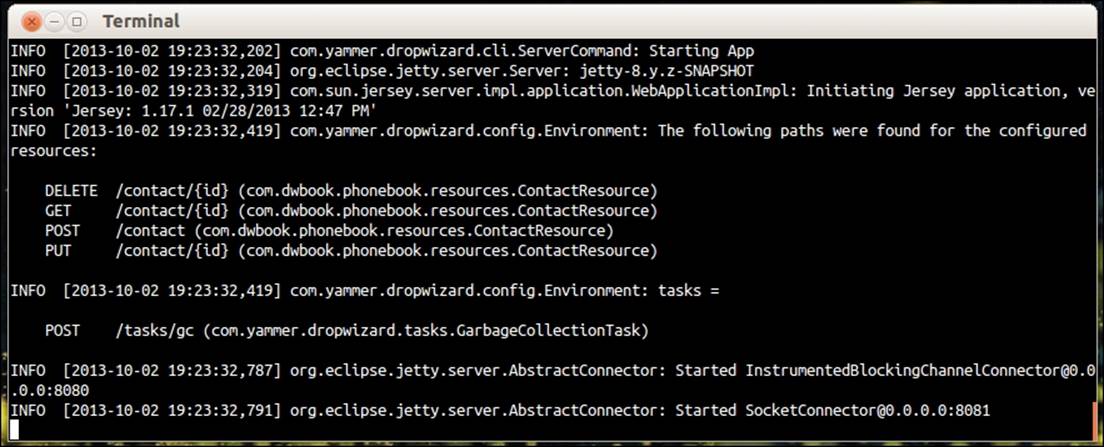
56. Point your browser at http://localhost:8080/contact/100 and see the results; it will generate a dummy JSON representation with the ID 100, which you provided in the URL (a path parameter, which will work with any integer).

The service is running and listening to incoming requests. You can shut it down by pressing Ctrl + C in your terminal. After a few seconds, the service will stop.
How it works…
The resource class is the most important part of a RESTful Web Service, as it is the place where you define the resources and their URIs you wish to expose.
The @Produces annotation defines the content type of the responses the class methods generate. Despite of defining the value of the HTTP Content-Type header, it is also used to instruct Jackson to transform the representations to the appropriate format, JSON in thiscase; thus the MediaType.APPLICATION_JSON definition. In case we would want to return an XML document as the response, we should use MediaType.APPLICATION_XML instead.
We use the @Path annotation to define a URI template. By applying it and bringing it on to the level of a class, we define that the base URI of our resources will be /contact. We used this annotation for the #getContact method as well, specifying the/{id} template. This leads on to the complete URI that will trigger the execution of #getContact being /contact/{id}.
The {id} part of the URI is a path parameter, which we mapped to the int id argument using the @PathParam annotation. PathParam takes the name of the path parameter as its parameter, which in this case is id.
Jersey will intercept every incoming HTTP request and try to match it with the defined URI template in order to find which resource class method to invoke.
It is generally a good practice to define the base URI at the class level, and additionally, more specific URI templates per method.
In order to configure our application to use the resources we created, we had to add them to the execution environment, post initialization, in the #run() method of the App class.
There's more…
A representation is an entity; something that one can refer to. A representation can be created, updated, deleted, and returned. A REST resource is an endpoint that accepts HTTP requests for such operations.
We used the @GET annotation for the #getContact() method. This implies that the method is bound to, and only to, the HTTP GET verb. We used this verb because we were returning data about an entity without modifying it in any way.
HTTP verbs – RESTful convention
Generally, a RESTful Web Service uses four fundamental HTTP methods (verbs) mapped to CRUD operations:
· POST for creating a resource
· PUT for updating a resource
· DELETE for deleting a resource
· GET for returning the representation of a resource
GET is an idempotent operation; if given the same input, it will return the same results without modifying the requesting entity in any case.
Tip
You can map HTTP verbs to a resource method (for example, #getContact()) using an appropriate annotation (such as @POST, @PUT, @DELETE, and @GET).
HTTP response codes
Another important RESTful Web Service design principle, apart from CRUD operations being mapped to specific HTTP methods, is the usage of specific response codes according to the request and the outcome of the action it triggered.
According to this convention, when a new entity is created successfully, our application would respond indicating 201 Created as the HTTP Response Status code.
Similarly, when an entity is successfully deleted, our application would send the 204 No Content code. The 204 No Content code may also be used in other cases where the response we send to the client does not include an entity, and not only in cases where we delete resources.
For most cases though, when our application is returning data while responding to GET requests, the 200 OK response code is sufficient.
We used the response class in our implementation in order to include specific response codes to our application's responses.
The Response class
The javax.ws.rs.Response class, instances of which all of our methods return, provides a set of ResponseBuilder methods that we can use for constructing the data we return to the client that performs the HTTP request to our service.
The method Response#ok() accepts an Object instance as the parameter, which is then serialized to our service's response format (defined by the @Produces annotation) accordingly. The usage of this method returns an HTTP 200 OK response code to the client.
The Response#noContent() method returns an HTTP 204 No Content response code to the client, indicating that no content is applicable to this request.
On the other hand, the Response#created() method is used to send a 201 Created response code along with the URI of the newly created resource. The URI (or null) can be passed as a parameter to this method and will be used as the value for the Location header of the response.
The Response class has a number of useful methods like these, but it also enables us to set custom response codes without necessarily using one of the predefined methods. To do so, you can use the Response#status() method by providing it with the appropriate response code, as shown in the following example:
Response.status(Status.MOVED_PERMANENTLY);
Additionally, we are able to use the ResponseBuilder#entity() method in order to set the appropriate response payload. The #entity() method accepts Object as the parameter and processes it in a way similar to the Response#created() method:
Response.status(Status.MOVED_PERMANENTLY).entity(new Object());
What should be noted is that all these methods return a ResponseBuilder instance and can be chained as well. In order to build the Response object, we must use the ResponseBuilder#build() method.