Idiot's Guides: 3D Printing (2015)
PART 1
What Is 3D Printing?
CHAPTER 3
Manufacturing with 3D Printers and CNC Mills
In This Chapter
![]()
· How 3D printers work
· The workings of CNC mills
· Should you use a 3D printer or a CNC mill?
When it comes to rapid prototyping, there are generally two approaches that can be taken: 3D printing and computer numerical control (CNC) milling. CNC milling isn’t strictly considered “rapid prototyping,” but that’s mostly a matter of semantics. In practice, CNC mills can create 3D parts just like a 3D printer, and can often do it more quickly and with greater precision.
However, CNC mills and 3D printers differ greatly in their actual operation. Essentially, they’re two completely different ways of solving the same problem: how to quickly create a functional three-dimensional part from a computer model. 3D printers solve this problem with additive manufacturing, meaning the 3D printer starts with nothing and adds material to create the part. On the other hand, CNC mills use subtractive manufacturing, a process which starts with a block of material and cuts it away, leaving the part behind.
Both processes have their advantages and disadvantages and are useful in different situations. You’ve purchased this book, so you’ve probably already decided that 3D printing is right for you. So why even discuss CNC milling? For one, highlighting the differences will help you understand how 3D printing works and its benefits. The second reason is more practical: it’s often possible to convert CNC mills into 3D printers, and some manufacturers are even building multipurpose machines that are capable of both CNC milling and 3D printing. In this chapter, I take you through the functions of both 3D printers and CNC mills and how they can be useful to you in the 3D printing process.
The Simple Principle Behind 3D Printing
3D printing is an additive manufacturing process, and how a 3D printer operates is all about laying down new material as precisely as possible. For virtually all 3D printers today, this is accomplished by building the part up in a series of horizontal layers stacked on top of each other. In consumer 3D printing, those layers are almost always created by extruding molten plastic in a precise 2D cross-section of the part.
Slicing and Creating Layers for Your Model
The one thing that virtually all 3D printers have in common, regardless of the particular technology they’re using, is that they all build parts layer by layer. Part of the 3D printing work flow is taking the desired 3D model (generally in STL format) and feeding it into slicing software. This appropriately named software then slices that 3D model into a series of thin horizontal cross-sections that will form the complete part when stacked.
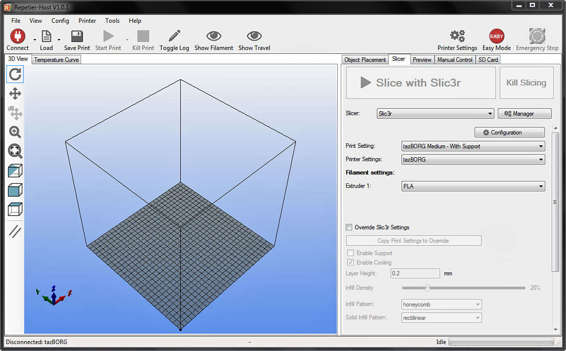
A screen capture of Slic3r, an open-source program for slicing models for 3D printing.
These horizontal cross-sections (called layers) can vary in thickness depending on the hardware of the 3D printer being used and the settings entered by the user. For consumer 3D printers, the layer thickness is generally somewhere between .10mm and .50mm, although it can be outside that range with the right hardware and settings.
![]()
HOT TIP
Check to see if the manufacturer of a 3D printer has published recommended layer settings. Manufacturers usually do testing to determine an optimal layer thickness based on their hardware. These recommended settings will be a good starting point and will help you quickly achieve high-quality prints.
Layer thickness is one of the most relevant contributors in the quality of the printed part. The thinner each layer is, the higher the quality of print. The easiest way to visualize this is to picture it at its extremes. If you had a model with very thick layers, say 5mm (which is way outside of what actual 3D printers will print), your printed part would be extremely blocky. At the other end of the spectrum, a model printed with extremely small layers, like .01mm, would yield a very-high-quality result.
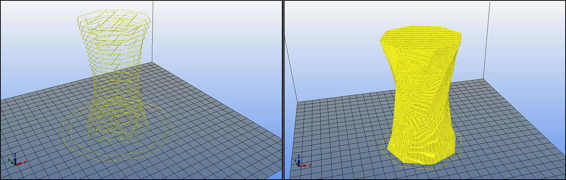
The difference between 5mm (left) and .01mm (right) layer heights.
But, of course, there are limitations that keep you from being able to print very small layers. The hardware itself, especially for consumer fused filament fabrication (FFF) 3D printers, has limits on how thin it can extrude filament. Even if the hardware was capable of extremely thin layers, it would take an impractical amount of time for the slicing software to generate the layers.
The most noticeable factor for the end user, however, ends up being print time. As the thickness of the layers decreases, the total number of layers increases. The more layers there are to print, the longer it will take the print to complete. For example, if a particular model takes two hours to print with layers set at .4mm, you would expect it to take four hours when the layer thickness is cut in half to .2mm. You doubled the number of layers, and so the time to print would double as well, right?
Unfortunately, that’s not the case, and the print time would actually increase by a lot more than that. The reason for this is that the filament being extruded has a 3D profile, so as the height decreases (in the Z direction), its width (in the X/Y plane) also decreases. The result is that each layer itself takes longer to print, in addition to having more layers to print.
Extruding Filament
Filament extrusion is how the 3D printer actually creates each of those layers. In consumer FFF printers, the process generally works like this: a spool of filament is fed into an extruder (see Chapter 7), which has a motor and drive system to push the filament into the hot end. The hot end then very quickly melts the filament and pushes it through a small nozzle. The result is a thin thread of soft molten plastic being squirted out of the nozzle.
![]()
DEFINITION
The hot end of a 3D printer is what heats and melts the filament that is fed by the extruder assembly. As filament is pushed into the hot end, a heating element heats the hot end. The temperature is hot enough to almost instantly melt the plastic into a very viscous fluid, which is then squeezed out of the nozzle and deposited on the print bed.
While the 3D printer is running, the tip of the nozzle is held very close to the print bed. As it’s being ejected from the nozzle, the thread of plastic sticks to the print bed. The 3D printer continuously moves the tip of the nozzle around the print bed, trailing a thread of plastic behind, to form a solid layer of plastic that matches the layer generated by the slicing software. The printer then moves the nozzle up slightly (relative to the bed) and starts extruding a new layer of plastic on top of the previous layer. That process is repeated until all the layers have been printed and the part is complete.
The size of the molten plastic thread coming out of the nozzle, the distance between the nozzle and print bed, and the amount of filament being pushed into the hot end are how the 3D printer controls the thickness of the layer it’s printing. The thread size is directly proportional to the size of the hole in the tip of the nozzle. So layer thickness can be adjusted by changing these parameters.
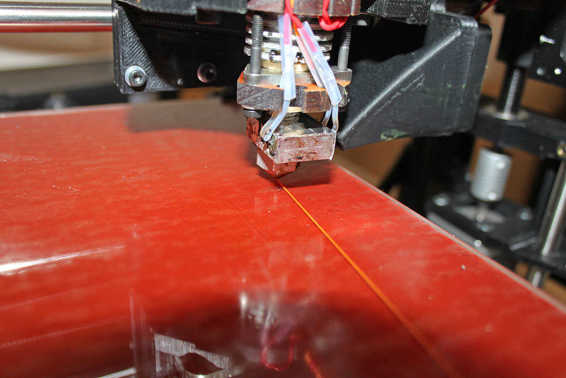
Molten filament being extruded to create the first layer of a part.
However, as I touched on in the previous section, the layer thickness is linked to the amount of time it takes to print the layer. As that thread of molten plastic gets thinner, it takes more time to create a solid layer. The result is a trend that holds true in most aspects of 3D printing: the quality of the printed object and the time it takes to print are locked together.
CNC Milling and How It Works
Milling machines are a standard tool in machine shops around the world. In their most basic form, they have a motor called a spindle that spins an end mill (which is very similar to a drill bit). The material to be milled is attached to a platform that can be moved in three (or more) dimensions, relative to the end mill. The machinist then manually moves the platform (or end mill) around using control mechanisms. This allows him to cut away at the material with the end mill to form the desired part.
![]()
FASCINATING FACT
Before the advent of computer numerical control, there was just numerical control. Numerical control mills relied on a complex mechanical punch card system to program the mill. These programs took a great deal of time and expertise to create, but the repeatability of the programs made numerical control mills useful in manufacturing settings.
CNC mills simply remove manual operation from the equation. Instead of a machinist having to manipulate the controls, a computer controls the movement. The way the computer controls movement is actually pretty similar to the way 3D printers work: electric motors move the end mill in the X, Y, and Z axes relative to the print bed. The primary differences are the subtractive manufacturing aspect and the materials CNC mills can work with compared to 3D printers. The similarity between the three-axis movement in CNC mills and 3D printers is what makes it possible to convert a CNC mill into a 3D printer. It’s also what allows manufacturers to make machines that can handle both tasks.
Subtracting with CAM Software
Because CNC mills create a part by subtracting material (as opposed to adding it like a 3D printer), the software and process they follow are completely different. While 3D printers add material in layers, CNC mills start with a block of material (or bar, cylinder, and so on depending on the stock used) and cut away material in “pockets.” They don’t cut away a layer at time, but rather cut out particular sections and features (often completely) before moving onto other features. Sometimes cast metal parts are even used as the initial stock and then are refined with CNC milling.
This is controlled with computer-aided manufacturing (CAM) software. Like slicing software, CAM software takes a 3D model (often in STL format) and processes it to create instructions for the CNC mill to follow. However, unlike slicing software for 3D printers, CAM software generally requires much more operator interaction. This is a profession unto itself, because setting up a CNC program requires experience and skill.
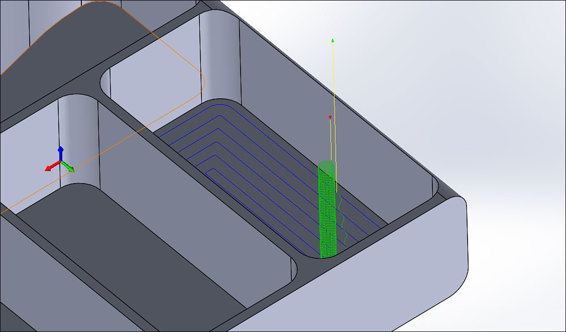
CAM software serves the same purpose as slicing software but follows very different rules.
![]()
HOT TIP
The skill and experience of the CNC operator is important because CNC milling techniques and settings can vary tremendously based on the shape of the part being made, the material it’s cut from, the type of end mill being used, and the desired surface finish and quality. For these reasons (among others), 3D printers are more suitable for home use, as the slicing software is much simpler to use than CNC CAM software.
Milling the Material
While 3D printers are mostly limited to plastic (except in experimental printers and very expensive printers), a common CNC mill is capable of creating parts from a variety of materials. Steel, aluminum, brass, titanium, wood, and most plastic types are all possible to machine on a suitable CNC mill. Whatever the material, CNC mills start with a block of it, and whatever is milled is either thrown away or recycled.
That versatility makes CNC milling useful for more than just rapid prototyping. CNC mills are very often used to actually manufacture parts, especially aluminum and steel parts. The precision of CNC milling also allows it to achieve very tight tolerances that are necessary for production parts.
However, because milling is a subtractive process, the material that’s cut away is generally wasted. 3D printers usually only use the material that’s actually needed to create the part (although sometimes more is used for support structures). Considering the high cost of materials, that can be a significant factor in the price of the part.
Pros and Cons of 3D Printers vs. CNC Mills
3D printers and CNC mills are both versatile and useful, and each excels at different tasks. Each has jobs for which they’re better suited, and each has jobs for which they would be a poor choice. So what are the pros and cons of each? When should you use one versus the other?
Cost
The most obvious difference, for anyone purchasing a 3D printer or CNC mill, is going to be cost. Capable consumer 3D printers can be purchased for under $1,000, while CNC mills capable of machining metals like aluminum and steel are rarely less than $5,000 (and are usually much more). However, less powerful CNC mills capable of milling soft materials like wood are significantly less expensive (usually less than $2,000).
The cost difference is mostly due to the expensive high-power electric motor needed for the CNC spindle, the cooling systems needed when milling metal, and the fact that CNC mills require a very solid and rigid frame. 3D printers, in comparison, require much less expensive parts to build.
Aside from the price of the machine itself, there are other costs to consider. CNC mills require end mills, which need to be replaced after they become worn. Most CNC operators prefer to have a range of end mills as well, in different sizes and shapes for different jobs. 3D printers, on the other hand, generally only require that your purchase the material itself.
If you wanted to convert a CNC mill to a 3D printer, it is relatively inexpensive, generally only a few hundred dollars.
![]()
HOT TIP
While 3D printers don’t require expensive consumable accessories like end mills, you should consider the cost of filament. Most people end up purchasing many rolls of filament in a variety of colors and materials. This expense can be significant, especially for exotic filament materials.
Part Geometry
One of the biggest advantages that 3D printers have to offer is their ability to create complex geometry. There are parts that can be 3D printed that simply aren’t possible with traditional manufacturing methods. The way that 3D printers create parts in layers means that internal geometry can be produced just as easily as external geometry, a prospect which simply isn’t possible with any other manufacturing method.
An easy-to-understand example of this is a simple cube with a hollow sphere in the center. No other manufacturing method is capable of producing such a part, but it’s a trivial task for a 3D printer. Practically speaking, it’s not any more difficult for a 3D printer to create a part like that than it would be to create a solid cube.
This capability unleashes a whole world of possibilities that were previously considered unfeasible or simply impossible. You could even print two (or more) parts that are already assembled, allowing you to create assemblies which wouldn’t be possible with any other manufacturing tool.
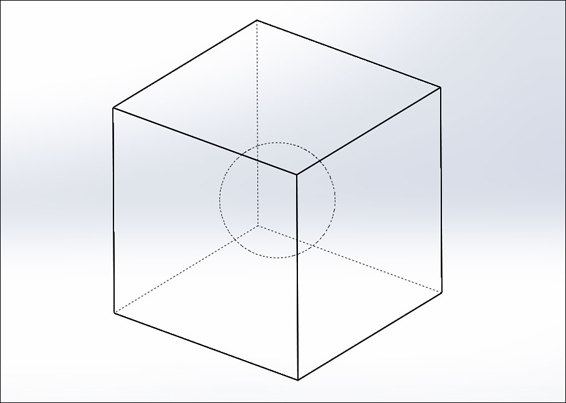
A part that could only be created by a 3D printer.
Even more traditional parts are easier to create with a 3D printer. Parts with features on all sides, for example, can’t be machined on a standard three-axis CNC mill without additional work. The part would have to be turned over to machine the other side, or a fourth axis would have to be added to the mill for rotating the part (which is a fairly expensive addition).
However, 3D printers do have limitations on what kind of geometry they can handle (especially consumer FFF printers). These limitations are usually related to overhangs in the part, as there always has to be something to print on top of. But that can be overcome by printing support material which is later removed.
![]()
FASCINATING FACT
3D printers with two or more extruders can use one of the extruders solely for printing support material. This support material is often a special kind of filament produced specifically for this use. Once the print is finished, it can be soaked in a chemical bath, which dissolves the support material but leaves the rest of the part untouched. Such a setup would be capable of producing almost any geometry imaginable.
Material Matters
As I explained in the previous sections, the material CNC mills are capable of machining is a lot more varied than what 3D printers can print. 3D printers in the consumer market are limited to different kinds of plastics, while CNC mills can machine most common materials (with the right setup).
But it’s actually not that simple in practice. The cost of material is certainly a concern. Machinable blocks of material suitable for CNC milling tend to be fairly expensive and have to be purchased or cut in the necessary sizes. If the part you’re making isn’t very close in size to the block of material, the chances are good that a lot of material will go to waste.
Milling different materials also requires that the CNC mill be set up for that material. The end mill, cooling system, and even the frame of the CNC mill itself needs to be correct for that material. This is why mills are less expensive when they only need to be capable of cutting soft materials, and are more expensive when they need to cut hard materials like steel. Each material also requires different milling settings, and it takes experience and knowledge to properly mill a variety of materials.
In contrast, 3D printers generally only require that you adjust a few settings (namely temperature) when switching between materials. Simply put, 3D printing is much easier, and the learning curve is shorter than CNC milling. CNC mills certainly have the advantage of material versatility, but that versatility is difficult to achieve.
Surface Finish
The final quality of a part is largely a consequence of the surface finish on the part. The surface finish, in this context, is mostly about how smooth the completed part is. In a manufacturing setting, surface finish has a slightly different connotation. For production parts, a smooth surface isn’t always what is desired. Sometimes it’s preferable to have a rough finish, brushed finish, or matte finish. These are all different types of surface finishes, and there are many others. No particular type is necessarily better; it’s just a matter of what’s needed for the part.
However, in most cases, the manufacturer must first start with a smooth finish and then add the desired surface finish. If we use injection molded plastic parts as an example, this process is part of making the mold. If a textured matte finish is desired on the part, that finish has to be on the surface of the mold. In this case, the mold is milled as smoothly as possible, and then the finish is added afterward (either mechanically with sanding or with chemical etching).
In almost every case, the mold or part is ideally as smooth as possible to begin with, and then the surface finish is added. The reason it’s done that way is to avoid imparting unintended artifacts onto the surface. And so, you’d want to be able to achieve as smooth of a surface finish as possible when initially making a part.
Getting a very smooth finish is usually a simple matter with a CNC mill. It does take skill on the CNC operator’s part, and usually a smoother finish takes longer to machine, but it’s certainly possible to get a very smooth finish straight off the mill. Unfortunately, this isn’t the case with 3D printers, and is probably one of the primary reasons that 3D printing isn’t more common in production manufacturing.
As I’ve explained previously, the nature of 3D printing makes ridges on the surface almost unavoidable. The way 3D printers create parts by adding layers virtually ensures that small differences between those layers will be visible. Very-high-end (non-FFF) 3D printers used in professional settings can achieve smooth surface finishes, but those kinds of printers are far out of reach for consumers. Their high cost also makes them impractical for any kind of manufacturing, even for the companies that can afford them.
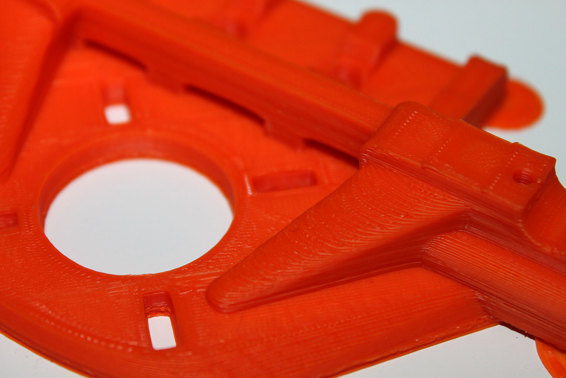
Even at high-quality settings, a 3D-printed part has a rough surface.
So is it ever possible to achieve a smooth surface finish on a consumer 3D printer? Luckily, the answer is yes! Smooth finishes on 3D-printed parts can be attained with postprint finishing. There are many techniques to do this: everything from simply sanding the part to more complicated chemical methods. But those postprint finishing methods are still an additional step that CNC mills don’t require.
At the end of the day, if you’re looking for professional-looking parts with a smooth surface finish, CNC mills are the better choice. Without postprint finishing, 3D-printed parts will always look like they were 3D printed. You can get a nice and professional finish on a 3D-printed part; it will just take more work.
Using the Right Tool for the Job
With all of these differences, how do you know if you should use a 3D printer or a CNC mill? As always, it’s important to choose the right tool for the job. Just like you wouldn’t use a wood saw to cut a metal pipe, you don’t want to use a 3D printer when a CNC mill would do the job better (and vice versa). In this case, choosing the right tool is about first determining what the job will be.
![]()
HOT TIP
There are practical differences which might affect your decision as well. For example, CNC mills are very loud and can be quite messy. 3D printers, however, are usually fairly quiet and don’t create much mess. If you live in an apartment, a CNC mill would probably be pretty disturbing to your neighbors, while a 3D printer shouldn’t even be noticeable to them.
If you intend to make production parts or molds for injection-molded parts, a CNC mill is generally the clear choice. They’re still capable of creating prototype parts in a short amount of time but can also produce professional parts with a high-quality surface finish. However, their noise, mess, and expense are certainly a concern.
For most home users and hobbyists, a 3D printer will be easier to use and more useful in general. You can create a wide range of parts with little concern about geometry limitations and complicated settings. The cost of material is lower, you waste less of it, and the noise and mess are minimal.
In the end, it’s easy to see why a machine capable of both tasks would be so useful. The frame, movement mechanics, and controls are very similar between 3D printers and CNC mills. Switching the CNC spindle for an extruder allows you to do both CNC milling and 3D printing with the same basic machine. This is certainly more expensive than a dedicated 3D printer or CNC mill, but much less expensive than purchasing one of each.
The Least You Need to Know
· 3D printers create parts by building up layers of material, a process called additive manufacturing.
· CNC mills use subtractive manufacturing, which means they create parts by cutting away material.
· Generally speaking, 3D printers are better for the home user, while CNC mills may be a better choice for businesses, depending on the expected use.