Mastering the Nikon D610 (2014)
13. Speedlight Flash
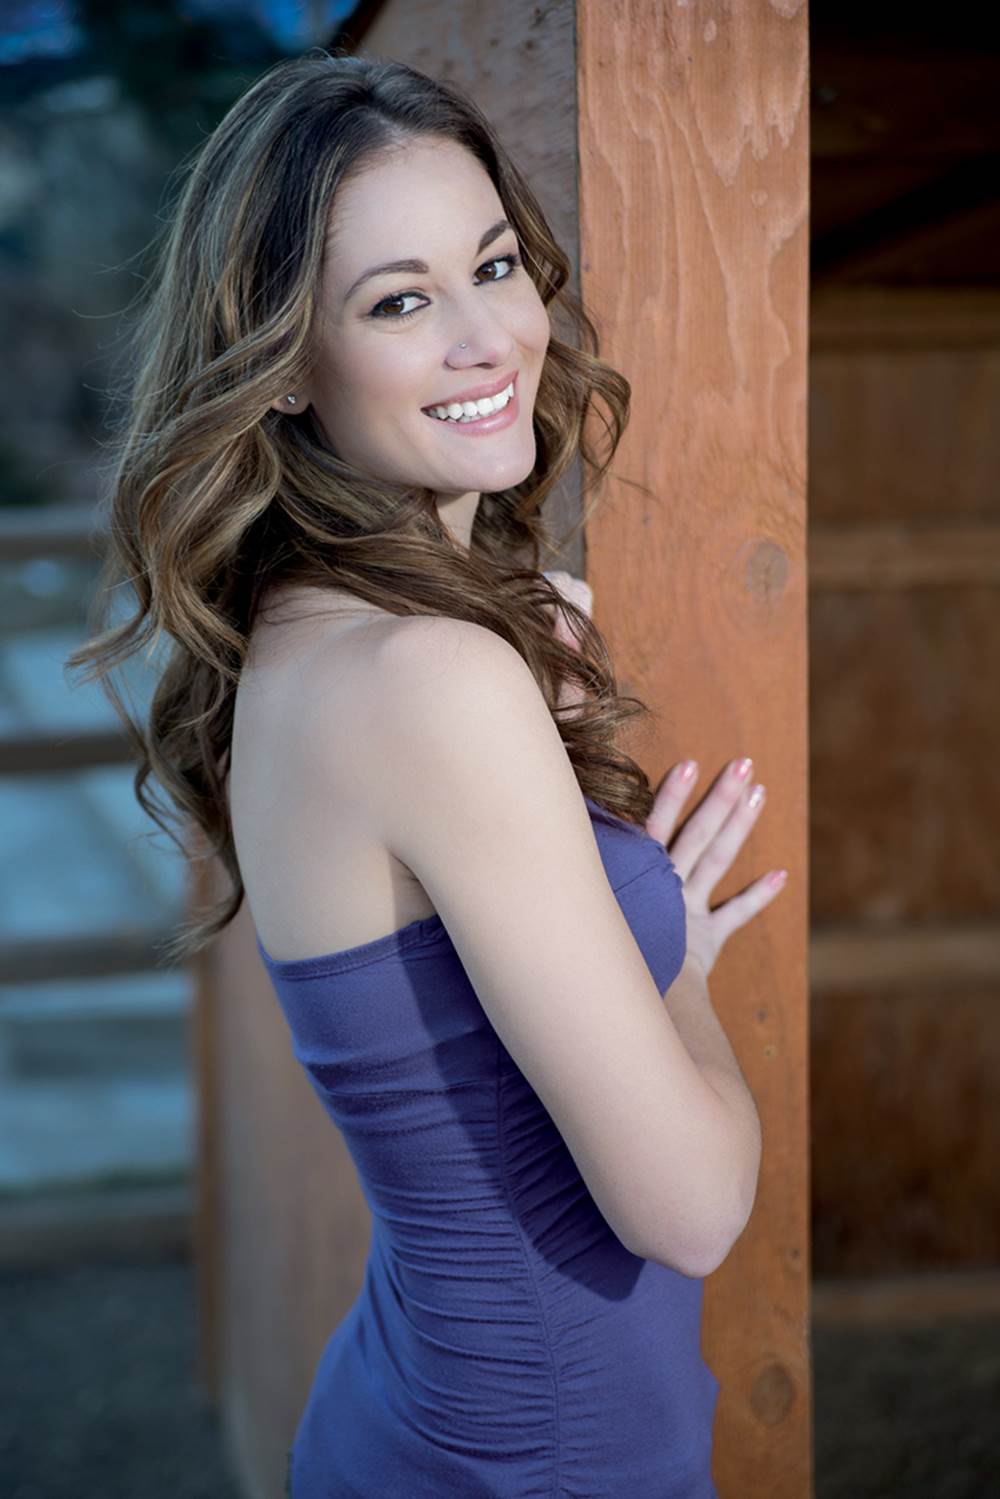
Lyndia’s Beautiful Smile – Jesse Martinez (jesse101)
Light Is a Photographer’s Friend!
Controlling light is the primary thing that separates excellent from not-so-excellent photographers. On beautiful, balmy summer evenings, the light wraps around the land and gives us that so-called golden hour that we crave. However, some days are rainy, and some are dark and gloomy.
As photographers we want to take pictures. We don’t want to stop just because the Sun won’t cooperate. We need light that we can take with us, and we want it to be available quickly. We need a Speedlight!
Fortunately, your D610 has a built-in Speedlight (figure 13.1). That’s Nikon’s name for its flash units, large and small.
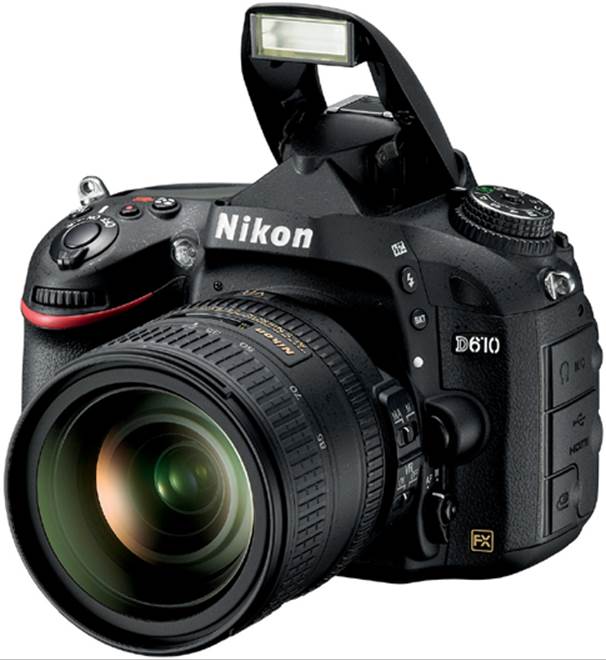
Figure 13.1 – Nikon D610 with popup Speedlight flash open
From the tiny popup flash on your camera to the flagship SB-910 flash, you have several choices. You can even create a wireless flash array using your camera, a commander unit, and several Speedlight flash units.
This type of setup is called the Nikon Creative Lighting System (CLS). We’ll look at the CLS later in this chapter. First let’s examine some general flash information and explore how the D610 uses flash. How can you determine which flash will work best for your style of shooting? Will the popup flash be enough with its range limitations, or do you need more power to reach out and light up more distant subjects? How is the power output of a flash unit rated?
First, we’ll look at how to rate the power output of a flash by examining the guide number.
What Is a Guide Number?
The guide number (GN) for a flash unit measures how well it can light a subject at a specific ISO sensitivity and with a precise angle of view (wide angle versus telephoto). To put it simply, a higher GN means the flash is more powerful, all other things being equal.
Be careful when you are deciding on an external flash unit to use, whether it is a Nikon Speedlight or an aftermarket unit. Simply comparing the GN is not enough. You must understand the settings on which the GN is based. Many flash units have zoom capability and can light subjects farther away when they are zoomed out. Imagine buying a flash unit from a manufacturer who publishes the GN based on a longer zoom position and then comparing it to a different flash unit based on a shorter nonzoom position. The GN rating on the flash that is zoomed out would seem to be higher than the same unit not zoomed out. However, unless you are comparing flash unit GNs with exactly the same settings, it is truly like comparing apples to oranges. For instance, to get an exact comparison of GNs, you would have to know the following:
• Distance from flash head to the subject
• Aperture in use on your camera
• ISO sensitivity of your sensor
• Angle-of-view setting on the flash zoom head
• Actual angle of view your lens provides (must match flash head)
• Temperature of ambient air
In reality, the camera has little to do with figuring the GN, other than providing an f-stop number and ISO sensitivity. So how can you decide what GN is best without whipping out a scientific calculator? Just look at the flash unit specifications to see what the GN is based on. Here are the most important figures:
• Flash zoom angle-of-view setting (e.g., 24mm or 85mm)
• ISO sensitivity
If you see a flash unit advertised as GN 98, realize that this is not enough information to make a decision. In this instance, 98 is the GN. It represents the number of feet from the flash head to the subject (98 feet). In countries that use the metric system, an equivalent GN is 30, which is the number of meters from the flash head to the subject. That number by itself is simply incomplete. Don’t buy a flash unit based solely on a GN like 98 or 100 or 111.
Let’s think about this for a second. Let’s say I’m a manufacturer who is desperate to sell you a flash unit. I might stretch things a little bit. I might say my Super-Duper flash unit has a GN of 98 (feet) or 30 (meters) and hope you won’t ask about the settings I used to arrive at that number. Here is a comparison of two flash units with a so-called comparable GN:
Super-Duper flash unit GN information
• GN 98 (30)
• 80mm zoom-head setting
• ISO 200 sensitivity
Nikon SB-400 flash unit GN information (real values)
• GN 98 (30)
• 35mm zoom-head setting
• ISO 100 sensitivity
Both of the flash units have the same GN, so which one is really more powerful? The Nikon SB-400 will literally blow away the Super-Duper unit. Yet the Super-Duper manufacturer lists the same GN! The Super-Duper unit must have its zoom head set to 80mm, a much narrower beam, and have twice the camera ISO sensitivity to equal the Nikon SB-400 unit. Mr. Super-Duper is hoping you won’t check the fine print at the bottom of the specifications so you’ll think his much less powerful unit equals the Nikon SB-400. Surprisingly, there are flash unit manufacturers who do exactly this.
What can you learn from this example? The GN itself is not enough to make a decision on which flash unit to use. You must know what the GN is based on to make an informed decision. Take your time when buying a flash unit. You’re safe in sticking with Nikon Speedlights, since the ratings are well known and they’re designed to support all the features of your D610. There are also excellent after-market flash units available from manufacturers like Vivitar, Sigma, Sunpak, Metz, Braun/Leitz, and others. Examine the underlying settings and not just the GN. What the GN is based on is as important as the actual number.
For comparison purposes, the GN of the D610 popup Speedlight is 39 (feet) or 12 (meters) at ISO 100. Nikon’s flagship Speedlight, the SB-910, is 111.5 (feet) or 34 (meters) at ISO 100 at the 35mm zoom head position. Obviously, the larger external flash unit has a lot more power and can light up subjects that are farther away.
Now, let’s examine the various Flash modes found on the Nikon D610. Since I have no way of knowing which flash unit you’ll be using, I’ll write from the perspective of the popup flash. Almost everything mentioned next applies to the built-in flash and most Accessory shoe–mounted Nikon-brand Speedlight units, plus many Nikon-specific aftermarket flash units.
Page 293 in the Nikon D610 User’s Manual has a listing of compatible Nikon Speedlight flash units, which include the following:
• SB-910
• SB-900
• SB-800
• SB-700
• SB-600
• SB-400
• SB-R200
Technical GN Information
The GN is based on a specific formula: GN = distance × f-stop. It is based on the inverse-square law, which states that doubling the GN requires four times more flash power. A flash with a GN of 100 is four times more powerful than a flash with a GN of 50. The GN represents an exposure constant for a flash unit. For example, a GN of 80 feet at ISO 100 means that a subject 20 feet away can be completely illuminated with an aperture of f/4 (80 = 20 × 4) using a sensitivity of ISO 100. For the same GN and an aperture of f/8, the light source should be 10 feet from the subject (80 = 10 × 8). Fortunately, your camera and flash combination are capable of figuring the correct values for you when you use TTL mode.
Flash Modes
(User’s Manual – Page 143)
The built-in popup flash has two types of flash metering:
• i-TTL balanced fill flash – The flash fires in two stages. Nikon calls stage 1 monitor preflash. The built-in flash emits a series of almost invisible flashes (stage 1) before the main flash burst fires (stage 2). The preflashes allow the 2,016-pixel RGB sensor to examine all areas of the frame for reflectivity. The camera uses the Matrix meter and distance information from a D or G lens to calculate a flash output that is balanced between the main subject and the ambient lighting.
• Standard i-TTL – When the Spot meter is used, the camera automatically switches to standard i-TTL. This mode ignores the background and concentrates on whatever the camera’s selected AF point is focused on. For the most accurate flash output for a specific subject, set your camera to use its Spot meter and the flash will meter for the subject only.
In addition to the types of flash metering, the camera also has several Flash modes that affect how it controls light. We’ll consider each of them shortly, but first let’s talk about how the shutter blades work when the flash fires. This is basic information that will help you understand the Flash modes. To fully know what’s happening when the flash fires, you must understand a little bit about the shutter curtains in your camera.
Your D610 exposes the sensor to light for specific periods of time. This is controlled by the camera’s shutter speed. The actual exposure is handled by two moving objects called curtains. The D610 has two shutter curtains. You can see the front curtain in figure 13.2 (red arrow). It’s composed of several narrow overlapping blades and is in the closed position.
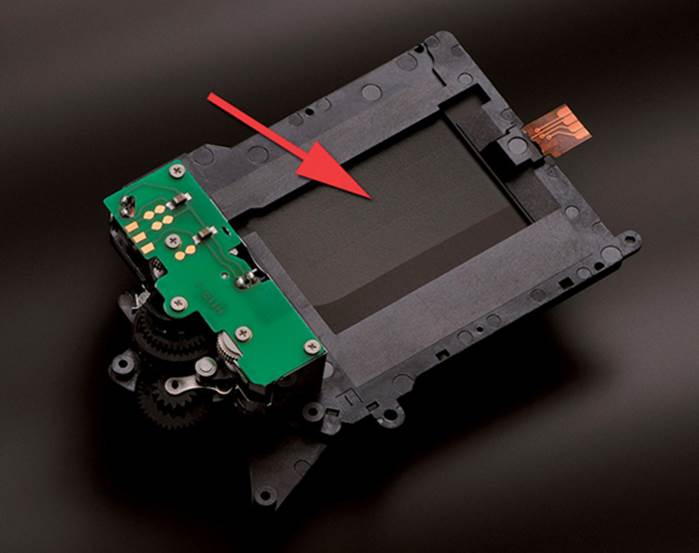
Figure 13.2 – Nikon D610 shutter assembly and front shutter curtain (red arrow)
How do the curtains work? One curtain gets out of the way of the sensor to start the exposure, and the other curtain replaces it to stop the exposure. The first one is called the front curtain, and the second one is called the rear curtain. In this context, front and rear are not important as indicators of position but as indicators of which moves first and which moves second. The flash must fire when the first, or front, curtain is fully open and before the second, or rear, curtain starts closing. The time between the front curtain opening and the rear curtain closing is the actual shutter speed.
The whole sensor must be uncovered when the flash fires in normal Flash modes (non-Auto FP). If the shutter speed is too fast, the rear curtain will closely follow the front curtain and partially block the sensor when the flash fires. That’s why the shutter speed is limited to a maximum of 1/200 second on the D610 when a flash is used. With faster shutter speeds, the sensor is always partially covered by one of the shutter curtains. If the flash fires while one of the curtains covers part of the sensor, that part of the sensor will not get a proper exposure from the flash and there will be an underexposed black band in your image.
The whole point of the Flash modes is to determine at what point during shutter curtain movement the flash fires and whether it’s the main source of light or if some ambient light is mixed in. Keep this information in mind as we discuss the Flash modes.
Be sure to read the upcoming sidebar called Auto FP High-Speed Sync be-cause Auto FP affects the maximum shutter sync speed and allows you to take it higher than 1/250 second. Also see the heading e1 Flash Sync Speed in the Custom Setting Menu chapter, where this mode is discussed in great detail.
Here are the steps to select one of the Flash modes:
1. Hold down the Flash mode button (figure 13.3, image 1).
2. Turn the Main command dial while watching the various modes change on the Control panel (figure 13.3, images 2 and 3).
3. Release the Flash mode button to lock in the Flash mode.
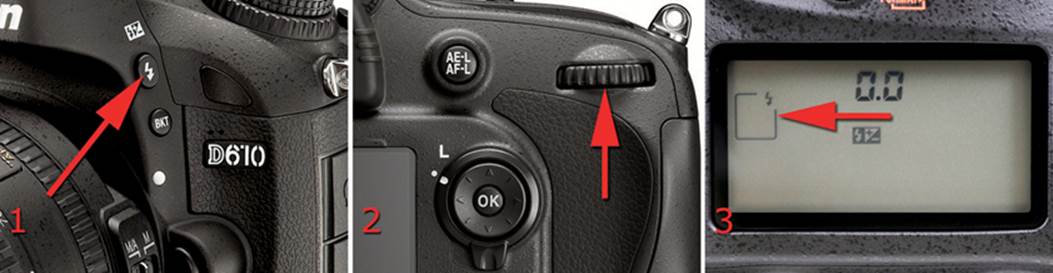
Figure 13.3 – Flash mode button (image 1), Main command dial (image 2), Control panel Flash mode readout (image 3)
Auto FP High-Speed Sync
The D610 has an additional mode that lets it exceed the normal flash sync speed of 1/200 second. It is called Auto FP high-speed sync mode. Remember how normally both the front and rear shutter curtains must be out of the way before the flash fires? Auto FP high-speed sync mode lets you use shutter speeds all the way up to 1/4000 second. At these speeds, the rear shutter curtain follows the front shutter curtain so closely that only a traveling narrow horizontal slit exposes the sensor at any given time.
When you select a sync speed faster than the normal 1/200 second, the camera fires the flash in a series of short pulses instead of one big flash. The pulses fire as the narrow shutter curtain slit moves across the face of the sensor. The faster the shutter speed, the less power the flash can manage. You must be able to depend on ambient light in addition to flash when using Auto FP high-speed sync mode, especially at higher shutter speeds. However, this lets you use your fast lenses (e.g., f/1.4, f/2.8) wide open in direct sunlight, due to the very fast shutter speed.
You can expose properly with a very shallow depth of field due to a large aperture, even though the light is very bright. We covered this mode in detail in the chapter titled Custom Setting Menu, under the heading e1 Flash Sync Speed.
The five basic Flash modes and how they work are described next. The camera will often combine these Flash modes as you use different shooting modes on the Mode dial. See the list of shooting modes at the end of this section.
Auto
Auto Flash mode is available only when you are using various SCENE modes (figure 13.4). It lets the camera decide when and what type of flash to use. You can select this mode if you are unsure about which mode to use in a certain situation, and the camera will do its best to give you a well-exposed picture. See the list at the end of this section to discover the other modes that are available when you are using the automatic SCENE modes.
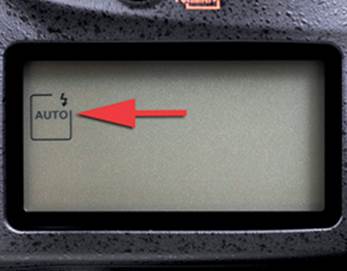
Figure 13.4 – Auto flash in SCENE modes only
Fill Flash (Front-Curtain Sync)
In Fill flash (Front-curtain sync mode), the camera tries its best to balance the light if you’re using a lens that has a CPU in it (figure 13.5). Older non-CPU lenses cause the camera to ignore the ambient light completely and use only the flash to expose the subject. A CPU lens, like an AF-S Nikkor G or D lens, balances ambient light and light from the flash and works to make the combined light look very natural. If you use this correctly outdoors, it will be hard to tell that you were using flash, except for the catch light in your subject’s eyes and the lack of deep shadows. The flash simply fills in some extra light without overpowering the ambient light. In a situation where there is very little ambient light, the camera will use only the flash to get a correct exposure. It balances with ambient light only if there is enough ambient light.
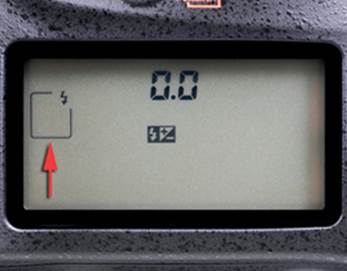
Figure 13.5 – Front-curtain sync
There is a side effect to using this mode with slow shutter speeds. Fill flash simply causes the flash to fire as soon as the front shutter curtain is out of the way and before the rear shutter curtain starts closing. If there is some ambient light, the shutter speed is long (like 1/2 second), and the subject is moving, you’ll see a well-exposed subject with a blurry trail in front of it. The flash correctly exposes the subject as soon as the front curtain gets out of the way, but the ambient light continues exposing the subject before the rear curtain closes. Since the subject was moving, you may see a ghostlike blur before or in front of the well-exposed moving subject in the picture. This can be seen at shutter speeds as fast as 1/60 second if the ambient light is strong enough and the subject is moving quickly enough.
Red-Eye Reduction
Red-eye reduction is not really a Flash mode (figure 13.6). It simply means that the AF-assist illuminator shines brightly in the face of your subject before the Fill flash fires. The intention is that the bright AF-assist illuminator will cause your subject’s pupils to close somewhat and reduce the red-eye effect. It acts like you are using Fill flash (Front-curtain sync mode).
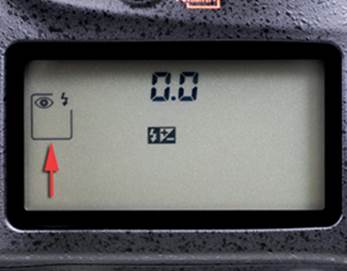
Figure 13.6 – Red-eye reduction
Slow Sync
Slow sync mode lets the camera use ambient light to make a good exposure and then fires the flash to add some extra light, rounding out the shadows or better exposing a foreground subject (figure 13.7). Use this mode in people shots outdoors or when you want ambient light to provide the primary exposure and the flash to add a sparkle to your subjects’ eyes and remove dark shadows from their faces.
This is closely related to Fill flash, except the ambient light is more important than the light from the flash. Be careful when using this mode indoors since it will expose for ambient light and only assist with some flash light. You can get some terrible ghosting and blurred handheld shots when using Slow sync indoors. Ambient light rules in this mode!
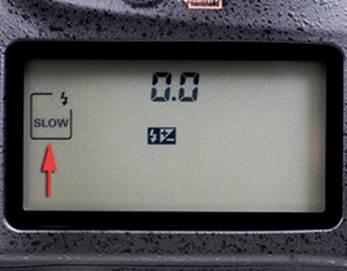
Figure 13.7 – Slow sync
Rear-Curtain Sync
Rear-curtain sync (figure 13.8) is the opposite of Fill flash, or Front-curtain sync. The flash waits to fire until just before the rear curtain starts to close. The entire shutter speed time is just ending when the flash fires. This causes a ghosting effect for moving subjects in higher ambient light with slow shutter speeds.
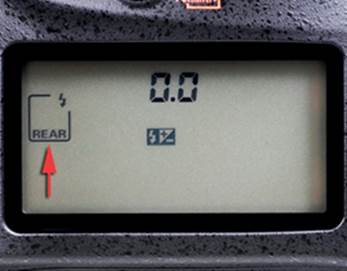
Figure 13.8 – Rear-curtain sync
When you press the Shutter-release button, the front curtain opens, ambient light starts hitting the sensor, and the sensor starts recording the subject. Just as the shutter’s rear curtain is about to close, the flash fires, exposing the subject at its current position. The subject was fully exposed by the flash at the end of the shutter speed time, so the ambient light had time to register the subject before the flash fired, thereby making a blurred ghost behind or after the well-exposed but moving subject.
List of Flash Modes by Shooting Mode
As mentioned previously, when you use the various shooting modes on the Mode dial, such as P, S, A, M, SCENE, and so forth, the camera will allow you to use certain Flash modes at certain times. Not all flash modes are available at all exposure settings.
The following list shows the shooting modes and available Flash modes:
SCENE modes – Portrait, Child, Close up, Party/indoor, Pet portrait, and AUTO
• Auto
• Auto + red-eye reduction
SCENE mode – Night portrait
• Auto + slow sync + red-eye reduction
• Auto + slow sync
SCENE mode – Food
• Fill flash (front curtain sync)
Shooting mode – Programmed auto (P) and Aperture-priority auto (A)
• Fill flash
• Red-eye reduction
• Slow sync + red-eye reduction
• Slow sync
• Rear curtain + slow sync
Shooting mode – Shutter-priority auto (S) and Manual (M)
• Fill flash
• Red-eye reduction
• Rear-curtain sync
No Flash Mode
There is a final Flash mode, if you want to call it that. It’s Off, or no flash mode. Figure 13.9 shows it on the Mode dial and Control panel. When you use this mode, the flash is disabled. Obviously you cannot select the no flash mode when you use any of the other shooting mode selections on the Mode dial.
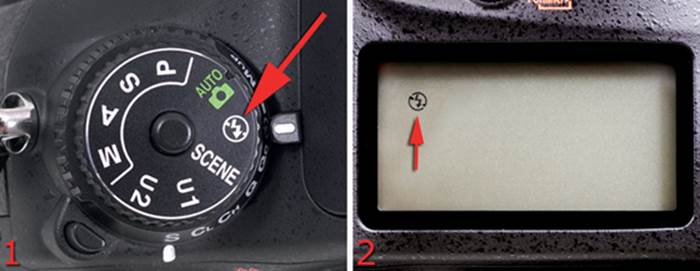
Figure 13.9 – No flash mode (Off)
Settings Recommendation: I use Fill flash for normal, everyday flash. It balances ambient light with flash light. Switch to Spot metering mode when you use Fill flash if you want extremely accurate exposures of a particular subject.
External Speedlight flash units offer modes like TTL BL, TTL BL FP, TTL FP, or just TTL. TTL stands for through the lens and represents an i-TTL mode (intelligent though the lens). BL stands for balanced. FP stands for Auto FP high-speed sync mode. Refer to the user’s manual for your flash unit for exact details on how to switch modes on the flash unit.
When I’m shooting outside (only) and want a great exposure of my subject’s surroundings, along with the subject, I often use Slow sync mode. The only caveat is that you must be aware that slow shutter speeds will cause ghosting and blurring as the light falls.
I don’t use the Red-eye reduction mode often because it seems to confuse people. They think the initial shine of the AF-assist illuminator is the flash firing and then they look away just as the main flash fires. If you are going to use Redeye reduction mode, you might want to tell your subject to wait for the main flash.
Rear-curtain sync creates a cool effect if you want to show a ghosted image stretching out behind your subject when you use slow shutter speeds. It is sometimes used by sports shooters in situations when there may be some blurring from fast movement in low light. It is much more acceptable to have a ghosted blur after the subject since it implies motion. Front-curtain sync makes the blur show up in front of the subject, which just plain looks weird.
I suggest experimenting with all of these modes. You’ll want to use each of them at various times.
Now let’s look into the Nikon CLS, which allows your camera to control multiple flash units in a wireless array.
Flash Compensation
The Nikon D610 also offers a Flash compensation setting, as mentioned briefly in a previous chapter. You can add up to one EV step (overexposure) and subtract down to three EV steps (underexposure).
Use the following steps to dial in Flash compensation:
1. Hold in the Flash mode/Compensation button (figure 13.10, image 1).
2. Turn the Sub-command dial to select a Flash compensation amount (figure 13.10, image 2).
3. The Control panel will display the compensation in 1/3 or 1/2 EV steps, according to how you have Custom Setting Menu > b Metering/exposure > b2 EV steps for exposure cntrl set (1/3 step or 1/2 step). Figure 13.10, image 3 (red arrow), shows that I have selected +0.3 EV step overexposure.
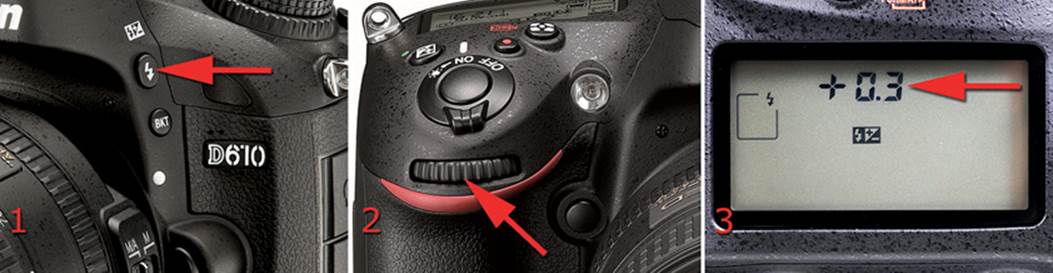
Figure 13.10 – 0.3 EV step Flash compensation (1/3 stop overexposure)
Nikon Creative Lighting System (CLS)
(User’s Manual – Pages 293)
The CLS is an advanced wireless lighting technology that allows you to use your imagination in designing creative lighting arrangements. No wires are used since the CLS-compatible remote flash units are controlled by a commander device, or what Nikon refers to as a “master flash unit.” You can use the Commander mode built into the D610; an Accessory shoe–mounted commander, such as the SB-910, SB-900, SB-800, and SB-700 Speedlights; or the SU-800 Wireless Speedlight Commander unit.
The Nikon SB-600 and SB-R200 Speedlights have only a remote mode, so they cannot be used as a commander unit. The Nikon SB-400 is not compatible with the CLS at all; therefore, it can be used only as a standard i-TTL flash unit.
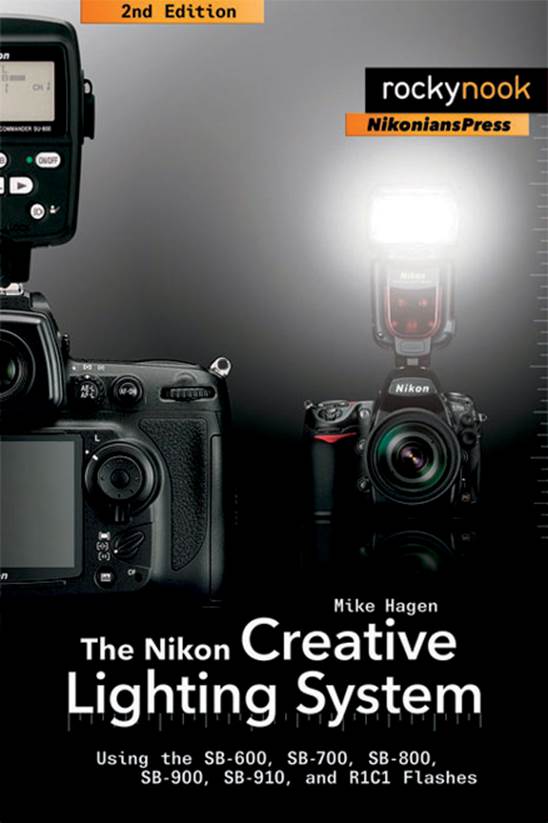
Figure 13.11 – The Nikon Creative Lighting System, 2nd Edition by Mike Hagen
We’ll consider only the camera’s built-in Commander mode in this chapter. If you want to learn more about using a full-blown remote external flash unit, multiflash CLS system, I suggest buying a copy of The Nikon Creative Lighting System, 2nd Edition by Mike Hagen (published by Rocky Nook and NikoniansPress; figure 13.11). Mike’s book goes into excellent detail on how to use the CLS with multiple banks of various external Nikon Speedlight flash units.
With the CLS you can easily experiment with setups and flash output. You can obtain a visual preview of how things will look by pressing the Depth-of-field preview button, which will fire the pulsed modeling capability within Nikon Speedlights.
There is no need to calculate complex lighting ratios when you can control your flash banks right from the camera and see the results immediately. The CLS simplifies the use of multiple flash unit setups for portraits, interiors, nature, or any situation where several Speedlights need to work in unison.
You can simply position the flash units where you’d like them to be and let the CLS automatically calculate the correct exposure, or you can change the lighting ratios directly from the Custom Setting Menu > e3 Flash cntrl for built-in flash > Commander mode menu of your D610.
Nikon’s CLS is world class in power and not too difficult to use. The Nikon D610 contains everything you need to control a simple or complex CLS setup. Let’s learn how to use it!
How Does the D610 Fit into the CLS Scheme?
In Commander mode, the camera functions as a controller for multiple Nikon Speedlight flash units. Although the professional-level Nikon D4, D3, D3S, and D3X cameras require the separate purchase of an Accessory shoe–mounted commander device, the D610 body has full Nikon CLS technology built right into the camera.
You can use normal i-TTL flash technology with the camera’s built-in flash or use Commander mode and the built-in flash to control up to two groups of an unlimited number of external Nikon Speedlight flash units.
Nikon currently makes the powerful flagship SB-910 and SB-900 flash units, along with their only slightly less powerful SB-700 and SB-600 cousins, and other smaller Speedlight units, such as the SB-400 and SB-R200.
Many people who use the D610 have an external flash unit or two—usually the SB-910, SB-900, SB-800 (now discontinued), SB-700, SB-600, or SB-400. The SB-R200 flash is designed to be used on various brackets that are available from Nikon, and it will work in conjunction with the bigger Speedlight flash units. The Nikon D610 is happy to let you arrange professional lighting setups using these relatively inexpensive and very portable Speedlights.
The cool thing about the D610 is it can serve as a CLS flash commander device or use Nikon’s other CLS flash commander devices at will. You have great control with this fine camera!
What Is Commander Mode and How Does It Work?
Commander mode is controlled through a menu on your D610. If you examine the Commander mode screen shown in figure 13.12, you’ll see that there are controls for the built-in flash and two groups of external flash units (Group A and Group B). You’ll also see that you can set exposure compensation for either of these groups.
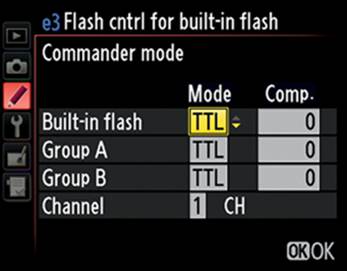
Figure 13.12 – Commander mode
If the main flash is too bright, you can either move it farther away or dial down its power by setting compensation (Comp.) to underexpose a little. You can set Comp. in 1/3-stop increments, so you have very fine control of each group’s flash output. You can experiment until you get the image just the way you want it. Sure, you can do things the old way and use a flash meter or get your calculator and figure out complex fill ratios. Or you can simply use the CLS to vary your settings visually until the image is just right (figure 13.13).

Figure 13.13 – J. Ramón Palacios used a Commander device and two SB-800 Speedlights to take this CLS photo
Isn’t it more fun to simply enter some initial settings into your Commander mode screen and then take a test shot? If it doesn’t look right, change the settings and do it again. Within two or three tries you’ll probably get it right, and you will have learned something about the performance of the CLS. In a short time you’ll have a feel for how to set the camera and flash units, and you’ll use your flash/camera combo with authority. Mike Hagen’s CLS book, mentioned previously, will help you learn these techniques.
Note: If you leave Custom Setting Menu > e Bracketing/Flash > e5 Modeling flash set to the factory default of On, you can test fire the built-in modeling light of your single Speedlight—or all Speedlights in Groups A and B—by pressing and holding the camera’s Depth-of-field preview button.
Using Commander Mode
Start by putting your camera into Commander mode. It will allow you to configure a CLS session using one or many external flash units.
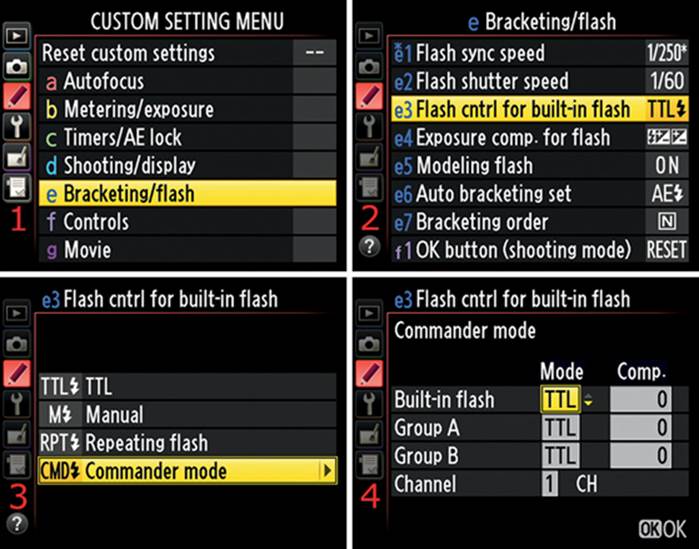
Figure 13.14 – Setting the camera to Commander mode
Use these steps to enter and adjust Commander mode in your D610:
1. Select e Bracketing/flash from the Custom Setting Menu (figure 13.14, screen 1).
2. Choose e3 Flash cntrl for built-in flash and scroll to the right (figure 13.14, screen 2).
3. Select CMD Commander mode and scroll to the right (figure 13.14, screen 3).
4. Use the final screen to adjust the various Commander mode settings (Mode, Comp., and Channel) and then press the OK button to lock in the settings (figure 13.14, screen 4).
Since this section is about controlling multiple flash units, we’ll have to change the settings in Commander mode, as shown in figure 13.14, screen 4. We’ll examine each of the settings available in Commander mode.
First, we’ll consider TTL (also known as i-TTL). It’s the easiest to use since it allows you to set exposure compensation for the built-in flash and each of your flash groups. Second, we’ll briefly look at AA mode, which is an old-fashioned mode that is not often used by new photographers. Third, we’ll look at M mode, since that gives you fine control of your flash from full power (1/1) to 1/128 power. Finally, we’ll consider the – – (double-dash) mode, which prevents the camera’s built-in flash from firing the main flash output in whichever group is using – – mode.
When your camera is controlling external Speedlights using its built-in Commander mode, you must always raise the built-in flash on your D610. The camera communicates with the external flash units during the monitor preflash cycle.
Always position the sensor windows on the external Speedlights where they will pick up the monitor preflashes from the built-in flash.
Commander Mode Settings
Basically, the Mode fields on the Commander mode screen will display the selections in the following list. Use the Multi selector to change the values, as shown in figure 13.15.
Here are the four Commander mode settings:
• TTL, or i-TTL mode
• AA, or Auto Aperture mode
• M, or Manual mode
• – –, or double-dash mode (what else would one call it?)

Figure 13.15 – Commander mode screen
You’ll find each mode in the yellow highlighted Mode box in figure 13.15. Use the Multi selector to scroll up or down and select a mode. AA mode is not available for the Built-in flash, so you will see AA only in the Mode boxes following Group A and Group B. Now, let’s examine each mode in more detail:
• TTL mode – The TTL setting allows you to use the full power of i-TTL technology. By leaving Mode set to TTL (as shown in figure 13.15) for the Built-in flash or Group A or B, you derive maximum flexibility and accuracy from all your flash units. In this mode the Comp. setting will display exposure values from –3.0 EV to +3.0 EV, a full six-stop range of exposure compensation for each group of Speedlights. You can set the Comp. in 1/3 EV steps for very fine control.
• AA mode – The AA mode is an older non-i-TTL technology included for people who are accustomed to using it. It is not available for the built-in Speedlight on the D610 or for the SB-600. You can safely ignore the AA mode, unless you want to experiment with it. It may not provide as accurate a flash exposure as TTL mode since it is not based on the amazing i-TTL technology. Otherwise it works pretty much the same as TTL mode.
• M mode – This mode allows you to set different levels of flash output in 1/3 EV steps for the Built-in flash or the Speedlights in Group A or B. The settings you can put in the Comp. field are between 1/1 (full power) and 1/128. The intermediate 1/3-stop settings are presented as decimals within the fractions. For example, 1/1.3 and 1/1.7 are 1/3 and 2/3 stops below 1/1 (full). Many people are used to working with flash units this way, so it seems more familiar to them. The CLS accommodates people who have experience working manually.
• – – mode (double-dash mode) – The built-in Speedlight will not fire the main flash burst in this mode. It will fire the monitor preflashes, since it uses them to determine exposure and communicate with the external flash groups. Be sure you always raise the camera’s built-in flash in any of the Commander modes; otherwise the external flash groups will not receive a signal and won’t fire their flashes. When you set the mode for Group A or B to – – (double-dash mode), that entire group of flashes will not fire. You can use this mode to temporarily turn off one of the flash groups for testing purposes.
Since the preflashes of the built-in flash always fire, be careful that they do not influence the lighting of your image. Use a smaller aperture, or move the camera farther away from your subject if the preflashes add unwanted light. Alternatively, you could purchase the Nikon SG-3IR infrared panel, which fits in front of the Built-in flash and prevents light from influencing the exposure.
What Are Monitor Preflashes?
When you press the Shutter-release button with the popup flash open, the camera’s built-in Speedlight fires several brief preflashes and then fires the main flash burst. These preflashes fire whenever your camera is set to TTL mode, even if your D610 is controlling multiple flash units through the CLS. The camera can determine a very accurate exposure by lighting your subject with a preflash, adjusting the exposure, and then firing the main flash burst.
Setting the Channel (CH) for Communication
Look at figure 13.16, or your camera’s Commander mode screen, and you’ll notice that just below Group B there is a Channel (CH) selection. The number 3 that I selected in the yellow box is the communication channel your D610 will use to talk to the external flash groups (the factory default is 1).
There are four channels available (1–4), in case you happen to be working in the vicinity of another Nikon photographer who is also using Commander mode. By using separate channels, you won’t interfere with each other.
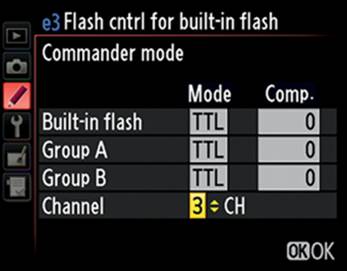
Figure 13.16 – Commander mode – Channel of communication
Note: It is important to realize that all external flashes in all groups must be on the same channel. This involves setting up your individual flash units to respond on a particular channel. They might be in separate groups, but they must be on the same channel. Each external Speedlight flash will have its own method for selecting a Group and a Channel. To learn how to configure each flash unit separately, you’ll need to get Mike Hagen’s book or read the user’s manual for your flash unit.
Downloadable Resource on Flash Units
There is a downloadable PDF document accompanying this chapter called Selecting a Nikon Speedlight Flash Unit at either of these two websites:
http://www.nikonians.org/NikonD610
http://rockynook/NikonD610
The document discusses individual Nikon Speedlights that were available at the time this book was published.
Author’s Conclusions
The Nikon D610 gives you control over the world-class Nikon Creative Lighting System. It is the envy of many other camera brand manufacturers and users.
I suggest that you find a good book on lighting techniques and study it well. You’ll have to learn how to control shadows and reflections, plus you’ll have to understand lighting ratios so you can recognize a good image when you see one.
Buy a couple of light stands and some cheap white flash umbrellas and set up some portrait sessions of your family, or even some product shots. With the Nikon D610 and just one extra Speedlight, you can create some very impressive images with much less work than ever before.
The really nice thing is that the Nikon CLS—executed by your camera’s Commander mode and external Speedlight flashes—will allow you to shoot without worrying so much about detailed exposure issues. Instead, you can concentrate on creating a great-looking image (figure 13.17).
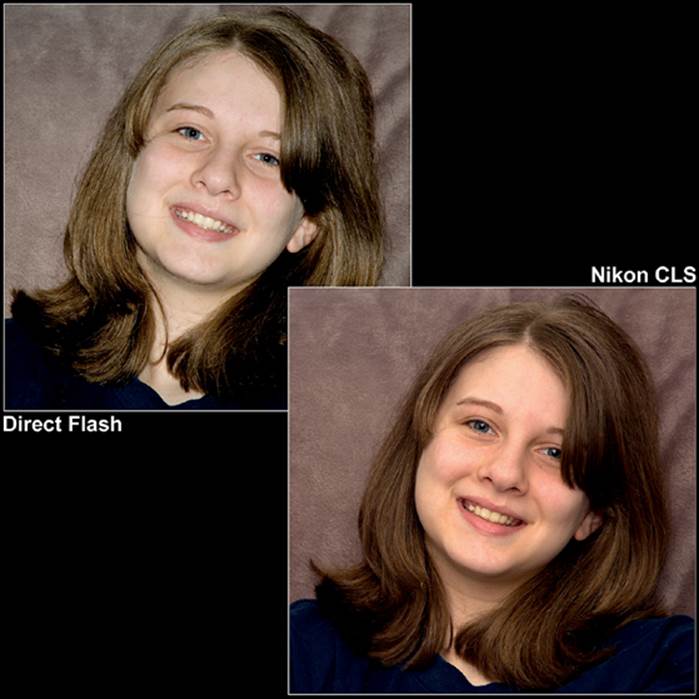
Figure 13.17 – Single-flash Nikon CLS compared to direct flash
Thank You!
I’d like to express my personal appreciation to you for buying this book and sticking with me all the way to the end of it. I sincerely hope that it has been useful to you and that you’ll recommend my books to your Nikon-using friends.
Keep on capturing time...
Credits for Chapter Opening Images
Chapter 1 – Jesse Martinez (jesse101) — Isabell and Her New Toys
Nikon D600 with a Tamron 28–75mm f/2.8 XR Di lens at 62mm, 1/100s at f/2.8, ISO 640 One-year-old Isabell Rose Martinez is playing with her new toys that she got during the holidays in 2012. From the cute expression on her face, you can tell that she was really fascinated with her new toy dog.
Chapter 2 – Marcel Carey (mcpianoca) — Bountiful Harvest
Nikon D600 with an AI Nikkor 35mm manual focus lens, 1/100s at f/11, ISO 1100
I really enjoyed this combination because the 35 AI Nikkor is small and light. As you can see, it’s also very sharp, and has a little glow quality to it. This is one of my favorite lenses. The picture was taken under a gazebo tent where producers were exhibiting their crops. There was a window to the left of the pumpkins and I really liked the light caressing them.
Chapter 3 – Philip Rice (pjr) — Rendezvous
Nikon D600 with an AF-S Nikkor 24–120mm f/4G ED VRII lens at 40mm, 1/20s at f/6.3, ISO 800
I shot this image in what was an old train tunnel, now a passageway, in Ottawa, Ontario, Canada. I was with several other photographers at a photo meet up when a couple of them wandered ahead of us. I spotted them, liked the scene, framed the picture, and took the shot! I later made a B&W conversion from the minimally-processed-in-Lightroom image.
Chapter 4 – Eric Bowles (ericbowles) — Mesquite Flat Dunes in Death Valley
Nikon D600 with an AF-S Nikkor 24–70mm f/2.8 lens at 34mm, 1/40s at f/11, ISO 100 Death Valley is a fabulous place for landscape photography, and Mesquite Flat Dunes is one of the best locations. The strong wind of the previous day and night wiped away all the footprints on the dunes and provided us with clean, unblemished sand for sunrise images. Warm early morning light and a blue sky provided great color for the scene. By using a wide lens setting and emphasizing the foreground, the texture of the dunes made wonderful patterns and leading lines in the composition.
Chapter 5 – Jim Hammond (hamjam) — Twenty-Seven Cents Per Gallon
Nikon D600 with a Nikkor 28–300mm lens at 58mm, 1/200s at f/11, ISO 200
I took this image in early morning sunlight on our way back to Lincoln, CA from a trip to Reno, NV, USA. We drove down into Old Town Truckee, CA, to get a cup of coffee and to see if there might be an image waiting for us. Sure enough, we spotted this old Texaco Flying A Service Station, now a Sporting Goods Store. The old pumps brought back some nostalgic memories of when you could get a gallon of gas at 27 cents per gallon. That’s the price that is still shown on the pumps, which is why I titled the image Twenty-Seven Cents Per Gallon.
Chapter 6 – Donald Heldoorn (TakeTwo) — Spirit of Texas in Semi Finals
Nikon D600 with a Nikon 300mm lens, 1/250s at f/13, ISO 200
I took this shot, up close and personal, at the Lucas Oil Drag Boat Racing Series (LODBRS) on Sunday, November 4, 2012. The Boat is the “Spirit of Texas,” a Top fuel Hydro, 8000 horse power machine, which does 0–1000 feet in 3.4 seconds at a top speed of 250 mph.
Chapter 7 – Jackie Donaldson (bhpr) — Nature’s Beauty
Nikon D600 with an AF-S Nikkor 28–300mm VR lens at 300mm, 1/500s at f/7.1, ISO 800
I took the butterfly photo under the New River Gorge Bridge in West Virginia, USA, on the railroad tracks. I was learning the D600 and it was proving to be an excellent camera. I was walking the tracks looking for a better shot of the bridge and I came across this beautiful butterfly. I had just bought my D600 a few days before my vacation so I was excited to come across this great subject. The original file was in landscape mode and I cropped it for better composition.
Chapter 8 – Anthony Do (gudnuf4u) — Baby Big Bear
Nikon D600 with an AF-S Nikkor 85mm f/1.8G lens, 1/250s at f/4, ISO 180
I took this picture of my baby girl in Big Bear Lake, California, USA. It was her first day in the snow and I wanted to capture the memory. I really love this picture of my baby, and now I have something to show her when she grows up.
Chapter 9 – Mike Goodman (mrginhop) — Mandarin Duck on Golden Pond
Nikon D600 with an AF-S Nikkor 200–400mm f/4.0 lens at 400mm, 1/250s at f/8, ISO 1400
This Mandarin duck resides at a pond in the Albuquerque Zoo. I was in the area to shoot at the Bosque del Apache sanctuary in late November, which is about an hour away. It was late afternoon and the low light was creating wonderful golden reflections on the pond. The challenge was to get the duck in the sunlight facing me. It took many shots before it all came together.
Chapter 10 – Rocky Fletcher (rf10956) — Taking Prey
Nikon D600 with a Nikkor 300mm f/4.0 lens and TC-14E II teleconverter, 1/1250s at f/5.6, ISO 720
A friend of mine is an avid eagle photographer and stimulated my interest in giving it a try. This was actually my first go at it, hoping that I would get a couple of keepers. The D600 made it possible to get many nice captures. I took this picture at Lock and Dam 14 on the Mississippi River. It is a well-known spot for eagle photography in January and February. I had literally received the camera the previous week as a replacement for my D300, which had recently been stolen.
Chapter 11 – Susan Braunhut (wife of dhmiller) — Iguana Invasion
Nikon D600 with an AF-S Nikkor 70–300mm f/4–5.6G VR lens at 300mm, 1/1250s at f/11, ISO 1100
I shot this image near Arenal Volcano in Costa Rica, outside the Iguana Restaurant, where the grounds were covered with iguanas of all shapes and sizes.
Chapter 12 – Brenda Young (DigitalBrenda) — Bald River Falls
Nikon D600 with an AF-S Nikkor 24–85mm f/3.5–4.5G VR lens at 46mm, 1.3s at f/16, ISO 100 Darrell and I were on an autumn trip to explore Cherohala Skyway in Tennessee and North Carolina, USA. We always stop at Bald River Falls in Tellico Plains, TN, for a few shots. I was using my new Nikon D600, a gift from Darrell, and I shot this vertical using my Manfrotto tripod. This is one of the highest waterfalls in Tennessee, at over 100 feet, and it is quite beautiful year round, but especially in the fall.
Chapter 13 – Jesse Martinez (jesse101) — Lyndia’s Beautiful Smile
Nikon D600 with a Tamron 28–75mm f/2.8 XR Di lens at 72mm, 1/160s at f/2.8, ISO 100 The beautiful model’s name is Lyndia. I took this shot in Denver, Colorado, using Nikon CLS for lighting. I positioned the flash on a Manfrotto stand, set it to remote mode, and used the in-camera Commander mode to control the Speedlight. The flash was used as fill only, to remove shadows, thereby allowing ambient light to be the main light source.