The DSLR Filmmaker’s Handbook: Real-World Production Techniques, Second Edition (2015)
Chapter 1. Fundamentals of DSLR Filmmaking
When choosing to shoot with DSLR cameras, you need to know some of the basics. Whether your background is with a traditional video camera, as a still photographer, or as a filmmaker, you’ll see some overlap in equipment and terms you are familiar with. However, some unique processes, gear, and workflows apply specifically to shooting video on DSLR cameras, so don’t just skip ahead and assume you know everything.
Features of DSLR Cameras
Until Nikon released the D90 in 2008, buyers had to choose between a digital still camera and a digital video camera. Filmmakers were using film or traditional video cameras for production. When the D90 and, quickly afterward, the Canon 5D Mark II were released, you finally had the ability to shoot digital stills and HD video on the same device. Since then, every major camera manufacturer has added DSLR cameras that can shoot video.
At the time, HD video on a still camera was controversial. A lot of photographers worried that improvements to the still camera would be limited because it seemed all the attention was being placed on the video side of the camera. Independent filmmakers took one look at the early footage and realized the vast potential of this new technology. HD video has been around since the 1990s but was practically available only on traditional video cameras. The design and function of traditional video cameras prevented a lot of the cinematic qualities that traditional film cameras provided.
DSLR cameras allowed filmmakers to easily and inexpensively use interchangeable lenses to craft the look of their film more like traditional filmmaking. These factors, along with an available shallow depth of field and low-light capabilities, were not available on most traditional video cameras. These issues, coupled with the price and quality of the video image, helped supersize the growth of the DSLR market.
As stated previously, since the launch of the Nikon D90 and the Canon 5D Mark II, manufacturers have released an endless string of DSLR cameras that shoot video. The still/HD video hybrid has become the norm for capturing video. You can now just compare models and find the right functions and price point for your project and start shooting.
Sensor Size
If you are not a photographer and not accustomed to dealing with sensor sizes, let’s put it in motion-picture film terms. Sensor size is a bit like choosing whether to shoot on 8 mm, 16 mm, Super 16 mm, 35 mm, Super 35 mm, or 70 mm film. Just as you would with motion-picture film stock, you choose your sensor size based on your budget, the depth of field, and the aesthetic look for your film. In general, the bigger the sensor, the more expensive the camera (just like 35 mm or 70 mm film); the smaller the sensor, the cheaper the camera. This is a generalization, because some higher-end cameras have smaller than full-frame sensors.
A full-frame sensor is approximately the same size as a single frame of 35 mm film from a traditional still film camera (Figure 1-1).
Any non-full-frame sensor is referred to as a crop sensor (Figure 1-2). These sensors vary in size but are smaller than a single frame of 35 mm film from a traditional still film camera.
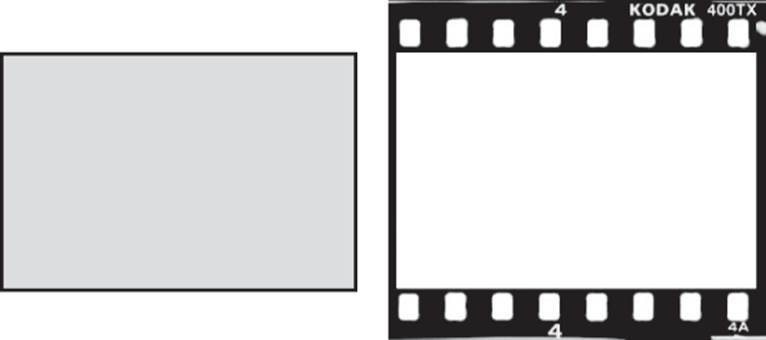
Figure 1-1: A full-frame sensor and 35 mm still film are the same size; the sensor area is 36×24 mm, or 864 mm2.
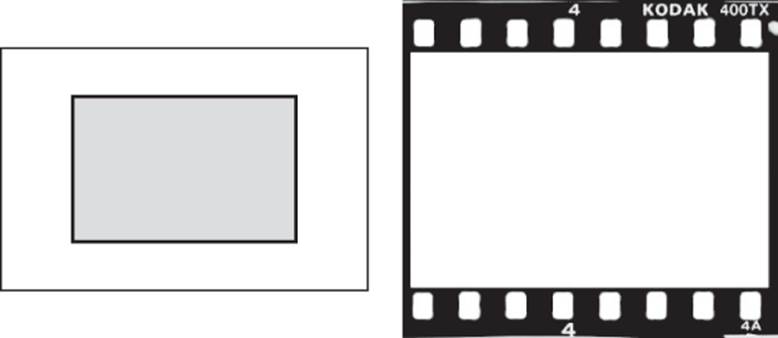
Figure 1-2: A crop sensor is smaller than 35 mm film. The Canon APS-C sensor area is 22.2×14.8 mm, or 329 mm2.
The sensor size affects the “grain” in your image, the light sensitivity, and the depth of field aesthetic for that camera. At the time of this writing, there are two dominant sensor sizes: full-frame sensors and APS-C crop sensors.
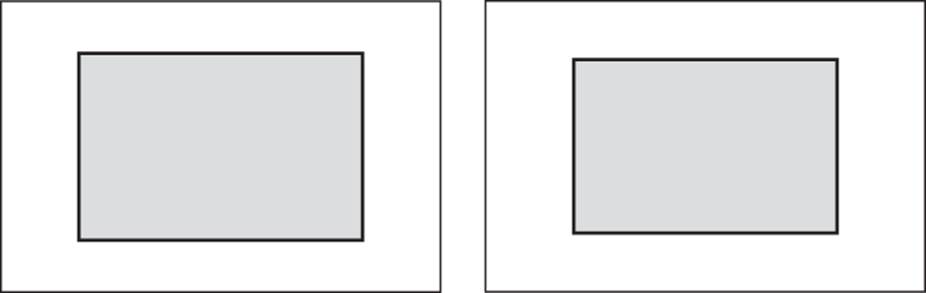
Figure 1-3: Nikon APS-C (left) vs. Canon APS-C sensor (right). The Nikon sensor is also used by Pentax and Sony. Notice that the Canon APS-C sensor is slightly smaller than the Nikon APS-C sensor.
APS-C is currently in all non-full-frame Nikon cameras and the Canon 7D Mark II, EOS 70D, and Rebel T5i. To make things slightly more confusing, there is a slight difference between the Canon APS-C and Nikon APS-C sensors (Figure 1-3): specifically, the Nikon APS-C sensor (22.2×14.8 mm, or 329 mm2) is slightly larger than the Canon version (~23.6×15.7 mm, or about 370 mm2).
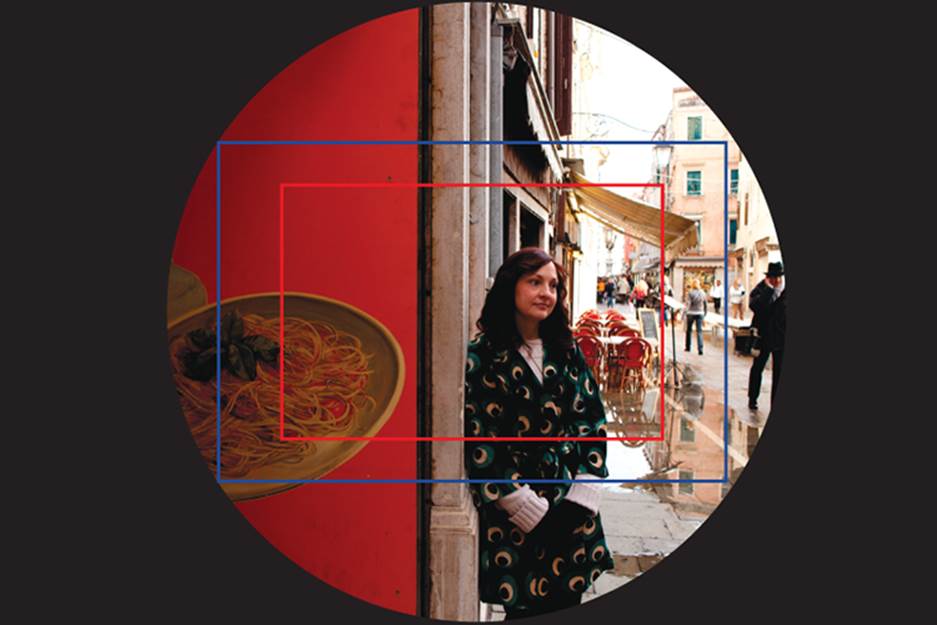
Figure 1-4: Field of view comparison between full-frame sensor (blue) and crop sensor (red)
If you are using a crop sensor, be aware of how this affects your lenses. When you’re shooting with lenses from traditional 35 mm film cameras, the field of view will not match up with the given focal length on the lens. This is due to the fact that the sensor is smaller than the area the lens would normally be filling when shooting with 35mm film or a full-frame sensor camera.
Some people say that the focal length will be changed when used on a crop-sensor camera, but that is not accurate. Standard still lenses were designed so that the field of view would cover the full frame of the 35 mm film (Figure 1-4). A crop sensor is smaller than a standard 35 mm film frame, and when a standard lens is used, the field of view is greater than what is captured on the sensor (Figure 1-5). This creates a magnification effect. For example, your 50 mm lens will have a narrower field of view. This does not in any way change the actual focal length of the lens, just how much of the area of view is captured (Figure 1-6).

Figure 1-5: Full-frame sensor captured with an 85 mm Zeiss lens
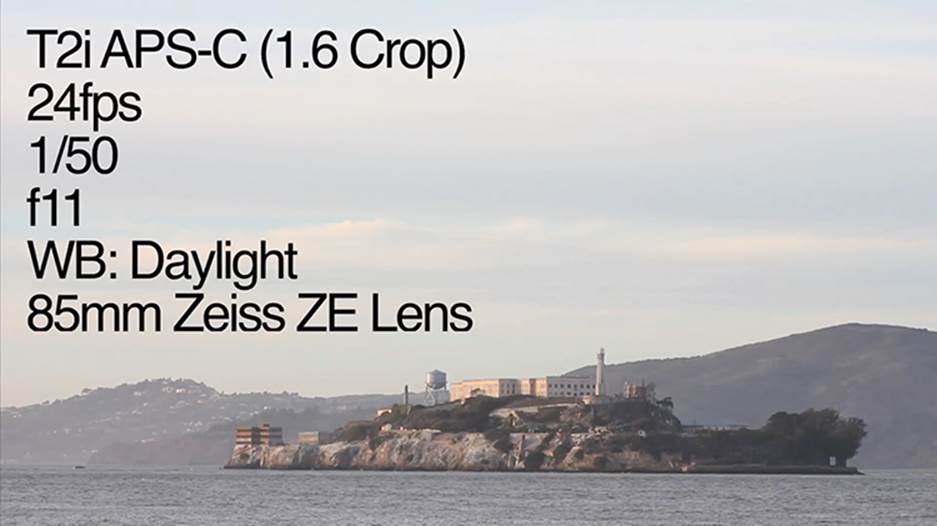
Figure 1-6: APS-C sensor in the same camera position with the same lens. Notice the magnification effect as compared to the full-frame image in the previous figure.
The various sizes of crop sensors have their own multiplication factor specific to that size of sensor; these are referred to as either the crop factor or the focal length multiplier. Specific crop factors range between 1.3 and 2 depending on the size of the sensor. The way the crop factor is determined is a simple division of the size of the sensor by a full frame. For example, a full-frame sensor is 36×24 mm, and a Canon APS-C sensor is 22.3×14.9 mm. Dividing 36 by 22.3, we get 1.614, which we round to 1.6. If you are using a standard 24 mm wide-angle lens on a 1.6 crop sensor, your field of view is more like what you get with a 38 mm lens than with a 24 mm lens. This can hurt you if you are shooting in a really tight location, because you may not be able to achieve a wide enough angle.
The APS-C crop sensor is almost identical in size to the standard 35 mm film that Hollywood uses. So, don’t get worried if you have a crop-sensor camera. Before you decide which camera you should buy, look at some footage from the cameras you are looking to shoot with and choose the one that best aesthetically matches the movie you want to make. Decide the speed of film (ISO on your camera) and the grain tolerance (sensor size), and choose as you would between standard film stock, Kodak Vision stock, and so on.
Full-frame sensors are, for a variety of reasons, the most desirable, and the Canon 5D Mark III and the Sony A7s are the two leading cameras in the DSLR space with full-frame sensors. The great part of the full-frame sensor is that traditional 35 mm film lenses retain their true focal length. If you have your trusty 35 mm or 50 mm lens (or any lens, for that matter), then there is no learning curve for what image you will get. It will look the same as when shooting still images.
A good thing to note when comparing a full-frame digital sensor to 35 mm still or motion-picture film is that a full-frame digital sensor is in fact larger than 35 mm film. In reality, a full-frame sensor is almost equivalent to a VistaVision frame (Figure 1-7).

Figure 1-7: VistaVision film frame (left) vs. 35 mm film frame (right)
VistaVision
VistaVision was created in 1954 at Paramount Pictures; 35 mm motion film stock is 24×36 mm, whereas the full-frame digital sensor is 36×24 mm.
In VistaVision, instead of recording an image horizontally from edge to edge of 35 mm motion-picture film, the image is recorded vertically, allowing a much larger area of the film stock to be used for each frame. The main benefit is a much higher-resolution image and the possibility of a much greater depth of field.
Because of the lack of speed of the film stock circa 1954, usually productions blasted the scenes with light to create a large depth of field and usually didn’t take advantage of the ability to have a narrow or shallow depth of field. Thus, if you watch VistaVision movies like Alfred Hitchcock’s North by Northwest, you won’t see a shallow depth of field because they lit everything with mega Hollywood lights. Because DSLR cameras are so sensitive, now for the first time filmmakers are able to shoot at narrow depths of field previously not seen on a mass scale.
Table 1-1 lists the dimensions of the most common DSLR sensors; Figure 1-8 compares those dimensions visually. Figure 1-9 compares various physical film sizes.
Table 1-1: Sensor dimensions
|
Sensor |
Dimensions |
Area |
|
35 mm full frame |
36×24 mm |
864 mm2 |
|
APS-H: Canon |
28.7×19 mm |
~545 mm2 |
|
APS-C: Nikon DS, Pentax, Sony |
~23.6×15.7 mm |
~370 mm2 |
|
APS-C: Canon |
22.2×14.8 mm |
329 mm2 |
|
Foveon (Sigma) |
20.7×13.8 mm |
286 mm2 |
|
Four-Thirds system |
17.3×13 mm |
225 mm2 |

Figure 1-8: Comparisons of sensor size
The major benefits of using a camera with a full-frame sensor are that it is more light-sensitive, creates less noise in your image, and offers the ability for a narrow depth of field.
1. More Light Sensitivity The reason that a camera with a full-frame sensor has more light sensitivity is simple—there’s more space for light to hit the sensor and bigger pixels collect more light (photons). The full-frame sensor has more than double the area of the APS-C crop sensor. The bigger (fatter) pixels catch more of the light than the smaller sensors.
2. Less Noise By having the larger pixels to catch the light, the camera doesn’t have to amplify them in order to match the same ISO from a smaller sensor. Think of it as blowing up your image. The larger the image you begin with, the less noise in your final print. The larger the sensor you start with, the less noise in your final footage.
3. Depth of Field Most filmmakers were never happy with the look of video. When HD came into existence, it was touted for its clear and sharp image. Many filmmakers didn’t like the look because it didn’t look cinematic. That all changed with the release of the first DSLR cameras. The ability to have a shallow depth of field and the more natural color rendering of flesh tones made HD video desirable to many filmmakers who previously disliked the look of HD video.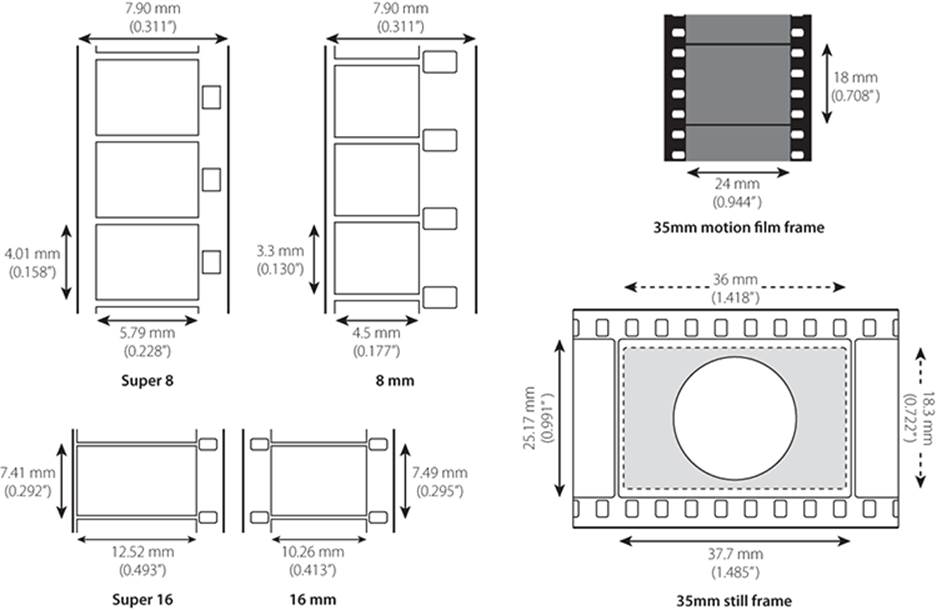
Figure 1-9: Various motion-picture film sizes
4. Depth of field is what we unconsciously think of when we want something to look cinematic. Look at your favorite movies to see how much you see of the background in any given shot. You will see that many scenes have a shallow depth of field where the background is more or less out of focus. With a traditional home video camera, you always have a deep depth of field, and when you view your footage, you will find that most things are in focus almost as far back as you can see. This is because sensors in home camcorders are small and the lenses are not fast so they have a bigger aperture than a DSLR camera.
The larger the sensor, the more shallow the possible depth of field; the smaller the sensor, the deeper the depth of field will be. Also, shooting at lower f-stops will cause a shallow depth of field vs. a higher f-stop on any sensor size.
With DSLR cameras, you can now create films just like Hollywood does. As a matter of fact, DSLR cameras have now been used to shoot major Hollywood film theatrical releases, many leading TV shows, and even many images you see when watching sports. You can choose a lens and paint with light just as filmmakers have since the dawn of the movie industry. And that is why shooting on a DSLR camera is revolutionary. We are making movies that look just those we have been watching for as long as the medium has existed.
Frame Rates
Current DSLR cameras offer a range of frame rates depending on which camera you buy or rent. Let’s talk for a moment about the standard frame rates in both film and video production. We call these frames per second (fps). These are the most common, or standard, frame rates:
1. 24 fps is the standard rate at which motion-picture film gets run through the camera. So, any movie that is shot on film that you see in the movie theater was shot at 24 fps and is the holy grail of the “film feel” of your footage.
2. 25 fps is the standard in most of the world (outside the United States and Japan) for video broadcast. This is close to the “film look” and was widely sought after in video cameras in the United States for filmmakers looking to get away from the 30 fps look of U.S. video cameras.
3. 29.97 fps is the standard for broadcast in the United States. Most people refer to this as 30 fps, but there is a huge difference between 30 fps and 29.97 fps when it comes to broadcasting or viewing your footage in traditional formats (that is, TV, DVD, VHS, and so on).
4. 30 fps is the standard more or less for web video. On the Web, there are no rules for frame rate. The Canon 5D Mark II originally was able to shoot only 30 fps and was limited to web-only video or complicated transcoding that doesn’t always work without problems.
5. Slow motion would be any frame rate greater than 30 fps. The two most common frame rates on DSLR cameras are 50 fps and 60 fps. This means you are recording double the number of frames as you would at 25 fps or 30 fps, and you can (in post) play these shots back at half speed smoothly, giving you slow motion.
fps and p vs. i
Many times fps is not listed next to your frame rate. Instead, you will see the frame rate of 24, 30, and so on, and either the letter i or the letter p will follow it. For example, if you want to shoot at 24 fps, you can select 24p, which stands for “24 frames per second progressive.”
When you see 60p vs. 60i, the p stands for “progressive,” and i stands for “interlaced.” Interlaced video records every other line, whereas progressive records a full-frame image. For example, 60p means you are recording 60 full-frame images each second, whereas 60i means you record half an image each second, so you end with a total of 30 full frames.
You might hear a few other terms related to frame rates. For example, NTSC stands for “National Television System Committee” and is the analog television system used in North America, South America, South Korea, Taiwan, Japan, Burma, the Philippines, and some other Pacific islands. NTSC has been the standard for more than 50 years in broadcast media in the United States and represents a 4:3 aspect ratio (think of the standard TV image, that is, non-wide-screen models) and a frame rate of 30 fps (also 29.97 fps). Both 30 fps and 29.97 fps are referred to when talking about NTSC. Although 30 fps was the initial standard for NTSC in 1941, in 1953 with the introduction of color television, the committee required a slight reduction in frame rate down to 29.97 fps. This reduction was needed because of visible interference with the chrominance signal and the sound signals over the airwaves. (In June 2009, the United States transitioned from analog to digital transmissions, and the new standard is called ATSC, which includes the digital formats 16:9 and 1920×1200 resolutions.)
ISO Settings
What is ISO? ISO represents how sensitive the image sensor is to the amount of light available. The higher your ISO, the more sensitive the image sensor is, thus increasing your ability to get shots in low-light situations. By raising your ISO rating to shoot with less light, you will be adding more noise or video grain into your image. Just note that often when you change one setting you are not changing just one thing—likely you are affecting something else by your choice. This is why it is critical to know all the basics and how they all interact so you can make sure you understand and predict what the end result will look like in the video image.
ISO is mostly an issue when you are shooting in low-light situations. If you are outside on a bright, sunny day or if you light your scene, you will be able to stay with a lower ISO. Think of ISO as a tool to help you capture an image if you aren’t in ideal conditions or if you don’t have enough lights to illuminate the scene.
Which ISO settings are available will differ from camera to camera.
If you have a still-film background, you may be more familiar with this being referred to as the ASA rating. ISO is the digital-photo equivalent of a film stock ASA rating.
As the famous quote states, “You can’t have your cake and eat it too.” There is a trade-off to high ISO settings: noise. When you boost your sensor’s sensitivity by selecting a higher ISO, you are enabling the camera to record a fainter light signal. By enabling the camera to record a fainter light signal, you, at the same time, are allowing the camera to record the fainter noise signal. Noise is defined as any signal that is not attributed to the light from the subject you are shooting. Noise appears as colored pixels usually most visible in the shadows and dark areas of your footage.
The sensor in your camera is an analog device and as such will create some noise itself in capturing your footage. This, coupled with the increased ability of the sensor to capture the light signal and noise signal, creates the visible noise in your captured footage. If you ever shoot high ASA film stock, then you have grain instead of noise; in general, film grain is acceptable, whereas digital noise is considered bad.
Your sensor size and camera manufacturer determine the range of ISO settings available on any given camera without being affected by noise (at least noticeable noise). The signal-to-noise ratio (or the S/N ratio) is the amount of light (signal) captured in relation to the amount of noise captured. This is why, in general, the larger the sensor, the less noise present in your footage. The reason for this is the number of pixels and their density on the actual sensor. Look at various camera models, and you will see that the manufacturer has placed a rating of 8 megapixels (MP), 10 megapixels, 12.1 megapixels, and so on for the sensor of those cameras (a megapixel is 1 million pixels).
This can be a bit deceiving, though, because it’s possible for two cameras—one that has a crop sensor and the other a full-frame sensor—to have the same megapixel count. In this case, the manufacturer has crammed the same number of pixels on the smaller sensor as on the larger sensors. This causes the pixels to be much closer together and affects how much signal (light) can be captured through each pixel. For instance, consider an 18 MP Canon 7D (Canon APS-C sensor) and a 16 MP Canon 1D Mark IV APS-H. You might think that because the 7D has more megapixels, it would yield a better image. Actually, the 1D Mark IV, with only a 16 MP count, will yield a better (less noisy) image because the pixels are less densely packed on the larger sensor.
So, you cannot look just at the megapixel count; you also need to look at the sensor size and the density of the pixels in the camera you want to use. The best possible situation is a full-frame sensor with a high megapixel count. If you are looking at cameras that share the same sensor size but have different megapixel counts, you may want to rent both cameras and shoot some footage to test the noise signals and see which one gives you the better image for your project.
Features of SLR Lenses
The lens is the “eye” of your camera; what is captured in the lens is what will end up on the screen. Shooting with a DSLR opens up the world for most videographers who were limited by a single lens or complicated adaptations, and filmmakers are curious to see how a familiar lens interacts with the new system.
Because the choice of lens is the single most important decision you will have to make for every single shot, it is important to start with the relevant basics. Here we will talk about the lens choices and how they affect your final footage.
Aperture, f-stops, and t-stops
Aperture (the measure of the space that light passes through in the lens) is measured in f-stops. An f-stop is a ratio or fraction, so smaller numbers mean more light. Often lenses are considered fast or slow: a lens with a low-numbered minimum f-stop is considered a fast lens because it allows in more light (or, put another way, you can use a faster shutter speed). A lens with a large minimum f-stop number is considered a slow lens.
The sequence of f-stops follows an unusual pattern; this is a typical sequence:
1. f/1.0, f/1.4, f/2, f/2.8, f/4, f/5.6, f/8, f/11, f/16, f/22, f/32, f/45, f/64
Each stop represents a change of half the size greater or lesser than the adjacent aperture; so, f/2.8 lets in twice as much light as f/4.
The reason for these apparently strange numbers is that the aperture opening is essentially a circle, so each successive f-stop is calculated by dividing by the square root of 2.
There are also half-stop and third-stop calculations, which allow for even greater control of the amount of light passing through the aperture opening and the exposure. If you see other numbers between the standard full stops, these represent half or third stops.
An f-stop is a geometric calculation between focal length and aperture, but light can be lost within the lens or optics. This loss will usually be more apparent with zoom lenses or when shooting with multiple lenses. The determination of a t-stop is used to handle this loss of light within a camera system. A t-stop is a “true” stop or “transmission” stop and measures exactly how much light is making it through the lens to the sensor. A t-stop is a simple measurement of actual light and deals only with exposure, not depth of field. In general, t-stops will not be an issue, but certain lenses are calibrated in both f-stops and t-stops.
Cine-Style Lenses vs. Photo Lenses
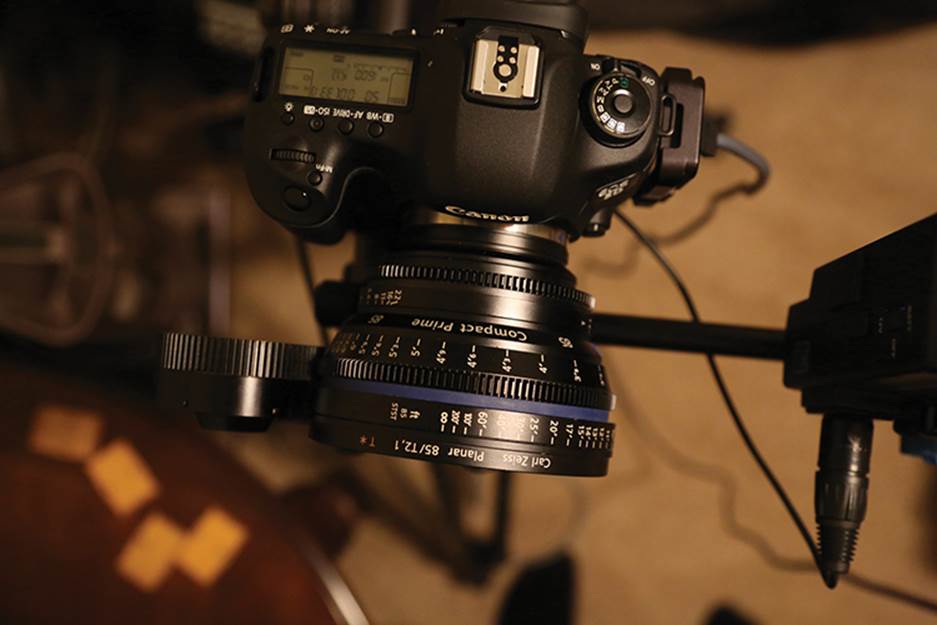
Cine lenses were lenses originally designed with the goal of the recorded image being projected in a theater. A good cine lens is designed to be incredibly sharp and has amazing glass that transmits light nearly flawlessly with high resolution and often low contrast. Cine lenses were also designed to fit a 35 mm movie film print, so if these lenses are used on a DLSR camera (Figure 1-10)—where the sensor is larger than 35 mm motion-picture film—vignetting will occur. Also, cine lenses may be marked with t-stops instead of f-stops.
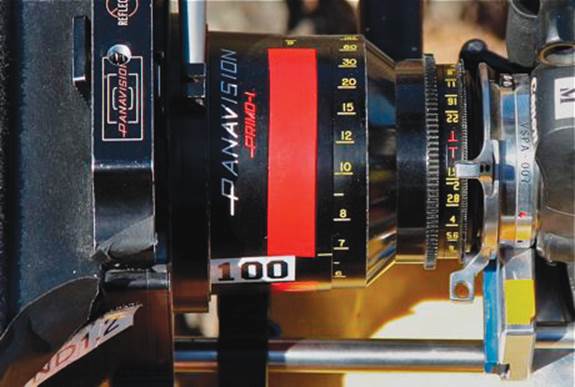
Figure 1-10: A cinema-style lens on a DSLR camera
One of the main differences of cine lenses from traditional still photography lenses is that cine lenses are matched sets optically: they have matching t-stops, barrel size, focal length, and back focus throughout the set of lenses. This means there is no change from lens to lens when switching from one cine prime lens to the next. Still lenses are not always matched, and the f-stops, barrel sizes, focal lengths, and so on can change from lens to lens. Another feature of a cine lens is properly calibrated marks for distance, and on cine lenses there are usually more than on a still lens.
A cine lens is designed with focus in mind and has focus gearing. The lens has a wider and smoother range of movement from one focus point to another than a still lens. This increased turning distance is necessary for various focus changes within a shot. A cine lens is designed so that it can be manipulated by a second person and can be done with extreme accuracy because focus is even more crucial when the image is going to be projected in a theater.
A cine lens also has internal focus. As you obtain focus, the lens front does not move forward because cine lenses utilize internal focusing. Cine lenses do not “breathe” much, or at all, as you focus.
“Breathing” Lenses
This phenomenon happens in some lenses (both prime and zoom lenses): when you focus the image, it temporarily appears to expand and reduce. If you are doing a rack focus from a foreground image to an image in the background and you have a lens that breathes, you will not get a smooth rack focus from the foreground to the background. The only way to find out whether your lens breathes is to do a rack focus and see if it does it.
Some cine lenses may still have slight breathing problems, and some photo lenses won’t breathe. Testing is always critical because breathing is more apparent when the image is projected.
Cine lenses also do not have “hard clicks” and have a step-less aperture for f-stops. This feature means that you can set the f-stop exactly at the level where it needs to be with no need to move to the next level in order to get close.
“Hard Click” for f-stop
Most still-camera lenses have spring-type mechanisms that click as the aperture setting of the lens is turned. The click indicates that the next f-stop setting or step has been reached, and the f-stops are generally accurately set. Importantly for moviemakers, this also means that only the preset f-stops can be used.
In Chapter 4, “Cameras and Lenses on Location,” we’ll tell you how to “de-click” a lens.
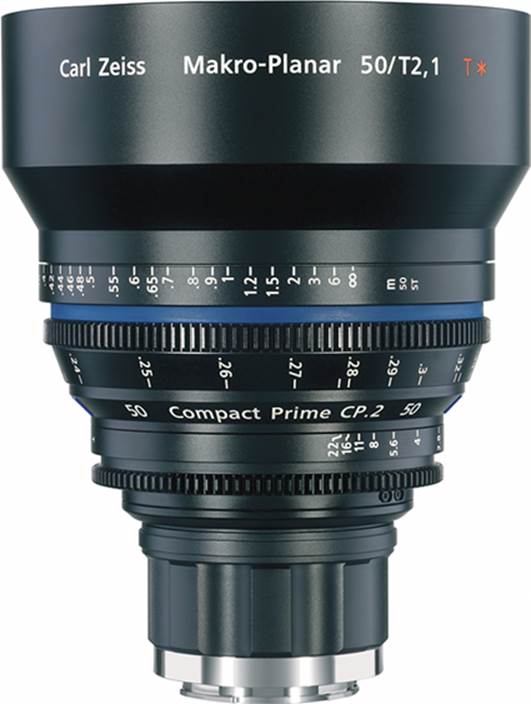
Figure 1-11: Zeiss CP.2 lenses are modified still lenses that are housed in a cinema-style body that allows for measurements on both sides of the lens and a longer focus throw for better focus pulling.
Lenses can be put into cine-style casings (Figure 1-11), or you can get a cine-style lens that is easier to use when shooting video. A real cine lens is more expensive than a comparable still lens. Cine lenses are also quite heavy and can feel cumbersome to use, especially if used with added matte boxes or other accessories.
Photo or still lenses are and should be used for DSLR video because they give you great results. The advent of high-quality DSLR cameras and options for the filmmaker has opened the floodgates on lenses that can be used. Traditional still lenses are now being used to shoot movies. There are some noteworthy differences between a cine-style lens and a still lens.
In general, the focus and zoom on photo lenses are designed for quick adjustments for stills. The movement is not going to be incorporated into the shot either with a zoom or with a focus change, so the focus and zoom on a still camera can sometimes be too sensitive for easy motion on video. This means the focus on a still lens may change drastically by moving the focus ring only a small amount. This small amount of movement can make pulling focus and smooth zooming difficult but not impossible. Some photo lenses also have the focus, zoom, and aperture ring set in the opposite direction of a cine lens and so shifting between lenses forces you to shift more gear around or mentally take note of the shift. Some still lenses rely on the camera settings to make aperture changes, which limits the aperture range that can used for the shot. So just like with cameras you need to use trial and error to find the exact lens or lenses you want to use for the long run.
“Hard Stop” for Focus
A hard stop occurs when the lens will not spin any further. Cinema lenses or high-quality still lenses like Zeiss ZE or ZF lenses will not spin around forever. They have a hard stop at infinity and the other end of their focus ring. This provides the ability to accurately predict your lens when pulling focus.
Types of Lenses
Most films are shot using a combination of lenses. The combination of lenses you choose will depend on a number of factors. These include availability, desired look and effect, budget, and location parameters. Some combination of primes and zooms will be used on most DSLR shoots.
Prime Lenses
Prime lenses are lenses with a fixed focal length; this means each lens has a single angle of view. It is this angle of view that categorizes what type of prime lens it is.
You will often hear the phrase “a set of primes,” and that just means a multitude of prime lenses. There is no standardized set of prime lenses; rather, a set of primes is a collection of lenses of various highly used and versatile focal lengths (Figure 1-12). The goal in choosing a set of primes is to allow for desired shots in a variety of locations and situations.
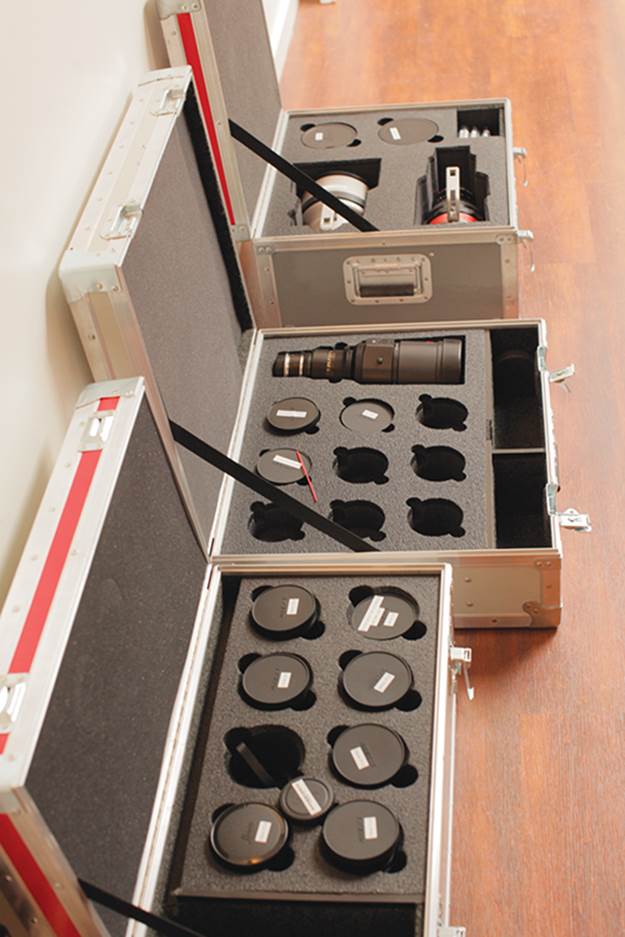
Figure 1-12: A set of Leica R prime lenses
If you have no prime lenses and you want to start with three lenses, it would behoove you to grab a wide-angle lens, a “normal” lens, and a portrait or telephoto lens. This gives you a range to work with. With this said, you should move your focal lengths farther away from each other. For instance, don’t buy a 35 mm for your wide, a 50 mm for your normal, and an 85 mm for your portrait lens. These focal lengths are so close together you don’t get much variety. You would be better off with something like a 24 mm for your wide, a 50 mm for your normal, and a 100 or 135 for your portrait/telephoto lens. Again, these are guidelines and not hard and fast focal lengths you should buy. Some of what you need is dependent on what you are shooting.
Zoom Lenses
Zoom lenses (Figure 1-13) are lenses that have a range of focal lengths and angles of view available in a single lens. The zoom range refers to these lengths; for example, an 18–70 mm lens will cover the focal lengths between 18 mm and 70 mm. Zoom lenses are named based on the ratio of their longest to shortest focal lengths or their magnification factor.
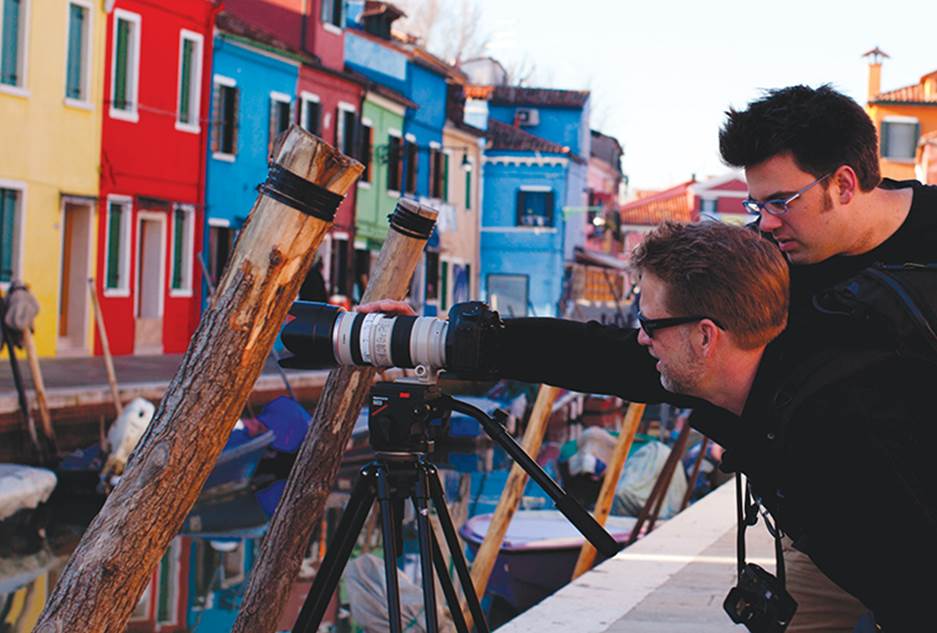
Figure 1-13: Canon 70-200 2.8 IS zoom lens on the set of The Shamus in Burano, Italy
The other major factor on a zoom lens is aperture and whether the lens has a variable aperture or a fixed aperture. A variable-aperture lens means that the f-stop will change depending on the focal length the lens is set at or zoomed to. If you have a lens that is a 28–135 mm f/3.5–5.6, the range of f-stops indicates that it is a variable-aperture lens: at 28 mm wide, the f-stop can be 3.5, but when the lens is zoomed to 135 mm, it can be opened up only to f/5.6.
A fixed-aperture lens allows you to set the aperture or shoot at the lowest f-stop the lens will allow at any focal length.
One drawback of zoom lenses is that they can be large and heavy. If size and weight are of the utmost importance to you, then you might want to not use or at least minimize the use of zoom lenses on your shoot.
Categorizing Lenses Based on Angle of View
Lenses are often broken down into categories based on the focal length’s interaction with the angle of view. The angle of view, or field of view, is determined by the focal length and the dimension of the image format, which in a 35 mm film shoot is the size of a frame; for a DSLR, this correlates with the sensor size.
1. Extreme wide-angle lenses are typically in the 8 mm to 16 mm range.
2. Wide-angle lenses are typically in the 16 mm to 35 mm range.
3. Normal lenses are typically in the 35 mm to 80 mm range.
4. Telephoto lenses are typically in the 80 mm to 200 mm range.
5. Super telephoto lenses are typically in the 200 mm to 800 mm range.
Specialty Lenses
Specialty lenses are increasingly being used in DSLR productions. Often they were limited to big-budget feature films that had the luxury of time and budget to include elaborate shots. Now DSLR filmmakers can easily rent, buy, or borrow these lenses to achieve unique looks in their productions.
1. Macro Lenses These are lenses designed for close focusing and for getting close to the subjects they are recording. They are typically used for small items or items where tiny details are crucial. The depth of field is limited, which allows the subject that is the focus of the shot to be prominent.
2. Fish-Eye Lenses These are ultra-wide-angle lenses that result in an extremely wide hemispherical image. They are deliberately distorted and have a view up to 180 degrees.
3. Tilt/Shift Lenses These are distinctive because they move side to side (laterally) and up and down (vertically) while allowing for a coherent image to be captured with the sensor.
The Tilt
With a normal lens, the sensor plane and the plane of focus are parallel to each other (Figure 1-14).
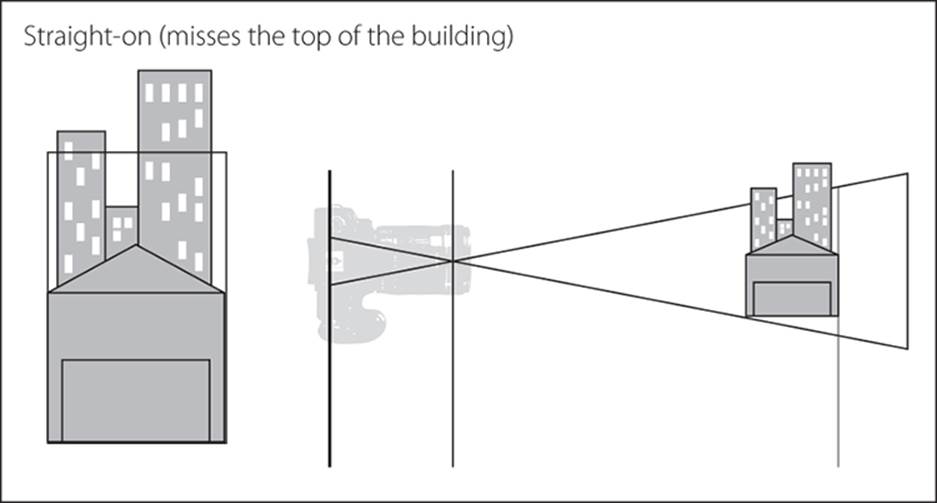
Figure 1-14: Angle of standard lens to a building that cannot fit entirely in the frame
Tilting the lens and moving it to the side allows the plane of focus to be at an angle to the camera instead of perpendicular to it. This means you can change the plane of focus in relation to the sensor and you can have more control of what is in focus in a given shot (Figure 1-15).
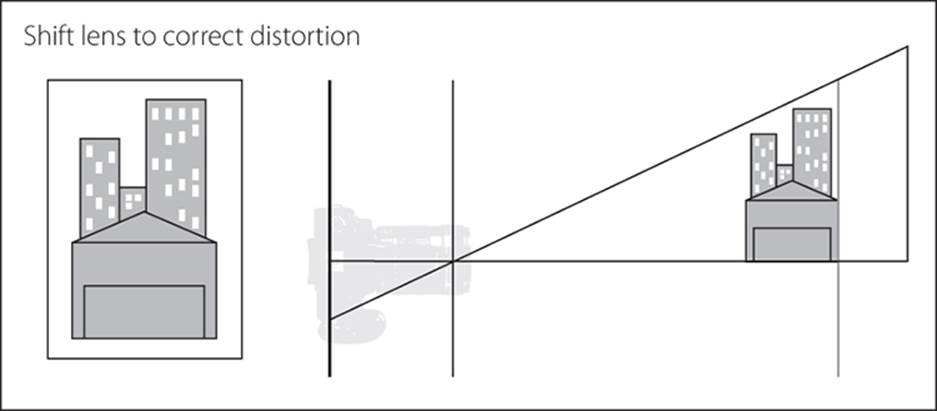
Figure 1-15: The angle of a tilted lens to the same building; notice how the entire building is in the frame with the lens correction.
The Shift
By shifting, or moving laterally, the lens, you have control of the relationship between the image plane and the subject plane. Shift lenses allow you to move the centerline without moving the camera or changing the angle of the camera or perspective of the image (Figure 1-16).
The lens elements are still parallel to the sensor/film, but they are no longer directly in front of the sensor/film (Figure 1-17).
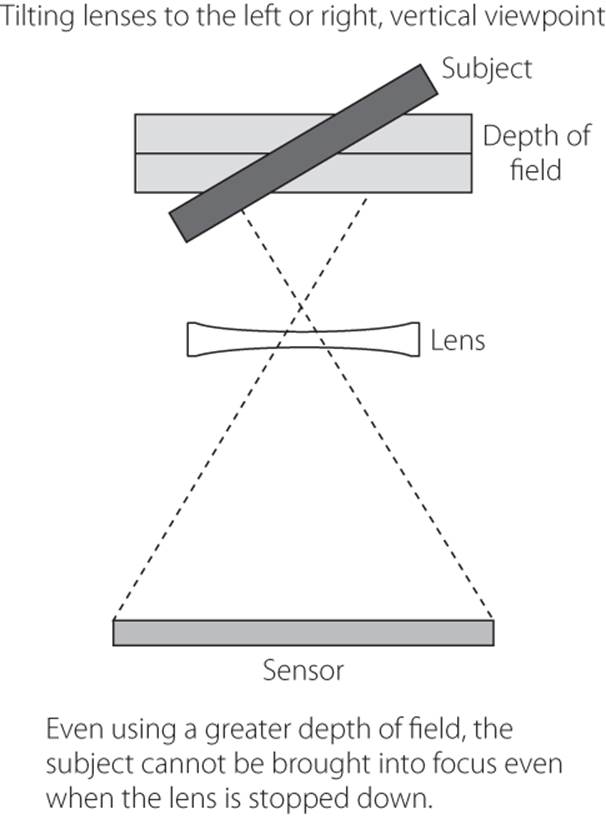
Figure 1-16: The plane in relation to the camera and the shifted lens
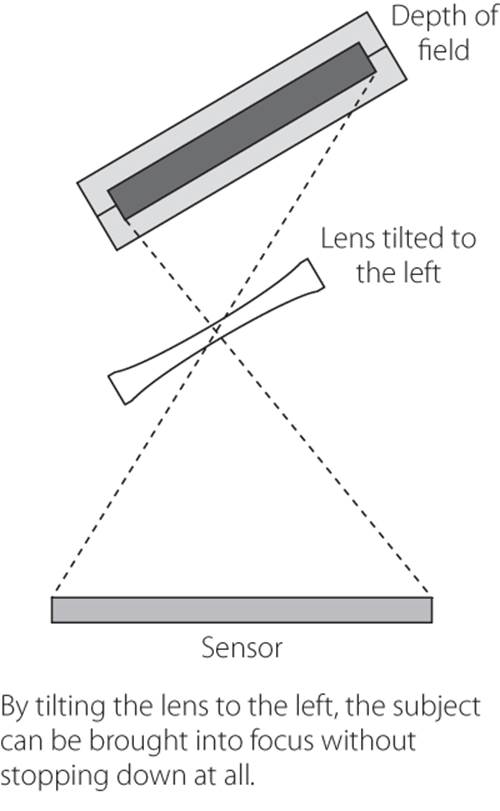
Figure 1-17: The lens is to the side of the center of the camera.
In addition to allowing for special-effect shots such as miniaturization, tilt shift lenses have a utilitarian purpose. Tilt movements allow you to obtain a wide depth of field even at the maximum aperture and still keep the entire subject in focus. Shift movements correct the trapezoidal effect seen in pictures taken of tall objects so as not to distort the subject. This can be helpful when using your DSLR camera in low-light situations.
Lensbaby, Subjectiv, and Loreo Lenses
These kinds of lenses are used for various special effects. The effects include pinhole, multi-element anachromatic, some unique tilt functions, and selective focus. These special-effect lenses are used for shots where a distinctive look is the goal, and they have specialized components and construction.
Anamorphic Lenses
Anamorphic lenses are often used with DSLR filmmaking to achieve unique lens flare and bokeh. An anamorphic lens is designed to “squeeze” a widescreen image onto the sensor and must be “unsqueezed” in post to be viewed correctly. When you use an anamorphic lens, your horizontal image will be up to two times wider than a standard 16×9 frame so you will have letterboxing on the top and bottom of your image. This process creates an interesting look and effect on the footage.
How Sensor Size and Lenses Interact
One of the major options for DSLR cameras is sensor size, and one of the factors to take note of is how sensor size affects lens choice or usage. Here we will split the sensors into two rough categories: full-frame sensors and crop sensors. The format—that is, the sensor—changes either in relation to 35 mm or because various cameras have different size sensors. The sensor size affects how a lens will work with that particular format, so lenses that you are accustomed to working with in a different format may behave differently than you think. The change can be compared to moving from a standard 35 mm still camera to a medium-format camera or moving from 35 mm film to 16 mm but still using the same lenses on each camera body.
Film movie cameras have always had lenses designed specifically for their format, but with DSLRs, the lenses can be used on different formats and in many cases interchangeably. Additionally, a 35 mm movie frame is a different size than the DSLR formats, most dramatically with a full-frame sensor camera, so the lenses may not behave as you envision. When comparing the size of a DSLR sensor to 35 mm, most people mean in the context of the 35 mm being the size of a 35 mm film frame taken with a still camera, not a movie camera, because that is where most of the lenses for these cameras originated; ultimately, the cameras are both still cameras and video cameras. The great news is that camera manufacturers are meeting the demand for lenses, and lenses are manufactured with sensor size/format type in mind.
Canon makes an EF-S series of lenses specifically for the APS-C sensor size. EF-S lenses are designed to provide a narrower field of view (sometimes referred to as a light cone) to match the smaller sensor, allowing the actual focal length to be achieved on crop-sensor cameras. The main benefit is that wide-angle lenses actually stay wide angle instead of the 1.6× that a regular lens would have. EF-S lenses are a bit more expensive, and you might have a hard time finding used lenses of the EF-S series. Nikon makes a DX lens for its APS-C sensor; however, they make only a limited number and are mostly consumer zoom lenses.
Focal Length Multiplication Factors
In an effort to figure out how the different lenses work with different size sensors, you can look to focal length multiplication factors. The focal length multiplier (FLM), or sometimes format factor, is stated as a ratio between the size of the sensor and the size of 35 mm still film.
A full-frame sensor is the same size as a 35 mm film still, so its FLM is 1. A larger FLM indicates a smaller sensor and vice versa. Table 1-2 shows some of the most common FLMs.
Lenses are designed with a minimum FLM. A full-frame lens is designed for an FLM of 1 but can be used with smaller sensors, such as those with an FLM of 1.5. However, a lens with an FLM of 1.5 cannot be used on a full-frame camera.
Table 1-2: Common focal length multiplication factors
|
Model |
Factor |
|
Nikon DX |
1.5 FLM |
|
Canon APS-C |
1.6 FLM |
|
Olympus Four-Thirds chip |
2 FLM |
|
Panasonic Four-Thirds chip |
2 FLM |
|
Canon APS-H |
1.3 FLM |
|
Olympus micro 4/3 |
2.0 FLM |
|
Panasonic micro 4/3 |
2.0 FLM |
Focal Length and Field of View
What do you do with these multiplication factors? You multiply them by the given focal length of the lens to determine the field of view (see Figure 1-18).
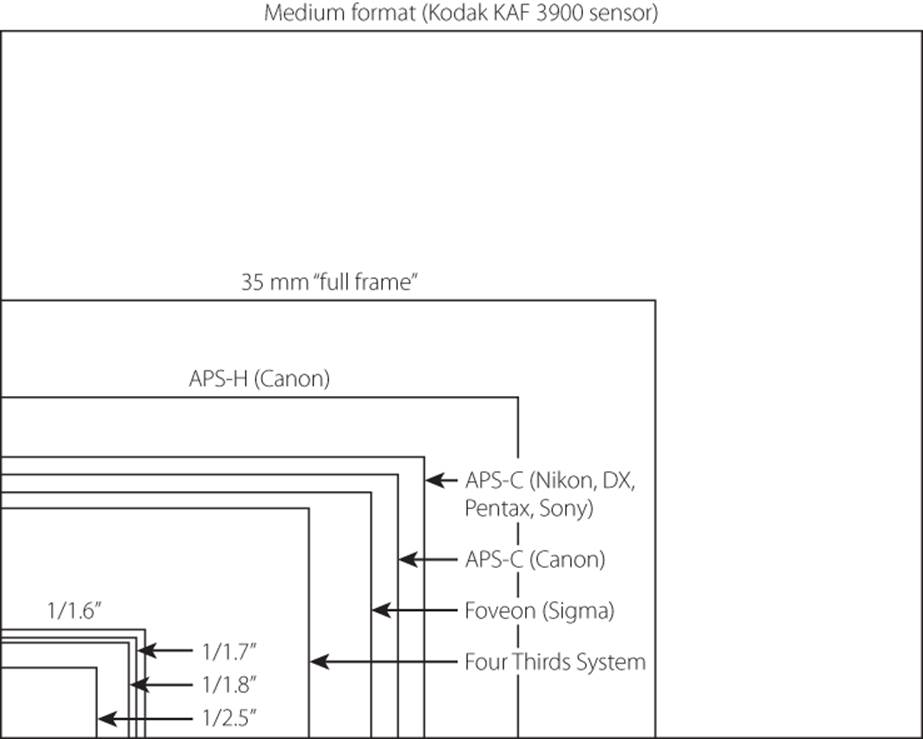
Figure 1-18: Common video sensor sizes and how they visually compare to the other available sensors
Focal length is a measurement of the distance from the lens, specifically a point of the lens called the nodal point, to the focal plane when the lens is focused on an object set at infinity. The focal plane is inside the camera at the point where the light rays are brought back into the lens to form a point. Practically speaking, this measurement is gauging the capacity of the lens to bend the light back to a point where it will hit the sensor. This measurement is made inside the lens casing, and lenses are labeled by their focal length measurements (Figure 1-19).
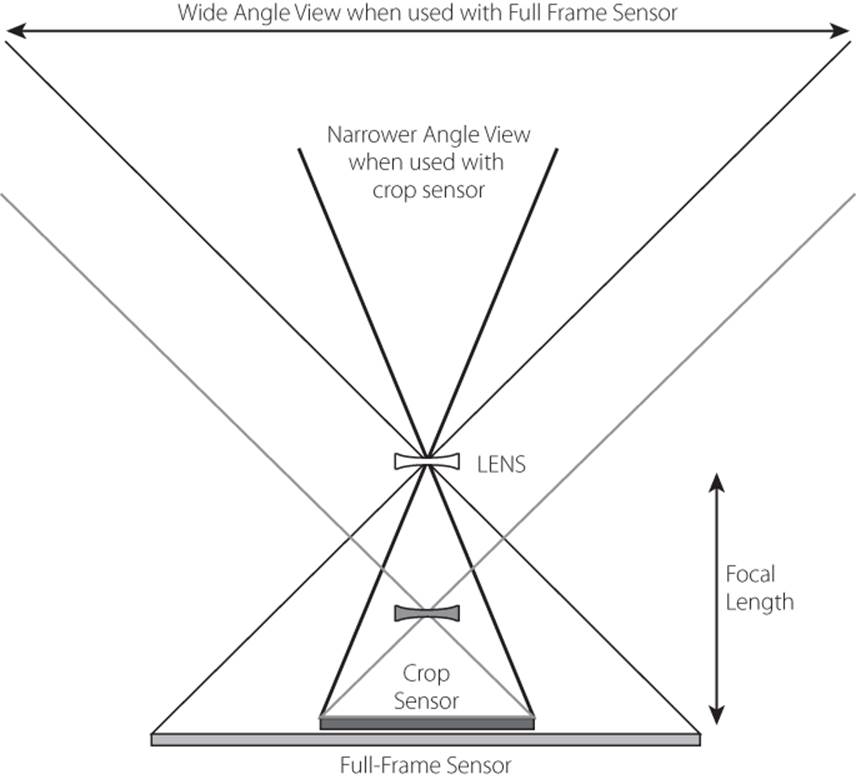
Figure 1-19: Focal plane of full-frame and crop-sensor camera
The focal length is an indicator of the angle of view of the lens and the perspective of the shot. In simple terms, it measures how much the lens can see in a given area or how much of the scene will be in the shot. For a given sensor size, a longer focal length will generally provide a narrower field of view.
For instance, looking through a 50 mm lens on a 1.6 crop-sensor camera yields a field of view that is equivalent to 80 mm on a full-frame body or on 35 mm film (50 × 1.6 = 80). With a 1.6 FLM, in order to achieve the “normal” field of view traditionally seen through a 50 mm lens on a full-frame/35 mm film, you must use a 30 mm lens. Multiply the 1.6 crop factor by the focal length 30 mm, and you get the equivalent 48 mm field of view . . . close enough.
Because of the explosion of digital photography and the popularity of smaller camera sensors, manufacturers have begun to develop lenses that are exclusively designed for specific sensor sizes of digital SLRs. In general, a DSLR with a smaller sensor size can use a lens that was designed for a larger sensor size but not vice versa.
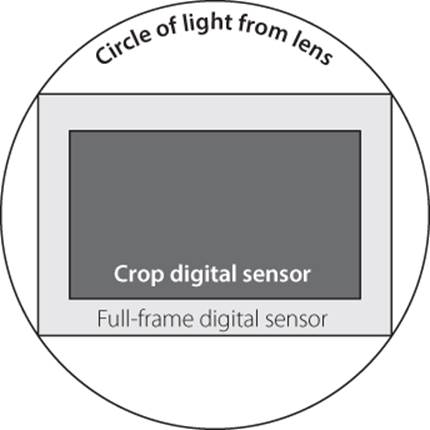
Figure 1-20: Field of view circle with sensor sizes
The size of the camera’s sensor determines the field of view in the recorded image. Most lenses used on DSLR cameras cast a light circle that is intended to cover a full-frame sensor/35 mm negative. Since crop sensors are actually smaller than a 35 mm negative, the sensor captures a smaller portion of the light circle that is covered by a full-frame sensor. Figure 1-20 is a rough illustration. By capturing a smaller area of light, the field of view that is recorded in the picture has the appearance of having been cropped from the center of a 35 mm photograph.
It is important to note that sensor sizes do not change the actual focal length of a lens. A 50 mm lens will always be 50 mm no matter what the sensor size is of the camera being used. A crop sensor simply changes the field of view in an image taken at a given focal length.
Angle of View and Magnification Factor
Angle of view is defined as the angle that fills the frame (of any format) of a still or motion-picture camera. The actual angle of view is determined by the film format (35 mm, 16 mm, full-frame sensor, crop sensor, and so on) in relation to the focal length of the lens (50 mm, 28 mm, 200 mm, and so on), not the focal length on its own.
As previously stated, the size of a DSLR’s sensor affects the viewing angle of any given lens. The angle of view is thus magnified on most DSLR cameras since the majority of DSLR cameras use sensors that are smaller than the 35 mm format.
Compare a standard 35 mm film camera equipped with a 35 mm lens to a digital SLR with a sensor size of 22.5×15.0 mm. The DSLR’s image sensor is smaller than the full-frame 35 mm camera’s film area by a focal length multiplier of 1.6. This means the 35 mm lens translates essentially to a lens of 50 mm (35 mm × 1.6 = 56 mm) when used on this particular DSLR.
The angle of view of a lens is proportional to the sensor size. The smaller the format, the shorter the focal length needs to be for any given angle of view.
The magnification factor affects wide-angle lenses as well; thus, it’s challenging for a digital photographer or cinematographer to find a wide-angle lens that is truly a wide angle when dealing with a smaller sensor size. When translated by the multiplier, most wide-angle lenses offer only a standard angle of view. For example, an 18 mm lens would be extremely wide on a full-frame camera but has an effective focal length of 28 mm, or moderate wide angle, on a DSLR.
The term crop is commonly used to describe the alteration of angle of view: the imaging area is physically smaller. If you look at the image circle projected by the lens, less of the total area is used. However, crop is more than a simple angle-of-view change.
The image remains the same size at the film plane for a given lens and subject distance; it is not magnified. However, it does take up a larger proportion of the (smaller) frame. It is easy to see why some people refer to it as a magnifying effect.
Small sensor sizes have other big advantages when it comes to telephoto lenses. You can achieve a 300 mm telephoto angle of view, using a camera with a 1.5 FLM, by using a smaller-focal-length lens. You can use a 200 mm telephoto lens and get in effect a 300 mm image. Therefore, you can buy telephoto lenses that are less expensive and lighter weight.
Tele-extenders
You can use a tele-extender to increase the focal length of your lens. To use a tele-extender, you must have a lot of light available because you lose from one stop to two stops of light when using one. By using a crop sensor and lens, you don’t lose any stops to achieve the same focal length image.
All materials on the site are licensed Creative Commons Attribution-Sharealike 3.0 Unported CC BY-SA 3.0 & GNU Free Documentation License (GFDL)
If you are the copyright holder of any material contained on our site and intend to remove it, please contact our site administrator for approval.
© 2016-2026 All site design rights belong to S.Y.A.