The Android Developer’s Cookbook: Building Applications with the Android SDK, Second Edition (2013)
Chapter 1. Overview of Android
The Android operating system (OS) has come a long way since the announcement of the Open Handset Alliance in late 2007. The idea of an open source OS for embedded systems was not new, but Google’s aggressive backing of it has definitely helped push Android to the forefront in just a few years.
Many wireless carriers in multiple countries across various communication protocols have one or more Android phones available. Other embedded devices, such as tablets, netbooks, televisions, set-top boxes, and even automobiles, have also adopted the Android OS.
This chapter discusses various general aspects of Android that are useful for developers. It provides a foundation for the creation of Android applications and a context for the recipes in the rest of this book.
The Evolution of Android
Google, seeing a large growth of Internet use and search with mobile devices, acquired Android, Inc., in 2005 to focus its development on a mobile device platform. Apple introduced the iPhone in 2007 with some groundbreaking ideas, including multitouch and an open market for applications. Android was quickly adapted to include these features and to offer definite distinctions, such as more control for developers and multitasking. In addition, Android incorporated enterprise requirements, such as exchange support, remote wipe, and virtual private network (VPN) support, to go after the enterprise market that Research In Motion had developed and held so well with its BlackBerry models.
Device diversity and quick adaptation have helped Android grow its user base, but such growth comes with potential challenges for developers. Applications need to support multiple screen sizes, resolution ratios, keyboards, hardware sensors, OS versions, wireless data rates, and system configurations. Each can lead to different and unpredictable behavior, but testing applications across all environments is an impossible task.
Android has therefore been constructed to ensure as uniform an experience across platforms as possible. By abstracting the hardware differences, Android OS tries to insulate applications from device-specific modifications while providing the flexibility to tune aspects as needed. Future-proofing applications to the introduction of new hardware platforms and OS updates is also a consideration. This mostly works as long as the developer is well aware of this systematic approach. The generic Application Programming Interfaces (APIs) that Android offers and how to ensure device and OS compatibility are main threads discussed throughout this book.
Still, as with any embedded platform, extensive testing of applications is required. Google provides assistance to third-party developers in many forms as Android Development Tools (ADT) plugins for Eclipse (also as stand-alone tools), including real-time logging capabilities, a realistic emulator that runs native ARM code, and in-field error reports from users to developers of Google Play applications.
The Dichotomy of Android
Android has some interesting dichotomies. Knowing about them up front is useful for understanding not only what Android is, but what it is not.
Android is an embedded OS that relies on the Linux kernel for core system services, but it is not embedded Linux. For example, standard Linux utilities such as X Windows and GNU C libraries are not supported. Android applications are written using the Java framework, but Android is not Java. Standard Java libraries such as Swing are not supported. Other libraries such as Timer are not preferred; they have been replaced by Android’s own libraries, which are optimized for usage in a resource-constrained, embedded environment.
The Android OS is open source, which means developers can view and use any of the system source code, including the radio stack. This source code is one of the first resources for seeing examples of Android code in action, and it helps clarify the usage when documentation is lacking. This also means developers can use the system in the same way as any core application and can swap out system components for their own components. However, Android devices do contain some proprietary software that is inaccessible to developers (such as Global Positioning System (GPS) navigation).
Devices Running Android
Worldwide there are hundreds of Android devices on the market from many manufacturers, including phones, tablets, televisions, car stereos, exercise equipment, and accessories. Software can access information on the target device using the android.os.Build class, for example:
if(android.os.Build.MODEL.equals("Nexus+One")) { ... }
All Android-supported hardware shares some common features due to the nature of the operating system. The Android OS is organized into the following images:
![]() Bootloader—Initiates loading of the boot image during start-up
Bootloader—Initiates loading of the boot image during start-up
![]() Boot image—Kernel and RAMDisk
Boot image—Kernel and RAMDisk
![]() System image—Android operating system platform and apps
System image—Android operating system platform and apps
![]() Data image—User data saved across power cycles
Data image—User data saved across power cycles
![]() Recovery image—Files used for rebuilding or updating the system
Recovery image—Files used for rebuilding or updating the system
![]() Radio image—Files of the radio stack
Radio image—Files of the radio stack
These images are stored in nonvolatile flash memory, so they are protected when the device powers down. The flash memory is used like read-only memory (hence, some call it ROM), but it can be rewritten as necessary (for example, with over-the-air Android operating system updates).
On start-up, the microprocessor executes the bootloader to load the kernel and RAMDisk to RAM for quick access. The microprocessor then executes instructions and pages portions of the system and data images into RAM as needed. The radio image resides on the baseband processor, which connects to the radio hardware.
A comparison of some of the early and more recent smartphone models is shown in Table 1.1. It shows that the processing hardware architecture is similar across devices: a microprocessor unit (MPU), synchronous dynamic random access memory (SDRAM or RAM for short), and flash memory (called ROM for short). The screen size is given in pixels, but the dots per inch (dpi) vary depending on the physical screen size. For example, the HTC Magic has a 3.2-inch diagonal screen with 320×480 pixels. This equates to 180 pixels per inch but is classified as a medium-pixel-density device by Android (which averages 160 dpi). All smartphones also offer a CMOS image sensor camera, Bluetooth (BT), and Wi-Fi (802.11), although there are variations.
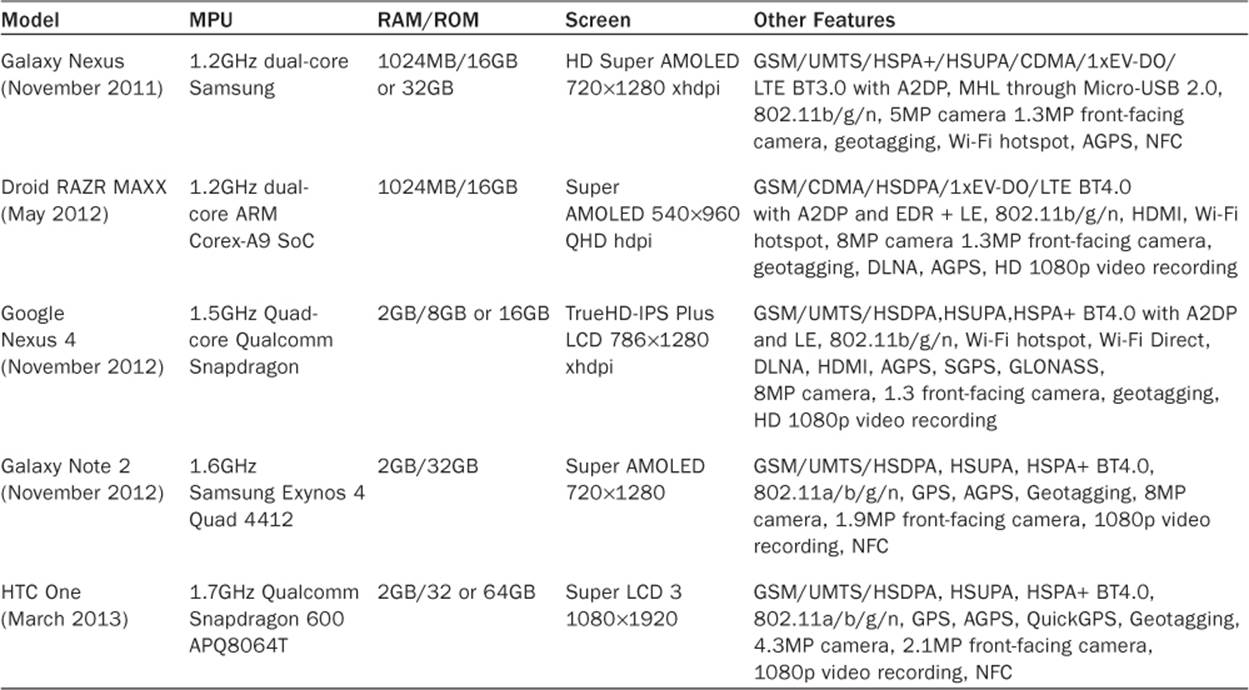
Table 1.1 Representative Android Smartphones*
*Data from http://en.wikipedia.org/wiki/Comparison_of_Android_devices and http://pdadb.net/
Other than improved capacity and performance on newer models, another main differentiator is additional features. Some devices offer 4G; some have FM or additional cellular radios, video output (through HDMI or micro-USB), and a front-facing camera. Knowing the differentiators helps a developer create great applications. In addition to the built-in hardware, many Android devices come with a Micro Secure Digital (microSD) card slot. A microSD card provides additional storage space for multimedia and extra application data. However, until Android 2.2, the apps themselves could be stored only on the internal ROM.
HTC Models
HTC is a Taiwanese company founded in 1997. The first commercially available hardware running Android was the HTC Dream (also known as the G1 where G stands for Google). It was released in October 2008. Since then, HTC has put out over 20 phones running Android, including Google’s Nexus One, the EVO 3D, and the One X+.
The Nexus One was one of the first Android devices to use a 1GHz microprocessor, the Snapdragon platform from Qualcomm. Snapdragon includes Qualcomm’s own core as opposed to an ARM core, and it contains circuitry to decode high-definition video at 720p. Most smartphones that have followed also use a 1GHz microprocessor. Other distinctions of the Nexus One are the use of two microphones to cancel background noise during phone conversations and a backlit trackball that lights up in different colors based on the notification.
The HTC EVO 4G released in June 2010 produced quite a sensation as the first commercially available phone that supports WiMAX (802.16e-2005). HTC also released the EVO 3D in August 2011. It is similar to the EVO 4G but has the distinction of packing a 3D display that does not require the use of 3D glasses to view, as well as two rear-facing cameras that can record 720p HD videos in 3D.
Motorola Models
Motorola has put out close to ten additional phone brands running Android. The Motorola Droid X has capabilities similar to the HTC Droid Incredible, including HD video capture. In 2011 Google acquired Motorola Mobility in the hope of strengthening Android in the marketplace, giving a boost in innovation, and to protect the Android ecosystem through the use of Motorola Mobility’s patent portfolio.
The Droid RAZR MAXX and RAZR MAXX HD are two phones developed by Motorola that have an exceptionally long battery life while keeping a fairly slim form factor.
Samsung Models
Samsung has been a strong force in the mobile market and is currently the number-one Android device manufacturer, accounting for 42 percent of all Android devices shipped during the fourth quarter of 2012. The most popular Samsung phones available are the Galaxy Note 2 and the Galaxy S3. Both of these devices feature Bluetooth 4.0, near field communication (NFC), and Samsung specifics such as S Beam and AllShare support.
The Samsung Galaxy Nexus was the first Android 4.2 phone and one of the first phones to be released with NFC built in. Samsung was the first to introduce smartphones that attempt to bridge the gap between phones and tablets. Some refer to these phones as “phablets,” as both the Galaxy Note and Galaxy Note 2 feature a screen that is larger than 5 inches.
Tablets
With Apple’s introduction of the iPad, Android manufacturers were expected to introduce tablet computers of their own. A tablet computer is loosely defined as having a screen of 4.8 inches or larger and Wi-Fi connectivity. Because many have 3G wireless service, they tend to be more like smartphones with large screens.
Archos was one of the first to market an Android tablet in late 2009. The first model had a diagonal screen size of 4.8 inches and was called the Archos 5. Archos has since introduced new models with screens ranging in size from 7 to 10 inches. Some models come with an actual hard drive, while others use flash drives for memory. Samsung offers several Galaxy Tab models with a variety of screen sizes from 7 to 10.1 inches.
Amazon offers the Kindle Fire line of tablets in four varieties. The tablets range in size from 7 inches to 8.9 inches and have either single- or dual-core processors. Each of these runs on a modified Android system that is connected to the Amazon Appstore as well as Amazon MP3 and Amazon Video.
Google has also partnered with Asus to release the Nexus 7, a 7-inch tablet with Android 4.2.1. Shortly thereafter, Google partnered with Samsung to build the Nexus 10. The Nexus 10 is the first Android tablet to contain a resolution of 2560×1600, which matches the display of the “retina” MacBook Pro computers and newer full-size iPad devices. A comparison of some tablet computer models is shown in Table 1.2.
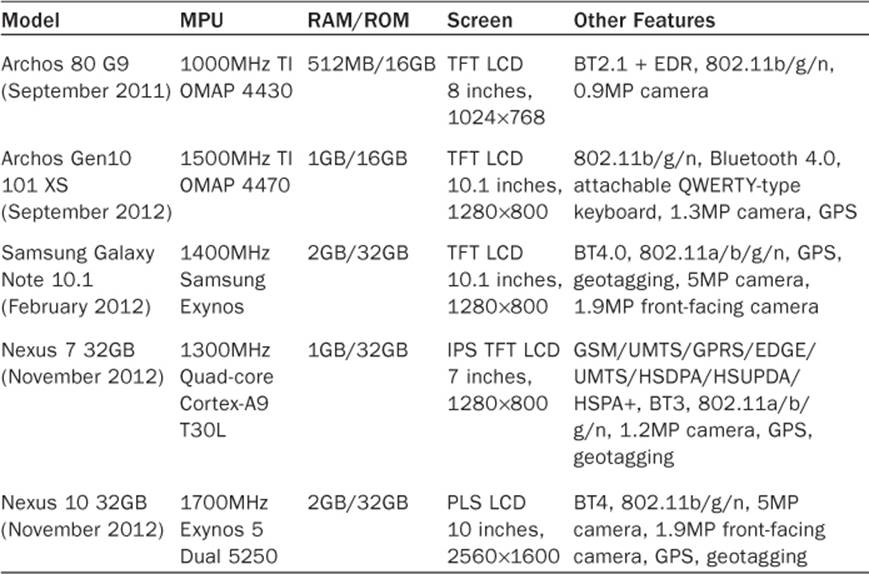
Table 1.2 Representative Android Tablets
Other Devices
Given that Android is a generic embedded platform, it is expected to be used in many other applications beyond smartphones and tablets. The first Android-based automobile is the Roewe 350, which Shanghai Automotive Industry Corporation manufactures. Android is mainly used for GPS navigation but can also support web browsing.
Saab has also created an information and entertainment system named IQon that runs on the Android platform, giving drivers real-time feedback about engine workload, speed, torque, and similar mechanical data. It displays this information through a built-in 8-inch console that features a touchscreen with a 3G or 4G data connection. While some of this information could be obtained by installing an aftermarket part into the engine control unit (ECU) of the car, the idea of having Android baked directly into the ECU is an interesting and exciting idea.
Android has also migrated into some new and exciting platforms such as watches and the OUYA console. The Pebble watch was a Kickstarter project to build a watch that could communicate with Android and iOS devices. It allows for access from an Android device through use of its software development kit (SDK) and communicates by using Bluetooth to show caller ID, current time, incoming text messages, email reminders, and so on. The OUYA console is a terrific example of pushing the Android system to the extreme. It is a console (similar to a PlayStation or Xbox) that is devoted to Android gaming. While the project is new and at the time of this writing not available to the general public, OUYA has promised to release low-cost, cutting-edge hardware on a yearly basis.
Hardware Differences on Android Devices
The hardware available on each Android device varies, as seen in Table 1.1. In general, most of the differences are transparent to the developer and not covered further here. However, a few hardware differences are important to understand to assist in writing device-independent code. Screens, user input methods, and sensors are discussed here.
Screens
Two technologies used for displays are liquid crystal displays (LCDs) and light-emitting diodes (LEDs). The two specific choices in Android phones are thin-film transistor (TFT) LCDs and active-matrix organic LED (AMOLED) displays. A benefit of TFT displays is a longer lifetime. A benefit of AMOLED displays is no need for backlighting and therefore deeper blacks and lower power usage.
Overall, Android devices are categorized into small, normal, large, and extra-large screens and low, medium, high, and extra-high pixel density. Note that the actual pixel density may vary but will always be defaulted to low, medium, high, or extra-high. Table 1.3 shows the typical screen size, resolution, and name associated with different screen sizes.
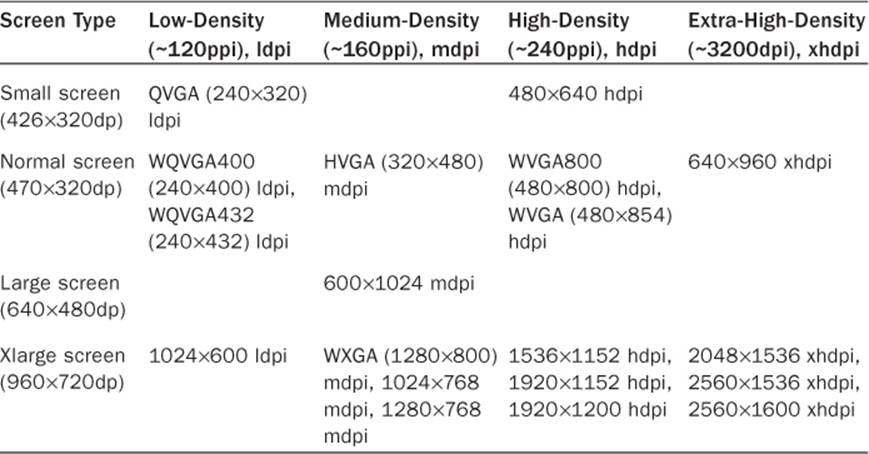
Table 1.3 Device Screens Supported by Android
User Input Methods
Touchscreens enable users to interact with the visual display. There are three types of touchscreen technology:
![]() Resistive—Two layers of resistive material sit on top of a glass screen. When a finger, stylus, or any object applies pressure, the two layers touch and the location of the touch can be determined. Resistive touchscreens are cost-effective, but only 75 percent of the light shows through, and until recently multitouch was not possible.
Resistive—Two layers of resistive material sit on top of a glass screen. When a finger, stylus, or any object applies pressure, the two layers touch and the location of the touch can be determined. Resistive touchscreens are cost-effective, but only 75 percent of the light shows through, and until recently multitouch was not possible.
![]() Capacitive—A layer of charged material is overlaid on a glass screen. When a finger or any conductive object touches the layer, some charge is drawn off, changing the capacitance, which is measured to determine the location of the touch. Capacitive touchscreens allow as much as 90 percent of the light through, although accuracy can be less than that of resistive touchscreens.
Capacitive—A layer of charged material is overlaid on a glass screen. When a finger or any conductive object touches the layer, some charge is drawn off, changing the capacitance, which is measured to determine the location of the touch. Capacitive touchscreens allow as much as 90 percent of the light through, although accuracy can be less than that of resistive touchscreens.
![]() Surface acoustic wave—This uses a more advanced method that sends and receives ultrasonic waves. When a finger or any object touches the screen, the waves are absorbed and are measured to determine the location of the touch. It is the most durable solution, but more suitable for large-scale screens such as those on automatic bank tellers.
Surface acoustic wave—This uses a more advanced method that sends and receives ultrasonic waves. When a finger or any object touches the screen, the waves are absorbed and are measured to determine the location of the touch. It is the most durable solution, but more suitable for large-scale screens such as those on automatic bank tellers.
All Android devices use either resistive or capacitive touchscreen technology, and all support multitouch. In addition, each Android device may provide an alternative method to access the screen through one of the following methods:
![]() D-pad (directional pad)—An up-down-right-left type of joystick
D-pad (directional pad)—An up-down-right-left type of joystick
![]() Trackball—A rolling ball acting as a pointing device that is similar to a mouse
Trackball—A rolling ball acting as a pointing device that is similar to a mouse
![]() Trackpad—A special rectangular surface acting as a pointing device
Trackpad—A special rectangular surface acting as a pointing device
Sensors
Smartphones are becoming sensor hubs in a way, opening a rich experience for users. Other than the microphone that every phone has, the first additional sensor introduced on phones was the camera. Different phone cameras have varying capabilities, and this is an important factor for people when selecting a device. The same type of diversity is now seen with the additional sensors.
Most smartphones have at least three additional basic sensors: a three-axis accelerometer to measure gravity, a three-axis magnetometer to measure the ambient magnetic field, and a temperature sensor to measure the ambient temperature. For example, the HTC Dream (G1) contains the following sensors (which can be displayed using getSensorList()as described further in Chapter 9, “Hardware Interface”):
![]() AK8976A three-axis accelerometer
AK8976A three-axis accelerometer
![]() AK8976A three-axis magnetic field sensor
AK8976A three-axis magnetic field sensor
![]() AK8976A orientation sensor
AK8976A orientation sensor
![]() AK8976A temperature sensor
AK8976A temperature sensor
The AK8976A is a single package from Asahi Kasei Microsystems (AKM) that combines a piezoresistive accelerometer, Hall-effect magnetometer, and temperature sensor. All provide 8-bit precision data. The orientation sensor is a virtual sensor that uses the accelerometer and magnetometer to determine the orientation.
For comparison, the Motorola Droid contains the following sensors:
![]() LIS331DLH three-axis accelerometer
LIS331DLH three-axis accelerometer
![]() AK8973 three-axis magnetic field sensor
AK8973 three-axis magnetic field sensor
![]() AK8973 temperature sensor
AK8973 temperature sensor
![]() SFH7743 proximity sensor
SFH7743 proximity sensor
![]() Orientation sensor type
Orientation sensor type
![]() LM3530 light sensor
LM3530 light sensor
The LIS331DLH is a 12-bit capacitive accelerometer from ST Microelectronics. It provides much more accurate data and can sample up to 1kHz. The AK8973 is an AKM package with an 8-bit Hall-effect magnetometer and temperature sensor.
In addition, the Droid contains two more sensors. The SFH7743 is an Opto Semiconductor’s short-range proximity detector that turns the screen off when an object (such as the ear) is within about 40mm distance. The LM3530 is an LED driver with a programmable light sensor from National Semiconductor that detects ambient light and adjusts the screen backlight and LED flash appropriately.
One other example of sensors available on an Android device is the HTC EVO 4G, which has the following sensors:
![]() BMA150 three-axis accelerometer
BMA150 three-axis accelerometer
![]() AK8973 three-axis magnetic field sensor
AK8973 three-axis magnetic field sensor
![]() AK8973 orientation sensor
AK8973 orientation sensor
![]() CM3602 proximity sensor
CM3602 proximity sensor
![]() CM3602 light sensor
CM3602 light sensor
The BMA150 is a Bosch Sensortec 10-bit accelerometer which can sample up to 1.5kHz. The CM3602 is a Capella Microsystems, Inc., short-distance proximity sensor and ambient light sensor combined into one.
Overall, it is important to understand that each Android model has different underlying hardware. These differences can lead to varying performance and accuracy of the sensors.
Features of Android
The detailed features of Android and how to take advantage of them provide a main theme throughout this book. On a broader level, some key features of Android are major selling points and differentiators. It is good to be aware of these strong points of Android and use them as much as possible.
Multiprocess and App Widgets
The Android OS does not restrict the processor to a single application at a time. The system manages priorities of applications and of threads within a single application. This has the benefit that background tasks can be run while a user engages the device in a foreground process. For example, while a user plays a game, a background process can check stock prices and trigger an alert as necessary.
App Widgets are mini applications that can be embedded in other applications (such as the home screen). They can process events, such as start a music stream or update the outside temperature, while other applications are running.
Multiprocessing has the benefit of a rich user experience. However, care must be taken to avoid power-hungry applications that drain the battery. Multiprocess features are discussed further in Chapter 3, “Threads, Services, Receivers, and Alerts.”
Touch, Gestures, and Multitouch
The touchscreen is an intuitive user interface for a hand-held device. If used well, it can transcend the need for detailed instructions. After a finger touches the screen, drags and flings are natural ways to interact with graphics. Multitouch provides a way to track more than one finger touch at the same time. This is often used to zoom or rotate a view.
Some touch events are available transparently to the developer without the need to implement their detailed behaviors. Custom gestures can be defined as needed. It is important to try to maintain a consistent usage of touch events across applications. Touch events are discussed further inChapter 6, “User Interface Events.”
Hard and Soft Keyboards
One feature on a hand-held device that polarizes users is whether it should have a physical (also called hard) keyboard or a software (also called soft) keyboard. The tactile feedback and definite placement of keys provided by a hard keyboard tend to make typing much faster for some, whereas others prefer the sleek design and convenience offered by a software-only input device.
With the large variety of Android devices available, either type can be found. A side effect for developers is the need to support both. One downside of a soft keyboard is that a portion of the screen needs to be dedicated to the input. This needs to be considered and tested for any user interface (UI) layout.
Android Development
This book is focused on writing Android code, the main aspect of Android development. However, dedicating a few words to the other aspects of development, including design and distribution, is appropriate.
Designing Applications Well
Three elements are needed for an excellent application: a good idea, good coding, and good design. Often, the last element is paid the least attention because most developers work alone and are not graphic designers. Google must realize this because it has created a set of design guidelines: icon design, App Widget design, activity and task design, and menu design. These can be found at http://developer.android.com/guide/practices/ui_guidelines/. Google has also taken things a step further by creating a site specifically to demonstrate design principles and how they can be implemented in Android applications. This can be found at http://developer.android.com/design/index.html.
Good design cannot be stressed enough. It sets an application apart, increases user adoption, and builds user appreciation. Some of the most successful apps on the market are a result of the collaboration between a developer and a graphic designer. A significant portion of an app’s development time should be dedicated to considering the best design for it.
Maintaining Forward Compatibility
New Android versions are generally additive and forward compatible at the API level. In fact, a device can be called an Android device only if it passes compatibility tests with the Android APIs. However, if an application makes changes to the underlying system, compatibility is not guaranteed. To ensure forward compatibility of an application when future Android updates are installed on devices, follow these rules suggested by Google:
![]() Do not use internal or unsupported APIs.
Do not use internal or unsupported APIs.
![]() Do not directly manipulate settings without asking the user. A future release might constrain settings for security reasons. For instance, it used to be possible for an app to turn on GPS or data roaming by itself, but this is no longer allowed.
Do not directly manipulate settings without asking the user. A future release might constrain settings for security reasons. For instance, it used to be possible for an app to turn on GPS or data roaming by itself, but this is no longer allowed.
![]() Do not go overboard with layouts. This is rare, but complicated layouts (more than ten deep or 30 total layouts) can cause crashes.
Do not go overboard with layouts. This is rare, but complicated layouts (more than ten deep or 30 total layouts) can cause crashes.
![]() Do not make bad hardware assumptions. Not all Android devices have all possible supported hardware. Be sure to check for the hardware needed, and if it does not exist, handle the exception.
Do not make bad hardware assumptions. Not all Android devices have all possible supported hardware. Be sure to check for the hardware needed, and if it does not exist, handle the exception.
![]() Ensure that device orientations do not disrupt the application or result in unpredictable behavior. Screen orientation can be locked, as described in Chapter 2, “Application Basics: Activities and Intents.”
Ensure that device orientations do not disrupt the application or result in unpredictable behavior. Screen orientation can be locked, as described in Chapter 2, “Application Basics: Activities and Intents.”
Note that backward compatibility is not guaranteed with Android. It is best to declare the minimum SDK version as described in Chapter 2, so the device can load the proper compatibility settings. Using other new features on older targets is also discussed in various places throughout the book.
Ensuring Robustness
In the same vein as compatibility support, applications should be designed and tested for robustness. Following are a few tips to help ensure robustness:
![]() Use the Android libraries before Java libraries. Android libraries are constructed specifically for embedded devices and cover many of the requirements of an application. For cases such as working with third-party plugins and application frameworks, Java libraries are included. However, in cases where either can be used, the Android library is better.
Use the Android libraries before Java libraries. Android libraries are constructed specifically for embedded devices and cover many of the requirements of an application. For cases such as working with third-party plugins and application frameworks, Java libraries are included. However, in cases where either can be used, the Android library is better.
![]() Take care of memory allocation. Initialize variables. Try to reuse objects rather than reallocate. This speeds up application execution and avoids excessive use of garbage collection. Memory allocations can be tracked using the Dalvik Debug Monitor Server (DDMS) tool as discussed in Chapter 16, “Debugging.”
Take care of memory allocation. Initialize variables. Try to reuse objects rather than reallocate. This speeds up application execution and avoids excessive use of garbage collection. Memory allocations can be tracked using the Dalvik Debug Monitor Server (DDMS) tool as discussed in Chapter 16, “Debugging.”
![]() Use the LogCat tool for debugging and check for warnings or errors as also discussed in Chapter 16.
Use the LogCat tool for debugging and check for warnings or errors as also discussed in Chapter 16.
![]() Test thoroughly, including different environments and devices if possible.
Test thoroughly, including different environments and devices if possible.
Software Development Kit (SDK)
The Android SDK is composed of the platform, tools, sample code, and documentation needed to develop Android applications. It is built as an add-on to the Java Development Kit and has an integrated plugin for the Eclipse Integrated Development Environment (IDE).
Installing and Upgrading
Many places on the Internet have detailed step-by-step instructions for how to install the Android SDK. For example, all the necessary links can be found on the Google website http://developer.android.com/sdk/. Currently Google has bundled together all the necessary pieces of the SDK into one convenient download as the ADT Bundle. This bundle contains Eclipse with the ADT plugin installed, the Android SDK Tools, Android Platform tools, the latest Android Platform, and the latest Android system image for the emulator. It is available for Windows, Mac, and Linux systems.
As this bundle is a zip and preconfigured, all that really needs to be done is to unzip the bundle and start the Eclipse program. When launched, the application will ask where the workspace should be set up. Once that is determined, a screen appears to help with setting up a new project or learning more about developing with Android.
For developers who do not wish to download the entire bundle and would rather install just the pieces they need, the general procedure outlined here emphasizes the most common installation steps. These steps should be performed on a host computer used as the development environment.
1. Install the Java Development Kit (for example, install JDK 6.0 for use with Android 2.1 or above; JDK 5.0 is the minimum version needed for any earlier version of Android).
2. Install Eclipse Classic (for example, version 4.2.1). In the case of Windows, this just needs to be unzipped in place and is ready to use.
3. Install the Android SDK starter package (for example, version r21). In the case of Windows, this just needs to be unzipped in place and is ready to use.
4. Start Eclipse and select Help → Install New Software . . ., and then type https://dl-ssl.google.com/android/eclipse/ and install the Android DDMS and Android Development Tools.
5. In Eclipse, select Window → Preferences . . . (on a Mac, select Eclipse → Preferences) and select Android. Browse to the location where the SDK was unzipped and apply.
6. In Eclipse, select Window → Android SDK and AVD Manager → Available Packages, and then choose the necessary APIs to install (for example, Documentation for Android SDK, SDK Platform, Google APIs, API 17).
7. From the same Android SDK and AVD Manager menu, create an Android virtual device to run the emulator, or install USB drivers to run applications on a plugged-in phone.
8. In Eclipse, select Run → Run Configurations. . . and create a new run configuration to be used with each Android application (or similar for a debug configuration). Android JUnit tests can be configured here, too.
Now the environment should be configured to easily develop any Android application and run on the emulator or an actual Android device. Upgrading to a new version of the SDK is simply a matter of selecting Help → Software Updates. . . in Eclipse and choosing the appropriate version.
Software Features and API Level
The Android OS periodically rolls out new features, enhancements such as improved efficiency, and bug fixes. A main driver in OS improvement is the increased capability of hardware on new devices. In fact, major releases of the OS are generally coordinated with new hardware rollouts (such as Eclair’s release with Droid).
Some legacy Android devices cannot support the new version requirements and are not updated with new OS releases. This leads to a user base with a variety of possible experiences. The developer is left with the task of checking for device capability or at least warning of required features. This can be done through a check of a single number: the API level. For a list of Android versions and the changes made in each version, see Appendix D.
Android currently follows a release schedule of six to nine months. Although possible, the over-the-air updates are logistically tricky and carriers prefer to avoid them. Hardware manufacturers also appreciate some stability, which does not mean the first devices in stores need an immediate update. However, when a release is made, the additional features are worthwhile for developers to use.
Emulator and Android Device Debug
The emulator launches a window on the development computer that looks like an Android phone and runs actual ARM instructions. Note that the initial start-up is slow, even on high-end computers. Although there are ways to configure the emulator to try to emulate many aspects of a real Android device such as incoming phone calls, limited data rate, and screen orientation change, some features (such as sensors and audio/video) are not the same. A recent addition to the emulator is the ability to use the host GPU. This has helped to speed up the visual effects and transitions displayed on the emulator. The emulator should be considered a useful way to validate basic functionality for devices not available to the user. For example, the tablet screen size can be tried without purchasing a tablet.
Note that a target virtual device must be created before the emulator can properly run. Eclipse provides a nice method to manage Android Virtual Devices (AVDs). A handy list of keyboard shortcuts for emulator functions is shown in Table 1.4.
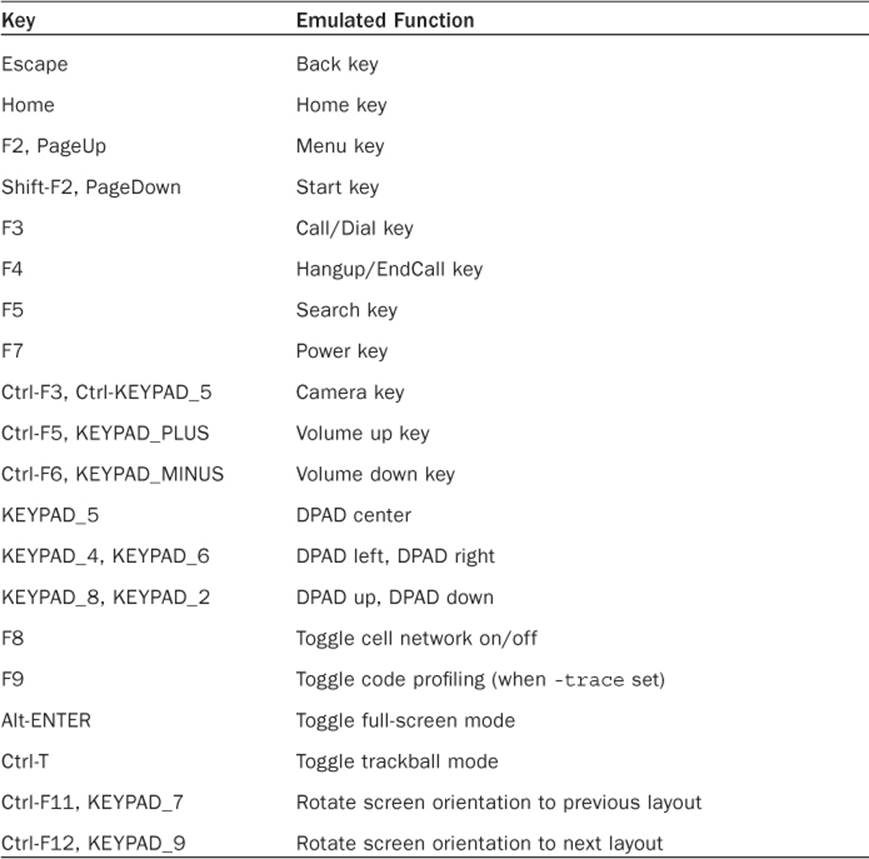
Table 1.4 Android OS Emulator Controls
In general, the first testing is best done with an Android phone. This ensures full functionality and identification of real-time issues that cannot be fully re-created with the emulator. To use an Android device as a developer platform, just hook it up to the USB using the USB cable that came with the phone and ensure that the USB driver is detected (this is automatic with a Mac; the drivers are included with the SDK for Windows; and see Google’s web page for Linux).
Some settings on the Android device need to be changed to enable developer usage. From the home screen, select MENU → Settings → Applications → Unknown sources and MENU → Settings → Applications → Development → USB debugging to enable installation of applications through the USB cable. More details about Android debugging are provided in Chapter 16, “Debugging.”
Using the Android Debug Bridge
It is often convenient to use the command line to access the Android device. This is possible when it is connected to a computer using the USB cable. The Android Debug Bridge (ADB), which comes with the SDK, can be used to access the Android device. For example, to log in to the Android device as if it were a Linux computer, type the following:
> adb shell
Then, many UNIX commands are usable on the device. Use exit to exit the shell. A single command can be appended to the shell command to be executed without needing to enter and exit the shell:
> adb shell mkdir /sdcard/app_bkup/
To copy files off the device, use pull and rename the files copied as needed:
> adb pull /system/app/VoiceSearchWithKeyboard.apk VSwithKeyboard.apk
To copy a file onto the device, use push:
> adb push VSwithKeyboard.apk /sdcard/app_bkup/
To delete an application, for example, com.dummy.game, from the device, type the following:
> adb uninstall com.dummy.game
These commands are the most commonly used, but more are available. Some additional commands are introduced in Chapter 16.
Signing and Publishing
For an application to be accepted on Google Play, it needs to be signed. To do this, a private key needs to be generated and kept in a secure place. Then, the app needs to be packaged in release mode and signed with the private key. When an application is upgraded, the same key needs to sign it to ensure a transparent update for the user.
Eclipse automatically does all of this. Just right-click on the project to be signed and select Export. . . → Export Android Application to initiate packaging. A password can be used to create a private key, which is saved for future applications and upgrades. Then, continue through the menu to the creation of an APK file. This is a packaged version of the Android project in release mode and signed with the private key. It is ready for upload to Google Play.
Google Play
After an application is designed, developed, tested, and signed, it is ready to be deployed into Google Play. To use Google Play, a Google Checkout account needs to be created. It is used not only to pay the initial developer fee of $25 but also for payments to the developer for any charged apps. Public exposure to a developer’s creation is often exciting. Within hours of upload, an application can get hundreds of views, downloads, ratings, and reviews from around the world. A few considerations for publication of an app are provided here for reference.
End User License Agreement
Any original content distributed in a tangible form is automatically copyrighted in most of the world under the Berne Convention. Still, it is common practice to add a copyright line with a date of publication to the content, such as © 2013. The method for adding this symbol to an Android app is discussed in Chapter 5, “User Interface Layout.”
This can be taken one step further in an end user license agreement (EULA), which is a contract between the developer (or company) and the customer (or end user) providing the developer a form of protection for publicly distributed software. Most EULAs contain sections such as “Grant of License,” “Copyright,” and “No Warranties.” It is common practice to add a EULA to an application, especially if it is offered for sale. The method for adding a EULA to an Android app is discussed in Chapter 11, “Data Storage Methods.”
Improving App Visibility
Users find applications in three different ways. Catering to these methods helps to increase visibility for an application.
Depending on the version of Play store users have on their devices, they may be able to find new apps by browsing “Just In” apps. Choose a good descriptive name for the application and place it in an appropriate category, such as “Games” or “Communication.” Keep the description simple and to the point to get more views. The “Games” category is overladen with apps, so there are subcategories. If the app is fun but has no score or goal, consider the “Entertainment” category. Even so, with over 10,000 applications uploaded to the Android Market each month, an uploaded application is pushed off the “Just In” list within a day or two.
Google has a committee that reviews new Android applications and selects them to be shown prominently in various places of the “Apps” section of the Play store. The best way to get an application featured is to make sure that all screen resolutions and dpi levels are supported, there are well-articulated descriptions of the application, images and a video of the app in action are included, and the app includes no services that users perceive as a violation of privacy (such as reading system logs, sending SMS messages without stating why, and using fine location instead of coarse location unless absolutely required).
Another way users can find an app is by performing a keyword search. Determine the essential keywords users might choose and include those in either the title or the description of the app. Some users might speak a different language, so including appropriate international keywords can help.
The last way users find an app in the Play store is by looking in the category of “Top” apps; these apps get the highest ratings and the most downloads. To get in this category takes time and effort with possible updates to fix bugs. This points to the last consideration for app visibility: robustness. Ensure that the app does not contain major bugs, does not waste excessive battery life, and has a foolproof way to exit. Nothing turns off a potential customer more than seeing reviews that say, “This app uses all of my battery,” or, “I can’t uninstall this app.” The “Top” apps are carved into “Free,” “Paid,” and “Trending.”
One side note to mention: Almost all interactions between the developer and users take place through Google Play. Providing developer contact information or a supporting website is often superfluous, as people browsing the mobile market rarely use it.
Differentiating an App
Sometimes a developer creates an application only to find a similar variant already in the Android Market. This should be treated as an opportunity rather than a discouragement. Differentiating the app simply through better design, interface, or execution can quickly win over a user base. Basically, originality is nice, but it is not required. That being said, one must be careful to avoid using copyrighted material.
Charging for an App
Every time a new application or its update is uploaded to the Android Market, the developer must choose whether to provide it for free or charge for it. Following are the main options:
![]() Provide the app for free. Everyone who can access Google Play can see and install the app.
Provide the app for free. Everyone who can access Google Play can see and install the app.
![]() Provide a free app, but include advertisements. In some cases, the developer negotiates sponsorship for an app. More often, the developer works with a third-party aggregator. Payouts are provided for clicked ads and less often for impressions (ad views). Figure 1.1 shows an example banner ad from AdMob (which is now part of Google). Such ads require the application to have permission to access the Internet and the location of the device. Consider using coarse location instead of fine location to avoid deterring some potential customers from installing the app.
Provide a free app, but include advertisements. In some cases, the developer negotiates sponsorship for an app. More often, the developer works with a third-party aggregator. Payouts are provided for clicked ads and less often for impressions (ad views). Figure 1.1 shows an example banner ad from AdMob (which is now part of Google). Such ads require the application to have permission to access the Internet and the location of the device. Consider using coarse location instead of fine location to avoid deterring some potential customers from installing the app.

Figure 1.1 Example mobile banner ad from AdMob
![]() Provide the app for a charge. Google handles all transactions, including charges, but takes 30 percent of the proceeds and requires developers to have a merchant account set up through Google Wallet. Countries that are not set up for charges through Google Checkout cannot see or install an app for a charge. For these reasons, some developers turn to third-party app stores for distribution.
Provide the app for a charge. Google handles all transactions, including charges, but takes 30 percent of the proceeds and requires developers to have a merchant account set up through Google Wallet. Countries that are not set up for charges through Google Checkout cannot see or install an app for a charge. For these reasons, some developers turn to third-party app stores for distribution.
![]() Post a free limited version, but charge for a full version. This gives users the opportunity to try the app, and if they like it, they will have less resistance to purchasing the full version. For some apps, this is a natural model (such as a game with ten free levels), but not all apps can be partitioned this way.
Post a free limited version, but charge for a full version. This gives users the opportunity to try the app, and if they like it, they will have less resistance to purchasing the full version. For some apps, this is a natural model (such as a game with ten free levels), but not all apps can be partitioned this way.
![]() Sell virtual goods inside the app, or use in-app purchasing. Selling virtual items is familiar in pay-to-win apps that are free but require the user to make a purchase to increase inventory items, provide power-ups, or even to skip parts of the game. This is an important way Facebook apps work, and it is becoming a popular choice in the mobile world.
Sell virtual goods inside the app, or use in-app purchasing. Selling virtual items is familiar in pay-to-win apps that are free but require the user to make a purchase to increase inventory items, provide power-ups, or even to skip parts of the game. This is an important way Facebook apps work, and it is becoming a popular choice in the mobile world.
Free applications tend to get a lot of views. Even the most obscure and odd applications seem to be downloaded and viewed by at least 1,000 people in the first month the application is in the Play store. There are some developers who explicitly say, “This app is absolutely useless,” and yet they get over 10,000 downloads and a four-star rating. Somewhat relevant free applications can get as many as 50,000 downloads, and extremely useful free applications have over 100,000 downloads. For most developers, such exposure is quite impressive.
Mobile advertisement is still in its infancy and usually does not entice enough users to click the ad to make the app profitable. For now, monetizing apps is best done by charging in the Play store or through in-app purchases. As long as the app is useful for some people, has a clear description, and has a good selection of positive reviews, users will purchase it. If an app is successful, it might make sense to raise its price.
Managing Reviews and Updates
If their apps are successful, most independent developers go through a process of releasing a version and adapting it based on user feedback. Users like to see a developer who is responsive. This leads to more people downloading an app, and as the number of downloads increases, the validity of the app increases.
In general, it seems about 1 in 200 people rate an application, and a small subset of those actually leave a review. If someone takes the time to type a review, it is usually worth paying attention to it, especially if the review comments are constructive, such as “Doesn’t work on the HTC Hero,” or “Nice app, just wish it did. . . .”
Updates that respond to user comments are seen in a positive light by new potential customers. In any case, the reason for the update should be clearly highlighted. Some users may get ten or more notifications a day of applications that have updates available. If they do not see a good reason to upgrade, they might not.
Alternatives to Google Play
Other independent Android app stores exist. They might not have as convenient access to Android devices as Google Play does, but they provide other benefits for developers such as better app visibility, more places to charge for apps, and taking no portion of the proceeds from an app. Also, some Android manufacturers create customized app stores that are accessible from their devices. For example, getting app visibility onto Motorola Android phones in the Chinese and Latin American markets can be done through the Motorola app market athttp://developer.motorola.com/shop4apps.
Several third-party application stores also exist, which are given in the following list. Please note that some third-party stores pass around illegal, stolen, and/or cracked software. If you are absolutely determined to use a third-party store, make absolutely sure that you can trust it and do some research on it first.
![]() The Baidu App store (China)
The Baidu App store (China)
http://as.baidu.com/
![]() Amazon Apps
Amazon Apps
www.amazon.com/appstore
![]() Opera Mobile Apps Store
Opera Mobile Apps Store
http://apps.opera.com/en_us/
![]() SlideMe
SlideMe
http://slideme.org/
![]() Getjar
Getjar
www.getjar.com/
![]() AppBrain
AppBrain
www.appbrain.com/
All materials on the site are licensed Creative Commons Attribution-Sharealike 3.0 Unported CC BY-SA 3.0 & GNU Free Documentation License (GFDL)
If you are the copyright holder of any material contained on our site and intend to remove it, please contact our site administrator for approval.
© 2016-2026 All site design rights belong to S.Y.A.