The Android Developer’s Cookbook: Building Applications with the Android SDK, Second Edition (2013)
Chapter 3. Threads, Services, Receivers, and Alerts
This chapter continues the introduction of the basic building blocks of an application. First, the explicit specification of threads is introduced as a method to separate tasks. Then, services and broadcast receivers are introduced. As shown in some recipes, services and broadcast receivers benefit from using threads. The application widget, which uses receivers, is then covered. This leads naturally to the discussion of various alerts available to the developer.
Threads
Every application by default runs a single process upon creation that contains all the tasks. To avoid hanging the user interface, time-consuming tasks, such as network downloads or computationally intensive calculations, should reside in a separate background thread. It is up to the developer to implement this properly, but then the Android OS prioritizes the threads accordingly.
Most applications can benefit from the use of threads. If such occasions are not detected in the software design phase, they quickly display during testing because the Android system provides an alert to the user when the UI hangs, as shown in Figure 3.1.
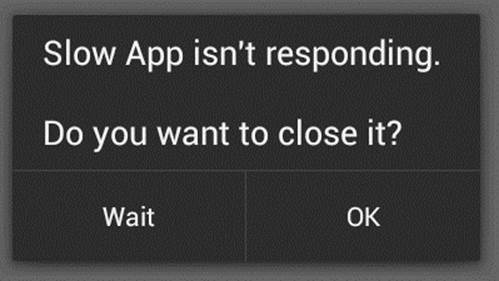
Figure 3.1 An example message that displays when a thread hangs
Recipe: Launching a Secondary Thread
In this recipe, a ringtone song is played when an on-screen button is pressed. This provides a simple illustration of how threads can be used with a time-consuming operation. In the following, calling the play_music() function without specifying a separate thread blocks the application during music playback:
Button startButton = (Button) findViewById(R.id.trigger);
startButton.setOnClickListener(new View.OnClickListener() {
public void onClick(View view){
// BAD USAGE: function call too time-consuming
// function causes main thread to hang
play_music();
}
});
This means that any user request such as navigating back to the home screen or multiple pushes of an on-screen button are not registered until the music is completely finished playing. The unresponsive UI might even cause the Android system to display an error such as the one shown inFigure 3.1.
This is resolved by launching a secondary thread to call the play_music() function as follows:
1. Create a new thread to hold a Runnable object:
Thread initBkgdThread = new Thread(
//Insert runnable object here
);
2. Create a Runnable object that overrides the run() method to call the time-consuming task:
new Runnable() {
public void run() {
play_music();
}
}
3. Start the thread, which then runs the task:
initBkgdThread.start();
The setup of the secondary thread to contain the time-consuming task is quick, so the main thread can continue servicing other events.
Before the code for the full activity is shown, the supporting files are discussed. Media playback is covered more fully in Chapter 8, “Multimedia Techniques,” but for illustration, the song is implemented here as a sequence of notes specified using ringtone text transfer language (RTTTL). For example, the following RTTTL code describes a quarter-note of the A (220Hz) just below middle C. Putting this in a single-line text file in the res/raw/ directory registers it as the R.raw.a4 resource.
a4:d=4,o=5,b=250:a4
Then, a call in the activity to the media player plays this ringtone note:
m_mediaPlayer = MediaPlayer.create(this, R.raw.a4);
m_mediaPlayer.start();
This recipe uses four different notes in four separate RTTTL files: g4.rtttl, a4.rtttl, b4.rtttl, and c5.rtttl. These are just exact copies of the preceding example with the a4 changed in the file to reflect the new note in each case, but it can also be expanded to other notes or formats.
One aside is that MediaPlayer launches its own background thread to play the media. So, if this were a single longer file, it would be possible to avoid the use of an explicit thread as explained in Chapter 8, “Multimedia Techniques.” That fact does not help when multiple files need to be played quickly, as here, but it is important to know that threads are not always necessary.
The trigger for starting the music is a button press. The Button widget needs to be specified in the main layout file (here called main.xml) and is identified with the name trigger, as shown in Listing 3.1.
Listing 3.1. res/layout/main.xml
<?xml version="1.0" encoding="utf-8"?>
<LinearLayout xmlns:android="http://schemas.android.com/apk/res/android"
android:orientation="vertical"
android:layout_width="match_parent"
android:layout_height="match_parent"
>
<Button android:id="@+id/trigger"
android:layout_width="100dip" android:layout_height="100dip"
android:text="Press Me"
/>
</LinearLayout>
One side effect of launching a separate thread is that it still continues even if the main activity is paused. This is seen by implementing the background thread and navigating back to the home screen during music play. The music keeps playing until it is completed. If this is not the preferred behavior, the play_music() function can check a flag (here called paused), which is set during the main activity’s onPause() function to stop music playback when the main thread is paused.
All the previous items are combined into the full activity PressAndPlay in Listing 3.2.
Listing 3.2. src/com/cookbook/launch_thread/PressAndPlay.java
package com.cookbook.launch_thread;
import android.app.Activity;
import android.media.MediaPlayer;
import android.os.Bundle;
import android.view.View;
import android.widget.Button;
public class PressAndPlay extends Activity {
@Override
public void onCreate(Bundle savedInstanceState) {
super.onCreate(savedInstanceState);
setContentView(R.layout.main);
Button startButton = (Button) findViewById(R.id.trigger);
startButton.setOnClickListener(new View.OnClickListener() {
public void onClick(View view){
//Stand-alone play_music() function call causes
//main thread to hang. Instead, create
//separate thread for time-consuming task.
Thread initBkgdThread = new Thread(new Runnable() {
public void run() {
play_music();
}
});
initBkgdThread.start();
}
});
}
int[] notes = {R.raw.c5, R.raw.b4, R.raw.a4, R.raw.g4};
int NOTE_DURATION = 400; //millisec
MediaPlayer m_mediaPlayer;
private void play_music() {
for(int ii=0; ii<12; ii++) {
//Check to ensure main activity not paused
if(!paused) {
if(m_mediaPlayer != null) {m_mediaPlayer.release();}
m_mediaPlayer = MediaPlayer.create(this, notes[ii%4]);
m_mediaPlayer.start();
try {
Thread.sleep(NOTE_DURATION);
} catch (InterruptedException e) {
e.printStackTrace();
}
}
}
}
boolean paused = false;
@Override
protected void onPause() {
paused = true;
super.onPause();
}
@Override
protected void onResume() {
super.onResume();
paused = false;
}
}
Note that the Thread.sleep() method pauses the thread for approximately the amount of time specified (in milliseconds). This is used to implement the note duration.
Also note the convention used in the lifecycle methods: Additional activity-specific logic is bracketed by the super methods. This is good practice to ensure proper completion of commands. So the internal pause flag is set to true before truly pausing the activity, and the activity is fully resumed before setting the internal pause flag to false.
Recipe: Creating a Runnable Activity
This recipe shows an activity that evaluates a computationally intensive function, such as edge detection in an image. Here, a dummy function called detectEdges() is run to emulate the actual image-processing algorithm.
If detectEdges() is called in onCreate() by itself, it hangs the main thread and does not display the UI layout until computation is done. Therefore, a separate thread needs to be created and started for the time-consuming function. Because the main purpose of the activity is this time-consuming operation, it is natural to have the activity itself implement Runnable. As shown in Listing 3.3, the background thread is declared in the onCreate() method. When the background thread is started, it calls the activity’s run() method, which is overridden with the intended functionality.
The button is implemented exactly as in the previous “Launching a Secondary Thread” recipe. Pressing the button shows that the UI is still responsive when the background task detectEdges() runs.
Listing 3.3. src/com/cookbook/runnable_activity/EdgeDetection.java
package com.cookbook.runnable_activity;
import android.app.Activity;
import android.os.Bundle;
import android.view.View;
import android.widget.Button;
import android.widget.TextView;
public class EdgeDetection extends Activity implements Runnable {
int numberOfTimesPressed=0;
@Override
public void onCreate(Bundle savedInstanceState) {
super.onCreate(savedInstanceState);
setContentView(R.layout.main);
final TextView tv = (TextView) findViewById(R.id.text);
//In-place function call causes main thread to hang:
/* detectEdges(); */
//Instead, create background thread for time-consuming task
Thread thread = new Thread(EdgeDetection.this);
thread.start();
Button startButton = (Button) findViewById(R.id.trigger);
startButton.setOnClickListener(new View.OnClickListener() {
public void onClick(View view){
tv.setText("Pressed button" + ++numberOfTimesPressed
+ " times\nAnd computation loop at "
+ "(" + xi + ", " + yi + ") pixels");
}
});
}
@Override
public void run() {
detectEdges();
}
//Edge Detection
int xi, yi;
private double detectEdges() {
int x_pixels = 4000;
int y_pixels = 3000;
double image_transform=0;
//Double loop over pixels for image processing
//Meaningless hyperbolic cosine emulates time-consuming task
for(xi=0; xi<x_pixels; xi++) {
for(yi=0; yi<y_pixels; yi++) {
image_transform = Math.cosh(xi*yi/x_pixels/y_pixels);
}
}
return image_transform;
}
}
Recipe: Setting a Thread’s Priority
The Android system handles thread priorities. By default, a new thread, myThread, gets a priority of 5. The developer can suggest a different priority by calling myThread.setPriority(priority) before myThread.start(). The priority cannot be set higher than Thread.MAX_PRIORITY (which is 10) or lower than Thread.MIN_PRIORITY (which is 1).
Android provides an alternative way to set threading priorities. With android.os.Process.setThreadPriority()a priority based on the “nice” Linux values between 20 and -20 can be requested. Both versions map to the same underlying system call, butandroid.os.Process.setThreadPriority() is more fine-grained.
Recipe: Canceling a Thread
Sometimes when a component is finished or killed, the developer wants the threads it spawns to also be killed. For example, take a thread defined in an activity:
private volatile Thread myThread;
The myThread.stop() method is deprecated because it might leave the application in an unpredictable state. Instead, use the following when needed, such as in the onStop() method of the parent component:
//Use to stop the thread myThread
if(myThread != null) {
Thread dummy = myThread;
myThread = null;
dummy.interrupt();
}
At the application level, there is another way to do this: Declare all spawned threads as daemon threads using the setDaemon(true) method, as in the following example. This ensures that threads associated with that application are killed when the application’s main thread is killed.
//Use when initially starting a thread
myThread.setDaemon(true);
myThread.start();
Finally, there is always the method of using a while(stillRunning) loop in the run() method and externally setting stillRunning=false to kill the thread. However, this might not provide sufficient control over the timing of when the thread stops.
Recipe: Sharing a Thread between Two Applications
The previous recipes motivated the use of multiple threads in a single application. The converse case is also sometimes useful, that is, use of multiple applications in a single thread. For example, if two applications need to communicate with each other, they can do so using binders rather than the more complicated inter-process communication (IPC) protocol. The steps for doing this follow:
![]() Make sure each application, when packaged for release, is signed with the same key for security reasons.
Make sure each application, when packaged for release, is signed with the same key for security reasons.
![]() Make sure each application is run with the same user ID. This is done by declaring the same attribute, android:sharedUserId="my.shared.userid", in the ActivityManifest.xml file for each application.
Make sure each application is run with the same user ID. This is done by declaring the same attribute, android:sharedUserId="my.shared.userid", in the ActivityManifest.xml file for each application.
![]() Declare each relevant activity or component to be run in the same process. This is done by declaring the same attribute, android:process="my.shared.process-name", in the ActivityManifest.xml file for each component.
Declare each relevant activity or component to be run in the same process. This is done by declaring the same attribute, android:process="my.shared.process-name", in the ActivityManifest.xml file for each component.
This ensures that the two components are run in the same thread and transparently share the same information. The more complex case where permissions cannot be shared is covered in the “Implementing a Remote Procedure Call” recipe in Chapter 4, “Advanced Threading Techniques.”
Messages between Threads: Handlers
After multiple threads run concurrently, such as a main application thread and a background thread, there needs to be a way for them to communicate. Example use cases for such communication are:
![]() A main thread serves time-critical information and passes messages to the background time-consuming thread to update.
A main thread serves time-critical information and passes messages to the background time-consuming thread to update.
![]() A large computation completes and sends a message back to the calling thread with the result.
A large computation completes and sends a message back to the calling thread with the result.
This can be accomplished with handlers, which are objects for sending messages between threads. Each handler is bound to a single thread, delivering messages to it and executing commands from it.
Recipe: Scheduling a Runnable Task from the Main Thread
This recipe implements a clock timer, which is often needed in applications. For example, it can be used in a game to keep track of how long a player takes to complete a level. This provides a simple way to handle user interaction while a background thread continues to run.
The timer is run in a background thread so it does not block the UI thread, but it needs to update the UI whenever the time changes. As shown in Listing 3.4, the TextView text starts with a welcome message and the button text with trigger ID starts with the value "Press Me".
Listing 3.4. res/layout/main.xml
<?xml version="1.0" encoding="utf-8"?>
<LinearLayout xmlns:android="http://schemas.android.com/apk/res/android"
android:orientation="vertical"
android:layout_width="match_parent"
android:layout_height="match_parent"
>
<TextView android:id="@+id/text"
android:layout_width="match_parent"
android:layout_height="wrap_content"
android:text="@string/hello"
/>
<Button android:id="@+id/trigger"
android:layout_width="100dip" android:layout_height="100dip"
android:text="Press Me"
/>
</LinearLayout>
These text resources in the layout XML file are associated with TextView variables in the BackgroundTimer Java activity using the following initializers:
mTimeLabel = (TextView) findViewById(R.id.text);
mButtonLabel = (TextView) findViewById(R.id.trigger);
After being identified in Java, the text can be modified during run-time. When the application starts, mUpdateTimeTask starts a timer and overwrites the text mTimeLabel with the new time in minutes and seconds. When the button is pressed, its onClick() method overwrites the textmButtonLabel with the number of times the button was pressed.
The handler mHandler is created and used to queue the runnable object mUpdateTimeTask. It is first called in the onCreate() method, and then the recursive call in the task itself continues to update the time every 200ms. This is used more often than not to ensure a smooth time change each second without excessive overhead in task calls. The complete activity is shown in Listing 3.5.
Listing 3.5. src/com/cookbook/background_timer/BackgroundTimer.java
package com.cookbook.background_timer;
import android.app.Activity;
import android.os.Bundle;
import android.os.Handler;
import android.os.SystemClock;
import android.view.View;
import android.widget.Button;
import android.widget.TextView;
public class BackgroundTimer extends Activity {
//Keep track of button presses, a main thread task
private int buttonPress=0;
TextView mButtonLabel;
//counter of time since app started, a background task
private long mStartTime = 0L;
private TextView mTimeLabel;
//handler to handle the message to the timer task
private Handler mHandler = new Handler();
@Override
public void onCreate(Bundle savedInstanceState) {
super.onCreate(savedInstanceState);
setContentView(R.layout.main);
if (mStartTime == 0L) {
mStartTime = SystemClock.uptimeMillis();
mHandler.removeCallbacks(mUpdateTimeTask);
mHandler.postDelayed(mUpdateTimeTask, 100);
}
mTimeLabel = (TextView) findViewById(R.id.text);
mButtonLabel = (TextView) findViewById(R.id.trigger);
Button startButton = (Button) findViewById(R.id.trigger);
startButton.setOnClickListener(new View.OnClickListener() {
public void onClick(View view){
mButtonLabel.setText("Pressed " + ++buttonPress
+ " times");
}
});
}
private Runnable mUpdateTimeTask = new Runnable() {
public void run() {
final long start = mStartTime;
long millis = SystemClock.uptimeMillis() - start;
int seconds = (int) (millis / 1000);
int minutes = seconds / 60;
seconds = seconds % 60;
mTimeLabel.setText("" + minutes + ":"
+ String.format("%02d",seconds));
mHandler.postDelayed(this, 200);
}
};
@Override
protected void onPause() {
mHandler.removeCallbacks(mUpdateTimeTask);
super.onPause();
}
@Override
protected void onResume() {
super.onResume();
mHandler.postDelayed(mUpdateTimeTask, 100);
}
}
Recipe: Using a Countdown Timer
The previous recipe is an example of handlers and a functional timer. Another timer is provided with the built-in class CountDownTimer. This encapsulates the creation of a background thread and the handler queuing into a convenient class call.
The countdown timer takes two arguments: the number of milliseconds until the countdown is done and how often in milliseconds to process onTick() callbacks. The onTick() method is used to update the countdown text. Note that otherwise the recipe is identical to the previous recipe. The full activity is shown in Listing 3.6.
Listing 3.6. src/com/cookbook/countdown/CountDownTimerExample.java
package com.cookbook.countdown;
import android.app.Activity;
import android.os.Bundle;
import android.os.CountDownTimer;
import android.view.View;
import android.widget.Button;
import android.widget.TextView;
public class CountDownTimerExample extends Activity {
//Keep track of button presses, a main thread task
private int buttonPress=0;
TextView mButtonLabel;
//countdown timer, a background task
private TextView mTimeLabel;
@Override
public void onCreate(Bundle savedInstanceState) {
super.onCreate(savedInstanceState);
setContentView(R.layout.main);
mTimeLabel = (TextView) findViewById(R.id.text);
mButtonLabel = (TextView) findViewById(R.id.trigger);
new CountDownTimer(30000, 1000) {
public void onTick(long millisUntilFinished) {
mTimeLabel.setText("seconds remaining: "
+ millisUntilFinished / 1000);
}
public void onFinish() {
mTimeLabel.setText("done!");
}
}.start();
Button startButton = (Button) findViewById(R.id.trigger);
startButton.setOnClickListener(new View.OnClickListener() {
public void onClick(View view){
mButtonLabel.setText("Pressed " + ++buttonPress + " times");
}
});
}
}
Recipe: Handling a Time-Consuming Initialization
This recipe addresses a common case of needing to run a time-consuming initialization when an application starts. Initially, the layout is set to show a specific “Loading. . .” splash screen specified in the loading.xml file. In this example, it is a simple text message as shown in Listing 3.7, but it could be a company logo or introductory animation.
Listing 3.7. res/layout/loading.xml
<?xml version="1.0" encoding="utf-8"?>
<LinearLayout
xmlns:android="http://schemas.android.com/apk/res/android"
android:layout_width="wrap_content"
android:layout_height="wrap_content">
<TextView android:id="@+id/loading"
android:layout_width="match_parent"
android:layout_height="wrap_content"
android:text="Loading..."
/>
</LinearLayout>
While this layout is being displayed, the function initializeArrays(), which takes time to complete, is launched in a background thread to avoid hanging the UI. The initialization uses static variables to ensure that a screen change or another instance of the activity does not require a recalculation of the data.
When the initialization is done, a message is sent to the handler mHandler. Since the act of sending a message is all the information needed, just an empty message is sent as mHandler.sendEmptyMessage(0).
Upon receiving the message, the UI thread runs the handleMessage() method. It is overridden to continue with the activity after the starting initialization, here setting up the main screen specified in the main.xml layout file. The full activity is shown in Listing 3.8.
Listing 3.8. src/com/cookbook/handle_message/HandleMessage.java
package com.cookbook.handle_message;
import android.app.Activity;
import android.os.Bundle;
import android.os.Handler;
import android.os.Message;
public class HandleMessage extends Activity implements Runnable {
@Override
public void onCreate(Bundle savedInstanceState) {
super.onCreate(savedInstanceState);
setContentView(R.layout.loading);
Thread thread = new Thread(this);
thread.start();
}
private Handler mHandler = new Handler() {
public void handleMessage(Message msg) {
setContentView(R.layout.main);
}
};
public void run(){
initializeArrays();
mHandler.sendEmptyMessage(0);
}
final static int NUM_SAMPS = 1000;
static double[][] correlation;
void initializeArrays() {
if(correlation!=null) return;
correlation = new double[NUM_SAMPS][NUM_SAMPS];
//calculation
for(int k=0; k<NUM_SAMPS; k++) {
for(int m=0; m<NUM_SAMPS; m++) {
correlation[k][m] = Math.cos(2*Math.PI*(k+m)/1000);
}
}
}
}
Alerts
Alerts provide a quick message to the user outside of the application’s main UI. An alert can be in an overlay window such as a toast or AlertDialog box. It can also be in the notification bar at the top of the screen. The toast alert provides a printed message to the screen with a single line of code. There is no need to work with the layout files. For this reason, it is also a handy debug tool, equivalent to the printf statement in C programs.
Recipe: Using Toast to Show a Brief Message on the Screen
The Toast method was introduced in the previous chapter in a compact form:
Toast.makeText(this, "text", Toast.LENGTH_SHORT).show();
It can also be written as a multiline command:
Toast tst = Toast.makeText(this, "text", Toast.LENGTH_SHORT);
tst.show();
This form is useful when the text needs to be shown multiple times, as the instance in the first line can be reused.
Two other uses for the multiline Toast command are to reposition the text location or to add an image. To reposition the text location, or to center the toast in the screen display, use setGravity before calling the show() method:
tst.setGravity(Gravity.CENTER, tst.getXOffset() / 2,
tst.getYOffset() / 2);
To add an image to a toast, use the following:
Toast tst = Toast.makeText(this, "text", Toast.LENGTH_LONG);
ImageView view = new ImageView(this);
view.setImageResource(R.drawable.my_figure);
tst.setView(view);
tst.show();
Recipe: Using an Alert Dialog Box
Providing a user with an alert and up to three buttons of possible actions can be done with the AlertDialog class. Some examples are:
![]() “Your final score was 90/100: Try this level again, advance to next level, or go back to the main menu.”
“Your final score was 90/100: Try this level again, advance to next level, or go back to the main menu.”
![]() “The image file is corrupt. Choose another or cancel action.”
“The image file is corrupt. Choose another or cancel action.”
This recipe takes the first example and shows how to provide an action on each choice depending on which button is clicked. The example code is shown in Listing 3.9.
AlertDialog is initialized using the create() method; the text is specified using the setMessage() method; the three possible button texts and corresponding actions are specified using the setButton() method; and finally, the dialog box is displayed to the screen using the show() method. Note that the logic in each of the onClick() callback functions is just an example to show how to specify button actions.
Listing 3.9. Providing Action Choices with AlertDialog
AlertDialog dialog = new AlertDialog.Builder(this).create();
dialog.setMessage("Your final score: " + mScore + "/" + PERFECT_SCORE);dialog.setButton(DialogInterface.BUTTON_POSITIVE, "Try this level again",
new DialogInterface.OnClickListener() {
public void onClick(DialogInterface dialog, int which) {
mScore = 0;
start_level();
}
});dialog.setButton(DialogInterface.BUTTON_NEGATIVE, "Advance to next level",
new DialogInterface.OnClickListener() {
public void onClick(DialogInterface dialog, int which) {
mLevel++;
start_level();
}
});dialog.setButton(DialogInterface.BUTTON_NEUTRAL, "Back to the main menu",
new DialogInterface.OnClickListener() {
public void onClick(DialogInterface dialog, int which) {
mLevel = 0;
finish();
}
});dialog.show();
This produces the pop-up dialog box shown in Figure 3.2. Note that the buttons are displayed in the order BUTTON_POSITIVE, BUTTON_NEUTRAL, and BUTTON_NEGATIVE. If a dialog box with two options or one option is needed, do not specify all three button choices.
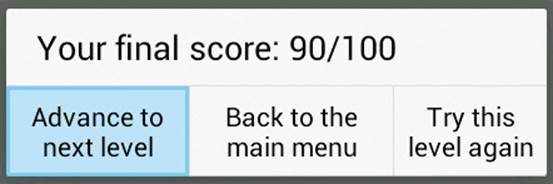
Figure 3.2 An alert dialog box with three options
Recipe: Showing Notification in the Status Bar
The status bar across the top of the device screen shows pending notifications for users to read whenever they choose. In general, because an activity mostly interacts with the user, services are more likely to use this feature. As a rule, notifications should be concise and minimal for the best user experience.
The steps for creating a status bar notification are:
1. Declare a notification and specify how it displays on the status bar:
String ns = Context.NOTIFICATION_SERVICE;
mNManager = (NotificationManager) getSystemService(ns);
final Notification msg = new Notification(R.drawable.icon,
"New event of importance",
System.currentTimeMillis());
2. Define how it looks when the status bar is expanded for details and the action taken when clicked (this future action is defined by a PendingIntent class):
Context context = getApplicationContext();
CharSequence contentTitle = "ShowNotification Example";
CharSequence contentText = "Browse Android Cookbook Site";
Intent msgIntent = new Intent(Intent.ACTION_VIEW,
Uri.parse("http://www.pearson.com"));
PendingIntent intent =
PendingIntent.getActivity(ShowNotification.this,
0, msgIntent,
Intent.FLAG_ACTIVITY_NEW_TASK);
3. Add any further configurable information, such as whether to blink an LED, play a sound, or automatically cancel the notification after it is selected. The latter two are shown here:
msg.defaults |= Notification.DEFAULT_SOUND;
msg.flags |= Notification.FLAG_AUTO_CANCEL;
4. Set the information for the notification event to the system:
msg.setLatestEventInfo(context, contentTitle, contentText, intent);
5. When the event of interest happens in the application, trigger notification with a unique identifier:
mNManager.notify(NOTIFY_ID, msg);
6. Upon completion, clear notification as needed with the same identifier.
If any information gets changed, the notification should be updated rather than sending another notification. This can be done by updating the relevant information in step 2, and then calling setLatestEventInfo again. An example activity illustrating a notification is shown in Listing 3.10.
Listing 3.10. src/com/cookbook/show_notification/ShowNotification.java
package com.cookbook.show_notification;
import android.app.Activity;
import android.app.Notification;
import android.app.NotificationManager;
import android.app.PendingIntent;
import android.content.Context;
import android.content.Intent;
import android.net.Uri;
import android.os.Bundle;
import android.view.View;
import android.view.View.OnClickListener;
import android.widget.Button;
public class ShowNotification extends Activity {
private NotificationManager mNManager;
private static final int NOTIFY_ID=1100;
/** called when the activity is first created */
@Override
public void onCreate(Bundle savedInstanceState) {
super.onCreate(savedInstanceState);
setContentView(R.layout.main);
String ns = Context.NOTIFICATION_SERVICE;
mNManager = (NotificationManager) getSystemService(ns);
final Notification msg = new Notification(R.drawable.icon,
"New event of importance",
System.currentTimeMillis());
Button start = (Button)findViewById(R.id.start);
Button cancel = (Button)findViewById(R.id.cancel);
start.setOnClickListener(new OnClickListener() {
public void onClick(View v) {
Context context = getApplicationContext();
CharSequence contentTitle = "ShowNotification Example";
CharSequence contentText = "Browse Android Cookbook Site";
Intent msgIntent = new Intent(Intent.ACTION_VIEW,
Uri.parse("http://www.pearson.com"));
PendingIntent intent =
PendingIntent.getActivity(ShowNotification.this,
0, msgIntent,
Intent.FLAG_ACTIVITY_NEW_TASK);
msg.defaults |= Notification.DEFAULT_SOUND;
msg.flags |= Notification.FLAG_AUTO_CANCEL;
msg.setLatestEventInfo(context,
contentTitle, contentText, intent);
mNManager.notify(NOTIFY_ID, msg);
}
});
cancel.setOnClickListener(new OnClickListener() {
public void onClick(View v) {
mNManager.cancel(NOTIFY_ID);
}
});
}
}
With Android 4.1 came additional notification styles and an API based on a builder pattern to create them. The recommended way to use them is by using the NotificationCompat API, which requires the addition of android-support-v4.jar to the project’s /libs/ folder. The four new styles are big text, big picture, inbox style, and the ability to add a progress bar to a notification. All notifications still need to have a small icon, title, and content text. Big text and big picture are very similar (either a text or a bitmap object is added as content). The big-picture style is shown inListing 3.11.
Listing 3.11. A Big-Picture-Style Notification
Button startBigPic = (Button)findViewById(R.id.startBigPic);
Button stopBigPic = (Button)findViewById(R.id.stopBigPic);
startBigPic.setOnClickListener(new OnClickListener() {
public void onClick(View v) {
Context context = getApplicationContext();
CharSequence contentTitle = "Show Big Notification Example";
CharSequence contentText = "Browse Android Cookbook Site";
Intent msgIntent = new Intent(Intent.ACTION_VIEW,
Uri.parse("http://www.pearson.com"));
PendingIntent intent =
PendingIntent.getActivity(ShowNotification.this,
0, msgIntent,
Intent.FLAG_ACTIVITY_NEW_TASK);
NotificationCompat.Builder builder =
new NotificationCompat.Builder(context);
builder.setSmallIcon(R.drawable.icon);
builder.setContentTitle(contentTitle);
builder.setContentText(contentText);
builder.setContentIntent(intent);
NotificationCompat.BigPictureStyle pictureStyle = new
NotificationCompat.BigPictureStyle();
Bitmap bigPicture= BitmapFactory.decodeResource(getResources(),
R.drawable.bigpicture);
pictureStyle.bigPicture(bigPicture);
builder.setStyle(pictureStyle);
mNManager.notify(NOTIFY_ID+1,builder.build());
}
});
stopBigPic.setOnClickListener(new OnClickListener() {
public void onClick(View v) {
mNManager.cancel(NOTIFY_ID+1);
}
});
Intent, title, and content text are the same as in the previous notification. A new builder instance is obtained and the mandatory information is set by calling builder.setSmallIcon(..) and builder.setContentXX(..) for text, title, and intent. The NotificationCompat.BigPictureStyle class needs to be given a bitmap object, which can be read from the drawable folder with BitmapFactory.decodeResource(getResources,R.drawable.bigpicture). A call to builder.setStyle(pictureStyle); will ensure that the image gets displayed, then the notification is shown.
The inbox style displays a list of text lines that resemble an email inbox. The steps to display this are the same, except that an instance of NotificationCompat.InboxStyle is given to the builder, and every line of text needs to be added to the style object by calling inboxStyle.addline(..)with a CharSequence argument. This is shown in Listing 3.12.
Listing 3.12. Inbox-Style Notification
Button startInbox = (Button)findViewById(R.id.startInbox);
Button stopInbox = (Button)findViewById(R.id.stopInbox);
startInbox.setOnClickListener(new OnClickListener() {
public void onClick(View v) {
Context context = getApplicationContext();
CharSequence contentTitle = "Show Big Notification Example";
CharSequence contentText = "Browse Android Cookbook Site";
Intent msgIntent = new Intent(Intent.ACTION_VIEW,
Uri.parse("http://www.pearson.com"));
PendingIntent intent =
PendingIntent.getActivity(ShowNotification.this,
0, msgIntent,
Intent.FLAG_ACTIVITY_NEW_TASK);
NotificationCompat.Builder builder =
new NotificationCompat.Builder(context);
builder.setSmallIcon(R.drawable.icon);
builder.setContentTitle(contentTitle);
builder.setContentText(contentText);
NotificationCompat.InboxStyle inboxStyle =
new NotificationCompat.InboxStyle();
for(int i=0;i<4;i++){
inboxStyle.addLine("subevent #"+i);
}
builder.setStyle(inboxStyle);
builder.setContentIntent(intent);
mNManager.notify(NOTIFY_ID+2,builder.build());
}
});
stopInbox.setOnClickListener(new OnClickListener() {
public void onClick(View v) {
mNManager.cancel(NOTIFY_ID+2);
}
});
Services
A service is an Android component that runs in the background without any user interaction. It can be started and stopped by any component. While it is running, any component can bind to it. A service can also stop itself. Some illustrative scenarios of a service are:
![]() An activity provides the user a way to select a set of music files, which then starts a service to play back the files. During playback, a new activity starts and binds to the existing service to allow the user to change songs or stop playback.
An activity provides the user a way to select a set of music files, which then starts a service to play back the files. During playback, a new activity starts and binds to the existing service to allow the user to change songs or stop playback.
![]() An activity starts a service to upload a set of pictures to a website. A new activity starts and binds to the existing service to determine which file is currently being uploaded and displays the picture to the screen.
An activity starts a service to upload a set of pictures to a website. A new activity starts and binds to the existing service to determine which file is currently being uploaded and displays the picture to the screen.
![]() A broadcast receiver receives a message that a picture was taken and launches a service to upload the new picture to a website. The broadcast receiver then goes inactive and is eventually killed to reclaim memory, but the service continues until the picture is uploaded. Then, the service stops itself.
A broadcast receiver receives a message that a picture was taken and launches a service to upload the new picture to a website. The broadcast receiver then goes inactive and is eventually killed to reclaim memory, but the service continues until the picture is uploaded. Then, the service stops itself.
The general lifecycle of a service is illustrated in Figure 3.3.
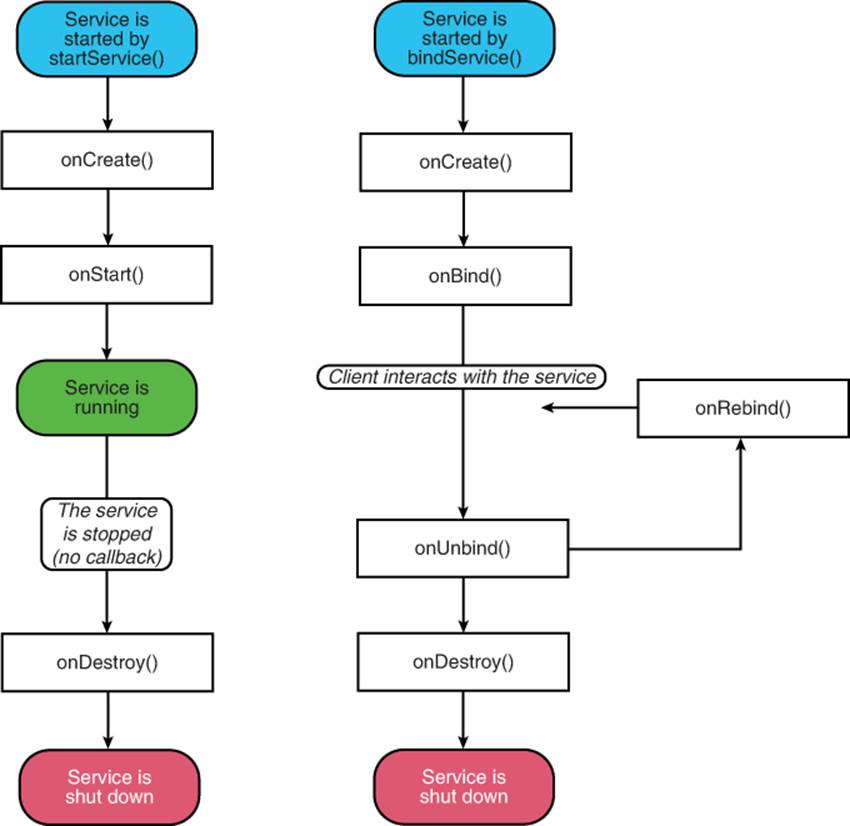
Figure 3.3 Service lifecycle (http://developer.android.com/)
As an aside on the third scenario, any background task within a component will be killed when the component is killed. Therefore, tasks that are meaningful to continue even after the component stops should be done by launching a service. This ensures that the operating system is aware that active work is still being done by the process.
All services extend the abstract class Service or one of its subclasses. Similar to an activity, the entry point to each service is the onCreate() method. There is no concept of pausing a service, but it can be stopped, which calls the onDestroy() method.
Recipe: Creating a Self-Contained Service
The steps to create a self-contained service associated with a single component are:
1. Create a class to extend Service. (In Eclipse, this can be done by right-clicking the project, choosing New → Class, and specifying android.app.Service as the superclass.)
2. Declare the service in the AndroidManifest.xml file by adding a variation of the following (this should be done automatically if the previous Eclipse step was used):
<service android:name=".myService"></service>
3. Override the onCreate() and onDestroy() methods. (In Eclipse, this can be done by right-clicking on the class file, choosing Source → Override/Implement Methods..., and checking the onCreate() and onDestroy() methods.) These contain the functionality of the service when it is started and stopped.
4. Override the onBind() method for cases when a new component binds to this service after it has already been created.
5. Activate the service from an external trigger. The service cannot run by itself but instead needs to be activated by a separate component or trigger in some way. For example, a component can create an intent to start or stop the service using startService() or stopService() as needed.
To illustrate the previous process, a simple service is shown in Listing 3.13 to use the play_music() function from the first recipe in this chapter. Note the following:
![]() A Toast is used to show when the service is started or stopped.
A Toast is used to show when the service is started or stopped.
![]() The onBind() method is overridden but not used. (This can be extended as needed.)
The onBind() method is overridden but not used. (This can be extended as needed.)
![]() A thread still needs to be created for playing music so as not to block the UI.
A thread still needs to be created for playing music so as not to block the UI.
![]() The service does not stop when the activity is destroyed (for example, by changing the screen orientation) or when the activity is paused (for example, when pressing the Home key). This shows that the service, although launched by the activity, runs as its own entity.
The service does not stop when the activity is destroyed (for example, by changing the screen orientation) or when the activity is paused (for example, when pressing the Home key). This shows that the service, although launched by the activity, runs as its own entity.
Listing 3.13. src/com/cookbook/simple_service/SimpleService.java
package com.cookbook.simple_service;
import android.app.Service;
import android.content.Intent;
import android.media.MediaPlayer;
import android.os.IBinder;
import android.widget.Toast;
public class SimpleService extends Service {
@Override
public IBinder onBind(Intent arg0) {
return null;
}
boolean paused = false;
@Override
public void onCreate() {
super.onCreate();
Toast.makeText(this,"Service created ...",
Toast.LENGTH_LONG).show();
paused = false;
Thread initBkgdThread = new Thread(new Runnable() {
public void run() {
play_music();
}
});
initBkgdThread.start();
}
@Override
public void onDestroy() {
super.onDestroy();
Toast.makeText(this, "Service destroyed ...",
Toast.LENGTH_LONG).show();
paused = true;
}
int[] notes = {R.raw.c5, R.raw.b4, R.raw.a4, R.raw.g4};
int NOTE_DURATION = 400; //millisec
MediaPlayer m_mediaPlayer;
private void play_music() {
for(int ii=0; ii<12; ii++) {
//Check to ensure main activity not paused
if(!paused) {
if(m_mediaPlayer != null) {m_mediaPlayer.release();}
m_mediaPlayer = MediaPlayer.create(this, notes[ii%4]);
m_mediaPlayer.start();
try {
Thread.sleep(NOTE_DURATION);
} catch (InterruptedException e) {
e.printStackTrace();
}
}
}
}
}
The AndroidManifest.xml file now has both the activity and service declared, as shown in Listing 3.14.
Listing 3.14. AndroidManifest.xml
<?xml version="1.0" encoding="utf-8"?>
<manifest xmlns:android="http://schemas.android.com/apk/res/android"
package="com.cookbook.simple_service"
android:versionCode="1"
android:versionName="1.0">
<application android:icon="@drawable/icon"
android:label="@string/app_name">
<activity android:name=".SimpleActivity"
android:label="@string/app_name">
<intent-filter>
<action android:name="android.intent.action.MAIN" />
<category android:name="android.intent.category.LAUNCHER" />
</intent-filter>
</activity>
<service android:name=".SimpleService"></service>
</application>
<uses-sdk android:minSdkVersion="3" />
</manifest>
The example activity that sets up the UI to trigger the start and stop of this service is shown in Listing 3.15, and the associated layout file is shown in Listing 3.16 for the two buttons.
Listing 3.15. src/com/cookbook/simple_service/SimpleActivity.java
package com.cookbook.simple_service;
import android.app.Activity;
import android.content.Intent;
import android.os.Bundle;
import android.view.View;
import android.widget.Button;
public class SimpleActivity extends Activity {
@Override
protected void onCreate(Bundle savedInstanceState) {
super.onCreate(savedInstanceState);
setContentView(R.layout.main);
Button startButton = (Button) findViewById(R.id.Button01);
startButton.setOnClickListener(new View.OnClickListener() {
public void onClick(View view){
startService(new Intent(SimpleActivity.this,
SimpleService.class));
}
});
Button stopButton = (Button)findViewById(R.id.Button02);
stopButton.setOnClickListener(new View.OnClickListener() {
public void onClick(View v){
stopService(new Intent(SimpleActivity.this,
SimpleService.class));
}
});
}
}
Listing 3.16. res/layout/main.xml
<?xml version="1.0" encoding="utf-8"?>
<LinearLayout xmlns:android="http://schemas.android.com/apk/res/android"
android:orientation="vertical"
android:layout_width="match_parent"
android:layout_height="match_parent">
<TextView
android:layout_width="match_parent"
android:layout_height="wrap_content"
android:text="@string/hello"
/>
<Button android:text="Do it" android:id="@+id/Button01"
android:layout_width="wrap_content"
android:layout_height="wrap_content"></Button>
<Button android:text="Stop it" android:id="@+id/Button02"
android:layout_width="wrap_content"
android:layout_height="wrap_content"></Button>
</LinearLayout>
Recipe: Adding a WakeLock
When the user presses the power button or the device has not been used for a certain amount of time, the screen goes off and the device goes to standby. While it is on standby, most running processes are shut down or canceled, and the processor goes into sleep mode, saving precious battery life. It is good practice to respect that behavior and not drain the user’s battery by preventing standby. That being said, there are cases when it is desirable to keep an app running even if the screen is off, music playback being a prime example. To be able to keep an app running while the screen is off, the app must set a WakeLock. This recipe uses the service from the previous recipe and adds a WakeLock to it, so that music playback continues after the power button on the device has been pressed. Table 3.1 shows which types of WakeLocks are available for use.
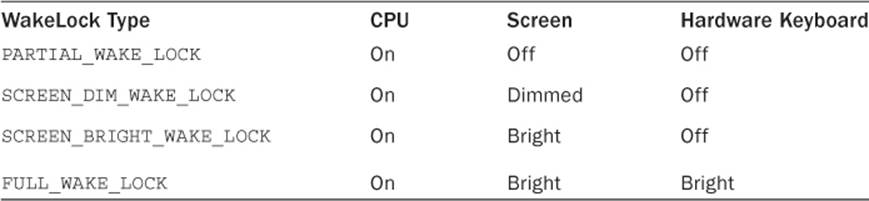
Table 3.1 Comparison of Available WakeLocks
There are two main types of WakeLock: partial WakeLock, which lets the screen go off but makes sure the app is still running, and full WakeLock, which also keeps the screen and the keyboard on even if the power button is pressed. Two subtypes building upon partial WakeLock give a bit more fine-grained control over the screen behavior. This recipe uses the partial WakeLock as the screen does not need to be on while audio is playing. For using WakeLocks, a special WakeLock permission is needed. This is added to the AndroidManifest.xml file in Listing 3.17.
Listing 3.17. AndroidManifest.xml
<?xml version="1.0" encoding="utf-8"?>
<manifest xmlns:android="http://schemas.android.com/apk/res/android"
package="com.cookbook.simple_service"
android:versionCode="1"
android:versionName="1.0">
<uses-permission android:name="android.permission.WAKE_LOCK"/>
<application android:icon="@drawable/icon"
android:label="@string/app_name">
<activity android:name=".SimpleActivity"
android:label="@string/app_name">
<intent-filter>
<action android:name="android.intent.action.MAIN" />
<category android:name="android.intent.category.LAUNCHER" />
</intent-filter>
</activity>
<service android:name=".SimpleService"></service>
</application>
<uses-sdk android:minSdkVersion="3" />
</manifest>
To acquire a WakeLock, access to the PowerManager class is needed. This class is a system service and can be retrieved by calling Context.getSystemService(Context.PowerService). To create a new WakeLock instance, call the following:
powerManager.mWakeLock =
powerManager.newWakeLock(PowerManager.PARTIAL_WAKE_LOCK, LOG_TAG);
Here, all the WakeLock properties wanted are specified by concatenating the flags with an OR operation in the first argument, and giving a name tag to the WakeLock in the second, usually the log tag of the service or activity. To activate the WakeLock, simply call mWakelock.acquire()whenever needed.
WakeLocks need to be explicitly released if they are not needed anymore. This is done by checking if they are held with mWakelock.isHeld() and then calling mWakelock.release();. After the WakeLock is released, the device can go back to sleep as it would normally when the screen goes off. One thing to note is that WakeLocks need to be released in the reverse order in which they were acquired, in the rare case that more than one of them is used. This is demonstrated in Listing 3.18.
Listing 3.18. Simple Service with a WakeLock
public class SimpleService extends Service {
private static final String LOG_TAG = SimpleService.class.getSimpleName();
@Override
public IBinder onBind(Intent arg0) {
return null;
}
boolean paused = false;
private WakeLock mWakeLock=null;
@Override
public void onCreate() {
super.onCreate();
Toast.makeText(this,"Service created ...", Toast.LENGTH_LONG).show();
setWakeLock();
paused = false;
Thread initBkgdThread = new Thread(new Runnable() {
public void run() {
play_music();
}
});
initBkgdThread.start();
}
private void setWakeLock() {
PowerManager powerManager =
(PowerManager)getSystemService(Context.POWER_SERVICE);
mWakeLock=powerManager.newWakeLock(PowerManager.PARTIAL_WAKE_LOCK, LOG_TAG);
mWakeLock.acquire();
}
@Override
public void onDestroy() {
super.onDestroy();
releaseWakeLock();
Toast.makeText(this, "Service destroyed ...", Toast.LENGTH_LONG).show();
paused = true;
}
private void releaseWakeLock() {
if(mWakeLock!=null && mWakeLock.isHeld())
{
mWakeLock.release();
}
}
int[] notes = {R.raw.c5, R.raw.b4, R.raw.a4, R.raw.g4};
int NOTE_DURATION = 400; //millisec
MediaPlayer m_mediaPlayer;
private void play_music() {
for(int ii=0; ii<12; ii++) {
//Check to ensure main activity not paused
if(!paused) {
if(m_mediaPlayer != null) {m_mediaPlayer.release();}
m_mediaPlayer = MediaPlayer.create(this, notes[ii%4]);
m_mediaPlayer.start();
try {
Thread.sleep(NOTE_DURATION);
} catch (InterruptedException e) {
e.printStackTrace();
}
}
}
}
}
In Listing 3.18, WakeLock is handled in two separate functions for a cleaner separation; setWakeLock() is called in the onCreate() method of the service so it gets set the moment the service starts. In the onDestroy() method, releaseWakeLock() is called to make sure system resources are released if the service receives a stop request.
Recipe: Using a Foreground Service
Services are meant to run in the background and do short-lived tasks with a lower priority. This means that services are the first thing the system will kill if a foreground process such as an activity needs more memory or computing power. This is the desired behavior in most cases. However, there are some times when it is desirable for a service to stay alive and take priority over other background tasks. Again, playing back music is a prime example. Android allows a service to be marked as a foreground service, but this requires setting a mandatory ongoing notification in the notification bar, so the user is informed about a service taking priority.
Activating the foreground mode is as simple as calling the following:
startForeground(NOTIFICATION_ID, getForegroundNotification());
The arguments of startForeground are an ID with which to recognize the notification and a new instance of a notification to show.
Foreground mode can easily be stopped by calling stopForeground(true);, the flag telling it to remove the notification now. Again, those two calls are put in separate methods and called from the onCreate() and onDestroy() methods of the service. The biggest hassle here is creating the notification itself, as can be seen in Listing 3.19.
Listing 3.19. Foreground Service Class
public class SimpleService extends Service {
private static final int NOTIFICATION_ID = 1;
@Override
public IBinder onBind(Intent arg0) {
return null;
}
boolean paused = false;
@Override
public void onCreate() {
super.onCreate();
enforceForegroundMode();
Toast.makeText(this,"Service created ...", Toast.LENGTH_LONG).show();
paused = false;
Thread initBkgdThread = new Thread(new Runnable() {
public void run() {
play_music();
}
});
initBkgdThread.start();
}
@Override
public void onDestroy() {
super.onDestroy();
releaseForegroundMode();
Toast.makeText(this, "Service destroyed ...", Toast.LENGTH_LONG).show();
paused = true;
}
private final void enforceForegroundMode() {
startForeground(NOTIFICATION_ID, getForegroundNotification());
}
private final void releaseForegroundMode(){
stopForeground(true);
}
protected Notification getForegroundNotification(){
// Set the icon, scrolling text, and timestamp
Notification notification = new Notification(R.drawable.icon,
"playback running",System.currentTimeMillis());
// the PendingIntent to launch the activity if the user selects this notification
Intent startIntent=new Intent(getApplicationContext(),SimpleActivity.class);
startIntent.setFlags(Intent.FLA)
PendingIntent contentIntent = PendingIntent.getActivity(this, 0, startIntent, 0);
// Set the info for the views that show in the notification panel
notification.setLatestEventInfo(
this,
"Playing Music",
"Playback running",
contentIntent
);
return notification;
}
int[] notes = {R.raw.c5, R.raw.b4, R.raw.a4, R.raw.g4};
int NOTE_DURATION = 400; //millisec
MediaPlayer m_mediaPlayer;
private void play_music() {
for(int ii=0; ii<12; ii++) {
//Check to ensure main activity not paused
if(!paused) {
if(m_mediaPlayer != null) {m_mediaPlayer.release();}
m_mediaPlayer = MediaPlayer.create(this, notes[ii%4]);
m_mediaPlayer.start();
try {
Thread.sleep(NOTE_DURATION);
} catch (InterruptedException e) {
e.printStackTrace();
}
}
}
}
}
This listing shows that the code for creating the notification is the biggest change to the service class. First, a new notification instance is created and given an icon and ticker text to show in the collapsed notification bar. An intent is then wrapped into a pending intent that will display the activity if the user clicks on the notification in the fully shown state. That intent is set together with a title and a bit of descriptive text in notification.setLatestEventInfo(..), and then this notification instance is returned to pass it to the startForeground(..) method.
Recipe: Using an IntentService
An IntentService is a service that holds a queue of intents it has received and executes them one by one. This is an ideal worker thread for many background tasks like polling servers for new information or downloading large amounts of data. As intents are very flexible and can hold any type of parcelable object in their extras, the amount of configuration given within an intent is almost limitless. This enables sending very complex queries to an IntentService and then letting it react. This recipe shows a very simple example of such a service that receives texts to show in a notification. For this, a layout with an edit text field for entering the message and a button to send it are needed, as shown in Listing 3.20.
Listing 3.20. main.xml
<?xml version="1.0" encoding="utf-8"?>
<LinearLayout xmlns:android="http://schemas.android.com/apk/res/android"
android:orientation="vertical"
android:layout_width="match_parent"
android:layout_height="match_parent"
>
<TextView
android:layout_width="match_parent"
android:layout_height="wrap_content"
android:text="@string/hello"
/>
<EditText
android:id="@+id/editText1"
android:layout_width="match_parent"
android:layout_height="wrap_content"
android:ems="10" >
<requestFocus />
</EditText>
<Button
android:id="@+id/Button01"
android:layout_width="wrap_content"
android:layout_height="wrap_content"
android:text="send message" />
</LinearLayout>
This activity is almost the same as in the other service examples. The edit text box and the button in onCreate are registered and an onClickListener is set to the button. Within the onClickListener the string is read from the edit box and put into the intent as a string extra called msg. ThenstartService(..) is called on the intent. This is shown in Listing 3.21.
Listing 3.21. Main Activity
public class SimpleActivity extends Activity {
EditText editText;
@Override
protected void onCreate(Bundle savedInstanceState) {
super.onCreate(savedInstanceState);
setContentView(R.layout.main);
editText=(EditText) findViewById(R.id.editText1);
Button sendButton = (Button) findViewById(R.id.Button01);
sendButton.setOnClickListener(new View.OnClickListener() {
public void onClick(View view){
Intent intent =
new Intent(SimpleActivity.this, SimpleIntentService.class);
intent.putExtra("msg",editText.getText().toString());
startService(intent);
}
});
}
}
The IntentService class does all the hard work; it will even stop itself after the IntentQueue is empty. Only two things need to be implemented: a constructor that gives the queue a name by calling super("myName"), and the handleIntent method, in which the intent is demarshaled and the query is executed. Not much more is done than creating a notification, as seen in previous recipes, and extracting the message sent with intent.getStringExtra("msg"). That string is used to replace the descriptive text of the notification. Listing 3.22 shows the full IntentService.
Listing 3.22. Simple IntentService
public class SimpleIntentService extends IntentService {
Notification notification=null;
private NotificationManager mNManager;
public SimpleIntentService() {
super("SimpleIntentService");
}
@Override
protected void onHandleIntent(Intent intent) {
createNotification();
if(intent.hasExtra("msg")){
updateNotification(intent.getStringExtra("msg"));
mNManager.notify(1, notification);
}
}
protected void createNotification(){
if(mNManager==null){
mNManager = (NotificationManager)
getSystemService(Context.NOTIFICATION_SERVICE);
}
notification = new Notification(
R.drawable.icon,
"New event of importance",
System.currentTimeMillis());
// Set the icon, scrolling text, and timestamp
}
protected void updateNotification(final String text){
// the PendingIntent to launch the activity if the user
// selects this notification
Intent startIntent=new Intent(getApplicationContext(),SimpleActivity.class);
PendingIntent contentIntent =
PendingIntent.getActivity(this, 0,startIntent, 0);
// Set the info for the views that show in the notification panel
notification.setLatestEventInfo(
this,
"Message received",
text,
contentIntent
);
}
}
Broadcast Receivers
A broadcast receiver listens for relevant broadcast messages to trigger an event. Some examples of broadcasted events already sent from the OS are:
![]() The camera button was pressed.
The camera button was pressed.
![]() The battery is low.
The battery is low.
![]() A new application was installed.
A new application was installed.
A user-generated component can also send a broadcast, such as:
![]() A calculation was finished.
A calculation was finished.
![]() A particular thread has started.
A particular thread has started.
All broadcast receivers extend the abstract class BroadcastReceiver or one of its subclasses. The lifecycle of a broadcast receiver is simple. A single method, onReceive(), is called when a message arrives for the receiver. After this method is finished, the BroadcastReceiver instance goes inactive.
A broadcast receiver normally initiates a separate component or sends a notification to the user in its onReceive() method, as discussed later in this chapter. If a broadcast receiver needs to do something more time-consuming, it should start a service instead of spawn a thread because an inactive broadcast receiver might be killed by the system.
Recipe: Starting a Service When the Camera Button Is Pressed
This recipe shows how to start a service based on a broadcasted event, such as when the camera button is pressed. The BroadcastReceiver is needed to listen for the specified event(s) and subsequently launch the service. The BroadcastReceiver itself is started in another component. (Here, it is implemented as a stand-alone activity, SimpleActivity.)
The activity shown in Listing 3.23 sets up a BroadcastReceiver and builds an intent with the filter for the camera button. The filter for package-added messages is also added for illustration purposes. Then, the BroadcastReceiver is started and this intent filter is passed to it using theregisterReceiver() method.
Listing 3.23. src/com/cookbook/simple_receiver/SimpleActivity.java
package com.cookbook.simple_receiver;
import android.app.Activity;
import android.content.Intent;
import android.content.IntentFilter;
import android.os.Bundle;
public class SimpleActivity extends Activity {
SimpleBroadcastReceiver intentReceiver =
new SimpleBroadcastReceiver();
/** called when the activity is first created */
@Override
public void onCreate(Bundle savedInstanceState) {
super.onCreate(savedInstanceState);
setContentView(R.layout.main);
IntentFilter intentFilter =
new IntentFilter(Intent.ACTION_CAMERA_BUTTON);
intentFilter.addAction(Intent.ACTION_PACKAGE_ADDED);
registerReceiver(intentReceiver, intentFilter);
}
@Override
protected void onDestroy() {
unregisterReceiver(intentReceiver);
super.onDestroy();
}
}
Note that the receiver is unregistered if the activity is ever destroyed. This is unnecessary, but useful. The BroadcastReceiver component is shown in Listing 3.24. The single lifecycle method onReceive() is overridden to check for any broadcasted event. If it matches the specified event (here, it is the ACTION_CAMERA_BUTTON event), a service is started in the original context.
Listing 3.24. src/com/cookbook/simple_receiver/SimpleBroadcastReceiver.java
package com.cookbook.simple_receiver;
import android.content.BroadcastReceiver;
import android.content.Context;
import android.content.Intent;
public class SimpleBroadcastReceiver extends BroadcastReceiver {
@Override
public void onReceive(Context rcvContext, Intent rcvIntent) {
String action = rcvIntent.getAction();
if (action.equals(Intent.ACTION_CAMERA_BUTTON)) {
rcvContext.startService(new Intent(rcvContext,
SimpleService2.class));
}
}
}
The service that is started in the SimpleBroadcastReceiver of Listing 3.24 is shown in Listing 3.25. The service simply shows whether it was started or stopped using Toast.
Listing 3.25. src/com/cookbook/simple_receiver/SimpleService2.java
package com.cookbook.simple_receiver;
import android.app.Service;
import android.content.Intent;
import android.os.IBinder;
import android.widget.Toast;
public class SimpleService2 extends Service {
@Override
public IBinder onBind(Intent arg0) {
return null;
}
@Override
public void onCreate() {
super.onCreate();
Toast.makeText(this,"Service created ...",
Toast.LENGTH_LONG).show();
}
@Override
public void onDestroy() {
super.onDestroy();
Toast.makeText(this, "Service destroyed ...",
Toast.LENGTH_LONG).show();
}}
App Widgets
App Widgets are small iconlike views in an application. They implement a subclass of the BroadcastReceiver for use in updating this view. Called widgets for short, they can be embedded into other applications, such as the home screen, by long-clicking (in other words, pressing and holding) an empty area of the touchscreen. This displays a menu where a widget can be selected to install at that location. On Android 4 devices they can also be added from the launcher directly. They can be removed by a long click on the widget and dragging to the trash can. In all, they require the following:
![]() A view describing the appearance of the widget. This is defined in an XML layout resource file and contains text, background, and other layout parameters.
A view describing the appearance of the widget. This is defined in an XML layout resource file and contains text, background, and other layout parameters.
![]() An App Widget provider that receives broadcast events and interfaces to the widget to update it.
An App Widget provider that receives broadcast events and interfaces to the widget to update it.
![]() Detailed information about the App Widget, such as the size and update frequency. Note that the home screen is divided into 4x4 cells for phones and 8x7 cells for tablets, and so a widget is often a multiple of a single cell size.
Detailed information about the App Widget, such as the size and update frequency. Note that the home screen is divided into 4x4 cells for phones and 8x7 cells for tablets, and so a widget is often a multiple of a single cell size.
![]() Optionally, an App Widget configuration activity can be defined to properly set any parameters of the widget. This activity is launched upon creation of the widget.
Optionally, an App Widget configuration activity can be defined to properly set any parameters of the widget. This activity is launched upon creation of the widget.
Recipe: Creating an App Widget
This recipe creates a simple App Widget that displays some text on the home screen. The text is configured to update every second, but note that by default, the Android system forces the minimum update time to be 30 minutes. This helps prevent poorly written widgets from draining the battery. Listing 3.26 implements AppWidgetProvider, which is a subclass of BroadcastReceiver. The main method to override is the onUpdate() function, which gets called when the system determines it is time to update the widgets.
Listing 3.26. src/com/cookbook/widget_example/SimpleWidgetProvider.java
package com.cookbook.simple_widget;
import android.appwidget.AppWidgetManager;
import android.appwidget.AppWidgetProvider;
import android.content.Context;
import android.widget.RemoteViews;
public class SimpleWidgetProvider extends AppWidgetProvider {
final static int APPWIDGET = 1001;
@Override
public void onUpdate(Context context,
AppWidgetManager appWidgetManager, int[] appWidgetIds) {
super.onUpdate(context, appWidgetManager, appWidgetIds);
// Loop through all widgets to display an update
final int N = appWidgetIds.length;
for (int i=0; i<N; i++) {
int appWidgetId = appWidgetIds[i];
String titlePrefix = "Time since the widget was started:";
updateAppWidget(context, appWidgetManager, appWidgetId,
titlePrefix);
}
}
static void updateAppWidget(Context context, AppWidgetManager
appWidgetManager, int appWidgetId, String titlePrefix) {
Long millis = System.currentTimeMillis();
int seconds = (int) (millis / 1000);
int minutes = seconds / 60;
seconds seconds % 60;
CharSequence text = titlePrefix;
text += " " + minutes + ":" + String.format("%02d",seconds));
// Construct the RemoteViews object
RemoteViews views = new RemoteViews(context.getPackageName(),
R.layout.widget_layout);
views.setTextViewText(R.id.widget_example_text, text);
// Tell the widget manager
appWidgetManager.updateAppWidget(appWidgetId, views);
}
}
The XML file describing the detailed information on the widget is shown in Listing 3.27. It shows the size the widget takes on the home screen and how often it should be updated in milliseconds. (The system minimum is 30 minutes.)
Listing 3.27. src/res/xml/widget_info.xml
<?xml version="1.0" encoding="utf-8"?>
<appwidget-provider xmlns:android="http://schemas.android.com/apk/res/android"
android:minWidth="146dp"
android:minHeight="72dp"
android:updatePeriodMillis="1000"
android:initialLayout="@layout/widget_layout"></appwidget-provider>
The view describing the appearance of the widget is laid out in an XML file, as shown in Listing 3.28.
Listing 3.28. src/res/layout/widget_layout.xml
<?xml version="1.0" encoding="utf-8"?>
<TextView xmlns:android="http://schemas.android.com/apk/res/android"
android:id="@+id/widget_example_text"
android:layout_width="wrap_content"
android:layout_height="wrap_content"
android:textColor="#ff000000"
android:background="#ffffffff"
All materials on the site are licensed Creative Commons Attribution-Sharealike 3.0 Unported CC BY-SA 3.0 & GNU Free Documentation License (GFDL)
If you are the copyright holder of any material contained on our site and intend to remove it, please contact our site administrator for approval.
© 2016-2025 All site design rights belong to S.Y.A.