Android Application Development For Dummies, 3rd Edition (2015)
Part III. Creating a Feature‐Rich Application
 Check out the free articles at www.dummies.com/extras/androidappdevelopment to learn how to add GPS location features to your app.
In this part . . .
Part III expands on the knowledge that you acquire in Part II by demonstrating how you can build a feature‐rich application from scratch. By the end of Part III, you will have an advanced app that interacts with a local database, send notifications, and writes its settings to preferences.
Chapter 9. Designing the Tasks Application
In This Chapter
![]() Determining what you want your app to do
Determining what you want your app to do
![]() Understanding fragments
Understanding fragments
![]() Creating the Task list fragment
Creating the Task list fragment
![]() Setting the style and action bar of your app
Setting the style and action bar of your app
![]() Adding library dependencies to your app
Adding library dependencies to your app
![]() Using RecyclerView, ViewHolder, and adapters
Using RecyclerView, ViewHolder, and adapters
Building Android applications is fun, but building truly in‐depth applications is exciting because you dive into the guts of the Android platform. This chapter introduces you to the Tasks application, which you build in the next few chapters.
The Tasks application lets users create a list of tasks that can each have a reminder associated with them.
Reviewing the Basic Requirements
The Tasks application has a few basic requirements:
· Users must be able to add, edit, and delete tasks.
· Tasks must be easy to manage.
· Every task must have a reminder date and time when the user will be reminded of the task.
This application invites lots of interaction between the user and the Android system. The following sections delve into the features that you need to build in order to meet the above requirements.
Storing data
The task data and alarms needed to make the Tasks app work are stored in these locations:
· Task data: In a ContentProvider backed by an SQLite database. Android uses SQLite as its database. You will create a SQLite database to contain your task data, and you will then create a ContentProvider to access that database.
· Alarm info: In the AlarmManager after being pulled from the ContentProvider.
Scheduling a reminder script (That’s alarming!)
For the Tasks application to work well, you need to implement a reminder system. The first thing that comes to mind is a scheduled task, or cron job. In the Windows operating system, you create a scheduled task to handle the execution of code and scripts at a given time. In the world of Unix and Linux, you use cron (short for the Greek word chronos, which means time) to schedule scripts or applications.
Because Android is running the Linux kernel, you might assume that Android uses cron to schedule tasks. Unfortunately, Android doesn’t have cron, but instead it has the AlarmManager class, which accomplishes the same thing. The AlarmManager class lets you specify when things should happen, even if your app is not currently running. An alarm can be set as a single‐use alarm or repeating. The Tasks application uses AlarmManager to remind users of pending tasks.
Notifying the user
After an alarm fires, the app has to notify the user of the alarm. You have two ways to grab the user’s attention:
· Toast: A small view that contains a brief message for the user. The message is usually available for only a few seconds — a toast never receives focus. Because it shows up only briefly, it’s good for showing users a message when you already have their attention, but it’s bad at getting their attention when they’re doing something else. The Tasks app uses a toast not for reminding users but instead for notifying users when their changes have been saved.
· Notification Manager: The NotificationManager class notifies a user that events have taken place. They can appear on the status bar at the top of the screen. Notification items can contain various views and are identified by icons you provide. The user can slide down the notification list to view notifications. The Tasks application uses the NotificationManager class to handle reminders. (See Chapter 1 if you’re unsure how the notification area works.)
Creating the Application’s Screens
The Tasks application needs two different screens to perform all its basic functions — create, read, update, and delete (CRUD) tasks:
· A list view that displays all the tasks in the application. This view also allows the user to delete a task by long‐pressing the item.
· An edit view to allow the user to view or create a task, read a task’s full details, or update a task.
Each screen eventually interacts with a database for changes to be persisted over the long‐term use of the application.
Each screen consists of a single Android fragment that contains most of the user interface for the screen, and that fragment is contained in an activity. See Chapter 1 for more information about fragments.
 You use fragments to reuse UI code between multiple activities. You will reuse the fragments you create here when you build tablet support into your app in Part IV.
Starting the new project
To get started, choose File⇒New Module and create a new module in your project. (If you’re unfamiliar with how to create an Android project, see Chapter 3.) Choose Phone and Tablet as the module type, and use the settings in Table 9-1:
Table 9‐1 Module Settings for Tasks
|
Setting |
Value |
|
Application Name |
Tasks |
|
Module Name |
Tasks |
|
Package Name |
com.dummies.tasks |
|
Minimum Required SDK |
21 |
If you download the source code from this book’s website, you can also open the Tasks example.
Choose Blank Activity when asked to add an activity, and use the following settings for the activity:
Table 9‐2 Activity Settings for Tasks
|
Setting |
Value |
|
Activity Name |
TaskListActivity |
|
Layout Name |
activity_task_list |
|
Title |
Tasks |
|
Menu Resource Name |
menu_task_list |
Cleaning up the TaskListActivity
The TaskListActivity class that Android Studio generated for you is just a template, so you’ll want to do a few things to fix it up before you go any further:
· Change the package to com.dummies.tasks.activity : Edit the TaskListActivity.java file, and change the package on the first line of the file to be com.dummies.tasks.activity. This will cause an error in the editor. Click on the error, and then press Alt+Enter to open the Quick Fix dialog box (see Chapter 3 to remind yourself how to use the Quick Fix dialog box). Choose Move to package com.dummies.tasks.activity to move the file to the proper directory. If you are given a choice between multiple directories, make sure you choose the directory path that contains main as in Figure 9-1. You may also need to update the entry for TaskListActivity in your AndroidManifest.xml.
· Remove the menus: Remove the onCreateOptionsMenu and onOptionsItemSelected methods. Also remove the res/menu/menu_task_list.xml file. You won’t need them in this activity.
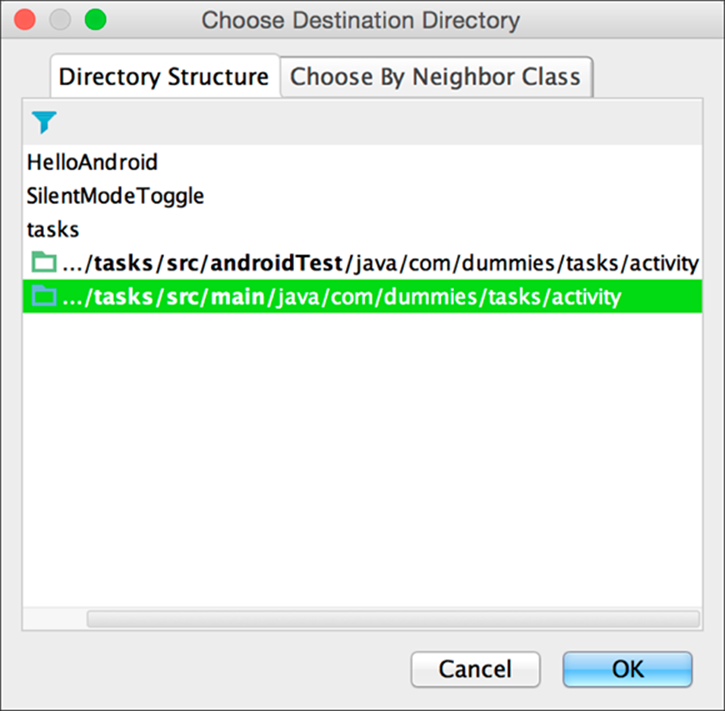
Figure 9‐1: Changing an activity’s package.
Your new TaskListActivity class now looks like Listing 9-1 .
Listing 9‐1 The ReminderListActivity Class
public class TaskListActivity extends Activity {
@Override
protected void onCreate(Bundle savedInstanceState) {
super.onCreate(savedInstanceState);
setContentView(R.layout.activity_task_list);
}
}
Run it now and you will see the familiar “Hello world!” displayed on your device.
Editing the activity_task_list.xml layout file
Now that your activity runs, you will need to edit its layout file. The TaskListActivity will have a very simple layout consisting of a toolbar and a fragment. Open up activity_task_list.xml and edit the file to match Listing 9-2:
Listing 9‐2 The activity_task_list.xml Contents
<?xml version="1.0" encoding="utf-8"?>
<LinearLayout xmlns:android="http://schemas.android.com/apk/res/android" →3
android:orientation="vertical"
android:layout_width="match_parent"
android:layout_height="match_parent">
<Toolbar →8
style="?android:actionBarStyle"
android:layout_width="match_parent"
android:layout_height="wrap_content"
android:title="@string/app_name"
android:id="@+id/toolbar"/>
<fragment →15
android:layout_width="match_parent"
android:layout_height="match_parent"
android:id="@+id/fragment"
android:name="com.dummies.tasks.fragment.TaskListFragment"/> →19
</LinearLayout>
There are several things to be aware of in the previous layout file:
→ 3 The top‐level layout for this activity. It is a vertically oriented linear layout that will contain the toolbar and the fragment.
→ 8 The toolbar for the activity. It won’t be styled automatically, so set its style to the theme’s actionBarStyle. Also, set its title to the app’s name. Its id is set to @+id/toolbar so that it can be referenced later in the code.
→ 15 The fragment. A fragment of type TaskListFragment will be created using the default constructor, and attached to this layout. It is named @+id/fragment so that we can reference it later from the code.
→ 19 The com.dummies.tasks.fragment.TaskListFragment class does not exist yet, but you will create it in a subsequent section.
Setting the action bar
You need to tell Android how to find the action bar for the activity. Open up the TaskListActivity.java file and modify your onCreate method to add the line in bold:
@Override
protected void onCreate(Bundle savedInstanceState) {
super.onCreate(savedInstanceState);
setContentView(R.layout.activity_task_list);
setActionBar((Toolbar) findViewById(R.id.toolbar));
}
This tells Android how to find the toolbar that you created in your layout, and use it as your activity’s action bar.
 An action bar is a special case of a toolbar. You can have multiple toolbars in your activity, but only one may be your activity’s action bar. The action bar is generally at the top of your activity.
Then open res/values/styles.xml and change your app’s theme to be the following:
<resources>
<!-- By default, most apps for Lollipop and later should use
some variant of android:Theme.Material.NoActionBar -->
<style name="AppTheme"
parent="android:Theme.Material.NoActionBar">
</style>
</resources>
 If there are any other styles.xml files in other values directories in your module, delete them now. There should be only one, located in res/values. So for example, if the New Blank Activity Wizard created a second styles.xml in res/values‐21/, you should delete it.
Creating the TaskListFragment
Fragments are the parts of your activities that are meant to be reused throughout your application. Most activities have one or two fragments. The list activity needs a fragment to display the list of tasks, so right‐click on tasks (under com/dummies) in the Project view and add a new package named fragment. Then right‐click on fragment and add a new Blank Fragment. Use the settings in Table 9-3:
Table 9‐3 Fragment Settings for TaskListFragment
|
Setting |
Value |
|
Fragment Name |
TaskListFragment |
|
Create Layout XML? |
Yes |
|
Fragment Layout Name |
fragment_task_list |
|
Include Fragment Factory Methods |
No |
|
Include Interface Callbacks |
No |
The resulting fragment should look like Listing 9-3.
Listing 9‐3 The TaskListFragment
package com.dummies.tasks.fragment;
import android.os.Bundle;
import android.app.Fragment;
import android.view.LayoutInflater;
import android.view.View;
import android.view.ViewGroup;
import com.dummies.tasks.R;
public class TaskListFragment extends Fragment {
public TaskListFragment() {
// Required empty public constructor
}
@Override
public View onCreateView(
LayoutInflater inflater, ViewGroup container,
Bundle savedInstanceState) {
// Inflate the layout for this fragment
return inflater.inflate(R.layout.fragment_task_list, container, false);
}
}
 Knowing when to use activities or fragments
Both activities and fragments are central parts of your user interface (UI) code. So how then do you decide whether to put certain functionality into a fragment or an activity?
If activities are the lunchbox of UI code, fragments are its Tupperware. You can insert your UI code directly into your lunchbox, but like an egg salad sandwich it would make a big mess all over your lunchbox. Put your UI code into your fragment Tupperware instead, where you can shift it from lunchbox to lunchbox as you need to use it again.
If you’re absolutely certain that the code you’re writing is specific to a given activity, put it directly into an activity. But if you’re unsure, put your UI code in a fragment. In most applications, fragments contain all your UI code, and your activities contain only the glue that binds the fragments together.
If you run your app now, you should see a slightly modified message that now says “Hello blank fragment.”
Making your fragment show a list
The goal of the TaskListFragment is to show a list of items. There are three things that need to be done for this to happen: Add a RecyclerView to your layout, create a view that represents a task in your list, and add an adapter to supply these task views to yourRecyclerView.
Adding a RecyclerView
A RecyclerView is a neat view that can display an infinite set of items on your tiny little phone’s screen. Because your phone has a limited amount of memory, it won’t always be possible to display your entire database of tasks on the screen at one time without running out of memory. A RecyclerView takes care of this for you by only loading into memory the items that can fit onto the screen at any given time. As you scroll through your infinite list, items that fall off the screen will be purged from memory, and items that come onto the screen will be loaded into memory.
To add a RecyclerView to your fragment, first open the build.gradle file in your Tasks directory and replace the dependencies section with the following (or add a dependencies section at the end if one doesn’t exist):
// Libraries that our app will use
dependencies {
// recyclerview, cardview, and palette are all google libraries
// used to create Android Lollipop apps.
compile 'com.android.support:recyclerview-v7:21.0.3'
compile 'com.android.support:cardview-v7:21.0.3'
}
In the old days, if you needed to add a library to your app, you would have to go out and find the library, download it, and copy it into your sourcetree. Not anymore! With Gradle, all you need to do is specify the name of the dependency you want, and Gradle automatically downloads it for you. For more information about Gradle dependency management, visit http://www.gradle.org/docs/current/userguide/dependency_management.html.
Then edit fragment_task_list.xml and replace its contents with a single RecyclerView:
<?xml version="1.0" encoding="utf-8"?>
<!-- Our recyclerview, which shows a scrolling list of items -->
<android.support.v7.widget.RecyclerView
xmlns:android="http://schemas.android.com/apk/res/android"
android:id="@+id/recycler"
android:layout_width="match_parent"
android:layout_height="match_parent"
/>
Finally, add the RecyclerView to your fragment by making the following edits to TaskListFragment.java:
public class TaskListFragment extends Fragment {
RecyclerView recyclerView;
public TaskListFragment() {
// Required empty public constructor
}
@Override
public View onCreateView(LayoutInflater inflater,
ViewGroup container,
Bundle savedInstanceState) {
final View v = inflater.inflate(R.layout.fragment_task_list,
container, false);
recyclerView = (RecyclerView) v.findViewById(R.id.recycler); →16
recyclerView.setHasFixedSize(true); →17
recyclerView.setLayoutManager(
new LinearLayoutManager(getActivity())); →19
return v;
}
}
Things to note from the previous changes:
→ 16 Finds the RecyclerView in the layout and assigns it to the recyclerView field in the class.
→ 17 If all of a RecyclerView’s items are going to be the same size, the RecyclerView can cut some corners and improve performance by not having to re‐measure the layout after displaying every item. All the items will be the same size, so turn onsetHasFixedSize.
→ 19 Every RecyclerView needs to have a LayoutManager that tells it how to lay out the views. Because this fragment is just displaying a list, use a LinearLayoutManager, which knows how to lay things out linearly in a list. There are otherLayoutManagers, such as the GridLayoutManager, which knows how to lay things out in a two‐dimensional grid, but for now all you need is the LinearLayoutManager.
Creating the item view
Each task in your RecyclerView must have a view to display it.
First, create a layout that’s going to represent an item in your list. Create a new file named res/layout/card_task.xml, and add the following to it:
<?xml version="1.0" encoding="utf-8"?>
<android.support.v7.widget.CardView →3
xmlns:android="http://schemas.android.com/apk/res/android"
xmlns:card_view="http://schemas.android.com/apk/res-auto"
android:id="@+id/card_view"
android:layout_width="match_parent"
android:layout_height="100dp" >
<RelativeLayout
android:layout_width="match_parent"
android:layout_height="match_parent">
<ImageView →14
android:id="@+id/image"
android:layout_width="100dp"
android:layout_height="100dp"
android:scaleType="centerCrop"
android:layout_alignParentStart="true"/>
<TextView →22
style="@android:style/TextAppearance.Medium.Inverse"
android:id="@+id/text1"
android:layout_width="match_parent"
android:layout_height="wrap_content"
android:maxLines="1"
android:ellipsize="end"
android:padding="10dp"
android:layout_alignTop="@id/image"
android:layout_toEndOf="@id/image"/>
<TextView →33
style="@android:style/TextAppearance.Inverse"
android:id="@+id/text2"
android:layout_width="match_parent"
android:layout_height="match_parent"
android:maxLines="2"
android:ellipsize="end"
android:padding="10dp"
android:layout_alignStart="@id/text1"
android:layout_below="@id/text1"/>
</RelativeLayout>
</android.support.v7.widget.CardView>
Here is some more information about the code you just put into card_task.xml:
→ 3 The card into which you’ll place your task information. The view is the same width as the parent and a height of 100dp.
→ 14 The image for the task. It’s a cropped square image that fills the height of the card. It’s aligned to the far left of the card (the far right in languages that read right‐to‐left like Hebrew and Arabic).
→ 22 The title of the task. You made it a little larger (Medium) than normal text. You also used the Inverse color because the theme (Theme.Material) uses light text on a dark background by default, which is what you want; but if you did that on the light‐colored cards, then you wouldn’t be able to read the text. A maxLines of 1 is set to prevent wrapping of the title, and you’ve ellipsized the end if it exceeds one line. You placed the title to the right and aligned it with the top of the task image. You also gave the title a little padding on all sides to make it look good within the card.
→ 33 The task notes. You limit the number of lines to two and place them below the title and aligned on the left with the title.
Now that you have a basic CardView layout, add a little style to it by adding the following lines in bold:
<android.support.v7.widget.CardView
xmlns:android="http://schemas.android.com/apk/res/android"
xmlns:card_view="http://schemas.android.com/apk/res-auto"
android:id="@+id/card_view"
android:layout_width="match_parent"
android:layout_height="100dp"
android:layout_marginTop="@dimen/task_card_half_spacing"
android:layout_marginBottom="@dimen/task_card_half_spacing"
android:layout_marginStart="@dimen/gutter"
android:layout_marginEnd="@dimen/gutter"
android:layout_gravity="center"
android:elevation="@dimen/task_card_elevation"
android:foreground="?android:attr/selectableItemBackground"
card_view:cardCornerRadius="0dp" >
The lines in bold in the previous block of code make a few visual improvements to the CardView. You added a margin on the top and bottom to create an empty space between items in the list, and added a gutter on the left and right. You’re using an elevation to add a subtle shadowing effect. You set the foreground drawable to Android’s selectableItemBackground so that you get a nice click animation when the user clicks on the card. You also turned off the default rounded corners for the card.
Now edit res/values/dimens.xml to create some of the values you just used in your layout:
<?xml version="1.0" encoding="utf-8"?>
<resources>
<!-- The gutter on the left and ride side of most of our pages -->
<dimen name="gutter">10dp</dimen>
<!-- Half of the spacing we'll add between task cards. The full
spacing will be double this number. -->
<dimen name="task_card_half_spacing">5dp</dimen>
<!-- The elevation of our task cards -->
<dimen name="task_card_elevation">6dp</dimen>
</resources>
Adding an adapter
A RecyclerView isn’t very interesting without a list of data to display. To use a RecyclerView, you must create an adapter which will supply it with views of your tasks. An adapter is a class that knows how to read from a list of data somewhere (whether in a database, file, or wherever), and creates a view that represents an item in that list.
Create a new file called com/dummies/tasks/adapter/TaskListAdapter.java and set its contents to the following:
public class TaskListAdapter
extends RecyclerView.Adapter<TaskListAdapter.ViewHolder> →2
{
static String[] fakeData = new String[] { →4
"One",
"Two",
"Three",
"Four",
"Five",
"Ah . . . ah . . . ah!"
};
@Override
public ViewHolder onCreateViewHolder(ViewGroup parent, int i) { →14
// create a new view
CardView v = (CardView) LayoutInflater.from(parent.getContext()) →16
.inflate(R.layout.card_task, parent, false);
// wrap it in a ViewHolder
return new ViewHolder(v);
}
@Override
public void onBindViewHolder(ViewHolder viewHolder, int i) { →23
viewHolder.titleView.setText(fakeData[i]);
}
@Override
public int getItemCount() { →28
return fakeData.length;
}
static class ViewHolder extends RecyclerView.ViewHolder { →32
CardView cardView;
TextView titleView;
public ViewHolder(CardView card) {
super(card);
cardView = card;
titleView = (TextView)card.findViewById(R.id.text1); →39
}
}
}
Here’s what the TaskListAdapter is doing:
→ 2 The TaskListAdapter is a subclass of RecyclerView.Adapter. RecyclerView.Adapter takes a parameter which represents the kind of ViewHolder that will be used by this adapter. The ViewHolder you will use isTaskListAdapter.ViewHolder, which will be defined on line 32.
→ 4 In Chapter 13 you will create a SQLite database that will contain all your task data. But for now, just use some dummy data.
→ 14 Every RecyclerView.Adapter must override onCreateViewHolder, which will be called whenever a new ViewHolder is needed. You must do two things to create a new view holder. First, you must inflate a card_task view. This card_taskview will be reused over and over to display new tasks as they scroll onto the screen. Second, you must create a ViewHolder to wrap this card_task view.
 The purpose of a ViewHolder is to improve performance. Every call to findViewById is relatively expensive. By using a ViewHolder, you only need to make your calls to findViewById when the view is created in onCreateViewHolder, rather than every time a view is recycled in onBindViewHolder. Because you will create only a handful of views, this can be a significant time savings if you’re scrolling through a nearly infinite list of tasks.
→ 16 Inflates the CardView from card_task.xml using a LayoutInflater. The call to inflate takes as parameters the XML file to inflate, the parent view to instantiate the right LayoutParams subclass, and false to indicate that this view should not be automatically attached to the parent (because the RecyclerView takes care of attaching and detaching the views).
→ 23 There will be roughly as many ViewHolders created by onCreateViewHolder as can fit on the screen at any one time, and each of these ViewHolders will be reused whenever a new item needs to be displayed. onBindViewHolder is responsible for recycling one of these ViewHolders and updating it to display the information for the item that’s currently being shown on the screen. The only thing that must be done to update the ViewHolder is to set its titleView to display the appropriate string from ourfakeData.
→ 28 Returns the count of items in the list.
→ 32 The TaskListAdapter.ViewHolder class is a subclass of RecyclerView.ViewHolder. The purpose of the ViewHolder is to make it quick and easy to access the subviews in your CardView without having to call findViewById all the time. The two subviews you’ll need access to for now are the cardView itself, as well as the titleView that contains the title of the card.
→ 39 Finds the titleView of the card by calling findViewById on the cardView.
Now modify your TaskListFragment.java file to add the adapter:
public class TaskListFragment extends Fragment {
RecyclerView recyclerView;
TaskListAdapter adapter;
public TaskListFragment() {
// Required empty public constructor
}
@Override
public void onCreate(Bundle savedInstanceState) {
super.onCreate(savedInstanceState);
adapter = new TaskListAdapter();
}
@Override
public View onCreateView(LayoutInflater inflater,
ViewGroup container,
Bundle savedInstanceState) {
final View v = inflater.inflate(R.layout.fragment_task_list,
container, false);
recyclerView = (RecyclerView) v.findViewById(R.id.recycler);
recyclerView.setAdapter(adapter);
recyclerView.setHasFixedSize(true);
recyclerView.setLayoutManager(
new LinearLayoutManager(getActivity()));
return v;
}
}
Now run your app. You should see something like what’s in Figure 9-2:
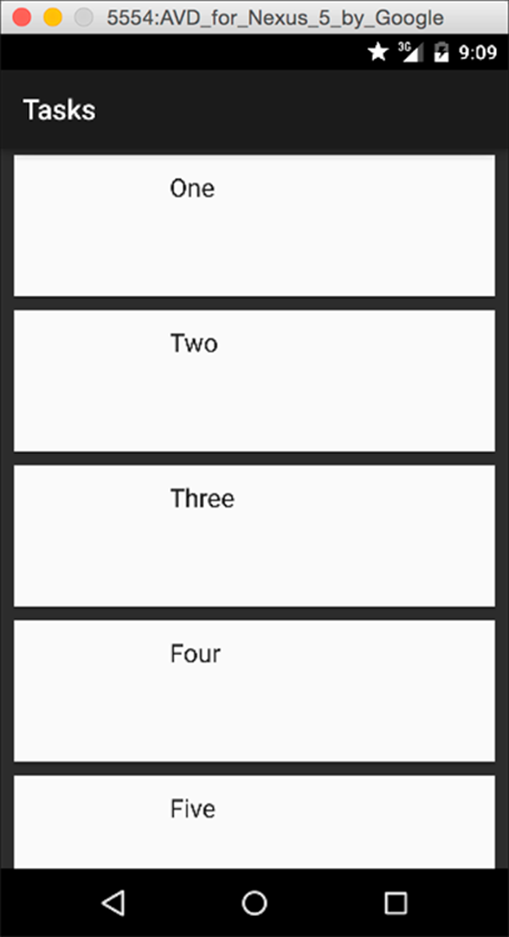
Figure 9‐2: The Tasks app running with fake data.
The fragment lifecycle
Just like activities (see Chapter 5), fragments have their own lifecycle.
Like an activity, a fragment can exist in three states:
· Resumed: The fragment is visible in the running activity.
· Paused: Another activity is in the foreground and has focus, but the activity in which this fragment lives is still visible (the foreground activity is partially transparent or doesn’t cover the entire screen).
· Stopped: The fragment is not visible. Either the host activity has been stopped, or the fragment has been removed from the activity but added to the back stack. A stopped fragment is still alive (all state and member information is retained by the system). However, it is no longer visible to the user and will be killed if the activity is killed.
Most of the fragment callbacks are very similar to the activity callbacks. However, there are some important differences. The three most common fragment callbacks are
· onCreate: Unlike an activity, fragments don’t have a setContentView() method. Unlike activities, views are not created at all in a fragment’s onCreate() method, so there is no way to manipulate views in onCreate().
· onCreateView: To create a view in a fragment, override the onCreateView() method and inflate the view yourself, and then return it at the end of the function. See Listing 9-3 for an example. One important thing to note: Even though the views are created, they aren’t fully constructed yet. If any saved state needs to be restored to the view (for example, if the activity was destroyed and re‐created because of a screen rotation), that state isn’t available until the next step.
· onActivityCreated: onActivityCreated() is the final step called before your fragment is fully created. At this point, your fragment is fully set up. Because of this, it’s usually best to put most of the code involving views or saved state in onActivityCreated().
Styling your activity
Now that you have a working list view for your tasks, it’s time to make it a little bit prettier. Here’s the list of changes you will make:
· Pick a color scheme for your app.
· Color the action bar, status bar, and navigation bar based on your scheme.
· Add an image to your cards.
Coloring your activity
Every Android app needs to have several colors defined:
· Primary: This is the main color of your app. You should set it to something distinctive that represents your app’s brand. Your action bar will use this color to help users visually identify your app.
· Primary Dark: A slightly darker version of the primary color. Primary Dark will be used in the status bar above your action bar, as well as other places throughout your app.
· Text Color Primary: The main color for text in your app. There is also Text Color Primary Inverse for when you need to display text against a different colored background.
· Accent: An accent color that can be used to draw attention to things in your app. Typically, the accent color should be something bold and eye‐catching.
· Background: The background color of your app.
You can see how these colors are used in a typical activity in Figure 9-3.
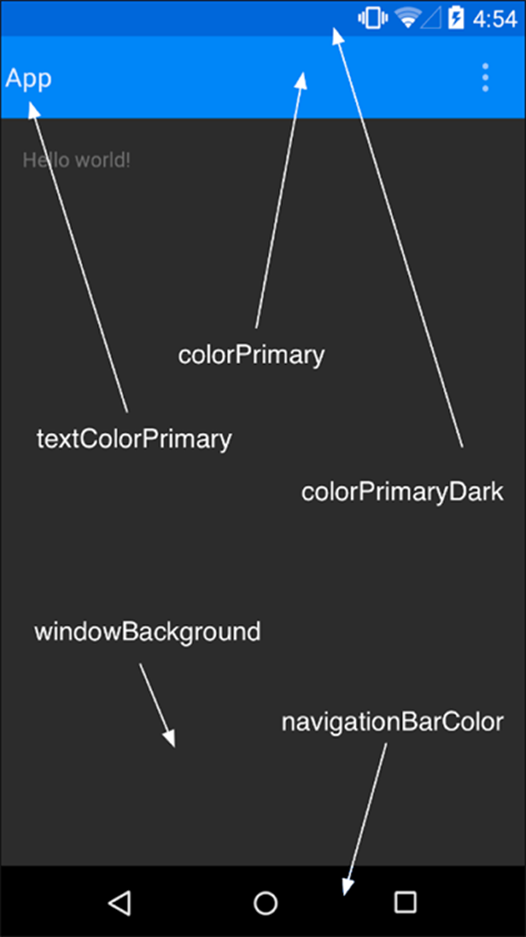
Figure 9‐3: The main colors used to describe an Android app.
Open the res/values/styles.xml file and edit it to look like the following:
<?xml version="1.0" encoding="utf-8"?>
<resources xmlns:android="http://schemas.android.com/apk/res/android">
<!-- define your colors so that they can be referenced
anywhere else you might need them -->
<color name="primary">#1eabf2</color> →6
<color name="primary_dark">#178acf</color>
<color name="accent">#ffb936</color>
<color name="window_background">#c1dae6</color>
<!-- By default, most apps for Lollipop and later should use
some variant of android:Theme.Material.NoActionBar -->
<style name="AppTheme"
parent="android:Theme.Material.NoActionBar"> →15
<!-- your app's branding color (for the app bar) -->
<item name="android:colorPrimary">@color/primary</item>
<!-- darker variant of colorPrimary (for status bar, contextual
app bars) -->
<item name="android:colorPrimaryDark">@color/primary_dark</item>
<!-- theme UI controls like checkboxes and text fields -->
<item name="android:colorAccent">@color/accent</item>
<!-- the background color of your windows -->
<item name="android:windowBackground">
@color/window_background
</item>
<!-- the background of the device's navigation bar (visible if the
device doesn't have physical navigation buttons) -->
<item name="android:navigationBarColor">@color/primary_dark</item>
<!-- your primary and inverse text colors used in things like
the actionbar. These are commented out because we are
happy with the default values. Uncomment and set your own
colors if desired. -->
<!--<item name="android:textColorPrimary">-->
<!--@color/text_color_primary-->
<!--</item>-->
<!--<item name="android:textColorPrimaryInverse">-->
<!--@color/text_color_primary_inverse-->
<!--</item>-->
</style>
</resources>
About this listing:
→ 6 First, you define the various colors that you will need to use throughout your app’s theme.
→ 15 Now take the AppTheme you defined earlier in the chapter and update it to use the colors you defined in line 6.
Now run your app. You should see the same app as before, only now it will be using some prettier colors as in Figure 9-4:
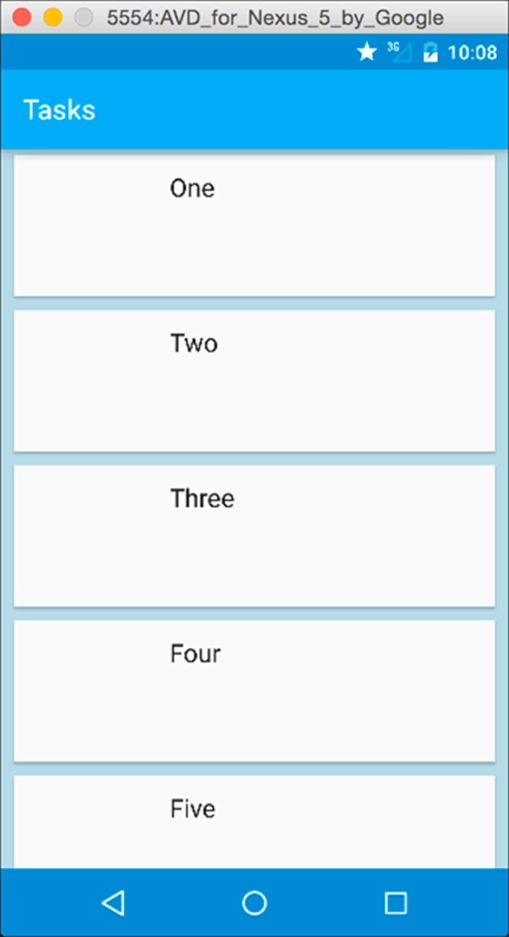
Figure 9‐4: The styled Tasks app.
Adding an image
Most cards in a list view look better with an image. For now, there aren’t any images for the tasks in the list, but you can add some dummy placeholder images and replace them later.
To do this, you will want to use a handy image library called Picasso. Add it to your project dependencies by opening Tasks/build.gradle and adding the lines in bold:
// Libraries that our app will use
dependencies {
// recyclerview and cardview are google libraries
// used to create Android Lollipop apps.
compile 'com.android.support:recyclerview-v7:21.0.3'
compile 'com.android.support:cardview-v7:21.0.3'
// Picasso is a library from Square that makes downloading images easy
compile 'com.squareup.picasso:picasso:2.4.0'
}
For more information on Picasso, visit http://square.github.io/picasso/
Now open up TaskListAdapter.java and add the lines in bold:
public class TaskListAdapter
extends RecyclerView.Adapter<TaskListAdapter.ViewHolder>
{
. . .
@Override
public void onBindViewHolder(ViewHolder viewHolder, int i) {
Context context = viewHolder.titleView.getContext();→8
viewHolder.titleView.setText(fakeData[i]);
// set the thumbnail image
Picasso.with(context)→13
.load(getImageUrlForTask(i))
.into(viewHolder.imageView);
}
. . .
static class ViewHolder extends RecyclerView.ViewHolder {
CardView cardView;
TextView titleView;
ImageView imageView;→24
public ViewHolder(CardView card) {
super(card);
cardView = card;
titleView = (TextView)card.findViewById(R.id.text1);
imageView = (ImageView)card.findViewById(R.id.image);
}
}
}
The new code does the following:
→ 8 Finds the context (the current activity) for the item in the list. Picasso will need the context later.
→ 13 Uses Picasso to load an image into the card’s ImageView. All Picasso commands start with a with() clause, which instructs Picasso which context to use to download the image. This generally is your current activity. Next, you tell Picasso which URL to load using the load() command. In this case, the URL comes from getImageUrlForTask, which hasn’t been defined yet. Finally, you tell Picasso which ImageView to put the image into after it has been downloaded. Picasso then fires up an HTTP request on a background thread to download the image and displays it after it’s available.
→ 24 Adds the ImageView to the ViewHolder. You previously defined the ImageView when you created card_task.xml, so all you have to do here is create a field for it and call findViewById to set it.
Because Picasso downloads images from the Internet, add the line in bold to your AndroidManifest.xml to give your app permission to access the Internet:
<?xml version="1.0" encoding="utf-8"?>
<manifest xmlns:android="http://schemas.android.com/apk/res/android"
package="com.dummies.tasks" >
<uses-permission android:name="android.permission.INTERNET"/>
This does everything that’s necessary to display an image for each task. The only thing left to do is to determine which image to display.
Add the following method to TaskListAdapter.java:
public static String getImageUrlForTask(long taskId) {
return "http://lorempixel.com/600/400/cats/?fakeId=" + taskId;
}
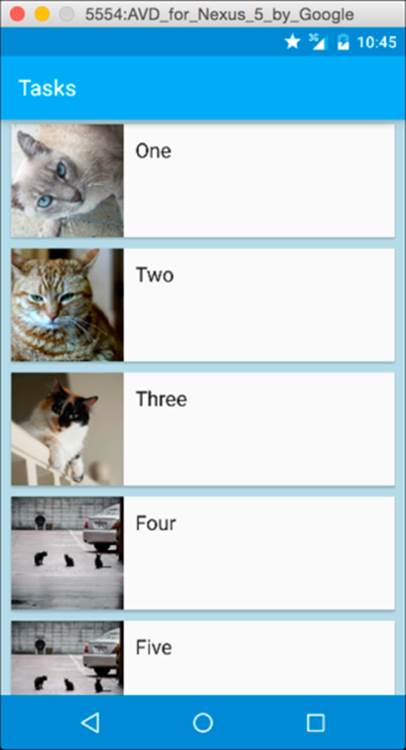
This uses the lorempixel.com service to download a random 600‐x‐400‐pixel cat image for the given taskId. Because cats. (If you prefer a different random image, you may also be interested in checking out fillmurray.com.)
You are now done styling your TaskListActivity! Run the app and you should see something like Figure 9-5:
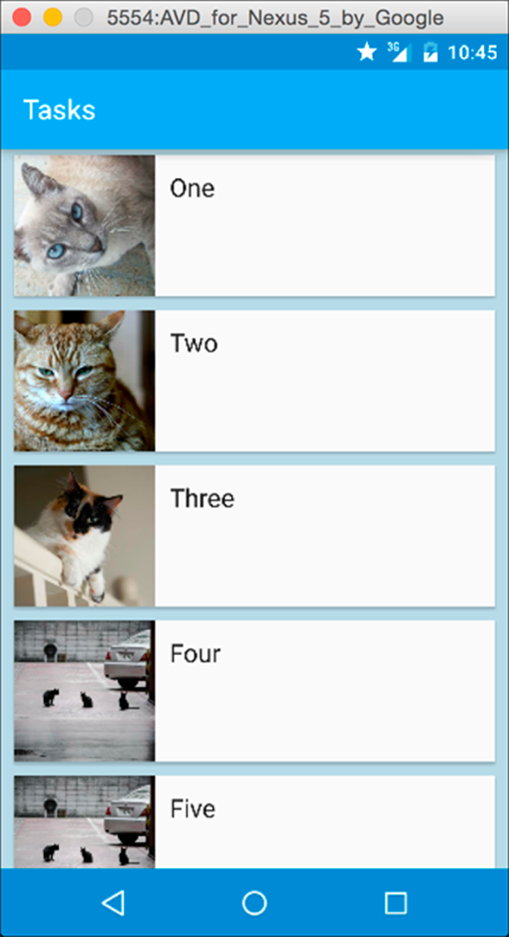
Figure 9‐5: The fully styled TaskListActivity.
Are you interested to learn more about how to style your Android app? There is a lot more information available on the web. Check out http://android‐developers.blogspot.com/2014/10/material‐design‐on‐android‐checklist.html and http://d.android.com/designand http://developer.android.com/training/material/index.html for more information.