Android Wearable Programming (2015)
Chapter 2. Creating Notifications
This chapter provides you with a background of essential features of Android notifications and how we can use these to send messages between a handheld device and a wearable device.
We will be taking a look at how we can use different notification methods to develop an application that shows how we can create basic and custom notifications. You will also learn how you can incorporate and make use of Android's voice capabilities to respond to notification messages that are contained within a notification.
At the end of the chapter, we will take a look at how we can use notification stacking to display multiple notification messages within a notification.
This chapter includes the following topics:
· Introducing Android notifications
· Creating a basic notification for wearables
· Creating a custom notification for wearables
· Receiving voice input within a notification
· Receiving multiple notifications through a process called page stacking
Introducing Android notifications
Android notification is basically a way of communicating with the user. This is done by letting the user know of an upcoming appointment or of an incoming call or SMS message. The user can then decide how to respond to the option presented to him/her.
Notifications in wear are the result of events that happen on the paired smartphone, which are then mirrored on the wearable device, or contextual events like location-aware events or time, and date-based reminders. Android notification messaging works by communicating between the handheld device and wearable device over Bluetooth. When the connection has been established, the Google Play Service notification messages can be exchanged between the handheld device and the wearable. An example of a notification message that has been sent from the Android handheld device to the Android wearable can be seen in the following screenshot:

In the next sections, we will be taking a look at the different ways we can send notifications and how we can respond to them.
Creating a basic notification for wearables
In this section, we will take a look at how to create a basic notification that will be displayed on our wearable device. So let's get started!
Firstly, create a new project in Android Studio by following these simple steps:
1. Launch Android Studio, and then navigate to the File | New Project menu option.
2. Next, enter WearNotifications for the Application name field.
3. Then, provide the name for the Company Domain field.
4. Next, choose Project location where you would like to save your application code:
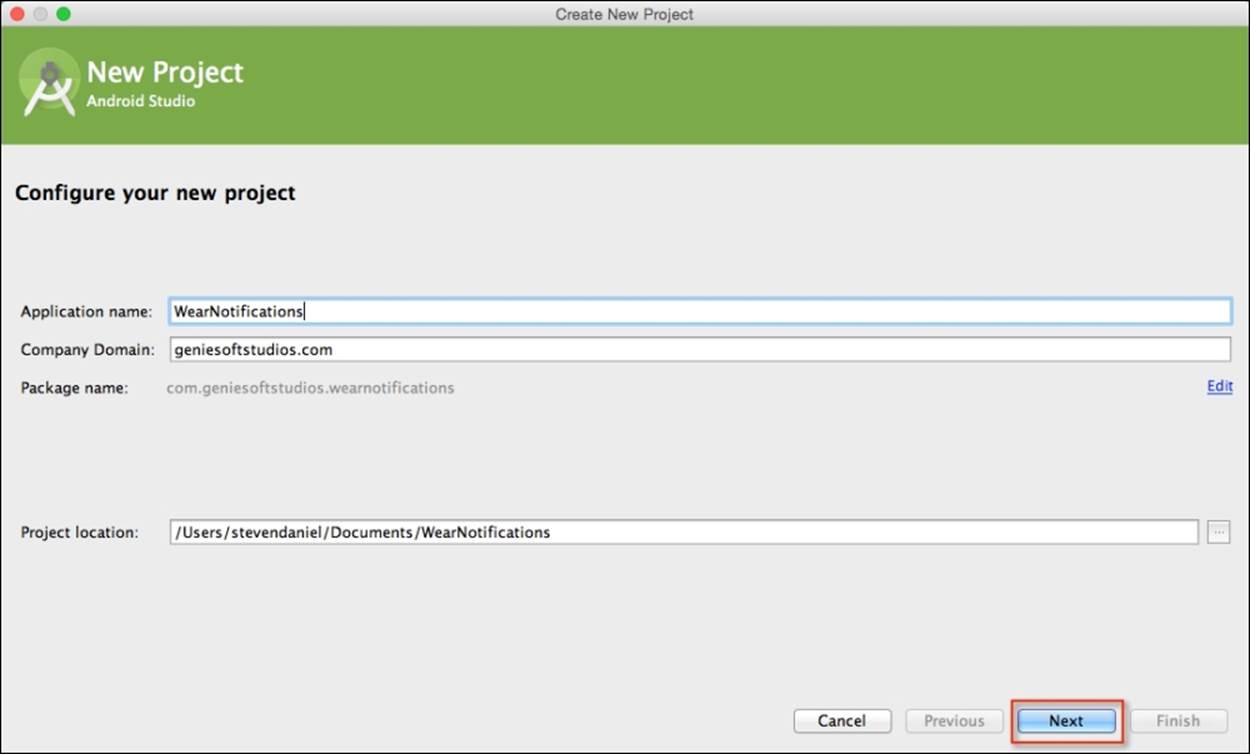
5. Finally, click on the Next button to proceed to the next step.
Specifying the form factors
Next, we will need to specify the form factors that our application will use, as will be using a single module instead of the app and wear modules as discussed previously in Chapter 1, Understanding Android Wearables and Building Your First Android Wear App.
On the following screen we will need to choose the minimum SDK version for our phone/tablet and perform the following steps:
1. Click on the Phone and Tablet option and choose the API 19: Android 4.4 (KitKat) option for Minimum SDK:
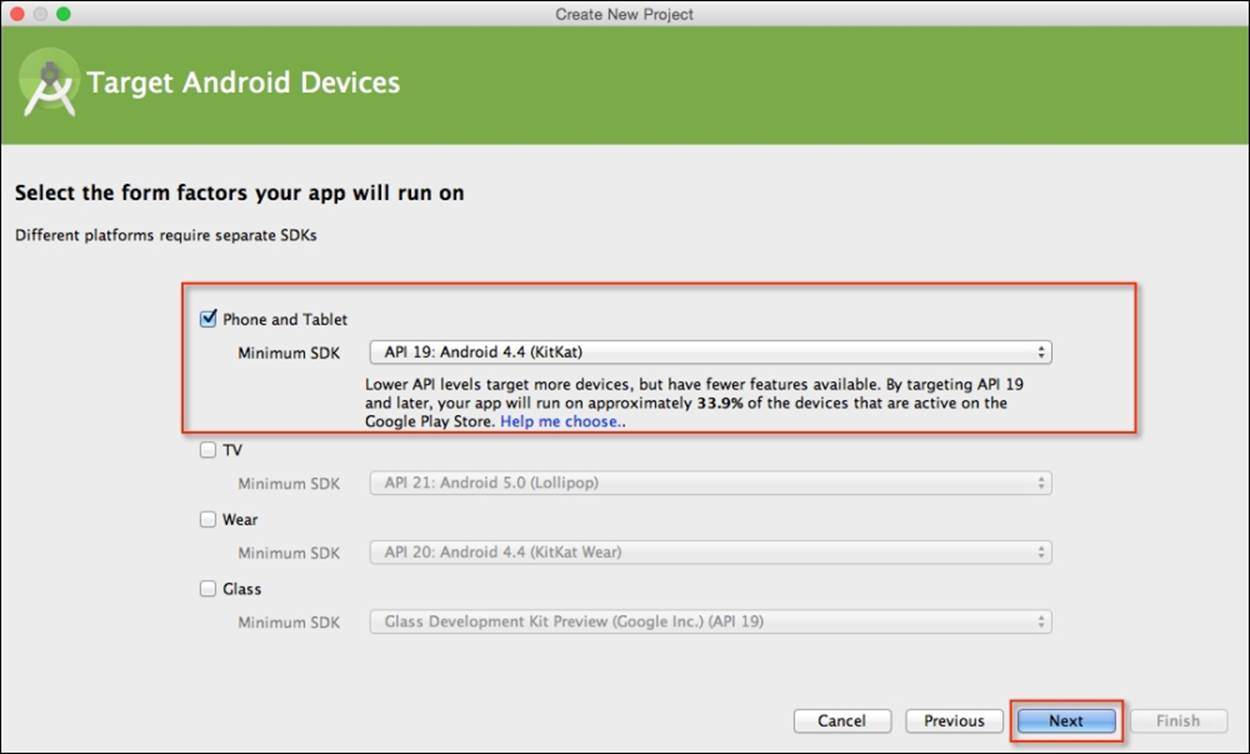
2. Next, click on the Next button to proceed to the next step.
Adding and customizing a blank activity
In our next step, we will need to add Blank Activity to our application project for the mobile section of our app. If you remember from Chapter 1, Understanding Android Wearables and Building Your First Android Wear App, we had mentioned that an activity is basically an application component that provides a screen that the users can interact with. Perform the following steps to add and customize a blank activity:
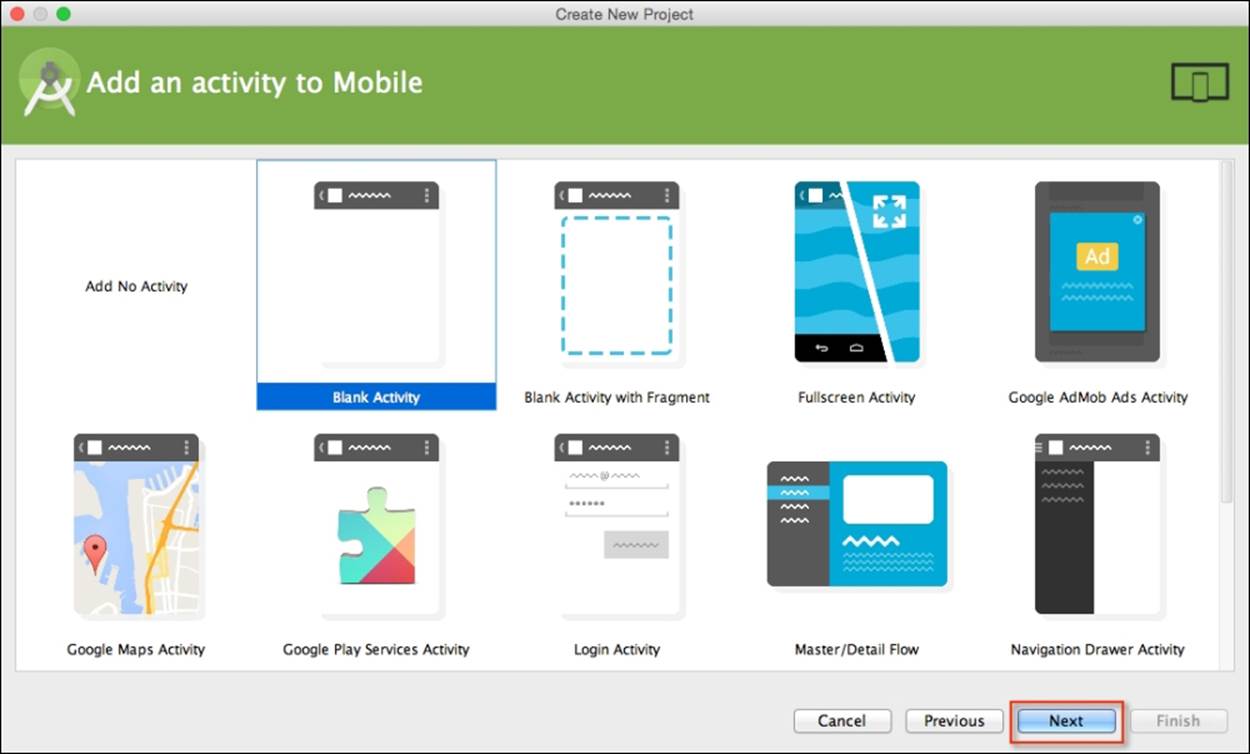
1. From the Add an activity to Mobile screen, choose the Blank Activity option from the list of activities shown and click on the Next button to proceed to the next step:
Next, we need to customize the properties for Blank Activity so that it can be used by our application. Here we will need to specify the name of our activity, the layout information, and the title as well as its menu resource file.
2. From the Customize the Activity screen, accept the default properties that the wizard has created for us:
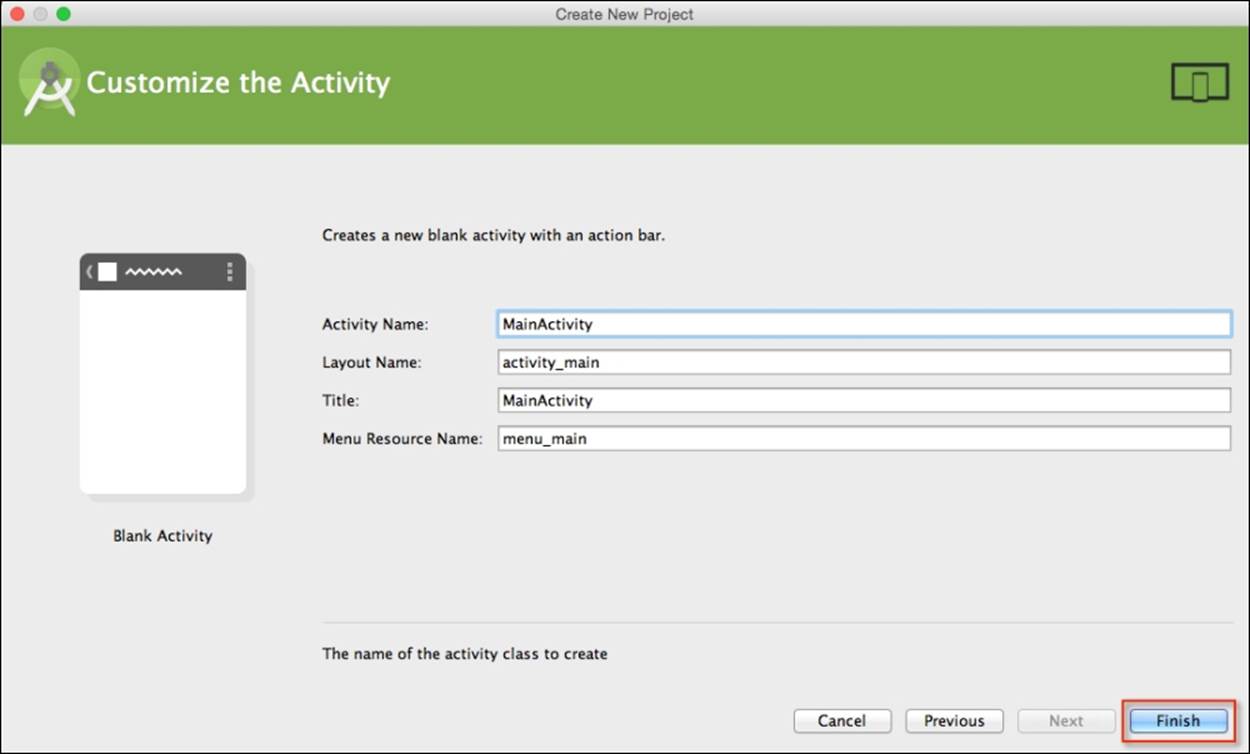
3. Click on the Finish button. Your project will be generated by the wizard. After a few moments, the Android Studio window will appear with your project displayed.
Adding dependencies to Gradle scripts
In our next step, we need to add a new dependency to the Gradle Scripts section of our project.
This will provide us with the ability to send notification messages between the handheld and the wearable device:
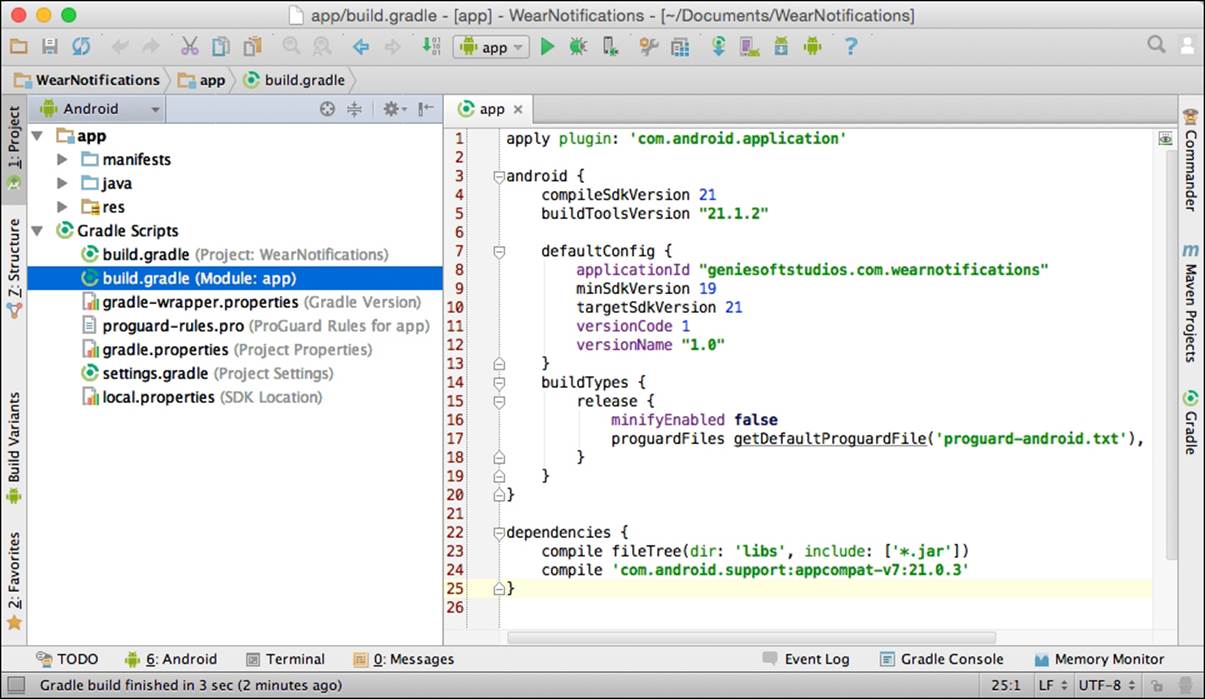
1. From the Project Navigator window, double-click on the build.gradle (Module: app) node, which is located within the Gradle Scripts section of Project Navigator, as shown in the following screenshot:
Note
Gradle is the packaging tool that comes bundled with Android Studio, and it takes care of building the application's APK package. Gradle supports incremental builds and intelligently determines what parts of the project source code are up to date, without the need to recompile the whole project.
2. Next, under the dependencies section, add the following highlighted code:
3. dependencies {
4. compile fileTree(dir: 'libs', include: ['*.jar'])
5. compile 'com.android.support:appcompat-v7:21.0.3'
6. compile 'com.android.support:support-v4:20.0.+'
}
7. Then, open the MainActivity.java file as shown in the following screenshot:
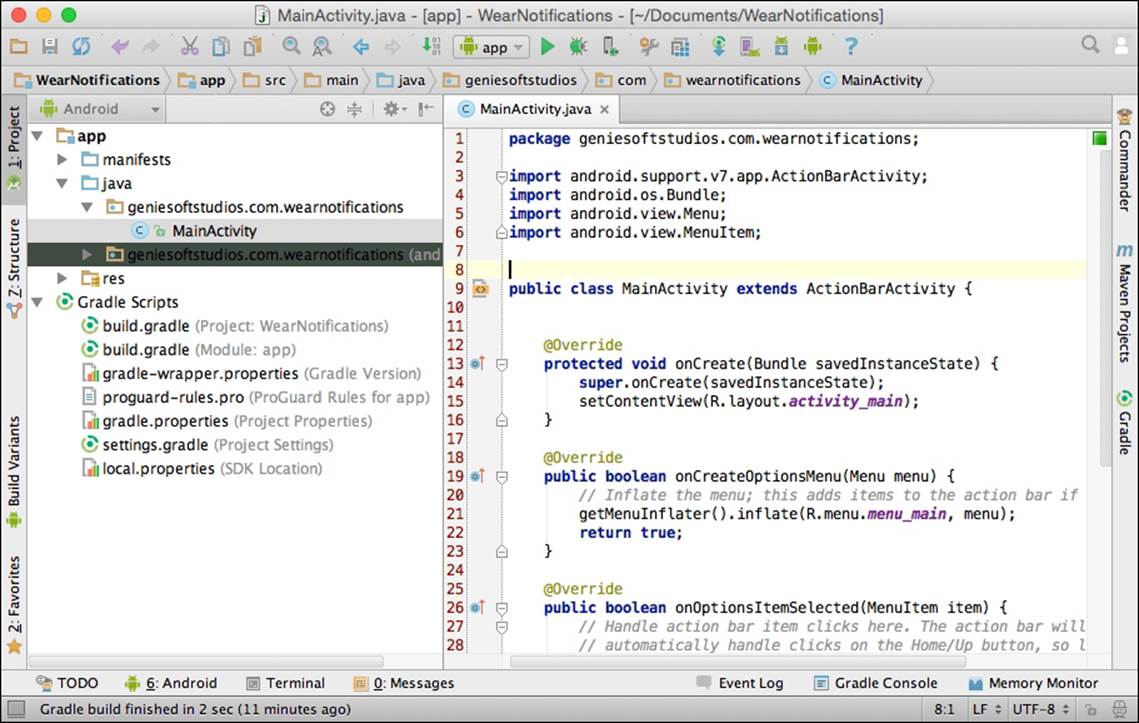
8. Next, modify the import statements within our MainActivity.java file with the highlighted entries shown in the following code snippet:
9. import android.app.Notification;
10.import android.app.PendingIntent;
11.import android.support.v4.app.NotificationCompat;
12.import android.support.v4.app.NotificationManagerCompat;
13.import android.content.Intent;
14.import android.support.v7.app.ActionBarActivity;
15.import android.os.Bundle;
16.import android.view.Menu;
17.import android.view.MenuItem;
18.// Handling Custom Notifications
19.import android.view.View;
20.import android.widget.Button;
21.import android.widget.EditText;
22.
23.// Handling Voice Notifications
24.import android.support.v4.app.RemoteInput;
25.import android.util.Log;
26. Next, from the Project Navigator window, open the strings.xml file, which is located in the res | values folder, as follows:
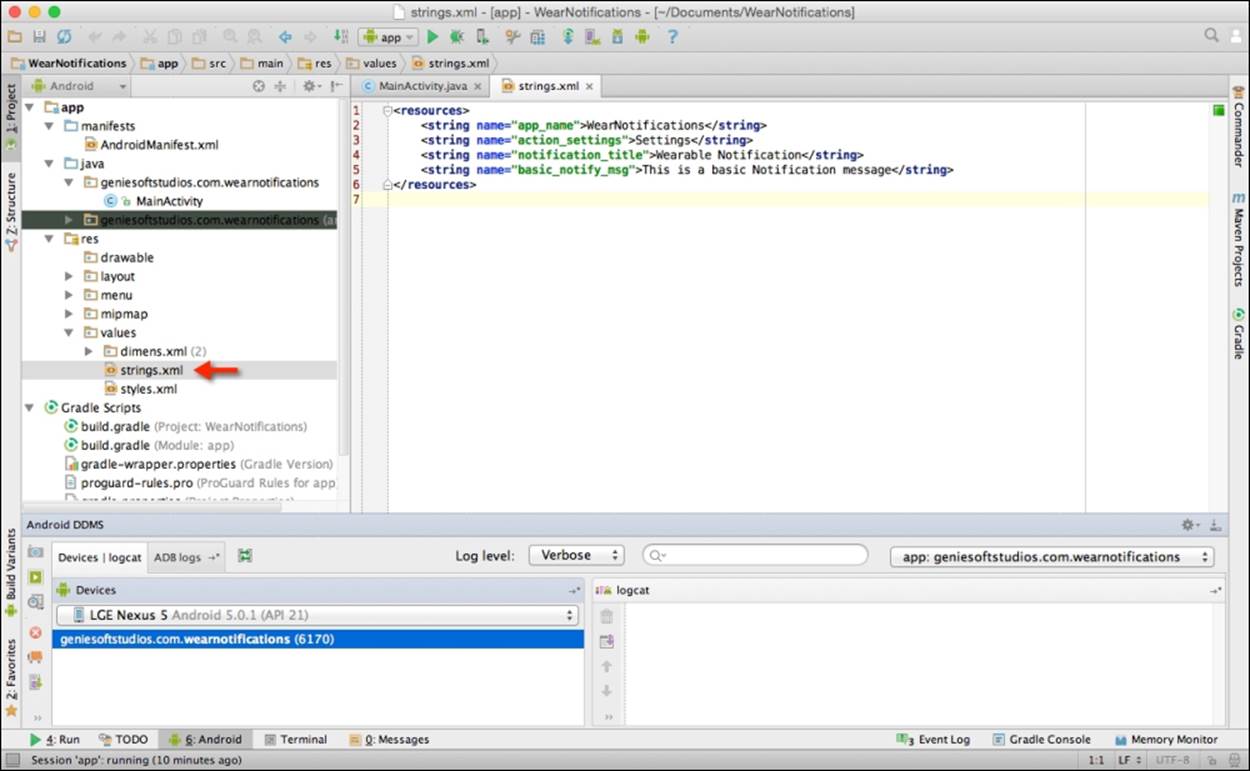
27. Next, add the following highlighted entries as shown in the following code snippet:
28.<resources>
29.<string name="app_name">WearNotifications</string>
30.<string name="action_settings">Settings</string>
31.<string name="notification_title">Wearable
32. Notification</string>
33.<string name="basic_notify_msg">This is a basic
34. Notification message</string>
35.<string name="notification_button">Send
36. Notification</string>
37.<string name="notification_message">Custom notification
38. message</string>
39.<string-array name="voice_choices">
40.<item>OK</item>
41.<item>Great</item>
42.<item>Im not sure</item>
43.</string-array>
</resources>
44. Next, we need to add our notification message ID to the MainActivity class. This value can be any arbitrary string value, but each unique notification will need to have it's own ID as it will be responsible for sending notification message between our handheld device and the wearable. This is shown in the following code snippet:
45.public class MainActivity extends ActionBarActivity {
46.
47. // Set up our Notification message ID
int NOTIFICATION_ID = 001;
48. Then, modify the onCreate method as follows:
49. @Override
50. protected void onCreate(Bundle savedInstanceState)
51.{
52. super.onCreate(savedInstanceState);
53. setContentView(R.layout.activity_main);
54.
55. // Clear all previous notifications and
56. // generate new unique ids
57.NotificationManagerCompat.from(this).cancelAll();
58.
59. Intent intent = new Intent(this, MainActivity.class);
60. PendingIntent pendingIntent = PendingIntent.getActivity(this, 0,
61.intent,
62.PendingIntent.FLAG_UPDATE_CURRENT);
63.
64. // Method to display our basic notification
65. displayBasicNotification(pendingIntent);
}
66. Next, we need to create a new displayBasicNotification method that will be responsible for sending a basic notification message to the Android wearable device, which is shown in the following code snippet:
67.// Method for displaying our basic notification message
68.public void displayBasicNotification(PendingIntent pendingIntent)
69. {
70.// Set up our Notification Action class method
71. NotificationCompat.Action action = new
72.NotificationCompat.Action.Builder(
73.R.mipmap.ic_launcher,
74.getString(R.string.notification_title),
75.pendingIntent)
76..build();
77.
78.Notification notification = new
79.NotificationCompat.Builder(MainActivity.this)
80..setContentText(getString(R.string.basic_notify_msg))
81..setContentTitle(getText(R.string.notification_title))
82. .setSmallIcon(R.mipmap.ic_launcher)
83. .extend(new
84.NotificationCompat.WearableExtender().addAction(action))
85. .build();
86.
87.NotificationManagerCompat notificationManagerCompat = NotificationManagerCompat.from(MainActivity.this);
88.notificationManagerCompat.notify(NOTIFICATION_ID, notification);
}
In the preceding code snippet, we started by adding our import statements that are responsible for handling the notifications between our Android handheld device and the wearable device. Then we added a NOTIFICATION_ID constant variable that is a unique identifier for our notification and will be responsible for sending the notification between the handheld and the wearable device. Next, we call the cancelAll() method to our NotificationManagerCompat class that cancels all of the previously shown notifications prior to creation of the two class variables, Intent and PendingIntent.
Intent is used to bind itself to the current activities connection at runtime to send messages from one component to another within the same application context. PendingIntent is basically a token that we provide to NotificationManager that provides our application permission to perform operation, for the application's current activity.
Then, specify FLAG_UPDATE_CURRENT on our PendingIntent class object to indicate that pendingIntent already exists. This is basically to keep our pendingIntent active so that we can replace the intent with the code declared by the new Intent class and then thependingIntent object is passed as a parameter to our displayBasicNotification method.
Within our displayBasicNotification method, we begin by declaring a NotificationCompat.Action action object that basically builds our notification that will be shown as part of the notification and must include an icon, label, and PendingItent that will be fired when the user selects the action.
We create a Notification object and a NotificationCompat.Builder class for the main activity, and pass our notification message to the setContentText class and specify its title and icon. We use the extend property to add support for wearable devices and pass ouraction variable so that actions can be responded to by these devices. Next, we use .build to construct our notification object and then specify NotificationManagerCompat that accepts a .from property. This contains our MainActivity class instance context, a .notifyproperty that contains the ID of our notification as specified by NOTIFICATION_ID, as well as the notification object that will be used to post the notification to the system.
Next, we can finally compile, build, and run our application. Simply press CMD + F9 and choose your AVD or your Android handheld device from the list of Android Emulators.
Once the emulator has launched, you should see the notification displayed in the following screenshot:
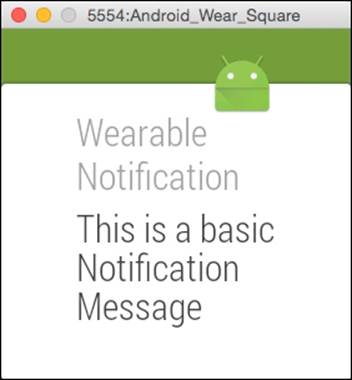
As you can see, creating notifications is quite simple. In the next section, we will take a look at how we can send a custom notification message entered by the user.
Creating a custom notification for wearables
In this section, we will take a look at how we can create a custom notification message that will be entered by the user within our code example. This will be done on the paired smartwatch, with the notification being displayed on the Android wearable device.
So let's get started:
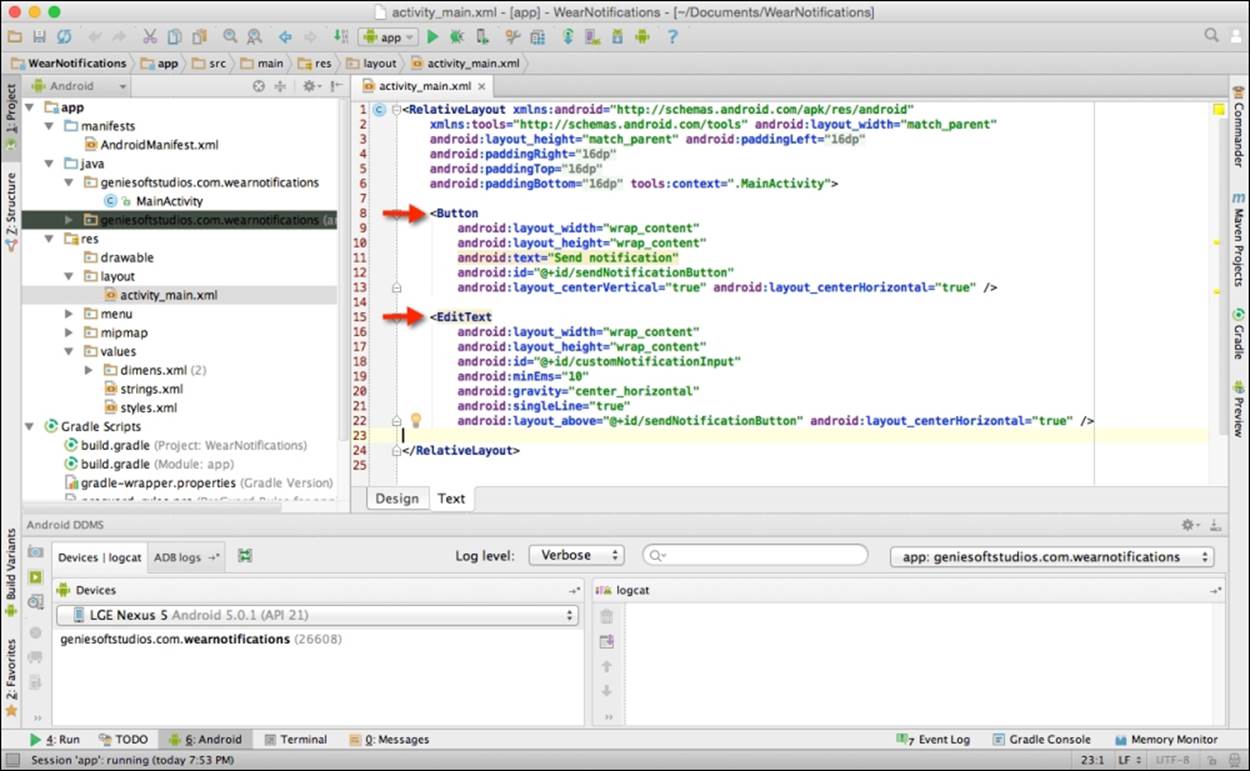
1. First, open the activity_main.xml file, which is located in the res | layout folder structure within Project Navigator, and add the highlighted entries as shown in the following code snippet:
2. <RelativeLayout
3. xmlns:android="http://schemas.android.com/apk/res/android"
4. xmlns:tools="http://schemas.android.com/tools"
5. android:layout_width="match_parent"
6. android:layout_height="match_parent"
7. android:paddingLeft="@dimen/activity_horizontal_margin"
8. android:paddingRight="@dimen/activity_horizontal_margin"
9. android:paddingTop="@dimen/activity_vertical_margin"
10. android:paddingBottom="@dimen/activity_vertical_margin"
11. tools:context=".MainActivity">
12.
13.<Button
14. android:layout_width="wrap_content"
15. android:layout_height="wrap_content"
16. android:text="Send notification"
17. android:id="@+id/sendNotificationButton"
18. android:layout_centerVertical="true"
19.android:layout_centerHorizontal="true" />
20.
21.<EditText
22. android:layout_width="wrap_content"
23. android:layout_height="wrap_content"
24. android:id="@+id/customNotificationInput"
25. android:minEms="10"
26. android:gravity="center_horizontal"
27. android:singleLine="true"
28. android:layout_above="@+id/sendNotificationButton"
29.android:layout_centerHorizontal="true" />
30.
</RelativeLayout>
Now that we have created UIs for our application, we can proceed and start to create the additional code that will hook up our button and text field controls to their associated method events.
31. Open the MainActivity.java file from within the Project Navigator window.
32. Modify the onCreate method with the following highlighted code:
33.@Override
34. protected void onCreate(Bundle savedInstanceState) {
35. super.onCreate(savedInstanceState);
36. setContentView(R.layout.activity_main);
37.
38. // Clear all previous notifications and
39. // generate new unique ids
40. NotificationManagerCompat.from(this).cancelAll();
41.
42. Intent intent = new Intent(this, MainActivity.class);
43. PendingIntent pendingIntent =
44. PendingIntent.getActivity(this, 0, intent,
45. PendingIntent.FLAG_UPDATE_CURRENT);
46.
47. // Method to handle our custom notifications
48.displayCustomNotification(pendingIntent);
}
49. Next, create the displayCustomNotification method underneath the displayBasicNotification method and add the following code:
50. // Method for displaying our custom notification message
51. public void displayCustomNotification(final PendingIntent
52. pendingIntent) {
53.
54. // Get a reference to our Send Notifications Button
55.final Button mSendNotificationButton = (Button)
56. findViewById(R.id.sendNotificationButton);
57.final EditText mSendNotificationInput = (EditText)
58. findViewById(R.id.customNotificationInput);
59.
60. // Set our notification input hint message and
61. // update the text for our button
62. mSendNotificationInput.setHint(R.string.notification_message);
63. mSendNotificationButton.setText(R.string.notification_button);
64.
65. // Set up our Send Notifications Button OnClick method
66. mSendNotificationButton.setOnClickListener(new
67. View.OnClickListener() {
68. @Override
69. public void onClick(View v) {
70.// Get a pointer to our entered in message textBox
71. String message =
72. mSendNotificationInput.getText().toString();
73.
74. // Set up our Notification Action class method
75. NotificationCompat.Action action = new
76. NotificationCompat.Action.Builder(
77. R.mipmap.ic_launcher,
78. getString(R.string.notification_title),
79. pendingIntent)
80. .build();
81.
82. Notification notification = new
83. NotificationCompat.Builder(MainActivity.this)
84. .setContentText(message)
85. .setContentTitle(getText(R.string.notification_title))
86. .setSmallIcon(R.mipmap.ic_launcher)
87. .extend(new
88. NotificationCompat.WearableExtender().addAction(action))
89. .build();
90. NotificationManagerCompat notificationManagerCompat =
91. NotificationManagerCompat.from(MainActivity.this);
92. notificationManagerCompat.notify(NOTIFICATION_ID,
93. notification);
94. }
95. });
}
In the preceding code snippet, we started by calling the cancelAll() method to our NotificationManagerCompat class to clear all of the previous notifications prior to the creation of our class variables, Intent and PendingIntent. Next, we passed the current class'sPendingIntent object to our displayCustomNotification method that will be responsible for displaying the custom message entered by the user.
Within our displayCustomNotification method, we begin by declaring two objects, mSendNotificationButton and mSendNotificationInput. These objects contain the reference to Button and EditTextField that will hold the text entered by the user, and we proceed to set some properties for each of these fields.
Next, we set up a setOnClickListener object that will handle response to the events when the user has tapped on the SEND NOTIFICATION button. Then we specify our NotificationCompat.Action action object that basically builds our notification object that will be shown as part of the notification service and must include an icon, label, and PendingItent that will be fired when the user selects the action.
We create a Notification object and a NotificationCompat.Builder class for the main activity, pass the message entered by the user to the setContentText class, and specify its title and icon. We use the extend property to add support for wearable devices, and pass our action variable so that actions can be responded to by these devices.
Next, we use .build to construct our notification object and then specify NotificationManagerCompat that accepts a .from property that contains our MainActivity class instance context, a .notify property that contains the ID of our notification specified byNOTIFICATION_ID, as well as the notification object that will be used to post the notification to the system.
Next, we can finally compile, build, and run our application. Simply press CMD + F9 and choose your AVD or Android handheld device from the list of Android Emulators:
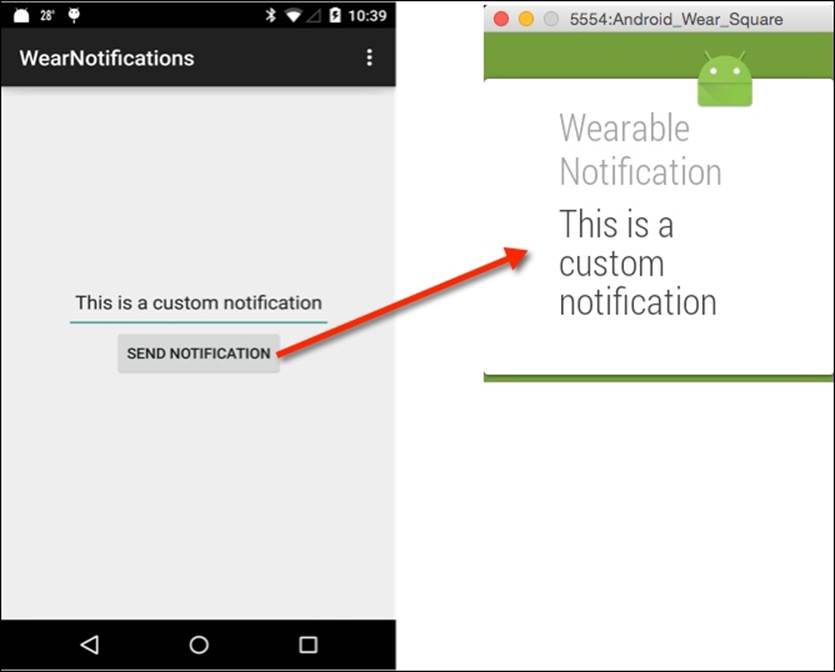
Once the emulator has launched, you should see the custom notification message displayed.
Enter some text within the text field using your Android handheld device, and then click on the SEND NOTIFICATION button. After a couple of seconds, you should see the custom notification you entered on your Android wearable and the handheld device.
Receiving voice input within a notification
In this section, we will be taking a look at how we can use notifications that can allow the user to respond to these by simply using their voice. Since Android wearable devices don't contain a keyboard, a user can swipe on a notification and respond to the action using their voice, or simply by choosing from a list of options presented to them, and tapping on the item right from their Android wearable device.
To receive voice input within a notification, perform the following steps:
1. Open the MainActivity.java file from within the Project Navigator window.
2. Modify the onCreate(Bundle savedInstanceState) method and add the following highlighted code:
3. @Override
4. protected void onCreate(Bundle savedInstanceState) {
5. super.onCreate(savedInstanceState);
6. setContentView(R.layout.activity_main);
7.
8. // Clear all previous notifications and
9. // generate new unique ids
10. NotificationManagerCompat.from(this).cancelAll();
11.
12. Intent intent = new Intent(this, MainActivity.class);
13. PendingIntent pendingIntent =
14. PendingIntent.getActivity(this, 0, intent,
15. PendingIntent.FLAG_UPDATE_CURRENT);
16.
17. // Method to handle voice notifications
18.voiceNotifications(pendingIntent);
}
19. Next, create the voiceNotifications method underneath the displayCustomNotification method and add the following code:
20.// Method for handling our Voice Notifications
21. public void voiceNotifications(PendingIntent pendingIntent)
22. {
23.// Key for the string that's delivered in
24. // the action's intent
25. final String EXTRA_VOICE_REPLY = "extra_voice_reply";
26. final String voiceOptions = "Choose one of these
27.options";
28. String[] voiceChoices =
29.getResources().getStringArray(R.array.voice_choices);
30.
31. final RemoteInput remoteInput = new
32.RemoteInput.Builder(VOICE_NOTIFY_OPTIONS)
33. .setLabel(voiceOptions)
34. .setChoices(voiceChoices)
35. .build();
36.// Call our voice notification
37. handleVoiceNotifications(remoteInput, pendingIntent);
38.
39. // Get the users spoken voice message and display it
40. CharSequence replyText = getMessageText(getIntent(),
41. EXTRA_VOICE_REPLY);
42. if(replyText != null) {
43. Log.d("VoiceNotifications", "You replied: " +
44. replyText);
45. }
}
46. Next, create the handleVoiceNotifications method underneath the voiceNotifications method and add code as follows:
47.// Method for responding to Voice Notification messages
48. public void handleVoiceNotifications(RemoteInput
49.remoteInput, PendingIntent pendingIntent)
50. {
51.// Get a reference to our entered in message textBox
52.String message = "Please respond to this message";
53.
54.// Set up our Notification Action class method
55.NotificationCompat.Action action = new NotificationCompat.Action.Builder(
56. R.mipmap.ic_launcher,
57.getString(R.string.notification_title),
58.pendingIntent)
59. .addRemoteInput(remoteInput) // Voice Input
60. .build();
61.
62.Notification notification = new
63.NotificationCompat.Builder(MainActivity.this)
64..setContentText(message)
65..setContentTitle(getText(R.string.notification_title))
66..setSmallIcon(R.mipmap.ic_launcher)
67..extend(new
68.NotificationCompat.WearableExtender().addAction(action))
69..build();
70.NotificationManagerCompat notificationManagerCompat =
71.NotificationManagerCompat.from(MainActivity.this);
72. notificationManagerCompat.notify(NOTIFICATION_ID,
73.notification);
}
74. Next, create the getMessageText method underneath the handleVoiceNotifications method and add the following:
75. // Method that accepts an intent and returns the voice
76. // response, which is referenced by the EXTRA_VOICE_REPLY
77. // key.
78. private CharSequence getMessageText(Intent intent,
79. String EXTRA_VOICE_REPLY) {
80. Bundle remoteInput =
81. RemoteInput.getResultsFromIntent(intent);
82. if (remoteInput != null) {
83. return
84. remoteInput.getCharSequence(EXTRA_VOICE_REPLY);
85. }
86. return null;
}
In the preceding code snippet, we started by calling the cancelAll() method to our NotificationManagerCompat class to clear all of the previous notifications prior to the creation of class variables Intent and PendingIntent. Next, we added our method call tovoiceNotifications that will be responsible for setting up our voice notifications. In this method, we begin by creating our EXTRA_VOICE_REPLY string variable and our voiceChoices string array that will act as our group container and contain our list of valid responses that the user can respond to using their voice. In the next step, we begin by creating our RemoteInput.Builder class method that will hold our label and list of choices that the user can respond to, by either using their voice or tapping on them with their finger. This method will then display the spoken text on the console window.
Next, we declare our handleVoiceNotifications method that will be responsible for handling the voice notifications. This method accepts our remoteInput and pendingIntent class as parameters and begins to declare a NotificationCompat.Action action object. This basically builds our notification object that will be shown as part of the notification service and must include an icon, label, and PendingItent that will be fired when the user selects the action. One different thing you will notice here is that we added a new property called addRemoteInput and passed our remoteInput instance variable to this. This is done to collect the input from the user when the response has been sent. Next, we start by creating our notificationManager object based on our NotificationManagerCompat instance class that accepts the .from property. This contains our current class instance context, which is referred to as this. It also contains a .notify property that contains the ID of our voice notification as specified by NOTIFICATION_ID, as well as our notification object that will be used to post the notification to the system.
Finally, we create our getMessageText method that accepts the intent of our Activity class that is carrying the information from the wearable, and returns back the voice response. This is referenced by our EXTRA_VOICE_REPLY key back to our voiceNotifications method to display the captured voice response to the user.
Next, we can finally compile, build, and run our application. Simply press CMD + F9 and choose your AVD or Android handheld device from the list of Android emulators:
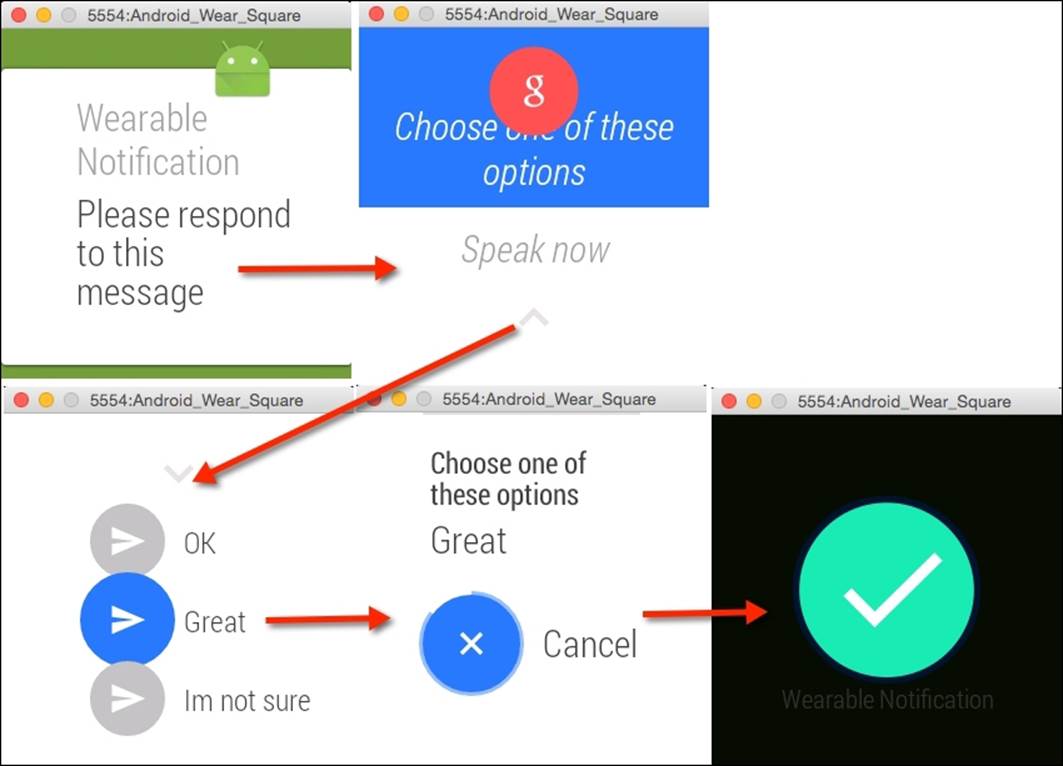
Once the emulator has launched, you should see the notification messages displayed and grouped as shown in the preceding screenshot.
Receiving multiple notifications through a process called page stacking
In the previous sections, we have looked at how we can use notifications to send basic and customized notifications to our Android wearable device. In the final section, we will look at how we can use our notification service to group notifications through a process called page stacking.
This process helps us to intelligently collate and bundle similar items within a single collection to provide us with easy navigation from the same app. So, let's get started:
1. Open the MainActivity.java file from within our Project Navigator window.
2. Modify the onCreate(Bundle savedInstanceState) method and add the following highlighted code:
3. @Override
4. protected void onCreate(Bundle savedInstanceState) {
5. super.onCreate(savedInstanceState);
6. setContentView(R.layout.activity_main);
7.
8. // Clear all previous notifications and
9. // generate new unique ids
10. NotificationManagerCompat.from(this).cancelAll();
11.
12. Intent intent = new Intent(this, MainActivity.class);
13. PendingIntent pendingIntent =
14.PendingIntent.getActivity(this, 0, intent,
15.PendingIntent.FLAG_UPDATE_CURRENT);
16.
17.// Method to display our Page-Stacking notifications
18.displayPageStackNotifications();
}
19. Next, create the displayPageStackNotifications method underneath the handleVoiceNotifications method and add the following code:
20.// Method for displaying our page stacking
21. // notification messages
22. public void displayPageStackNotifications() {
23.
24. int stackNotificationId = 0;
25. int MAX_NOTIFICATIONS = 2;
26.
27. // String to represent and group all of the notifications
28. // that will be a part of it.
29. final String GROUP_NOTIFICATIONS = "group_notifications";
30.
31. // Group notification that will be visible on the phone
32. Notification summaryNotification = new
33. NotificationCompat.Builder(this)
34. .setContentTitle(MAX_NOTIFICATIONS + "
35. Notifications Received")
36. .setContentText("You have received " +
37. MAX_NOTIFICATIONS + " messages")
38. .setSmallIcon(R.mipmap.ic_launcher)
39. .setGroup(GROUP_NOTIFICATIONS)
40. .setGroupSummary(true)
41. .build();
42.
43. // Create our first view Intent
44. Intent viewIntent1 = new Intent(this, MainActivity.class);
45. PendingIntent viewPendingIntent1 =
46. PendingIntent.getActivity(this,
47. (stackNotificationId + 1), viewIntent1, 0);
48.
49. Notification notification1 = new
50. NotificationCompat.Builder(this)
51. .addAction(R.mipmap.ic_launcher, "Sounds Great",
52. viewPendingIntent1)
53. .setContentTitle("Movie Message")
54. .setContentText("Do you want to go to the
55. movies?")
56. .setSmallIcon(R.mipmap.ic_launcher)
57. .setGroup(GROUP_NOTIFICATIONS)
58. .build();
59.
60. // Create our second view intent
61. Intent viewIntent2 = new Intent(this, MainActivity.class);
62. PendingIntent viewPendingIntent2 =
63. PendingIntent.getActivity(this,
64. (stackNotificationId + 2), viewIntent2, 0);
65.
66. Notification notification2 = new
67. NotificationCompat.Builder(this)
68. .addAction(R.mipmap.ic_launcher, "Why not",
69. viewPendingIntent2)
70. .setContentTitle("Red Wine Message")
71. .setContentText("Another glass of Red Wine?")
72. .setSmallIcon(R.mipmap.ic_launcher)
73. .setGroup(GROUP_NOTIFICATIONS)
74. .build();
75.
76. // Issue our group notification message
77. NotificationManagerCompat notificationManager =
78. NotificationManagerCompat.from(this);
79. notificationManager.notify(stackNotificationId,
80. summaryNotification);
81. // Then, issue each of our separate wearable notifications
82. notificationManager.notify((stackNotificationId + 1),
83. notification1);
84. notificationManager.notify((stackNotificationId + 2),
85. notification2);
}
In the preceding code snippet, we started by adding our import statements that are responsible for handling the notifications between our Android handheld device and the wearable device, just like how we created the basic and custom notifications.
Just like our previous examples in this chapter, we make a call to the cancelAll() method in our NotificationManagerCompat class to clear all of the previous notifications prior to the creation of our class variables, Intent and PendingIntent. Next, we add the method call to displayPageStackNotifications that will be responsible for displaying our page stacking notifications. In this method, we begin by initializing stackNotificationId, which will be used to keep a track of each notification that we create. We then create aMAX_NOTIFICATIONS variable that contains the total number of page stacking notifications, and then create a GROUP_NOTIFICATIONS string that contains our group container to hold each of our notifications.
In our next step, we begin by creating our group notification class using our NotificationCompat.Builder class method as we did in the previous sections, but with one difference, that is we include the setGroup and setGroupSummary properties.
The setGroup property groups all of your notifications in a single card, and then allows you to scroll through each of these on your wearable device.
The setGroupSummary property allows you to provide a summary as part of your page stacking notification, for example, it shows how many unread messages you have. In the next step, we start by creating our view that will be used for our first notification and get theintent and pendingIntent current classes. Then we increment stackNotification for our first view and begin setting up our notification adding it as part of our GROUP_NOTIFICATIONS group. After this, we do the same for our next notifications view and increment the number by one each time, so that we do not override the previous notifications intent view before adding this item as part of our group.
Finally, we create our notificationManager object based on the instance of the NotificationManagerCompat class that accepts the .from property. This contains our current class instance context, which is referred to as this. It also contains a .notify property that has the ID of our stack notification as specified by stackNotificationId, as well as our summaryNotification object that will be used to post the notification to the system. Then we begin issuing each of our separate wearable notifications using our notificationManager.notifymethod and passing stackNotificationId to our notification service, as well as the notification that we want to start posting.
Next, we can finally compile, build, and run our application. Simply press CMD + F9 and choose your AVD or your Android handheld device from the list of android emulators.
Once the emulator has launched, you should see the notification messages displayed and grouped as shown in the following screenshot:
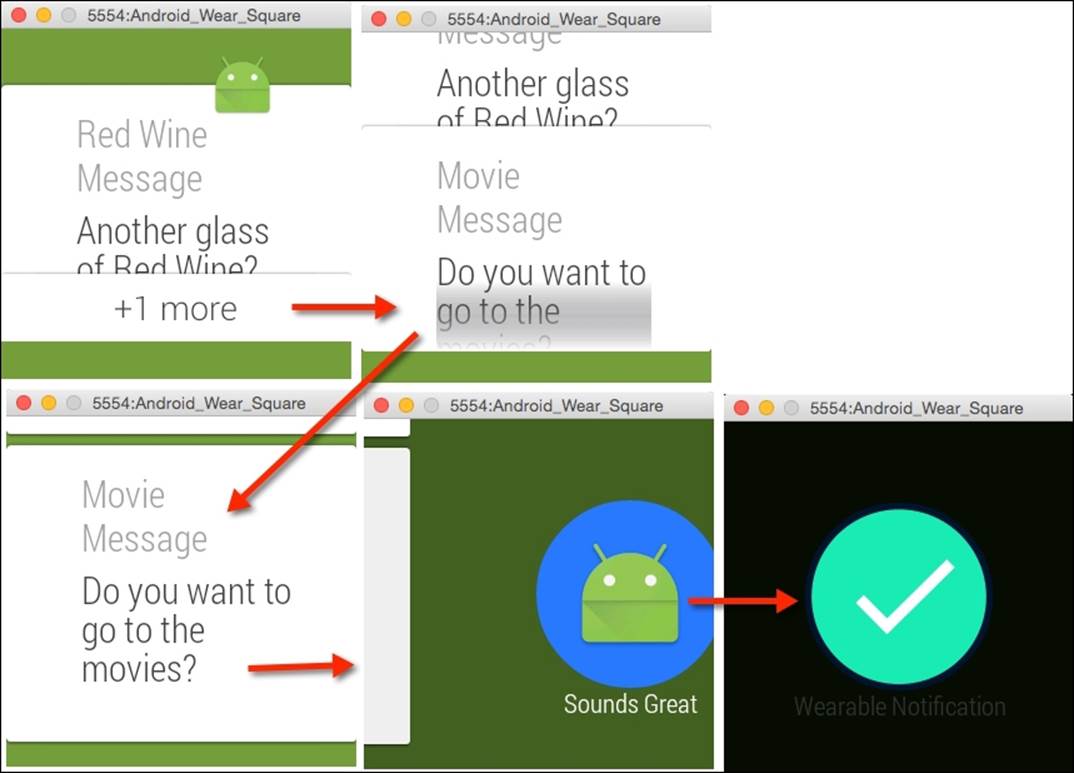
The preceding screenshot shows the current notification workflow including each of the respective screens when the user responds to the actions.
Note
Android Wear often displays a confirmation screen after user input, which can be programmatically manipulated, either with an animation or a timer-based confirmation that lets the user cancel their selection. To obtain further information about this process, it is worth checking out the Showing Confirmations documentation at https://developer.android.com/training/wearables/ui/confirm.html.
Summary
In this chapter, we explored the various ways by which we are able to send notifications between the handheld device and the Android wearable. We looked at how to build a simple Android handheld app with customized notifications for Android Wear to show different types of notifications. Next, we looked at how to send basic and custom notification messages, which can be customized by the user. Also, we looked at how we can use notifications that can be responded to by the user using their voice.
In the final part of this chapter, we looked at how we can receive multiple notifications on our Android wearable, and group these by using a process called page stacking.
In the next chapter, we will gain an understanding of how we can build effective UIs to create, customize, and draw watch faces using Google's official API that will provide us the ability to present information within the watch area.