Raspberry Pi Hacks (2014)
Preface
The inspiration for the Raspberry Pi was born when Eben Upton was working with computer science students at Cambridge University (see the Foreword for his own account). He saw a need for incoming students to have greater opportunities to obtain programming experience before they got to the university level. The first concept designs for what would become the Pi we know now were born in 2006. Alpha boards were demonstrated in late 2011, and the first 10 boards were auctioned off at the beginning of 2012, raising £16,000.
The first batch of 10,000 Raspberry Pis went on sale February 29, 2012. Toward the end of 2011, the SD card image for it had already been downloaded more than 50,000 times, hinting at its impending popularity. The two UK sellers at the time, Premier Farnell and RS Components, sold out within minutes, with the latter reporting more than 100,000 orders that day. Upton designed them for education—specifically Python, hence the “Pi” part of the name. But the tiny board caught the eye of already-experienced programmers and electronics hackers. As of this writing, a year and a half after that first day of sale, more than two million have been sold.
And then roughly 1.95 million of them got stuck in an office drawer while their owners gathered with hackerspace friends over beer and collectively lamented, “Yeah, I bought a Pi, but I haven’t figured out what to do with it yet. I was thinking I might use it to build a time machine and try to study the K-Pg event in person, but I’ll probably just put XBMC on it.”
We wrote this book for you, the ones who haven’t decided what to do with your languishing Pis yet. Of course, if you do just want to install XBMC, you can refer to [Hack #54] and then read the rest of the book to see the fun you’re missing. Alas, we haven’t perfected the time machine hack yet, but follow @suehle and @spotrh on Twitter, and we’ll let you know if we find a good source for flux capacitors.
We’re in what we hope is still the early stages of a return to a DIY culture. Those of you deeply embroiled in it already, who have been to every Maker Faire and joined your local hackerspace the day it opened, might insist that, on the contrary, we are deep in the midst of said return. But it hasn’t gone far enough yet. Beyond our little maker/hacker/builder/doer niche is still a wide world of disposable goods and electronics consumption and dump-tion. Our devices are increasingly designed to do what the designer intended without the flexibility to do what the owner intends, needs, or wants. Further, they often are sealed up boxes, keeping prying fingers from ripping them apart and rebuilding them to suit new visions.
The acceptance of closed, unhackable, unfixable goods is relatively new in the course of human culture. It’s not so long ago—perhaps even your own childhood if you’re over 30 or so—in which we were happily building our computers from kits and taking the TV to the repair shop instead of buying a new one. Devices like the Raspberry Pi help bring us back to that better time when we knew (or could find out) what was happening inside the things that we owned, when we could change them for the better and give them new life when they broke down.
The first chapter of this book is for everyone with a Raspberry Pi; it gives you a basis on which to build all of the hacks. From there, we move on to the larger projects that implement all of those smaller hack needs. And in the spirit of the Pi’s original purpose, we hope you learn a lot.
Who This Book Is For
Despite the potentially intimdating word “hacks” in the title, we don’t expect you to be a Linux kernel developer or electrical engineer to be able to use this book. Hacks and hacking—not in the sense you hear those words used on the six o’clock news—are how many of us learn best. Hands on, trying something new, possibly frying electronics in the process.
We’ve tried to write these hacks so that even the novice can follow along and become a Raspberry Pi hacker. It will help greatly if you have at least a rudimentary understanding of how to use the Linux command line. For the most part, we walk you through those steps, too, but in places where we haven’t, a quick look to Google or to the man pages of a command should catch you up.
As to the electronics half of the hacking, we’ve tried to spell as much out in detail as possible. For those who already have a workroom filled with jumper wires and strange parts you picked up out of the electronics store clearance bin “because they might be handy someday,” this level of detail might feel belabored. Just skip ahead to the parts that are useful to you and be thankful that your less-knowledgeable friends will be getting help from the book instead of calling you to ask if “GND” is really that important, based on the assumption that it’s an amusing nod to their childhood and stands for “Goonies Never (say) Die.”
How to Use This Book
Although you can read this book cover to cover, each hack should stand alone, so feel free to browse and jump to the different sections that interest you most. If there’s a prerequisite you need to know about, a cross-reference will guide you to the right hack.
The hacks in the book are organized into the following chapters:
Chapter 1, Configuration Hacks
The first chapter introduces you to the common needs of Raspberry Pi users, like making sure you have the right SD card for the project. It deals with the assorted parts and issues you’re likely to encounter with any Raspberry Pi project, such as power problems and getting aquainted with the GPIO pins. You’ll also find tips and tricks for dealing with some of its more finicky aspects.
Chapter 2, Hacking Linux for the Raspberry Pi
The most basic description you can give of the Raspberry Pi is “small Linux computer,” which means a lot of the things you’ll want to do will require some knowledge of Linux, working from the command line, and getting into the system. Even if you’re relatively new to Linux, we’ll help you walk through processes—like building a custom kernel and updating the firmware—that might sound challenging to the novice but don’t have to be.
Chapter 3, Raspberry Pi Around the House
Now that you’ve gotten the hardware and operating system under control, you can start looking for bigger projects. In this chapter, you’ll find some ways to use it around the house, including in really useful projects that make your home computing setup a little smoother.
Chapter 4, Hacking the Outdoors
Why should all the Pi fun be inside your house? You can use it to help out in the garden, take it geocaching, or run an animated holiday lights display from it. And that’s just the beginning. What if you could (nearly) waterproof it?
Chapter 5, Multimedia Hacks
Back inside (mostly), this chapter presents the many ways you can use your Pi for entertainment. You can play music in a few ways, including by turning the Pi itself into an FM radio or by using it to set up a home theater. Then you can take it on the road and let the kids watch movies from the backseat by integrating a touchscreen.
Chapter 6, Extend Your Pi
This final chapter addresses some larger projects (not that launching an aerial photography rig isn’t big!). Use the hacks in this chapter to attach more things to your Pi, get more control over the GPIO, and even build your own cluster of Raspberry Pis with up to 64 nodes.
Hardware Requirements
Most of the hacks in this book use the Raspberry Pi Model B, version 2. Here is a little information for you to consult and compare to the needs of your intended project before deciding whether the board you have will serve your purpose.
WHY “MODEL A” AND “MODEL B”?
In keeping with the educational goals, these names are a nod to the inspiration for the Raspberry Pi, the BBC Micro computer released with the same model names in 1981.
The Broadcom BCM2835 chip, 700 MHz CPU, and GPU are the same across the boards. All of them offer HDMI, composite RAC (PAL and NTSC), and a 3.5 mm audio jack. They all also have the same SD card slot. The Model A sells for $25, while the Model B sells for $35. See Table 1 for a description of notable differences.
Table 1. Differences between Model A and Model B
|
Feature |
Model A |
Model B |
|
Memory |
256 MB SDRAM |
512 MB SDRAM |
|
USB ports |
1 |
2 |
|
Ethernet |
none |
10/100 Ehternet RJ45 |
There are also two revisions of the Model B board, as shown in Figure 1.
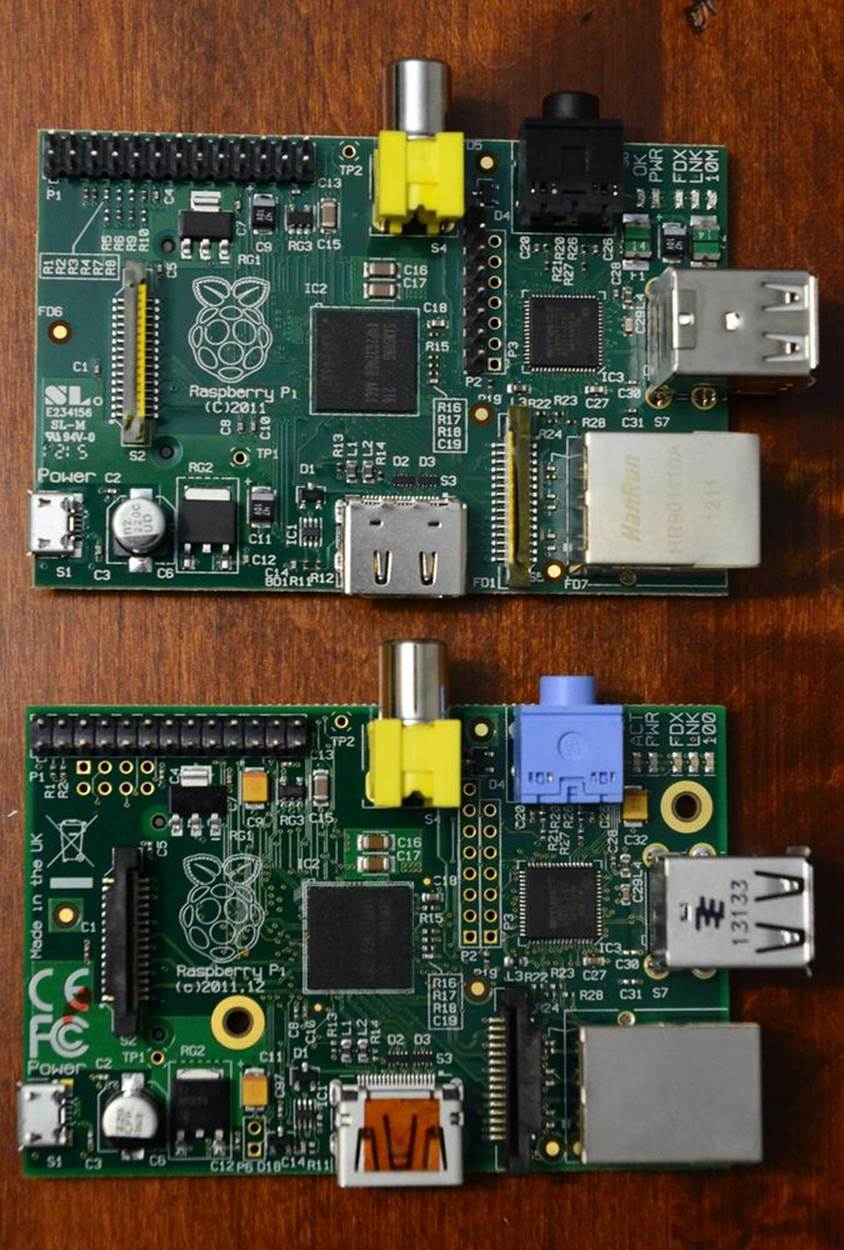
Figure 1. For visual comparison, the two Model B boards: revision 1 (top) and revision 2 (bottom)
Changes made for rev 2 include:
§ 2 2.5 mm nonplated mounting holes added
§ LED labeling: D9 (yellow) corrects 10 label to 100, and D5 (green) says ACT for “Activity” instead of OK.
§ Reset circuit added (see [Hack #17] for how to use it)
§ USB fuses removed (this helps with USB hubs that backfeed power, as long it’s no more than 2.5A under fault conditions)
§ GPIO pin changes:
§ CAM_GPIO: GPIO27 now GPIO21 routed to S5 pin 11 (S5 is the camera interface)
§ GPIO_GEN2: GPIO21 now GPIO27 routed to P1 pin 13 (P1 is the main, long strip of GPIO pins)
§ Additional GPIO added on P5 (see Figure 2), which maps as follows:
§ P1 - 5V0
§ P2 - 3.3V
§ P3 - GPIO28
§ P4 - GPIO29
§ P5 - GPIO30
§ P6 - GPIO31
§ P7 - GND
§ P8 - GND
§ Primary and secondary I2C channels switched (see Table 2)
|
|
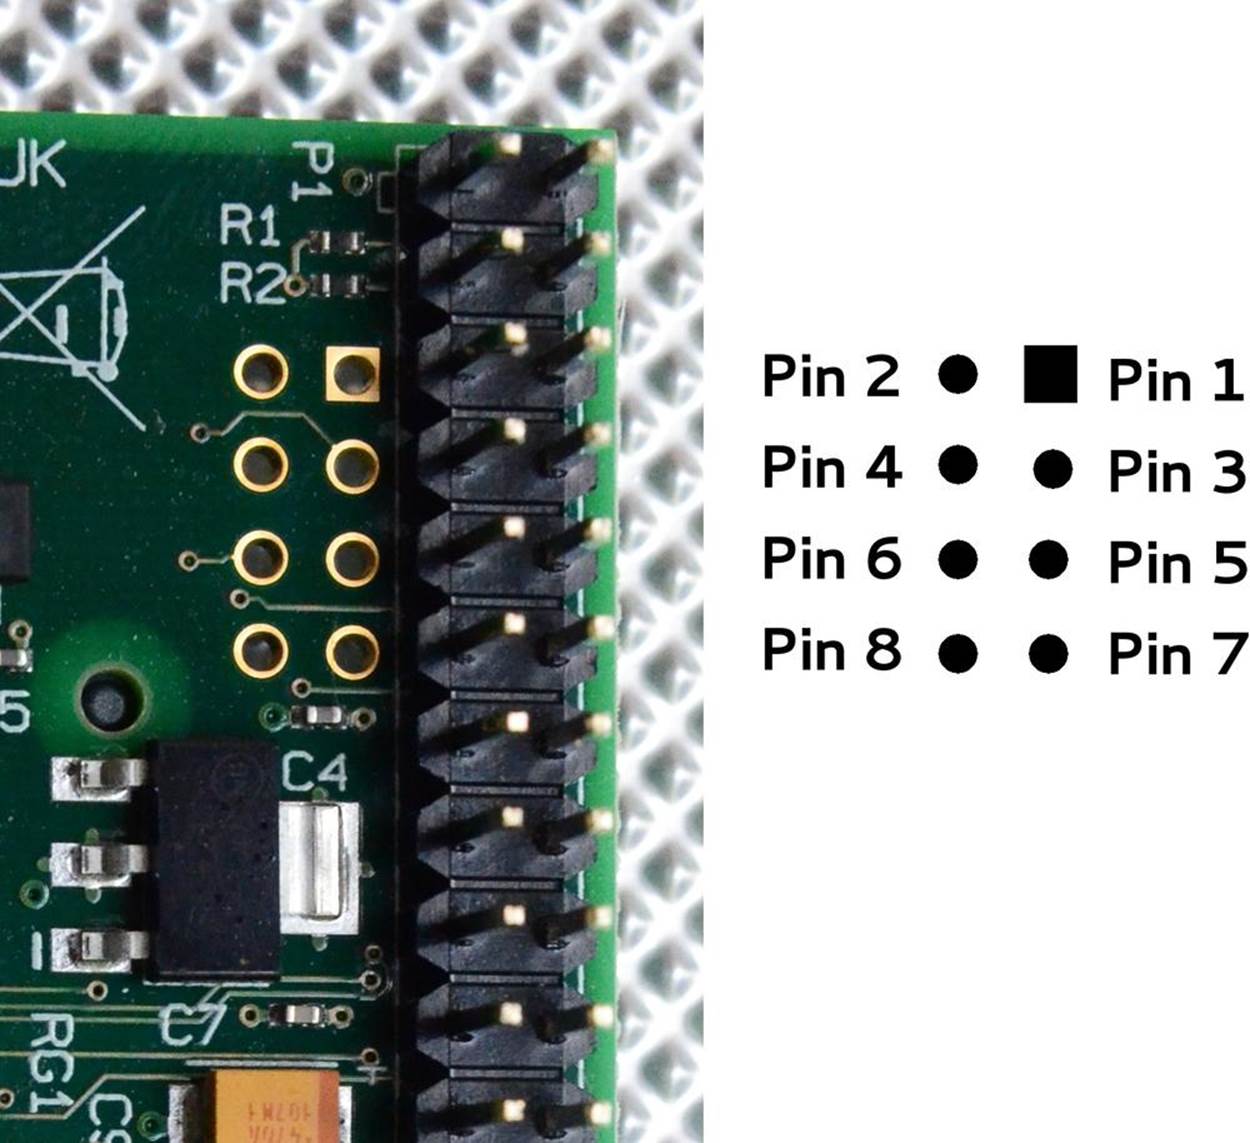
Figure 2. P5 pin order (Note that “P5” label is on bottom of the board)
Table 2. I2C channels in Rev 1 and Rev 2
|
Rev 1 |
Rev 2 |
|
|
SCL0 (GPIO 1) |
routed to P1 pin 5 |
routed to S5 pin 13 |
|
SDA0 (GPIO 0) |
routed to P1 pin 3 |
routed to S5 pin 14 |
|
SCL1 (GPIO 3) |
routed to S5 pin 13 |
routed to P1 pin 5 |
This information is applicable for most of the hacks in the book. But, of course, just because they were tested (and possibly designed for) the Model B, it doesn’t mean that the hacks won’t work with a different model or revision (unless otherwise specified). Feel free to use what you have, but know you might need to refer to additional information online about older boards.
Conventions Used in This Book
The following typographical conventions are used in this book:
Italic
Indicates new terms, URLs, and email addresses.
Constant width
Used for program listings, as well as within paragraphs to refer to program elements such as variable or function names, databases, data types, environment variables, statements, filenames, file extensions, and keywords.
Constant width bold
Shows commands or other text that should be typed literally by the user.
Constant width italic
Shows text that should be replaced with user-supplied values or by values determined by context.
This element signifies a tip, suggestion, warning, caution or general note.
All materials on the site are licensed Creative Commons Attribution-Sharealike 3.0 Unported CC BY-SA 3.0 & GNU Free Documentation License (GFDL)
If you are the copyright holder of any material contained on our site and intend to remove it, please contact our site administrator for approval.
© 2016-2026 All site design rights belong to S.Y.A.