Hacking Raspberry Pi (2014)
Part II. Software Foundations
Chapter 8. Programming Raspberry Pi with Scratch-Beginnings
Now that you’ve learned some of the history behind the Raspberry Pi, you understand why the Pi comes preloaded with Scratch, Python, and other software development environments. After all, the Pi’s fundamental reason for being is to encourage schoolchildren to build an interest in computer programming.
Scratch is an intuitive programming language that was developed by the Lifelong Kindergarten group of the Media Lab at the Massachusetts Institute of Technology (MIT) in Cambridge, Massachusetts (http://is.gd/LYZJWm). The Media Lab folks wanted to present an easy-to-learn programming toolset that empowers interested kids (and adults) to quickly create games and other media-rich interactive experiences without having to understand complex syntax rules.
What’s particularly cool about Scratch is its use of drag-and-drop blocks instead of traditional text commands to build computer programs. The MIT Media Lab wanted to help students avoid stumbling over the learning curve inherent in memorizing complex programming language syntax and instead focus on using logic and intuition to create Scratch projects.
So in a nutshell, Scratch is a way to teach nonprogrammers how to program. How cool is that?
To illustrate this point, take a look at Figure 8.1, which shows the same programmatic procedure (specifically an if/then condition) in C and in Scratch. Which syntax is more immediately relatable to you?
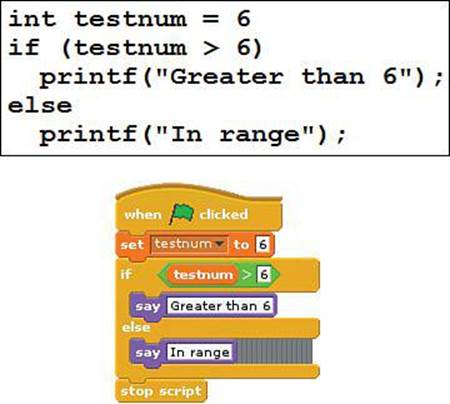
FIGURE 8.1 A conditional logic expression in C (top) and in Scratch (bottom).
Technical Aspects of Scratch
Scratch is an open source integrated development environment (IDE) that was itself built in Squeak, a dialect of the Smalltalk programming language. As you have probably come to expect with open source software, you can install Scratch on Windows, OS X, or Linux. Plans are already underway to port Scratch on mobile platforms. As I said earlier, the Raspberry Pi Foundation includes Scratch 1.4 in its Raspbian operating system distribution.
Because Scratch is a cross-platform application, you can create a .sb Scratch project file on your Pi, save the project file to an online storage service, download the .sb file to your PC, Mac, or Linux box, and resume your work seamlessly. Of course, this process works just as well in reverse.
Scratch Version Issues
I have good news and bad news for you. The good news is that Scratch 1.4 works just fine on the Raspberry Pi, and there are plenty of Scratch 1.4 programmers in the world. The bad news (if you want to call it that) is that the Lifelong Kindergarten Group released Scratch 2.0 in May 2013, and it is incompatible with the Raspberry Pi.
The incompatibility centers on the fact that Scratch 2.0 is built with Adobe Flash, and Flash is not supported on the Pi. By contrast, the Pi includes kernel support for Squeak, the underlying programming language behind Scratch 1.4.
I chatted with Eben Upton, co-creator of the Raspberry Pi, regarding the likelihood that the Foundation will find a way to bundle Scratch 2.0 on the Pi. This was his response:
We don’t expect to support Scratch 2.0 any time soon, but we are doing a lot of work to make Scratch 1.4 more performant on the Pi (Smalltalk optimization and updating the underlying Squeak VM). In practice, we don’t expect the Scratch team’s use of Flash to last very long (even Adobe doesn’t believe in that stuff anymore), so hopefully we’ll reconverge when they port to JavaScript or similar.
So...the long and the short of it is that functionally Scratch 1.4 and Scratch 2.0 are practically identical, so everything you learn to do in this chapter is directly applicable to Scratch 2.0. That said, I focus educational efforts in this chapter strictly on Scratch 1.4 because that is the version included in Raspbian.
The Scratch Community
Another important principle behind Scratch is the power of community. Before going too much further with this discussion, I want you to visit the Scratch home page at scratch.mit.edu and register for a free Scratch user account (see Figure 8.2).
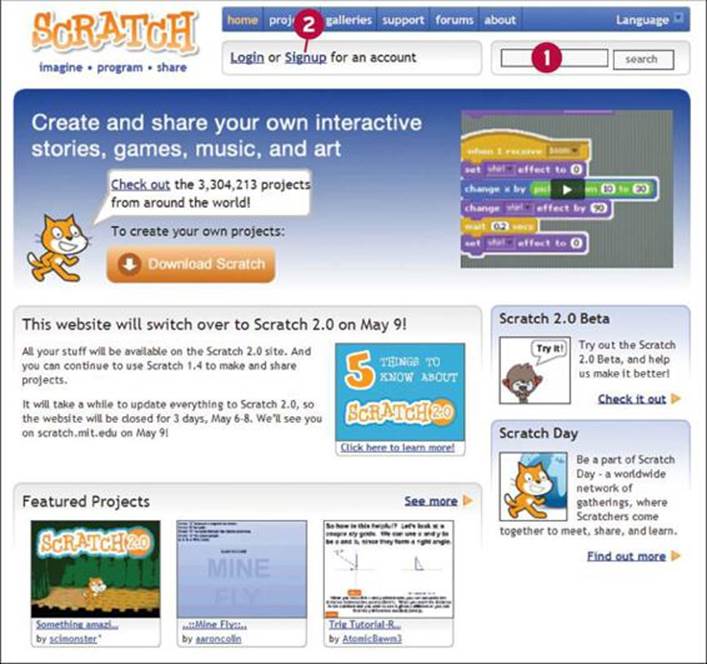
FIGURE 8.2 You should become a part of the Scratch community.
1. Browse Scratch projects here
2. Create a Scratch account here
Becoming a member of the Scratch community enables you to download projects made by other Scratchers (yes, Scratch users call themselves “Scratchers”), as well as to share your own work. Scratch site members can also post and answer questions on the Scratch discussion forums (http://is.gd/S4ZeId).
Note: Cat Scratch Fever
The name Scratch does not officially arise from the feline world, although the Scratch Cat is the official mascot of the product. Instead, scratch in this context refers to the disc jockey (DJ) technique of scratching vinyl records on a turntable to produce interesting musical beats and variations. This notion of scratching is linked to the creativity and self-expression that is encouraged in building Scratch games.
The only downsides I’ve found to using Scratch on the Pi are as follows:
![]() Because the Pi does not support either Adobe Flash or Java, you can’t preview Scratch games on the Scratch website.
Because the Pi does not support either Adobe Flash or Java, you can’t preview Scratch games on the Scratch website.
![]() Because the Pi isn’t exactly a robust computer, overall Scratch performance is a bit on the slow side.
Because the Pi isn’t exactly a robust computer, overall Scratch performance is a bit on the slow side.
If you want to install Scratch on one of your full-fledged desktop computers, it’s easy to do. Scratch is a cross-platform application, which means that you can install and run it on Windows, OS X, or Linux. Download Scratch from the Scratch website (http://is.gd/iIuIQK).
One thing you will notice about Scratch 2.0 when you view the site is that you no longer need to download and install the environment. Instead, you can jump directly into the editor from the Scratch website.
Getting Comfortable with the Scratch Interface
To start Scratch, simply double-click the icon on your Raspbian desktop. An annotated version of the Scratch interface is shown in Figure 8.3.
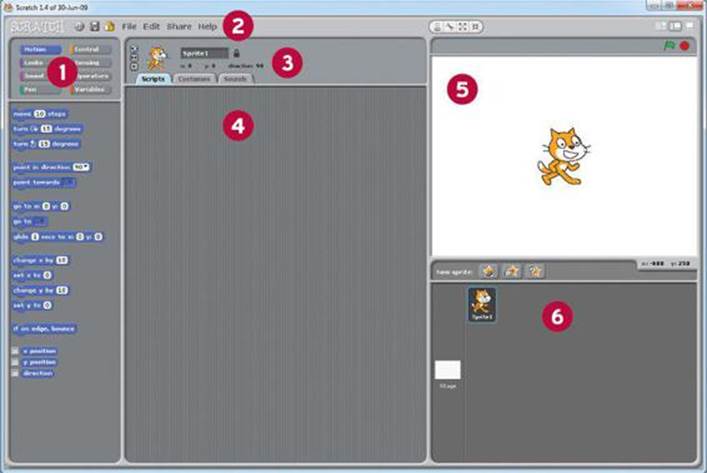
FIGURE 8.3 The Scratch user interface is friendly and intuitive.
1. Blocks Palette: You construct Scratch code by dragging and dropping action blocks.
2. Menu Bar: Here you can save a project, interact with the Scratch website, get online help, and perform other file management tasks.
3. Sprite Header Pane: This area displays important details for the currently selected sprite, including X/Y coordinates, name, and positional restrictions.
4. Scripts Area: This is where you actually program the logic of your Scratch application. Each sprite can have one or more script “stacks” associated with it. You’ll notice that the Scripts area has three tabs:
![]() Scripts: For your code blocks.
Scripts: For your code blocks.
![]() Costumes: Used to alter the appearance of your sprites (for the Stage, this tab is called Backgrounds).
Costumes: Used to alter the appearance of your sprites (for the Stage, this tab is called Backgrounds).
![]() Sounds: Attach recorded or imported audio files to your sprites.
Sounds: Attach recorded or imported audio files to your sprites.
5. Stage: The Stage is the work area for our Scratch application. This is where all the action occurs. The Stage Toolbar, located above the Stage, gives you control over sprites and allows you to resize the Stage three different ways.
6. Sprites Pane: In case you wondered, a sprite is a graphical object that you include in your Scratch app. By default, the Scratch Cat appears as a sprite in all new Scratch projects. You can import existing graphics as sprites or draw your own from, well, scratch.
To get started, visit the Scratch Projects site (http://is.gd/tsr9gM) and download somebody’s project that looks interesting. Again, you need to be logged in with your Scratch account to download projects (see Figure 8.4).
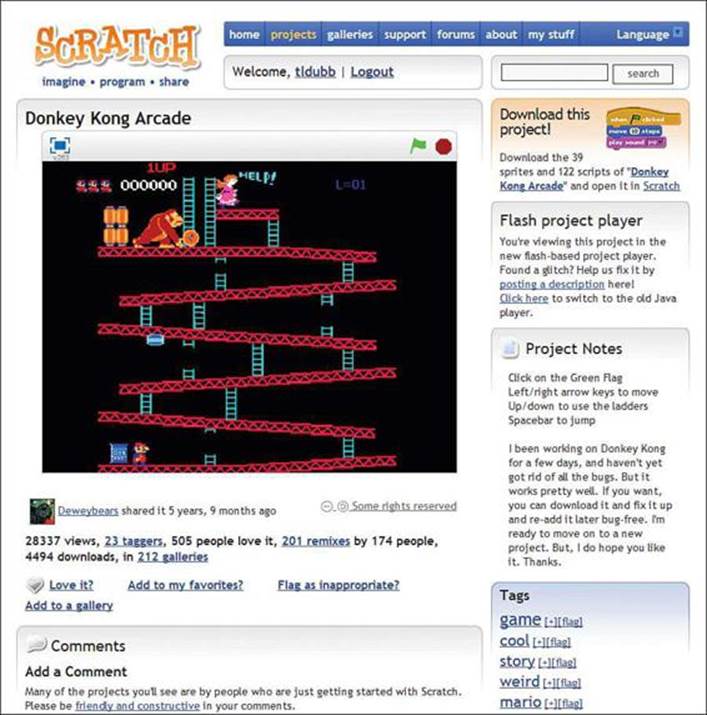
FIGURE 8.4 You can try out and download other peoples’ Scratch projects directly from your web browser.
It bears repeating that you cannot preview projects in a browser on Raspi because the Pi does not support Adobe Flash. Moreover, my communication exchanges with Eben tell me that the Raspberry Pi Foundation has no future plans for the Pi to support Flash.
The main Scratch Projects website contains only Scratch 2.0 projects. Although you can upload your Scratch 1.4 projects to the website, they will be converted to Scratch 2.0 before they appear on the website. You can then edit the uploaded projects directly in your web browser (unfortunately, you can’t run Scratch 2.0 projects from Scratch 1.4).
The traditional way to start a Scratch project (whether from a web browser or from within Scratch itself) is to click the Green Flag icon in the Stage area. By contrast, you can use the Red Stop Sign icon to manually stop the project.
One of the awesome things about open source software such as Scratch is that you can go beyond simply admiring other Scratchers’ projects—you can actually view their source code and base your own Scratch projects off of that code.
Let’s spend some time getting to know how the actual programming code works in Scratch. To that point, you need to understand what blocks are and how they are used.
About Blocks
As I said earlier, you can use these easy-to-understand blocks to actually program your Scratch app. As you’ll learn soon enough, blocks are puzzle-type pieces that “snap” together in much the same way that LEGO blocks do.
These blocks make it easier for beginning programmers to think about and execute programming logic without having the additional burden of learning programming language syntax.
In the Scratch interface Blocks palette, blocks are arranged in the following eight categories:
![]() Motion: These blocks enable you to position a sprite on the Stage and optionally move or glide it around. Click Edit, Show Motor Blocks to reveal extra blocks intended for use with the LEGO Education WeDo Robotics Kit (http://is.gd/HIquiE).
Motion: These blocks enable you to position a sprite on the Stage and optionally move or glide it around. Click Edit, Show Motor Blocks to reveal extra blocks intended for use with the LEGO Education WeDo Robotics Kit (http://is.gd/HIquiE).
![]() Looks: These purple blocks allow you to change the look (called a Costume) of your sprites. You also can have a sprite “say” or “think,” as well as ask the user for feedback.
Looks: These purple blocks allow you to change the look (called a Costume) of your sprites. You also can have a sprite “say” or “think,” as well as ask the user for feedback.
![]() Sound: These pink blocks give you control over system volume and allow your sprites to make sounds of their own.
Sound: These pink blocks give you control over system volume and allow your sprites to make sounds of their own.
![]() Pen: These dark green blocks enable your sprites to draw vector lines onscreen.
Pen: These dark green blocks enable your sprites to draw vector lines onscreen.
![]() Control: These gold blocks represent the brains of your Scratch app. You can start scripts, stop scripts, and manage all events within the program by using Control blocks.
Control: These gold blocks represent the brains of your Scratch app. You can start scripts, stop scripts, and manage all events within the program by using Control blocks.
![]() Sensing: These light blue blocks are used to detect input from the user. For instance, you can detect mouse clicks, typed responses, and analog events inbound from a PicoBoard. (I’ll tell you more about the PicoBoard momentarily.)
Sensing: These light blue blocks are used to detect input from the user. For instance, you can detect mouse clicks, typed responses, and analog events inbound from a PicoBoard. (I’ll tell you more about the PicoBoard momentarily.)
![]() Operators: These light green blocks perform mathematical equations and are also used to handle string data.
Operators: These light green blocks perform mathematical equations and are also used to handle string data.
![]() Variables: These blocks are used to make two types of variables: traditional variables and lists (formally called arrays).
Variables: These blocks are used to make two types of variables: traditional variables and lists (formally called arrays).
I don’t notice this because I am profoundly colorblind, but I’m sure you observed that blocks within each type are color-coded. This helps you associate certain types of actions with certain types of blocks. Moreover, the color-coding helps you keep your variables distinct from each other within your program.
Note: What is a Variable?
A variable is nothing but an in-memory placeholder for a piece of data. Computer programs use variables, which can dynamically change their stored values (hence the name variable), to move data around inside an application.
Scratch blocks themselves fall into six shape types:
![]() Hat blocks
Hat blocks
![]() Stack blocks
Stack blocks
![]() Boolean blocks
Boolean blocks
![]() Reporter blocks
Reporter blocks
![]() C blocks
C blocks
![]() Cap blocks
Cap blocks
Figure 8.5 displays representative examples of each block type. Take a look at them, and then let’s learn a little bit more about each block shape.
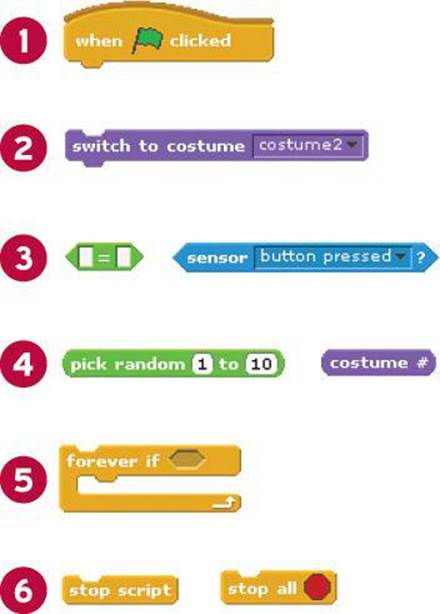
FIGURE 8.5 A mash-up showing you the different types of block shapes in Scratch. Here’s a key to the annotations: 1: Hat block; 2: Stack block; 3: Boolean block; 4: Reporter block; 5: C block; 6: Cap block.
Hat Blocks
Hat blocks have rounded tops, which indicate that they are used to initiate actions, not follow other actions. The Green Flag hat block is universally used to start scripts. I myself also use the Broadcast hat blocks a lot to send and receive messages among different parts of my Scratch app.
Stack Blocks
Stack blocks typically form the bulk of your Scratch programming logic. You can see by the notch at the top and bump at bottom (like interlocking puzzle pieces) that Stack blocks can have blocks attached above and below, forming, well, stacks of programming logic.
Boolean Blocks
Boolean blocks are used to represent binary (yes/no, on/off, true/false, 0/1) conditions in your program. You’ll note two things about Boolean blocks:
![]() They have sharp edges.
They have sharp edges.
![]() They cannot be stacked, but instead are placed inside of Stack blocks as arguments.
They cannot be stacked, but instead are placed inside of Stack blocks as arguments.
Because Boolean blocks report values (namely true or false), they are also considered Reporter blocks.
Reporter Blocks
Reporter blocks hold values. Like Boolean blocks, Reporter blocks fit inside of other blocks rather than stack themselves. Visually, Reporter blocks have rounded ends as opposed to the sharp ends of Boolean blocks.
C Blocks
C blocks derive their name from their visual appearance. These blocks wrap around one or more other blocks. For instance, you can use a Forever C block to perpetually repeat one or more actions throughout the runtime of the application.
Alternatively, you can apply true/false conditions to C blocks such that their enclosing actions run only as long as the root expression evaluates to True.
Cap Blocks
Cap blocks are used to stop individual scripts or all scripts within the app. You’ll see visually that Cap blocks have smooth bottoms and notched tops, which clues you in instantly as to their purpose.
Crafting a (Very) Simple Scratch Application
You will create a fleshed-out Scratch application in Chapter 9, “Programming Raspberry Pi with Scratch—Next Steps.” In the meantime, I would be remiss as your guide if I didn’t give you some preliminary direction on how to actually build a Scratch game.
Let’s get this party started, shall we?
Task: Creating a Basic Scratch App
As you’ll be able to see from the following steps, the Scratch project development workflow is friendly, intuitive, and fun:
1. Open Scratch and start a new file. Make sure to save your work—there is nothing more annoying than unnecessarily losing your progress because you forget to save.
2. Let’s change the background to something more educational. Double-click the Stage sprite, navigate to the Backgrounds tab, and click Import.
3. In the Import Background dialog box, select the xy-grid background and click OK. Next are some relevant points I want to draw your attention to before we proceed any further:
![]() The Scratch Cat is the default sprite for any new Scratch app. You can delete it or any other sprite by right-clicking it from the Stage or the Sprites area and selecting Delete from the shortcut menu
The Scratch Cat is the default sprite for any new Scratch app. You can delete it or any other sprite by right-clicking it from the Stage or the Sprites area and selecting Delete from the shortcut menu
![]() Although you can view the Stage in three different sizes, the Stage itself is of fixed dimensions: 360 pixels tall by 480 pixels wide. In point of fact, the reason I had you load up the xy-grid background is to see these dimensions by using the Cartesian x/y coordinate system.
Although you can view the Stage in three different sizes, the Stage itself is of fixed dimensions: 360 pixels tall by 480 pixels wide. In point of fact, the reason I had you load up the xy-grid background is to see these dimensions by using the Cartesian x/y coordinate system.
![]() What we are going to have this app do is glide the Scratch Cat counter-clockwise, draw a square, and then notify the user that the program is finished.
What we are going to have this app do is glide the Scratch Cat counter-clockwise, draw a square, and then notify the user that the program is finished.
Note: About the Cartesian Coordinate System
The Cartesian coordinate system represents a handy way to represent two-dimensional space. The X-axis represents the horizontal plane, and the Y-axis represents the vertical plane. You can read a nice write-up on the Cartesian coordinate system at Wikipedia:http://is.gd/93qUQC. In the meantime, know that the notation (100, -100) represents x=100 and y = -100. The built-in xy-grid Stage background in Scratch makes this easier to visualize.
4. Double-click the Scratch Cat sprite, navigate to the Scripts tab, and assemble the blocks as shown in Figure 8.6.
FIGURE 8.6 Your very first Scratch application.
Note
When you drag a block in proximity of another block, you’ll see a horizontal line letting you know where the block will be positioned. Simply use drag-and-drop to accurately place or move the blocks.
To unlink blocks, note that you need to click and drag the block beneath the block from which you want to detach it. Yes, the block drag-and-drop thing requires some patience—stick with it!
Let’s explain the purpose of each block in this first app; use the annotations in Figure 8.6 as your reference:
1: Starts the script when the user clicks the Green Flag.
2: Lifts the Pen tool from the Stage (this ensures that the Pen doesn’t continue to draw from previous runs of the program).
3: Clears any Pen tool remnants from previous runs of the app.
4: Positions the Scratch Cat sprite instantly at the origin point (x=0, y=0) on Stage.
5: Moves the sprite slowly from origin (0,0) to Stage coordinates (100,0). For more information on the coordinate system see the sidebar, “About the Cartesian Coordinate System.”
6–8: Here you customize the Pen tool color and line size. The pen down action figuratively puts down the Pen tool “point” to the Stage surface. Note that you need to manually “lift” the Pen tool with the pen up block to stop the line drawing.
9–14: Here you glide the sprite counter-clockwise around the Stage in a square shape. You should see the line automatically reset and redraw each time you click the Green Flag button to rerun the app.
15: Lifts up the Pen tool and therefore stop drawing lines.
16: Resets the sprite’s position to the (0,0) origin point.
17: Has the sprite communicate the end of the program to the user. In this case, the game simply stops. As you gain expertise with Scratch, you will doubtless implement more elegant methods to start, run, and stop your projects.
Then the final block stops the application.
The PicoBoard
Traditional Scratch programming involves sensing and responding to a variety of events:
![]() Mouse clicks
Mouse clicks
![]() Individual keystrokes
Individual keystrokes
![]() Keyboard-based user input
Keyboard-based user input
However, each of these events is what we can call digital. In other words, a mouse has either been clicked or it has not—there are no in-between states. Likewise, a mathematical calculation results in a particular result—there isn’t any gray area to speak of.
The PicoBoard is a separate piece of hardware you can use to bring analog, external events to your Scratch projects. Fans of the PicoBoard stress that the board allows you to connect your Scratch projects to the outside world.
For instance, how about a game that responds to voice input? Or perhaps a game that uses a custom joystick controller? You can do all this and more with the Picoboard.
The PicoBoard is, like the Raspberry Pi, a printed circuit board. As you can see in Figure 8.7, the PCB consists of a number of inputs that cover a wide variety of analog sensory data:
1: 4 Expansion Connectors: Each plug links to a pair of alligator clip connectors that can be used to measure resistance in any external object. Scratch represents the connector states as 100 (no circuit) to 0 (complete circuit between alligator clips). Intermediate values represent the degree of resistance in the circuit between the two alligator clips.
2: Slider: Scratch quantifies the slider position in the range 0–100.
3: Light Sensor: The sensor is quantified (or rendered digitally) by Scratch in a range from 0 (totally dark) to 100 (maximum brightness detected).
4: Microphone: This sound sensor is quantified in Scratch in a range from 0 (silence) to 100 (loudest audio signal detected).
5: Button: The tactile (physical) button has two states: True (when pressed) and False (when unpressed).
6: USB: This port both provides power to the board and serves as a way to transfer data to and from the PicoBoard.
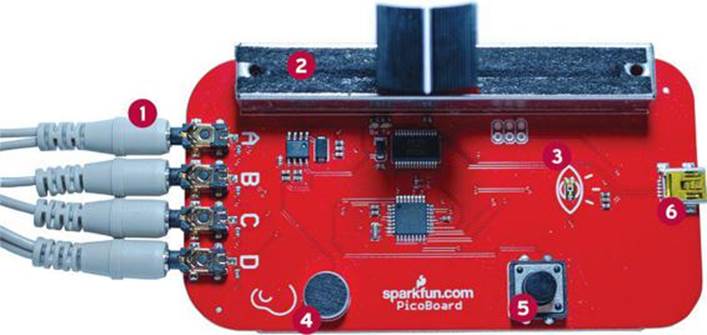
FIGURE 8.7 The PicoBoard is a sensor module that brings the external environment to Scratch.
Incidentally, analog signals are distinct from digital ones because analog signals operate on a continuum of continuously varying values. For instance, the human voice generates a wave-like pattern of data. When computers use analog-to-digital converters (which the Pi can do thanks to the Gertboard accessory), they attempt to replicate an analog waveform by using two values: 0 and 1. The more bits you add to the conversion, the more faithfully you can reproduce the original audio signal. That’s why low bitrate MP3 audio sounds so much worse than high bitrate MP3 audio.
Obtaining a PicoBoard?
The PicoBoard is manufactured and sold by Sparkfun Electronics (http://is.gd/WyVO4D); as of this writing, the price is $44.95. Please note that the PicoBoard as it is sold by Sparkfun does not include the requisite mini USB cable that is required to use the board.
Note, also, that the PicoBoard uses the mini USB cable, not the micro USB cable that the Raspberry Pi uses.
Using a PicoBoard in Scratch
Recall that the Raspberry Pi requires at least 700 mA inbound to perform its work and that you should plan on using a powered USB hub to power any external devices.
To that point, be sure to plug your PicoBoard’s USB cable into your powered hub and not into the Pi itself.
I’ve found that the Raspbian OS automatically detects the PicoBoard, and the device is therefore immediately usable in the Raspberry Pi. This is good news because you need to manually install PicoBoard device drivers for Windows and OS X computers (you can download the drivers from the Cricket website at http://is.gd/GTkHm7).
Task: Using the PicoBoard in Scratch
Now that I’ve whet your appetite and you’ve received your PicoBoard, it is time to learn how to use it with your Raspberry Pi. Let’s begin!
1. Ensure that your PicoBoard is plugged in and that Scratch detects it. An easy way to test functionality is by using the ScratchBoard watcher.
2. Navigate to the Sensing blocks palette, right-click the slider sensor value block, and select show ScratchBoard watcher from the shortcut menu.
This action adds a Stage monitor (also called a watcher) to the Stage that displays the current values of all sensors on the PicoBoard. You can see this in action in Figure 8.8.
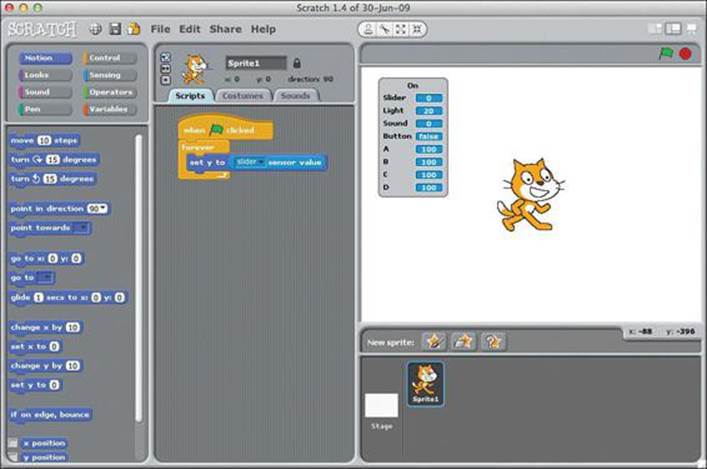
FIGURE 8.8 The ScratchBoard Watcher gives you at-a-glance status of all PicoBoard sensors. You can see the Watcher in the Stage area above and to the left of the Scratch Cat sprite.
3. In Raspbian, open a web browser and download the Scratch project called “PicoBoard Tester” (http://is.gd/ry5nra).
4. In Scratch, click File, Open and navigate to the PicoBoard Tester project. Open the project and click the Green Flag icon to run it.
5. On the PicoBoard, jog the slider back and forth. Note both the graphical element on the Stage as well as the watcher readout value.
Note: The Difference Between the ScratchBoard and the PicoBoard?
The MIT Learning Lab people originally developed the PicoBoard; the device was initially yellow and carried the name Scratch Sensor Board. Before too long, ownership of the project changed hands a couple of times. Now Sparkfun Electronics owns the hardware; to celebrate they renamed the device PicoBoard and gave the PCB a nice red paint job.
6. Snap your fingers. Again, observe both the program’s graphical display as well as the value on the watcher. You’ll find that the PicoBoard microphone is pretty darned sensitive!
7. Pick up your PicoBoard (carefully) and hold it close to a nearby light. By contrast, slowly cover up the light sensor with your cupped hand. Observe value changes in the Scratch project.
8. Click the tactile pushbutton on the PicoBoard and watch for changes in the Scratch app.
9. Finally, plug in one of the alligator clip pairs and touch the alligator clip metal ends together. Note the changes in the Scratch program that indicate you’ve completed a zero-resistance circuit between the probes.
Two final points to consider regarding this final project:
![]() Try building your own sprites that take actions based on PicoBoard-detected events.
Try building your own sprites that take actions based on PicoBoard-detected events.
![]() Remember to scour the source code of any project you download from the Scratch website. You can learn a lot about best (and worst) practices by studying how other Scratchers think and develop their apps.
Remember to scour the source code of any project you download from the Scratch website. You can learn a lot about best (and worst) practices by studying how other Scratchers think and develop their apps.