HTML5 APPLICATIONS DEVELOPMENT MANUAL (2016)
12 - Input and Validation
Developers use Web forms as the interface to collect information from Web site and client application users. HTML input elements serve to build a form’s interface and ensure that information is collected from users consistently. Validation ensures that the entered information is in the correct format and usable before sending the data to the server.
In HTML, input and validation apply to forms.
Web Forms
A Web form is a page that features input fields where users enter data. Form input, or the data supplied by users, is sent to a server where it is processed and stored. Web forms are commonly used when making purchases, signing up for newsletters, or completing surveys.
The HTML <form> element defines a form that is used to collect user input. An HTML form contains form elements.
Form elements are different types of input elements, like text fields, checkboxes, radio buttons, submit buttons, and more.
The <label> element displays a label for each field.
The <input> element is used to dictate the type of input that is expected
<!DOCTYPE html>
<html>
<head>
<meta charset="UTF-8">
<title></title>
</head>
<body>
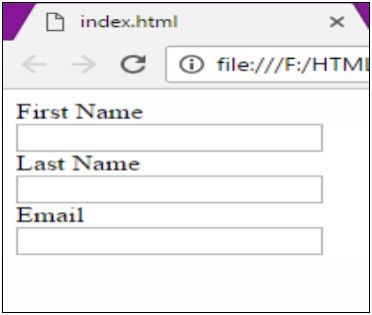
<form id="contact" method="post" action="">
<label for=“firstName">First Name</label> <br/>
<input type="text" name=“firstName" /><br />
<label for=“lastName">Last Name</label> <br/>
<input type="text" name=“lastName" /><br />
<label for="email">Email</label> <br />
<input type="email" name="email" /><br />
</form>
</body>
</html>
Input Attributes
There are several attributes that can be used with the <input> element to enhance Web forms:
- the autofocus attribute to point the focus to a specific input field when a web page loads
- the required attribute when a field is required
- the placeholder attribute to add text to a field that will help users know what to enter
- value attribute specifies the initial value for an input field
- readonly attribute specifies that the input field is read only (cannot be changed)
- disabled attribute specifies that the input field is disabled
- size attribute specifies the size (in characters) for the input field
- maxlength attribute specifies the maximum allowed length for the input field
<!DOCTYPE html>
<html>
<head>
<meta charset="UTF-8">
<title></title>
</head>
<body>
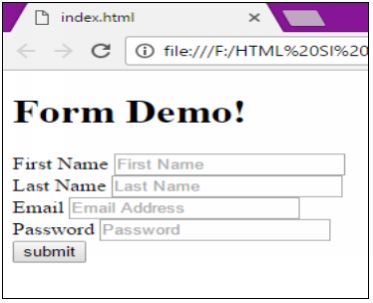
<h1>Form Demo!</h1>
<form id="contact" method="post" action="">
<label for=“firstName">First Name</label>
<input type="text" name=“firstName" placeholder="First Name" /><br />
<label for=“lastName">Last Name</label>
<input type="text" name=“lastName" placeholder="Last Name" /><br />
<label for="email">Email</label>
<input type="email" name="email" placeholder="Email Address" /><br />
<label for="password">Password</label>
<input type="password" name="password" placeholder="Password" /><br />
<input type="submit" name="submit" value="submit">
</form>
</body>
</html>
Form Validation
Validation is the process of verifying that the information obtained from a form is in the appropriate format.
Common issues that arise with forms are:
- empty fields
- invalid email addresses
- invalid dates
- text vs. numbers and vice versa
In HTML 4.01, validation required the use of JavaScript, but HTML5 now offers automatic validation. This is referred to as client-side validation, because the input data is validated before submission to the server (if validation is performed by a server, then it’s called server-side validation).
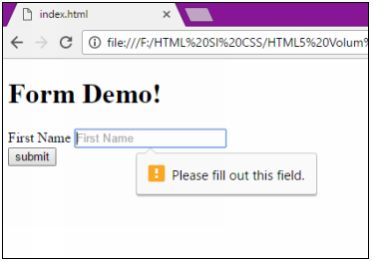
If a user enters the wrong value into a form field, then the browser will instruct them to correct the error. The browser determines if the data is valid by reading attributes in the form’s tags, such as the pattern attribute.
The required attribute avoids the problem of empty fields that need to be populated. When a user skips a required field, and clicks the submit button, an error message appears.
<!DOCTYPE html>
<html>
<head>
<meta charset="UTF-8">
<title></title>
</head>
<body>
<h1>Form Demo!</h1>
<form id="contact" method="post" action="">
<label for=“firstName">First Name</label>
<input type="text" name=“firstName" placeholder="First Name" required /><br />
<input type="submit" name="submit" value="submit">
</form>
</body>
</html>
All materials on the site are licensed Creative Commons Attribution-Sharealike 3.0 Unported CC BY-SA 3.0 & GNU Free Documentation License (GFDL)
If you are the copyright holder of any material contained on our site and intend to remove it, please contact our site administrator for approval.
© 2016-2026 All site design rights belong to S.Y.A.